最近很多小伙伴都在问powerpoint怎么用形状画箭头和ppt形状箭头如何改变这两个问题,那么本篇文章就来给大家详细解答一下,同时本文还将给你拓展PowerPointInterop:如何检测用户何时
最近很多小伙伴都在问powerpoint怎么用形状画箭头和ppt形状箭头如何改变这两个问题,那么本篇文章就来给大家详细解答一下,同时本文还将给你拓展PowerPoint Interop:如何检测用户何时关闭PowerPoint而又不保存更改?、PowerPoint 教程,如何在 PowerPoint 中打印幻灯片、讲义或备注?、powerpoint-利用PHPPowerpoint下载ppt时,设置的字体、PowerPoint2016合并形状功能等相关知识,下面开始了哦!
本文目录一览:- powerpoint怎么用形状画箭头(ppt形状箭头如何改变)
- PowerPoint Interop:如何检测用户何时关闭PowerPoint而又不保存更改?
- PowerPoint 教程,如何在 PowerPoint 中打印幻灯片、讲义或备注?
- powerpoint-利用PHPPowerpoint下载ppt时,设置的字体
- PowerPoint2016合并形状功能
")
powerpoint怎么用形状画箭头(ppt形状箭头如何改变)
powerpoint怎么用形状画箭头 ppt形状画箭头的图文教程你知道怎么在ppt中画箭头吗?对于新手来说还是有一定难度,怎么办?不用着急下面小编就为你提供在ppt里面怎么画箭头的方法啦,希望小编整理的资料对大家有帮助。
如图,选择“任意多边形”工具。

左键点击PPT空白地方点击鼠标,移动到另一个地方,点击,再次移动点击,在结束的地方双击鼠标即可。

选中绘制的形状,右键-设置形状格式-线条-后端类型:选择结尾处箭头方向。


选中绘制的形状,右键-设置形状格式-线条颜色-实线:设置箭头颜色。

或者选中绘制的形状,选择绘图工具-格式-设置箭头、颜色、粗细也可以。


PowerPoint Interop:如何检测用户何时关闭PowerPoint而又不保存更改?
如何解决PowerPoint Interop:如何检测用户何时关闭PowerPoint而又不保存更改??
我有一个WPF应用程序,可将PowerPoint文件存储在sql Server数据库中。该应用程序具有一个编辑按钮,可以打开给定的PowerPoint文件进行编辑。由于PowerPoint是基于文件的应用程序,因此我必须使用临时文件来加载和保存PowerPoint。
为此目的我编写的帮助程序类具有绑定到编辑按钮的IsEnabled属性的属性;我们在编辑过程中禁用该按钮。编辑过程中,有一个ManualResetEvent会在此帮助程序类中挂起Edit方法。我钩上Presentation.Saved事件以检测用户何时将更改保存到PowerPoint中。不用说,这都是精心策划的。
在测试过程中,我们发现,如果用户在不保存更改的情况下关闭PowerPoint,然后对随后出现的“您希望保存更改”对话框回答“是”,则Presentation.Saved不会触发直到Presentation.CloseFinal事件已经执行之后,对我们而言,对此做任何事情都为时已晚。 Presentation.CloseFinal是我们从磁盘检索保存的文件并将其存储到数据库的地方。如果用户单击PowerPoint中的“保存”按钮,则会立即触发Presentation.Saved。
为了解决该问题,我钩住了PresentationClose事件并编写了以下代码。
// Detects when the user closes the PowerPoint after changes have been made.
private void Application_PresentationClose(Presentation presentation)
{
    // If the user has edited the presentation before closing PowerPoint,// this event fires twice.  The first time it fires,presentationSaved
    // is msoFalse.  That''s how we kNow the user has edited the PowerPoint.
    if (presentation.Saved == MsoTriState.msoFalse)
        IsDirty = true;
}
然后我检查IsDirty中的Presentation.CloseFinal属性,并将PowerPoint保存到数据库(如果将其设置为true)。
不幸的是,出现了无法预料的皱纹;似乎没有可靠的方法来确定用户是否放弃了更改。第二次触发此事件时,无论用户对“保存更改吗?”的回答如何,Presentation.Saved属性始终设置为MsoTriState.msoTrue。对话框。
如果用户放弃了所做的更改,PowerPoint Interop中是否有一种方法可以避免承担将未更改的文件保存到数据库的费用?
作为参考,以下是整个帮助器类:
using Microsoft.Office.Core;
using Microsoft.Office.Interop.PowerPoint;
using System;
using System.IO;
using System.Threading;
using System.Threading.Tasks;
using System.Windows.Xps.Packaging;
using PropertyChanged;  // PropertyChanged.Fody

namespace Helpers
{
    /// <summary>
    /// Helper class for PowerPoint file handling
    /// </summary>
    [AddINotifyPropertyChangedInterface]
    public sealed class PowerPointApplication : Idisposable
    {
        private Application _application;
        private Presentation _presentation;
        private string _tempFolder;
        private string _pptPath;
        private string _extension;

        /// <summary>
        /// Used to block the Edit method until the PowerPoint presentation is closed.
        /// </summary>
        private ManualResetEvent manualResetEvent = new ManualResetEvent(false);

        public byte[] PptData { get; private set; }
        public byte[] PptxData { get; private set; }
        public byte[] JpgData { get; private set; }

        /// <summary>
        /// Indicates whether any instance of PowerPointApplication is in an edit state.
        /// Used to disable Edit PowerPoint buttons.
        /// </summary>
        public static bool IsEditing { get; private set; }

        /// <summary>
        /// Indicates if the PowerPoint file has been saved after changes were made to it.
        /// </summary>
        public bool IsSaved { get; set; }

        /// <summary>
        /// Indicates if the PowerPoint file has been changed but not saved.
        /// </summary>
        public bool IsDirty { get; set; }

        public PowerPointApplication()
        {
            _tempFolder = Path.GetTempPath();

            if (!Directory.Exists(_tempFolder))
                Directory.CreateDirectory(_tempFolder);

            _application = new Application();
            _application.PresentationSave += Application_PresentationSave;
            _application.PresentationClose += Application_PresentationClose;
            _application.PresentationCloseFinal += Application_PresentationCloseFinal;
        }

        // Detects when the user presses the "Save" button in PowerPoint
        private void Application_PresentationSave(Presentation presentation)
        {
            IsSaved = true;
        }

        // Detects when the user closes the PowerPoint after changes have been made.
        private void Application_PresentationClose(Presentation presentation)
        {
            // If the user has edited the presentation before closing PowerPoint,presentationSaved
            // is msoFalse.  That''s how we kNow the user has edited the PowerPoint.
            // It fires again after the users has responded to the "save changes?" dialog.
            if (presentation.Saved == MsoTriState.msoFalse)
                IsDirty = true;
        }

        private void Application_PresentationCloseFinal(Presentation presentation)
        {
            if ((IsDirty || IsSaved) && File.Exists(_pptPath))
            {
                var data = File.ReadAllBytes(_pptPath);

                if (_extension == "pptx")
                {
                    PptxData = data;
                    PptData = GetPpt(presentation);
                }
                else
                {
                    PptData = data;
                    PptxData = GetPptx(presentation);
                }
                JpgData = GetJpg(presentation);

                IsSaved = true;
                IsDirty = false;
            }
            manualResetEvent.Set();
            IsEditing = false;

            Task.Run(() => DeleteFileDelayed(_pptPath));
        }

        /// <summary>
        /// Waits for PowerPoint to close,and then makes a best effort to delete the temp file.
        /// </summary>
        private static void DeleteFileDelayed(string path)
        {
            if (path == null) return;
            var file = new FileInfo(path);

            Thread.Sleep(5000);
            try
            {
                file.Delete();
            }
            catch { }
        }

        /// <summary>
        /// Opens the provided PowerPoint byte array in PowerPoint and displays it.
        /// </summary>
        public void Edit(byte[] data,string ext = "xml")
        {
            _extension = ext;
            _pptPath = GetTempFile(_extension);

            if (data == null)
            {
                // Open a blank presentation and establish a save path.
                _presentation = _application.Presentations.Add(MsoTriState.msoTrue);
                _presentation.SaveAs(_pptPath,PpSaveAsFileType.ppSaveAsXMLPresentation);
                IsSaved = false;
            }
            else
            {
                // Save the data to a file and open it.
                File.WriteallBytes(_pptPath,data);
                _presentation = _application.Presentations.Open(_pptPath);
                IsEditing = true;
            }

            // Make sure IsEnabled state of WPF buttons is properly set.
            ApplicationHelper.DoEvents();
            Thread.Sleep(100);
            ApplicationHelper.DoEvents();

            // Wait for PowerPoint to exit.
            manualResetEvent.WaitOne();
        }

        /// <summary>
        /// Opens the provided PowerPoint byte array in PowerPoint without displaying it.
        /// </summary>
        public void Open(byte[] data,string ext = "xml")
        {
            _extension = ext;
            _pptPath = GetTempFile(ext);
            File.WriteallBytes(_pptPath,data);
            _presentation = _application.Presentations.Open(_pptPath,WithWindow: MsoTriState.msoFalse);
            IsEditing = true;
        }

        public void Close()
        {
            _presentation.Close();
        }

        public byte[] GetJpg() { return GetJpg(_presentation); }
        /// <summary>
        /// Returns a byte array containing a JPEG image of the first slide in the PowerPoint.
        /// </summary>
        public byte[] GetJpg(Presentation presentation)
        {
            presentation.SavecopyAs(_tempFolder,PpSaveAsFileType.ppSaveAsJPG,MsoTriState.msoFalse);
            byte[] result = File.ReadAllBytes(Path.Combine(_tempFolder,"Slide1.jpg"));
            File.Delete(Path.Combine(_tempFolder,"Slide1.jpg"));
            return result;
        }

        public byte[] GetPptx() { return GetPptx(_presentation); }

        public byte[] GetPptx(Presentation presentation)
        {
            var path = Path.ChangeExtension(_pptPath,"pptx");
            presentation.SavecopyAs(path,PpSaveAsFileType.ppSaveAsOpenXMLPresentation,MsoTriState.msoFalse);
            byte[] result = File.ReadAllBytes(path);
            return result;
        }

        public byte[] GetPpt(Presentation presentation)
        {
            var path = Path.ChangeExtension(_pptPath,"ppt");
            presentation.SavecopyAs(path,PpSaveAsFileType.ppSaveAsPresentation,MsoTriState.msoFalse);
            byte[] result = File.ReadAllBytes(path);
            return result;
        }

        /// <summary>
        /// Returns an XPS document of the presentation.
        /// </summary>
        public XpsDocument ToXps(string pptFilename,string xpsFilename)
        {
            var presentation = _application.Presentations.Open(pptFilename,MsoTriState.msoTrue,MsoTriState.msoFalse,MsoTriState.msoFalse);
            presentation.ExportAsFixedFormat(xpsFilename,PpFixedFormatType.ppFixedFormatTypeXPS);
            return new XpsDocument(xpsFilename,FileAccess.Read);
        }

        /// <summary>
        /// Returns a path to a temporary working file having the specified extension.
        /// </summary>
        private string GetTempFile(string extension)
        {
            return Path.Combine(_tempFolder,Guid.NewGuid() + "." + extension);
        }

        #region Idisposable implementation
        public void dispose()
        {
            _application.PresentationSave -= Application_PresentationSave;
            _application.PresentationClose -= Application_PresentationClose;
            _application.PresentationCloseFinal -= Application_PresentationCloseFinal;

            IsEditing = false;
        }
        #endregion
    }
}
解决方法
暂无找到可以解决该程序问题的有效方法,小编努力寻找整理中!
如果你已经找到好的解决方法,欢迎将解决方案带上本链接一起发送给小编。
小编邮箱:dio#foxmail.com (将#修改为@)

PowerPoint 教程,如何在 PowerPoint 中打印幻灯片、讲义或备注?

转:
PowerPoint 教程,如何在 PowerPoint 中打印幻灯片、讲义或备注?
欢迎观看 Microsoft PowerPoint 中文版教程,小编带大家学习 PowerPoint 的使用技巧,了解如何在 PowerPoint 中打印幻灯片、讲义或备注。
在 PowerPoint 中,可以打印幻灯片、演讲者备注,以及为受众创建讲义。
「大纲」仅打印幻灯片中的文本,不打印图像。演示文稿的「备注」会显示幻灯片及其下方相关演讲者备注。如果选择打印讲义,可使用各种版式在一页上打印多张幻灯片,有的可留出空间做笔记。
打印幻灯片,在「文件」菜单上选择「打印...」。

在对话框的底部选择「显示详细信息」。

在「版式」框中,选择「幻灯片」。

如果打印含演讲者备注的幻灯片,在「版式」框中,选择「注释」。

如果打印大纲,在「版式」框中,选择「大纲」。

设置其他所需打印选项,然后选择「打印」。

打印讲义或不带幻灯片编号,在「版式」框中,选择「讲义」选项之一,具体取决于每页所需幻灯片张数。

默认情况下,打印的讲义包括每张幻灯片图像下方的幻灯片编号,在「打印」对话框中选择「页眉 / 页脚...」。

在打开的「页眉 / 页脚」面板中选择「备注和讲义」,取消勾选「页码」,单击「全部应用」。

选择「打印」。

以上就是在 Microsoft PowerPoint 中打印幻灯片、讲义或备注的方法。
软件下载地址:Microsoft PowerPoint 2019 for Mac (ppt 2019) 中文版
windows 软件安装地址:PowerPoint 2019
转:
PowerPoint 教程,如何在 PowerPoint 中打印幻灯片、讲义或备注?
--Posted from Rpc

powerpoint-利用PHPPowerpoint下载ppt时,设置的字体
powerpointphp字体
利用phppowerpoint下载ppt时,设置的字体只对字母和数字生效,对中文失效,一直都是默认字体arial

PowerPoint2016合并形状功能
PowerPoint2016怎么合并形状 PowerPoint2016合并形状功能教程PowerPoint是一款常用的office软件,我们在工作和学习中,经常会使用PPT来制作幻灯片,以便大家更好的理解内容。在PowerPoint 2016中,有合并形状功能,不知大家晓得不?我们可以使用合并形状功能制作出各种精美的导航式目录页(如下图),让听众可以清晰明了的知道内容的概要。那么合并形状功能要如何使用呢?我们一起来看看。

步骤如下:
1、启动PowerPoint 2016新建一个空白文档,然后切换到“插入”选项卡,点击“形状”,选择绘制一个圆形。注意,为了得到一个正圆形,绘制之前要先按下Shift键不放再拖动鼠标绘制,这样无论如何都是个正圆;
2、右击绘制的圆形,从右键菜单中选择“边框→粗细→6磅”,或者点击“其他线条”,再在右侧打开的窗格中设置更宽的边框;

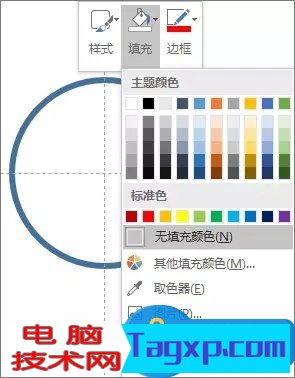
3、再次右击圆形,从右键菜单中选择“填充→无填充色”,即可得到一个圆环图形;
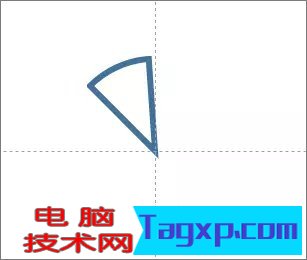
4、在幻灯片空白处右击,从右键菜单中选择“网格和参考线→添加垂直参考线(及添加水平参考线)”。将刚才制作的圆环的圆心对齐十字线的中心。这时再绘制一个等腰直角的斜三角色,愉好覆盖掉半个圆环;
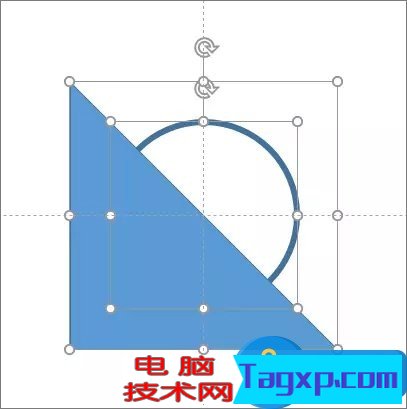

5、按Ctrl+A键全选三角形和圆环,再切换到“绘图工具-格式”选项卡中,点击工具栏左侧的“合并形状”从下拉菜单中选择“剪除”模式,即可得到一个半圆形的圆环了;
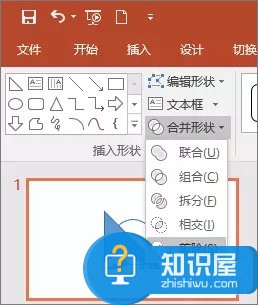
6、再绘制一个直角三角形,直角的一边对齐垂直参考线,覆盖住圆环的一侧。然后将这个直角三角线略做旋转,并稍移位置,确保直角线经过十字参考线的中心;
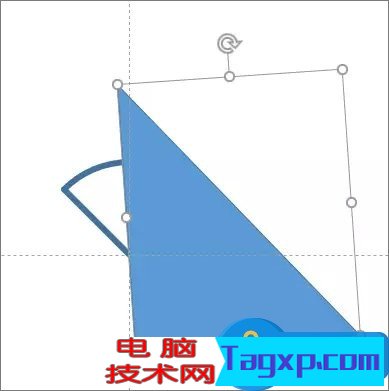
7、再次按Ctrl+A键全选形着,并再次应用“合并形状→剪除”模式,即可得到一个小的弧形了;
8、接下来就是复制这个弧形并粘贴出多个,围绕十字中心线旋转排列成一个圆形。每个弧形可以赋予不同的色彩。然后再绘制一个正圆形将中间部分覆盖。


9、最后,把覆盖的圆改变颜色,填充上文字。另外,再绘制箭头形着置于齿轮之上,通过旋转调整好位置,并将颜色一一对应,就可以得到本文开始所展示的图形效果啦。
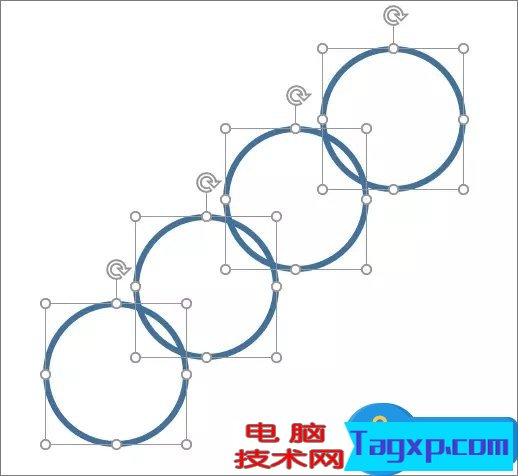
PS:举一反三,利用合并形状功能,还可以完成其他的图形效果,这里我们再看一个实例,同样先来看看效果图。
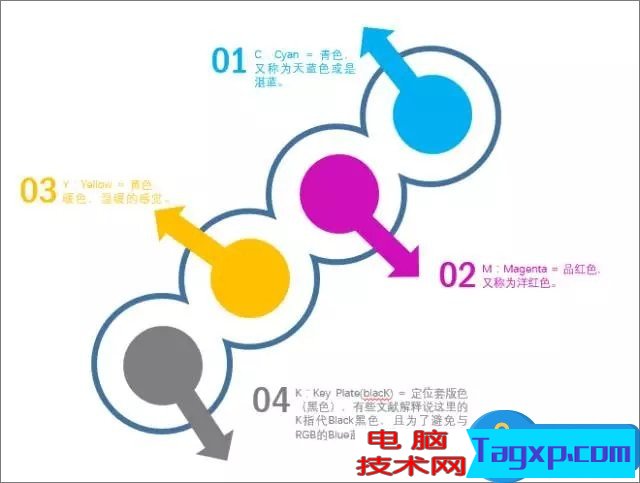
这个图的制作关键,其实就是先绘制出四个圆,进行重叠,然后在合并形状时,采用“组合”模式,即可得到连环的外形。再然后就是加入圆形、箭头、文字等各种元素就可以啦。
以上就是PowerPoint 2016 合并形状功能的使用方法,大家如果能够掌握方法,可以制作出各种各样有特色的导航条哦!
关于powerpoint怎么用形状画箭头和ppt形状箭头如何改变的介绍已经告一段落,感谢您的耐心阅读,如果想了解更多关于PowerPoint Interop:如何检测用户何时关闭PowerPoint而又不保存更改?、PowerPoint 教程,如何在 PowerPoint 中打印幻灯片、讲义或备注?、powerpoint-利用PHPPowerpoint下载ppt时,设置的字体、PowerPoint2016合并形状功能的相关信息,请在本站寻找。
本文标签:


