如果您想了解谷歌启动黑五促销:送礼推荐Pixel7,苹果iPhone用户切换到Pixel流程更顺畅的相关知识,那么本文是一篇不可错过的文章,我们将为您提供关于(Pixel2PixelGANs)Imag
如果您想了解谷歌启动黑五促销:送礼推荐 Pixel 7,苹果 iPhone 用户切换到 Pixel 流程更顺畅的相关知识,那么本文是一篇不可错过的文章,我们将为您提供关于(Pixel2PixelGANs)Image-to-Image translation with conditional adversarial networks、C#-用于Windows窗体应用程序的位图的SetPixel和GetPixel的更快替代品、Delphi中GetPixel和Canvas.Pixels之间的区别、DX9纹理半像素偏移-Directly Mapping Texels to Pixels的有价值的信息。
本文目录一览:- 谷歌启动黑五促销:送礼推荐 Pixel 7,苹果 iPhone 用户切换到 Pixel 流程更顺畅
- (Pixel2PixelGANs)Image-to-Image translation with conditional adversarial networks
- C#-用于Windows窗体应用程序的位图的SetPixel和GetPixel的更快替代品
- Delphi中GetPixel和Canvas.Pixels之间的区别
- DX9纹理半像素偏移-Directly Mapping Texels to Pixels

谷歌启动黑五促销:送礼推荐 Pixel 7,苹果 iPhone 用户切换到 Pixel 流程更顺畅
11 月 18 日消息,国外双十一活动“黑色星期五”已经开始,谷歌今天特别发布了一篇名为“切换到 Pixel
的四种更快方法”的博文,明确提及:“Pixel 7/7 Pro 是非常不错的礼物,而且从
iOS 切换到 Pixel 现在也更加顺畅”。

这四种方式包括:
数据传输只要三步:连接--选择--传输
支持联系人、短信等更多信息的迁移
支持传输来自于 iCloud 的照片
支持 iMessages 信息迁移和交互
小编了解到,谷歌在博文中强调,在圣诞购物季中 Pixel 7 和 Pixel 7 Pro 是非常不错的礼物,只需要将旧款 iPhone 和
Pixel 7 连接起来,包括联系人、照片和短信在内的数据可以在 30 分钟内完成迁移。
Image-to-Image translation with conditional adversarial networks")
(Pixel2PixelGANs)Image-to-Image translation with conditional adversarial networks
Introduction
1. develop a common framework for all problems that are the task of predicting pixels from pixels.
2. CNNs learn to minimize a loss function -an objective that scores the quality of results-- and although the learning process is automatic, a lot of manual effort still goes into designing effective losses.
3.the CNN to minimize Euclidean distance(欧式距离L2) between predicted and ground truth pixels, it will tend to produce blurry results.
why? because the L2 distance is minimized by averaging all plausible outputs, which cause blurring.
4.GANs learn a loss that tries to classify if the output image is real of fake , blurry images will not be tolerated since they obviously fake!
5. they apply cGANs suitable for image-to-image translation tasks, where we condition on input image and generate a corresponding output image.
Releted work
1.image-to-image translation problems are formulated as per-pixel(逐个像素的)classfication or regression.but these formulations treat the output space as “unstructured” ,each output pixel is considered conditionally independent from all others given the input image.(独立性!)
2. conditional GANs learn a structured loss.
3. cGANs is different in that the loss is learned(损失可以学习), in theory, penalize any possible structure that differs between output and target.(条件GAN的不同之处在于,损失是可以习得的,理论上,它可以惩罚产出和目标之间可能存在差异的任何结构。)
4. the choices for generator and discriminator achitecture:
for G: using ''U-Net ''
for D: using PatchGAN classifier penalizes structure at the scale of image patches.
The purpose of PatchGAN aim to capure local style statistics.(用于捕获本地样式统计信息)
Method
1. The whole of framwork is that conditional GANs learn a mapping from observed image x and random noise vector z, to y. $G:{x,z}\rightarrow y(ground-truth)$ .
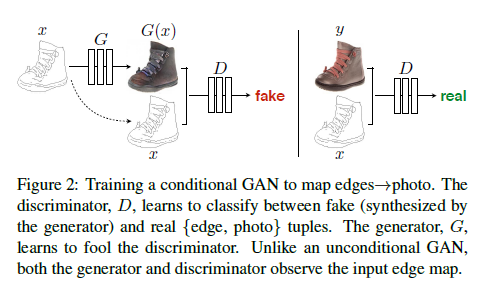
2. Unlike an unconditional GAN, both the generator and discriminator observe the input edge map.
3. objective function:

G try to minimize this objective against an adversarial D that try to maximize it.
4. they test the importence of conditioning the disctiminator, the discriminator dose not oberve x(edge map):
5. it''s beneficial to mix GAN objective with a more traditional loss, such as L2-distance.
6. G is tasked to not only fool the discriminator but also to be near the ground truth output in an L2 sense.
7. L1 distance is applied into the additional loss rather than L2 as L1 encourages less blurring(remeber it!).
8.
final objective

9. without $z$ (random noise vector), the net still learn a mapping from $x$ to $y$, but would produce deterministic output, therefore fail to match any distribution other than a delta function.(因此无法匹配除函数之外的任何分布)
10. towords $z$, Gaussian noise often is used in the past, but authors find this strategy ineffective, the G simply learned to ignore the noise. Finally, in the form of dropout is provided.but we observe only minor stochasticity in the output of our nets.
Network Architecture
1. The whole of generator and discriminator architectures from DCGANs.
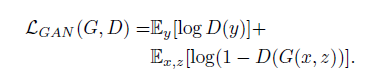
For G: U-Net;DCGAN; encoder- decoder; bottleneck; shuttle the information;
The job:
1.mapping a high resolution grid to a high resolution output grid.
2. although the input and output differ in surface appearance, but both are rendering of same underlying structure.
The character:
structure in the input is roughly aligned with structure in the output.
The previous measures:
1.encoder-decoder network is applied.
2.until a bottleneck layer, downsample is changed to upsample.
Q:
1. A great deal of low-level information shared between the input and output, shuttling this information directly across the net is desirable.例如,在图像着色的情况下,输入和输出共享突出边缘的位置。
END:
To give the generator a means to circumvent(绕过) the bottleneck for information like this, adding skip connections is adopted, this architecture called ''U-Net''
The results of different loss function:
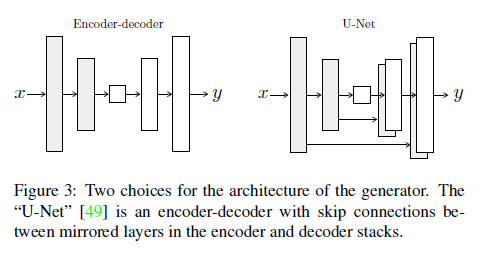
L1 loss or L2 loss produce the blurry results on image generation problems.
For D:
1. both L1 and L2 produce blurry results on image generation problems.
2. L1 and L2 fail to encourage high frequency crispness(锐度),nonetheless(仍然) accurately capture the low frequencies.
3.in order to model high-frequencies , we pay attention to the structure in local image patches.
4.This discriminator tries to classify if each patch in an N*N image is real or fake. We run this discriminator convolutationally across the image, averaging all responses to provide the ultimate output of D.(这个鉴别器试图分类一个N*N图像中的每个补丁是真还是假。我们用这个判别器对图像进行卷积,对所有响应进行平均,得到D的最终输出).
5. N can be much smaller than full size of image and still produce high quality results. smaller pathGAN have mang advantages.
6. D effectively models the image as Markov random field, PatchGAN cn be understand as a form of texture/ style loss!
For Optimization.
1. slows down D relative to G.(此外,在优化D时,我们将目标除以2,这减慢了D相对于G的学习速度)
2.当批大小设置为1时,这种批处理规范化方法被称为实例规范化,并被证明在图像生成任务中是有效的,
batchsize is setted into 1 to 10
3. Instance normalization(IN) and batch normalization(BN), the strategy of IN is adopted in this paper because IN has been demonstrated to be effective at image generation task.
BN 是一个batch 里面的所有图片的均值和标准差,IN 是对一张图片求均值和标准差,shuffle的存在让batch 不稳定, 本来就相当于引入了noise, in the task of image generation, IN outperforms compared with BN, 因为这类生成式任务自己的风格较为独立不应该与batch中的其他样本产生较大的联系,相反在图像和视频的task of classification, BN outperforms IN .
For Experiments
1. removing conditioning for D have very poor performance because the loss does not penalize mismatch between the input and output; it only cares
that the output look realistic.
2. L1 + CGANs create realistic rendersings(渲染), L1 penalize the distance between ground truth outputs, which correctly match the input and synthesized outputs.
3.An advantage of the PatchGAN is that a fixed-size patch discriminator can be applied to arbitrarily large images.
4.

C#-用于Windows窗体应用程序的位图的SetPixel和GetPixel的更快替代品
我正在尝试自学C#,并从各种来源获悉,函数获取和setpixel可能非常慢。有哪些替代方案,性能改进真的那么重要吗?提前致谢!
我的代码的一部分供参考:
public static Bitmap Paint(Bitmap _b, Color f){ Bitmap b = new Bitmap(_b); for (int x = 0; x < b.Width; x++) { for (int y = 0; y < b.Height; y++) { Color c = b.GetPixel(x, y); b.SetPixel(x, y, Color.FromArgb(c.A, f.R, f.G, f.B)); } } return b;}答案1
小编典典立即可用的代码
public class DirectBitmap : IDisposable{ public Bitmap Bitmap { get; private set; } public Int32[] Bits { get; private set; } public bool Disposed { get; private set; } public int Height { get; private set; } public int Width { get; private set; } protected GCHandle BitsHandle { get; private set; } public DirectBitmap(int width, int height) { Width = width; Height = height; Bits = new Int32[width * height]; BitsHandle = GCHandle.Alloc(Bits, GCHandleType.Pinned); Bitmap = new Bitmap(width, height, width * 4, PixelFormat.Format32bppPArgb, BitsHandle.AddrOfPinnedObject()); } public void SetPixel(int x, int y, Color colour) { int index = x + (y * Width); int col = colour.ToArgb(); Bits[index] = col; } public Color GetPixel(int x, int y) { int index = x + (y * Width); int col = Bits[index]; Color result = Color.FromArgb(col); return result; } public void Dispose() { if (Disposed) return; Disposed = true; Bitmap.Dispose(); BitsHandle.Free(); }}不需要LockBits或SetPixel。使用上述类可直接访问位图数据。
使用此类,可以将原始位图数据设置为32位数据。请注意,它是PARGB,它是预乘alpha。有关如何工作的更多信息,请参见Wikipedia上的Alpha合成,有关BLENDFUNCTION的MSDN文章上的示例,请参阅示例以了解如何正确计算Alpha。
如果预乘可能会使事情复杂化,请PixelFormat.Format32bppArgb改用。绘制时会发生性能下降的情况,因为它是在内部转换为的PixelFormat.Format32bppPArgb。如果在绘制之前不必更改图像,则可以在预乘之前完成工作,将其绘制到PixelFormat.Format32bppArgb缓冲区中,然后从那里进一步使用。
Bitmap通过Bitmap属性公开访问标准成员。使用该Bits属性可以直接访问位图数据。
使用byte代替int原始像素数据
将的两个实例都更改Int32为byte,然后更改此行:
Bits = new Int32[width * height];对此:
Bits = new byte[width * height * 4];使用字节时,格式为Alpha / Red / Green /
Blue。每个像素占用4个字节的数据,每个通道一个。GetPixel和SetPixel函数将需要进行相应的重新设计或删除。
使用上述课程的好处
- 仅用于处理数据的内存分配是不必要的;对原始数据所做的更改将立即应用于位图。
- 没有其他要管理的对象。
IDisposable就像一样实现Bitmap。 - 它不需要
unsafe块。
注意事项
- 固定的内存无法移动。为了使这种内存访问起作用,这是必需的副作用。这降低了垃圾收集器的效率(MSDN文章)。仅对需要性能的位图执行此操作,并
Dispose在完成操作后确保对位图进行操作,以便可以取消固定内存。
通过Graphics对象访问
因为该Bitmap属性实际上是.NET Bitmap对象,所以使用Graphics该类执行操作很简单。
var dbm = new DirectBitmap(200, 200);using (var g = Graphics.FromImage(dbm.Bitmap)){ g.DrawRectangle(Pens.Black, new Rectangle(50, 50, 100, 100));}性能比较
该问题询问性能,因此下面的表格应显示答案中提出的三种不同方法之间的相对性能。这是使用基于.NET Standard 2的应用程序和NUnit完成的。
* Time to fill the entire bitmap with red pixels *- Not including the time to create and dispose the bitmap- Best out of 100 runs taken- Lower is better- Time is measured in Stopwatch ticks to emphasize magnitude rather than actual time elapsed- Tests were performed on an Intel Core i7-4790 based workstation Bitmap sizeMethod 4x4 16x16 64x64 256x256 1024x1024 4096x4096DirectBitmap <1 2 28 668 8219 178639LockBits 2 3 33 670 9612 197115SetPixel 45 371 5920 97477 1563171 25811013* Test details *- LockBits test: Bitmap.LockBits is only called once and the benchmark includes Bitmap.UnlockBits. It is expected that this is the absolute best case, adding more lock/unlock calls will increase the time required to complete the operation.
Delphi中GetPixel和Canvas.Pixels之间的区别
解决方法
function TCanvas.GetPixel(X,Y: Integer): TColor;
begin
  requiredState([csHandleValid]);
  GetPixel := Windows.GetPixel(FHandle,X,Y);
end;

DX9纹理半像素偏移-Directly Mapping Texels to Pixels
原文: DX9纹理半像素偏移-Directly Mapping Texels to Pixels
为了便于理解, 我们通常会把像素抽象成下面的样子
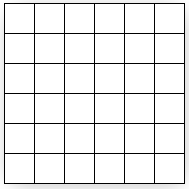
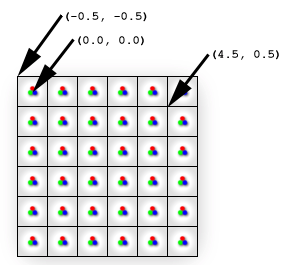
但是更正确的理解应该是这样, 像素始终是一个点, 它位于格子的中心, 这个格子用来表示像素照亮的区域.
这时, 如果我们画一个从 ( 0, 0 ) 到 ( 4, 4 ) 的矩形, 光栅化之后的结果实际上会偏移 0.5 个像素. 因为一个像素的颜色只能有一个值, 如果直接显示意味着边缘的像素需要两个颜色.
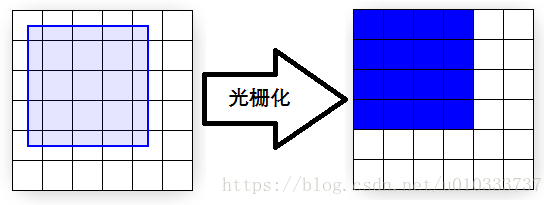
现在我们画的是一个全蓝色的方块, 这个时候还没有严重的问题, 接下来我们看一下给他添加纹理之后的情况.
这个纹理是 4 x 4 的, 也许你希望看到的是一个和 4 x 4 矩形完美匹配的样子, 但实际上添加纹理之后的结果是这样的 ( linear filtering mode + clamp addressing mode ).
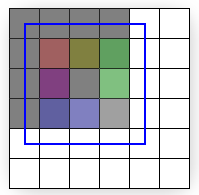
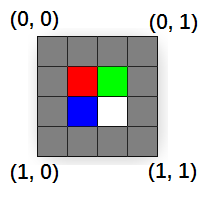
假设我们的 4 x 4 纹理存储在 MyTexture 里, 使用 MySampler 对其进行采样. 每一个光栅化后得到的像素都会执行一次 Pixel Shader, 并且返回一个在 vTexCoord 坐标处采样到的颜色. 但是纹理坐标系是不受光栅化影响的, 如下图所示, 纹理实际上还处在原来的位置, 但是光栅化得到的像素实际上是偏移了 0.5 个像素的( 参考黑点和蓝点的差异 )
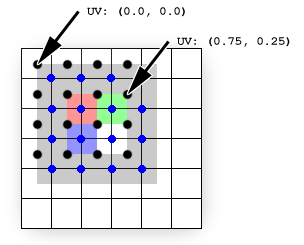
光栅化后的像素 ( 0, 0 )直接拿到了 UV ( 0.0, 0.0 ). 但是, 光栅化后的像素 ( 3, 1 ) 经过插值之后拿到的是 UV ( 0.75, 0.25 ), 而这个 UV 值采样的颜色经过 Bilinear Texture Filtering 之后是绿色占 1/4, 灰色占 3/4. 所有像素都经过这个采样之后就会变成之前看到的那种奇怪的样子.
如何调整这个问题? 将顶点的坐标偏移 ( -0.5, -0.5 )
//define FVF with vertex values in transformed screen space
#define D3DFVF_CUSTOMVERTEX (D3DFVF_XYZRHW|D3DFVF_TEX1)

struct CUSTOMVERTEX
{
    FLOAT x, y, z, rhw; // position
    FLOAT tu, tv;       // texture coordinates
};

//unadjusted vertex values
float left = 0.0f;
float right = 255.0f;
float top = 0.0f;
float bottom = 255.0f;

//256 by 256 rectangle matching 256 by 256 texture
CUSTOMVERTEX vertices[] =
{
    { left,  top,    0.5f, 1.0f, 0.0f, 0.0f}, // x, y, z, rhw, u, v
    { right, top,    0.5f, 1.0f, 1.0f, 0.0f},
    { right, bottom, 0.5f, 1.0f, 1.0f, 1.0f},
    { left,  top,    0.5f, 1.0f, 0.0f, 0.0f},
    { right, bottom, 0.5f, 1.0f, 1.0f, 1.0f},
    { left,  bottom, 0.5f, 1.0f, 0.0f, 1.0f},
};

//adjust all the vertices to correctly line up texels with pixels
for (int i=0; i<6; i++)
{
    vertices[i].x -= 0.5f;
    vertices[i].y -= 0.5f;
}今天关于谷歌启动黑五促销:送礼推荐 Pixel 7,苹果 iPhone 用户切换到 Pixel 流程更顺畅的介绍到此结束,谢谢您的阅读,有关(Pixel2PixelGANs)Image-to-Image translation with conditional adversarial networks、C#-用于Windows窗体应用程序的位图的SetPixel和GetPixel的更快替代品、Delphi中GetPixel和Canvas.Pixels之间的区别、DX9纹理半像素偏移-Directly Mapping Texels to Pixels等更多相关知识的信息可以在本站进行查询。
本文标签:


