在本文中,我们将详细介绍Mybatis架构原理(一)的各个方面,并为您提供关于叙述一下mybatis的架构流程的相关解答,同时,我们也将为您带来关于2、MyBatis架构原理、java-mybaits
在本文中,我们将详细介绍Mybatis架构原理(一)的各个方面,并为您提供关于叙述一下mybatis的架构流程的相关解答,同时,我们也将为您带来关于2、MyBatis架构原理、java-mybaits-015-mybatis逆向工程最佳实践【基础mybatis-generator、tk.mybatis、mubatis-plus】、java架构之路-(mybatis源码)mybatis基本使用、MyBatis 学习 之 一、MyBatis 简介与配置 MyBatis+Spring+MySql的有用知识。
本文目录一览:- Mybatis架构原理(一)(叙述一下mybatis的架构流程)
- 2、MyBatis架构原理
- java-mybaits-015-mybatis逆向工程最佳实践【基础mybatis-generator、tk.mybatis、mubatis-plus】
- java架构之路-(mybatis源码)mybatis基本使用
- MyBatis 学习 之 一、MyBatis 简介与配置 MyBatis+Spring+MySql
(叙述一下mybatis的架构流程)")
Mybatis架构原理(一)(叙述一下mybatis的架构流程)
Mybatis架构原理(一)
架构设计图

总体流程:
加载配置并初始化
触发条件:加载配置文件;配置来源于两个地方,一个是xml文件,一个是java代码中的注解;将主配置文件内容解析封装到configuration,将sql的配置信息加载成为一个mappedstatement对象,存储在内存之中
接受调用请求
触发条件:调用Mybatis提供的API
传入参数:为sql的id和传入参数对象
处理过程:将请求传递给下层的请求处理曾进行处理
处理操作请求
触发条件:API接口层传递请求过来
传入参数为sql的id和传入参数对象
处理过程
根据sql的id查找对应的MappedStatement对象
根据传入参数对象解析MappedStatement对象,得到最终要执行的sql和执行传入参数
获取数据库连接,根据得到的最终sql语句和执行传入参数到数据库执行,并得到执行结果
根据MappedStatement对象中的结果映射配置对得到的执行结果进行转换处理,并得到最终的处理结果
释放链接资源
返回处理结果
将最终的处理结果返回
Mybatis源码剖析
mybatis源码下载地址:https://gitee.com/mirrors/mybatis.git
传统方式的源码分析
第一步:
// 1. 读取配置文件,读成字节输入流,注意:现在还没解析
InputStream resourceAsstream = Resources.getResourceAsstream("sqlMapConfig.xml");
-->
public static InputStream getResourceAsstream(ClassLoader loader, String resource) throws IOException {
InputStream in = classLoaderWrapper.getResourceAsstream(resource, loader);
if (in == null) {
throw new IOException("Could not find resource " + resource);
}
return in;
}
借助类加载器中的getResourceAsstream根据当前配置文件的路径把配置文件加载成输入流进行返回
第二步:
// 2. 解析配置文件,封装Configuration对象 创建DefaultsqlSessionFactory对象
sqlSessionFactory sqlSessionFactory = new sqlSessionFactoryBuilder().build(resourceAsstream);
-->
// 调用的重载方法
public sqlSessionFactory build(InputStream inputStream, String environment, Properties properties) {
try {
// 创建 XMLConfigBuilder, XMLConfigBuilder是专门解析mybatis的配置文件的类
XMLConfigBuilder parser = new XMLConfigBuilder(inputStream, environment, properties);
// 执行 XML 解析
// 创建 DefaultsqlSessionFactory 对象
return build(parser.parse());
} catch (Exception e) {
throw ExceptionFactory.wrapException("Error building sqlSession.", e);
} finally {
ErrorContext.instance().reset();
try {
inputStream.close();
} catch (IOException e) {
// Intentionally ignore. Prefer prevIoUs error.
}
}
}
-->
// 解析 XML 成 Configuration 对象。
public Configuration parse() {
// 若已解析,抛出 BuilderException 异常
if (parsed) {
throw new BuilderException("Each XMLConfigBuilder can only be used once.");
}
// 标记已解析
parsed = true;
///parser是XPathParser解析器对象,读取节点内数据,<configuration>是MyBatis配置文件中的顶层标签
// 解析 XML configuration 节点
parseConfiguration(parser.evalNode("/configuration"));
return configuration;
}
-->
//解析 XML
private void parseConfiguration(XNode root) {
try {
//issue #117 read properties first
// 解析 <properties /> 标签
propertiesElement(root.evalNode("properties"));
// 解析 <settings /> 标签
Properties settings = settingsAsProperties(root.evalNode("settings"));
// 加载自定义的 VFS 实现类
loadCustomVfs(settings);
// 解析 <typeAliases /> 标签
typeAliasesElement(root.evalNode("typeAliases"));
// 解析 <plugins /> 标签
pluginElement(root.evalNode("plugins"));
// 解析 <objectFactory /> 标签
objectFactoryElement(root.evalNode("objectFactory"));
// 解析 <objectWrapperFactory /> 标签
objectWrapperFactoryElement(root.evalNode("objectWrapperFactory"));
// 解析 <reflectorFactory /> 标签
reflectorFactoryElement(root.evalNode("reflectorFactory"));
// 赋值 <settings /> 到 Configuration 属性
settingsElement(settings);
// read it after objectFactory and objectWrapperFactory issue #631
// 解析 <environments /> 标签
environmentsElement(root.evalNode("environments"));
// 解析 <databaseIdProvider /> 标签
databaseIdProviderElement(root.evalNode("databaseIdProvider"));
// 解析 <typeHandlers /> 标签
typeHandlerElement(root.evalNode("typeHandlers"));
// 解析 <mappers /> 标签
mapperElement(root.evalNode("mappers"));
} catch (Exception e) {
throw new BuilderException("Error parsing sql Mapper Configuration. Cause: " + e, e);
}
}
-->(以properties举例)
//1. 解析 <properties /> 标签,成 Properties 对象。
//2. 覆盖 configuration 中的 Properties 对象到上面的结果。
//3. 设置结果到 parser 和 configuration 中
private void propertiesElement(XNode context) throws Exception {
if (context != null) {
// 读取子标签们,为 Properties 对象
Properties defaults = context.getChildrenAsProperties();
// 读取 resource 和 url 属性
String resource = context.getStringAttribute("resource");
String url = context.getStringAttribute("url");
if (resource != null && url != null) { // resource 和 url 都存在的情况下,抛出 BuilderException 异常
throw new BuilderException("The properties element cannot specify both a URL and a resource based property file reference. Please specify one or the other.");
}
// 读取本地 Properties 配置文件到 defaults 中。
if (resource != null) {
defaults.putAll(Resources.getResourceAsProperties(resource));
// 读取远程 Properties 配置文件到 defaults 中。
} else if (url != null) {
defaults.putAll(Resources.getUrlAsProperties(url));
}
// 覆盖 configuration 中的 Properties 对象到 defaults 中。
Properties vars = configuration.getvariables();
if (vars != null) {
defaults.putAll(vars);
}
// 设置 defaults 到 parser 和 configuration 中。
parser.setvariables(defaults);
configuration.setvariables(defaults);
}
}
-->(mapperElement(root.evalNode("mappers"));)
private void mapperElement(XNode parent) throws Exception {
if (parent != null) {
// 遍历子节点
for (XNode child : parent.getChildren()) {
// 如果是 package 标签,则扫描该包
if ("package".equals(child.getName())) {
// 获取 <package> 节点中的 name 属性
String mapperPackage = child.getStringAttribute("name");
// 从指定包中查找 mapper 接口,并根据 mapper 接口解析映射配置
configuration.addMappers(mapperPackage);
// 如果是 mapper 标签,
} else {
// 获得 resource、url、class 属性
String resource = child.getStringAttribute("resource");
String url = child.getStringAttribute("url");
String mapperClass = child.getStringAttribute("class");
// resource 不为空,且其他两者为空,则从指定路径中加载配置
if (resource != null && url == null && mapperClass == null) {
ErrorContext.instance().resource(resource);
// 获得 resource 的 InputStream 对象
InputStream inputStream = Resources.getResourceAsstream(resource);
// 创建 XMLMapperBuilder 对象
XMLMapperBuilder mapperParser = new XMLMapperBuilder(inputStream, configuration, resource, configuration.getsqlFragments());
// 执行解析
mapperParser.parse();
// url 不为空,且其他两者为空,则通过 url 加载配置
} else if (resource == null && url != null && mapperClass == null) {
ErrorContext.instance().resource(url);
// 获得 url 的 InputStream 对象
InputStream inputStream = Resources.getUrlAsstream(url);
// 创建 XMLMapperBuilder 对象
XMLMapperBuilder mapperParser = new XMLMapperBuilder(inputStream, configuration, url, configuration.getsqlFragments());
// 执行解析
mapperParser.parse();
// mapperClass 不为空,且其他两者为空,则通过 mapperClass 解析映射配置
} else if (resource == null && url == null && mapperClass != null) {
// 获得 Mapper 接口
Class<?> mapperInterface = Resources.classForName(mapperClass);
// 添加到 configuration 中
configuration.addMapper(mapperInterface);
// 以上条件不满足,则抛出异常
} else {
throw new BuilderException("A mapper element may only specify a url, resource or class, but not more than one.");
}
}
}
}
}
//加载核心配置文件的时候,根据映射文件进行加载,把映射文件中的每一个标签例如insert,select标签里面的内容封装成一个mappedStatement对象,然后将 mappedStatement封装到configuration中;
-->
configuration对象重点内容
/**
* MappedStatement 映射
*
* KEY:`${namespace}.${id}`
*/
protected final Map<String, MappedStatement> mappedStatements = new StrictMap<>("Mapped Statements collection");
//解析映射配置文件,将配置文件里面的每一个标签内容封装成一个mappedStatement对象;
-->
/**
* 映射的语句,每个 <select />、<insert />、<update />、<delete /> 对应一个 MappedStatement 对象
*/
public final class MappedStatement {... ...}
执行sql流程
sqlSession是一个接口,它有两个实现类,DefaultsqlSession(默认)和sqlSessionManager(弃用),
sqlSession是mybatis中用于和数据库交互的顶层类,通常将它与ThreadLocal绑定,一个会话使用一个sqlSession,由于是线程不安全的,所以使用完毕后需要close;
Executor
Executor也是一个接口,他有三个常用的实现类
BatchExecutor (重用语句并执行批量更新)
ReuseExecutor (重用预处理语句,prepared statements)
SimpleExecutor (普通的执行器,默认)
第三步:
// 3. 生产了Defaultsqlsession实例对象 设置了事务不自动提交 完成了executor对象的创建
sqlSession sqlSession = sqlSessionFactory.openSession();
-->
// 进入openSession方法
@Override
public sqlSession openSession() {
//getDefaultExecutorType()传递的是SimpleExecutor
return openSessionFromDataSource(configuration.getDefaultExecutorType(), null, false);
}
-->
//进入openSessionFromDataSource。
//ExecutorType 为Executor的类型,TransactionIsolationLevel为事务隔离级别,autoCommit是否开启事务
//openSession的多个重载方法可以指定获得的SeqSession的Executor类型和事务的处理
private sqlSession openSessionFromDataSource(ExecutorType execType, TransactionIsolationLevel level, boolean autoCommit) {
Transaction tx = null;
try {
// 获得 Environment 对象
final Environment environment = configuration.getEnvironment();
// 创建 Transaction 对象
final TransactionFactory transactionFactory = getTransactionFactoryFromEnvironment(environment);
tx = transactionFactory.newTransaction(environment.getDataSource(), level, autoCommit);
// 创建 Executor 对象
final Executor executor = configuration.newExecutor(tx, execType);
// 创建 DefaultsqlSession 对象
return new DefaultsqlSession(configuration, executor, autoCommit);
} catch (Exception e) {
// 如果发生异常,则关闭 Transaction 对象
closeTransaction(tx); // may have fetched a connection so lets call close()
throw ExceptionFactory.wrapException("Error opening session. Cause: " + e, e);
} finally {
ErrorContext.instance().reset();
}
}
第四步:
// 4.(1)根据statementid来从Configuration中map集合中获取到了指定的MappedStatement对象
//(2)将查询任务委派了executor执行器
User user = sqlSession.selectList("com.yun.mapper.IUserMapper.findById",1);
System.out.println(user);
-->
public <E> List<E> selectList(String statement, Object parameter, RowBounds rowBounds) {
try {
// 获得 MappedStatement 对象
MappedStatement ms = configuration.getMappedStatement(statement);
// 执行查询
return executor.query(ms, wrapCollection(parameter), rowBounds, Executor.NO_RESULT_HANDLER);
} catch (Exception e) {
throw ExceptionFactory.wrapException("Error querying database. Cause: " + e, e);
} finally {
ErrorContext.instance().reset();
}
}
-->
//此方法在SimpleExecutor的父类BaseExecutor中实现
@Override
public <E> List<E> query(MappedStatement ms, Object parameter, RowBounds rowBounds, ResultHandler resultHandler) throws sqlException {
//根据传入的参数动态获得sql语句,最后返回用Boundsql对象表示
Boundsql boundsql = ms.getBoundsql(parameter);
//为本次查询创建缓存的Key
CacheKey key = createCacheKey(ms, parameter, rowBounds, boundsql);
// 查询
return query(ms, parameter, rowBounds, resultHandler, key, boundsql);
}
-->
public <E> List<E> query(MappedStatement ms, Object parameter, RowBounds rowBounds, ResultHandler resultHandler, CacheKey key, Boundsql boundsql) throws sqlException {
ErrorContext.instance().resource(ms.getResource()).activity("executing a query").object(ms.getId());
// 已经关闭,则抛出 ExecutorException 异常
if (closed) {
throw new ExecutorException("Executor was closed.");
}
// 清空本地缓存,如果 queryStack 为零,并且要求清空本地缓存。
if (queryStack == 0 && ms.isFlushCacherequired()) {
clearLocalCache();
}
List<E> list;
try {
// queryStack + 1
queryStack++;
// 从一级缓存中,获取查询结果
list = resultHandler == null ? (List<E>) localCache.getobject(key) : null;
// 获取到,则进行处理
if (list != null) {
handleLocallyCachedOutputParameters(ms, key, parameter, boundsql);
// 获得不到,则从数据库中查询
} else {
list = queryFromDatabase(ms, parameter, rowBounds, resultHandler, key, boundsql);
}
} finally {
// queryStack - 1
queryStack--;
}
if (queryStack == 0) {
// 执行延迟加载
for (DeferredLoad deferredLoad : deferredLoads) {
deferredLoad.load();
}
// issue #601
// 清空 deferredLoads
deferredLoads.clear();
// 如果缓存级别是 LocalCacheScope.STATEMENT ,则进行清理
if (configuration.getLocalCacheScope() == LocalCacheScope.STATEMENT) {
// issue #482
clearLocalCache();
}
}
return list;
}
-->
// 从数据库中读取操作
private <E> List<E> queryFromDatabase(MappedStatement ms, Object parameter, RowBounds rowBounds, ResultHandler resultHandler, CacheKey key, Boundsql boundsql) throws sqlException {
List<E> list;
// 在缓存中,添加占位对象。此处的占位符,和延迟加载有关,可见 `DeferredLoad#canLoad()` 方法
localCache.putObject(key, EXECUTION_PLACEHOLDER);
try {
// 执行读操作
list = doQuery(ms, parameter, rowBounds, resultHandler, boundsql);
} finally {
// 从缓存中,移除占位对象
localCache.removeObject(key);
}
// 添加到缓存中
localCache.putObject(key, list);
// 暂时忽略,存储过程相关
if (ms.getStatementType() == StatementType.CALLABLE) {
localOutputParameterCache.putObject(key, parameter);
}
return list;
}
-->
public <E> List<E> doQuery(MappedStatement ms, Object parameter, RowBounds rowBounds, ResultHandler resultHandler, Boundsql boundsql) throws sqlException {
Statement stmt = null;
try {
Configuration configuration = ms.getConfiguration();
// 传入参数创建StatementHanlder对象来执行查询
StatementHandler handler = configuration.newStatementHandler(wrapper, ms, parameter, rowBounds, resultHandler, boundsql);
// 创建jdbc中的statement对象
stmt = prepareStatement(handler, ms.getStatementLog());
// 执行 StatementHandler ,进行读操作
return handler.query(stmt, resultHandler);
} finally {
// 关闭 StatementHandler 对象
closeStatement(stmt);
}
}
-->
// 初始化 StatementHandler 对象
private Statement prepareStatement(StatementHandler handler, Log statementLog) throws sqlException {
Statement stmt;
// 获得 Connection 对象
Connection connection = getConnection(statementLog);
// 创建 Statement 或 PrepareStatement 对象
stmt = handler.prepare(connection, transaction.getTimeout());
// 设置 sql 上的参数,例如 PrepareStatement 对象上的占位符
handler.parameterize(stmt);
return stmt;
}
第五步:
// 5.释放资源
    sqlSession.close();
mapper代理方式源码分析,前三步和传统方式相同,这边不在叙述
第四步
思考一个问题,通常mapper接口我们都没有实现的方法却可以使用,是为什么呢?答案很简单: 动态代理
开始之前介绍一下Mybatis初始化时对接口的处理,MapperRegistry是Configuration中的一个属性,它内部维护一个HashMap用于存放mapper接口的工厂类,每个接口对应一个工厂类,mappers可以配置接口的包路径,或者某个具体的接口类
<mappers>
    <mapper/>
    <package name = "com.yun.mapper"/>
</mappers>
当解析mappers标签时,它会判断解析到的是mapper配置文件时,会再将对应配置文件中的CRUD标签一一封装成MappedStatement对象,存入mappedStatements中,当判断解析到接口时,会建此接口对应的MapperProxyFactory对象,存入HashMap中,key = 接口的字节码对象,value = 此接口对应的MapperProxyFactory对象;
// 使用JDK动态代理对mapper接口产生代理对象
IUserMapper mapper = sqlSession.getMapper(IUserMapper.class);
-->
//这个类中维护一个HashMap存放MapperProxyFactory
private final Map<Class<?>, MapperProxyFactory<?>> kNownMappers = new HashMap<>();
public <T> T getMapper(Class<T> type, sqlSession sqlSession) {
// 获得 MapperProxyFactory 对象
final MapperProxyFactory<T> mapperProxyFactory = (MapperProxyFactory<T>) kNownMappers.get(type);
// 不存在,则抛出 BindingException 异常
if (mapperProxyFactory == null) {
throw new BindingException("Type " + type + " is not kNown to the MapperRegistry.");
}
/// 通过动态代理工厂生成实例。
try {
return mapperProxyFactory.newInstance(sqlSession);
} catch (Exception e) {
throw new BindingException("Error getting mapper instance. Cause: " + e, e);
}
}
-->
//MapperProxyFactory类中的newInstance方法 MapperProxy实现了InvocationHandler接口
public T newInstance(sqlSession sqlSession) {
// 创建了JDK动态代理的invocationHandler接口的实现类mapperProxy
final MapperProxy<T> mapperProxy = new MapperProxy<>(sqlSession, mapperInterface, methodCache);
// 调用了重载方法
return newInstance(mapperProxy);
}
protected T newInstance(MapperProxy<T> mapperProxy) {
return (T) Proxy.newProxyInstance(mapperInterface.getClassLoader(), new Class[]{mapperInterface}, mapperProxy);
}
当代理对象去调用接口的任意方法时,都要去执行动态代理中MapperProxy里面的invoke方法,
-->
public Object invoke(Object proxy, Method method, Object[] args) throws Throwable {
try {
// 如果是 Object 定义的方法,直接调用
if (Object.class.equals(method.getDeclaringClass())) {
return method.invoke(this, args);
} else if (isDefaultMethod(method)) {
return invokeDefaultMethod(proxy, method, args);
}
} catch (Throwable t) {
throw ExceptionUtil.unwrapThrowable(t);
}
// 获得 MapperMethod 对象
final MapperMethod mapperMethod = cachedMapperMethod(method);
// 重点在这:MapperMethod最终调用了执行的方法
return mapperMethod.execute(sqlSession, args);
}
-->
public Object execute(sqlSession sqlSession, Object[] args) {
Object result;
//判断mapper中的方法类型,最终调用的还是sqlSession中的方法
switch (command.getType()) {
case INSERT: {
// 转换参数
Object param = method.convertArgsTosqlCommandParam(args);
// 执行 INSERT 操作
// 转换 rowCount
result = rowCountResult(sqlSession.insert(command.getName(), param));
break;
}
case UPDATE: {
// 转换参数
Object param = method.convertArgsTosqlCommandParam(args);
// 转换 rowCount
result = rowCountResult(sqlSession.update(command.getName(), param));
break;
}
case DELETE: {
// 转换参数
Object param = method.convertArgsTosqlCommandParam(args);
// 转换 rowCount
result = rowCountResult(sqlSession.delete(command.getName(), param));
break;
}
case SELECT:
// 无返回,并且有 ResultHandler 方法参数,则将查询的结果,提交给 ResultHandler 进行处理
if (method.returnsVoid() && method.hasResultHandler()) {
executeWithResultHandler(sqlSession, args);
result = null;
// 执行查询,返回列表
} else if (method.returnsMany()) {
result = executeForMany(sqlSession, args);
// 执行查询,返回 Map
} else if (method.returnsMap()) {
result = executeForMap(sqlSession, args);
// 执行查询,返回 Cursor
} else if (method.returnsCursor()) {
result = executeForCursor(sqlSession, args);
// 执行查询,返回单个对象
} else {
// 转换参数
Object param = method.convertArgsTosqlCommandParam(args);
// 查询单条
result = sqlSession.selectOne(command.getName(), param);
if (method.returnsOptional() &&
(result == null || !method.getReturnType().equals(result.getClass()))) {
result = Optional.ofNullable(result);
}
}
break;
case FLUSH:
result = sqlSession.flushStatements();
break;
default:
throw new BindingException("UnkNown execution method for: " + command.getName());
}
// 返回结果为 null ,并且返回类型为基本类型,则抛出 BindingException 异常
if (result == null && method.getReturnType().isPrimitive() && !method.returnsVoid()) {
throw new BindingException("Mapper method '" + command.getName()
+ " attempted to return null from a method with a primitive return type (" + method.getReturnType() + ").");
}
// 返回结果
return result;
}

2、MyBatis架构原理
一、架构设计
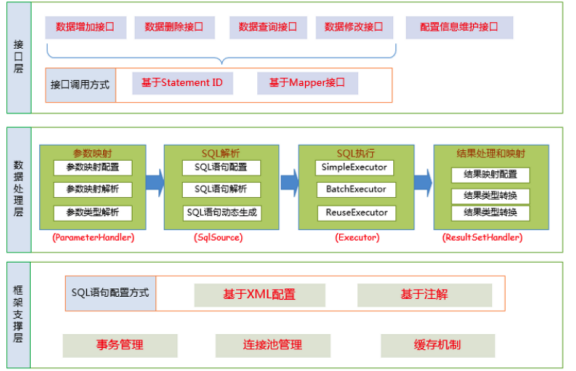
Mybatis的功能架构分为三层:
-
API接⼝层:提供给外部使⽤的接⼝ API,开发⼈员通过这些本地API来操纵数据库。接⼝层⼀接收 到 调⽤请求就会调⽤数据处理层来完成具体的数据处理。
MyBatis和数据库的交互有两种⽅式:
-
使⽤传统的MyBati s提供的API ;
-
使⽤Mapper代理的⽅式
-
-
数据处理层:负责具体的SQL查找、SQL解析、SQL执⾏和执⾏结果映射处理等。它主要的⽬的是根 据调⽤的请求完成⼀次数据库操作。
-
基础⽀撑层:负责最基础的功能⽀撑,包括连接管理、事务管理、配置加载和缓存处理,这些都是 共 ⽤的东⻄,将他们抽取出来作为最基础的组件。为上层的数据处理层提供最基础的⽀撑
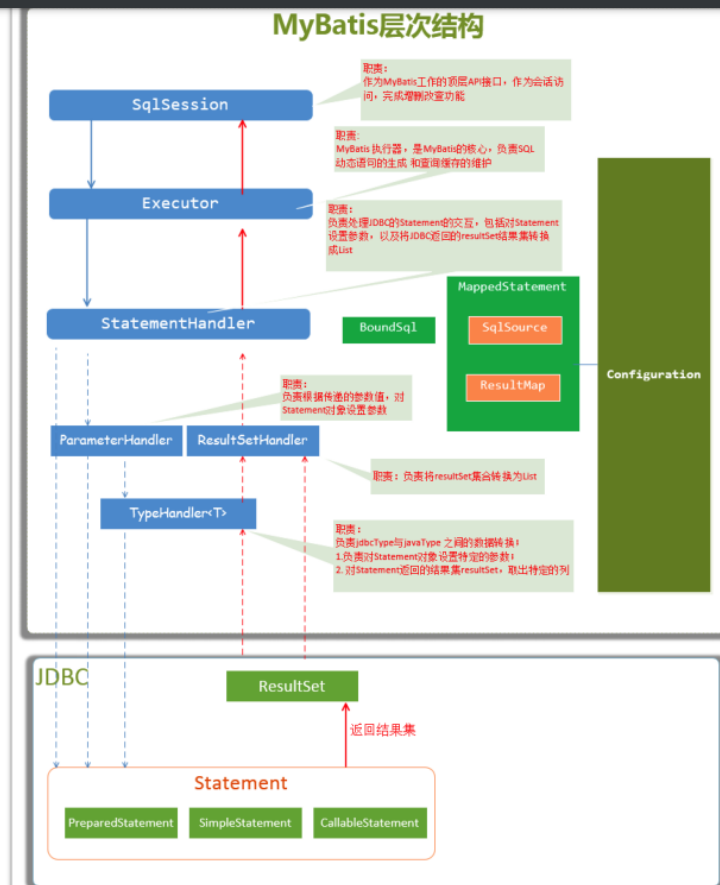
二、主要构件及其相互关系
SqlSession: MyBatis⼯作的主要顶层API,表示和数据库交互的会话,完成必要数 据库增删改查功能Executor:MyBatis执⾏器,是MyBatis调度的核⼼,负责SQL语句的⽣成和查询缓 存的维护StatementHandler:封装了JDBC Statement操作,负责对JDBC statement的操作,如设置参 数、将Statement结果集转换成List集合ParameterHandler:负责对⽤户传递的参数转换成JDBC Statement所需要的参数ResultSetHandler:负责将JDBC返回的ResultSet结果集对象转换成List类型的集合;TypeHandler:负责java数据类型和jdbc数据类型之间的映射和转换MappedStatement:MappedStatement维护了⼀条<select | update | delete | insert>节点 的封 装SqlSource:负责根据⽤户传递的parameterObject,动态地⽣成SQL语句,将信息封 装到BoundSql对象中,并返回BoundSql:表示动态⽣成的SQL语句以及相应的参数信息

java-mybaits-015-mybatis逆向工程最佳实践【基础mybatis-generator、tk.mybatis、mubatis-plus】
一、概述
三款框架的功能对比
|
|
Mybatis-generator |
通用Mapper |
Mybatis-Plus |
| 代码生成器 |
支持自动生成Model,Mapper,Mapper XML文件 生成方式不够灵活; 生成代码功能较为简单 |
支持自动生成Entity,Mapper,Mapper XML文件; 提供通用的Mapper模板,生成方式较灵活; 生成的Model文件包含注释能够很好地与数据库表完成映射 |
支持自动生成Entity,Mapper,Mapper XML,Service,Controller文件; 提供BaseMapper接口 |
| CRUD操作 |
代码生成后每个Mapper有固定的CRUD方法; 在每个Mapper上分别扩展 |
提供通用Mapper接口;方便构造统一service 可以扩展通用接口 |
提供BaseMapper接口; 可以扩展通用接口 |
| 条件构造器 |
每个实体类自己的Example构造条件【对象方式】 |
提供通用Example【构建sql】 |
提供Wrapper进行复杂条件构造 |
| 乐观锁 |
|
支持 |
支持 |
| 主键策略 |
|
支持 |
支持 |
| 分页 |
|
|
支持 |
| 逻辑删除 |
|
|
支持 |
| 通用枚举 |
|
|
支持 |
| 攻击Sql阻断 |
|
|
支持 |
| 性能分析 |
|
|
支持 |
通用Mapper是对Mybatis-generator的升级改造,解决了使用Mybatis-generator可能需要大量重构的问题,并且在这个基础上加入了一些新的功能。
Mybatis-Plus可以看作是在另一个方向上对Mybatis的升级改造,不仅能够根据数据库表快速生成pojo实体类,还封装了大量CRUD方法,使用Wrapper解决了复杂条件构造等问题,更是根据开发中常见的问题给出了一系列解决方案。
在拥有Maven和Spring boot的开发框架下,MBG、通用Mapper和MP都可以快速地完成安装,相比于MBG和通用Mapper仅需要执行插件就可以完成基本的开发工作,MP可能需要更多的开发工作量。
最佳实践参看代码:https://github.com/bjlhx15/java_base_architecture.git
二、Mybatis-generator
MyBatis Generator(MBG)是MyBatis MyBatis 和iBATIS的代码生成器。它为所有版本的MyBatis以及版本2.2.0之后的iBATIS版本生成代码。它将根据数据库表生成可用于访问表的文件。
Mybatis-generator主要完成的工作是依据数据库表创建对应的model、dao、mapping文件,可以通过Maven插件或者mybatis-generator的jar包生成。
这里介绍Maven插件使用方法:
1、在pom.xml文件中加入mybatis-generator系列插件;
2、创建generatorConfig.xml文件,在配置文件中指定数据库连接地址、生成类的存放地址、生成对应表的类名等信息;
3、执行mybatis-generator插件,即可生成相应文件;
4、此外,mybatis-generator自动生成了example类用于构造复杂的筛选条件
Mybatis-generator使用较为简单,生成的DAO类及映射文件中包含基本的CRUD操作。
需要注意的是,在一次项目中多次执行mybatis-generator,xml文件会追加,会覆盖原本的Model、DAO;可以使用如下方式
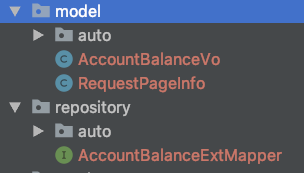
1、每次清理要生成的xml
2、自动生成的写入auto,
3、个人扩展的使用上图方式
可以参看上述github代码
三、通用Mapper【tk.mybatis】
官网:https://github.com/abel533/Mapper/wiki
当数据库字段变化频繁时,使用MBG(mybatis-generator)会带来大量的重构工作,对此,通用Mapper给出的解决办法是:给予开发者一个具备丰富的单表方法并且容易扩展的通用的Mapper。
通用Mapper是对单表的CRUD操作进行了较为详细的实现,使得开发人员可以随意的按照自己的需求选择通用的方法,同时允许开发人员便捷地对通用Mapper进行扩展。
1. 在pom.xml中添加插件配置


<!-- 命令:mvn mybatis-generator:generate -->
            <plugin>
                <groupId>org.mybatis.generator</groupId>
                <artifactId>mybatis-generator-maven-plugin</artifactId>
                <version>1.3.6</version>
                <configuration>
                    <!-- 配置实际调用地址-->
                    <configurationFile>src/main/resources/mybatis_generatorConfig/generatorConfig-base.xml
                    </configurationFile>
                    <verbose>true</verbose>
                    <overwrite>true</overwrite>
                </configuration>
                <dependencies>
                    <dependency>
                        <groupId>mysql</groupId>
                        <artifactId>mysql-connector-java</artifactId>
                        <version>5.1.38</version>
                    </dependency>
                    <dependency>
                        <groupId>tk.mybatis</groupId>
                        <artifactId>mapper</artifactId>
                        <version>4.0.0</version>
                    </dependency>
                </dependencies>
</plugin>可以看到,通用Mapper的代码生成实际上是使用了MGB,因此通用Mapper的代码生成器只是调用了MGB,然后在这个基础上加入了一些元素来方便开发。
2. 配置文件generatorConfig.xml


<?xml version="1.0" encoding="UTF-8" ?>
<!DOCTYPE generatorConfiguration PUBLIC
        "-//mybatis.org//DTD MyBatis Generator Configuration 1.0//EN"
        "http://mybatis.org/dtd/mybatis-generator-config_1_0.dtd" >
<generatorConfiguration>
    <!--导入属性配置,前面我们写的一个配置文件,你也可以直接使用mybatis的jdbc的配置文件 -->
    <properties resource="jdbc.properties"></properties>
    <!-- 数据库驱动,注意,这里必须要修改成你的数据库的驱动地址 -->
    <!--    如果 pom配置这里可以不写-->
    <!--    <classPathEntry  location=".m2/repository/mysql/mysql-connector-java/5.1.8/mysql-connector-java-5.1.8.jar"/>-->

    <context id="Mysql" targetRuntime="MyBatis3Simple" defaultModelType="flat">
        <property name="beginningDelimiter" value="`"/>
        <property name="endingDelimiter" value="`"/>
        <plugin type="tk.mybatis.mapper.generator.MapperPlugin">
            <property name="mappers" value="tk.mybatis.mapper.common.Mapper"/>
            <property name="caseSensitive" value="true"/>
        </plugin>

        <!--数据库连接的信息:驱动类、连接地址、用户名、密码 -->
        <jdbcConnection driverClass="${jdbc.driver}"
                        connectionURL="${jdbc.url}"
                        userId="${jdbc.username}" password="${jdbc.password}">
        </jdbcConnection>

<!--        <javaTypeResolver>-->
<!--            <property name="forceBigDecimals" value="false"/>-->
<!--        </javaTypeResolver>-->
        <!-- targetProject:生成PO类的位置 -->
        <javaModelGenerator targetPackage="com.github.bjlhx15.mybatis.springboot.base.model.auto"
                            targetProject="../tk-mybatis-springboot-base1/src/main/java">
            <!-- enableSubPackages:是否让schema作为包的后缀 -->
            <property name="enableSubPackages" value="false"/>
            <!-- 从数据库返回的值被清理前后的空格 -->
            <property name="trimStrings" value="true"/>
        </javaModelGenerator>

        <!-- targetProject:mapper xml 映射文件生成的位置 -->
        <sqlMapGenerator targetPackage="autoxml"
                         targetProject="../tk-mybatis-springboot-base1/src/main/resources/mapper/">
            <!-- enableSubPackages:是否让schema作为包的后缀 -->
            <property name="enableSubPackages" value="false"/>
        </sqlMapGenerator>

        <!--targetPackage:mapper接口生成的位置 -->
        <javaClientGenerator type="XMLMAPPER"
                             targetPackage="com.github.bjlhx15.mybatis.springboot.base.repository.auto"
                             targetProject="../tk-mybatis-springboot-base1/src/main/java">
            <!-- enableSubPackages:是否让schema作为包的后缀 -->
            <property name="enableSubPackages" value="false"/>
        </javaClientGenerator>

        <!-- 指定数据库表 -->
        <table tableName="accountbalance" domainObjectName="AccountBalance">
            <generatedKey column="id" sqlStatement="JDBC"/>
        </table>


    </context>
</generatorConfiguration>与MGB原有的配置文件相比,这里只是多了一个插件的配置,这个插件的作用是:配置生成的Mapper接口都会自动继承这个接口,也就是说,使用通用Mapper生成的mapper接口即使看上去空空如也,但已经具备了大量的对数据库的操作方法。此外,通用 Mapper 专用代码生成器生成的 Model 会在原有基础上增加 @Table,@Id,@Column 等注解,方便自动与数据库字段进行映射。
3. 在 pom.xml 这一级目录的命令行窗口执行 mvn mybatis-generator:generate或者直接在执行mvn插件即可。
4. 通用Mapper同样有Example的设计,与MGB不同的是,MDB会对每一个表生成对应的Example类,而通用Mapper提供了一个统一的Example类,这个类和 MBG 生成的相比,需要自己设置属性名,这个类还额外提供了更多的方法。
通用Mapper可以看作是MGB的改进和扩展,一定程度上解决了使用MGB重构的问题。
可以参看上述github代码
四、Mybatis-Plus
官网地址:https://mp.baomidou.com/guide/generator.html
(以下简称MP)是Mybatis的增强工具(MBG和通用Mapper可看成插件),在Mybatis的基础上增加了很多功能,简化开发,提高效率。
在Spring Boot中的引入:
1. 在maven中添加MP启动器
<dependency>
    <groupId>com.baomidou</groupId>
    <artifactId>mybatis-plus-boot-starter</artifactId>
    <version>3.1.2</version>
</dependency>
2. 要使用代码生成器还需要添加模板引擎依赖
参看地址:AutoGenerator的使用参考 https://mybatis.plus/guide/generator.html 。
添加 模板引擎 依赖,MyBatis-Plus 支持 Velocity(默认)、Freemarker、Beetl,用户可以选择自己熟悉的模板引擎,如果都不满足您的要求,可以采用自定义模板引擎。
Velocity(默认):
<dependency>
    <groupId>org.apache.velocity</groupId>
    <artifactId>velocity-engine-core</artifactId>
    <version>2.1</version>
</dependency>
Freemarker:
<dependency>
    <groupId>org.freemarker</groupId>
    <artifactId>freemarker</artifactId>
    <version>2.3.29</version>
</dependency>
Beetl:
<dependency>
    <groupId>com.ibeetl</groupId>
    <artifactId>beetl</artifactId>
    <version>3.0.11.RELEASE</version>
</dependency>
注意!如果您选择了非默认引擎,需要在 AutoGenerator 中 设置模板引擎。


AutoGenerator generator = new AutoGenerator();

// set freemarker engine
generator.setTemplateEngine(new FreemarkerTemplateEngine());

// set beetl engine
generator.setTemplateEngine(new BeetlTemplateEngine());

// set custom engine (reference class is your custom engine class)
generator.setTemplateEngine(new CustomTemplateEngine());

// other config
...3、代码的自动生成。AutoGenerator是MP的代码生成器,通过调用AutoGenerator,进行相应的模板、策略配置可以快速生成Entity、Mapper、Mapper XML、Service、Controller各个模块的代码。
4. MP将通用的CRUD操作封装进BaseMapper接口,而自动生成的Mapper接口便自动继承了BaseMapper接口。复杂的Sql操作,则可以使用QueryWrapper(LambdaQueryWrapper) 和 UpdateWrapper(LambdaUpdateWrapper)进行动态Sql拼接。
5、此外,MP还支持分页、逻辑删除、通用枚举、Sql注入等功能,在:https://mp.baomidou.com/guide/generator.html
还有性能分析插件:https://mp.baomidou.com/guide/performance-analysis-plugin.html
与MBG不同,使用Mybatis-Plus自动生成代码需要编写代码,通过调用AutoAutoGenerator类实现代码生成,从这方面来说不如使用插件方便。但是它丰富的功能以及只是相对复杂的配置还是使它领先于MBG以及通用Mapper。
双方都
mybatis基本使用")
java架构之路-(mybatis源码)mybatis基本使用
我们今天先来简单了解一下我们持久层框架,mybatis的使用。而且现在的注解成为趋势,我主要说一下注解方向的使用吧(配置文件也会说)
从使用角度只要是三个部分,mybatis-config.xml,mapper.xml,执行文件三个部分。
mybatis-config.xml:
主键标签为configuration成对出现的,然后是properties也就是我们的配置,用于配置数据库。settings声明一些配置,比如打印sql语句等,后面会一个个去说。然后就是我们的mappers,里面包含多个mapper标签,也就是对应我们的mapper.xml文件,在这里说一下一共有三种注入的方式,resource,class,url,resource是通过classpath配置的,如果你没有把mapper放置在resources配置下面,需要在maven里设置编译,不然我们的mapper.xml不会编译到classpath里,class通过类来注入mapper,url一般是远程注入的。再就是我们的typehandlers,可以指定类型转换的。我们也可以继承BaseTypeHandler来重写父类的方法来自定义类型转换。
来一个我自己的简单配置。
<?xml version="1.0" encoding="UTF-8" ?>
<!DOCTYPE configuration
        PUBLIC "-//mybatis.org//DTD Config 3.0//EN"
        "http://mybatis.org/dtd/mybatis-3-config.dtd">
<configuration>
    <properties resource="app.properties">
        <property name="jdbc.driver" value="com.mysql.jdbc.Driver"/>
    </properties>

    <settings>
        <!-- 打印查询语句 -->
        <setting name="logImpl" value="STDOUT_LOGGING"/>
    </settings>

    <environments default="${default.environment}">
        <environment id="dev">
            <transactionManager type="JDBC"/>
            <dataSource type="POOLED">
                <property name="driver" value="${jdbc.driver}"/>
                <property name="url" value="${jdbc.url}"/>
                <property name="username" value="${jdbc.username}"/>
                <property name="password" value="${jdbc.password}"/>
            </dataSource>
        </environment>
    </environments>
    <mappers>
        <mapper resource="mybatis/dao/StudentMapper.xml"/>
        <!--        <mapper></mapper>-->
        <!--        <mapper url="mybatis.dao.StudentDao"></mapper>-->
    </mappers>

</configuration>
配置还要很多,后面源码解析里面会一点点来说明。
mapper.xml:
  这个文件就是我们的编写sql的文件了,里面主要标签就是select,insert,update,delete我们的增删改查标签,再就是我们的缓存设置(二级缓存)。下次博客主要说博客,源码级的。
select里包含我们常见的id,resultType,resultMap,id用来指向我们的接口文件的类名,resultType为我们mybatis自带的类型,也可以是我们设置的对象Bean,resultMap是我们自己定义的返回类型。这里可能会有疑问,一堆多应该怎么来配置?
association我们可以用他来指定一对多的配置,同时可以配置懒查询还是及时查询的。我们来看一个实例,我们现有学生表格分数表,学生对应很多科目的分数,我们来看一下。先来一段测试代码。
<?xml version="1.0" encoding="UTF-8" ?>
<!DOCTYPE configuration
        PUBLIC "-//mybatis.org//DTD Config 3.0//EN"
        "http://mybatis.org/dtd/mybatis-3-config.dtd">
<configuration>
    <environments default="development">
        <environment id="development">
            <transactionManager type="JDBC"/>
            <dataSource type="POOLED">
                <property name="driver" value="com.mysql.jdbc.Driver"/>
                <property name="url" value="jdbc:mysql://localhost/jdbc"/>
                <property name="username" value="root"/>
                <property name="password" value="root"/>
            </dataSource>
        </environment>
    </environments>
    <mappers>
<!--        <mapper resource="mybatis/dao/StudentMapper.xml"/>-->
        <mapper class="mybatis.dao.StudentMapper"></mapper>
        <mapper class="mybatis.dao.ScoreMapper"></mapper>
    </mappers>
</configuration><?xml version="1.0" encoding="UTF-8" ?>
<!DOCTYPE mapper
PUBLIC "-//mybatis.org//DTD Mapper 3.0//EN"
"http://mybatis.org/dtd/mybatis-3-mapper.dtd">
<mapper namespace="mybatis.dao.StudentMapper">
<select id="selectUser" resultType="mybatis.bean.StudentBean">
select * from stu where id = #{id}
</select>
</mapper>package mybatis.bean;
import java.io.Serializable;
public class StudentBean implements Serializable {
private static final long serialVersionUID = 2193971369901198487L;
private int id;
private String name;
public int getId() {
return id;
}
public void setId(int id) {
this.id = id;
}
@Override
public String toString() {
return "selectUser{" +
"id=" + id +
"name=" + name +
''}'';
}
}package mybatis;
import mybatis.bean.ScoreBean;
import mybatis.bean.StudentBean;
import mybatis.dao.ScoreMapper;
import mybatis.dao.StudentMapper;
import org.apache.ibatis.io.Resources;
import org.apache.ibatis.session.SqlSession;
import org.apache.ibatis.session.SqlSessionFactory;
import org.apache.ibatis.session.SqlSessionFactoryBuilder;
import org.junit.Test;
import java.io.IOException;
import java.io.InputStream;
import java.util.List;
public class Test1 {
@Test
public void test() throws IOException {
String resource = "mybatis-config.xml";
InputStream inputStream = Resources.getResourceAsStream(resource);
SqlSessionFactory sqlSessionFactory = new SqlSessionFactoryBuilder().build(inputStream);
SqlSession session = sqlSessionFactory.openSession();
StudentMapper mapper = session.getMapper(StudentMapper.class);
StudentBean result = mapper.selectUser(1);
System.out.println(result);
}
}这样我们查询到我们的学生信息,但是还未包含我们的分数。我们来改造一下。
<?xml version="1.0" encoding="UTF-8" ?>
<!DOCTYPE mapper
        PUBLIC "-//mybatis.org//DTD Mapper 3.0//EN"
        "http://mybatis.org/dtd/mybatis-3-mapper.dtd">
<mapper namespace="mybatis.dao.StudentMapper">
    <resultMap id="studentMap" type="mybatis.bean.StudentBean">
        <id property="id" column="id"></id>
        <collection property="scoreBean" ofType="mybatis.bean.ScoreBean">
            <id property="id" column="sid"></id>
<!--            <result property="subject" column="subject"></result>-->
            <result property="score" column="score"></result>
            <result property="studentId" column="studentId"></result>
        </collection>

    </resultMap>

    <select id="selectUser" resultMap="studentMap">
        select t.id,t.name,t.address,t.num,s.id as sid,s.subject,s.score,s.studentId as studentId from student t left join score s on s.studentId = t.id where t.id = #{id}
    </select>
</mapper>
这样就可以查询到对应关系了。需要注意的事子表如果和主表重名,一定给子表起一个别名,而且子表的每一项需要写result,不然没有结果的,但是还不是很好,本来是一个对象一个集合,现在直接变成集合了,我们再来改改。
<?xml version="1.0" encoding="UTF-8" ?>
<!DOCTYPE mapper
        PUBLIC "-//mybatis.org//DTD Mapper 3.0//EN"
        "http://mybatis.org/dtd/mybatis-3-mapper.dtd">
<mapper namespace="mybatis.dao.StudentMapper">
    <resultMap id="studentMap" type="mybatis.bean.StudentBean">
        <id property="id" column="id"></id>
        <collection property="scoreBean" javaType="java.util.ArrayList" ofType="mybatis.bean.ScoreBean" select="mybatis.dao.ScoreMapper.selectScoreByStudentId" column="{studentId=id}">
        </collection>
    </resultMap>

    <select id="selectUser" resultMap="studentMap">
        select * from student t where t.id = #{id}
    </select>
</mapper>
这个比较好用,但是切记,不是懒加载,不是懒加载,需要注意的是collection的property指定我们实体类Bean类中集合的名字。ofType是指向我们一对多中多方的实体Bean,select指定我们对应的第二句sql语句,也就是我们的子查询语句。
column="{studentId=id}" 中studentId是我们的子查询参数名,id是和我们主表的对应关系。就是说,我们要子表的什么参数等于我们的主表的哪个参数传递过去。
接下来就是我们简单的一对一了(也可以当做一对多,但是没啥卵用的多对一,项目经理让从多往一查的时候,请你吐他。。。)我们来看我一下我的配置
<?xml version="1.0" encoding="UTF-8" ?>
<!DOCTYPE mapper
        PUBLIC "-//mybatis.org//DTD Mapper 3.0//EN"
        "http://mybatis.org/dtd/mybatis-3-mapper.dtd">
<mapper namespace="mybatis.dao.ScoreMapper">
    <resultMap id="scoreMap" type="mybatis.bean.ScoreBean">
        <id property="id" column="id"></id>
        <result property="subject" column="subject"></result>
        <result property="score" column="score"></result>

        <association property="studentBean" javaType="mybatis.bean.StudentBean" column="studentId">
            <id property="id" column="id"></id>
            <result property="name" column="name"></result>
            <result property="address" column="address"></result>
            <result property="num" column="num"></result>
        </association>
    </resultMap>

    <select id="selectScoreByStudentId" resultMap="scoreMap">
        select * from score s left join student t on s.studentId = t.id where studentId = #{studentId}
    </select>
</mapper>
这个比较简单,就不说了,就是写了一个resultMap。我们来看一下两条sql的怎么来进行。
<?xml version="1.0" encoding="UTF-8" ?>
<!DOCTYPE mapper
        PUBLIC "-//mybatis.org//DTD Mapper 3.0//EN"
        "http://mybatis.org/dtd/mybatis-3-mapper.dtd">
<mapper namespace="mybatis.dao.ScoreMapper">
    <resultMap id="scoreMap" type="mybatis.bean.ScoreBean">
        <id property="id" column="id"></id>
        <result property="subject" column="subject"></result>
        <result property="score" column="score"></result>

        <association property="studentBean" javaType="mybatis.bean.StudentBean" select="mybatis.dao.StudentMapper.selectUser" column="studentId">
            <id property="id" column="id"></id>
            <result property="name" column="name"></result>
            <result property="address" column="address"></result>
            <result property="num" column="num"></result>
        </association>
    </resultMap>

    <select id="selectScoreByStudentId" resultMap="scoreMap">
        select * from score where studentId = #{studentId}
    </select>
</mapper>
简单解释一下,其实和上面collection差不多的,select指定查询sql位置,column执行传递过去的参数。
其余的insert,update,delete都差不多,我这里就放在一起说了。
| id | 命名空间中的唯一标识符,可被用来代表这条语句。 |
| parameterType | 将要传入语句的参数的完全限定类名或别名。这个属性是可选的,因为 MyBatis 可以通过类型处理器推断出具体传入语句的参数,默认值为未设置(unset)。 |
| flushCache | 将其设置为 true 后,只要语句被调用,都会导致本地缓存和二级缓存被清空,默认值:true(对于 insert、update 和 delete 语句)。 |
| timeout | 这个设置是在抛出异常之前,驱动程序等待数据库返回请求结果的秒数。默认值为未设置(unset)(依赖驱动)。 |
| statementType | STATEMENT,PREPARED 或 CALLABLE 的一个。这会让 MyBatis 分别使用 Statement,PreparedStatement 或 CallableStatement,默认值:PREPARED。 |
| useGeneratedKeys | (仅对 insert 和 update 有用)这会令 MyBatis 使用 JDBC 的 getGeneratedKeys 方法来取出由数据库内部生成的主键(比如:像 MySQL 和 SQL Server 这样的关系数据库管理系统的自动递增字段),默认值:false。 |
| keyProperty | (仅对 insert 和 update 有用)唯一标记一个属性,MyBatis 会通过 getGeneratedKeys 的返回值或者通过 insert 语句的 selectKey 子元素设置它的键值,默认值:未设置(unset)。如果希望得到多个生成的列,也可以是逗号分隔的属性名称列表。 |
| keyColumn | (仅对 insert 和 update 有用)通过生成的键值设置表中的列名,这个设置仅在某些数据库(像 PostgreSQL)是必须的,当主键列不是表中的第一列的时候需要设置。如果希望使用多个生成的列,也可以设置为逗号分隔的属性名称列表。 |
| databaseId | 如果配置了数据库厂商标识(databaseIdProvider),MyBatis 会加载所有的不带 databaseId 或匹配当前 databaseId 的语句;如果带或者不带的语句都有,则不带的会被忽略。 |
useGeneratedKeys=”true”这个相当来说配置的还是比较多的,也就是我们新增成功后,我们的对象可以返回我们插入成功的主键ID。
拼装sql:
#{}:是预处理,也是一个占位符的方式来执行sql,${}是sql的拼接,我们其实可以这样来写。
  @Select("select * from ${}_sys_log where id=#{condition}")
    public SystemLog findSystemLog(String year,String condition);
也就是说,我们对日志sys_log表做了分库分表,按照年份来区分的表,这时我们可以采用sql拼接的方式来做。
但尽力不要用拼接的方式来做,后面我将动态sql会说具体怎么来实现。${}容易被sql注入。所以我们尽力还用占位符的方式来处理我们的SQL。
然后就是我们的插件集成,还有缓存,下次博客我们来说说缓存吧。
忘记了,学mybatis的使用,推荐一个网站https://mybatis.org/mybatis-3/zh/index.html 上面挺全的(没有源码解析,源码还得回来看我博客)。
最进弄了一个公众号,小菜技术,欢迎大家的加入

原文出处:https://www.cnblogs.com/cxiaocai/p/11520734.html

MyBatis 学习 之 一、MyBatis 简介与配置 MyBatis+Spring+MySql
一、MyBatis 简介与配置 MyBatis+Spring+MySql
MyBatis 学习 之 一、MyBatis 简介与配置 MyBatis+Spring+MySql
MyBatis 学习 之 二、SQL 语句映射文件 (1) resultMap
MyBatis 学习 之 二、SQL 语句映射文件 (2) 增删改查、参数、缓存
MyBatis 学习 之 三、动态 SQL 语句
MyBatis 学习 之 四、MyBatis 配置文件
1.1MyBatis 简介
MyBatis 是一个可以自定义 SQL、存储过程和高级映射的持久层框架。MyBatis 摒除了大部分的 JDBC 代码、手工设置参数和结果集重获。MyBatis 只使用简单的 XML 和注解来配置和映射基本数据类型、Map 接口和 POJO 到数据库记录。相对 Hibernate 和 Apache OJB 等 “一站式” ORM 解决方案而言,Mybatis 是一种 “半自动化” 的 ORM 实现。
需要使用的 Jar 包:mybatis-3.0.2.jar(mybatis 核心包)。mybatis-spring-1.0.0.jar (与 Spring 结合包)。
下载地址:
http://ibatis.apache.org/tools/ibator
http://code.google.com/p/mybatis/
1.2MyBatis+Spring+MySql 简单配置
1.2.1 搭建 Spring 环境
1, 建立 maven 的 web 项目;
2, 加入 Spring 框架、配置文件;
3, 在 pom.xml 中加入所需要的 jar 包(spring 框架的、mybatis、mybatis-spring、junit 等);
4, 更改 web.xml 和 spring 的配置文件;
5, 添加一个 jsp 页面和对应的 Controller;
6, 测试。
可参照:http://limingnihao.iteye.com/blog/830409。使用 Eclipse 的 Maven 构建 SpringMVC 项目
1.2.2 建立 MySql 数据库
建立一个学生选课管理数据库。
表:学生表、班级表、教师表、课程表、学生选课表。
逻辑关系:每个学生有一个班级;每个班级对应一个班主任教师;每个教师只能当一个班的班主任;
使用下面的 sql 进行建数据库,先建立学生表,插入数据(2 条以上)。
更多 sql 请下载项目源文件,在 resource/sql 中。
/* 建立数据库 */
CREATE DATABASE STUDENT_MANAGER;
USE STUDENT_MANAGER;

/***** 建立student表 *****/
CREATE TABLE STUDENT_TBL
(
   STUDENT_ID         VARCHAR(255) PRIMARY KEY,
   STUDENT_NAME       VARCHAR(10) NOT NULL,
   STUDENT_SEX        VARCHAR(10),
   STUDENT_BIRTHDAY   DATE,
   CLASS_ID           VARCHAR(255)
);

/*插入学生数据*/
INSERT INTO STUDENT_TBL (STUDENT_ID,
                         STUDENT_NAME,
                         STUDENT_SEX,
                         STUDENT_BIRTHDAY,
                         CLASS_ID)
  VALUES   (123456,
            ''某某某'',
            ''女'',
            ''1980-08-01'',
            121546
            )
创建连接 MySql 使用的配置文件 mysql.properties。
jdbc.driverClassName=com.mysql.jdbc.Driver
jdbc.url=jdbc:mysql://localhost:3306/student_manager?user=root&password=limingnihao&useUnicode=true&characterEncoding=UTF-8
1.2.3 搭建 MyBatis 环境
顺序随便,现在的顺序是因为可以尽量的少的修改写好的文件。
1.2.3.1 创建实体类: StudentEntity
public class StudentEntity implements Serializable {

	private static final long serialVersionUID = 3096154202413606831L;
	private ClassEntity classEntity;
	private Date studentBirthday;
	private String studentID;
	private String studentName;
	private String studentSex;

	public ClassEntity getClassEntity() {
		return classEntity;
	}

	public Date getStudentBirthday() {
		return studentBirthday;
	}

	public String getStudentID() {
		return studentID;
	}

	public String getStudentName() {
		return studentName;
	}

	public String getStudentSex() {
		return studentSex;
	}

	public void setClassEntity(ClassEntity classEntity) {
		this.classEntity = classEntity;
	}

	public void setStudentBirthday(Date studentBirthday) {
		this.studentBirthday = studentBirthday;
	}

	public void setStudentID(String studentID) {
		this.studentID = studentID;
	}

	public void setStudentName(String studentName) {
		this.studentName = studentName;
	}

	public void setStudentSex(String studentSex) {
		this.studentSex = studentSex;
	}
}
1.2.3.2 创建数据访问接口
Student 类对应的 dao 接口:StudentMapper。
public interface StudentMapper {

	public StudentEntity getStudent(String studentID);

	public StudentEntity getStudentAndClass(String studentID);

	public List<StudentEntity> getStudentAll();

	public void insertStudent(StudentEntity entity);

	public void deleteStudent(StudentEntity entity);

	public void updateStudent(StudentEntity entity);
}
1.2.3.3 创建 SQL 映射语句文件
Student 类的 sql 语句文件 StudentMapper.xml
resultMap 标签:表字段与属性的映射。
Select 标签:查询 sql。
<?xml version="1.0" encoding="UTF-8" ?>
<!DOCTYPE mapper PUBLIC "-//mybatis.org//DTD Mapper 3.0//EN" "http://mybatis.org/dtd/mybatis-3-mapper.dtd">
<mapper namespace="com.manager.data.StudentMapper">

	<resultMap type="StudentEntity" id="studentResultMap">
		<id property="studentID" column="STUDENT_ID"/>
		<result property="studentName" column="STUDENT_NAME"/>
		<result property="studentSex" column="STUDENT_SEX"/>
		<result property="studentBirthday" column="STUDENT_BIRTHDAY"/>
	</resultMap>

	<!-- 查询学生,根据id -->
	<select id="getStudent" parameterType="String" resultType="StudentEntity" resultMap="studentResultMap">
		<![CDATA[
			SELECT * from STUDENT_TBL ST
				WHERE ST.STUDENT_ID = #{studentID}
		]]>
	</select>

	<!-- 查询学生列表 -->
	<select id="getStudentAll"  resultType="com.manager.data.model.StudentEntity" resultMap="studentResultMap">
		<![CDATA[
			SELECT * from STUDENT_TBL
		]]>
	</select>

</mapper>
1.2.3.4 创建 MyBatis 的 mapper 配置文件
在 src/main/resource 中创建 MyBatis 配置文件:mybatis-config.xml。
typeAliases 标签:给类起一个别名。com.manager.data.model.StudentEntity 类,可以使用 StudentEntity 代替。
Mappers 标签:加载 MyBatis 中实体类的 SQL 映射语句文件。
<?xml version="1.0" encoding="UTF-8" ?>
<!DOCTYPE configuration PUBLIC "-//mybatis.org//DTD Config 3.0//EN" "http://mybatis.org/dtd/mybatis-3-config.dtd">
<configuration>
	<typeAliases>
		<typeAlias alias="StudentEntity" type="com.manager.data.model.StudentEntity"/>
	</typeAliases>
	<mappers>
		<mapper resource="com/manager/data/maps/StudentMapper.xml" />
	</mappers>
</configuration>
1.2.3.5 修改 Spring 的配置文件
主要是添加 SqlSession 的制作工厂类的 bean:SqlSessionFactoryBean,(在 mybatis.spring 包中)。需要指定配置文件位置和 dataSource。
和数据访问接口对应的实现 bean。通过 MapperFactoryBean 创建出来。需要执行接口类全称和 SqlSession 工厂 bean 的引用。
<!-- 导入属性配置文件 -->
<context:property-placeholder location="classpath:mysql.properties" />

<bean id="dataSource" class="org.springframework.jdbc.datasource.DriverManagerDataSource">
	<property name="driverClassName" value="${jdbc.driverClassName}" />
	<property name="url" value="${jdbc.url}" />
</bean>

<bean id="transactionManager" class="org.springframework.jdbc.datasource.DataSourceTransactionManager">
	<property name="dataSource" ref="dataSource" />
</bean>

<bean id="sqlSessionFactory" class="org.mybatis.spring.SqlSessionFactoryBean">
	<property name="configLocation" value="classpath:mybatis-config.xml" />
	<property name="dataSource" ref="dataSource" />
</bean>

<!— mapper bean -->
<bean id="studentMapper" class="org.mybatis.spring.MapperFactoryBean">
	<property name="mapperInterface" value="com.manager.data.StudentMapper" />
	<property name="sqlSessionFactory" ref="sqlSessionFactory" />
</bean>
也可以不定义 mapper 的 bean,使用注解:
将 StudentMapper 加入注解
@Repository
@Transactional
public interface StudentMapper {
}
对应的需要在 dispatcher-servlet.xml 中加入扫描:
<bean class="org.mybatis.spring.mapper.MapperScannerConfigurer">
        <property name="annotationClass" value="org.springframework.stereotype.Repository"/>
        <property name="basePackage" value="com.liming.manager"/>
        <property name="sqlSessionFactory" ref="sqlSessionFactory"/>
    </bean>
1.2.4 测试 StudentMapper
使用 SpringMVC 测试,创建一个 TestController,配置 tomcat,访问 index.do 页面进行测试:
@Controller
public class TestController {

	@Autowired
	private StudentMapper studentMapper;

	@RequestMapping(value = "index.do")
	public void indexPage() {
		StudentEntity entity = studentMapper.getStudent("10000013");
		System.out.println("name:" + entity.getStudentName());
	}
}
使用 Junit 测试:
使用Junit测试:
Java代码
@RunWith(value = SpringJUnit4ClassRunner.class)
@ContextConfiguration(value = "test-servlet.xml")
public class StudentMapperTest {

	@Autowired
	private ClassMapper classMapper;

	@Autowired
	private StudentMapper studentMapper;

	@Transactional
	public void getStudentTest(){
		StudentEntity entity = studentMapper.getStudent("10000013");
		System.out.println("" + entity.getStudentID() + entity.getStudentName());

		List<StudentEntity> studentList = studentMapper.getStudentAll();
		for( StudentEntity entityTemp : studentList){
			System.out.println(entityTemp.getStudentName());
		}

	}
}
关于Mybatis架构原理(一)和叙述一下mybatis的架构流程的介绍现已完结,谢谢您的耐心阅读,如果想了解更多关于2、MyBatis架构原理、java-mybaits-015-mybatis逆向工程最佳实践【基础mybatis-generator、tk.mybatis、mubatis-plus】、java架构之路-(mybatis源码)mybatis基本使用、MyBatis 学习 之 一、MyBatis 简介与配置 MyBatis+Spring+MySql的相关知识,请在本站寻找。
本文标签:


![[转帖]Ubuntu 安装 Wine方法(ubuntu如何安装wine)](https://www.gvkun.com/zb_users/cache/thumbs/4c83df0e2303284d68480d1b1378581d-180-120-1.jpg)

