本篇文章给大家谈谈centos6.6安装mysql-5.7.18,同时本文还将给你拓展Can''tconnecttolocalMySQLserverthroughsocket''/opt/lampp/
本篇文章给大家谈谈centos 6.6 安装 mysql-5.7.18,同时本文还将给你拓展Can''t connect to local MySQL server through socket ''/opt/lampp/var/mysql/mysql.sock'' (2)、Can''t connect to local MySQL server through socket ''/var/lib/mysql/mysql.sock''、CentOS 6.2 安装 MySQL 5.7.28的教程(mysql 笔记)、centos 7 yum 安装 mysql glib 安装 mysql等相关知识,希望对各位有所帮助,不要忘了收藏本站喔。
本文目录一览:- centos 6.6 安装 mysql-5.7.18
- Can''t connect to local MySQL server through socket ''/opt/lampp/var/mysql/mysql.sock'' (2)
- Can''t connect to local MySQL server through socket ''/var/lib/mysql/mysql.sock''
- CentOS 6.2 安装 MySQL 5.7.28的教程(mysql 笔记)
- centos 7 yum 安装 mysql glib 安装 mysql

centos 6.6 安装 mysql-5.7.18
tarxvfMysqL-5.7.18-linux-glibc2.5-x86_64.tar.gz-C/usr/local/
cd/usr/local/
mvMysqL-5.7.18-linux-glibc2.5-x86_64/MysqL
groupadd-u800MysqL
groupadd-g800MysqL
useradd-u800-gMysqLMysqL
mkdirMysqL/data
chown-RMysqL.MysqLMysqL
cdMysqL
bin/MysqLd--initialize--user=MysqL--basedir=/usr/local/MysqL--datadir=/usr/local/MysqL/data
bin/MysqL_ssl_rsa_setup--datadir=/usr/local/MysqL/data
cpMysqL.server/etc/init.d/MysqLd
vim/etc/my.cnf
[MysqLd]
user=MysqL
port=3306
server_id=1
socket=/tmp/MysqL.sock
basedir=/usr/local/MysqL
datadir=/usr/local/MysqL/data
#disablingsymbolic-linksisrecommendedtopreventassortedsecurityrisks
symbolic-links=0
[MysqLd_safe]
log-error=/var/log/MysqLd.log
pid-file=/var/run/MysqLd/MysqLd.pid
vim/etc/profile.d/MysqL.sh
exportPATH=$PATH:/usr/local/MysqL/bin
./etc/profile.d/MysqL.sh
chkconfigMysqLdon
serviceMysqLdstart
")
Can''t connect to local MySQL server through socket ''/opt/lampp/var/mysql/mysql.sock'' (2)
ERROR 2002 (HY000): Can''t connect to local MySQL server through socket ''/opt/lampp/var/mysql/mysql.sock'' (2)
原因:系统盘满了
[root@localhost opt]# df -h
Filesystem Size Used Avail Use% Mounted on
/dev/mapper/VolGroup-lv_root
18G 17G 0 100% /
tmpfs 504M 0 504M 0% /dev/shm
/dev/sda1 477M 80M 372M 18% /boot
[root@localhost opt]#
解决:
删除大文件后,重启系统解决
[root@localhost mysql]# /opt/lampp/lampp status
Version: XAMPP for Linux 1.8.3-3
Apache is not running.
MySQL is not running.
ProFTPD is running.
df: 未处理文件系统
[root@localhost opt]# df -h
Filesystem Size Used Avail Use% Mounted on
/dev/mapper/VolGroup-lv_root
18G 17G 0 100% /
tmpfs 504M 0 504M 0% /dev/shm
/dev/sda1 477M 80M 372M 18% /boot
[root@localhost opt]#
[root@localhost ~]# /opt/lampp/lampp status
Version: XAMPP for Linux 1.8.3-3
Apache is not running.
MySQL is running.
ProFTPD is running.
转
xampp 无法启动mysql 找不到mysql.sock
(2016-02-24 23:21:24)| 分类: 技术 |
如果xampp中的mysql启动不了,出现ERROR 2002 (HY000): Can''t connect to local MySQL server through socket ''/opt/lampp/var/mysql/mysql.sock'' (2)报错,
停止xampp的时候报:
-bash-4.1# /opt/lampp/lampp stop
Stopping XAMPP for Linux 1.8.2-6...
XAMPP: Stopping Apache...ok.
XAMPP: Stopping MySQL...ok.
XAMPP: Stopping ProFTPD...kill: usage: kill [-s sigspec | -n signum | -sigspec] pid | jobspec ... or kill -l [sigspec]
fail.
解决办法:
如果网上一些方法不好用的话,可以试试以下方法:
1. 确定系统盘是否满了
#df -h
2. 删除/opt/lampp目录中的pid文件(删掉后xampp重启时会重建,如果不放心,可以先备份lampp目录)
删除mysql相关缓存:
#rm -rf /opt/lampp/var/mysql/VM_*
删除proftp相关缓存:
#rm -rf /opt/lampp/var/proftpd.pid
如果找不到pid文件,可以搜一下:
#find /opt/lampp -name ''*.pid''

Can''t connect to local MySQL server through socket ''/var/lib/mysql/mysql.sock''
MySQL已经被我移到数据盘了,本地连接数据库会报错:Can''t connect to local MySQL server through socket ''/var/lib/mysql/mysql.sock''
但是远程是可以连接的,my.cnf设置mysql的根目录也改成了数据盘的地址,还要在加上client的参数,设置如下:
[client]
socket = /home/data/mysql/mysql.sock
之后重启下mysql就可以了
")
CentOS 6.2 安装 MySQL 5.7.28的教程(mysql 笔记)
1.环境准备
1.MySQL 安装路径:/usr/local
2.CentOS 6.2 服务器(64 bit)
3.MySQL 5.7.28 下载(64bit)
wget https://cdn.mysql.com//Downloads/MySQL-5.7/mysql-5.7.28-linux-glibc2.12-x86_64.tar.gz
2.MySQL安装
2.1 解压缩,并重命名为 mysql


2.2 在 mysql 目录下,创建 data 目录

2.3 创建 mysql 的用户组和用户,并对mysql目录设置用户组和用户

2.4 初始化 mysql

2.5 启动 mysql 服务

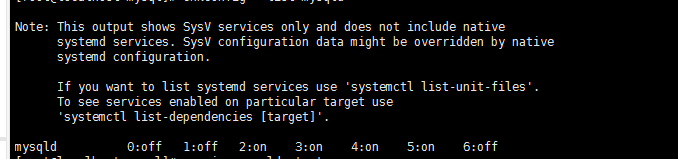
2.6 设置 mysql 服务开机自启动

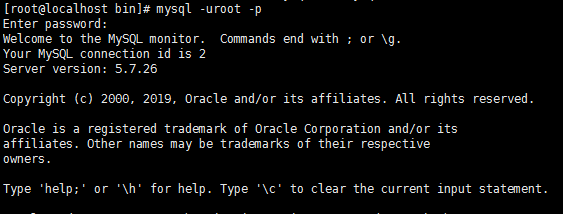
3.MySQL连接

4.修改密码
将生成的随机密码,修改为 root

5. 设定远程登录mysql(本例通过 Navicate 远程连接 MySQL)
在Linux下为了安全,默认是不允许 mysql 本机以外的机器访问 mysql 数据库服务,因此需要重新授权root,方便远程访问。

如果此时 Navicate 远程还是无法连接 MySQL,请注意防火墙问题。线上环境一般建议关闭指定端口,不建议关闭防火墙。如何开放指定端口,请参考: Linux开放指定端口
本实例使用 MySQL 默认端口 3306 来演示。通过命令 vi /etc/sysconfig/iptables 来开放端口


6. Navicate 远程登录 MySQL

测试远程登录 MySQL,连接成功。
出现如下问题,请参考:
1.ERROR 1862 (HY000): Your password has expired. To log in you must change it using a client that supports expired passwords
请参考链接:https://www.jb51.net/article/174243.htm
2. ERROR 2002 (HY000): Can''t connect to local MySQL server through socket ''/tmp/mysql.sock''
请参考链接:https://www.jb51.net/article/174244.htm
3.错误信息为:mysqld: unrecognized service
出现错误情况:使用二进制源码安装 MySQL,导致无法使用 service mysqld start 启动 MySQL服务
请参考链接:https://www.jb51.net/article/174244.htm
总结
以上所述是小编给大家介绍的CentOS 6.2 安装 MySQL 5.7.28的教程,希望对大家有所帮助,如果大家有任何疑问请给我留言,小编会及时回复大家的。在此也非常感谢大家对网站的支持!
如果你觉得本文对你有帮助,欢迎转载,烦请注明出处,谢谢!
- MySQL 5.7.30 安装与升级问题详细教程
- CentOS7 通过YUM安装MySQL5.7的步骤详解
- Windows下mysql-5.7.28下载、安装、配置教程图文详解
- mysql 5.7.27 安装配置方法图文教程
- MySQL5.7.27-winx64版本win10下载安装教程图解
- CentOS7 64位下MySQL5.7安装与配置教程
- MySQL5.7.33安装过程图文详解

centos 7 yum 安装 mysql glib 安装 mysql
centos 7 YUM 在线安装版
1.wget http://repo.mysql.com/mysql57-community-release-el7-10.noarch.rpm 下载
2.rpm -Uvh mysql57-community-release-el7-10.noarch.rpm 安装rpm源
3.yum install -y mysql-community-server 取决于网速
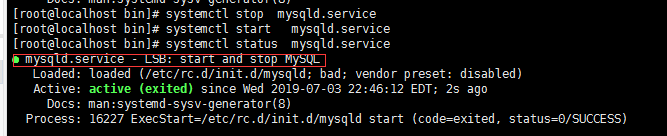
4.systemctl start mysqld.service / service mysqld start 启动mysql
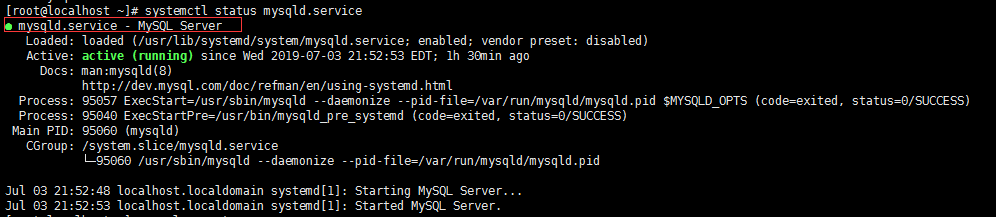
5.service mysqld status 查看启动状态
6.
7.grep ''temporary password'' /var/log/mysqld.log 查看mysql临时密码
8.mysql -uroot -p 登录mysql
9.ALTER USER ''root''@''localhost'' IDENTIFIED BY ''root'';
修改密码-> 提示: ERROR 1819 (HY000): Your password does not satisfy the current policy requirements
10. set global validate_password_policy=0;
11. set global validate_password_length=1; 重复9步骤--->修改密码
12.GRANT ALL PRIVILEGES ON *.* TO ''root''@''%'' IDENTIFIED BY ''yourpassword'' WITH GRANT OPTION; 开放远程登录
FLUSH PRIVILEGES; 刷新配置
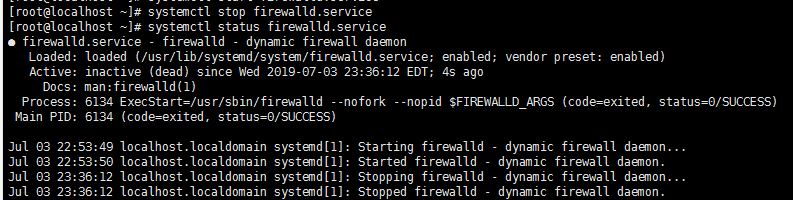
13.关闭防火墙
查看防火墙 systemctl status firewalld.service / service iptables status status/start/restart/stop --option

14.修改配置文件
vi /etc/my.cnf 编辑my.cnf / 没有手动创建文件
正确配置
# For advice on how to change settings please see
# http://dev.mysql.com/doc/refman/5.7/en/server-configuration-defaults.html
[mysqld]
character_set_server=utf8
#[client]
#default-character-set=utf8
#
# Remove leading # and set to the amount of RAM for the most important data
# cache in MySQL. Start at 70% of total RAM for dedicated server, else 10%.
# innodb_buffer_pool_size = 128M
#
# Remove leading # to turn on a very important data integrity option: logging
# changes to the binary log between backups.
# log_bin
#
# Remove leading # to set options mainly useful for reporting servers.
# The server defaults are faster for transactions and fast SELECTs.
# Adjust sizes as needed, experiment to find the optimal values.
# join_buffer_size = 128M
# sort_buffer_size = 2M
# read_rnd_buffer_size = 2M
datadir=/var/lib/mysql
socket=/var/lib/mysql/mysql.sock
# Disabling symbolic-links is recommended to prevent assorted security risks
symbolic-links=0
log-error=/var/log/mysqld.log
pid-file=/var/run/mysqld/mysqld.pid
15.systemctl status mysqld.service 查看mysql 状态 status/start/stop/restart -- option
Centos glib版安装
1.tar -zvxf mysql-5.7.26-linux-glibc2.12-x86_64.tar.gz 解压
2.mv mysql-5.7.26-linux-glibc2.12-x86_64/* /usr/local/mysql 移动文件
3.groupadd user 添加用户
4.useradd -r -g mysql mysql 添加用户组
5.rpm -qa | grep libaio 检查libaio
6.yum -y install libaio 安装libaio
7.vi /etc/my.cnf 编辑my.cnf / 没有手动创建文件
[mysql]
# 设置mysql客户端默认字符集
default-character-set=utf8
socket=/var/lib/mysql/mysql.sock
[mysqld]
#skip-name-resolve
#设置3306端口
port = 3306
socket=/var/lib/mysql/mysql.sock
# 设置mysql的安装目录
basedir=/usr/local/mysql
# 设置mysql数据库的数据的存放目录
datadir=/usr/local/mysql/data
# 允许最大连接数
max_connections=200
# 服务端使用的字符集默认为8比特编码的latin1字符集
character-set-server=utf8
# 创建新表时将使用的默认存储引擎
#default-storage-engine=MyIsam
default-storage-engine=INNODB
#lower_case_table_name=1
max_allowed_packet=16M
8.mkdir data 创建目录
9.[root@localhost mysql]# chown -R mysql:mysql ./ 授权目录拥有者
10.[root@localhost mysql]# ./bin/mysqld --initialize --user=mysql --basedir=/usr/local/mysql/ --datadir=/usr/local/mysql/data/ 初始化
11.成功图示

12.[root@localhost mysql]# cp ./support-files/mysql.server /etc/rc.d/init.d/mysqld
13.增加 mysqld 服务控制脚本执行权限:[root@localhost mysql]# chmod +x /etc/rc.d/init.d/mysqld
14.将 mysqld 服务加入到系统服务:[root@localhost mysql]# chkconfig --add mysqld
15.检查mysqld服务是否已经生效:[root@localhost mysql]# chkconfig --list mysqld
16.[root@localhost mysql]# service mysqld start 启动mysql 提示 err目录 pid不存在
Starting MySQL.Logging to ''/usr/local/mysql/data/localhost.localdomain.err''.
2019-07-04T02:40:27.646818Z mysqld_safe Directory ''/var/lib/mysql'' for UNIX socket file don''t exists.
ERROR! The server quit without updating PID file (/usr/local/mysql/data/localhost.localdomain.pid).
17.[root@localhost mysql]# mkdir /var/lib/mysql
[root@localhost mysql]# chown -R mysql /var/lib/mysql
18.再次启动

19.登录 提示command

20.进行软链接
ln -s /usr/local/mysql/bin/mysql /usr/bin
21.
22.先进行密码设置 ,
SET PASSWORD = PASSWORD(''123456''); 设置初始密码。 不然操作不了数据库
23.提示 You must reset your password using ALTER USER statement before executing this statement.
24
25.use mysql 切到系统库
26.mysql> grant all privileges on *.* to root@"%" identified by "123456" with grant option; 授权远程登录
Query OK, 0 rows affected, 1 warning (0.00 sec)
27.mysql> flush privileges; 刷新
Query OK, 0 rows affected (0.00 sec)
28. systemctl status mysqld.service mysql 状态
29.systemctl status firewalld.service 关闭防火墙
30.
完毕。整理OK。亲测可用。注意以上安装都没有配置环境变量。虚拟学习而已
补充:
今天关于centos 6.6 安装 mysql-5.7.18的分享就到这里,希望大家有所收获,若想了解更多关于Can''t connect to local MySQL server through socket ''/opt/lampp/var/mysql/mysql.sock'' (2)、Can''t connect to local MySQL server through socket ''/var/lib/mysql/mysql.sock''、CentOS 6.2 安装 MySQL 5.7.28的教程(mysql 笔记)、centos 7 yum 安装 mysql glib 安装 mysql等相关知识,可以在本站进行查询。
本文标签:


