如果您想了解Docker安装Mysql和Nginx和docker中安装mysql的知识,那么本篇文章将是您的不二之选。我们将深入剖析Docker安装Mysql和Nginx的各个方面,并为您解答dock
如果您想了解Docker 安装 Mysql 和 Nginx和docker中安装mysql的知识,那么本篇文章将是您的不二之选。我们将深入剖析Docker 安装 Mysql 和 Nginx的各个方面,并为您解答docker中安装mysql的疑在这篇文章中,我们将为您介绍Docker 安装 Mysql 和 Nginx的相关知识,同时也会详细的解释docker中安装mysql的运用方法,并给出实际的案例分析,希望能帮助到您!
本文目录一览:- Docker 安装 Mysql 和 Nginx(docker中安装mysql)
- 12.13 Nginx 防盗链 12.14 Nginx 访问控制 12.15 Nginx 解析 php 相关配置 12.16 Nginx 代理
- 6 月 11 日任务 Nginx 防盗链、Nginx 访问控制、Nginx 解析 php 相关配置、Nginx 代理
- Docker in Docker(实际上是 Docker outside Docker): /var/run/docker.sock
- docker vs docker-compose nginx:在/etc/nginx/nginx.conf的上游“ httpstat.us”中找不到[emerg]主机:21
")
Docker 安装 Mysql 和 Nginx(docker中安装mysql)
1. 序言
将应用容器化更方便于管理,昨天辛辛苦苦安装在宿主机上的,今天狠心重置服务器,学下 docker 练练手。
2. Get start
2.1 安装 Docker
公司的云用的是 ubuntu,我自己的用的是 centos,不过都差不多,在 Runnoob 上有详细的教程,可以在这里查看。
2.2 安装 mysql
在 / 目录下执行 mkdir -p /mysql/{conf.d,mysql} 可以根据喜好改名,主要是挂载一些配置文件。 执行以下命令:
docker run --name mysql \
    --restart=always \
    -p 3306:3306 \
    -v /mysql/conf.d:/etc/mysql/conf.d \
    -v /mysql/mysql:/var/lib/mysql \
    -e MYSQL_ROOT_PASSWORD=<你的root密码> \
    mysql
如果你的镜像库中没有 mysql,docker 会自动下载,注意,默认下载最新版本,可以通过加 -d mysql : <版本号> 的方式,或者提前 pull 指定版本的数据库安装。
我直接安装了最新的版本,目前是 8.0.18,但是有个问题,新版本数据库需要设置 native password 才可以远程登录。
接下来进入数据库,开一个用户,设置上面说到的东西吧。
docker exec -it mysql bash

mysql -p

--输入密码

create user ''<想要的用户名>''@''%'' identified by ''<密码>'';

grant all on *.* to ''<上面那个用户名>''@''%'';

flush privileges;

alter user ''<上面那个用户名>''@''%'' identified by ''<密码>'' password expire never;

alter user ''<上面那个用户名>''@''%'' identified with mysql_native_password by ''<密码>'';

flush privileges;
之后就可以用 navicat 等工具在远程登录了。
2.3 安装 Nginx
安装 mysql 并没有耗我太多时间,但是 nginx 的坑可真多啊。
首先我在根目录下创建一个文件夹,用于挂在配置文件。
mkdir -p /nginx/{conf,conf.d,log,dist}
conf: 用于放主配置文件
conf.d: 用于放一些主配置文件下拆出来的东西
log: 放 logs
dist: 其实一般叫做 html 比较好,用于存放打包的文件,叫 dist 可以直接拉过来不用改名了
然后在 conf 里写一个 nginx.conf
touch nginx.conf

vim nignx.conf
写入:
user  nginx;
worker_processes  1;

error_log  /var/log/nginx/error.log warn;
pid        /var/run/nginx.pid;


events {
    worker_connections  1024;
}


http {
    include       /etc/nginx/mime.types;
    default_type  application/octet-stream;

    log_format  main  ''$remote_addr - $remote_user [$time_local] "$request" ''
                      ''$status $body_bytes_sent "$http_referer" ''
                      ''"$http_user_agent" "$http_x_forwarded_for"'';

    access_log  /var/log/nginx/access.log  main;

    sendfile        on;
    #tcp_nopush     on;

    keepalive_timeout  65;

    #gzip  on;

    include /etc/nginx/conf.d/*.conf;
}
在 conf.d 中添加一个随便叫什么都可以的.conf
touch default.conf

vim default.conf
写入:
server {
    listen       80;
    server_name  localhost;

    #charset koi8-r;
    #access_log  /var/log/nginx/host.access.log  main;

    location / {
        root   /usr/share/nginx/html;
        index  index.html index.htm;
    }

    #error_page  404              /404.html;

    # redirect server error pages to the static page /50x.html
    #
    error_page   500 502 503 504  /50x.html;
    location = /50x.html {
        root   /usr/share/nginx/html;
        try_files $uri $uri/ /index.html;
    }

    # proxy the PHP scripts to Apache listening on 127.0.0.1:80
    #
    #location ~ \.php$ {
    #    proxy_pass   http://127.0.0.1;
    #}

    # pass the PHP scripts to FastCGI server listening on 127.0.0.1:9000
    #
    #location ~ \.php$ {
    #    root           html;
    #    fastcgi_pass   127.0.0.1:9000;
    #    fastcgi_index  index.php;
    #    fastcgi_param  SCRIPT_FILENAME  /scripts$fastcgi_script_name;
    #    include        fastcgi_params;
    #}

    # deny access to .htaccess files, if Apache''s document root
    # concurs with nginx''s one
    #
    #location ~ /\.ht {
    #    deny  all;
    #}
}
写完了之后就好了,创建 nginx 容器。
docker run --name nginx -d -p 80:80 \
-v /nginx/log:/var/log/nginx \
-v /nginx/conf.d:/etc/nginx/conf.d \
-v /nginx/conf/nginx.conf:/etc/nginx/nginx.conf \
-v /nginx/dist:/usr/share/nginx/html nginx
分别把配置文件和静态文件目录挂载。
这里直接映射到了 80 端口,如果有冲突的话,可以改成别的。
做到这里如果一切正常,那么应该成功了。
- 编辑,当需要在一个 nginx 中暴露多个端口部署多个站点时,可以 - p -p 一直开下去
docker run --name nginx -d -p 80:80 -p 443:443 \
-v /nginx/cert:/cert \
-v /nginx/log:/var/log/nginx \
-v /nginx/conf.d:/etc/nginx/conf.d \
-v /nginx/conf/nginx.conf:/etc/nginx/nginx.conf \
-v /nginx/dep:/usr/share/nginx/html nginx
坑点
- 不知道配置文件的格式,虽然和昨天的配置差不多,但是还是希望看到新的配置文件, 解决方案:
- 先安装一个不设置挂载的 nginx 容器
- 使用 docker cp 把这两个文件 copy 到宿主机上
如果你的网速够快,可以 apt-get update apt-get install vim-tiny, 然后 vi 打开配置文件直接复制出来(并不推荐,但是我是这么做的)
- 刷新 404
这好像是 Vue 项目的问题,其他不知道会不会有这种问题,因为每次刷新相当于请求那个 url 的文件,肯定是不存在的,也不可能拦截所有 /~,解决方案也很优雅,添加 try_files $uri $uri//index.html; 就可以了。(上面已加)
- 还有遇到问题的话,一定要看一下 docker log。我所有都配置完成后,发现启动 nginx 闪退,也没有报错,看了 log 才知道它报了不识别 erver。。。才发现少写了个 s,坑啊。大家复制一定要仔细,不要漏东西。

12.13 Nginx 防盗链 12.14 Nginx 访问控制 12.15 Nginx 解析 php 相关配置 12.16 Nginx 代理
12.13 Nginx 防盗链
因为该配置也使用 location 板块,所以本节可结合日志管理(不记录和过期时间)一起配置:
[root@cham002 ~]# vim /usr/local/nginx/conf/vhost/test.com.conf
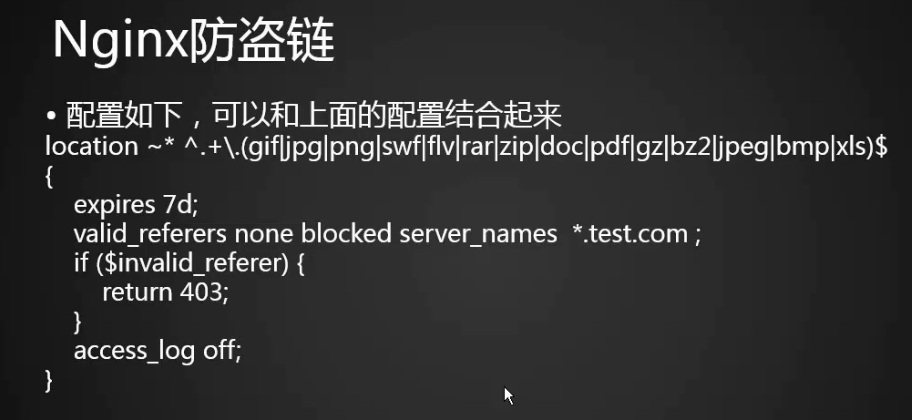
location ~* ^.+\.(gif|jpg|png|swf|flv|rar|zip|doc|pdf|gz|bz2|jpeg|bmp|xls)$
{
expires 7d;
valid_referers none blocked server_names *.test.com ;
#定义referer白名单
if ($invalid_referer) {
return 403;
#if函数的意思是:如果不是白名单内的域名,返回值:403
}
access_log off;
}
说明: “location ~* ^.+” 在此 0“ * ” 的作用是后面匹配的内容不区分大小写。
检测及测试
[root@cham002 ~]# /usr/local/nginx/sbin/nginx -t
nginx: the configuration file /usr/local/nginx/conf/nginx.conf syntax is ok
nginx: configuration file /usr/local/nginx/conf/nginx.conf test is successful
[root@cham002 ~]# /usr/local/nginx/sbin/nginx -s reload
[root@cham002 ~]# ls /data/wwwroot/test.com/
1.gif  2.js  admin  index.html
[root@cham002 ~]# curl -e "http://www.baidu.com/1.txt" -x127.0.0.1:80 -I test.com/1.gif
HTTP/1.1 403 Forbidden
Server: nginx/1.12.1
Date: Wed, 03 Jan 2018 13:54:39 GMT
Content-Type: text/html
Content-Length: 169
Connection: keep-alive

[root@cham002 ~]# curl -e "http://www.test.com/1.txt" -x127.0.0.1:80 -I test.com/1.gif
HTTP/1.1 200 OK
Server: nginx/1.12.1
Date: Wed, 03 Jan 2018 13:55:14 GMT
Content-Type: image/gif
Content-Length: 32
Last-Modified: Wed, 03 Jan 2018 13:34:18 GMT
Connection: keep-alive
ETag: "5a4cdbda-20"
Expires: Wed, 10 Jan 2018 13:55:14 GMT
Cache-Control: max-age=604800
Accept-Ranges: bytes
即,使用非白名单内的 referer 进行访问,被拒绝!!!
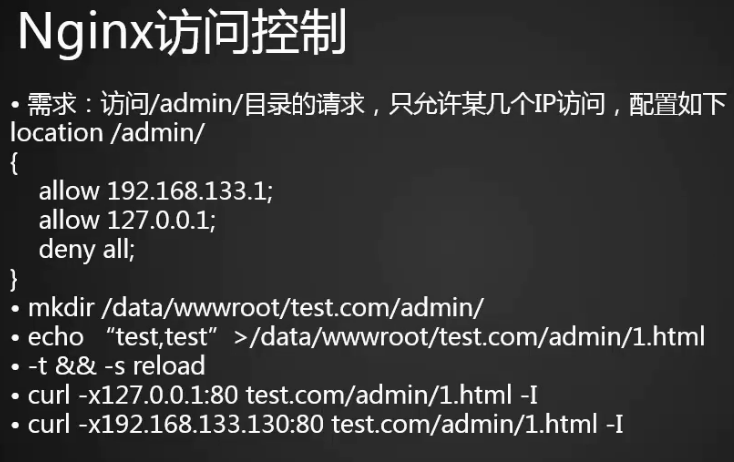
12.14 Nginx 访问控制
需求:访问 /admin/ 目录的请求,只允许几个指定 IP 通过,配置如下:
[root@cham002 ~]# vim /usr/local/nginx/conf/vhost/test.com.conf
server
{
listen 80;
server_name test.com test2.com test3.com;
index index.html index.htm index.php;
root /data/wwwroot/test.com;
if ($host != ''test.com'' ) {
rewrite ^/(.*)$ http://test.com/$1 permanent;
}
# location ~ .*\.(gif|jpg|jpeg|png|bmp|swf)$
# {
# expires 7d;
# access_log off;
# }
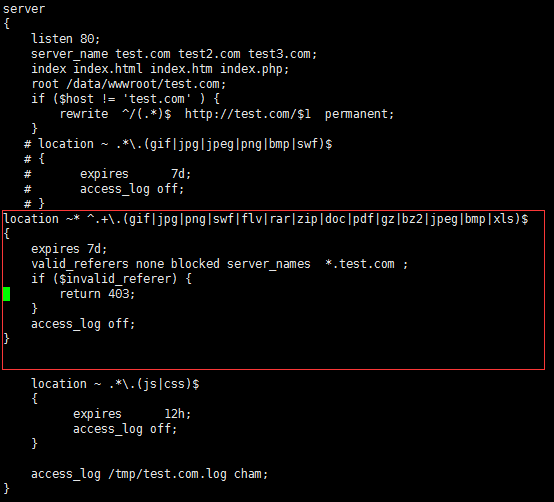
location ~* ^.+\.(gif|jpg|png|swf|flv|rar|zip|doc|pdf|gz|bz2|jpeg|bmp|xls)$
{
expires 7d;
valid_referers none blocked server_names *.test.com ;
if ($invalid_referer) {
return 403;
}
access_log off;
}
location ~ .*\.(js|css)$
{
expires 12h;
access_log off;
}
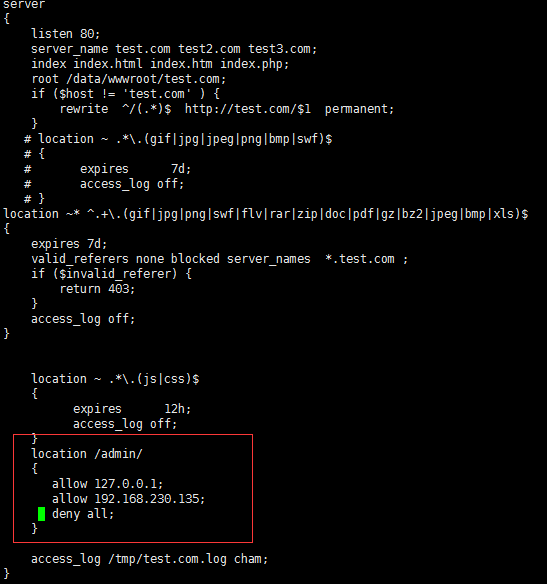
location /admin/
{
allow 127.0.0.1;
allow 192.168.230.135;
deny all;
#设置IP白名单
}
access_log /tmp/test.com.log cham;
}
[root@cham002 ~]# /usr/local/nginx/sbin/nginx -t
nginx: the configuration file /usr/local/nginx/conf/nginx.conf syntax is ok
nginx: configuration file /usr/local/nginx/conf/nginx.conf test is successful
[root@cham002 ~]# /usr/local/nginx/sbin/nginx -s reload
测试 (针对目录的)
[root@cham002 ~]# curl -e "http://www.baidu.com/1.txt" -x127.0.0.1:80 -I test.com/admin/
HTTP/1.1 200 OK
Server: nginx/1.12.1
Date: Thu, 04 Jan 2018 07:59:16 GMT
Content-Type: text/html
Content-Length: 20
Last-Modified: Wed, 03 Jan 2018 08:50:53 GMT
Connection: keep-alive
ETag: "5a4c996d-14"
Accept-Ranges: bytes

[root@cham002 ~]# curl -x192.168.230.150:80 -I test.com/admin/
HTTP/1.1 200 OK
Server: nginx/1.12.1
Date: Thu, 04 Jan 2018 08:01:00 GMT
Content-Type: text/html
Content-Length: 20
Last-Modified: Wed, 03 Jan 2018 08:50:53 GMT
Connection: keep-alive
ETag: "5a4c996d-14"
Accept-Ranges: bytes

[root@cham002 ~]# curl -x192.168.230.135:80 -I test.com/admin/
HTTP/1.1 200 OK
Server: nginx/1.12.1
Date: Thu, 04 Jan 2018 08:01:14 GMT
Content-Type: text/html
Content-Length: 20
Last-Modified: Wed, 03 Jan 2018 08:50:53 GMT
Connection: keep-alive
ETag: "5a4c996d-14"
Accept-Ranges: bytes

[root@cham002 ~]# cat /tmp/test.com.log
127.0.0.1 - [03/Jan/2018:21:35:36 +0800] test.com "/index.html" 200 "-" "curl/7.29.0"
127.0.0.1 - [04/Jan/2018:15:59:16 +0800] test.com "/admin/" 200 "http://www.baidu.com/1.txt" "curl/7.29.0"
192.168.230.135 - [04/Jan/2018:16:01:00 +0800] test.com "/admin/" 200 "-" "curl/7.29.0"
192.168.230.135 - [04/Jan/2018:16:01:14 +0800] test.com "/admin/" 200 "-" "curl/7.29.0"
[root@cham002 ~]# curl -x192.168.230.150:80 -I test.com/admin/
HTTP/1.1 200 OK
Server: nginx/1.12.1
Date: Thu, 04 Jan 2018 08:01:37 GMT
Content-Type: text/html
Content-Length: 20
Last-Modified: Wed, 03 Jan 2018 08:50:53 GMT
Connection: keep-alive
ETag: "5a4c996d-14"
Accept-Ranges: bytes

[root@cham002 ~]# cat /tmp/test.com.log
127.0.0.1 - [03/Jan/2018:21:35:36 +0800] test.com "/index.html" 200 "-" "curl/7.29.0"
127.0.0.1 - [04/Jan/2018:15:59:16 +0800] test.com "/admin/" 200 "http://www.baidu.com/1.txt" "curl/7.29.0"
192.168.230.135 - [04/Jan/2018:16:01:00 +0800] test.com "/admin/" 200 "-" "curl/7.29.0"
192.168.230.135 - [04/Jan/2018:16:01:14 +0800] test.com "/admin/" 200 "-" "curl/7.29.0"
192.168.230.135 - [04/Jan/2018:16:01:37 +0800] test.com "/admin/" 200 "-" "curl/7.29.0"

[root@cham002 ~]# ifconfig
ens33: flags=4163<UP,BROADCAST,RUNNING,MULTICAST>  mtu 1500
        inet 192.168.230.135  netmask 255.255.255.0  broadcast 192.168.230.255
        inet6 fe80::6f15:52d3:ebeb:e193  prefixlen 64  scopeid 0x20<link>
        ether 00:0c:29:b6:9f:e3  txqueuelen 1000  (Ethernet)
        RX packets 96831  bytes 41894507 (39.9 MiB)
        RX errors 0  dropped 0  overruns 0  frame 0
        TX packets 60974  bytes 20136998 (19.2 MiB)
        TX errors 0  dropped 0 overruns 0  carrier 0  collisions 0

ens33:0: flags=4163<UP,BROADCAST,RUNNING,MULTICAST>  mtu 1500
        inet 192.168.230.150  netmask 255.255.255.0  broadcast 192.168.230.255
        ether 00:0c:29:b6:9f:e3  txqueuelen 1000  (Ethernet)

ens37: flags=4163<UP,BROADCAST,RUNNING,MULTICAST>  mtu 1500
        inet 192.168.100.1  netmask 255.255.255.0  broadcast 192.168.100.255
        inet6 fe80::1801:cbbb:ebcc:89a3  prefixlen 64  scopeid 0x20<link>
        ether 00:0c:29:b6:9f:ed  txqueuelen 1000  (Ethernet)
        RX packets 3  bytes 746 (746.0 B)
        RX errors 0  dropped 0  overruns 0  frame 0
        TX packets 81  bytes 6462 (6.3 KiB)
        TX errors 0  dropped 0 overruns 0  carrier 0  collisions 0

lo: flags=73<UP,LOOPBACK,RUNNING>  mtu 65536
        inet 127.0.0.1  netmask 255.0.0.0
        inet6 ::1  prefixlen 128  scopeid 0x10<host>
        loop  txqueuelen 1  (Local Loopback)
        RX packets 1363  bytes 1359483 (1.2 MiB)
        RX errors 0  dropped 0  overruns 0  frame 0
        TX packets 1363  bytes 1359483 (1.2 MiB)
        TX errors 0  dropped 0 overruns 0  carrier 0  collisions 0

[root@cham002 ~]# curl -x192.168.100.1:80 test.com/admin/
<html>
<head><title>403 Forbidden</title></head>
<body bgcolor="white">
<center><h1>403 Forbidden</h1></center>
<hr><center>nginx/1.12.1</center>
</body>
</html>

[root@cham002 ~]# cat /tmp/test.com.log
127.0.0.1 - [03/Jan/2018:21:35:36 +0800] test.com "/index.html" 200 "-" "curl/7.29.0"
127.0.0.1 - [04/Jan/2018:15:59:16 +0800] test.com "/admin/" 200 "http://www.baidu.com/1.txt" "curl/7.29.0"
192.168.230.135 - [04/Jan/2018:16:01:00 +0800] test.com "/admin/" 200 "-" "curl/7.29.0"
192.168.230.135 - [04/Jan/2018:16:01:14 +0800] test.com "/admin/" 200 "-" "curl/7.29.0"
192.168.230.135 - [04/Jan/2018:16:01:37 +0800] test.com "/admin/" 200 "-" "curl/7.29.0"
192.168.100.1 - [04/Jan/2018:16:05:14 +0800] test.com "/admin/" 403 "-" "curl/7.29.0
访问控制(针对正则匹配)
[root@cham002 ~]# vim /usr/local/nginx/conf/vhost/test.com.conf
server
{
listen 80;
server_name test.com test2.com test3.com;
index index.html index.htm index.php;
root /data/wwwroot/test.com;
if ($host != ''test.com'' ) {
rewrite ^/(.*)$ http://test.com/$1 permanent;
}
# location ~ .*\.(gif|jpg|jpeg|png|bmp|swf)$
# {
# expires 7d;
# access_log off;
# }
location ~* ^.+\.(gif|jpg|png|swf|flv|rar|zip|doc|pdf|gz|bz2|jpeg|bmp|xls)$
{
expires 7d;
valid_referers none blocked server_names *.test.com ;
if ($invalid_referer) {
return 403;
}
access_log off;
}
location ~ .*\.(js|css)$
{
expires 12h;
access_log off;
}
location /admin/
{
allow 127.0.0.1;
allow 192.168.230.135;
deny all;
}
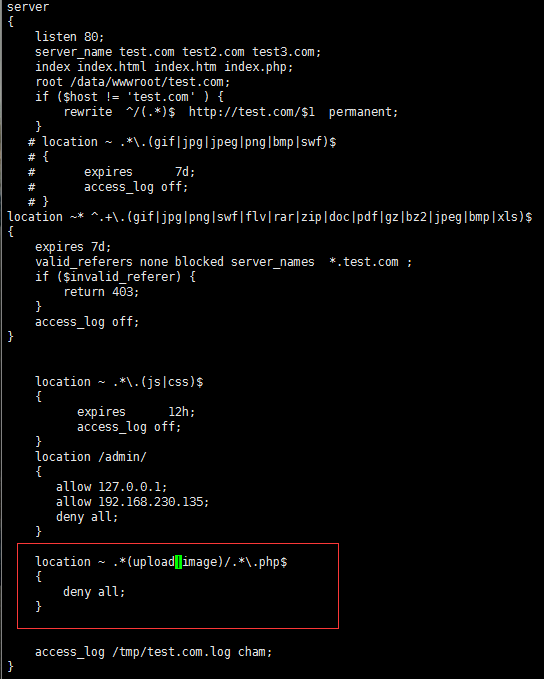
location ~ .*(upload|image)/.*\.php$
{
deny all;
}
access_log /tmp/test.com.log cham;
}
[root@cham002 ~]# /usr/local/nginx/sbin/nginx -t
nginx: the configuration file /usr/local/nginx/conf/nginx.conf syntax is ok
nginx: configuration file /usr/local/nginx/conf/nginx.conf test is successful
[root@cham002 ~]# /usr/local/nginx/sbin/nginx -s reload
[root@cham002 ~]# mkdir /data/wwwroot/test.com/upload
[root@cham002 ~]# echo "11111" > /data/wwwroot/test.com/upload/1.php
测试
[root@cham002 ~]# curl -x127.0.0.1:80 test.com/upload/1.php
<html>
<head><title>403 Forbidden</title></head>
<body bgcolor="white">
<center><h1>403 Forbidden</h1></center>
<hr><center>nginx/1.12.1</center>
</body>
</html>


[root@cham002 ~]# curl -x127.0.0.1:80 test.com/upload/1.txt
11111
看日志
[root@cham002 ~]# cat /tmp/test.com.log
127.0.0.1 - [03/Jan/2018:21:35:36 +0800] test.com "/index.html" 200 "-" "curl/7.29.0"
127.0.0.1 - [04/Jan/2018:15:59:16 +0800] test.com "/admin/" 200 "http://www.baidu.com/1.txt" "curl/7.29.0"
192.168.230.135 - [04/Jan/2018:16:01:00 +0800] test.com "/admin/" 200 "-" "curl/7.29.0"
192.168.230.135 - [04/Jan/2018:16:01:14 +0800] test.com "/admin/" 200 "-" "curl/7.29.0"
192.168.230.135 - [04/Jan/2018:16:01:37 +0800] test.com "/admin/" 200 "-" "curl/7.29.0"
192.168.100.1 - [04/Jan/2018:16:05:14 +0800] test.com "/admin/" 403 "-" "curl/7.29.0"
127.0.0.1 - [04/Jan/2018:16:15:46 +0800] test.com "/upload/1.php" 403 "-" "curl/7.29.0"
127.0.0.1 - [04/Jan/2018:16:16:46 +0800] test.com "/upload/1.txt" 200 "-" "curl/7.29.0"
针对 user_agent 限制

server
{
    listen 80;
    server_name test.com test2.com test3.com;
    index index.html index.htm index.php;
    root /data/wwwroot/test.com;
    if ($host != ''test.com'' ) {
        rewrite  ^/(.*)$  http://test.com/$1  permanent;
    }
   # location ~ .*\.(gif|jpg|jpeg|png|bmp|swf)$
   # {
   #       expires      7d;
   #       access_log off;
   # }
location ~* ^.+\.(gif|jpg|png|swf|flv|rar|zip|doc|pdf|gz|bz2|jpeg|bmp|xls)$
{
    expires 7d;
    valid_referers none blocked server_names  *.test.com ;
    if ($invalid_referer) {
        return 403;
    }
    access_log off;
}


    location ~ .*\.(js|css)$
    {
          expires      12h;
          access_log off;
    }
    location /admin/
    {
       allow 127.0.0.1;
       allow 192.168.230.135;
       deny all;
    }

    location ~ .*(upload|image)/.*\.php$
    {
        deny all;
    }

    if ($http_user_agent ~ ''Spider/3.0|YoudaoBot|Tomato'')
    {
      return 403;
    }


    access_log /tmp/test.com.log cham;
}
[root@cham002 ~]# /usr/local/nginx/sbin/nginx -t
nginx: the configuration file /usr/local/nginx/conf/nginx.conf syntax is ok
nginx: configuration file /usr/local/nginx/conf/nginx.conf test is successful
[root@cham002 ~]# /usr/local/nginx/sbin/nginx -s reload
[root@cham002 ~]# curl -x127.0.0.1:80 test.com/upload/1.txt -I
HTTP/1.1 200 OK
Server: nginx/1.12.1
Date: Thu, 04 Jan 2018 08:22:45 GMT
Content-Type: text/plain
Content-Length: 6
Last-Modified: Thu, 04 Jan 2018 08:16:39 GMT
Connection: keep-alive
ETag: "5a4de2e7-6"
Accept-Ranges: bytes

[root@cham002 ~]# curl -A "Tomatodsfsdf" -x127.0.0.1:80 test.com/upload/1.txt -I
HTTP/1.1 403 Forbidden
Server: nginx/1.12.1
Date: Thu, 04 Jan 2018 08:23:37 GMT
Content-Type: text/html
Content-Length: 169
Connection: keep-alive
说明: deny all 和 return 403 效果一样
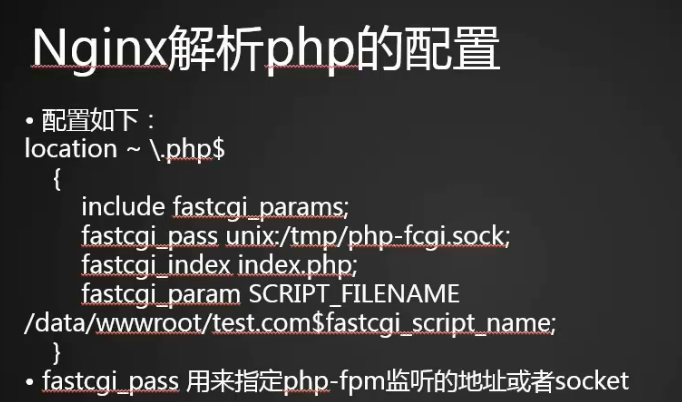
12.15 Nginx 解析 PHP 相关配置
核心配置:
[root@cham002 ~]# vim /usr/local/nginx/conf/vhost/test.com.conf

 location ~ \.php$
    {
        include fastcgi_params;
        #fastcgi_pass unix:/tmp/php-fcgi.sock;
        fastcgi_pass 127.0.0.1:9000;
##fastcgi_pass两种监听格式,但是要保证Nginx和php-fpm中格式一致
        fastcgi_index index.php;
        fastcgi_param SCRIPT_FILENAME /data/wwwroot/test.com$fastcgi_script_name;
    }

[root@cham002 ~]# cat /usr/local/php-fpm/etc/php-fpm.conf
[global]
pid = /usr/local/php-fpm/var/run/php-fpm.pid
error_log = /usr/local/php-fpm/var/log/php-fpm.log
[www]
#listen = /tmp/php-fcgi.sock
listen = 127.0.0.1:9000
listen.mode = 666
user = php-fpm
group = php-fpm
pm = dynamic
pm.max_children = 50
pm.start_servers = 20
pm.min_spare_servers = 5
pm.max_spare_servers = 35
pm.max_requests = 500
rlimit_files = 1024

[root@cham002 ~]# /usr/local/nginx/sbin/nginx -t
nginx: the configuration file /usr/local/nginx/conf/nginx.conf syntax is ok
nginx: configuration file /usr/local/nginx/conf/nginx.conf test is successful
[root@cham002 ~]# /usr/local/nginx/sbin/nginx -s reload
[root@cham002 ~]# /etc/init.d/php-fpm reload
Reload service php-fpm  done

[root@cham002 ~]# curl -x 127.0.0.1:80 test.com/3.php -I
HTTP/1.1 200 OK
Server: nginx/1.12.1
Date: Thu, 04 Jan 2018 10:44:25 GMT
Content-Type: text/html; charset=UTF-8
Connection: keep-alive
X-Powered-By: PHP/5.6.30

注: 在此注意两点,fastcgi_pass 有两种格式,但是无论使用哪种格式都有保证 Nginx 和 php-fpm 中格式一致,否则会报错 502;fastcgi _param SCRIPT _FILENAME 所在行的路径要和 root 路径一致!
12.16 Nginx 代理
Nginx 代理是一种反向代理。反向代理(Reverse Proxy)方式是指以代理服务器来接受 Internet 上的连接请求,然后将请求转发给内部网络上的服务器;并将从服务器上得到的结果返回给 Internet 上请求连接的客户端,此时代理服务器对外就表现为一个服务器。

工作原理
Nginx 代理是在一台代理服务器中自定义一个域名,该域名指向一个 IP,然后将用户的请求通过这台代理服务器访问指定的 IP 所对应的 web 服务器。
graph LR
用户-->代理服务器
代理服务器-->用户
代理服务器-->web服务器
web服务器-->代理服务器
[root@cham002 ~]# cd /usr/local/nginx/conf/vhost
[root@cham002 vhost]# vim proxy.conf
server
{
listen 80;
server_name ask.apelearn.com;
#定义域名(一般和被代理ip的域名保持一致)
location /
{
proxy_pass http://121.201.9.155/;
#指定被代理(被访问)的IP(web服务器IP)
proxy_set_header Host $host;
#$host指的是代理服务器的servername(也是被代理IP的域名)
proxy_set_header X-Real-IP $remote_addr;
proxy_set_header X-Forwarded-For $proxy_add_x_forwarded_for;
}
}说明: 因为该虚拟主机只用作代理服务器,不需要访问本地文件,所以不需要设置根目录。
没有设置代理前
[root@cham002 vhost]# curl -x127.0.0.1:80 ask.apelearn.com/robots.txt
<html>
<head><title>404 Not Found</title></head>
<body bgcolor="white">
<center><h1>404 Not Found</h1></center>
<hr><center>nginx/1.12.1</center>
</body>
</html>
[root@cham002 vhost]#

[root@cham002 vhost]# /usr/local/nginx/sbin/nginx -t
nginx: the configuration file /usr/local/nginx/conf/nginx.conf syntax is ok
nginx: configuration file /usr/local/nginx/conf/nginx.conf test is successful

[root@cham002 vhost]# /usr/local/nginx/sbin/nginx -s reload
设置代理后
[root@cham002 vhost]# curl -x127.0.0.1:80 ask.apelearn.com/robots.txt
#
# robots.txt for MiWen
#

User-agent: *

Disallow: /?/admin/
Disallow: /?/people/
Disallow: /?/question/
Disallow: /account/
Disallow: /app/
Disallow: /cache/
Disallow: /install/
Disallow: /models/
Disallow: /crond/run/
Disallow: /search/
Disallow: /static/
Disallow: /setting/
Disallow: /system/
Disallow: /tmp/
Disallow: /themes/
Disallow: /uploads/
Disallow: /url-*
Disallow: /views/
Disallow: /*/ajax/[root@cham002 vhost]#

6 月 11 日任务 Nginx 防盗链、Nginx 访问控制、Nginx 解析 php 相关配置、Nginx 代理
12.13 Nginx 防盗链
修改配置文件
location ~* ^.+\.(gif|jpg|png|swf|flv|rar|zip|doc|pdf|gz|bz2|jpeg|bmp|xls)$
{
expires 7d;
valid_referers none blocked server_names *.abc.com ;
if ($invalid_referer) {
return 403;
}
access_log off;
}
测试:
curl -e "http://www.abc.com/" -x127.0.0.1:80 -I abc.com/1.jpg
12.14 Nginx 访问控制
修改配置文件
#按目录匹配
location /
{
allow 127.0.0.1;
deny all;
}
#可以匹配正则
location ~ .*(upload|image)/.*\.php$
{
deny all;
}
#根据 user_agent 限制
if ($http_user_agent ~* ''Spider/3.0|YoudaoBot|Tomato'') // 匹配符号后面 +* 忽略大小写
{
return 403;
}
deny all 和 return 403 效果一样
12.15 Nginx 解析 php 相关配置
location ~ \.php$
{
fastcgi_pass 127.0.0.1:9000;
fastcgi_index index.php;
fastcgi_param SCRIPT_FILENAME $document_root$fastcgi_script_name;
include fastcgi_params;
fastcgi_pass 配置对应的参数 是 sock 还是 ip 否则 502 错误
listen.mode = 666 监听 sock 不定义 mode sock 文件权限 440
12.16 Nginx 代理

1. 新建配置文件 proxy.conf
server
{
listen 80;
server_name 111.com; // 本机域名
location /
{
proxy_pass http://106.39.167.118:80/; // 目标服务器
proxy_set_header Host $host;
proxy_set_header X-Real-IP $remote_addr;
proxy_set_header X-Forwarded-For $proxy_add_x_forwarded_for;
}
}
: /var/run/docker.sock")
Docker in Docker(实际上是 Docker outside Docker): /var/run/docker.sock
在 Docker 容器里面使用 docker run/docker build?
Docker 容器技术目前是微服务/持续集成/持续交付领域的第一选择。而在 DevOps 中,我们需要将各种后端/前端的测试/构建环境打包成 Docker 镜像,然后在需要的时候,Jenkins 会使用这些镜像启动容器以执行 Jenkins 任务。
为了方便维护,我们的 CI 系统如 Jenkins,也会使用 Docker 方式部署。 Jenkins 任务中有些任务需要将微服务构建成 Docker 镜像,然后推送到 Harbor 私有仓库中。 或者我们所有的 Jenkins Master 镜像和 Jenkins Slave 镜像本身都不包含任何额外的构建环境,执行任务时都需要启动包含对应环境的镜像来执行任务。
我们的 Jenkins Master、Jenkins Slaves 都是跑在容器里面的,该如何在这些容器里面调用 docker run 命令启动包含 CI 环境的镜像呢? 在这些 CI 镜像里面,我们从源码编译完成后,又如何通过 docker build 将编译结果打包成 Docker 镜像,然后推送到内网仓库呢?
答案下面揭晓。
一、原理说明:/var/run/docker.sock
Docker 采取的是 Client/Server 架构,我们常用的 docker xxx 命令工具,只是 docker 的 client,我们通过该命令行执行命令时,实际上是在通过 client 与 docker engine 通信。
我们通过 apt/yum 安装 docker-ce 时,会自动生成一个 systemd 的 service,所以安装完成后,需要通过 sudo systemctl enable docker.service 来启用该服务。 这个 Docker 服务启动的,就是 docker engine,查看 /usr/lib/systemd/system/docker.service,能看到有这样一条语句:
ExecStart=/usr/bin/dockerd -H fd:// --containerd=/run/containerd/containerd.sock
默认情况下,Docker守护进程会生成一个 socket(/var/run/docker.sock)文件来进行本地进程通信,因此只能在本地使用 docker 客户端或者使用 Docker API 进行操作。 sock 文件是 UNIX 域套接字,它可以通过文件系统(而非网络地址)进行寻址和访问。
因此只要以数据卷的形式将 docker 客户端和上述 socket 套接字挂载到容器内部,就能实现 "Docker in Docker",在容器内使用 docker 命令了。具体的命令见后面的「示例」部分。
要记住的是,真正执行我们的 docker 命令的是 docker engine,而这个 engine 跑在宿主机上。所以这并不是真正的 "Docker in Docker".
二、示例
在容器内部使用宿主机的 docker,方法有二:
- 命令行方式:将
/usr/bin/docker映射进容器内部,然后直接在容器内部使用这个命令行工具docker- 需要的时候,也可以将
/etc/docker文件夹映射到容器内,这样容器内的docker命令行工具也会使用与宿主机同样的配置。
- 需要的时候,也可以将
- 编程方式:在容器内部以编程的方式使用 docker
- 通过 python 使用 docker: 在 Dockerfile 中通过
pip install docker将 docker client 安装到镜像中来使用
- 通过 python 使用 docker: 在 Dockerfile 中通过
容器的启动方式也有两种,如下:
1. 直接通过 docker 命令启动
示例命令如下:
docker run --name <name> \
    -v /var/run/docker.sock:/var/run/docker.sock \
    -v /usr/bin/docker:/usr/bin/docker \
    --user root \
    <image-name>:<tag>
**必须以 root 用户启动!(或者其他有权限读写 /var/run/docker.sock 的用户)**然后,在容器内就能正常使用 docker 命令,或者访问宿主机的 docker api 了。
2. 使用 docker-compose 启动
docker-compose.yml 文件内容如下:
version: ''3.3''
services:
  jenkins-master:
    image: jenkinsci/blueocean:latest
    container_name: jenkins-master
    environment:
      - TZ=Asia/Shanghai  # 时区
    ports:
      - "8080:8080"
      - "50000:50000"
    volumes:
      - ./jenkins_home:/var/jenkins_home  # 将容器中的数据映射到宿主机
      - /usr/bin/docker:/usr/bin/docker  # 为容器内部提供 docker 命令行工具(这个随意)
      - /var/run/docker.sock:/var/run/docker.sock  # 容器内部通过 unix socket 使用宿主机 docker engine
    user: root  # 必须确保容器以 root 用户启动!(这样它才有权限读写 docker.socket)
    restart: always
然后通过 docker-compose up -d 即可后台启动容器。
Docker 中的 uid 与 gid
通过上面的操作,我们在容器内执行 docker ps 时,还是很可能会遇到一个问题:权限问题。
如果你容器的默认用户是 root,那么你不会遇到这个问题,因为 /var/run/docker.sock 的 onwer 就是 root.
但是一般来说,为了限制用户的权限,容器的默认用户一般都是 uid 和 gid 都是 1000 的普通用户。这样我们就没有权限访问 /var/run/docker.sock 了。
解决办法:
方法一(不一定有效):在构建镜像时,最后一层添加如下内容:
# docker 用户组的 id,通常都是 999
RUN groupadd -g 999 docker \
    && usermod -aG docker <your_user_name>
这样我们的默认用户,就能使用 docker 命令了。
P.S.
999不一定是 docker 用户组,所以上述方法某些情况下可能失效。这时还是老老实实通过docker run -u root启动容器吧。(或者在docker-compose.yml中添加user: root属性)
参考
- Docker in Docker - 王柏元
![docker vs docker-compose nginx:在/etc/nginx/nginx.conf的上游“ httpstat.us”中找不到[emerg]主机:21](http://www.gvkun.com/zb_users/upload/2025/04/659a2b03-b24a-4717-810b-c9eb38c1d1391745629606628.jpg "docker vs docker-compose nginx:在/etc/nginx/nginx.conf的上游“ httpstat.us”中找不到[emerg]主机:21")
docker vs docker-compose nginx:在/etc/nginx/nginx.conf的上游“ httpstat.us”中找不到[emerg]主机:21
我有this set个docker文件的非常奇怪的问题:
docker run会做我想要的,而docker-compose不会做
我对Docker非常了解,因此这可能是一个非常简单的问题-我事先表示歉意!
>但我只是无法确定我的错误
Docker运行-p 80:8080 -i -t lakrids_devlakrids
172.17.0.1–[01 / Feb / 2017:23:29:36 0000]“ GET / HTTP / 1.1” 200 6979“-”“ curl / 7.29.0”
但是如果我用docker-compose启动相同的容器,我会得到
docker-撰写up devlakrids
重建devlakrids
附加到devlakrids
devlakrids | 2017/02/01 23:28:19 [emerg] 11#11:在/etc/Nginx/Nginx.conf:21的上游“ httpstat.us”中找不到主机
devlakrids | Nginx:在/etc/Nginx/Nginx.conf:21的上游“ httpstat.us”中找不到[emerg]主机
devlakrids以代码1退出
> Nginx是一个有趣的野兽:如果在Nginx已经运行时上游出现故障,那么Nginx会继续运行.但是,如果在Nginx启动时上游无法访问,则后者将无法启动.为了解决这个问题,您可能需要在Nginx容器测试中添加一个启动脚本,以在启动Nginx之前启动上游.
>尝试显式添加链接:某种程度上,我们遇到了以下问题:Nginx docker看不到通过组合服务名称隐式定义的其他计算机.
最后,一个真正被遗忘的选项是:您未在显示的文件中的任何位置指定docker引擎中启动httpstat.us服务的位置,因此实际上它令人惊讶,无需编写即可.
我们今天的关于Docker 安装 Mysql 和 Nginx和docker中安装mysql的分享就到这里,谢谢您的阅读,如果想了解更多关于12.13 Nginx 防盗链 12.14 Nginx 访问控制 12.15 Nginx 解析 php 相关配置 12.16 Nginx 代理、6 月 11 日任务 Nginx 防盗链、Nginx 访问控制、Nginx 解析 php 相关配置、Nginx 代理、Docker in Docker(实际上是 Docker outside Docker): /var/run/docker.sock、docker vs docker-compose nginx:在/etc/nginx/nginx.conf的上游“ httpstat.us”中找不到[emerg]主机:21的相关信息,可以在本站进行搜索。
本文标签:


