本文将为您提供关于如何使用Python分析器获得调用树?的详细介绍,我们还将为您解释利用python进行数据分析源代码的相关知识,同时,我们还将为您提供关于[译]Twitter数据挖掘:如何使用Pyt
本文将为您提供关于如何使用Python分析器获得调用树?的详细介绍,我们还将为您解释利用python进行数据分析 源代码的相关知识,同时,我们还将为您提供关于[译] Twitter数据挖掘:如何使用Python分析大数据、【Python】【程序分析器】关于Python Profilers性能分析器、使用python分析git log日志示例、使用Python分析图像亮度的方法有哪些?的实用信息。
本文目录一览:- 如何使用Python分析器获得调用树?(利用python进行数据分析 源代码)
- [译] Twitter数据挖掘:如何使用Python分析大数据
- 【Python】【程序分析器】关于Python Profilers性能分析器
- 使用python分析git log日志示例
- 使用Python分析图像亮度的方法有哪些?
")
如何使用Python分析器获得调用树?(利用python进行数据分析 源代码)
我曾经使用内置在系统监视器
应用程序中的漂亮Apple Profiler 。只要您的C ++代码是用调试信息编译的,您
就可以对正在运行的应用程序进行采样,并且它将打印出一个缩进的树,
告诉您该函数花了父函数时间的百分比
(以及主体函数与其他函数调用的时间) 。
例如,如果main调用了function_1和function_2,先function_2调用function_3,然后调用main调用function_3:
main (100%, 1% in function body): function_1 (9%, 9% in function body): function_2 (90%, 85% in function body): function_3 (100%, 100% in function body) function_3 (1%, 1% in function body)我会看到这样的想法,并认为:“
主体代码中的某些事情花费了很长时间function_2。如果我希望我的程序更快,那是我
应该开始的地方。”
如何最轻松地为Python
程序获得此准确的概要分析输出?
我见过有人说要这样做:
import cProfile, pstatsprof = cProfile.Profile()prof = prof.runctx("real_main(argv)", globals(), locals())stats = pstats.Stats(prof)stats.sort_stats("time") # Or cumulativestats.print_stats(80) # 80 = how many to print但是,与优雅的调用树相比,这非常混乱。如果
您可以轻松做到这一点,请告诉我,这会有所帮助。
答案1
小编典典在此库http://pycallgraph.slowchop.com/中查看调用图。它
真的很好。如果要分析特定功能,请查看
http://mg.pov.lt/blog/profiling.html
这是来自profilehooks模块的结果。
![[译] Twitter数据挖掘:如何使用Python分析大数据](http://www.gvkun.com/zb_users/upload/2025/03/a75a15aa-d9bb-4b9a-bb9c-81a71a8308221740992400891.jpg "[译] Twitter数据挖掘:如何使用Python分析大数据")
[译] Twitter数据挖掘:如何使用Python分析大数据
原文请见Twitter Data Mining: A Guide to Big Data Analytics Using Python。
大数据无处不在。在时下这个年代,不管你喜欢与否,在运营一个成功的商业的过程中都有可能会遇到它。
本教程将会简要介绍何谓大数据,无论你是尝试抓住时机的商人,抑或是寻找下一个项目的编程高手,你都可以学到它是如何为你所用,以及如何使用Twitter API和Python快速开始。

何谓大数据?
大数据就像它看起来那样——有大量的数据。单独而言,你能从单一的数据获取的洞见穷其有限。但是结合复杂数学模型以及强大计算能力的TB级数据,却能创造出人类无法制造的洞见。大数据分析提供给商业的价值是无形的,并且每天都在超越人类的能力。
大数据分析的第一步就是要收集数据本身,也就是众所周知的“数据挖掘”。数据来自于四面八方。大部分的企业处理着GB级的数据,这些数据有用户数据、产品数据和地理位置数据。在本教程中,我们将会探索如何使用数据挖掘技术收集Twitter的数据,这可能会比你想象中的更有用。
举个例子,假设你运营着脸书,想使用Messager数据为如何更好地向用户投放广告提供一些见解。而Messager拥有着12亿月活跃用户。在这个案例中,大数据就是用户之间的对话。假设你能逐个阅读每个用户的对话,那么就能清楚知道他们喜欢什么,从而有针对性地向他们推荐相应的产品。使用广为人知的自然语言处理(NLP)这一机器学习技术,你可以大型地实现这一点,并且整个过程自动化,一切交给机器即可。
这仅仅是机器学习和大数据分析为公司带来价值的无数的示例中的一个。
为什么选择Twitter数据?
Twitter是一个数据金矿。不像其他的社交平台,几乎每个Twitter用户的微博都是完全开放并且是可拉取的。如果你想尝试获取大量的数据然后对其进行分析,这是相当有帮助的。同时,Twitter的数据也是非常具体的。它的API接口允许你进行复杂的查询,例如拉取最近20分钟内关于指定某个话题的每一条微博,或者是拉取某个用户非转发的微博。
这里一个简单的应用就是,分析大众是怎么看待你们公司的。你可以收集提到你们公司(或者其他任何词语)的最近2,000条微博,然后对其运行情感分析算法。
我们可以圈定具体居住在某个位置的用户,也就是所谓的空间数据。另一个应用可以是,在地球上标志出你们公司提及次数最多的地区。
如你所见,Twitter数据是通往大众见解的一扇大门,以及他们是如何针对某个主题进行大数据分析的。这些,结合透明度和Twitter API接口慷慨的调用次数,可以产出非凡的结果。
工具一览
对于这些示例,我们将使用Python 2.7。理想情况下,你应该有一个编写代码的IDE。我使用的是PyCharm - 社区版。
为了连接Twitter的API接口,将会用到叫做Tweepy的类库,这个类库稍微安装一下就可以了。
入门指南
Twitter开发者账号
为了使用Twitter的API接口,需要先在Twitter应用站点上创建一个开发者账号。
- 1、登录或者在https://apps.twitter.com/
- 2、创建一个新的应用(可点击右上角的按钮)
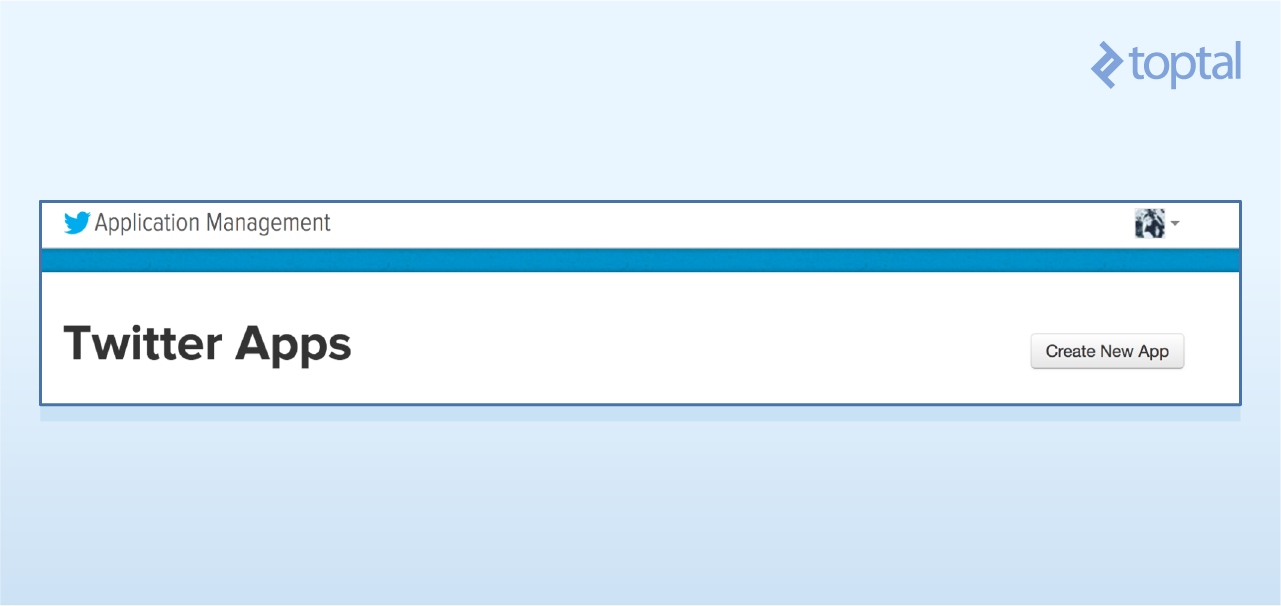
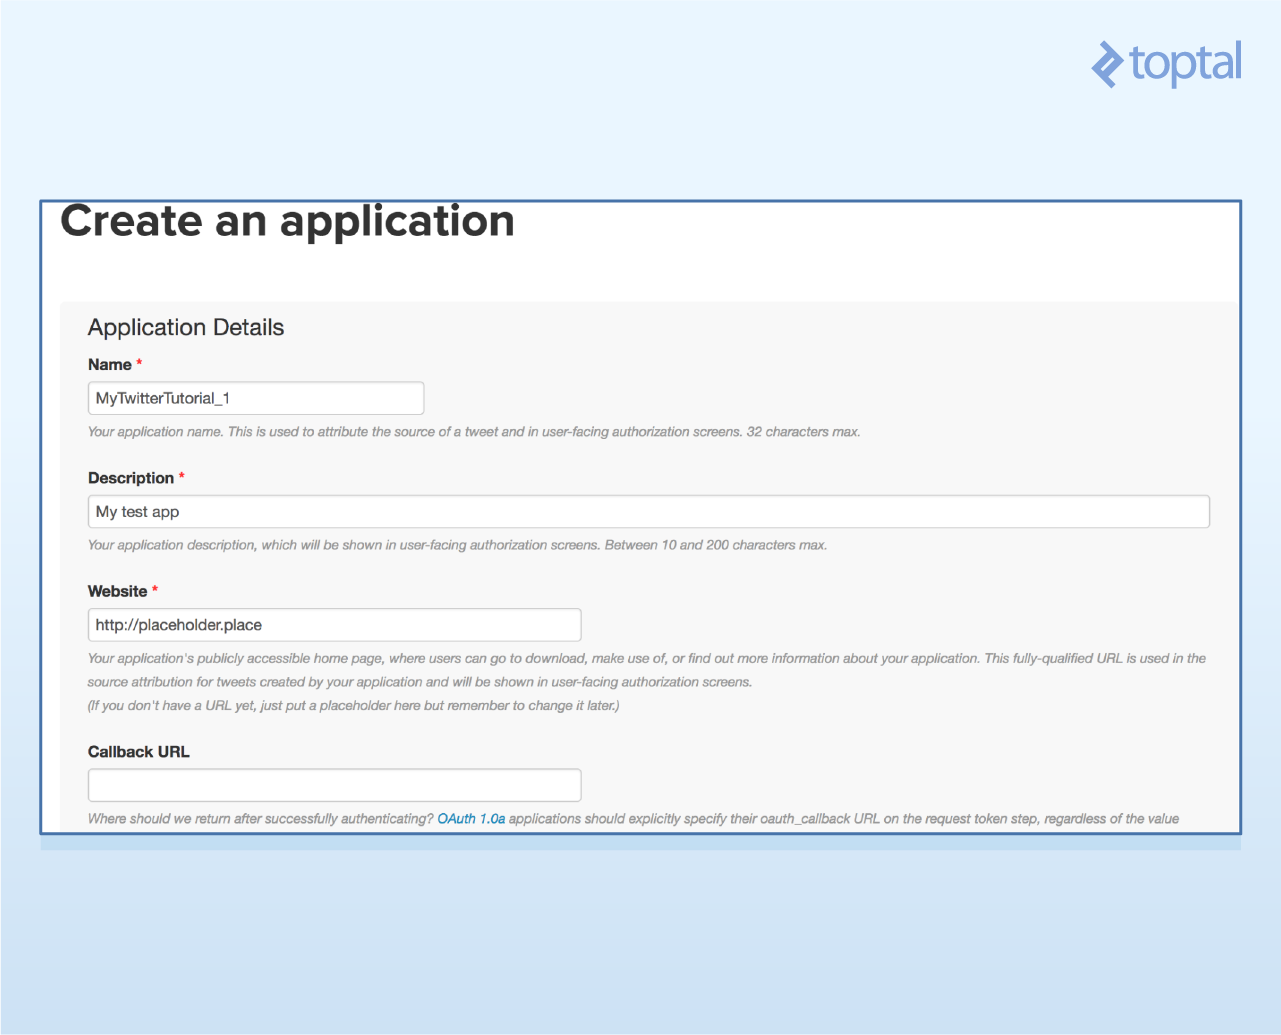
- 3、在创建应用的页面填写上唯一的名字,网站名字(如果没有可以使用默认值),和项目描述。接受协议和条款然后进入到下一个页面。
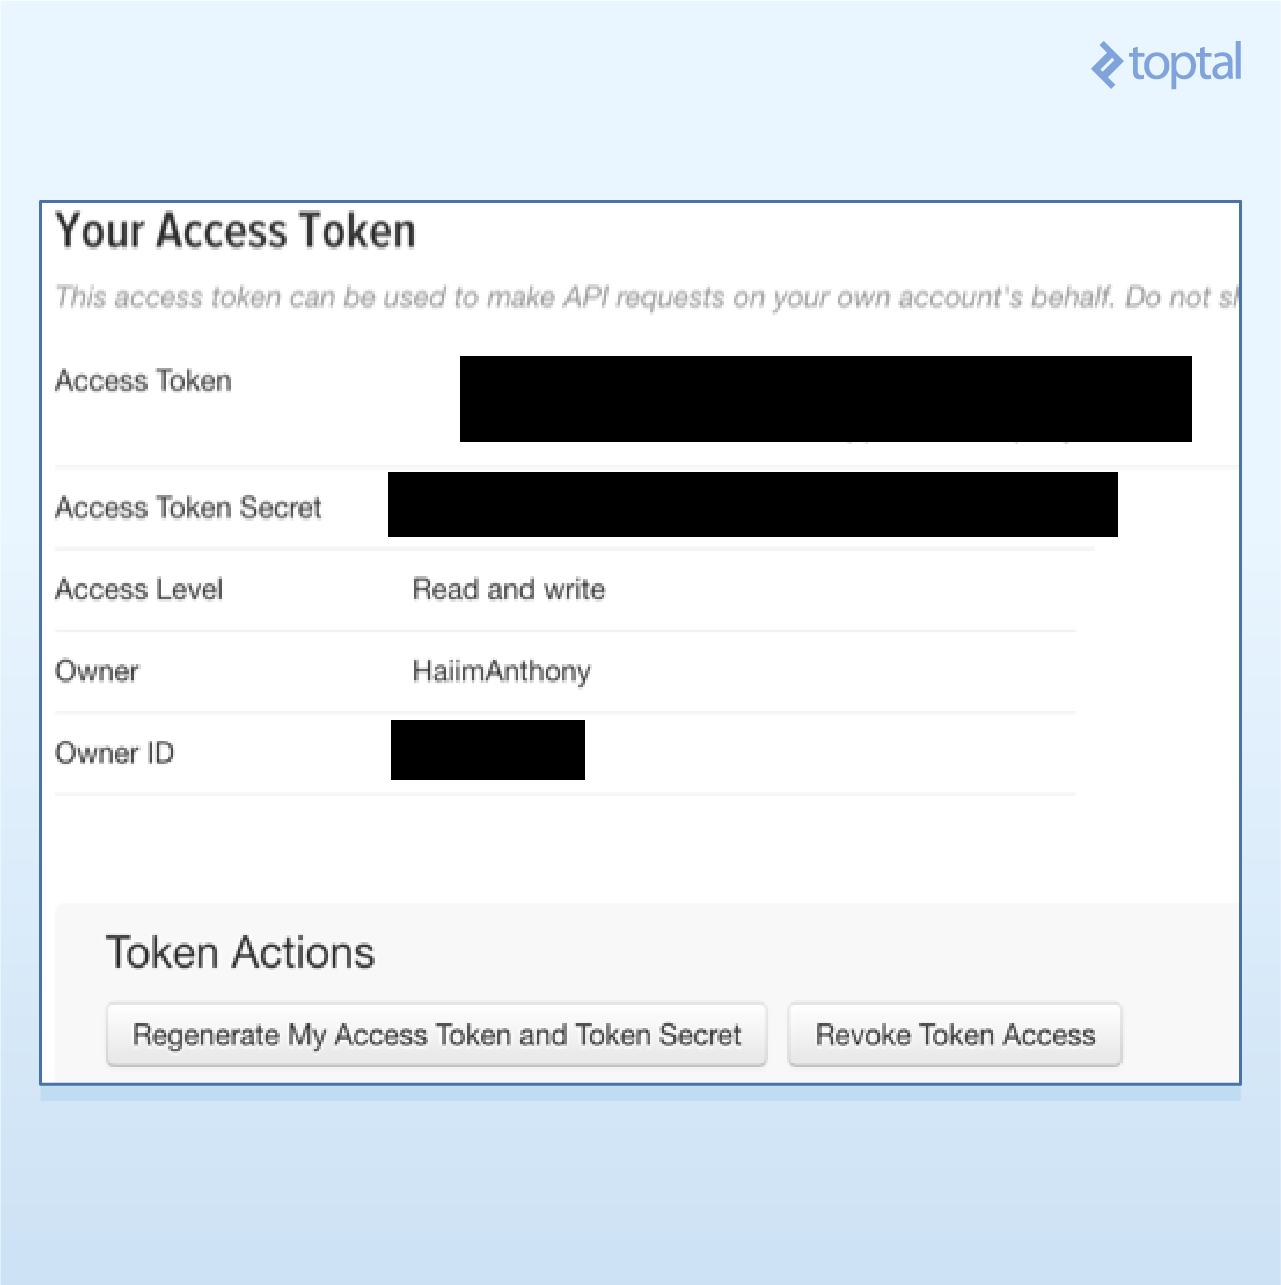
- 4、一旦创建好了你项目,点击“Keys and Access Tokens”标签页,应该就可以看到你使用的API secret和API key了。

- 5、你还需要一对访问凭证。可滚到下面并请求这些凭证。这时页面会进行刷新,然后就可以获得access token和access token secret了。
- 3、在创建应用的页面填写上唯一的名字,网站名字(如果没有可以使用默认值),和项目描述。接受协议和条款然后进入到下一个页面。
稍候都要用到这些数据,所以先不要关闭这些标签。
安装Tweepy
Tweepy是一个超级棒的工具,它可用于访问Twitter API接口。支持Python 2.6,2.7,3.3,3.4,3.5,,和3.6。安装Tweept有好两种不同的方式,最简单的方式就是使用pip。
使用pip安装
在你的终端上简单地输入pip install tweepy即可。
使用Github安装
可以按照Tweepy在Github仓库上的说明进行操作。基本的步骤如下:
git clone https://github.com/tweepy/tweepy.git
cd tweepy
python setup.py install
你也可以在那解决任何安装的问题。
认证
既然必要的工具已准备就绪,那么我们就可以开始写代码了!今天将要构建的每一个应用,其底线都是需要引用Tweepy来创建一个API对象,以便我们可以进行函数的调用。然而,要想创建这些API对象,首先必须先认证我们的开发者信息。
首先,导入Tweepy,并添加我们自己的认证信息。
import tweepy
consumer_key = "wXXXXXXXXXXXXXXXXXXXXXXX1"
consumer_secret = "qXXXXXXXXXXXXXXXXXXXXXXXXXXXXXXXXXXXXXXXXXXXXXXXXXh"
access_token = "9XXXXXXXX-XXXXXXXXXXXXXXXXXXXXXXXXXXXXXXXXXXXXXXXi"
access_token_secret = "kXXXXXXXXXXXXXXXXXXXXXXXXXXXXXXXXXXXXXXXXXXXT"
现在是时候创建API对象了。
# 创建认证对象
auth = tweepy.OAuthHandler(consumer_key, consumer_secret)
# 设置你的access token和access secret
auth.set_access_token(access_token, access_token_secret)
# 传入auth参数,创建API对象
api = tweepy.API(auth)
这些代码是构建每一个应用的基础部分,所以确保不要删除。
示例1:你的时间轴
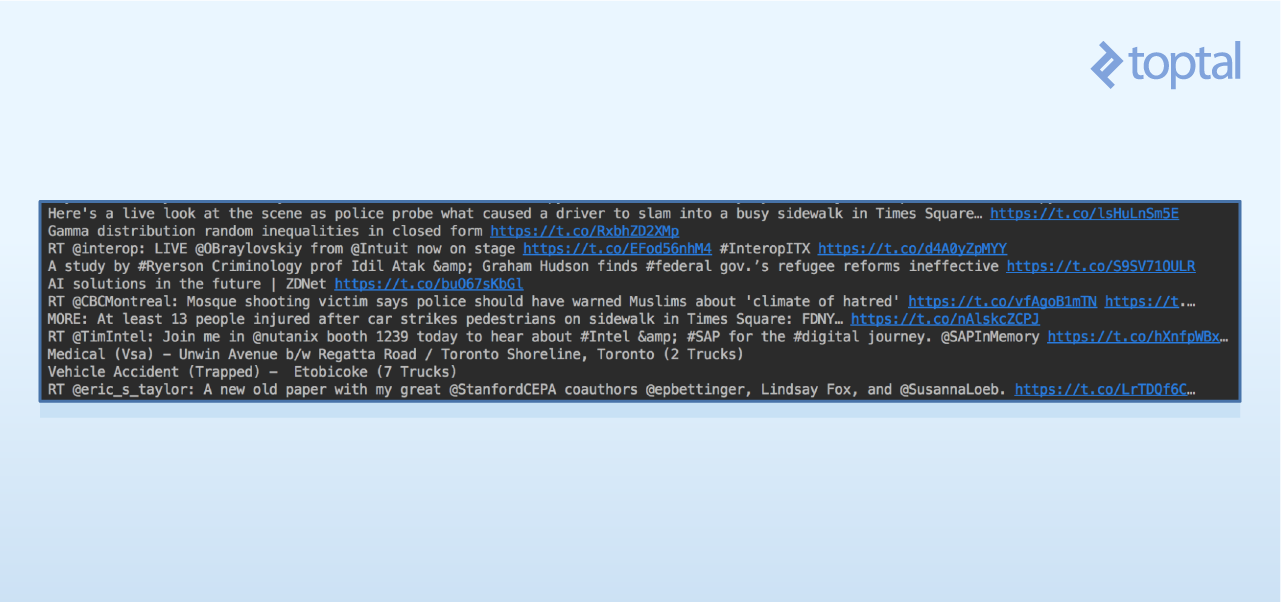
在这个示例中,我们将会从你的Twitter动态中拉取最新的微博。通过使用API对象的home_timeline()函数可以做到这一点。随后把这些结果存在某个变量中,并循环打印。
# 使用API对象获取你的时间轴上的微博,并把结果存在一个叫做public_tweets的变量中
public_tweets = api.home_timeline()
# 遍历所拉取的全部微博
for tweet in public_tweets:
   # 打印存在微博对象中的text字段
   print tweet.text
输出的结果可能看起来像是一堆随机的微博,后台跟着指向微博本身的URL。
打开指向微博的链接,通常会把你带到对应的微博那。例如,打开上面第一条微博中的链接,会看到以下这样的结果:

注意,如果你是通过终端而不是通过像PyCharm这样的IDE来运行的话,在打印微博的text内容时有可能会遇到一些格式化的问题。
结果背后的JSON
在上面的示例中,我们使用tweet.text打印了每一条微博的text内容。为了参考每一个微博对象有哪些具体的属性,不得不去看一下Twitter API接口返回的JSON数据。
从Twitter API接口接收到的结果是以JSON格式返回的,并且附有有相当多的信息。为了简单起见,本教程主要关注每一条微博的“text”属性,以及关于博主(即发布微博的用户)的信息。对于上面这个例子,你可以在这里看到整个返回的JSON对象。
下面快速来看下微博中提供的部分属性。
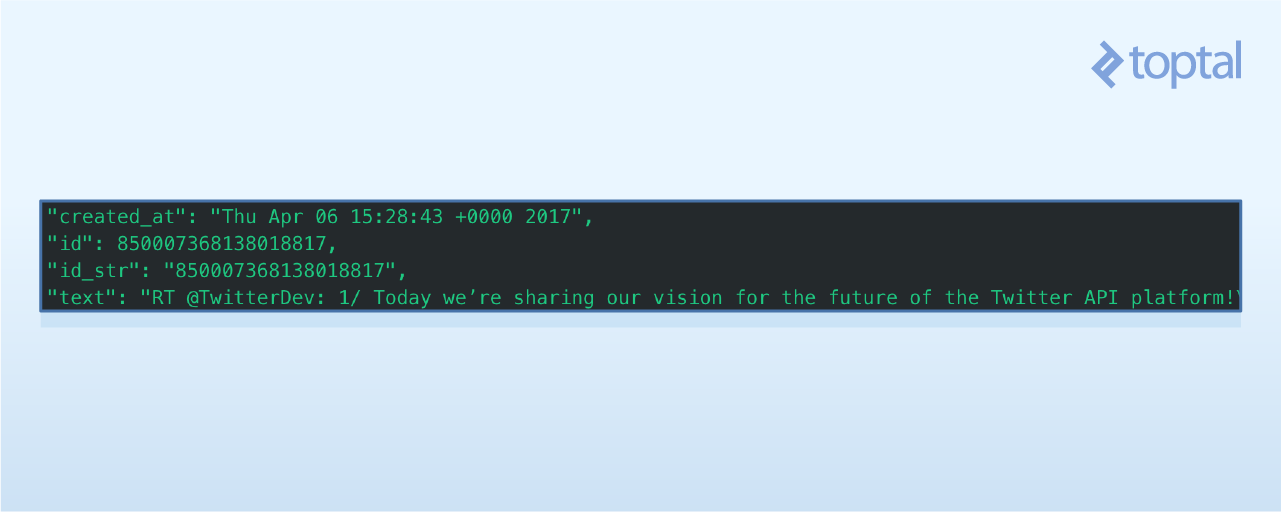
如果想找到创建微博的时间,可以使用print tweet.created_at进行查询。
你还可以看到,每一条微博都带有博主的相关信息。
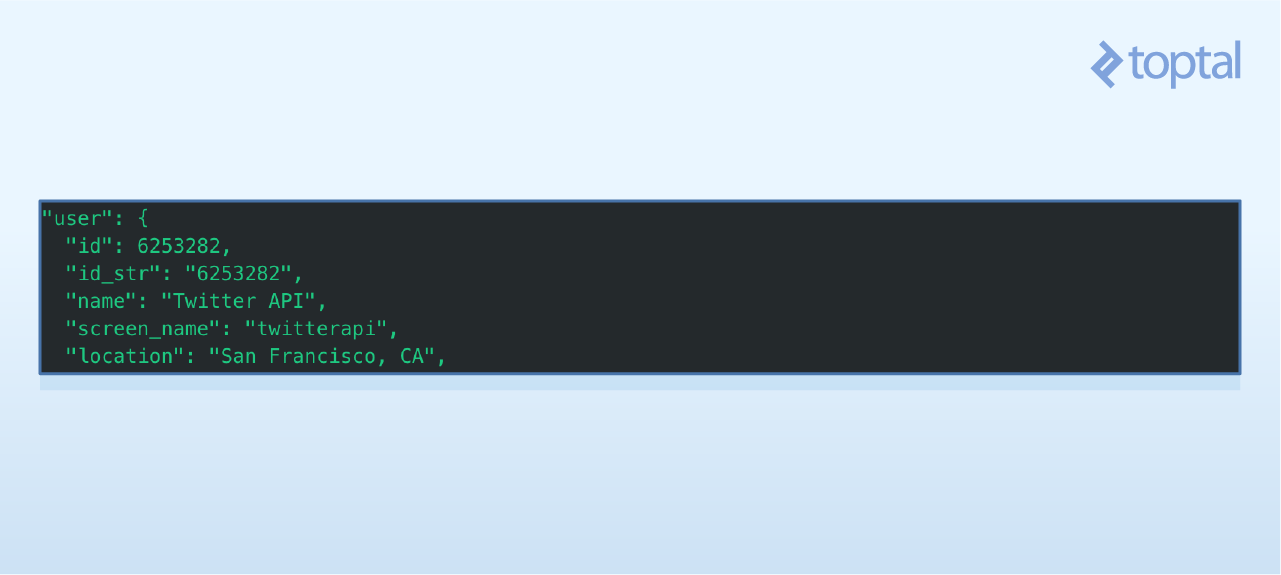
要是想获取博主的name和location属性,可以执行print tweet.user.screen_name和print tweet.user.location.
如果你的应用是基于空间数据的话,这些属性将会非常有用。
示例2:指定某个用户的微博
在这个示例中,我们将会拉取选中用户的最近20条微博。
首先,查看Tweepy 文档,看下是否存在一个像这样的函数。稍微调查一番,可以发现user_timeline()函数正是我们想要的。

可以看到,user_timeline()函数有一些能够用到的重要参数,特别是id(用户的ID)和count(待拉取的微博数量)。注意,由于Twitter的频率限制,每次查询只能拉取一定数量的微博。
让我们来拉取Twitter账号@NyTimes的最近20条微博。

我们可以创建变量来存放待拉取的微博数量(即count),以及待拉取的用户(即name)。然后用这两个参数调用user_timeline()函数。下面是更新后的代码(注意,在代码的顶部应该保持认证和API对象的创建)。
# 传入认证信息,并创建API对象
api = tweepy.API(auth)

# 待拉取微博的用户
name = "nytimes"
# 待拉取的微博数量
tweetCount = 20

# 使用上面的参数,调用user_timeline函数
results = api.user_timeline(id=name, count=tweetCount)

# 遍历所拉取的全部微博
for tweet in results:
   # 打印存在微博对象中的text字段
   print tweet.text
输出的结果看起来像这样:
这种类型数据的流行应用包括有:
- 对指定的用户进行分析,分析他们是如何与世界进行互动的
- 寻找Twitter的影响者并分析他们的粉丝的趋势和互动情况
- 监控某个用户的粉丝的变化情况
示例3:使用关键字查找微博
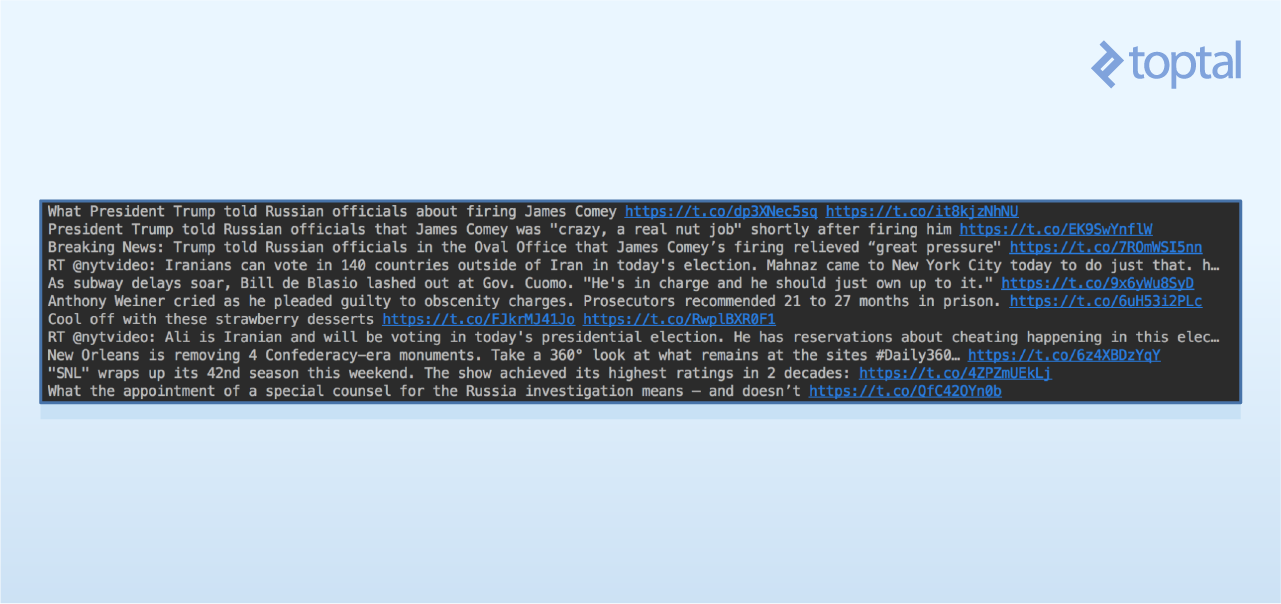
这是最后一个示例:获取包含某个关键字的最新的微博。如果想在Twitter世界中监控某个话题,或者甚至想看下你的商业被提到的情况,这都是相当有用的。假设现在想看下Twitter谈论Toptal的情况怎样。
翻阅完Tweept文档,search()函数似乎是完成我们目标的最佳工具。
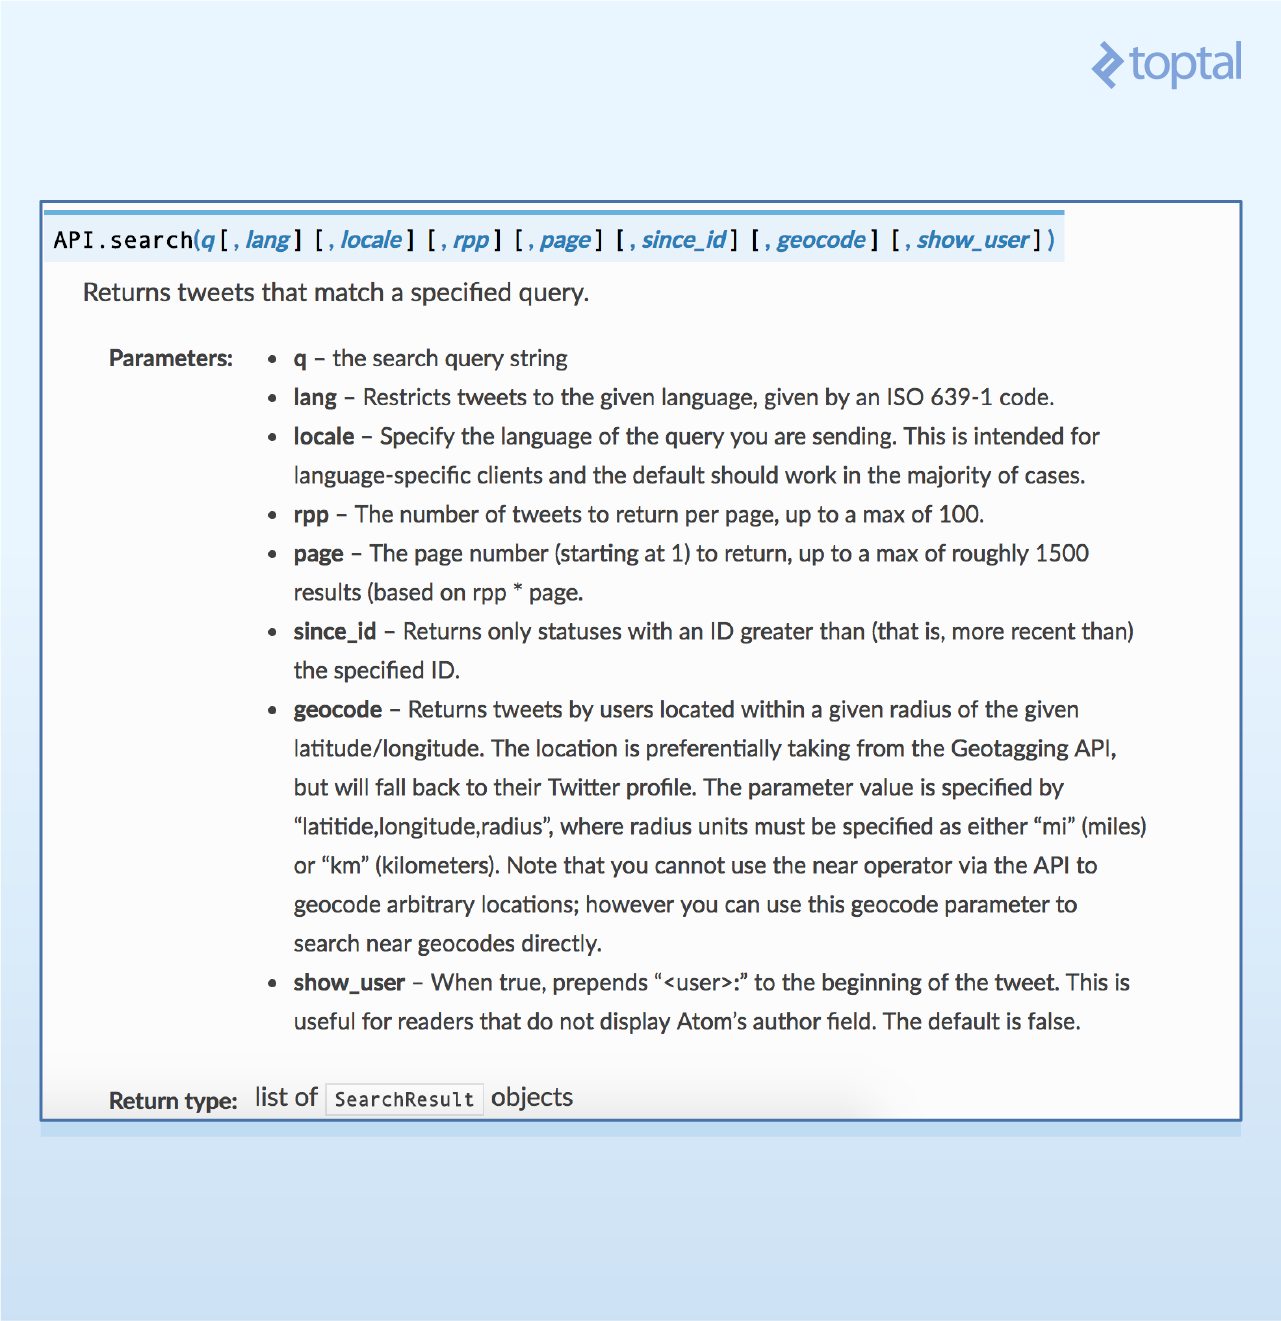
这里最重要的参数是q——查询参数,即要查找的关键字。
还可以设置lang参数,这样就只会取到想要的语言的微博。这里只返回英文(“en”)的微博。
现在可以修改代码,以体现要做的改变。首先创建存放参数(query和language)的变量,然后通过API对象调用相应的函数。最后在循环中也打印了发布微博的用户的终端名称。
# 传入认证信息,并创建API对象
api = tweepy.API(auth)

# 你想查找的关键字
query = "Toptal"
# 语言代码(遵循ISO 639-1标准)
language = "en"

# 使用上面的参数,调用user_timeline函数
results = api.search(q=query, lang=language)

# 遍历所拉取的全部微博
for tweet in results:
   # 打印存在微博对象中的text字段
   print tweet.user.screen_name,"Tweeted:",tweet.text
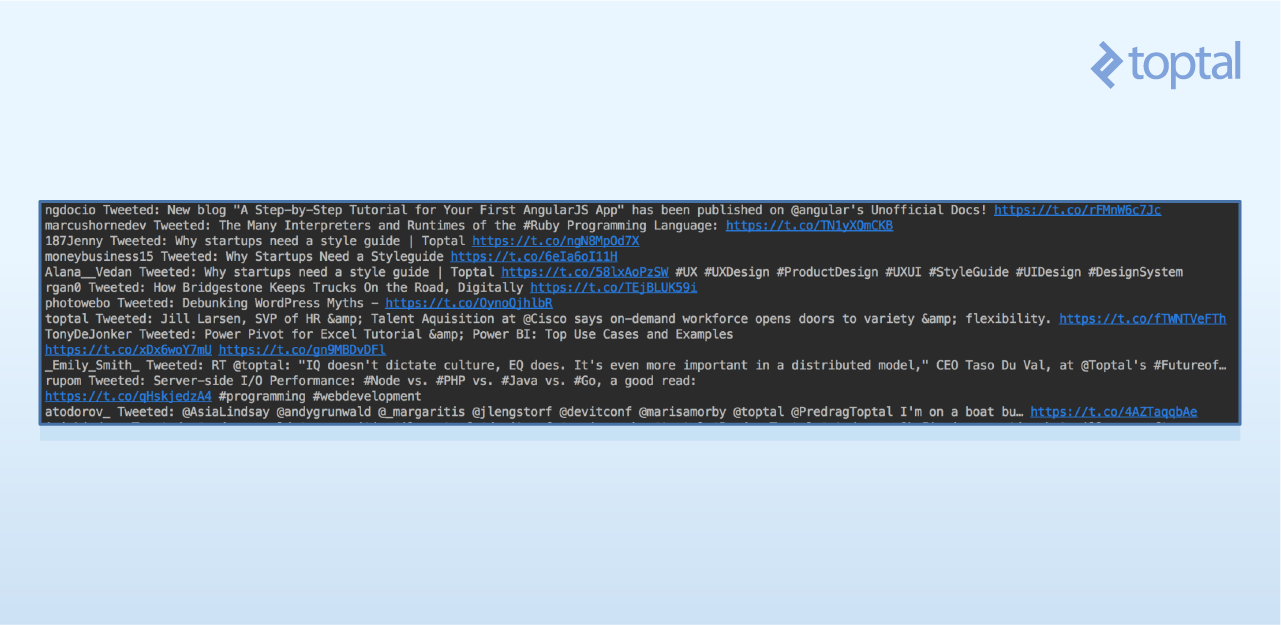
最后结果看起来像是这样:
以下是使用这些信息的一些实用途径:
- 创建空间图表,查看你们公司在世界哪些地方被提到最多
- 对微博进行情感分析,看下关于你们公司的整体意见是正面还是负面
- 创建关于发布你们公司或者产品相关微博中最热门的用户的社交图表
在后续的文章中,会覆盖到部分这些主题。
结论
Twitter的API接口在数据挖掘应用中非常有用,并且关于公众的意见能提供大量的见解。如果Twitter API接口和大数据分析是你未来会感兴趣的东西,建议查看Twitter API接口,Tweepy和Twitter的频率限制指南以获取更多信息。
在本教程,我们只是简单地讲了基本的访问和拉取。然而,Twitter的API接口还可用来服务于错综复杂的大数据问题,涉及人,趋势,和非常复杂以致单凭人类心智无法掌控的社交图。
译者注:本翻译旨在分享国外优秀文章,但翻译水平有限,如有不对,敬请指正,谢谢!
------------------------
- 本翻译版权归作者dogstar所有。
- 本网站采用CC BY-NC-SA 3.0许可协议,转载请注明艾翻译(itran.cc)。

【Python】【程序分析器】关于Python Profilers性能分析器
转载自:http://www.cnblogs.com/btchenguang/archive/2012/02/03/2337112.html
<phttps://www.jb51.cc/tag/ott/" target="_blank">ottom:0px; color:rgb(68,68,68); font-family:tahoma,arial,sans-serif; font-size:12px; line-height:1.5!important">
想了解一下python的性能调试方法,结果就看到这一篇文章,想翻译下来作个记录
<phttps://www.jb51.cc/tag/ott/" target="_blank">ottom:0px; color:rgb(68,sans-serif; font-size:12px; line-height:1.5!important">
原文来自于:<a target="_blank" title="http://docs.python.org/library/profile.html?highlight=profile#cProfile" href="http://docs.python.org/library/profile.html?highlight=profile#cProfile" rel="nofollow">http://docs.python.org/library/profile.html?highlight=profile#cProfile
<h2>
- 介绍性能分析器
<phttps://www.jb51.cc/tag/ott/" target="_blank">ottom:0px; color:rgb(68,sans-serif; font-size:12px; line-height:1.5!important">
profiler是一个程序,用来描述运行时的程序性能,并且从不同方面提供统计数据加以表述。Python中含有3个模块提供这样的功能,分别是cProfile,profile和pstats。这些分析器提供的是对Python程序的确定性分析。同时也提供一系列的报表生成工具,允许用户快速地检查分析结果。
<phttps://www.jb51.cc/tag/ott/" target="_blank">ottom:0px; color:rgb(68,sans-serif; font-size:12px; line-height:1.5!important">
Python标准库提供了3个不同的性能分析器:
<ol>
<li>cProfile,推荐给大部分的用户,是C的一个扩展应用,因为其合理的运行开销,所以适合分析运行时间较长的。是基于lsprof。 <li>profile,一个纯python模块,它的接口和cProfile一致。在分析程序时,增加了很大的运行开销。如果你想扩展profiler的功能,可以试着继承这个模块<li>hotshot,一个试验性的c模块,关注减少分析时的运行开销,但是是以需要更长的数据后处理的次数为代价。不过这个模块不再被维护,也有可能在新的python版本中被弃用。
<h2>
<div>
<div id="Highlighter_16630"https://www.jb51.cc/tag/Syntax/" target="_blank">SyntaxHighlighter py">
<table border="0" cellpadding="0" cellspacing="0"https://www.jb51.cc/tag/ott/" target="_blank">ottom:auto!important; float:none!important; height:auto!important; left:auto!important; line-height:1.1em!important; outline:0px!important; overflow:visible!important; position:static!important; right:auto!important; top:auto!important; vertical-align:baseline!important; font-family:Consolas,"Bitstream Vera Sans Mono","Courier New",Courier,monospace!important; font-size:12px!important; min-height:auto!important">
<tbodyhttps://www.jb51.cc/tag/ott/" target="_blank">ottom:auto!important; float:none!important; height:auto!important; left:auto!important; line-height:1.1em!important; outline:0px!important; overflow:visible!important; position:static!important; right:auto!important; top:auto!important; vertical-align:baseline!important; width:auto!important; font-size:12px!important; min-height:auto!important">
<trhttps://www.jb51.cc/tag/ott/" target="_blank">ottom:auto!important; float:none!important; height:auto!important; left:auto!important; line-height:1.1em!important; outline:0px!important; overflow:visible!important; position:static!important; right:auto!important; top:auto!important; vertical-align:baseline!important; width:auto!important; font-size:12px!important; min-height:auto!important">
<tdhttps://www.jb51.cc/tag/ott/" target="_blank">ottom:auto!important; float:none!important; height:auto!important; left:auto!important; line-height:1.1em!important; outline:0px!important; overflow:visible!important; position:static!important; right:auto!important; top:auto!important; vertical-align:baseline!important; width:35px!important; font-family:Consolas,monospace!important; min-height:auto!important; color:rgb(175,175,175)!important">
<divhttps://www.jb51.cc/tag/ott/" target="_blank">ottom-style:initial!important; border-left-style:initial!important; border-top-color:initial!important; border-right-color:rgb(108,226,108)!important; border-bottom-color:initial!important; border-left-color:initial!important; bottom:auto!important; float:none!important; height:auto!important; left:auto!important; line-height:1.5!important; outline:0px!important; overflow:visible!important; position:static!important; right:auto!important; text-align:right!important; top:auto!important; vertical-align:baseline!important; width:auto!important; font-size:12px!important; min-height:auto!important">
1

使用python分析git log日志示例
用git来管理工程的开发,git log是非常有用的‘历史’资料,需求就是来自这里,我们希望能对git log有一个定制性强的过滤。此段脚本就是在完成这种类型的任务。对于一个repo所有branch中的commit,脚本将会把message中存在BUG ID的一类commits给提取整理出来,并提供了额外的search_key, 用于定制过滤。
代码如下:
# -*- coding: utf-8 -*-
# created by vince67 Feb.2014
# nuovince@gmail.com
import re
import os
import subprocess
def run(project_dir, date_from, date_to, search_key, filename):
bug_dic = {}
bug_branch_dic = {}
try:
os.chdir(project_dir)
except Exception, e:
raise e
branches_list = []
branches_list = get_branches()
for branch in branches_list:
bug_branch_dic = deal_branch(date_from,
date_to,
branch,
search_key)
for item in bug_branch_dic:
if item not in bug_dic:
bug_dic[item] = bug_branch_dic[item]
else:
bug_dic[item] += bug_branch_dic[item]
log_output(filename, bug_dic)
# abstract log of one branch
def deal_branch(date_from, date_to, branch, search_key):
try:
os.system(‘git checkout ‘ + branch)
os.system(‘git pull ‘)
except Exception, error:
print error
cmd_git_log = [“git”,
“log”,
“–stat”,
“–no-merges”,
“-m”,
“–after=”+date_from,
“–before=”+date_to]
proc = subprocess.Popen(cmd_git_log,
stdout=subprocess.PIPE,
stderr=subprocess.PIPE)
stdout, stderr = proc.communicate()
bug_branch_dic = deal_lines(date_from,
date_to,
search_key,
stdout)
return bug_branch_dic
# write commits log to file
def log_output(filename, bug_dic):
fi = open(filename, ‘w’)
for item in bug_dic:
m1 = ‘–‘*5 + ‘BUG:’ + item + ‘–‘*20 + ‘
’
fi.write(m1)
for commit in bug_dic[item]:
fi.write(commit)
fi.close()
# analyze log
def deal_lines(date_from, date_to, search_key, stdout):
bug_dic = {}
for line in stdout.split(‘commit ‘):
if re.search(‘Bug: d+’, line) is not None and re.search(search_key, line) is not None:
bug_id = line.split(‘Bug: ‘)[1].split(‘
’)[0]
if bug_id not in bug_dic:
bug_dic[bug_id] = [line]
else:
bug_dic[bug_id] += [line]
return bug_dic
# get all branches of a project
def get_branches():
branch_list = []
branches = []
tmp_str = ”
try:
cmd_git_remote = ‘git remote show origin’
proc = subprocess.Popen(cmd_git_remote.split(),
stdout=subprocess.PIPE,
stderr=subprocess.PIPE)
stdout, stderr = proc.communicate()
tmp_str = stdout.split(‘Local branches configured’)[0]
try:
tmp_str = tmp_str.split(‘Remote branches:
’)[1]
except:
tmp_str = tmp_str.split(‘Remote branch:
’)[1]
branches = tmp_str.split(‘
’)
for branch in branches[0:-1]:
if re.search(‘ tracked’, branch) is not None:
branch = branch.replace(‘tracked’, ”).strip(‘ ‘)
branch_list.append(branch)
except Exception, error:
if branch_list == []:
print “Can not get any branch!”
return branch_list
if __name__ == ‘__main__’:
# path of the .git project. example: “/home/username/projects/jekyll_vincent”
project_dir = “”
date_from = “2014-01-25”
date_to = “2014-02-26”
# only search ‘Bug: d+’ for default
search_key = “”
# name of output file. example:”/home/username/jekyll_0125_0226.log”
filename = “”
run(project_dir, date_from, date_to, search_key, filename)

使用Python分析图像亮度的方法有哪些?
我想要一些有关在python中执行简单图像分析的建议。我需要为图像的“亮度”计算一个值。我知道PIL是执行此类操作的goto库。有一个内置的直方图功能。
我需要的是“感知亮度”值,我可以决定是否需要对图像进行进一步的调整。那么在这种情况下可以使用哪些基本技术呢?我应该只使用RGB值,还是直方图会给我足够接近的东西?
一种可能的解决方案是将两者结合起来,并使用直方图生成平均R,G和B值,然后应用“感知亮度”公式。
答案1
小编典典使用问题中提到的技术,我提出了几个不同的版本。
每个方法都返回一个close值,但与其他方法不完全相同。另外,除了最后一种方法外,所有方法都以相同的速度运行,这取决于图像大小,速度要慢得多。
将图像转换为灰度,返回平均像素亮度。
def brightness( im_file ):im = Image.open(im_file).convert(‘L’)
stat = ImageStat.Stat(im)
return stat.mean[0]将图像转换为灰度,返回RMS像素亮度。
def brightness( im_file ):im = Image.open(im_file).convert(‘L’)
stat = ImageStat.Stat(im)
return stat.rms[0]平均像素,然后转换为“感知的亮度”。
def brightness( im_file ):im = Image.open(im_file)
stat = ImageStat.Stat(im)
r,g,b = stat.mean
return math.sqrt(0.241(r2) + 0.691(g2) + 0.068*(b2))像素的RMS,然后转换为“感知的亮度”。
def brightness( im_file ):im = Image.open(im_file)
stat = ImageStat.Stat(im)
r,g,b = stat.rms
return math.sqrt(0.241(r2) + 0.691(g2) + 0.068*(b2))计算像素的“感知亮度”,然后返回平均值。
def brightness( im_file ):im = Image.open(im_file)
stat = ImageStat.Stat(im)
gs = (math.sqrt(0.241(r2) + 0.691(g2) + 0.068*(b2))
for r,g,b in im.getdata())
return sum(gs)/stat.count[0]
更新测试结果
我对200张图像进行了仿真。我发现方法#2,#4给出几乎相同的结果。方法#3,#5也几乎相同。方法#1紧跟在方法#3,#5之后(有一些例外)。
关于如何使用Python分析器获得调用树?和利用python进行数据分析 源代码的介绍现已完结,谢谢您的耐心阅读,如果想了解更多关于[译] Twitter数据挖掘:如何使用Python分析大数据、【Python】【程序分析器】关于Python Profilers性能分析器、使用python分析git log日志示例、使用Python分析图像亮度的方法有哪些?的相关知识,请在本站寻找。
本文标签:


