在这篇文章中,我们将带领您了解Python-有没有办法分离matplotlib图,以便继续计算?的全貌,包括matplotlib分段函数的相关情况。同时,我们还将为您介绍有关4.1Python数据处理
在这篇文章中,我们将带领您了解Python-有没有办法分离matplotlib图,以便继续计算?的全貌,包括matplotlib分段函数的相关情况。同时,我们还将为您介绍有关4.1Python数据处理篇之Matplotlib系列(一)---初识Matplotlib、Cpp调用Python3,使用matplotlib画(二维)图----1.配置(Clion,mingW64, python, matplotlib)、java版matplotlib,matplotlib4j使用,java中调用matplotlib或者其他python脚本、Python / Matplotlib-有没有办法制作不连续的轴?的知识,以帮助您更好地理解这个主题。
本文目录一览:- Python-有没有办法分离matplotlib图,以便继续计算?(matplotlib分段函数)
- 4.1Python数据处理篇之Matplotlib系列(一)---初识Matplotlib
- Cpp调用Python3,使用matplotlib画(二维)图----1.配置(Clion,mingW64, python, matplotlib)
- java版matplotlib,matplotlib4j使用,java中调用matplotlib或者其他python脚本
- Python / Matplotlib-有没有办法制作不连续的轴?
")
Python-有没有办法分离matplotlib图,以便继续计算?(matplotlib分段函数)
在Python解释器中执行以下指令后,将获得一个带有绘图的窗口:
from matplotlib.pyplot import *plot([1,2,3])show()# other code不幸的是,show()当程序进行进一步的计算时,我不知道如何继续以交互方式探索创建的图形。
有可能吗?有时计算很长,如果可以在检查中间结果时进行计算,则将有所帮助。
答案1
小编典典使用matplotlib不会阻塞的呼叫:
使用draw():
from matplotlib.pyplot import plot, draw, showplot([1,2,3])draw()print ''continue computation''# at the end call show to ensure window won''t close.show()使用交互模式:
from matplotlib.pyplot import plot, ion, showion() # enables interactive modeplot([1,2,3]) # result shows immediatelly (implicit draw())print ''continue computation''# at the end call show to ensure window won''t close.show()---初识Matplotlib")
4.1Python数据处理篇之Matplotlib系列(一)---初识Matplotlib
目录
[TOC]
前言
对于数据可视化的python库,对于Matplotlib早有耳闻,今天就来正式学习一下。
(一)matplotlib的介绍
matplotlib是python优秀的2D绘图库,可以完成大部分的绘图需求,同时其可定制性也很强,可内嵌在tkinter等各种GUI框架里。
官方网站:https://matplotlib.org/users/index.html
官方教程:https://matplotlib.org/tutorials/index.html
官方例子:https://matplotlib.org/gallery/index.html
(二)画一个简单的画布
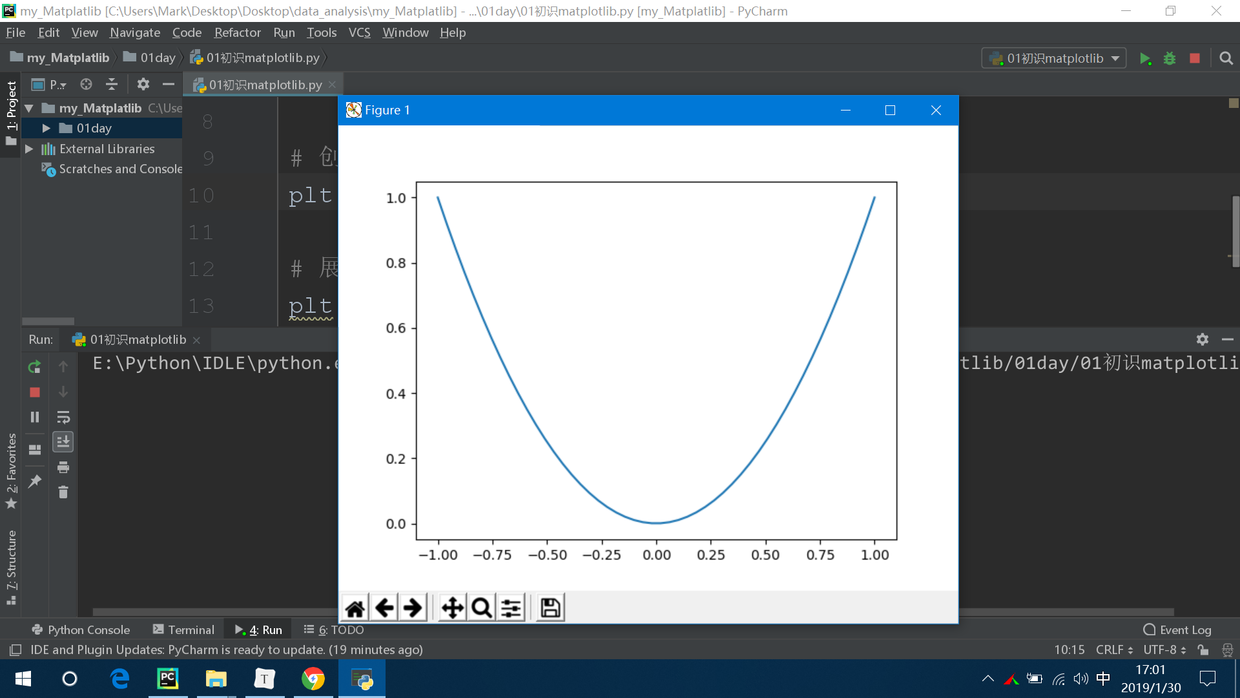
==1.源代码==
import matplotlib.pyplot as plt
import numpy as np

# 在-1~1之间建立50个点
x = np.linspace(-1, 1, 50)
# y = 2*x + 1
y = x**2

# 创建画布
plt.plot(x, y)

# 展现画布
plt.show()
==2.展示效果==
(三)画布按键的功能介绍
==1.对于画布功能键的排序==
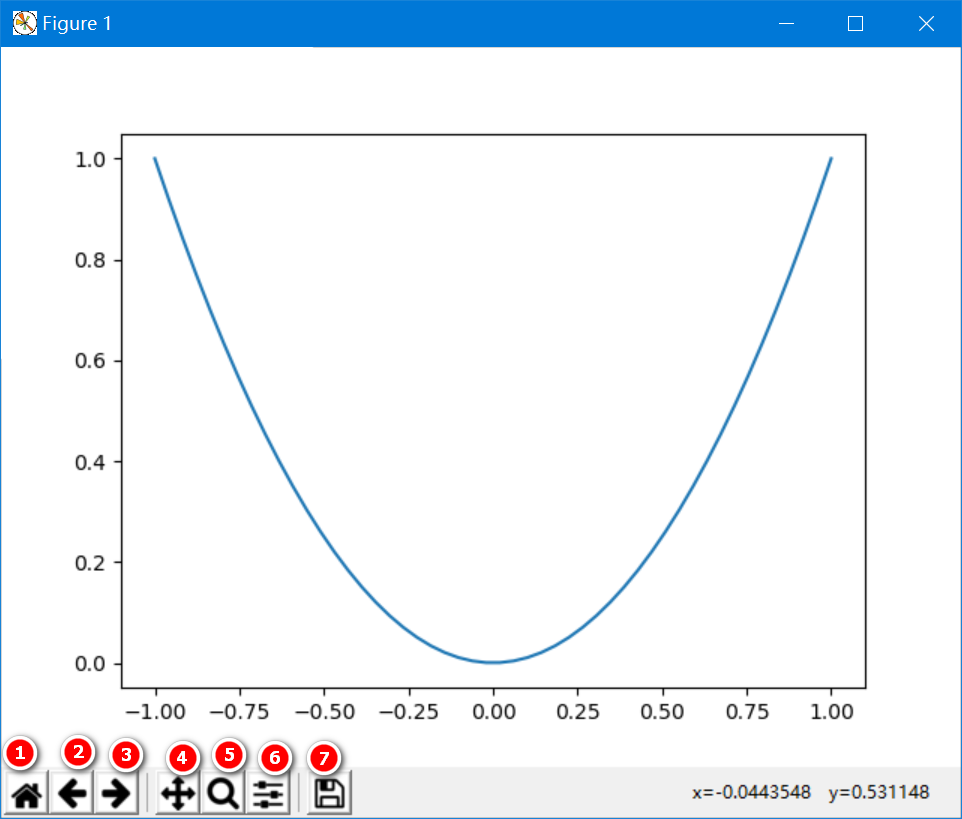
==(1)主页==
不管图片被你整成什么样,只要你按一下主页按钮,就会恢复到刚开始的样子。
==(2)上一个视图==
就是你改变了图片的位置,这个键就是跳到上一个键的图片位置。
==(3)下一个视图==
就是你改变了图片的位置,这个键就是跳到下一个键的图片位置。
==(4)移动查看==
我们可以以拖动的方式,来查看未显示的部分。
==(5)放大查看==
我们还可以用放大的方式,来细致的观察微小的部分。
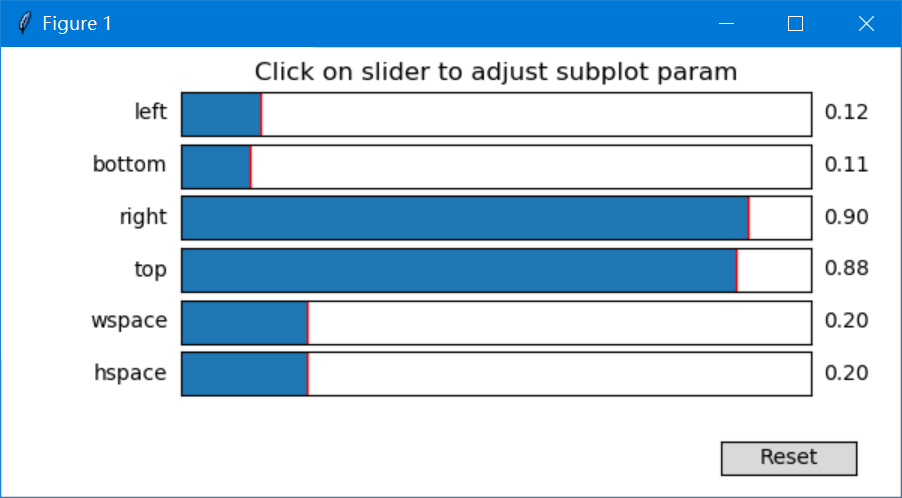
==(6)窗体设置==
我们可以调整显示区域在窗体的显示位置。
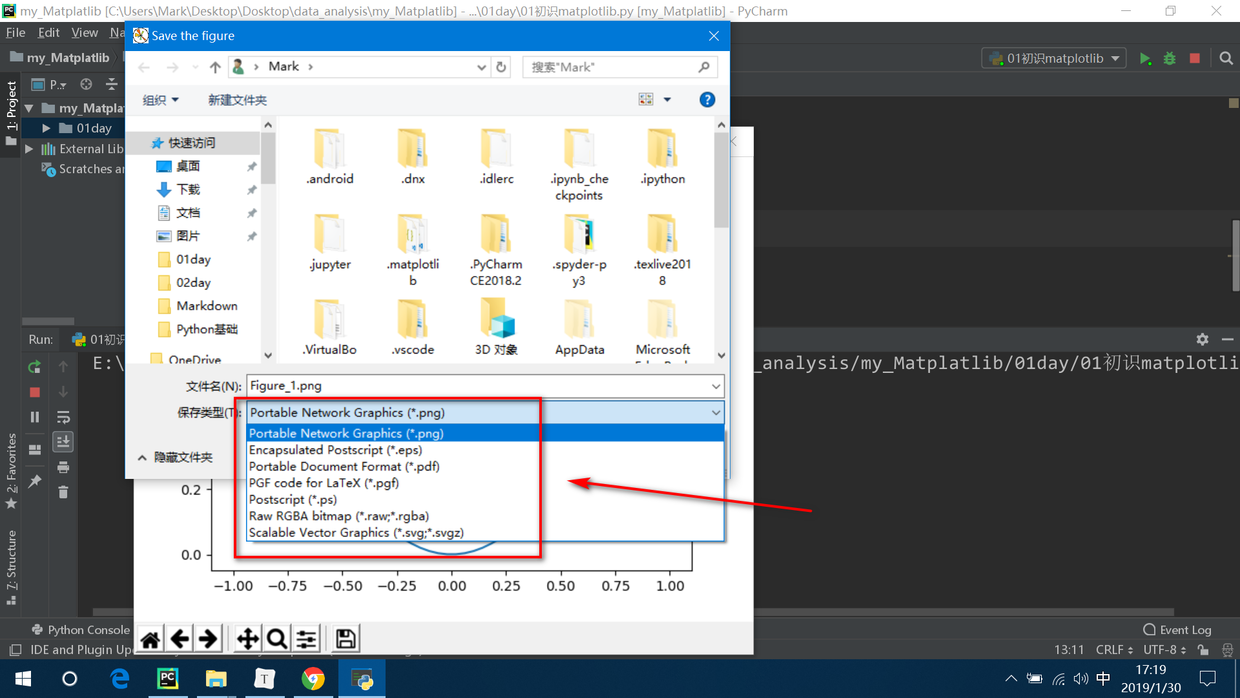
==(7)保存图片==
我们可以把视图保存为图片。
作者:Mark
日期:2019/01/30 周三
图----1.配置(Clion,mingW64, python, matplotlib)")
Cpp调用Python3,使用matplotlib画(二维)图----1.配置(Clion,mingW64, python, matplotlib)
To my knowledge so far, Cpp画图是真滴捉急, 那就调用python帮帮忙吧。
百度了好久,试了好几次,终于走完了配置的过程。我要记录一下。
1.0 配置:(操作系统)64位Win7, (Cpp的IDE是)Clion。
1.1 安装Clion
官网下载就可以了,地址 https://www.jetbrains.com/clion/
1.2 安装,配置mingW64
1.2.1:Clion需要我们安装Toolchain,我用的是mingW64(因为我用的是64位系统),附上百度网盘地址。
地址:https://pan.baidu.com/s/14FkN0Ul9cvcRxCOcylmoxw,密码:qu5l
1.2.2:然后我一股脑把路径全部添加到环境变量path了
(
D:\ProgramFile\mingw64;
D:\ProgramFile\mingw64\bin;
D:\ProgramFile\mingw64\lib;
D:\ProgramFile\mingw64\include
)
1.2.3:让Clion找到mingw64
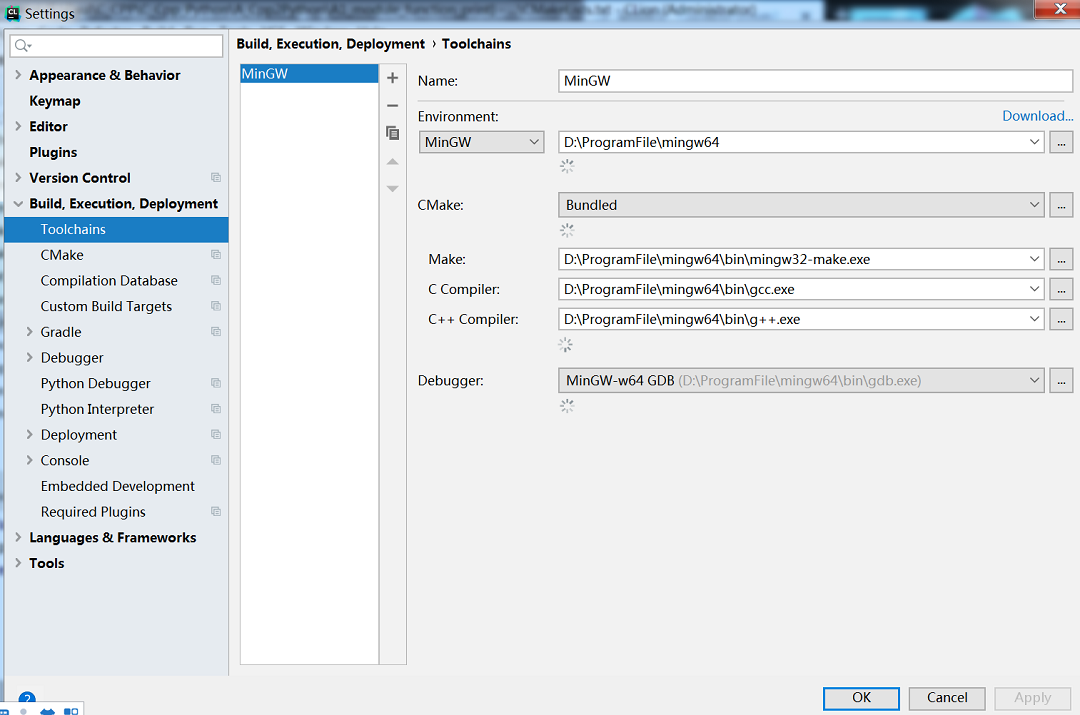
如果其中的Make, C Complier,C++ Complier没找到,就手动帮Clion添加。
!!!注意mingw的版本(指的是64位还是32位),一定要和pyhton的匹配。否则会出现如下错误:
载入Python.h:没问题 ; 读取其中函数:unreferenced...
1.3 安装python
1.3.1 安装python3.7
我的安装目录是 D:\ProgramFile\Python37 ,没有用Anaconda,事实上(可能是由于环境变量path中争抢调用关系的问题),我把原来装好的anaconda卸载了。
安装的版本是官网下载的。
同时,添加了 D:\ProgramFile\Python37到环境变量path。
1.3.2 用pip安装matplotlib
a. python3.7中的pip是自带的
b. 将python安装目录下的scripts添加到环境变量bin
c. (可选)查看python是否安装成功:在cmd界面,输入:python --version
d. (可选)查看pip是否安装成功:在cmd界面,输入:pip --version
e. (可选)升级pip:在cmd界面,输入:python -m pip install -U pip setuptools
f. 用pip安装matplotlib:在cmd界面,输入:python -m pip install matplotlib
1.4 Clion联结Cpp和python
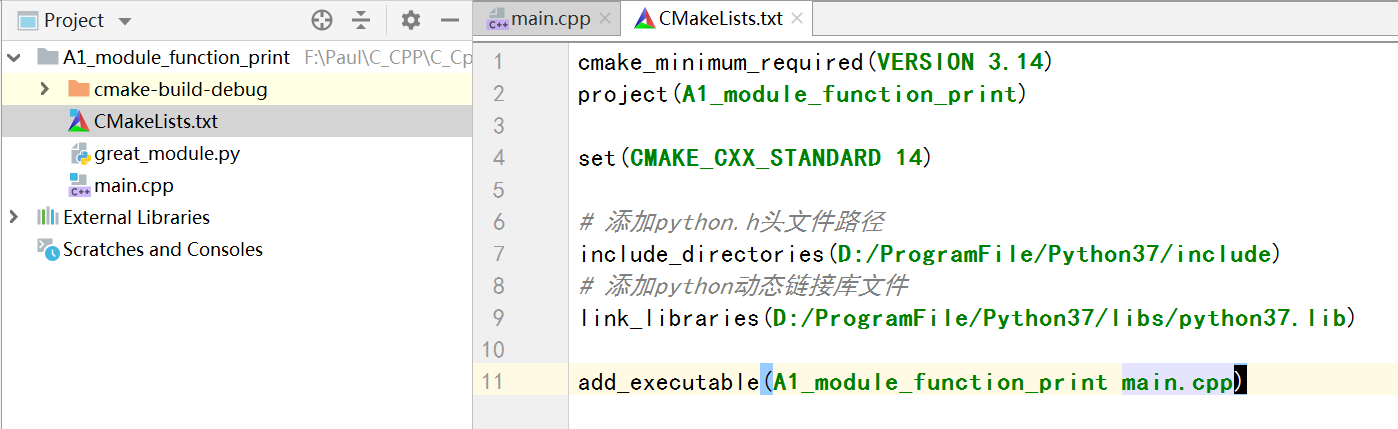
1.4.1:CMakeLists.txt的配置:
用clion新建cpp的project,在CMakeLists.txt中添加以下两句话
# 添加python.h头文件路径
include_directories(D:/ProgramFile/Python37/include)
# 添加python动态链接库文件
link_libraries(D:/ProgramFile/Python37/libs/python37.lib)
如下图:
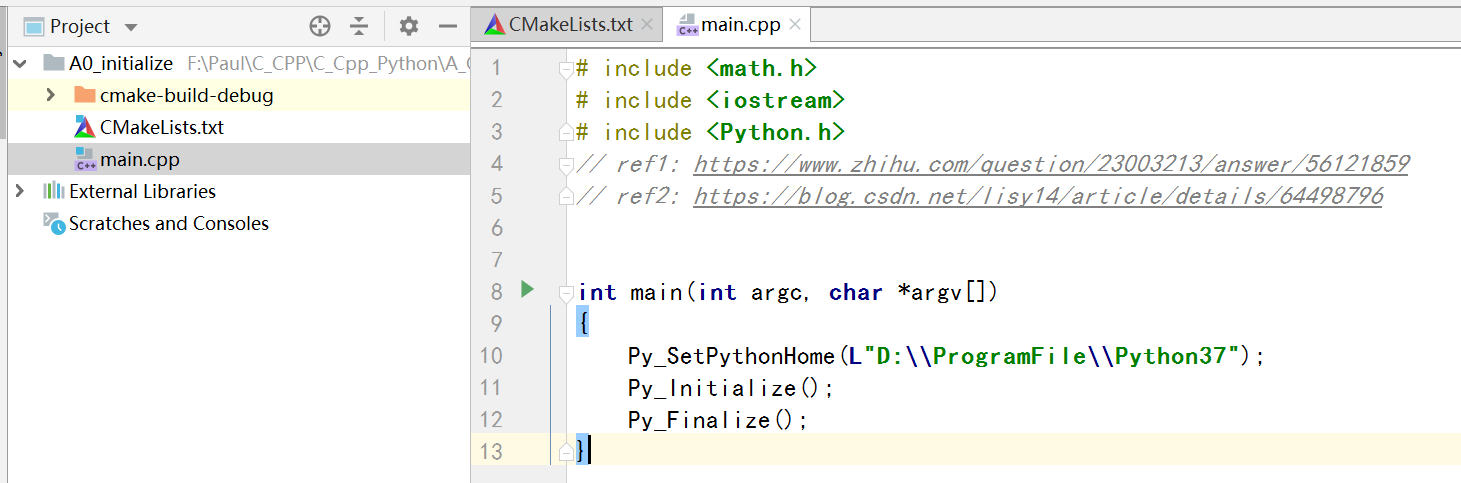
1.4.2:main.cpp的配置
我直接上图吧,如果这个cpp可以运行,那么说明配置成功了。

java版matplotlib,matplotlib4j使用,java中调用matplotlib或者其他python脚本
写在前面,最近需要在java中调用matplotlib,其他一些画图包都没这个好,毕竟python在科学计算有优势。找到了matplotlib4j,大概看了下github上的https://github.com/sh0nk/matplotlib4j,maven repository:
<dependency>
   <groupId>com.github.sh0nk</groupId>
       <artifactId>matplotlib4j</artifactId>
       <version>0.5.0</version>
</dependency>
简单贴个测试类,更多的用法在test报下有个MainTest.class。
 @Test
    public void testPlot() throws IOException, PythonExecutionException, ClassNotFoundException, NoSuchMethodException, illegalaccessexception, InvocationTargetException, InstantiationException {
        Plot plot = Plot.create(PythonConfig.pythonBinPathConfig("D:\\python3.6\\python.exe"));
        plt.plot()
                .add(Arrays.asList(1.3, 2))
                .label("label")
                .linestyle("--");
        plt.xlabel("xlabel");
        plt.ylabel("ylabel");
        plt.text(0.5, 0.2, "text");
        plt.title("Title!");
        plt.legend();
        plt.show();

    }
下面问题来了,这个对matplotlib的封装不是很全面,源码里也有很多todo,有很多函数简单用用还行,很多重载用不了,比如plt.plot(xdata,ydata)可以,但是无法在其中指定字体plt.plot(xdata,ydata,fontsize=30);
所以想要更全面的用法还得自己动手,几种办法:
- 大部分还是用matplotlib4j中的,个别的自己需要的但里头没有的函数,实现他的builder接口,重写build方法,返回一个py文件中命令行的字符串形式,然后反射取到PlotImpl中的成员变量registeredBuilders,往后追加命令行,感觉适用于只有极个别命令找不到的情况,挺麻烦的,而且要是传nd.array(…)这种参数还得额外拼字符串。
//拿到plotImpl中用于组装python脚本语句的的registeredBuilders,需要加什么直接添加新的builder就行了
        Field registeredBuildersField = plt.getClass().getDeclaredField("registeredBuilders");
        registeredBuildersField.setAccessible(true);
        List<Builder> registeredBuilders = (List<Builder>) registeredBuildersField.get(plt);

        TicksBuilder ticksBuilder = new TicksBuilder(yList, "yticks", fontSize);
        registeredBuilders.add(ticksBuilder);
- 这种比较直接,参照matplotlib4j底层,直接写py.exe文件,执行命令行,比较推荐这种,一行一行脚本自己写,数据拼装方便,看起来直观。比如写如下的脚本并执行,搞两组数据,画个散点图
import numpy as np
import matplotlib.pyplot as plt
plt.plot(np.array(自己的x数据), np.array(自己的y数据), 'k.', markersize=4)
plt.xlim(0,6000)
plt.ylim(0,24)
plt.yticks(np.arange(0, 25, 1), fontsize=10)
plt.title("waterfall")
plt.show()
像下面这么写就行了
		//1. 准备自己的数据 不用管
        List<Float> y_secondList_formatByHours = y_secondList.stream().map(second -> (float)second / 3600).collect(Collectors.toList());

        //2.准备命令行list,逐行命令添加
        List<String> scriptLines = new ArrayList<>();
        scriptLines.add("import numpy as np");
        scriptLines.add("import matplotlib.pyplot as plt");
        scriptLines.add("plt.plot("+"np.array("+x_positionList+"),"+"np.array(" +y_secondList_formatByHours+"),\"k.\",label=\"waterfall\",lw=1.0,markersize=4)");
        scriptLines.add("plt.xlim(0,6000)");
        scriptLines.add("plt.ylim(0,24)");
        scriptLines.add("plt.yticks(np.arange(0, 25, 1), fontsize=10)");
        scriptLines.add("plt.title(\"waterfall\")");
        scriptLines.add("plt.show()");
        //3. 调用matplotlib4j 里面的pycommond对象,传入自己电脑的python路径
        pycommand command = new pycommand(PythonConfig.pythonBinPathConfig("D:\\python3.6\\python.exe"));
        //4. 执行,每次执行会生成临时文件 如C:\Users\ADMINI~1\AppData\Local\Temp\1623292234356-0\exec.py,这个带的日志输出能看到,搞定
        command.execute(Joiner.on('\n').join(scriptLines));


Python / Matplotlib-有没有办法制作不连续的轴?
如何解决Python / Matplotlib-有没有办法制作不连续的轴??
这只是此示例的简单修改,具有不连续的x轴而不是y轴。(这就是为什么我要将此帖子设为CW)
基本上,你只需要执行以下操作:
import matplotlib.pylab as plt
import numpy as np

# If you''re not familiar with np.r_, don''t worry too much about this. It''s just
# a series with points from 0 to 1 spaced at 0.1, and 9 to 10 with the same spacing.
x = np.r_[0:1:0.1, 9:10:0.1]
y = np.sin(x)

fig,(ax,ax2) = plt.subplots(1, 2, sharey=True)

# plot the same data on both axes
ax.plot(x, y, ''bo'')
ax2.plot(x, y, ''bo'')

# zoom-in / limit the view to different portions of the data
ax.set_xlim(0,1) # most of the data
ax2.set_xlim(9,10) # outliers only

# hide the spines between ax and ax2
ax.spines[''right''].set_visible(False)
ax2.spines[''left''].set_visible(False)
ax.yaxis.tick_left()
ax.tick_params(labeltop=''off'') # don''t put tick labels at the top
ax2.yaxis.tick_right()

# Make the spacing between the two axes a bit smaller
plt.subplots_adjust(wspace=0.15)

plt.show()
要添加折断的轴线//效果,我们可以这样做(同样,从Paul Ivanov的示例进行了修改):
import matplotlib.pylab as plt
import numpy as np

# If you''re not familiar with np.r_, don''t worry too much about this. It''s just
# a series with points from 0 to 1 spaced at 0.1, and 9 to 10 with the same spacing.
x = np.r_[0:1:0.1, 9:10:0.1]
y = np.sin(x)

fig,(ax,ax2) = plt.subplots(1, 2, sharey=True)

# plot the same data on both axes
ax.plot(x, y, ''bo'')
ax2.plot(x, y, ''bo'')

# zoom-in / limit the view to different portions of the data
ax.set_xlim(0,1) # most of the data
ax2.set_xlim(9,10) # outliers only

# hide the spines between ax and ax2
ax.spines[''right''].set_visible(False)
ax2.spines[''left''].set_visible(False)
ax.yaxis.tick_left()
ax.tick_params(labeltop=''off'') # don''t put tick labels at the top
ax2.yaxis.tick_right()

# Make the spacing between the two axes a bit smaller
plt.subplots_adjust(wspace=0.15)

# This looks pretty good, and was fairly painless, but you can get that
# cut-out diagonal lines look with just a bit more work. The important
# thing to kNow here is that in axes coordinates, which are always
# between 0-1, spine endpoints are at these locations (0,0), (0,1),
# (1,0), and (1,1). Thus, we just need to put the diagonals in the
# appropriate corners of each of our axes, and so long as we use the
# right transform and disable clipping.

d = .015 # how big to make the diagonal lines in axes coordinates
# arguments to pass plot, just so we don''t keep repeating them
kwargs = dict(transform=ax.transAxes, color=''k'', clip_on=False)
ax.plot((1-d,1+d),(-d,+d), **kwargs) # top-left diagonal
ax.plot((1-d,1+d),(1-d,1+d), **kwargs) # bottom-left diagonal

kwargs.update(transform=ax2.transAxes) # switch to the bottom axes
ax2.plot((-d,d),(-d,+d), **kwargs) # top-right diagonal
ax2.plot((-d,d),(1-d,1+d), **kwargs) # bottom-right diagonal

# What''s cool about this is that Now if we vary the distance between
# ax and ax2 via f.subplots_adjust(hspace=...) or plt.subplot_tool(),
# the diagonal lines will move accordingly, and stay right at the tips
# of the spines they are ''breaking''

plt.show()
解决方法
我正在尝试使用具有不连续x轴的pyplot创建一个图。通常的绘制方法是轴将具有以下内容:
(值)---- // ----(后值)
// //表示您正在跳过(值)和(后值)之间的所有内容。
我还没有找到任何这样的例子,所以我想知道是否有可能。我知道您可以在不连续的情况下加入数据,例如财务数据,但我想使轴上的跳跃更明确。目前,我只是在使用子图,但我真的很希望最终所有内容都在同一张图上。
我们今天的关于Python-有没有办法分离matplotlib图,以便继续计算?和matplotlib分段函数的分享已经告一段落,感谢您的关注,如果您想了解更多关于4.1Python数据处理篇之Matplotlib系列(一)---初识Matplotlib、Cpp调用Python3,使用matplotlib画(二维)图----1.配置(Clion,mingW64, python, matplotlib)、java版matplotlib,matplotlib4j使用,java中调用matplotlib或者其他python脚本、Python / Matplotlib-有没有办法制作不连续的轴?的相关信息,请在本站查询。
本文标签:


