对于【numpy】新版本中numpy感兴趣的读者,本文将会是一篇不错的选择,我们将详细介绍numpy>1.17.0中的random模块,并为您提供关于"importnumpyasnp"ImportEr
对于【numpy】新版本中numpy感兴趣的读者,本文将会是一篇不错的选择,我们将详细介绍numpy>1.17.0中的random模块,并为您提供关于"import numpy as np" ImportError: No module named numpy、3.7Python 数据处理篇之 Numpy 系列 (七)---Numpy 的统计函数、Anaconda Numpy 错误“Importing the Numpy C Extension Failed”是否有另一种解决方案、cvxpy 和 numpy 之间的版本冲突:“针对 API 版本 0xe 编译的模块,但此版本的 numpy 是 0xd”的有用信息。
本文目录一览:- 【numpy】新版本中numpy(numpy>1.17.0)中的random模块(numpy.random.randomstate)
- "import numpy as np" ImportError: No module named numpy
- 3.7Python 数据处理篇之 Numpy 系列 (七)---Numpy 的统计函数
- Anaconda Numpy 错误“Importing the Numpy C Extension Failed”是否有另一种解决方案
- cvxpy 和 numpy 之间的版本冲突:“针对 API 版本 0xe 编译的模块,但此版本的 numpy 是 0xd”
中的random模块(numpy.random.randomstate)")
【numpy】新版本中numpy(numpy>1.17.0)中的random模块(numpy.random.randomstate)
numpy是Python中经常要使用的一个库,而其中的random模块经常用来生成一些数组,本文接下来将介绍numpy中random模块的一些使用方法。
首先查看numpy的版本:
import numpy
numpy.__version__
''1.18.2''
numpy获得随机数有两种方式:
- 结合BitGenerator生成伪随机数
- 结合Generate从一些统计分布中采样生成伪随机数
BitGenerator:生成随机数的对象。包含32或64位序列的无符号整数
Generator:将从BitGenerator生成的随机数序列转换为遵从特定概率分布(均匀、正态或二项式等)的数字序列的对象。
从Numpy版本1.17.0开始,可以使用许多不同的BitGenerators初始化Generator。 它包含了许多不同的概率分布。 传统的RandomState随机数例程仍然可用,但仅限于单个BitGenerator。为了方便和向后兼容,单个RandomState实例的方法被导入到numpy.random命名空间。
默认情况下,Generator使用PCG64提供的位,该位具有比RandomState中的传统mt19937随机数生成器更好的统计属性。
使用旧的numpy.random.RandomState
from numpy import random
random.standard_normal()
结果:1.3768264062478266
Generator可以替代RandomState。 现在,两个类实例都拥有一个内部BitGenerator实例来提供位流,可以通过gen.bit_generator对其进行访问。 某些过期的API清除意味着已从Generator中删除了旧方法和兼容性方法。

# As replacement for RandomState(); default_rng() instantiates Generator with
# the default PCG64 BitGenerator.
from numpy.random import default_rng
rg = default_rng()
rg.standard_normal()
rg.bit_generator
<numpy.random._pcg64.PCG64 at 0x7f6f87dac270>
以下这种方式可以支持RandomState和Generator,但是它们的接口有很大的不同:
try:
  rg_integers = rg.integers
except AttributeError:
  rg_integers = rg.randint
a = rg_integers(1000)
结果:775
种子可以传递给任何BitGenerator。 提供的值通过SeedSequence进行混合,以将可能的种子序列分布在BitGenerator的更广泛的初始化状态中。 这里使用PCG64,并用Generator包裹。
from numpy.random import Generator, PCG64
rg = Generator(PCG64(12345))
rg.standard_normal()
结果:-1.4238250364546312
新的基础结构采用了不同的方法来从RandomState对象生成随机数。 随机数生成分为两个部分,即位生成器和随机生成器。 BitGenerator的职责有限。 它管理状态并提供产生随机双精度数和随机无符号32位和64位值的功能。随机生成器采用生成器提供的流并将其转换成更有用的分布,例如模拟的正常随机值。 这种结构允许使用很少的代码重复来使用替代位生成器。 Generator是面向用户的对象,几乎与RandomState相同。 初始化生成器的规范方法将PCG64位生成器作为唯一参数。
from numpy.random import default_rng
rg = default_rng(12345)
rg.random()
结果:0.22733602246716966
也可以直接使用BitGenerator实例实例化Generator。 要使用较旧的MT19937算法,可以直接实例化并将其传递给Generator
from numpy.random import Generator, MT19937
rg = Generator(MT19937(12345))
rg.random()
结果:0.37786929937474845
警告:生成器不再提供用于生成NumPy标准的Box-Muller方法。 使用Generator不能为正态分布或任何其他依赖于正态的分布(例如RandomState.gamma RandomState.standard_t)确切的随机值。 如果需要按位向后兼容流,请使用RandomState。
- Generator的常规,指数和伽马函数使用256步Ziggurat方法,比NumPy的Box-Muller或逆CDF实现快2-10倍。
- 可选的dtype参数,它接受np.float32或np.float64来为选择分布产生统一的单或双精度的随机变量
- 可选的out参数,允许为选择分布填充现有阵列
- random_entropy提供对密码应用程序中使用的系统随机性源的访问(例如Unix上的/ dev / urandom)。
- 所有BitGenerator都可以通过CType(ctype)和CFFI(cffi)生成double,uint64和uint32。这允许在numba中使用位生成器。
- 位生成器可通过Cython用于下游项目。
- 整数现在是从离散均匀分布中生成整数随机数的规范方法。 rand和randn方法仅可通过旧版RandomState使用。端点关键字可用于指定打开或关闭间隔。这将替换randint和已弃用的random_integers。
- random现在是生成浮点随机数的规范方法,它取代了RandomState.random_sample,RandomState.sample和RandomState.ranf。这与Python的随机性是一致的。
- 随机。
- numpy中的所有BitGenerator都使用SeedSequence将种子转换为初始化状态。
Generator可以访问广泛的发行版,并替代RandomState。 两者之间的主要区别在于Generator依赖于附加的BitGenerator来管理状态并生成随机位,然后将这些随机位从有用的分布转换为随机值。 Generator使用的默认BitGenerator为PCG64。 可以通过将实例化的BitGenerator传递给Generator来更改BitGenerator。
也就是说,设置了:
np.random.default_rng(PCG64(随机种子))在生成随机数的时候都会是相同的。然后替换掉了原来的RandomState(随机种子)
如果省略seed或None,则每次都会实例化一个新的BitGenerator和Generator。 此功能不管理默认的全局实例。
Generator的一些方法:

Generator.integers(low, high=None, size=None, dtype=’int64’, endpoint=False)
例如:
rng = np.random.default_rng(PCG64(12345))
rng.integers(2, size=10)
结果:array([1, 0, 1, 0, 0, 1, 1, 1, 1, 0])
这里的意思是生成10个数,这是个数的取值范围在0-2之间,不包括2.
再看些例子:
rng.integers(5, size=(2, 4))结果:array([[4, 3, 4, 0], [4, 0, 2, 1]])
rng.integers(1, [3, 5, 10])结果:array([1, 3, 3])
这里的意思是生成1×3的数组,并且每一位都限制了取值范围。
rng.integers([1, 5, 7], 10)结果:array([6, 6, 7])
rng.integers([1, 3, 5, 7], [[10], [20]], dtype=np.uint8)结果:array([[ 1, 4, 8, 9], [ 5, 18, 16, 12]], dtype=uint8)
这里使用了广播机制。
Generator.random(size=None, dtype=’d’, out=None):
在半开区间[0.0,1.0)中返回随机浮点数。
结果来自指定时间间隔内的“连续均匀”分布。 要对[,)进行采样,>。将random的输出乘以(b-a)并加上a。
(b - a) * random() + a看一些例子:
rng.random()0.5110659735695771
type(rng.random())float
rng.random((5,))array([0.96743595, 0.68306482, 0.39162483, 0.18725257, 0.34596067])
我们可以稍加变化既可以改变获得区间的值了,例如区间为[-5,0)
5 * rng.random((3, 2)) - 5array([[-0.54395295, -1.12218029], [-3.409267 , -0.37891552], [-2.64545057, -1.53120579]])
Generator.choice()
choice(a, size=None, replace=True, p=None, axis=0):
Generates a random sample from a given 1-D array
看一些例子:
Generate a uniform random sample from np.arange(5) of size 3:
rng.choice(5, 3)array([3, 0, 2])
Generate a non-uniform random sample from np.arange(5) of size 3:
rng.choice(5, 3, p=[0.1, 0, 0.3, 0.6, 0])array([2, 3, 3])
Generate a uniform random sample from np.arange(5) of size 3 without replacement:
rng.choice(5, 3, replace=False)array([0, 4, 1])
Generate a non-uniform random sample from np.arange(5) of size 3 without replacement:
rng.choice(5, 3, replace=False, p=[0.1, 0, 0.3, 0.6, 0])array([3, 2, 0])
Any of the above can be repeated with an arbitrary array-like instead of just integers. For instance:
aa_milne_arr = [''pooh'', ''rabbit'', ''piglet'', ''Christopher'']
rng.choice(aa_milne_arr, 5, p=[0.5, 0.1, 0.1, 0.3])
array([''piglet'', ''Christopher'', ''pooh'', ''piglet'', ''pooh''], dtype=''<U11''
Generator.bytes(length)
Return random bytes.
Parameters
length [int] Number of random bytes.
Returns
out [str] String of length length.
看一些例子:
rng.bytes(10)b''[\x95\xe8\xc4\xbd\x16\xd8\x85\xa7*''
接下来是另外一些方法:

Generator.shuffle(x)
看一些例子:
arr = np.arange(10)
arr
rng.shuffle(arr)
arr
array([0, 1, 2, 3, 4, 5, 6, 7, 8, 9])
array([9, 7, 8, 5, 0, 4, 3, 6, 1, 2])
arr = np.arange(9).reshape((3, 3))
arr

rng.shuffle(arr)
arr
array([[0, 1, 2], [3, 4, 5], [6, 7, 8]])
array([[6, 7, 8], [0, 1, 2], [3, 4, 5]])
Generator.permutation(x)
看一些例子:
rng.permutation(10)array([1, 7, 4, 3, 0, 9, 2, 5, 8, 6])
rng.permutation([1, 4, 9, 12, 15])array([15, 1, 9, 4, 12])
arr = np.arange(9).reshape((3, 3))
rng.permutation(arr)
array([[0, 1, 2], [6, 7, 8], [3, 4, 5]])
最后是一些统计分布:


就简单的看一个分布:
n, p = 10, .5 # number of trials, probability of each trial
s = rng.binomial(n, p, 1000)
# result of flipping a coin 10 times, tested 1000 times.
array([7, 8, 9, 4, 5, 6, 3, 5, 4, 7, 2, 7, 2, 7, 5, 4, 4, 7, 4, 6, 7, 4, 5, 5, 7, 4, 4, 6, 3, 4, 6, 6, 5, 7, 4, 7, 4, 7, 6, 6, 5, 6, 4, 6, 3, 6, 8, 8, 4, 7, 5, 5, 5, 5, 5, 8, 6, 3, 6, 5, 9, 4, 6, 5, 4, 3, 7, 2, 4, 5, 4, 5, 4, 6, 5, 6, 8, 3, 5, 3, 4, 5, 6, 4, 6, 6, 5, 7, 5, 8, 8, 5, 8, 6, 5, 5, 6, 8, 7, 8, 5, 1, 3, 5, 3, 5, 3, 4, 4, 7, 5, 3, 6, 7, 6, 1, 7, 4, 6, 6, 6, 3, 4, 3, 6, 3, 5, 6, 6, 5, 3, 7, 4, 5, 1, 4, 7, 6, 6, 5, 3, 4, 8, 3, 6, 4, 6, 3, 3, 5, 4, 6, 9, 3, 4, 4, 5, 4, 5, 4, 5, 7, 7, 4, 4, 5, 5, 2, 6, 6, 5, 3, 6, 3, 3, 5, 5, 8, 4, 4, 4, 7, 6, 1, 3, 8, 5, 5, 3, 4, 2, 7, 7, 5, 6, 3, 4, 5, 6, 5, 3, 7, 4, 6, 7, 3, 5, 5, 9, 6, 5, 6, 5, 3, 4, 6, 6, 5, 4, 3, 6, 4, 6, 7, 6, 5, 2, 6, 8, 4, 7, 5, 6, 6, 4, 5, 3, 3, 4, 6, 5, 7, 6, 7, 6, 5, 3, 5, 5, 3, 3, 8, 6, 4, 2, 4, 5, 8, 2, 6, 8, 8, 5, 6, 6, 2, 4, 7, 3, 3, 5, 7, 4, 5, 8, 7, 2, 6, 3, 8, 6, 7, 5, 3, 4, 3, 6, 7, 5, 7, 4, 5, 5, 5, 2, 3, 3, 6, 5, 9, 6, 4, 3, 6, 6, 3, 5, 8, 7, 3, 5, 7, 5, 2, 4, 4, 4, 8, 6, 9, 6, 8, 5, 7, 5, 6, 4, 7, 5, 7, 4, 5, 5, 7, 6, 4, 5, 7, 7, 6, 4, 7, 5, 6, 6, 6, 2, 4, 6, 6, 7, 6, 6, 7, 7, 4, 7, 8, 3, 5, 5, 5, 7, 1, 3, 6, 4, 5, 3, 8, 5, 3, 7, 5, 4, 3, 2, 7, 3, 4, 5, 3, 6, 6, 6, 4, 4, 6, 8, 5, 7, 3, 6, 4, 4, 2, 7, 3, 4, 4, 5, 6, 3, 3, 4, 7, 6, 7, 5, 1, 5, 4, 3, 4, 6, 5, 6, 6, 5, 5, 6, 6, 6, 4, 4, 6, 6, 6, 4, 2, 6, 3, 6, 2, 3, 3, 3, 6, 2, 4, 5, 5, 6, 5, 3, 3, 6, 4, 3, 4, 3, 6, 4, 5, 5, 5, 7, 5, 3, 6, 4, 4, 6, 4, 4, 5, 6, 6, 5, 1, 1, 3, 9, 5, 5, 6, 5, 3, 6, 4, 4, 2, 6, 6, 4, 2, 4, 3, 4, 6, 5, 5, 5, 5, 5, 5, 3, 7, 4, 7, 7, 5, 6, 5, 6, 8, 1, 7, 4, 4, 6, 4, 5, 3, 2, 5, 3, 7, 2, 3, 7, 4, 5, 2, 6, 5, 6, 6, 6, 5, 5, 6, 4, 6, 3, 7, 5, 3, 4, 4, 3, 5, 5, 5, 5, 4, 6, 5, 1, 6, 2, 5, 5, 7, 7, 4, 5, 3, 5, 4, 5, 5, 7, 5, 7, 5, 4, 8, 4, 2, 4, 6, 5, 6, 6, 7, 3, 7, 4, 5, 7, 4, 5, 4, 3, 5, 3, 2, 5, 4, 6, 5, 4, 4, 7, 6, 5, 3, 5, 3, 3, 5, 3, 3, 5, 6, 4, 7, 3, 5, 4, 6, 5, 5, 3, 4, 4, 6, 7, 7, 7, 6, 7, 6, 2, 3, 3, 6, 6, 3, 4, 3, 7, 6, 6, 5, 5, 5, 3, 5, 5, 6, 3, 7, 6, 6, 4, 5, 6, 4, 6, 5, 6, 5, 6, 8, 6, 1, 3, 5, 5, 5, 5, 5, 3, 6, 5, 7, 7, 8, 6, 3, 5, 5, 4, 2, 6, 6, 4, 1, 6, 6, 3, 4, 4, 6, 7, 6, 4, 4, 5, 6, 4, 4, 5, 6, 6, 5, 2, 4, 5, 4, 8, 4, 7, 4, 6, 6, 9, 6, 7, 7, 4, 5, 3, 4, 7, 4, 4, 4, 6, 3, 5, 3, 7, 3, 5, 8, 6, 5, 6, 5, 3, 6, 7, 4, 5, 7, 4, 4, 4, 3, 7, 6, 6, 6, 7, 5, 8, 1, 4, 4, 5, 6, 7, 8, 7, 5, 5, 5, 1, 5, 6, 3, 4, 3, 3, 4, 5, 3, 6, 6, 9, 6, 2, 3, 7, 3, 4, 5, 6, 5, 2, 4, 8, 4, 6, 4, 2, 4, 5, 7, 4, 7, 3, 4, 5, 8, 4, 4, 2, 4, 6, 6, 5, 7, 2, 6, 5, 5, 4, 3, 3, 3, 5, 8, 3, 7, 6, 4, 3, 4, 8, 5, 9, 4, 3, 5, 3, 5, 5, 8, 6, 1, 2, 1, 5, 5, 5, 7, 4, 5, 7, 6, 4, 3, 3, 8, 3, 2, 6, 5, 5, 6, 4, 4, 4, 3, 6, 5, 5, 5, 6, 6, 6, 4, 3, 5, 4, 5, 7, 3, 4, 4, 5, 5, 4, 7, 5, 3, 6, 6, 5, 6, 6, 4, 7, 6, 3, 4, 2, 6, 3, 5, 5, 3, 9, 7, 9, 4, 4, 3, 9, 6, 3, 1, 6, 4, 4, 6, 6, 5, 7, 5, 5, 5, 5, 4, 6, 6, 3, 5, 5, 5, 5, 6, 5, 5, 7, 3, 6, 3, 2, 7, 3, 3, 6, 4, 5, 5, 5, 6, 5, 6, 4, 3, 6, 8, 7, 3, 5, 6, 5, 6, 8, 6, 7, 4, 5, 7, 4, 5, 6, 4, 6, 6, 5, 4, 4, 5, 4, 6, 6, 3, 6, 6, 6, 6, 6, 3, 4, 6, 6, 4, 5, 3, 6, 6, 2, 6, 4, 4, 5, 7, 4, 6, 9, 6, 6, 6])
参考了numpy==1.17.4的英文文档。

"import numpy as np" ImportError: No module named numpy
问题:没有安装 numpy
解决方法:
下载文件,安装
numpy-1.8.2-win32-superpack-python2.7
安装运行 import numpy,出现
Traceback (most recent call last):
  File "<pyshell#2>", line 1, in <module>
    import numpy
  File "C:\Python27\lib\site-packages\numpy\__init__.py", line 153, in <module>
    from . import add_newdocs
  File "C:\Python27\lib\site-packages\numpy\add_newdocs.py", line 13, in <module>
    from numpy.lib import add_newdoc
  File "C:\Python27\lib\site-packages\numpy\lib\__init__.py", line 8, in <module>
    from .type_check import *
  File "C:\Python27\lib\site-packages\numpy\lib\type_check.py", line 11, in <module>
    import numpy.core.numeric as _nx
  File "C:\Python27\lib\site-packages\numpy\core\__init__.py", line 6, in <module>
    from . import multiarray
ImportError: DLL load failed: %1 不是有效的 Win32 应用程序。
原因是:python 装的是 64 位的,numpy 装的是 32 位的
重新安装 numpy 为:numpy-1.8.0-win64-py2.7
---Numpy 的统计函数")
3.7Python 数据处理篇之 Numpy 系列 (七)---Numpy 的统计函数
目录
[TOC]
前言
具体我们来学 Numpy 的统计函数
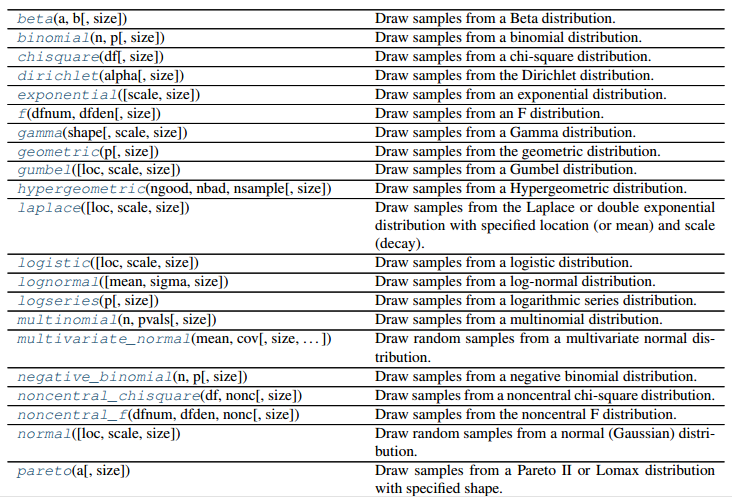
(一)函数一览表
调用方式:np.*
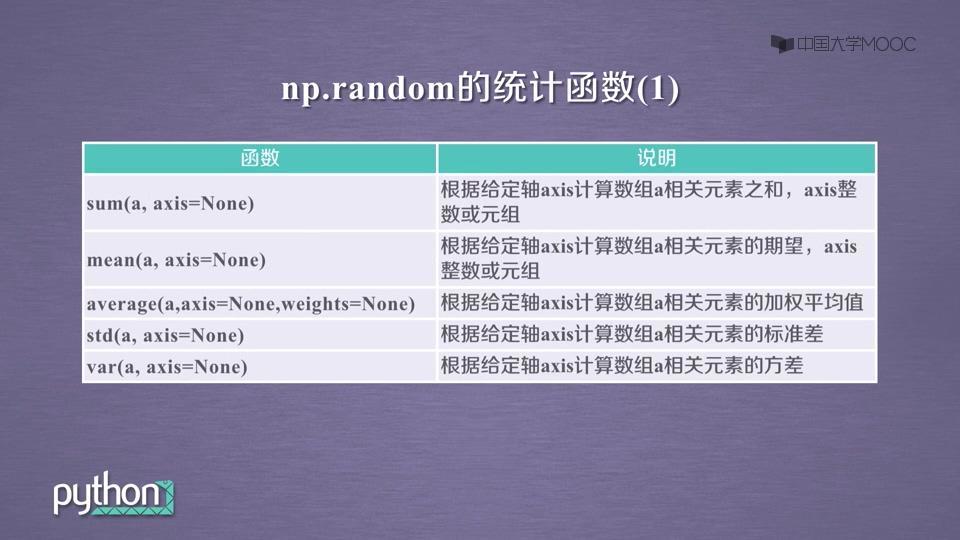
| .sum(a) | 对数组 a 求和 |
|---|---|
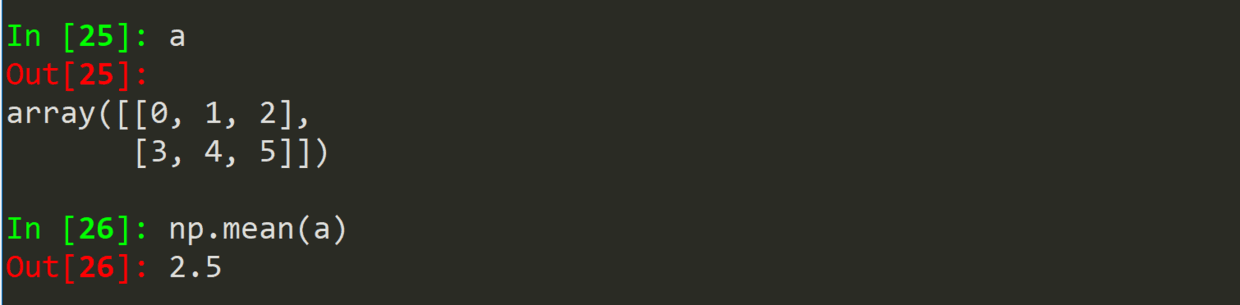
| .mean(a) | 求数学期望 |
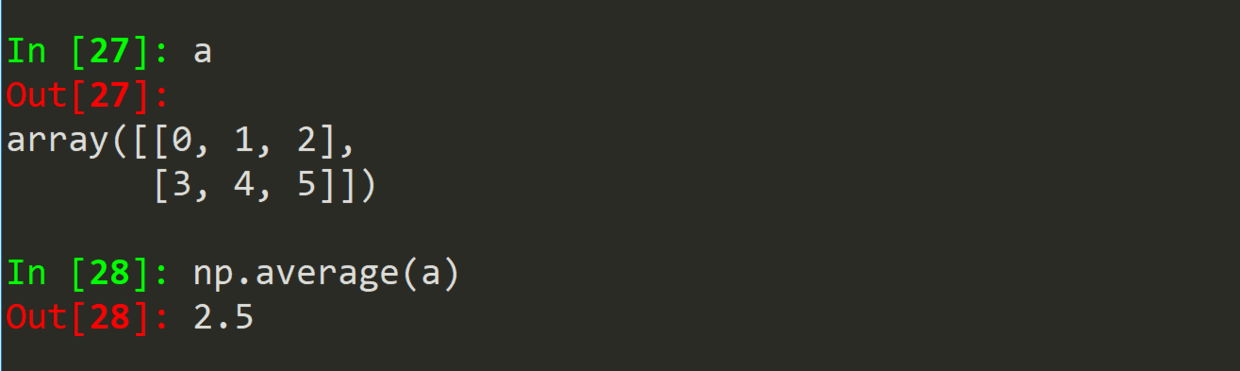
| .average(a) | 求平均值 |
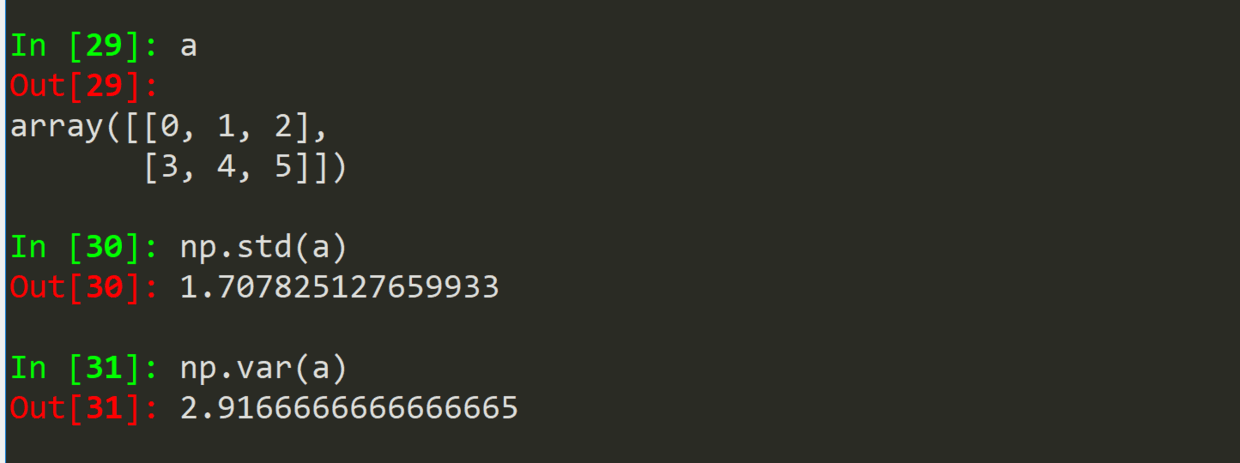
| .std(a) | 求标准差 |
| .var(a) | 求方差 |
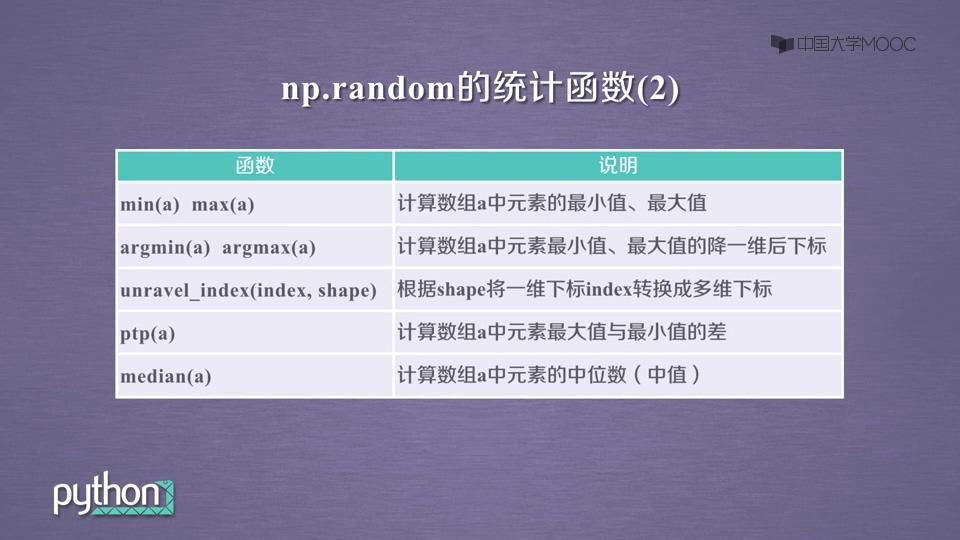
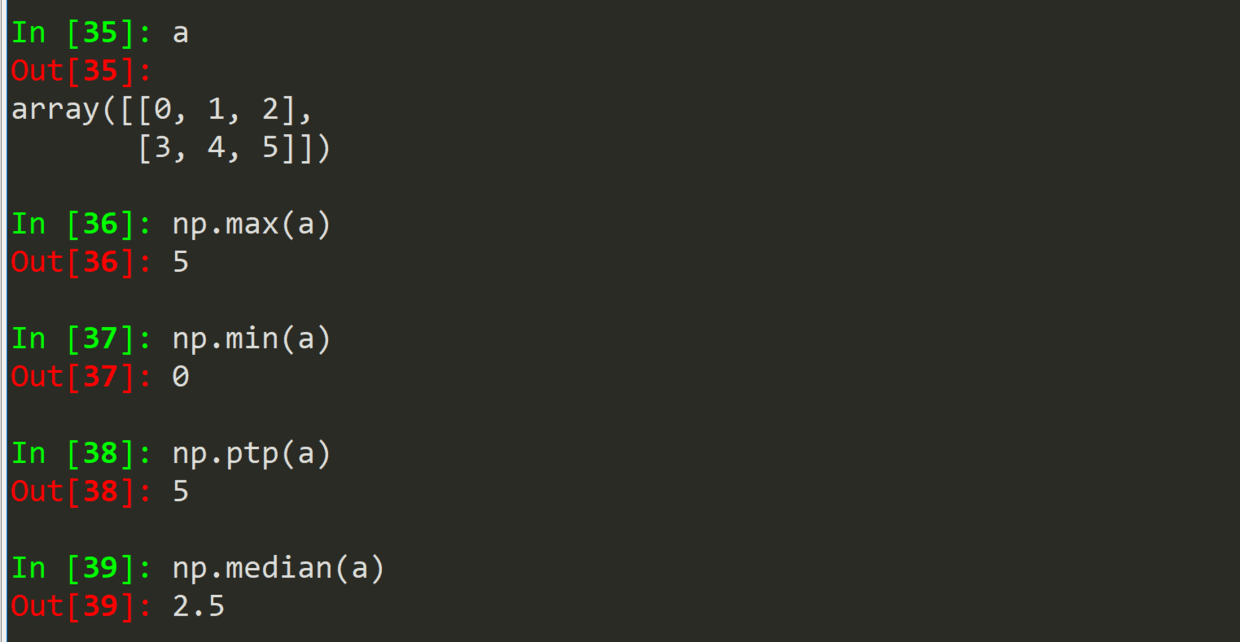
| .ptp(a) | 求极差 |
| .median(a) | 求中值,即中位数 |
| .min(a) | 求最大值 |
| .max(a) | 求最小值 |
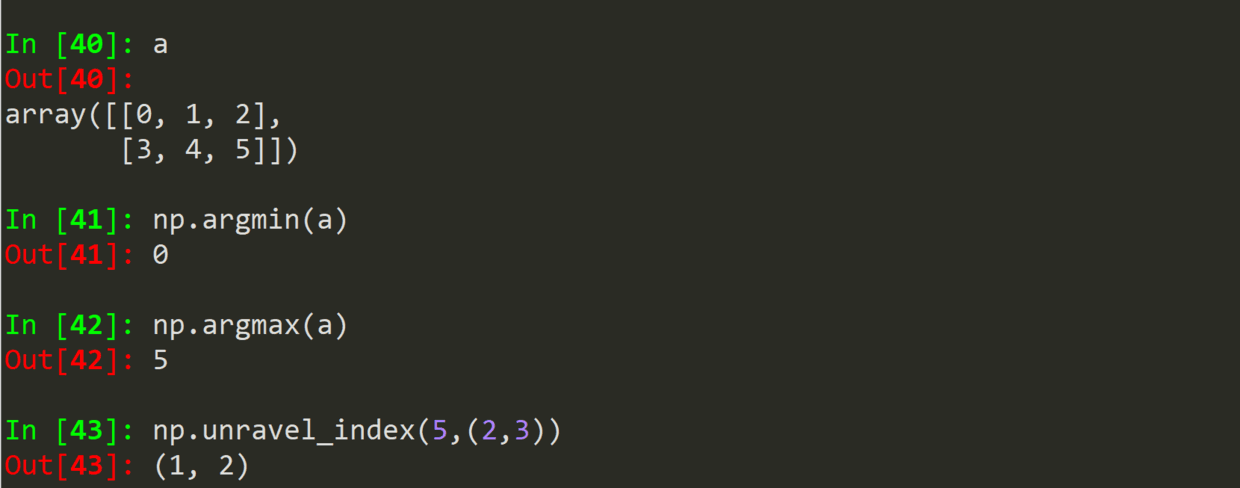
| .argmin(a) | 求最小值的下标,都处里为一维的下标 |
| .argmax(a) | 求最大值的下标,都处里为一维的下标 |
| .unravel_index(index, shape) | g 根据 shape, 由一维的下标生成多维的下标 |
(二)统计函数 1
(1)说明
(2)输出
.sum(a)

.mean(a)
.average(a)
.std(a)
.var(a)
(三)统计函数 2
(1)说明
(2)输出
.max(a) .min(a)
.ptp(a)
.median(a)
.argmin(a)
.argmax(a)
.unravel_index(index,shape)
作者:Mark
日期:2019/02/11 周一

Anaconda Numpy 错误“Importing the Numpy C Extension Failed”是否有另一种解决方案
如何解决Anaconda Numpy 错误“Importing the Numpy C Extension Failed”是否有另一种解决方案?
希望有人能在这里提供帮助。我一直在绕圈子一段时间。我只是想设置一个 python 脚本,它将一些 json 数据从 REST API 加载到云数据库中。我在 Anaconda 上设置了一个虚拟环境(因为 GCP 库推荐这样做),安装了依赖项,现在我只是尝试导入库并向端点发送请求。 我使用 Conda(和 conda-forge)来设置环境并安装依赖项,所以希望一切都干净。我正在使用带有 Python 扩展的 VS 编辑器作为编辑器。 每当我尝试运行脚本时,我都会收到以下消息。我已经尝试了其他人在 Google/StackOverflow 上找到的所有解决方案,但没有一个有效。我通常使用 IDLE 或 Jupyter 进行脚本编写,没有任何问题,但我对 Anaconda、VS 或环境变量(似乎是相关的)没有太多经验。 在此先感谢您的帮助!
  \Traceback (most recent call last):
File "C:\Conda\envs\gcp\lib\site-packages\numpy\core\__init__.py",line 22,in <module>
from . import multiarray
File "C:\Conda\envs\gcp\lib\site-packages\numpy\core\multiarray.py",line 12,in <module>
from . import overrides
File "C:\Conda\envs\gcp\lib\site-packages\numpy\core\overrides.py",line 7,in <module>
from numpy.core._multiarray_umath import (
ImportError: DLL load Failed while importing _multiarray_umath: The specified module Could not be found.

During handling of the above exception,another exception occurred:

Traceback (most recent call last):
File "c:\API\citi-bike.py",line 4,in <module>
import numpy as np
File "C:\Conda\envs\gcp\lib\site-packages\numpy\__init__.py",line 150,in <module>
from . import core
File "C:\Conda\envs\gcp\lib\site-packages\numpy\core\__init__.py",line 48,in <module>
raise ImportError(msg)
ImportError:

IMPORTANT: PLEASE READ THIS FOR ADVICE ON HOW TO SOLVE THIS ISSUE!

Importing the numpy C-extensions Failed. This error can happen for
many reasons,often due to issues with your setup or how NumPy was
installed.

We have compiled some common reasons and troubleshooting tips at:

https://numpy.org/devdocs/user/troubleshooting-importerror.html

Please note and check the following:

* The Python version is: python3.9 from "C:\Conda\envs\gcp\python.exe"
* The NumPy version is: "1.21.1"

and make sure that they are the versions you expect.
Please carefully study the documentation linked above for further help.

Original error was: DLL load Failed while importing _multiarray_umath: The specified module Could not be found.
解决方法
暂无找到可以解决该程序问题的有效方法,小编努力寻找整理中!
如果你已经找到好的解决方法,欢迎将解决方案带上本链接一起发送给小编。
小编邮箱:dio#foxmail.com (将#修改为@)

cvxpy 和 numpy 之间的版本冲突:“针对 API 版本 0xe 编译的模块,但此版本的 numpy 是 0xd”
如何解决cvxpy 和 numpy 之间的版本冲突:“针对 API 版本 0xe 编译的模块,但此版本的 numpy 是 0xd”?
我正在尝试升级一些软件包并为现有的 Python 程序整合我的 requirements.txt,以便将其移至 docker 容器。
这个容器将基于 tensorflow docker 容器,这决定了我必须使用的一些包版本。我们在 windows 下工作,我们希望能够在我们的机器上本地运行该程序(至少在一段时间内)。所以我需要找到一个适用于 docker 和 Windows 10 的配置。
Tensorflow 2.4.1 需要 numpy~=1.19.2。使用 numpy 1.20 时,pip 会抱怨 numpy 1.20 是一个不兼容的版本。
但是在使用 numpy~=1.19.2 时,导入 cvxpy 时出现以下错误。 pip 安装所有软件包都很好:
RuntimeError: module compiled against API version 0xe but this version of numpy is 0xd
Traceback (most recent call last):
  File "test.py",line 1,in <module>
    import cvxpy
  File "c:\Projekte\algo5\venv\lib\site-packages\cvxpy\__init__.py",line 18,in <module>
    from cvxpy.atoms import *
  File "c:\Projekte\algo5\venv\lib\site-packages\cvxpy\atoms\__init__.py",line 20,in <module>
    from cvxpy.atoms.geo_mean import geo_mean
  File "c:\Projekte\algo5\venv\lib\site-packages\cvxpy\atoms\geo_mean.py",in <module>
    from cvxpy.utilities.power_tools import (fracify,decompose,approx_error,lower_bound,File "c:\Projekte\algo5\venv\lib\site-packages\cvxpy\utilities\power_tools.py",in <module>
    from cvxpy.atoms.affine.reshape import reshape
  File "c:\Projekte\algo5\venv\lib\site-packages\cvxpy\atoms\affine\reshape.py",in <module>
    from cvxpy.atoms.affine.hstack import hstack
  File "c:\Projekte\algo5\venv\lib\site-packages\cvxpy\atoms\affine\hstack.py",in <module>
    from cvxpy.atoms.affine.affine_atom import AffAtom
  File "c:\Projekte\algo5\venv\lib\site-packages\cvxpy\atoms\affine\affine_atom.py",line 22,in <module>
    from cvxpy.cvxcore.python import canonInterface
  File "c:\Projekte\algo5\venv\lib\site-packages\cvxpy\cvxcore\python\__init__.py",line 3,in <module>
    import _cvxcore
ImportError: numpy.core.multiarray Failed to import
重现步骤:
1.)
在 Windows 10 下创建一个新的 Python 3.8 venv 并激活它
2.) 通过 requirements.txt 安装以下 pip install -r requirements.txt:
cvxpy
numpy~=1.19.2 # tensorflow 2.4.1 requires this version
3.) 通过 test.py
python test.py
import cvxpy

if __name__ == ''__main__'':
    pass
如果我想使用 tensorflow 2.3,也会发生同样的事情。在这种情况下需要 numpy~=1.18,错误完全相同。
搜索错误发现很少的命中,可悲的是没有帮助我。
我该怎么做才能解决这个问题?
解决方法
暂无找到可以解决该程序问题的有效方法,小编努力寻找整理中!
如果你已经找到好的解决方法,欢迎将解决方案带上本链接一起发送给小编。
小编邮箱:dio#foxmail.com (将#修改为@)
我们今天的关于【numpy】新版本中numpy和numpy>1.17.0中的random模块的分享已经告一段落,感谢您的关注,如果您想了解更多关于"import numpy as np" ImportError: No module named numpy、3.7Python 数据处理篇之 Numpy 系列 (七)---Numpy 的统计函数、Anaconda Numpy 错误“Importing the Numpy C Extension Failed”是否有另一种解决方案、cvxpy 和 numpy 之间的版本冲突:“针对 API 版本 0xe 编译的模块,但此版本的 numpy 是 0xd”的相关信息,请在本站查询。
本文标签:


