如果您想了解Python3定时输入的相关知识,那么本文是一篇不可错过的文章,我们将为您提供关于Crontab定时任务-定时执行python脚本部署、input()和print()函数同时输入输出多个数
如果您想了解Python 3定时输入的相关知识,那么本文是一篇不可错过的文章,我们将为您提供关于 Crontab定时任务 - 定时执行python脚本部署、input () 和 print () 函数同时输入输出多个数据 --python3、php-显示打字时输入的字符(即时输入)、python pytest测试框架介绍五---日志实时输出的有价值的信息。
本文目录一览:- Python 3定时输入
- Crontab定时任务 - 定时执行python脚本部署
- input () 和 print () 函数同时输入输出多个数据 --python3
- php-显示打字时输入的字符(即时输入)
- python pytest测试框架介绍五---日志实时输出

Python 3定时输入
我想做的是使用输入向用户提问。例如:
print(''some scenario'')prompt = input("You have 10 seconds to choose the correct answer...\n")然后如果时间到了,则打印类似
print(''Sorry, times up.'')向我指出正确方向的任何帮助将不胜感激。
答案1
小编典典这似乎可行:
import timefrom threading import Threadanswer = Nonedef check(): time.sleep(2) if answer != None: return print "Too Slow"Thread(target = check).start()answer = raw_input("Input something: ")答案2
小编典典如果在用户未提供答案时阻塞主线程是可以接受的:
from threading import Timertimeout = 10t = Timer(timeout, print, [''Sorry, times up''])t.start()prompt = "You have %d seconds to choose the correct answer...\n" % timeoutanswer = input(prompt)t.cancel()否则,你可以在Windows(未经测试)上使用@Alex Martelli的答案(针对Python 3修改):
import msvcrtimport timeclass TimeoutExpired(Exception): passdef input_with_timeout(prompt, timeout, timer=time.monotonic): sys.stdout.write(prompt) sys.stdout.flush() endtime = timer() + timeout result = [] while timer() < endtime: if msvcrt.kbhit(): result.append(msvcrt.getwche()) #XXX can it block on multibyte characters? if result[-1] == ''\n'': #XXX check what Windows returns here return ''''.join(result[:-1]) time.sleep(0.04) # just to yield to other processes/threads raise TimeoutExpired用法:
try: answer = input_with_timeout(prompt, 10)except TimeoutExpired: print(''Sorry, times up'')else: print(''Got %r'' % answer)在Unix上,你可以尝试:
import selectimport sysdef input_with_timeout(prompt, timeout): sys.stdout.write(prompt) sys.stdout.flush() ready, _, _ = select.select([sys.stdin], [],[], timeout) if ready: return sys.stdin.readline().rstrip(''\n'') # expect stdin to be line-buffered raise TimeoutExpired要么:
import signaldef alarm_handler(signum, frame): raise TimeoutExpireddef input_with_timeout(prompt, timeout): # set signal handler signal.signal(signal.SIGALRM, alarm_handler) signal.alarm(timeout) # produce SIGALRM in `timeout` seconds try: return input(prompt) finally: signal.alarm(0) # cancel alarm
Crontab定时任务 - 定时执行python脚本部署
Crontab命令格式:
* * * * * command
M H D m d command
M: 分(0-59)
H:时(0-23)
D:天(1-31)
m: 月(1-12)
d: 周(0-6) 0为星期日
* 代表取值范围内的数字
/ 代表"每"
- 代表从某个数字到某个数字
, 代表离散的取值(取值的列表)
Crontab脚本示例:
- 每分钟执行:
* * * * * python test.py等价于*/1 * * * * python test.py注意,每分钟的意思是指,每分钟的第1秒开始执行。 - 每4小时执行:
* */4 * * * python test.py - 每周日执行:
* * * * 0 python test.py - 每周六、周日执行:
* * * * 6,0 python test.py - 每小时的第5分钟执行:
5 * * * * python test.py
Crontab脚本编辑
编辑定时任务:
crontab -e # a 进入编辑模式
加入:0 16 * * * python /opt/test.py
保存,退出即可。
当我们编辑完定时任务过后,记得重载一遍crond
systemctl reload crond.service
启动、停止、重启服务↓
systemctl start crond.service
systemctl stop crond.service
systemctl restart crond.service
设置开机自启:
systemctl enable crond # 开机自启动
crontab -e编辑生成的定时任务,任务记录文件位置
操作过程:
1.举例在a**用户下,创建了如下的定时任务
a**@standby spool]$ crontab -l
*/1 * * * * /home/a**/check_ps_if_exits.sh
备注:通过crontab -l就可以查看当前用户下的定时任务的设定。
2.通过在网上,找了该内容所在的具体的文件
/var/spool/cron目录下,具体的用户名文件中
3.使用a**用户查看该文件
[a**@standby spool]$ cd /var/spool/
You have new mail in /var/spool/mail/a**
[a**@standby spool]$ ls
anacron  cron  lpd  mail  plymouth  postfix  rhsm  up2date
[a**@standby spool]$ cd cron/
-bash: cd: cron/: Permission denied
备注:发现权限是不够的,也就是普通过的用户无法进入到cron目录中。
4.使用root用户,查看该文件
[root@standby cron]# pwd
/var/spool/cron
[root@standby cron]# ls -l
total 4
-rw------- 1 a** oinstall 46 Mar 12 20:28 oracle
[root@standby cron]# cat oracle
*/1 * * * * /home/a**/check_ps_if_exits.sh
备注:通过root进入到cron目录中,查看a**文件,与crontab -l输出的内容是一致的。
小结:
linux操作系统中,crontab -l对应的文件是/var/spool/cron目录下的具体的用户名文件。
总结:1. 执行程序的文件的的权限,使其可以执行。2. 添加任务,编辑crontab命令了。如果用vi /etc/crontab命令的话,会列出root的已有任务列表,这是针对系统的服务。如果是想用当前用户执行,可以用命令crontab -e 来打开一个vi编辑自己的任务。
crontab -e
输入:*/5 * * * * python file_path/test.py >> /***/test.log 2>&1
每隔5分钟就,运行一次 file——path目录下的test.py,将日志输出值/***/test.log中; 2>&1的意思是把错误的输出也输出到标准输出(2表示错误,2>表示错误输出,&表示等同于,1表示正确),因此如果运行出错也会把错误输出到之前定义的log中。
流程:
- 设置定时任务的命令: crontab -e (设定好任务后,不用重启crontab服务, 可以即可生效,不要设定任务的执行时间等于当前或者很临近的,否则可能造成命令不生效)
- 查看定时任务的命令: crontab -l
- 注意设定任务时的,用户; 执行时需要两者一致。
 和 print () 函数同时输入输出多个数据 --python3")
input () 和 print () 函数同时输入输出多个数据 --python3
使用 input () 和 print () 函数同时输入输出多个数据,需要空格分割输入信息
#!/usr/bin/python3
#-*- conding:utf-8 -*-
name, age, QQ = input ("请输入姓名,年龄,QQ 号码:").split ()
print("============================================")
print ("姓名:% s, 年龄:% s, QQ 号码:% s" %(name, age, QQ))
print("============================================")
")
php-显示打字时输入的字符(即时输入)
在Google Wave的介绍视频中,他们讨论了Web应用程序中的聊天问题.在许多网络应用程序中,您会看到类似以下的消息:< name>正在输入..(在提交消息之前)
Google提出了一个“在键入时显示输入的每个字符”的想法,以避免出现这种令人讨厌的消息.
您如何创建类似的东西?
解决方法:
如果要编写解决方案,则将使用PHP套接字并使用更适合这种情况的UDP协议. UDP协议不可靠,但比最常用于通信的TCP快得多.所以我想我会有一个非常轻量级的PHP脚本,它将使用UDP将几个字节的数据发送到处理服务器.使用AJAX将数据发送到PHP脚本.当然会有延迟,但是UDP将大大加快事务处理.

python pytest测试框架介绍五---日志实时输出
同样的,在使用pytest进行自动化测试时,需要将实时日志打印出来,而不是跑完后才在报告中出结果。
不过,好在pytest在3.3版本开始,就支持这一功能了,而不用再像nose一样,再去装第三方插件。
网上也有相关实时的日志输入说明,但我尝试后,不是我想要的,比如:pytest输出Log
看看我们下面这样一段代码,以unittest模式写的:
#coding:utf-8
''''''
Created on 2017年8月31日
@author: huzq
''''''

from __future__ import print_function
import pytest
from unittest import TestCase
from selenium import webdriver
import logging,sys


log = logging.getLogger(__name__)


class TestClass(TestCase):

    @classmethod
    def setUpClass(cls):
        log.info(''setup_class()'')
        cls.driver = webdriver.Firefox()
        cls.driver.get("http://www.baidu.com")
        log.info("xxxxxxxxxxxxxxx")

    @classmethod
    def teardown_class(cls):

        log.info(''teardown_class()'')


    def setUp(self):
        log.info(''\nsetup_method()'')
        self.addCleanup(self.screen_shot)

    def screen_shot(self):
        log.info("yyyyyyyyyyyyyy")
        log.info("sereen_shot")

    def qqq(self):
        log.info("xxxxxxxxxxxqqqq")
        assert 4==5


    #def teardown_method(self, method):
    def tearDown(self):
        log.info("ffjiafuiodafdfj___teardown")

    @pytest.mark.slow
    def test_7(self):
        import time
        time.sleep(10)
        log.info(''- test_7()'')

    @pytest.mark.qq
    def test_4(self):
        import pdb;pdb.set_trace()
        self.result=self.addCleanup(self.qqq)
        log.info(''- test_4()'')


    def test_5(self):
        log.info(''- test_4()'')
        assert 4==5
如果没有加日志实时输出会是怎么样的,如下:
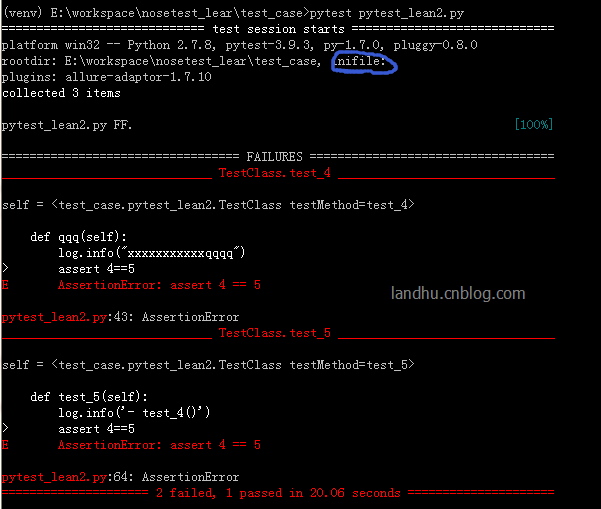
可以看出,日志在过程中没有实时输出,在实际跑项目录,这个有点不太好看。
解决:
看看pytest是怎么解决的呢。
首先pytest是从pytest.ini中读取log_cli配置的,默认是关闭的。如上图中显示,我们的pytest.ini文件是空的
再看看pytest -h文件:
关于log的help有以下:


--no-print-logs       disable printing caught logs on failed tests.
 --log-level=LOG_LEVEL
                       logging level used by the logging module
 --log-format=LOG_FORMAT
                       log format as used by the logging module.
 --log-date-format=LOG_DATE_FORMAT
                       log date format as used by the logging module.
 --log-cli-level=LOG_CLI_LEVEL
                       cli logging level.
 --log-cli-format=LOG_CLI_FORMAT
                       log format as used by the logging module.
 --log-cli-date-format=LOG_CLI_DATE_FORMAT
                       log date format as used by the logging module.
 --log-file=LOG_FILE   path to a file when logging will be written to.
 --log-file-level=LOG_FILE_LEVEL
                       log file logging level.
 --log-file-format=LOG_FILE_FORMAT
                       log format as used by the logging module.
 --log-file-date-format=LOG_FILE_DATE_FORMAT
log date format as used by the logging module.然后你还会发现一行:
[pytest] ini-options in the first pytest.ini|tox.ini|setup.cfg file found:所以,有两种方法解决
1) 在当前文件夹下写pytest.ini或tox.ini或setup.cfg文件,然后将日志相关写在里面,如下:
[pytest]
log_cli = 1
log_cli_level = INFO
log_cli_format = %(asctime)s [%(levelname)8s] %(message)s (%(filename)s:%(lineno)s)
log_cli_date_format=%Y-%m-%d %H:%M:%S
这时就可以正常打印日志出来。
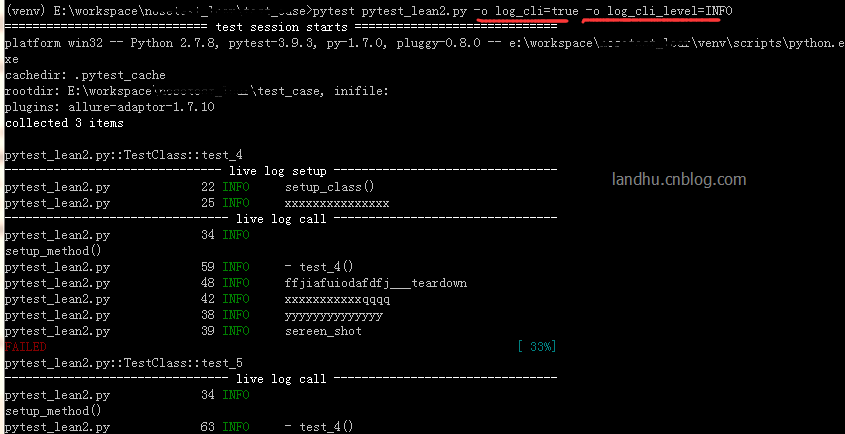
2) 直接用pytest -o方式重写,这个功能在pytest 3.4之后才实现,如下
pytest pytest_lean2.py -o log_cli=true -o log_cli_level=INFO结果如下:
update更新下:
实际在项目过程中,实时日志需要时间及文件名还有行号,可在后面加这样的参数:
-vv -o log_cli=true -o log_cli_level=INFO --log-date-format="%Y-%m-%d %H:%M:%S" --log-format="%(filename)s:%(lineno)s %(asctime)s %(levelname)s %(message)s"
结果就会像下面这样

关于Python 3定时输入的介绍现已完结,谢谢您的耐心阅读,如果想了解更多关于 Crontab定时任务 - 定时执行python脚本部署、input () 和 print () 函数同时输入输出多个数据 --python3、php-显示打字时输入的字符(即时输入)、python pytest测试框架介绍五---日志实时输出的相关知识,请在本站寻找。
本文标签:


