对于如何将python中的定位代码转换为kotlin?感兴趣的读者,本文将提供您所需要的所有信息,我们将详细讲解pythonuiautomator定位方法,并且为您提供关于python内置2to3工具
对于如何将python中的定位代码转换为kotlin?感兴趣的读者,本文将提供您所需要的所有信息,我们将详细讲解python uiautomator定位方法,并且为您提供关于python 内置2to3工具将python2代码转换为python3代码、Python-如何将PIL图像转换为numpy数组?、你将如何将MATLAB代码转换为Python代码?、使用python内置2to3工具将python2代码转换为python3代码的宝贵知识。
本文目录一览:- 如何将python中的定位代码转换为kotlin?(python uiautomator定位方法)
- python 内置2to3工具将python2代码转换为python3代码
- Python-如何将PIL图像转换为numpy数组?
- 你将如何将MATLAB代码转换为Python代码?
- 使用python内置2to3工具将python2代码转换为python3代码
")
如何将python中的定位代码转换为kotlin?(python uiautomator定位方法)
我正在开发将使用分水岭的图像分割应用程序。为此,我找到了需要在python中使用的代码。但是,我很难转换为Kotlin,因为Mat
Mat()不具有zero_likes函数,只有0函数。我正在使用opencv 3.31。我该如何在Kotlin中进行检查:
marked[marked == 1] = 0marked[marked > 1] = 255程式码python:
import cv2import numpy as npimport matplotlib.pyplot as plt# Load the imageimg = cv2.imread("/path/to/image.png", 3)# Create a blank image of zeros (same dimension as img)# It should be grayscale (1 color channel)marker = np.zeros_like(img[:,:,0]).astype(np.int32)# This step is manual. The goal is to find the points# which create the result we want. I suggest using a# tool to get the pixel coordinates.# Dictate the background and set the markers to 1marker[204][95] = 1marker[240][137] = 1marker[245][444] = 1marker[260][427] = 1marker[257][378] = 1marker[217][466] = 1# Dictate the area of interest# I used different values for each part of the car (for visibility)marker[235][370] = 255 # car bodymarker[135][294] = 64 # rooftopmarker[190][454] = 64 # rear lightmarker[167][458] = 64 # rear wingmarker[205][103] = 128 # front bumper# rear bumpermarker[225][456] = 128marker[224][461] = 128marker[216][461] = 128# front wheelmarker[225][189] = 192marker[240][147] = 192# rear wheelmarker[258][409] = 192marker[257][391] = 192marker[254][421] = 192# Now we have set the markers, we use the watershed# algorithm to generate a marked imagemarked = cv2.watershed(img, marker)# Plot this one. If it does what we want, proceed;# otherwise edit your markers and repeatplt.imshow(marked, cmap=''gray'')plt.show()# Make the background black, and what we want to keep whitemarked[marked == 1] = 0marked[marked > 1] = 255# Use a kernel to dilate the image, to not lose any detail on the outline# I used a kernel of 3x3 pixelskernel = np.ones((3,3),np.uint8)dilation = cv2.dilate(marked.astype(np.float32), kernel, iterations = 1)# Plot again to check whether the dilation is according to our needs# If not, repeat by using a smaller/bigger kernel, or more/less iterationsplt.imshow(dilation, cmap=''gray'')plt.show()# Now apply the mask we created on the initial imagefinal_img = cv2.bitwise_and(img, img, mask=dilation.astype(np.uint8))# cv2.imread reads the image as BGR, but matplotlib uses RGB# BGR to RGB so we can plot the image with accurate colorsb, g, r = cv2.split(final_img)final_img = cv2.merge([r, g, b])# Plot the final resultplt.imshow(final_img)plt.show()代码kotlin:
// Load the image val srcOriginal = Imgcodecs.imread(currentPhotoPath) // Create a blank image of zeros (same dimension as img) // It should be grayscale (1 color channel) val markers = Mat.zeros(srcOriginal.rows(), srcOriginal.cols(), CvType.CV_32S) // This step is manual. The goal is to find the points // which create the result we want. I suggest using a // tool to get the pixel coordinates. // Dictate the area of interest for(x in my_canvas.pointsToDrawX.indices) { for(y in my_canvas.pointsToDrawY.indices) { markers.put( my_canvas.pointsToDrawX.get(x).toInt(), my_canvas.pointsToDrawY.get(y).toInt(), 255.0 ) } } //Now we have set the markers, we use the watershed //algorithm to generate a marked image Imgproc.watershed(srcOriginal, markers) val marker_tempo = Mat() markers.convertTo(marker_tempo, CvType.CV_8U) // Plot this one. If it does what we want, proceed; // otherwise edit your markers and repeat //Create Bitmap val bmpOut = Bitmap.createBitmap(srcOriginal.cols(), srcOriginal.rows(), Bitmap.Config.RGB_565) Utils.matToBitmap(marker_tempo, bmpOut) val mPath = Environment.getExternalStorageDirectory().toString() + "/gray.png" Imgcodecs.imwrite(mPath,marker_tempo) //Make the background black, and what we want to keep white //Use a kernel to dilate the image, to not lose any detail on the outline //I used a kernel of 3x3 pixels val kernel = Mat(3, 3, CvType.CV_8U) val dilatation = Imgproc.dilate(marker_tempo, marker_tempo, kernel) val mPath1 = Environment.getExternalStorageDirectory().toString() + "/dilation.png" Imgcodecs.imwrite(mPath1,marker_tempo) //Now apply the mask we created on the initial image val final_image = Core.bitwise_and(srcOriginal, srcOriginal, dilatation) //cv2.imread reads the image as BGR, but matplotlib uses RGB //BGR to RGB so we can plot the image with accurate colors在pointsToDrawX和pointsToDrawY中,我将用户触摸事件的所有x,y坐标保存在屏幕上。正是从这些坐标中,我将传递到分水岭算法来执行分割并从图像中删除背景。有人可以帮我转换此代码吗?
答案1
小编典典//Load the imagesrcOriginal = Imgcodecs.imread(currentPhotoPath)//Create a blank image of zeros (same dimension as img)//It should be grayscale (1 color channel)markers = Mat.zeros(srcOriginal.rows(), srcOriginal.cols(), CvType.CV_32S)//This step is manual. The goal is to find the points//which create the result we want. I suggest using a//tool to get the pixel coordinates.//Dictate the background and set the markers to 1for (value in 0..my_canvas.pointsToDrawY.size - 1) { markers.put( my_canvas.pointsToDrawX[value].toInt(), my_canvas.pointsToDrawY[value].toInt(), 1.0 )}//Dictate the area of interest//I used different values for each part of the car (for visibility)for (value in 0..my_canvas.pointsToDrawYStepTwo.size - 1) { markers.put( my_canvas.pointsToDrawXStepTwo[value].toInt(), my_canvas.pointsToDrawYStepTwo[value].toInt(), 255.0 )}//Now we have set the markers, we use the watershed//algorithm to generate a marked imagewatershed(srcOriginal, markers)//Plot this one. If it does what we want, proceed;//otherwise edit your markers and repeatval mPath1 = Environment.getExternalStorageDirectory().toString() + "/watershed.png" Imgcodecs.imwrite(mPath1,markers)//Make the background black, and what we want to keep whitefor (x in 0 until srcOriginal.rows()-1) { for (y in 0 until srcOriginal.cols()-1) { if(markers.get(x,y).get(0).equals(1.0)){ markers.put( x, y, 0.0 ) } if((markers[x, y].get(0) == 255.0)){ markers.put( x, y, 255.0 ) } } }//Use a kernel to dilate the image, to not lose any detail on the outline//I used a kernel of 3x3 pixelsval marker_tempo = Mat()val dilatation = Mat()markers.convertTo(marker_tempo, CvType.CV_8U)val kernel = Mat(3, 3, CvType.CV_8U)Imgproc.dilate(marker_tempo, dilatation, kernel)//Plot again to check whether the dilation is according to our needs//If not, repeat by using a smaller/bigger kernel, or more/less iterationsval mPath2 = Environment.getExternalStorageDirectory().toString() + "/dilatation.png"Imgcodecs.imwrite(mPath2,dilatation)//Now apply the mask we created on the initial imageval final = Mat()Core.bitwise_and(srcOriginal, srcOriginal, final, dilatation)//Plot the final resultval mPath = Environment.getExternalStorageDirectory().toString() + "/final.png"Imgcodecs.imwrite(mPath,final)
python 内置2to3工具将python2代码转换为python3代码
python2与python3代码不兼容,如果需要python2代码在python3环境下运行,需要将代码进行转换,本文介绍使用python3内置工具2to3.py对代码进行转换
一:2to3.py在 python\Tools\scripts 目录下,具体位置根据自己的python安装路径查看
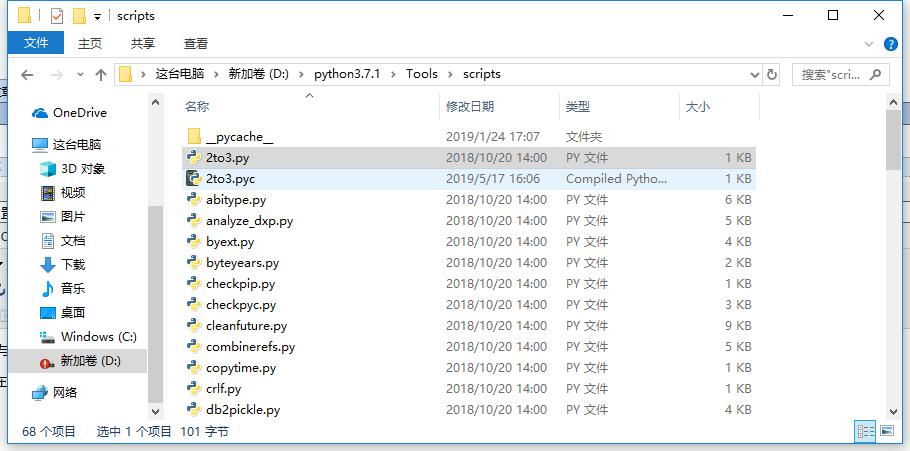
在此文件夹内打开cmd命令窗口,
输入:
python 2to3.py + 需要修改的py文件
如:python3 2to3.py D:\workspace\project3.0\testsuit01\testcase01.py
二:直接接文件夹位置可以批量修改文件下的py文件
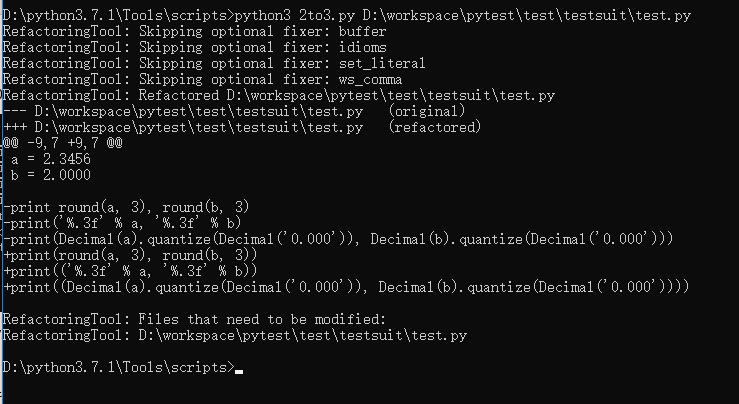
python3 2to3.py D:\workspace\pytest\test\testsuit\
三:接-w加文件可以将修改的文件覆盖到原文件并留有.bak的备份文件用来恢复
python3 2to3.py -w D:\workspace\pytest\test\testsuit\test.py
四:-w -n效果是修改但不留备份文件
python3 2to3.py -w -n D:\workspace\pytest\test\testsuit\test.py
注:2to3.py完成了py2代码转换成py3的主要工作,有时还需对代码做一些微调

Python-如何将PIL图像转换为numpy数组?
好吧,我想将PIL图像对象来回转换为numpy数组,因此我可以实现比PIL PixelAccess对象所允许的更快的逐像素转换。我想出了如何通过以下方式将像素信息放置在有用的3D numpy数组中:
pic = Image.open("foo.jpg")pix = numpy.array(pic.getdata()).reshape(pic.size[0], pic.size[1], 3)但是,在完成所有出色的转换之后,我似乎无法弄清楚如何将其重新加载到PIL对象中。我知道该putdata()方法,但似乎无法使其正常工作。
答案1
小编典典你并不是在说putdata()行为不正确。我假设你在做
>>> pic.putdata(a)Traceback (most recent call last): File "...blablabla.../PIL/Image.py", line 1185, in putdata self.im.putdata(data, scale, offset)SystemError: new style getargs format but argument is not a tuple这是因为putdata需要一个元组序列,并且你要给它一个numpy数组。这个
>>> data = list(tuple(pixel) for pixel in pix)>>> pic.putdata(data)可以工作,但是非常慢。
从PIL 1.1.6开始,在图像和numpy数组之间进行转换的“正确”方法很简单
>>> pix = numpy.array(pic)尽管结果数组的格式与你的格式不同(在这种情况下为3维数组或行/列/ rgb)。
然后,在对阵列进行更改后,你应该可以执行任一操作pic.putdata(pix)或使用创建新图像Image.fromarray(pix)。

你将如何将MATLAB代码转换为Python代码?
MATLAB是一种广泛应用于工程和科学领域的流行编程语言,但由于其灵活性和适应性,Python正迅速成为许多程序员的首选语言。如果您想将MATLAB代码转换为Python代码,一开始可能会感到非常困难。然而,通过正确的知识和方法,您可以使这个过程变得更加容易。
以下是一些步骤,帮助您将MATLAB代码转换为Python:
步骤1:熟悉Python语法
Python和MATLAB具有独特的语法,因此在开始转换代码之前,您需要熟悉Python语法。花一些时间了解Python语法基础知识,包括变量、数据类型、运算符、控制结构和函数。
步骤2:找到您需要转换的MATLAB函数
了解您的MATLAB代码的概述,并区分您希望转换的功能。您将首先创建一个这些函数的列表,以跟踪您的进展。
立即学习“Python免费学习笔记(深入)”;
点击下载“修复打印机驱动工具”;
第三步:使用Python库替代MATLAB函数
Python具有大量的库,可以用来替代MATLAB的功能。如果你想进行矩阵操作,你可以使用NumPy,这是一个强大的数值计算库,提供对数组和矩阵的支持。
第四步:将MATLAB语法转换为Python语法
下一步是将您的MATLAB代码转换为Python代码。这将包括更改代码的语法和结构以适应Python。
在MATLAB和Python之间最显著的区别之一是数组的排序方式。在MATLAB中,数组从1开始排序,而在Python中,数组从0开始索引。这意味着您需要修改代码中的索引以反映这种区别。
第五步:测试和调试你的Python代码
在将MATLAB代码转换为Python后,首要的重要事情是测试你的Python代码,以确保它能够正常工作。此外,可以在Spyder、Jupyter Notebook或PyCharm等工具中检查你的Python代码。调试代码也是一个必须的步骤,以消除任何错误。
第六步:优化和改进您的Python代码
最后,一旦你尝试并修复了你的Python代码,你将会对其进行优化和优化以提高执行效率。Python集成了各种优化工具和库,例如Numba和Cython,可以用于提高代码的执行效率。
Example
的中文翻译为:示例
这是一个将MATLAB代码转换为Python代码的示例。
MATLAB 代码 −
% Define a vector
x = [1 2 3 4 5];

% Calculate the sum of the vector
sum_x = sum(x);

% Print the sum of the vector
disp([''The sum of the vector is: '' num2str(sum_x)]);
Python code −
# Import the numpy library
import numpy as np

# Define a vector
x = np.array([1, 2, 3, 4, 5])
sum_x = np.sum(x)
print(''The sum of the vector is:'', sum_x)
我们导入了`numpy`库。这个库提供了用于处理数组和矩阵的函数。
我们使用np.array函数定义了向量"x"。使用值[1, 2, 3, 4, 5]创建了一个numpy数组。
接下来,使用`np.sum`函数,我们计算了向量的总和。结果存储在`sum_x`变量中。
最后,我们使用`print`函数打印结果。
工具
有几个可用的工具可以用来将MATLAB代码转换为Python代码。以下是常用的工具 -
MATLAB Coder
的中文翻译为:MATLAB 编码器
MATLAB Coder是由MathWorks提供的工具,可以将MATLAB代码转换为C/C++代码,然后可以使用CPython扩展模块将其集成到Python中。该工具分析您的MATLAB代码并生成优化的C/C++代码,可以在Python中进行编译和使用。该工具可用于转换各种MATLAB代码,包括矩阵操作、控制流和函数调用。
PyMat
的中文翻译为:PyMat
PyMat是一个Python库,可以在Python内部与MATLAB进行连接。它允许您在Python代码中直接调用MATLAB函数和使用MATLAB变量。PyMat为MATLAB提供了一个Pythonic接口,使您可以在Python代码中无缝使用MATLAB代码和数据结构。PyMat可用于转换小到中等大小的MATLAB脚本和函数。
M2PY
的中文翻译为:M2PY
M2PY是一个工具,可以将MATLAB代码转换为Python代码。它通过创建一个Python模块来包装MATLAB代码,并为其提供Python接口。生成的Python模块可以在任何Python脚本或应用程序中使用。M2PY支持广泛的MATLAB功能,包括基本算术、控制流和数据类型。
Scipy
的中文翻译为:Scipy
Scipy是一个Python库,提供了广泛的科学计算工具,包括数值积分、优化、信号处理等功能。它可以作为MATLAB中许多功能的替代品使用。Scipy是一个开源库,可以公开获取,并且是Python中最广泛使用的科学计算库之一。
Oct2Py
的中文翻译为:Oct2Py
Oct2Py 是一个工具,允许您从 Python 中运行 MATLAB 代码。它通过为 Octave 翻译器提供 Python 接口来实现,Octave 是 MATLAB 的开源替代品。Oct2Py 允许您在 Python 代码中直接调用 MATLAB 函数和使用 MATLAB 变量。它是一个很好的工具,用于转换依赖于 MATLAB 特定功能的 MATLAB 脚本和函数。
结论
将MATLAB代码转换为Python可能会令人生畏,但是通过正确的方法,可以使其变得更简单。步骤包括熟悉Python语法,识别要转换的功能,使用Python库,转换语法,测试和调试,以及优化代码。可以使用MATLAB Coder、PyMat、M2PY、Scipy和Oct2Py等工具进行转换。
以上就是你将如何将MATLAB代码转换为Python代码?的详细内容,更多请关注php中文网其它相关文章!

使用python内置2to3工具将python2代码转换为python3代码
我们都知道python有一个一直被诟病的毛病,python2与python3代码不兼容问题,而网上的一些教学大部分都是python2的,如果需要将其在python3环境下运行,有两个方法,一是:一个一个参考文档,对其中的库在3中的修改对应修改;二则是使用python内置工具2to3.py对代码进行批量修改。
首先找到2to3.py文件位置,一般是在“\Python\python36-32\Tools\scripts”这样的文件层内,具体要看自己python安装的位置。
cd C:\Users\Administrator\AppData\Local\Programs\Python\python37\Tools\scripts
python 2to3.py -w C:\Users\Administrator\PycharmProjects\DataDrivenFrameWork\util\ObjectMap.py
python 2to3.py C:\Users\Administrator\Desktop\ocr\server.py接-w加文件可以将修改的文件覆盖到原文件并留有.bak的备份文件用来恢复
python 2to3.py -w C:\Users\Administrator\Desktop\ocr\server.py-w -n效果是修改但不留备份文件
-f 给出明确的修复集
原文链接:https://blog.csdn.net/qq_36275540/article/details/80389941
关于如何将python中的定位代码转换为kotlin?和python uiautomator定位方法的问题我们已经讲解完毕,感谢您的阅读,如果还想了解更多关于python 内置2to3工具将python2代码转换为python3代码、Python-如何将PIL图像转换为numpy数组?、你将如何将MATLAB代码转换为Python代码?、使用python内置2to3工具将python2代码转换为python3代码等相关内容,可以在本站寻找。
本文标签:


