在本文中,您将会了解到关于SpringBootCloudFoundry错误中没有唯一的服务处理接口错误的新资讯,同时我们还将为您解释springboot没有service的相关在本文中,我们将带你探索
在本文中,您将会了解到关于Spring Boot Cloud Foundry错误中没有唯一的服务处理接口错误的新资讯,同时我们还将为您解释springboot没有service的相关在本文中,我们将带你探索Spring Boot Cloud Foundry错误中没有唯一的服务处理接口错误的奥秘,分析springboot没有service的特点,并给出一些关于(七十三) springcloud+springcloud+vue+uniapp分布式微服务电商 商城之Spring Cloud服务限流详解、(五十八) springcloud+springcloud+vue+uniapp分布式微服务电商 商城之Spring Cloud基于JWT创建统一的认证服务、(六十) springcloud+springcloud+vue+uniapp 分布式微服务电商 商城之 Spring Cloud 服务消费方申请 Token、(六十五) springcloud+springcloud+vue+uniapp分布式微服务电商 商城之使用Spring Security给Spring Boot Admin开启认证的实用技巧。
本文目录一览:- Spring Boot Cloud Foundry错误中没有唯一的服务处理接口错误(springboot没有service)
- (七十三) springcloud+springcloud+vue+uniapp分布式微服务电商 商城之Spring Cloud服务限流详解
- (五十八) springcloud+springcloud+vue+uniapp分布式微服务电商 商城之Spring Cloud基于JWT创建统一的认证服务
- (六十) springcloud+springcloud+vue+uniapp 分布式微服务电商 商城之 Spring Cloud 服务消费方申请 Token
- (六十五) springcloud+springcloud+vue+uniapp分布式微服务电商 商城之使用Spring Security给Spring Boot Admin开启认证
")
Spring Boot Cloud Foundry错误中没有唯一的服务处理接口错误(springboot没有service)
我正在尝试遵循本教程https://github.com/cf-platform-eng/spring-boot-
cities/tree/master/cities-service在Cloud Foundry中运行我的spring
boot应用程序。我在本地安装了bosh-lite
我的Spring Boot应用程序作为数据库连接到postgresql。我正在尝试连接到在本地(主机)上运行的Postgresql实例
如果部署到本地tomcat,我的应用程序在本地运行良好。但是,当我将应用程序部署到bosh-
lite时,它将失败,并显示以下错误“无唯一服务处理接口错误”。我的代码与本教程中提到的完全相同,只是我使用Maven来构建代码。
2017-06-07T22:29:54.44+0530 [App/0] OUT Caused by: org.springframework.cloud.CloudException: No unique service matching interface javax.sql.DataSource found. Expected 1, found 02017-06-07T22:29:54.44+0530 [App/0] OUT at org.springframework.cloud.Cloud.getSingletonServiceConnector(Cloud.java:149) ~[spring-cloud-core-1.2.3.RELEASE.jar!/:na]2017-06-07T22:29:54.44+0530 [App/0] OUT at org.saurav.cf.casestudy.employee.db.DataSourceConfiguration.dataSource(DataSourceConfiguration.java:20) ~[classes/:na]2017-06-07T22:29:54.44+0530 [App/0] OUT at org.saurav.cf.casestudy.employee.db.DataSourceConfiguration$$EnhancerBySpringCGLIB$$847aab5e.CGLIB$dataSource$0(<generated>) ~[classes/:na]2017-06-07T22:29:54.44+0530 [App/0] OUT at org.saurav.cf.casestudy.employee.db.DataSourceConfiguration$$EnhancerBySpringCGLIB$$847aab5e$$FastClassBySpringCGLIB$$2ad81e2b.invoke(<generated>) ~[classes/:na]2017-06-07T22:29:54.44+0530 [App/0] OUT at org.springframework.cglib.proxy.MethodProxy.invokeSuper(MethodProxy.java:228) ~[spring-core-4.3.8.RELEASE.jar!/:4.3.8.RELEASE]2017-06-07T22:29:54.44+0530 [App/0] OUT at org.springframework.context.annotation.ConfigurationClassEnhancer$BeanMethodInterceptor.intercept(ConfigurationClassEnhancer.java:358) ~[spring-context-4.3.8.RELEASE.jar!/:4.3.8.RELEASE]2017-06-07T22:29:54.44+0530 [App/0] OUT at org.saurav.cf.casestudy.employee.db.DataSourceConfiguration$$EnhancerBySpringCGLIB$$847aab5e.dataSource(<generated>) ~[classes/:na]2017-06-07T22:29:54.44+0530 [App/0] OUT at sun.reflect.NativeMethodAccessorImpl.invoke0(Native Method) ~[na:1.8.0_131]我与postgres的连接正常。如果我不使用弹簧云连接器并从application.properties中正常读取值,则同一个应用程序可以正常工作。
我的pom.xml`(具有Spring Boot云连接器和postgrsql驱动程序的依赖项)
<?xml version="1.0" encoding="UTF-8"?><project xmlns="http://maven.apache.org/POM/4.0.0" xmlns:xsi="http://www.w3.org/2001/XMLSchema-instance" xsi:schemaLocation="http://maven.apache.org/POM/4.0.0 http://maven.apache.org/xsd/maven-4.0.0.xsd"> <modelVersion>4.0.0</modelVersion> <groupId>org.saurav.cf.casestudy</groupId> <artifactId>employeerest</artifactId> <version>0.0.1-SNAPSHOT</version> <packaging>war</packaging> <name>employeerest</name> <description>Demo project for Spring Boot</description> <parent> <groupId>org.springframework.boot</groupId> <artifactId>spring-boot-starter-parent</artifactId> <version>1.5.3.RELEASE</version> <relativePath/> <!-- lookup parent from repository --> </parent> <properties> <project.build.sourceEncoding>UTF-8</project.build.sourceEncoding> <project.reporting.outputEncoding>UTF-8</project.reporting.outputEncoding> <java.version>1.8</java.version> <!-- <start-class>org.saurav.cf.casestudy.employee.EmployeerestApplication</start-class> --> </properties> <dependencies> <dependency> <groupId>org.springframework.boot</groupId> <artifactId>spring-boot-starter-data-jpa</artifactId> </dependency> <dependency> <groupId>org.springframework.boot</groupId> <artifactId>spring-boot-starter-data-rest</artifactId> </dependency> <dependency> <groupId>org.springframework.boot</groupId> <artifactId>spring-boot-starter-hateoas</artifactId> </dependency> <dependency> <groupId>org.springframework.boot</groupId> <artifactId>spring-boot-starter-web</artifactId> </dependency> <dependency> <groupId>org.springframework.boot</groupId> <artifactId>spring-boot-starter-cloud-connectors</artifactId></dependency> <dependency> <groupId>org.postgresql</groupId> <artifactId>postgresql</artifactId> <scope>runtime</scope> </dependency> <dependency> <groupId>org.springframework.boot</groupId> <artifactId>spring-boot-starter-test</artifactId> <scope>test</scope> </dependency><dependency> <groupId>log4j</groupId> <artifactId>log4j</artifactId> <version>1.2.14</version> </dependency> </dependencies> <build> <plugins> <plugin> <groupId>org.springframework.boot</groupId> <artifactId>spring-boot-maven-plugin</artifactId> </plugin> </plugins> </build></project>`
[更新]
根据以下Scott的回答,我了解了使用云连接器的UPS的要求。由于我的是用户提供的提供的服务,因此我没有标签和标签。但是我添加了jdbc网址。现在我的应用失败,出现以下错误
Caused by: org.hibernate.HibernateException: Access to DialectResolutionInfo cannot be null when ''hibernate.dialect'' not set为此,我已经"spring.jpa.properties.hibernate.dialect=org.hibernate.dialect.PostgreSQLDialect"
在我的application.properties中设置了,但仍然无法正常工作
我还检查了我的数据库是否正在运行,并且服务实例中的数据库设置正确。
以下是我的服务实例内容`
"VCAP_SERVICES": { "user-provided": [ { "credentials": { "jdbcUrl": "jdbc:postgresql://10.0.2.2:5432/employee", "username": "postgres", "password": "admin", "postgresUri": "postgresql://10.0.2.2:5432/employee", "uri": "postgresql://10.0.2.2:5432/employee" }, "label": "user-provided", "name": "postgresql-cf-service", "syslog_drain_url": "", "tags": [], "volume_mounts": [] } ] }最好的问候,索拉夫
答案1
小编典典如果您将其包括spring-boot-starter-cloud-connectors为依赖项,那么Spring Cloud
Connectors将尝试创建java.sql.DataSource连接数据库所需的bean。连接器通过查找具有某些特征的服务绑定来实现此目的。该消息表示连接器找不到适当类型的服务绑定。Nounique service matching interface javax.sql.DataSource found
如果要在该示例应用程序中使用连接器,则需要使用Postgres连接的详细信息创建用户提供的服务实例,并将该服务实例绑定到该应用程序。
或者,您可以删除spring-boot-starter-cloud-connectors依赖关系,而可以使用中的spring.datasource属性配置数据库连接application.yml。
这些选项在博客文章中有更详细的说明。
 springcloud+springcloud+vue+uniapp分布式微服务电商 商城之Spring Cloud服务限流详解")
(七十三) springcloud+springcloud+vue+uniapp分布式微服务电商 商城之Spring Cloud服务限流详解
高并发系统中有三把利器用来保护系统:缓存、降级和限流。限流的目的是为了保护系统不被大量请求冲垮,通过限制请求的速度来保护系统。在电商的秒杀活动中,限流是必不可少的一个环节。
限流的方式也有多种,可以在 Nginx 层面限流,也可以在应用当中限流,比如在 API 网关中。
限流算法
常见的限流算法有:令牌桶、漏桶。计数器也可以进行限流实现。
1)令牌桶
令牌桶算法是一个存放固定容量令牌的桶,按照固定速率往桶里添加令牌。可以控制流量也可以控制并发量,假如我们想要控制 API 网关的并发量最高为 1000,可以创建一个令牌桶,以固定的速度往桶里添加令牌,超出了 1000 则不添加。
当一个请求到达之后就从桶中获取一个令牌,如果能获取到令牌就可以继续往下请求,获取不到就说明令牌不够,并发量达到了最高,请求就被拦截。
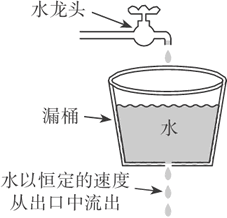
2)漏桶
漏桶是一个固定容量的桶,按照固定的速率流出,可以以任意的速率流入到漏桶中,超出了漏桶的容量就被丢弃,总容量是不变的。但是输出的速率是固定的,无论你上面的水流入的多快,下面的出口只有这么大,就像水坝开闸放水一样,如图 1 所示。
单节点限流
单节点限流指的是只对这个节点的并发量进行控制,相对于集群限流来说单节点限流比较简单,稳定性也好,集群限流需要依赖第三方中间件来存储数据,单节点限流数据存储在本地内存中即可,风险性更低。
从应用的角度来说单节点的限流就够用了,如果我们的应用有 3 个节点,总共能扛住 9000 的并发,那么单个节点最大能扛住的量就是 3000,只要单个节点扛住了就没什么问题了。
我们可以用上面讲的令牌桶算法或者漏桶算法来进行单节点的限流操作,算法的实现可以使用 Google Guava 中提供的算法实现类。实际使用中令牌桶算法更适合一些,当然这个得参考业务需求,之所以选择令牌桶算法是因为它可以处理突发的流量,漏桶算法就不行,因为漏桶的速率是固定的。
首先需要依赖 Guava,其实也可以不用,在 Spring Cloud 中好多组件都依赖了 Guava,如果你的项目是 Spring Cloud 技术栈的话可以不用自己配置,间接就已经依赖了,代码如下所示。
<dependency>
    <groupId>com.google.guava</groupId>
    <artifactId>guava</artifactId>
    <version>18.0</version>
</dependency>
创建一个限流的过滤器,order 返回 0,执行优先级第一,代码如下所示。
public class LimitFilter extends ZuulFilter {
    public static volatile RateLimiter rateLimiter = RateLimiter.create(100.0);

    public LimitFilter() {
        super();
    }

    @Override
    public boolean shouldFilter() {
        return true;
    }

    @Override
    public String filterType() {
        return "pre";
    }

    @Override
    public int filterOrder() {
        return 0;
    }

    @Override
    public Object run() {
        // 总体限流rateLimiter.acquire();
        return null;
    }
}
注册限流过滤器,代码如下所示。
@Bean
public LimitFilter limitFilter() {
    return new LimitFilter();
}
上面的方案有一个致命的问题就是速率值是写死的,往往我们需要根据服务器的配置以及当时的并发量来设置一个合理的值,那么就需要速率这个值能够实时修改,并且生效,这时配置中心又派上用场了。
添加 Apollo 的配置,代码如下所示。
@Data
@Configuration
public class BasicConf {
    @Value("${limitRate:10}")
    private double limitRate;
}
有一个问题是当这个值修改的时候需要重新初始化 RateLimiter,在配置类中实现修改回调的方法代码如下所示。
@Data
@Configuration
public class BasicConf {
    @Value("${limitRate:10}")
    private double limitRate;
    @ApolloConfig
    private Config config;
    @ApolloConfigChangeListener
    public void onChange(ConfigChangeEvent changeEvent) {
        if (changeEvent.isChanged("limitRate")) {
            // 更 新 RateLimiter
            LimitFilter.rateLimiter = RateLimiter.create(config.getDoubleProperty("limitRate", 10.0));
        }
    }
}
我们可以用 ab 来测试一下接口,代码如下所示。
ab -n 1000 -c 30 http://192.168.10.170:2103/fsh-house/house/1
Benchmarking 192.168.10.170 (be patient)
Completed 100 requests
Completed 200 requests
Completed 300 requests
Completed 400 requests
Completed 500 requests
Completed 600 requests
Completed 700 requests
Completed 800 requests
Completed 900 requests
Completed 1000 requests
Finished 1000 requests
Server Software:
Server Hostname: 192.168.10.170
Server Port: 2103
Document Path: /fsh-house/house/1
Document Length: 796 bytes
Concurrency Level: 30
Time taken for tests: 98.989 seconds
Complete requests: 1000
Failed requests: 6
(Connect: 0, Receive: 0, Length: 6, Exceptions: 0)
Total transferred: 1001434 bytes
HTML transferred: 833434 bytes
Requests per second: 10.10 [#/sec] (mean) Time per
request: 2969.679 [ms] (mean) Time per
request: 98.989 [ms] (mean, across all concurrent requests)
Transfer rate: 9.88 [Kbytes/sec] received
- -n 1000 表示总共请求 1000 次
- -c 30 表示并发数量
我们可以看到执行完这 1000 次请求总共花费了 98 秒,Time taken for tests 就是请求所花费的总时间,这是在限流参数为 10 的情况下,我们还可以把参数调到 100 然后测试一下,代码如下所示。
ab -n 1000 -c 30 http://192.168.10.170:2103/fsh-house/house/1
Benchmarking 192.168.10.170 (be patient) Completed 100
requests Completed 200
requests Completed 300
requests Completed 400
requests Completed 500
requests Completed 600
requests Completed 700
requests Completed 800
requests Completed 900
requests Completed 1000 requests Finished 1000 requests Server Software:
Server Hostname: 192.168.10.170
Server Port: 2103
Document Path: /fsh-house/house/1
Document Length: 7035 bytes
Concurrency Level: 30
Time taken for tests: 9.061 seconds
Complete requests: 1000
Failed requests: 30
(Connect: 0, Receive: 0, Length: 30, Exceptions: 0)
Total transferred: 7015830 bytes
HTML transferred: 6847830 bytes
Requests per second: 110.37 [#/sec] (mean)
Time per request: 271.821 [ms] (mean)
Time per request: 9.061 [ms] (mean, across all concurrent requests)
Transfer rate: 756.17 [Kbytes/sec] received
限流的参数调大后,请求 9 秒就完成了,这就证明我们的限流操作起作用了。
集群限流
集群限流可以借助Redis 来实现,至于实现的方式也有很多种,下面我们介绍一种比较简单的限流方式。
我们可以按秒来对并发量进行限制,比如整个集群中每秒只能访问 1000 次。我们可以利用计数器来判断,Redis 的 key 为当前秒的时间戳,value 就是访问次数的累加,当次数超出了我们限制的范围内,直接拒绝即可。需要注意的是集群中服务器的时间必须一致才能没有误差,下面我们来看代码。
首先在我们的 API 网关中集成 Redis 的操作,我们引入 Spring Data Redis 来操作 Redis,代码如下所示。
<dependency>
    <groupId>org.springframework.boot</groupId>
    <artifactId>spring-boot-starter-data-redis</artifactId>
</dependency>
属性配置文件中配置 Redis 的连接信息
spring.redis.host=192.168.10.47
spring.redis.port=6379
集成后就直接可以使用 RedisTemplate 来操作 Redis 了,这里配置了一个 RedisTemplate,key 为 String 类型,value 为 Long 类型,用来计数,代码如下所示。
@Configuration
public class RedisConfig {
    @Bean(name = "longRedisTemplate")
    public RedisTemplate<String, Long> redisTemplate(RedisConnectionFactory jedisConnectionFactory) {
        RedisTemplate<String, Long> template = new RedisTemplate<String, Long>();
        template.setConnectionFactory(jedisConnectionFactory);
        template.setKeySerializer(new StringRedisSerializer());
        template.setHashValueSerializer(new GenericToStringSerializer<Long>(Long.class));
        template.setValueSerializer(new GenericToStringSerializer<Long>(Long.class));
        return template;
    }
}
在之前的限流类的配置中增加集群限流的速率配置,代码如下所示。
@Data
@Configuration
public class BasicConf {
    @Value("${clusterLimitRate:10}")
    private double clusterLimitRate;
}
接下来我们改造之前单体限流用的过滤器 LimitFilter,采用 Redis 来进行限流操作,代码如下所示。
public class LimitFilter extends ZuulFilter {
    private Logger log = LoggerFactory.getLogger(LimitFilter.class);
    public static volatile RateLimiter rateLimiter = RateLimiter.create(100);
    @Autowired
    @Qualifier("longRedisTemplate")
    private RedisTemplate<String, Long> redisTemplate;
    @Autowired
    private BasicConf basicConf;
    public LimitFilter() {
        super();
    }
    @Override
    public boolean shouldFilter() {
        return true;
    }
    @Override
    public String filterType() {
        return "pre";
    }
    @Override
    public int filterOrder() {
        return 0;
    }
    @Override
    public Object run() {
        RequestContext ctx = RequestContext.getCurrentContext();
        Long currentSecond = System.currentTimeMillis() / 1000;
        String key = "fsh-api-rate-limit-" + currentSecond;
        try {
            if (!redisTemplate.hasKey(key)) {
                redisTemplate.opsForValue().set(key, 0L, 100, TimeUnit.SECONDS);
            }
            int rate = basicConf.getClusterLimitRate();
            // 当集群中当前秒的并发量达到了设定的值, 不进行处理
            // 注意集群中的网关与所在服务器时间必须同步
            if (redisTemplate.opsForValue().increment(key, 1) > rate) {
                ctx.setSendZuulResponse(false);
                ctx.set("isSuccess", false);
                ResponseData data = ResponseData.fail("当前负载太高,请稍后重试", ResponseCode.LIMIT_ERROR_CODE.getCode());
                ctx.setResponseBody(JsonUtils.toJson(data));
                ctx.getResponse().setContentType("application/json;charset=utf-8");
                return null;
            }
        } catch (Exception e) {
            log.error("集群限流异常", e);
            // Redis 挂掉等异常处理,可以继续单节点限流
            // 单节点限流
            rateLimiter.acquire();
        }
        return null;
    }
}
我们来看看 run 方法里面的逻辑,首先我们是获取了当前时间的时间戳然后转换成秒,定义了一个 Redis 的 key。判断这个 key 是否存在,不存在则插入一个,初始值为 0,然后通过 increment 来为这个 key 累加计数,并获取累加之后的值,increment 是原子性的,不会有并发问题,如果当前秒的数量超出了我们设定的值那就说明当前的并发量已经达到了极限值,然后直接拒绝请求。
这里还需要进行异常处理,前文推荐用单节点限流的方式来进行就是因为集群性质的限流需要依赖第三方中间件,如果中间件挂了,那么就会影响现有的业务,这里需要处理的是如果操作 Redis 出异常了怎么办?
首先是进行集群的限流,如果 Redis 出现挂了之类的问题,捕获到异常之后立刻启用单节点限流,进行双重保护。当然必须有完整的监控系统,当 Redis 出现问题之后必须马上处理。Redis 在生产环境中必须用集群,当然集群也有可能会出问题,所以单节点限流是一种比较好的方案。
具体服务限流
前面我们学习了如何进行单节点的限流和集群的限流。虽然抗住了整体的并发量,但是会有一个弊端,如果这些并发量都是针对一个服务的,那么这个服务还是会扛不住的,针对具体的服务做具体的限制才是最好的选择。
基于前面的基础,要针对具体的服务做限制是比较简单的事情,针对单节点限流我们的做法如下。
之前是用一个 RateLimiter 来防止整体的并发量,针对具体服务的前期是需要知道当前的请求会被转发到哪个服务里去,知道了这个我们只需要为每个服务创建一个 RateLimiter,不同的服务用不同的 RateLimiter 就可以实现具体服务的限制了。
集群的限流是通过时间的秒作为 key 来计数实现的,如果是针对具体的服务,只需要把服务名称加到 key 中就可以了,即一个服务就是一个 key,限流的操作自然而然是针对具体的服务。
可以用 Zuul 提供的 Route Filter 来做,在 Route Filter 中可以直接获取当前请求是要转发到哪个服务,代码如下所示。
RequestContext ctx = RequestContext.getCurrentContext();
Object serviceId = ctx.get("serviceId");
serviceId 就是 Eureka 中注册的服务名称。
具体接口限流
即使我们做了整体的集群限流,如果某个服务的具体限流持续并发量很大且是同一个接口,那么还会影响到其他接口的使用,华章所有的资源都被这一个接口占用了,其他的接口请求过来只能等待或者抛弃,所以我们需要将限流做得更细,可以针对具体的 API 接口进行并发控制。
具体的接口控制并发量我们将这个控制放到具体的服务中,之所以不放到 API 网关去做控制是因为 API 的量太大了,如果统一到 API 网关来控制那么需要配置很多 API 的并发量信息,如果放到具体的服务上,我们可以通过注解的方式在接口的方法上做文章,添加一个注解就可以实现并发控制,还可以结合我们的 Apollo 来做动态修改,当然也可以在 API 网关做,笔者推荐在具体的服务上做。
首先我们定义一个注解,用来标识某个接口需要进行并发控制,这个注解是通用的,可以放在公共的库中。在注解中定义一个 confKey,这个 key 对应的是 Apollo 中的配置 key,也就是说我们这个并发的数字不写死,而是通过 Apollo 来做关联,到时候可以动态修改,实时生效,代码如下所示。
/**
* 对 API 进行访问速度限制
* 限制的速度值在Apollo配置中通过 key 关联
*/
@Target(ElementType.METHOD)
@Retention(RetentionPolicy.RUNTIME)
@Documented
public @interface ApiRateLimit {
    /**
     * Apollo配置中的 key
     *
     * @return
     */
    String confKey();
}
接下来我们定义一个启动监听器,这个也是通用的,可以放在公共库中。这个启动监听器的主要作用就是扫描所有的 API 接口类,也就是我们的 Controller。
获取 Controller 中所有加了 ApiRateLimit 注解的信息,然后进行初始化操作,控制并发我们这里用 JDK 自带的 Semaphore 来实现,当然你也可以用之前讲的 RateLimiter,代码如下所示。
@Component
public class InitApiLimitRateListener implements ApplicationContextAware {
    public void setApplicationContext(ApplicationContext ctx) throws BeansException {
        Environment environment = ctx.getEnvironment();
        String defaultLimit = environment.getProperty("open.api.defaultLimit");
        Object rate = defaultLimit == null ? 100 : defaultLimit;
        ApiLimitAspect.semaphoreMap.put("open.api.defaultLimit", new Semaphore(Integer.parseInt(rate.toString())));
        Map<String, Object> beanMap = ctx.getBeansWithAnnotation(RestController.class);
        Set<String> keys = beanMap.keySet();
        for (String key : keys) {
            Class<?> clz = beanMap.get(key).getClass();
            String fullName = beanMap.get(key).getClass().getName();
            if (fullName.contains("EnhancerBySpringCGLIB") || fullName.contains("$$")) {
                fullName = fullName.substring(0, fullName.indexOf("$$"));
                try {
                    clz = Class.forName(fullName);
                } catch (ClassNotFoundException e) {
                    throw new RuntimeException(e);
                }
            }
            Method[] methods = clz.getMethods();
            for (Method method : methods) {
                if (method.isAnnotationPresent(ApiRateLimit.class)) {
                    String confKey = method.getAnnotation(ApiRateLimit.class).confKey();
                    if (environment.getProperty(confKey) != null) {
                        int limit = Integer.parseInt(environment.getProperty(confKey));
                        ApiLimitAspect.semaphoreMap.put(confKey, new Semaphore(limit));
                    }
                }
            }
        }
    }
}
上面的代码就是初始化的整个逻辑,在最开始的时候就是获取 open.api.defaultLimit 的值,那么这个值会配置在 Apollo 中,如果没有则给予一个默认值。open.api.defaultLimit 是考虑到并不是所有的接口都需要配置具体的限制并发的数量,所以给了一个默认的限制,也就是说没有加 ApiRateLimit 注解的接口就用这个默认的并发限制。
拿到所有的 Controller 类的信息,通过判断类上是否有 RestController 注解来确定这就是一个接口,然后获取类中所有的方法,获取方法上有 ApiRateLimit 注解的 key,通过 key获取配置的值,然后 new 一个 Semaphore 存入控制并发的切面的 map 中,切面下面会定义。
通过切面来对访问的接口进行并发控制,当然也可以用拦截器、过滤器之类的,切面也是共用的,可以放公共库中,代码如下所示。
/**
* 具体 API 并发控制
*/
@Aspect
@Order(value = Ordered.HIGHEST_PRECEDENCE)
public class ApiLimitAspect {
    public static Map<String, Semaphore> semaphoreMap = new ConcurrentHashMap<String, Semaphore>();
    @Around("execution(*com.biancheng.*.*.controller.*.*(..))")
    public Object around(ProceedingJoinPoint joinPoint) {
        Object result = null;
        Semaphore semap = null;
        Class<?> clazz = joinPoint.getTarget().getClass();
        String key = getRateLimitKey(clazz, joinPoint.getSignature().getName());
        if (key != null) {
            semap = semaphoreMap.get(key);
        } else {
            semap = semaphoreMap.get("open.api.defaultLimit");
        }
        try {
            semap.acquire();
            result = joinPoint.proceed();
        } catch (Throwable e) {
            throw new RuntimeException(e);
        } finally {
            semap.release();
        }
        return result;
    }
    private String getRateLimitKey(Class<?> clazz, String methodName) {
        for (Method method : clazz.getDeclaredMethods()) {
            if (method.getName().equals(methodName)) {
                if (method.isAnnotationPresent(ApiRateLimit.class)) {
                    String key = method.getAnnotation(ApiRateLimit.class).confKey();
                    return key;
                }
            }
        }
        return null;
    }
}
整个切面中的代码量不多,但是作用非常大,所有接口的请求都将会经过它,这是一个环绕通知。
第一行是一个 ConcurrentHashMap,用来存储我们之前在监听器里面初始化好的 Semaphore 对象,需要重点关注的是 around 中的逻辑。
首先获取当前访问的目标对象以及方法名称,通过 getRateLimitKey 获取当前访问的方法是否有限制并发的 key,通过 key 从 semaphoreMap 中获取对应的 Semaphore 对象做并发限制。
配置进行并发控制的切面,代码如下所示。
@Configuration
public class BeanConfig {
    /**
     * 具体的 API 并发控制
     *
     * @return
     */
    @Bean
    public ApiLimitAspect apiLimitAspect() {
        return new ApiLimitAspect();
    }
}
到这里整个限制的流程就结束了。启动服务,可以用并发测试工具 Apache ab 来测试效果。将并发数量配置为 1,测试请求 1000 次看需要多长时间,然后调大并发数量,再次请求,虽然比较耗时,但我们可以发现并发配置数量越小的耗时时间越长,这就证明并发控制生效了。
目前没有加我们自定义的注解,所有的接口都是用默认的并发控制数量,如果我们想对某个接口单独做并发控制,只需要在方法上加上 ApiRateLimit 注解即可,具体代码如下所示。
/**
* 获取房产信息
*
* @param houseId 房产编号
* @return
*/
@ApiRateLimit(confKey = "open.api.hosueInfo")
@GetMapping("/{houseId}")
public ResponseData hosueInfo(@PathVariable("houseId") Long houseId, HttpServletRequest request) {
    String uid = request.getHeader("uid");
    System.err.println("===" + uid);
    return ResponseData.ok(houseService.getHouseInfo(houseId));
}
ApiRateLimit 中配置的 confKey 要和 Apollo 配置中的 key 对应才行。目前限流的信号量对象是在启动时进行初始化的,如果需要实现在 Apollo 中动态新增或者修改配置也能生效的话,需要对配置的修改进行监听,然后动态创建信号量对象添加到 semaphoreMap 中。
推荐电子商务源码
 springcloud+springcloud+vue+uniapp分布式微服务电商 商城之Spring Cloud基于JWT创建统一的认证服务")
(五十八) springcloud+springcloud+vue+uniapp分布式微服务电商 商城之Spring Cloud基于JWT创建统一的认证服务
认证服务肯定要有用户信息,不然怎么认证是否为合法用户?因为是内部的调用认证,可以简单一点,用数据库管理就是一种方式。或者可以配置用户信息,然后集成分布式配置管理就完美了。
表结构
本教程中的案例把查数据库这一步骤省略了,大家可以自行补充,但是表的设计还是要跟大家讲解的。用户表的形式如图 1 所示。
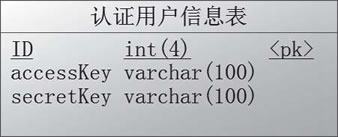
相关的代码如下所示。
create table auth_user(
  id int(4) not null,
  accessKey varchar(100) not null,
  secretKey varchar(100) not null,
  Primary key (id)
);
Alter table auth_user comment ''认证用户信息表'';
这里只有简单的几个字段,若大家有别的需求可以自行去扩展。代码中的 accessKey 和 secretKey 是用户身份的标识。
JWT 工具类封装
JWT 的 GitHub 地址是:https://github.com/jwtk/jjwt,依赖配置代码如下所示。
<dependency>
    <groupId>io.jsonwebtoken</groupId>
    <artifactId>jjwt</artifactId>
    <version>0.7.0</version>
</dependency>
用工具类进行认证主要有以下几个方法:
- 生成 Token。
- 检查 Token 是否合法。
- 刷新 RSA 公钥以及私钥。
生成 Token 是在进行用户身份认证之后,通过用户的 ID 来生成一个 Token,这个 Token 采用 RSA 加密的方式进行加密,Token 的内容包括用户的 ID 和过期时间。
检查 Token 则是根据调用方带来的 Token 检查是否为合法用户,就是对 Token 进行解密操作,能解密并且在有效期内表示合法,合法则返回用户 ID。
刷新 RSA 公钥及私钥的作用是防止公钥、私钥泄露,公钥、私钥一般是写死的,不过我们可以做成配置的。集成配置管理中心后,可以对公钥、私钥进行动态修改,修改之后需要重新初始化公钥、私钥的对象信息。
获取 Token 代码如下所示。
/**
* 获取 Token
*
* @param uid 用户 ID
* @param exp 失效时间, 单位分钟
* @return
*/
public static String getToken(String uid, int exp) {
    Long endTime = System.currentTimeMillis() + 1000 * 60 * exp;
    return Jwts.builder().setSubject(uid).setExpiration(new Date(endTime))
            .signWith(SignatureAlgorithm.RS512, priKey).compact();
}
检查 Token 是否合法代码如下所示。
/**
* 检查 Token 是否合法
*
* @param token
* @return JWTResult
*/
public JWTResult checkToken(String token) {
    try {
        Claims claims = Jwts.parser().setSigningKey(pubKey).parseClaimsJws(token).getBody();
        String sub = claims.get("sub", String.class);
        return new JWTResult(true, sub, "合法请求", ResponseCode.SUCCESS_CODE.getCode());
    } catch (ExpiredJwtException e) {
        // 在解析 JWT 字符串时, 如果''过期时间字段''已经早于当前时间,
        // 将会抛出 ExpiredJwtException 异常, 说明本次请求已经失效
        return new JWTResult(false, null, "token已过期 ", ResponseCode.TOKEN_TIMEOUT_CODE.getCode());
    } catch (SignatureException e) {
        // 在解析 JWT 字符串时, 如果密钥不正确, 将会解析失败, 抛出
        // SignatureException 异常, 说明该 JWT 字符串是伪造的
        return new JWTResult(false, null, "非法请求", ResponseCode.NO_AUTH_CODE.getCode());
    } catch (Exception e) {
        return new JWTResult(false, null, "非法请求", ResponseCode.NO_AUTH_CODE.getCode());
    }
}
完整代码如下所示。
/**
* API调用认证工具类,采用RSA加密
*/
public class JWTUtils {
    private static RSAPrivateKey priKey;
    private static RSAPublicKey pubKey;
    private static class SingletonHolder {
        private static final JWTUtils INSTANCE = new JWTUtils();
    }
    public synchronized static JWTUtils getInstance(String modulus, String privateExponent, String publicExponent) {
        if (priKey == null && pubKey == null) {
            priKey = RSAUtils.getPrivateKey(modulus, privateExponent);
            pubKey = RSAUtils.getPublicKey(modulus, publicExponent);
        }
        return SingletonHolder.INSTANCE;
    }
    public synchronized static void reload(String modulus, String privateExponent, String publicExponent) {
        priKey = RSAUtils.getPrivateKey(modulus, privateExponent);
        pubKey = RSAUtils.getPublicKey(modulus, publicExponent);
    }
    public synchronized static JWTUtils getInstance() {
        if (priKey == null && pubKey == null) {
            priKey = RSAUtils.getPrivateKey(RSAUtils.modulus, RSAUtils.private_exponent);
            pubKey = RSAUtils.getPublicKey(RSAUtils.modulus, RSAUtils.public_exponent);
        }
        return SingletonHolder.INSTANCE;
    }
    /**
     * 获取Token
     *
     * @param uid 用户ID
     * @param exp 失效时间,单位分钟
     * @return
     */
    public static String getToken(String uid, int exp) {
        long endTime = System.currentTimeMillis() + 1000 * 60 * exp;
        return Jwts.builder().setSubject(uid).setExpiration(new Date(endTime))
                .signWith(SignatureAlgorithm.RS512, priKey).compact();
    }
    /**
     * 获取Token
     *
     * @param uid 用户ID
     * @return
     */
    public String getToken(String uid) {
        long endTime = System.currentTimeMillis() + 1000 * 60 * 1440;
        return Jwts.builder().setSubject(uid).setExpiration(new Date(endTime))
                .signWith(SignatureAlgorithm.RS512, priKey).compact();
    }
    /**
     * 检查Token是否合法
     *
     * @param token
     * @return JWTResult
     */
    public JWTResult checkToken(String token) {
        try {
            Claims claims = Jwts.parser().setSigningKey(pubKey).parseClaimsJws(token).getBody();
            String sub = claims.get("sub", String.class);
            return new JWTResult(true, sub, "合法请求", ResponseCode.SUCCESS_CODE.getCode());
        } catch (ExpiredJwtException e) {
            // 在解析JWT字符串时,如果‘过期时间字段’已经早于当前时间,将会抛出ExpiredJwtException异常,说明本次请求已经失效
            return new JWTResult(false, null, "token已过期", ResponseCode.TOKEN_TIMEOUT_CODE.getCode());
        } catch (SignatureException e) {
            // 在解析JWT字符串时,如果密钥不正确,将会解析失败,抛出SignatureException异常,说明该JWT字符串是伪造的
            return new JWTResult(false, null, "非法请求", ResponseCode.NO_AUTH_CODE.getCode());
        } catch (Exception e) {
            return new JWTResult(false, null, "非法请求", ResponseCode.NO_AUTH_CODE.getCode());
        }
    }
    public static class JWTResult {
        private boolean status;
        private String uid;
        private String msg;
        private int code;
        public JWTResult() {
            super();
        }
        public JWTResult(boolean status, String uid, String msg, int code) {
            super();
            this.status = status;
            this.uid = uid;
            this.msg = msg;
            this.code = code;
        }
        public int getCode() {
            return code;
        }
        public void setCode(int code) {
            this.code = code;
        }
        public String getMsg() {
            return msg;
        }
        public void setMsg(String msg) {
            this.msg = msg;
        }
        public boolean isStatus() {
            return status;
        }
        public void setStatus(boolean status) {
            this.status = status;
        }
        public String getUid() {
            return uid;
        }
        public void setUid(String uid) {
            this.uid = uid;
        }
    }
}
认证接口
认证接口用于调用方进行认证时,认证通过则返回一个加密的 Token 给对方,对方就可以用这个 Token 去请求别的服务了,认证获取 Token 代码如下所示。
@PostMapping("/token")
public ResponseData auth(@RequestBody AuthQuery query) throws Exception {
    if (StringUtils.isBlank(query.getAccessKey()) || StringUtils.isBlank(query.getSecretKey())) {
        return ResponseData.failByParam("accessKey and secretKey not null");
    }
    User user = authService.auth(query);
    if (user == null) {
        return ResponseData.failByParam(" 认证失败 ");
    }
    JWTUtils jwt = JWTUtils.getInstance();
    return ResponseData.ok(jwt.getToken(user.getId().toString()));
}
认证参数代码如下所示。
/**
* API 用户认证参数类
*/
public class AuthQuery {
    private String accessKey;
    private String secretKey;
    // get set ...
}
AuthService 中的 auth 方法就是根据 accessKey 和 secretKey 判断是否有这个用户。
推荐电子商务源码
 springcloud+springcloud+vue+uniapp 分布式微服务电商 商城之 Spring Cloud 服务消费方申请 Token")
(六十) springcloud+springcloud+vue+uniapp 分布式微服务电商 商城之 Spring Cloud 服务消费方申请 Token
目前服务提供方已经开启了调用认证,这意味着如果现在直接调用接口会被拦截,所以在调用之前需要进行认证,即获取 Token 并将其放到请求头中与请求头一起传输才可以调用接口。
1. 调用前获取 Token
获取 Token 前我们先定义一个 Feign 的客户端,代码如下所示。
/**
* 认证服务 API 调用客户端
**/
@FeignClient(value = "auth-service", path = "/oauth")
public interface AuthRemoteClient {
    /**
     * 调用认证, 获取 token
     *
     * @param query
     * @return
     */
    @PostMapping("/token")
    ResponseData auth(@RequestBody AuthQuery query);
}
通过 AuthRemoteClient 就可以获取 Token。
2. 缓存 Token 信息
如果每次调用接口之前都去认证一次,肯定是不行的,因为这样会导致性能降低,而且 Token 是可以设置过期时间的,完全没必要每次都去重新申请。
大家可以将 Token 缓存在本地或者 Redis 中。需要注意的是缓存时间必须小于 Token 的过期时间。
3. 采用定时器刷新 Token
就算获取的 Token 采用缓存来降低申请次数,这种方式也不是最优的方案。如果我们用的是 Feign 来消费接口,那么以下两种方式更好一些:一种方式就是在所有业务代码中调用接口前获取 Token,然后再进行相关设置。另一种是利用 Feign 提供的请求拦截器直接获取 Token,然后再进行相关设置。
采用定时器刷新 Token 是笔者认为最优的方案,其耦合程度很低,只需要添加一个定时任务即可。需要注意的是,定时的时间间隔必须小于 Token 的失效时间,如果 Token 是 24 小时过期,那么你可以 20 个小时定时刷新一次来保证调用的正确性。
定时刷新 Token 的代码如下所示。
/**
* 定时刷新 token
**/
@Component
public class TokenScheduledTask {
    private static Logger logger = LoggerFactory.getLogger(TokenScheduledTask.class);
    public final static long ONE_Minute = 60 * 1000 * 60 * 20;
    @Autowired
    private AuthRemoteClient authRemoteClient;
    /**
     * 刷新 Token
     */
    @Scheduled(fixedDelay = ONE_Minute)
    public void reloadApiToken() {
        String token = this.getToken();
        while (StringUtils.isBlank(token)) {
            try {
                Thread.sleep(1000);
                token = this.getToken();
            } catch (InterruptedException e) {
                logger.error("", e);
            }
        }
        System.setProperty("fangjia.auth.token", token);
    }
    public String getToken() {
        AuthQuery query = new AuthQuery();
        query.setAccessKey("1");
        query.setSecretKey("1");
        ResponseData response = authRemoteClient.auth(query);
        return response.getData() == null ? "" : response.getData().toString();
    }
}
推荐电子商务源码
 springcloud+springcloud+vue+uniapp分布式微服务电商 商城之使用Spring Security给Spring Boot Admin开启认证")
(六十五) springcloud+springcloud+vue+uniapp分布式微服务电商 商城之使用Spring Security给Spring Boot Admin开启认证
监控类的数据 Web 管理端最好不要设置成直接通过输入访问地址就可以访问,必须得进行用户认证才行,以保证数据的安全性。Spring Boot Admin 开启认证也可以借助于 spring-boot-starter-security。
加入依赖,代码如下所示。
<dependency>
    <groupId>org.springframework.boot</groupId>
    <artifactId>spring-boot-starter-security</artifactId>
</dependency>
然后在属性文件里面配置认证信息:
spring.security.user.name=zhangsan
spring.security.user.password=123456
自定义安全配置类,代码如下所示。
@Configuration
public static class SecurityPermitAllConfig extends WebSecurityConfigurerAdapter {
    private final String adminContextPath;
    public SecurityPermitAllConfig(AdminServerProperties adminServerProperties) {
        this.adminContextPath = adminServerProperties.getContextPath();
    }
    @Override
    protected void configure(HttpSecurity http) throws Exception {
        SavedRequestAwareAuthenticationSuccessHandler successHandler = new SavedRequestAwareAuthenticationSuccessHandler();
        successHandler.setTargetUrlParameter("redirectTo");
        // 静态资源和登录页面可以不用认证
        http.authorizeRequests().antMatchers(adminContextPath + "/assets/**").permitAll()
                .antMatchers(adminContextPath + "/login").permitAll()
                // 其他请求必须认证
                .anyRequest().authenticated()
                // 自定义登录和退出
                .and().formLogin().loginPage(adminContextPath + "/login").successHandler(successHandler).and().logout()
                .logoutUrl(adminContextPath + "/logout")
                // 启用HTTP-Basic, 用于Spring Boot Admin Client注册
                .and().httpBasic().and().csrf().disable();
    }
}
重启程序,然后就会发现需要输入用户名和密码才能访问 Spring Boot Admin 的 Web 管理端,如下图所示。
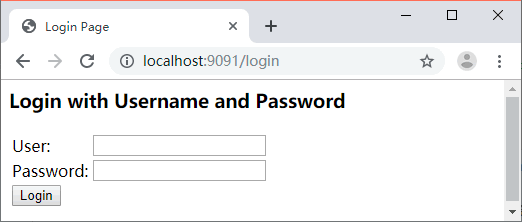
这里需要注意的是,如果 Spring Boot Admin 服务开启了认证,监控的服务中也需要配置对应的用户名和密码,否则会注册失败。
在 spring-boot-admin-client 属性文件中加上用户认证信息:
spring.boot.admin.client.username=zhangsan
spring.boot.admin.client.password=123456
推荐电子商务源码
关于Spring Boot Cloud Foundry错误中没有唯一的服务处理接口错误和springboot没有service的介绍现已完结,谢谢您的耐心阅读,如果想了解更多关于(七十三) springcloud+springcloud+vue+uniapp分布式微服务电商 商城之Spring Cloud服务限流详解、(五十八) springcloud+springcloud+vue+uniapp分布式微服务电商 商城之Spring Cloud基于JWT创建统一的认证服务、(六十) springcloud+springcloud+vue+uniapp 分布式微服务电商 商城之 Spring Cloud 服务消费方申请 Token、(六十五) springcloud+springcloud+vue+uniapp分布式微服务电商 商城之使用Spring Security给Spring Boot Admin开启认证的相关知识,请在本站寻找。
本文标签:


