对于没有SpringCloudConfigServer的RefreshScope运行时配置感兴趣的读者,本文将提供您所需要的所有信息,我们将详细讲解没有springcloud经验怎么办,并且为您提供关
对于没有Spring Cloud Config Server的RefreshScope运行时配置感兴趣的读者,本文将提供您所需要的所有信息,我们将详细讲解没有springcloud经验怎么办,并且为您提供关于## springCloud config refresh刷新actuator踩坑、0701-spring cloud config-简介、Config Server开发、Config Client开发、@RefreshScope 刷新机制都不懂,还敢说会Spring Cloud?、org.apache.hadoop.security.proto.RefreshUserMappingsProtocolProtos.RefreshSuperUserGroupsConfigurationRequestProto的实例源码的宝贵知识。
本文目录一览:- 没有Spring Cloud Config Server的RefreshScope运行时配置(没有springcloud经验怎么办)
- ## springCloud config refresh刷新actuator踩坑
- 0701-spring cloud config-简介、Config Server开发、Config Client开发
- @RefreshScope 刷新机制都不懂,还敢说会Spring Cloud?
- org.apache.hadoop.security.proto.RefreshUserMappingsProtocolProtos.RefreshSuperUserGroupsConfigurationRequestProto的实例源码
")
没有Spring Cloud Config Server的RefreshScope运行时配置(没有springcloud经验怎么办)
是否可以使用@RefreshScope通过POST rest api / refresh调用刷新property(api-url),而无需设置spring
cloud配置服务器和spring cloud配置客户端。
for.eg消费者.java
@Servicepublic class Consumer {@value(${api-url})private String apiUrl;现在正在从application.yml中读取api-url。我想在运行时更改api-url而不重启服务器。
Spring靴子有可能吗?
答案1
小编典典是的,只包括Spring Cloud Starter
<parent> <groupId>org.springframework.boot</groupId> <artifactId>spring-boot-starter-parent</artifactId> <version>1.5.2.RELEASE</version></parent><dependencyManagement> <dependencies> <dependency> <groupId>org.springframework.cloud</groupId> <artifactId>spring-cloud-dependencies</artifactId> <version>Dalston.RELEASE</version> <type>pom</type> <scope>import</scope> </dependency> </dependencies></dependencyManagement><dependencies> <dependency> <groupId>org.springframework.cloud</groupId> <artifactId>spring-cloud-starter</artifactId> </dependency></dependencies>
## springCloud config refresh刷新actuator踩坑
refresh刷新不起作用 404 actuator踩坑
Actuator
actuator是springboot中的一个附加功能,官方是对它这样介绍的:
Spring Boot includes a number of additional features to help you monitor and manage your application when you push it to production. You can choose to manage and monitor your application by using HTTP endpoints or with JMX. Auditing, health, and metrics gathering can also be automatically applied to your application.
用法:
1.引入依赖:
Maven方式:
org.springframework.boot spring-boot-starter-actuator2 加配置(敲黑板)
- 2.0之前 直接启动
在启动log日志中,可以看到springboot把一些默认的地址都映射好了,其中我们配置的actuator中health和info已经被映射上了,我们打开地址:http://localhost:8080/actuator/info 或者 http://localhost:8080/actuator/health - 2.0以后
management:  #actuator
  server:
    port: 8081
  endpoints:
    web:
#      base-path: / #默认是/actuator 前缀,可以在这里修改
      exposure:
        include: "*"  #打开全部请求端点
#        include: refresh,health,info #打开部分
必须加上启动端口 2.0以后不加上启动端口报404
management:  #actuator
  server:
    port: 8081
3 加注解
@RefreshScope
4 手动刷新(敲黑板,搞了一上午没吃饭)
2.0之前
curl -X POST http://localhost:1031/refresh
curl -X POST “http://localhost:1031/bus/refresh”
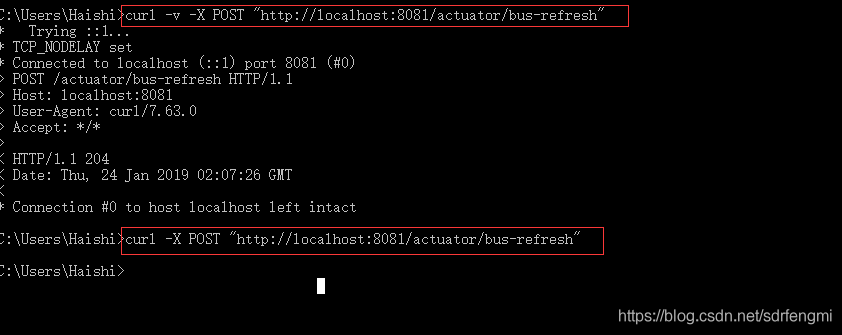
2.0之以后
curl -v -X POST “http://localhost:8081/actuator/bus-refresh”
curl -X POST “http://localhost:8081/actuator/bus-refresh”
纯手打请给与支持

0701-spring cloud config-简介、Config Server开发、Config Client开发
一、概述
参看地址:
https://cloud.spring.io/spring-cloud-static/Edgware.SR3/single/spring-cloud.html#_spring_cloud_config
https://gitee.com/itmuch/spring-cloud-book
1.1、为什么需要统一管理配置
集中管理、不同环境不同配置、运行期间动态调整配置、自动刷新
默认都是配置在配置文件中、数据库等中
1.2、简介
主要有两种分布式配置Zookeeper、Consul。
其实还有许多,如百度的disconf、阿里的diamond、携程的apollo
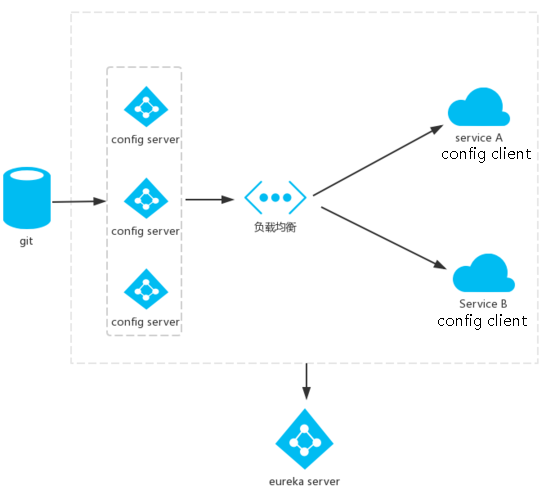
为分布式系统外部化配置提供了服务器端和客户端的支持。它包括Config Server和Config Client两部分。由于Config Server和Config Client都实现了对Spring Environment 和PropertySource抽象的映射,因此,Spring Cloud Config非常适合Spring应用程序,当然也可以与任何其他语言编写的应用程序配合使用。
Config Server是一个可横向扩展、集中式的配置服务器。它用于集中管理应用程序各个环境下的配置。默认使用Git存储配置内容(也可以使用Subversion,本地文件系统或Vault存储配置。)因此可以方便的实现对配置的版本控制与内容审计等
Config Client是Config Server的客户端,用于操作存储在Config Server中的配置属性。
1.3、架构图
在Config Server可以有dev、stage、prod等环境
二、Config Server开发
2.1、项目搭建
如git地址:https://github.com/bjlhx15/spring-cloud.git
增加pom
<dependencies>
        <dependency>
            <groupId>org.springframework.cloud</groupId>
            <artifactId>spring-cloud-config-server</artifactId>
        </dependency>
    </dependencies>
启动类增加注解
@SpringBootApplication
@EnableConfigServer
public class ConfigServerApplication {
    public static void main(String[] args) {
        SpringApplication.run(ConfigServerApplication.class, args);
    }
}
2.2、增加配置项目git
如:https://github.com/bjlhx15/spring-cloud-config-test-repo.git
2.3、在application.yml中增加
server:
  port: 8080
spring:
  cloud:
    config:
      server:
        git:
          uri: https://github.com/bjlhx15/spring-cloud-config-test-repo
启动项目测试即可.
2.4、访问地址
HTTP服务具有以下形式的资源映射规则:
/{application}/{profile}[/{label}]
/{application}-{profile}.yml
/{label}/{application}-{profile}.yml
/{application}-{profile}.properties
/{label}/{application}-{profile}.properties
其实是按照格式随意拼接即可。如:http://localhost:8080/aa-profile.properties 或者 http://localhost:8080/aa-profile.yml
其中label是git的分支版本。
2.5、测试
增加foobar-dev.yml测试。
访问:http://localhost:8080/foobar-dev.yml,发现是配置的文件,。
即访问优先级:先找到能匹配的文件【label/具体文件名】,如果不匹配即找到application配置文件。
平时使用建议使用一个配置文件即可
三、Config Client开发
3.1、创建项目
git地址:https://github.com/bjlhx15/spring-cloud.git
增加pom【注意是spring-cloud-starter-config】
<dependency>
            <groupId>org.springframework.cloud</groupId>
            <artifactId>spring-cloud-starter-config</artifactId>
        </dependency>
        <dependency>
            <groupId>org.springframework.boot</groupId>
            <artifactId>spring-boot-starter-web</artifactId>
        </dependency>
配置文件
新增一个bootstrap.yml
spring:
  cloud:
    config:
      uri: http://localhost:8080
      name: foobar
      profile: dev
      label: master   # 当configserver的后端存储是Git时,默认就是master
  application: #和配置文件匹配最好
    name: foobar
在application.yml
server:
  port: 8040
原因是:Spring云上下文
Spring Cloud应用程序通过创建“bootstrap”上下文来运行,该上下文是主应用程序的父上下文。【bootstrap.yml 优先级高于application.yml】开箱即用,它负责从外部源加载配置属性,并且还解密本地外部配置文件中的属性。这两个上下文共享一个环境,它是任何Spring应用程序的外部属性的来源。bootstrap属性以高优先级添加,因此默认情况下它们不能被本地配置覆盖。
bootstrap程序上下文默认约定:使用bootstrap.yml【bootstrap.properties】覆盖application.yml(或.properties)
但是可以使用spring.cloud.bootstrap.enabled=false禁用
bootstrap.*里面的配置→链接Config Server,加载远程配置之后→在加载application.*配置
2.2、增加启动类
@SpringBootApplication
public class ConfigClientApplication {
    public static void main(String[] args) {
        SpringApplication.run(ConfigClientApplication.class, args);
    }
}
2.3、增加测试
@RestController
public class ConfigClientController {
    // 传统方式需要在配置文件加上配置 ,但是优先级低于使用bootstap加载的配置
    @Value("${profile}")
    private String profile;

    @GetMapping("/profile")
    public String getProfile() {
        return this.profile;
    }
}
注意点:
1、pom的spring-cloud-starter-config不要引错;
2、不要不适用bootstrap.yml。否则默认是8888端口
3、如果本地属性也有远端属性,以bootstrap.yml先与本地application为主,故使用远端属性profile
4、注意git上的配置文件如果是yml类型,注意属性“:”后有空格。。

@RefreshScope 刷新机制都不懂,还敢说会Spring Cloud?
一、前言
用过Spring Cloud的同学都知道在使用动态配置刷新的我们要配置一个@RefreshScope 在类上才可以实现对象属性的的动态更新,本着知其所以然的态度,晚上没事儿又把这个点回顾了一下,下面就来简单的说下自己的理解。
总览下,实现@RefreshScope 动态刷新的就需要以下几个:
- @ Scope
- @RefreshScope
- RefreshScope
- GenericScope
- Scope
- ContextRefresher
二、@Scope
一句话,@RefreshScope 能实现动态刷新全仰仗着@Scope 这个注解,这是为什么呢?
@Scope 代表了Bean的作用域,我们来看下其中的属性:
@Target({ElementType.TYPE, ElementType.METHOD})
@Retention(RetentionPolicy.RUNTIME)
@Documented
public @interface Scope {

	/**
	 * Alias for {@link #scopeName}.
	 * @see #scopeName
	 */
	@AliasFor("scopeName")
	String value() default "";

	/**
	 *  singleton  表示该bean是单例的。(默认)
     *  prototype    表示该bean是多例的,即每次使用该bean时都会新建一个对象。
     *  request        在一次http请求中,一个bean对应一个实例。
     *  session        在一个httpSession中,一个bean对应一个实例
	 */
	@AliasFor("value")
	String scopeName() default "";

	/**
    *   DEFAULT			不使用代理。(默认)
	* 	NO				不使用代理,等价于DEFAULT。
	* 	INTERFACES		使用基于接口的代理(jdk dynamic proxy)。
	* 	TARGET_CLASS	使用基于类的代理(cglib)。
    */
	ScopedProxyMode proxyMode() default ScopedProxyMode.DEFAULT;

}
通过代码我们可以清晰的看到两个主要属性value 和 proxyMode,value就不多说了,大家平时经常用看看注解就可以。proxyMode 这个就有意思了,而这个就是@RefreshScope 实现的本质了。
我们需要关心的就是ScopedProxyMode.TARGET_CLASS 这个属性,当ScopedProxyMode 为TARGET_CLASS 的时候会给当前创建的bean 生成一个代理对象,会通过代理对象来访问,每次访问都会创建一个新的对象。
理解起来可能比较晦涩,那先来看下实现再回头来看这句话。
三、RefreshScope 的实现原理
- 先来看下@RefreshScope
@Target({ ElementType.TYPE, ElementType.METHOD })
@Retention(RetentionPolicy.RUNTIME)
@Scope("refresh")
@Documented
public @interface RefreshScope {
	/**
	 * @see Scope#proxyMode()
	 */
	ScopedProxyMode proxyMode() default ScopedProxyMode.TARGET_CLASS;

}
2. 可以看出,它使用就是 @Scope ,其内部就一个属性默认 ScopedProxyMode.TARGET_CLASS。知道了是通过Spring Scope 来实现的那就简单了,我们来看下Scope 这个接口
public interface Scope {

	/**
	 * Return the object with the given name from the underlying scope,
	 * {@link org.springframework.beans.factory.ObjectFactory#getObject() creating it}
	 * if not found in the underlying storage mechanism.
	 * <p>This is the central operation of a Scope, and the only operation
	 * that is absolutely required.
	 * @param name the name of the object to retrieve
	 * @param objectFactory the {@link ObjectFactory} to use to create the scoped
	 * object if it is not present in the underlying storage mechanism
	 * @return the desired object (never {@code null})
	 * @throws IllegalStateException if the underlying scope is not currently active
	 */
	Object get(String name, ObjectFactory<?> objectFactory);


	@Nullable
	Object remove(String name);


	void registerDestructionCallback(String name, Runnable callback);


	@Nullable
	Object resolveContextualObject(String key);


	@Nullable
	String getConversationId();

}
看下接口,我们只看Object get(String name, ObjectFactory<?> objectFactory); 这个方法帮助我们来创建一个新的bean ,也就是说,@RefreshScope 在调用 刷新的时候会使用此方法来给我们创建新的对象,这样就可以通过spring 的装配机制将属性重新注入了,也就实现了所谓的动态刷新。
- 那它究竟是怎么处理老的对象,又怎么除法创建新的对象呢?
在开头我提过几个重要的类,而其中 RefreshScope extends GenericScope, GenericScope implements Scope。
所以通过查看代码,是GenericScope 实现了 Scope 最重要的 get(String name, ObjectFactory<?> objectFactory) 方法,在GenericScope 里面 包装了一个内部类 BeanLifecycleWrapperCache 来对加了 @RefreshScope 从而创建的对象进行缓存,使其在不刷新时获取的都是同一个对象。(这里你可以把 BeanLifecycleWrapperCache 想象成为一个大Map 缓存了所有@RefreshScope 标注的对象)
知道了对象是缓存的,所以在进行动态刷新的时候,只需要清除缓存,重新创建就好了。 来看代码,眼见为实,只留下关键方法:
// ContextRefresher 外面使用它来进行方法调用 ============================== 我是分割线

	public synchronized Set<String> refresh() {
		Set<String> keys = refreshEnvironment();
		this.scope.refreshAll();
		return keys;
	}

// RefreshScope 内部代码  ============================== 我是分割线

	@ManagedOperation(description = "Dispose of the current instance of all beans in this scope and force a refresh on next method execution.")
	public void refreshAll() {
		super.destroy();
		this.context.publishEvent(new RefreshScopeRefreshedEvent());
	}


// GenericScope 里的方法 ============================== 我是分割线

	//进行对象获取,如果没有就创建并放入缓存
	@Override
	public Object get(String name, ObjectFactory<?> objectFactory) {
		BeanLifecycleWrapper value = this.cache.put(name,
				new BeanLifecycleWrapper(name, objectFactory));
		locks.putIfAbsent(name, new ReentrantReadWriteLock());
		try {
			return value.getBean();
		}
		catch (RuntimeException e) {
			this.errors.put(name, e);
			throw e;
		}
	}
	//进行缓存的数据清理
	@Override
	public void destroy() {
		List<Throwable> errors = new ArrayList<Throwable>();
		Collection<BeanLifecycleWrapper> wrappers = this.cache.clear();
		for (BeanLifecycleWrapper wrapper : wrappers) {
			try {
				Lock lock = locks.get(wrapper.getName()).writeLock();
				lock.lock();
				try {
					wrapper.destroy();
				}
				finally {
					lock.unlock();
				}
			}
			catch (RuntimeException e) {
				errors.add(e);
			}
		}
		if (!errors.isEmpty()) {
			throw wrapIfNecessary(errors.get(0));
		}
		this.errors.clear();
	}
通过观看源代码我们得知,我们截取了三个片段所得之,ContextRefresher 就是外层调用方法用的,GenericScope 里面的 get 方法负责对象的创建和缓存,destroy 方法负责再刷新时缓存的清理工作。当然spring n内部还进行很多其他有趣的处理,有兴趣的同学可以详细看一下。
四、总结
综上所述,来总结下@RefreshScope 实现流程
-
需要动态刷新的类标注@RefreshScope 注解
-
@RefreshScope 注解标注了@Scope 注解,并默认了ScopedProxyMode.TARGET_CLASS; 属性,此属性的功能就是在创建一个代理,在每次调用的时候都用它来调用GenericScope get 方法来获取对象
-
如属性发生变更会调用 ContextRefresher refresh() -》RefreshScope refreshAll() 进行缓存清理方法调用,并发送刷新事件通知 -》 GenericScope 真正的 清理方法destroy() 实现清理缓存
-
在下一次使用对象的时候,会调用GenericScope get(String name, ObjectFactory<?> objectFactory) 方法创建一个新的对象,并存入缓存中,此时新对象因为Spring 的装配机制就是新的属性了。
专注于分享技术干货文章的地方,内容涵盖java基础、中间件、分布式、apm监控方案、异常问题定位等技术栈。多年基础架构经验,擅长基础组件研发,分布式监控系统,热爱技术,热爱分享


org.apache.hadoop.security.proto.RefreshUserMappingsProtocolProtos.RefreshSuperUserGroupsConfigurationRequestProto的实例源码
@Override
public RefreshSuperUserGroupsConfigurationResponseProto
    refreshSuperUserGroupsConfiguration(RpcController controller,RefreshSuperUserGroupsConfigurationRequestProto request)
    throws ServiceException {
  try {
    impl.refreshSuperUserGroupsConfiguration();
  } catch (IOException e) {
    throw new ServiceException(e);
  }
  return VOID_REFRESH_SUPERUSER_GROUPS_CONfigURATION_RESPONSE;
}
今天关于没有Spring Cloud Config Server的RefreshScope运行时配置和没有springcloud经验怎么办的分享就到这里,希望大家有所收获,若想了解更多关于## springCloud config refresh刷新actuator踩坑、0701-spring cloud config-简介、Config Server开发、Config Client开发、@RefreshScope 刷新机制都不懂,还敢说会Spring Cloud?、org.apache.hadoop.security.proto.RefreshUserMappingsProtocolProtos.RefreshSuperUserGroupsConfigurationRequestProto的实例源码等相关知识,可以在本站进行查询。
本文标签:


