对于SpringBoot服务注入到doFiler感兴趣的读者,本文将提供您所需要的所有信息,我们将详细讲解springboot注入service,并且为您提供关于5、SpringBoot的Profil
对于Spring Boot服务注入到doFiler感兴趣的读者,本文将提供您所需要的所有信息,我们将详细讲解springboot注入service,并且为您提供关于5、SpringBoot 的 Profile 功能、Consul+Spring boot 的服务注册和服务注销、docker 带参数启动 配合 springboot profile、Maven 之 profile 与Spring boot 的 profile的宝贵知识。
本文目录一览:- Spring Boot服务注入到doFiler(springboot注入service)
- 5、SpringBoot 的 Profile 功能
- Consul+Spring boot 的服务注册和服务注销
- docker 带参数启动 配合 springboot profile
- Maven 之 profile 与Spring boot 的 profile
")
Spring Boot服务注入到doFiler(springboot注入service)
我正在尝试将身份验证服务注入Filter-
@AutowiredAuthRequestService authService;并在doFiler方法中使用它-
@Overridepublic void doFilter(ServletRequest request, ServletResponse response, FilterChain chain) throws IOException, ServletException { HttpServletRequest req = (HttpServletRequest) request; System.out.println("SAPServiceFilter: "+ req.getRequestURI()); //TODO - create auth sender authService.isAuthnticate((HttpServletRequest)request); //null chain.doFilter(request, response);}我的过滤器类位于类的子包中,@SpringBootApplication并带有@service-
@Servicepublic class AuthRequestService { @PostConstruct public void init() { System.out.println("AuthRequestService @PostConstruct"); } public boolean isAuthnticate(HttpServletRequest request) { System.out.println("isAuthnticate"); return true; }}当使用-列出我的所有豆子时,该类也会出现
for (String name : applicationContext.getBeanDefinitionNames()) { System.out.println(name);}仍然当调试authService为null时,向过滤器注册的最后一件事FilterRegistrationBean-
FilterRegistrationBean<SAPServiceFilter> filterRegBean = new FilterRegistrationBean<>();filterRegBean.setFilter(new SAPServiceFilter());答案1
小编典典您可以使用构造函数注入。假设您的过滤器注册Bean位于组件中,并且可以访问该服务,您可以在其中自动进行连接并将其传递给构造函数
@Autowired AuthRequestService authRequestService;[...]FilterRegistrationBean<SAPServiceFilter> filterRegBean = new FilterRegistrationBean<>();filterRegBean.setFilter(new SAPServiceFilter(authRequestService));
5、SpringBoot 的 Profile 功能
1.1、功能介绍
配置文件默认使用application.properties、application-default.properties
如果需要指定其他配置文件,可以在命令行参数中指定,spring.profiles.default=xxx
激活profile
spring.profiles.active=xxx
它与default配置文件互斥
希望两个配置文件同时被激活
spring.profiles.include=xxx,xxx
指定profile前缀,在命令行参数中配置,不推荐
spring.config.name=xxx
1.2、Profile 解析
private ConfigurableEnvironment prepareEnvironment(SpringApplicationRunListeners listeners,
                                                   ApplicationArguments applicationArguments) {
   // Create and configure the environment
   ConfigurableEnvironment environment = getOrCreateEnvironment();
   configureEnvironment(environment, applicationArguments.getSourceArgs());
   // 发出环境已准备好事件
   listeners.environmentPrepared(environment);
   bindToSpringApplication(environment);
   if (!this.isCustomEnvironment) {
       environment = new EnvironmentConverter(
		       getClassLoader()).convertEnvironmentIfNecessary(environment, deduceEnvironmentClass());
   }
   ConfigurationPropertySources.attach(environment);
   return environment;
}

// ConfigFileApplicationListener
private void onApplicationEnvironmentPreparedEvent(ApplicationEnvironmentPreparedEvent event) {
    List<environmentpostprocessor> postProcessors = loadPostProcessors();
    postProcessors.add(this);
    AnnotationAwareOrderComparator.sort(postProcessors);
    for (EnvironmentPostProcessor postProcessor : postProcessors) {
	// 这边上篇文章已经分析过,最后一个postProcessor就是它自己,ConfigFileApplicationListener,进去看
        postProcessor.postProcessEnvironment(event.getEnvironment(), event.getSpringApplication());
    }
}

@Override
public void postProcessEnvironment(ConfigurableEnvironment environment, SpringApplication application) {
    addPropertySources(environment, application.getResourceLoader());
}

protected void addPropertySources(ConfigurableEnvironment environment, ResourceLoader resourceLoader) {
    // 添加一个随机属性源
    RandomValuePropertySource.addToEnvironment(environment);
    // 这里面会解析profile配置文件
    new Loader(environment, resourceLoader).load();
}
public void load() {
    this.profiles = new LinkedList<>();
    this.processedProfiles = new LinkedList<>();
    this.activatedProfiles = false;
    this.loaded = new LinkedHashMap<>();
    // 下面先分析这个方法
    initializeProfiles();
    while (!this.profiles.isEmpty()) {
         Profile profile = this.profiles.poll();
         if (profile != null && !profile.isDefaultProfile()) {
             addProfileToEnvironment(profile.getName());
         }
         load(profile, this::getPositiveProfileFilter, addToLoaded(MutablePropertySources::addLast, false));
         this.processedProfiles.add(profile);
    }
    resetEnvironmentProfiles(this.processedProfiles);
    load(null, this::getNegativeProfileFilter, addToLoaded(MutablePropertySources::addFirst, true));
    addLoadedPropertySources();
}

private void initializeProfiles() {
    // The default profile for these purposes is represented as null. We add it
    // first so that it is processed first and has lowest priority.
    this.profiles.add(null);
    // 判断当前环境有没有配置spring.profiles.active或者spring.profiles.inculde属性,下面先分析这个方法
    Set<profile> activatedViaProperty = getProfilesActivatedViaProperty();
    this.profiles.addAll(getOtherActiveProfiles(activatedViaProperty));
    // Any pre-existing active profiles set via property sources (e.g.
    // System properties) take precedence over those added in config files.
    // this.profiles.addAll(profiles);该方法只是将activatedViaProperty放入到了profiles中
    addActiveProfiles(activatedViaProperty);
    // only has null profile
    // 如果已经配置了spring.profiles.active属性,就不会再创建default的了
    if (this.profiles.size() == 1) {
	// this.environment.getDefaultProfiles()默认返回default
        for (String defaultProfileName : this.environment.getDefaultProfiles()) {
	    // 创建一个name为default的Profile
            Profile defaultProfile = new Profile(defaultProfileName, true);
            this.profiles.add(defaultProfile);
        }
    }
}

public static final String ACTIVE_PROFILES_PROPERTY = "spring.profiles.active";

public static final String INCLUDE_PROFILES_PROPERTY = "spring.profiles.include";

private Set<profile> getProfilesActivatedViaProperty() {
    // 如果不包含这两个文件,直接返回一个空集合,默认是没有配置的
    if (!this.environment.containsProperty(ACTIVE_PROFILES_PROPERTY)
                                         && !this.environment.containsProperty(INCLUDE_PROFILES_PROPERTY)) {
        return Collections.emptySet();
    }
    // 如果配置了,则获取一些加入到set中,比如在命令行参数中配置--spring.profiles.active=dev,
    // 下面就会去创建一个dev的profile
    Binder binder = Binder.get(this.environment);
    Set<profile> activeProfiles = new LinkedHashSet<>();
    activeProfiles.addAll(getProfiles(binder, INCLUDE_PROFILES_PROPERTY));
    activeProfiles.addAll(getProfiles(binder, ACTIVE_PROFILES_PROPERTY));
    return activeProfiles;
}

// 已经添加过的就不添加了
private List<profile> getOtherActiveProfiles(Set<profile> activatedViaProperty) {
    return Arrays.stream(this.environment.getActiveProfiles()).map(Profile::new)
                 .filter((profile) -> !activatedViaProperty.contains(profile)).collect(Collectors.toList());
}
public void load() {
    this.profiles = new LinkedList<>();
    this.processedProfiles = new LinkedList<>();
    this.activatedProfiles = false;
    this.loaded = new LinkedHashMap<>();

    initializeProfiles();

    // 上面的已经分析完了,下面分析这个
    while (!this.profiles.isEmpty()) {
         Profile profile = this.profiles.poll();
         if (profile != null && profile.isDefaultProfile()) {
             addProfileToEnvironment(profile.getName());
         }
	 // 默认第一个是profile是null,先分析load方法
         load(profile, this::getPositiveProfileFilter, addToLoaded(MutablePropertySources::addLast, false));
         this.processedProfiles.add(profile);
    }
    resetEnvironmentProfiles(this.processedProfiles);
    load(null, this::getNegativeProfileFilter, addToLoaded(MutablePropertySources::addFirst, true));
    addLoadedPropertySources();
}
private void load(Profile profile, DocumentFilterFactory filterFactory, DocumentConsumer consumer) {
getSearchLocations().forEach((location) -> {
boolean isFolder = location.endsWith("/");
Set<string> names = isFolder ? getSearchNames() : NO_SEARCH_NAMES;
names.forEach((name) -> load(location, name, profile, filterFactory, consumer));
});
}
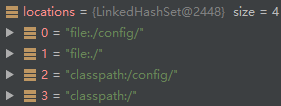
private static final String DEFAULT_SEARCH_LOCATIONS = "classpath:/,classpath:/config/,file:./,file:./config/";
private Set<string> getSearchLocations() {
if (this.environment.containsProperty(CONFIG_LOCATION_PROPERTY)) {
return getSearchLocations(CONFIG_LOCATION_PROPERTY);
}
Set<string> locations = getSearchLocations(CONFIG_ADDITIONAL_LOCATION_PROPERTY);
// 默认从这4个路径下去搜索,见下图
locations.addAll(asResolvedSet(ConfigFileApplicationListener.this.searchLocations, DEFAULT_SEARCH_LOCATIONS));
return locations;
}
private static final String DEFAULT_NAMES = "application";

// Set<string> names = isFolder ? getSearchNames() : NO_SEARCH_NAMES;
private Set<string> getSearchNames() {
    if (this.environment.containsProperty(CONFIG_NAME_PROPERTY)) {
        String property = this.environment.getProperty(CONFIG_NAME_PROPERTY);
        return asResolvedSet(property, null);
    }
    // 返回默认的配置文件的前缀"application";
    return asResolvedSet(ConfigFileApplicationListener.this.names, DEFAULT_NAMES);
}
// names.forEach((name) -> load(location, name, profile, filterFactory, consumer));
private void load(String location, String name, Profile profile, DocumentFilterFactory filterFactory,
				                                 DocumentConsumer consumer) {
    // name默认是application,跳过
    if (!StringUtils.hasText(name)) {
       for (PropertySourceLoader loader : this.propertySourceLoaders) {
          if (canLoadFileExtension(loader, location)) {
             load(loader, location, profile, filterFactory.getDocumentFilter(profile), consumer);
             return;
	  }
       }
    }
    Set<string> processed = new HashSet<>();
    // this.propertySourceLoaders见下图
    for (PropertySourceLoader loader : this.propertySourceLoaders) {
	// 返回每个loader可以处理的扩展名,PropertiesPropertySourceLoader可以处理{.properties,.xml},
	// YamlPropertySourceLoader可以处理{.yml,.yaml}格式的文件
        for (String fileExtension : loader.getFileExtensions()) {
           if (processed.add(fileExtension)) {
              loadForFileExtension(loader, location + name, "." + fileExtension, profile, filterFactory, consumer);
           }
        }
    }
}

// 走到这里
private void load(PropertySourceLoader loader, String location, Profile profile, DocumentFilter filter,
                                                                                 DocumentConsumer consumer) {
    try {
	// 加载资源
        Resource resource = this.resourceLoader.getResource(location);
        // applicationConfig: [classpath:application.properties]
        String name = "applicationConfig: [" + location + "]";
	// 下面分析这个方法
        List<document> documents = loadDocuments(loader, name, resource);
        List<document> loaded = new ArrayList<>();
        for (Document document : documents) {
            if (filter.match(document)) {
                addActiveProfiles(document.getActiveProfiles());
                addIncludedProfiles(document.getIncludeProfiles());
                loaded.add(document);
            }
        }
        Collections.reverse(loaded);
        if (!loaded.isEmpty()) {
           loaded.forEach((document) -> consumer.accept(profile, document));
        }
     }
}

private List<document> loadDocuments(PropertySourceLoader loader, String name, Resource resource)
	                                                                           throws IOException {
    // 构造缓存key
    DocumentsCacheKey cacheKey = new DocumentsCacheKey(loader, resource);
    List<document> documents = this.loadDocumentsCache.get(cacheKey);
    if (documents == null) {
        List<propertysource<?>> loaded = loader.load(name, resource);
        documents = asDocuments(loaded);
        this.loadDocumentsCache.put(cacheKey, documents);
    }
    return documents;
}

public List<propertysource<?>> load(String name, Resource resource) throws IOException {
     Map<string, ?> properties = loadProperties(resource);
     if (properties.isEmpty()) {
         return Collections.emptyList();
     }
     // 发现这边就是构造了一个属性源
     return Collections.singletonList(new OriginTrackedMapPropertySource(name, properties));
}

private List<document> asDocuments(List<propertysource<?>> loaded) {
     if (loaded == null) {
        return Collections.emptyList();
     }
     return loaded.stream().map((propertySource) -> {
         Binder binder = new Binder(ConfigurationPropertySources.from(propertySource), this.placeholdersResolver);
         return new Document(propertySource, binder.bind("spring.profiles", STRING_ARRAY).orElse(null),
               getProfiles(binder, ACTIVE_PROFILES_PROPERTY), getProfiles(binder, INCLUDE_PROFILES_PROPERTY));
     }).collect(Collectors.toList());
}

Consul+Spring boot 的服务注册和服务注销
一图胜千言
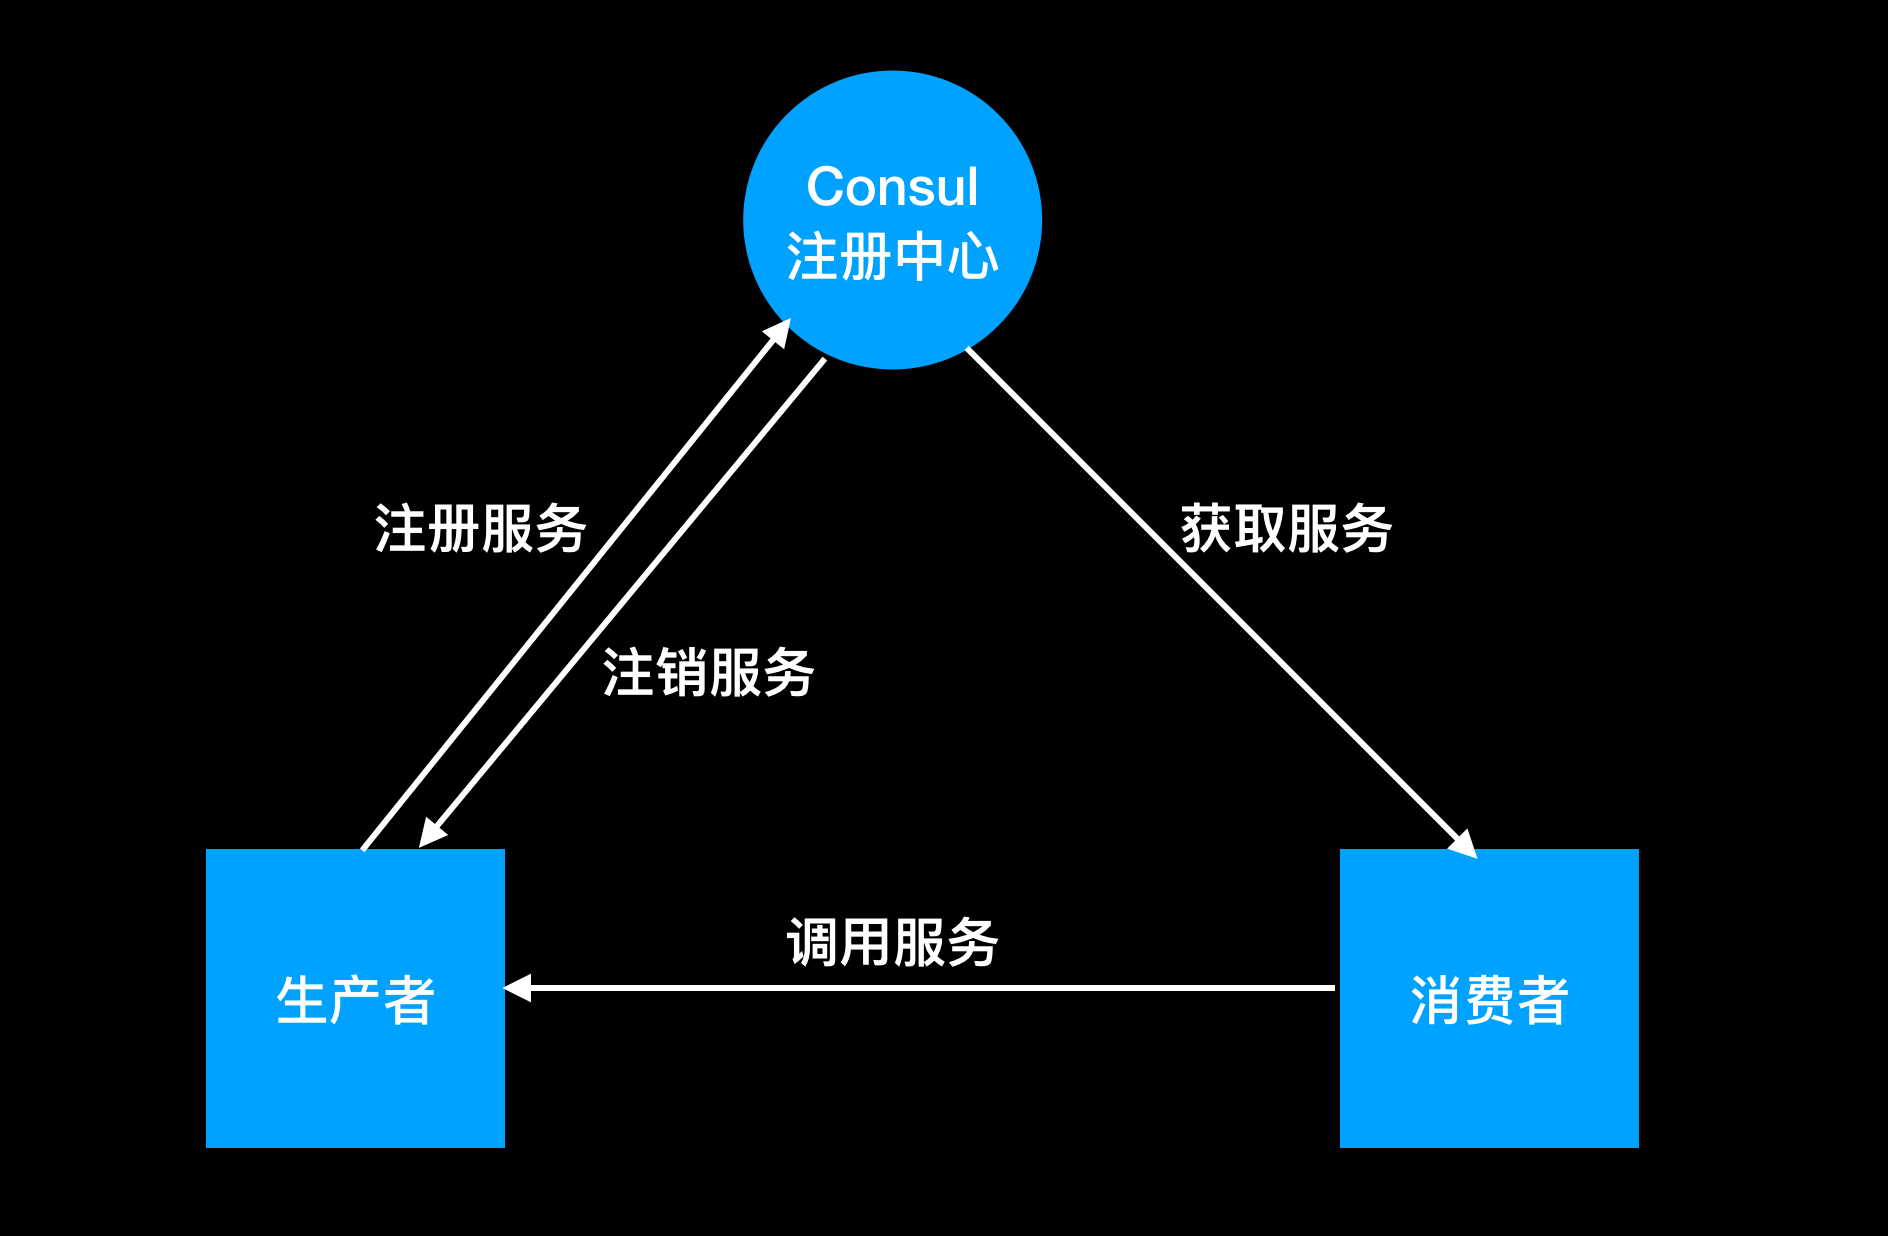
先看一看要做事情,需要在 Consul 上面实现注册中心的功能,并以 2 个 Spring boot 项目分别作为生产者,消费者。
Consul
假设已经完成文章《Consul 的开发者模式之 Docker 版》中的所有的配置,并启动了 Consul,访问:http://localhost:8500/ui/dc1/services 即如下图: 
生产者
生产者 - 目录结构
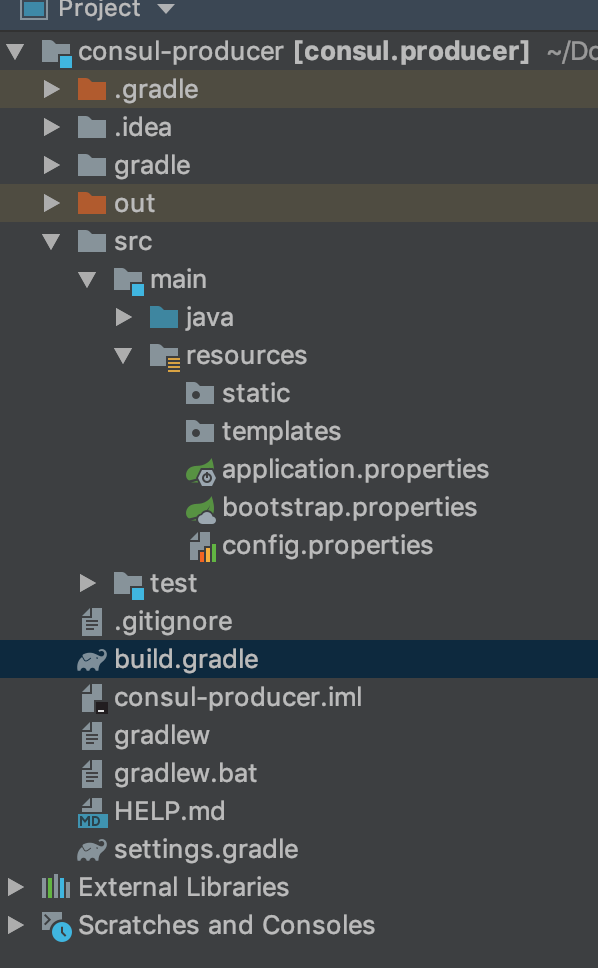
这里就是一个简单的 spring boot 工程。
生产者 - build.gradle
plugins {
	id ''org.asciidoctor.convert'' version ''1.5.3''
	id ''org.springframework.boot'' version ''2.1.6.RELEASE''
	id ''java''
}

apply plugin: ''io.spring.dependency-management''

group = ''com.zyl''
version = ''0.0.1-SNAPSHOT''
sourceCompatibility = ''1.8''

configurations {
	developmentOnly
	runtimeClasspath {
		extendsFrom developmentOnly
	}
	compileOnly {
		extendsFrom annotationProcessor
	}
}

repositories {
	mavenCentral()
}

ext {
	set(''snippetsDir'', file("build/generated-snippets"))
	set(''springCloudVersion'', "Greenwich.SR1")
}

dependencies {
	implementation ''org.springframework.boot:spring-boot-starter-web''
	implementation ''org.springframework.cloud:spring-cloud-starter-consul-discovery''
	implementation "org.springframework.boot:spring-boot-starter-actuator"
	compileOnly ''org.projectlombok:lombok''
	annotationProcessor ''org.projectlombok:lombok''
	developmentOnly ''org.springframework.boot:spring-boot-devtools''
	annotationProcessor ''org.projectlombok:lombok''
	testImplementation ''org.springframework.boot:spring-boot-starter-test''
}

dependencyManagement {
	imports {
		mavenBom "org.springframework.cloud:spring-cloud-dependencies:${springCloudVersion}"
	}
}

test {
	outputs.dir snippetsDir
}

asciidoctor {
	inputs.dir snippetsDir
	dependsOn test
}
生产者 - bootstrap.properties
spring.application.name=consul-producer
生产者 - application.properties
server.port=0

spring.cloud.consul.host=localhost
spring.cloud.consul.port=8500
spring.cloud.consul.discovery.prefer-ip-address=true
spring.cloud.consul.discovery.health-check-critical-timeout=90m

management.endpoints.web.exposure.include=*
management.endpoint.health.show-details=always

spring.jackson.serialization.indent_output=true
生产者 - config.properties
这个文件什么都没有,主要是解决一个警告。
生产者 - Application.java
@EnableDiscoveryClient
表示启用服务发现客户端。
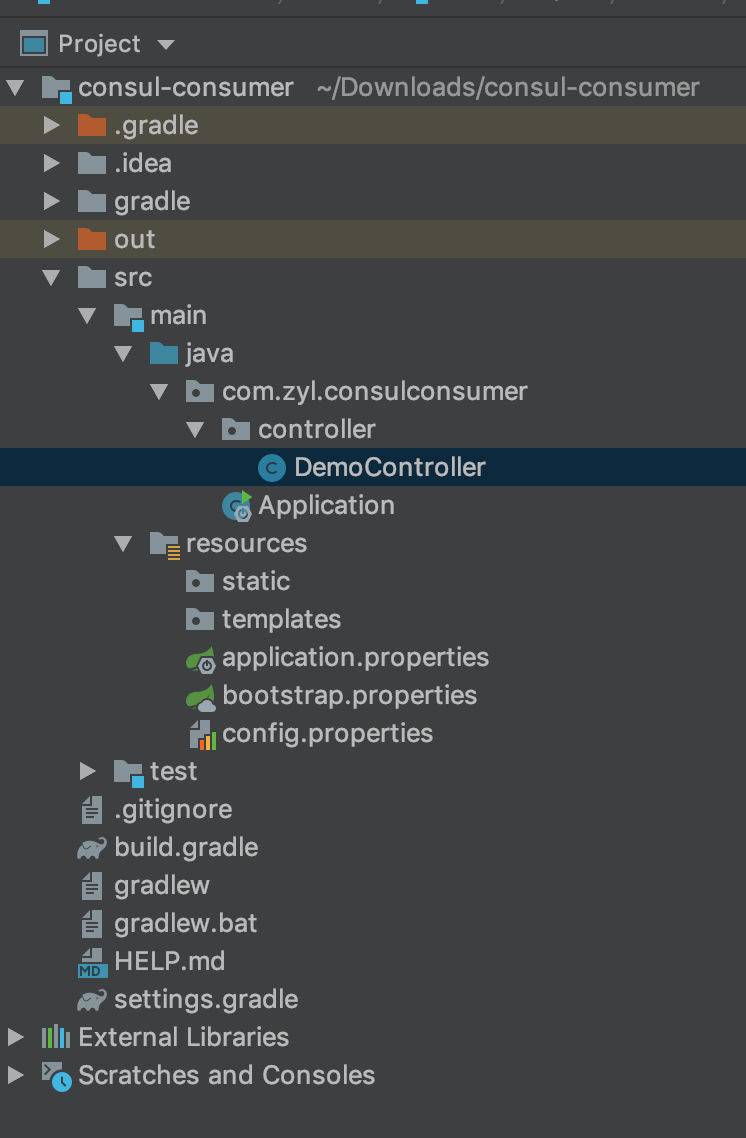
消费者
消费者包含以上配置,只是在调用生产者接口都部分有所不同。
消费者 - 目录结构
消费者 - Application.java
package com.zyl.consulconsumer;

import org.springframework.boot.SpringApplication;
import org.springframework.boot.autoconfigure.SpringBootApplication;
import org.springframework.boot.web.client.RestTemplateBuilder;
import org.springframework.cloud.client.discovery.EnableDiscoveryClient;
import org.springframework.cloud.client.loadbalancer.LoadBalanced;
import org.springframework.context.annotation.Bean;
import org.springframework.web.client.RestTemplate;

import java.time.Duration;

@SpringBootApplication
@EnableDiscoveryClient
public class Application {

	public static void main(String[] args) {
		SpringApplication.run(Application.class, args);
	}

	@LoadBalanced
	@Bean
	public RestTemplate restTemplate(RestTemplateBuilder builder) {
		return builder.setConnectTimeout(Duration.ofMillis(100))
				.setReadTimeout(Duration.ofMillis(500))
				.build();
	}

}
这里主要就是启用服务发现客户端,和启用 resttemplate 的负载均衡。
消费者 - DemoController.java
package com.zyl.consulconsumer.controller;

import org.springframework.web.bind.annotation.RequestMapping;
import org.springframework.web.bind.annotation.RestController;
import org.springframework.web.client.RestTemplate;

@RestController
public class DemoController {

    private final RestTemplate restTemplate;

    public DemoController(RestTemplate restTemplate) {
        this.restTemplate = restTemplate;
    }

    @RequestMapping("/")
    public String home() {
        return restTemplate.getForObject("http://consul-producer/", String.class);
    }
}
注意这里调用的时候只要使用 consul 注册中心发现的服务名,进行调用即可。
注册后效果
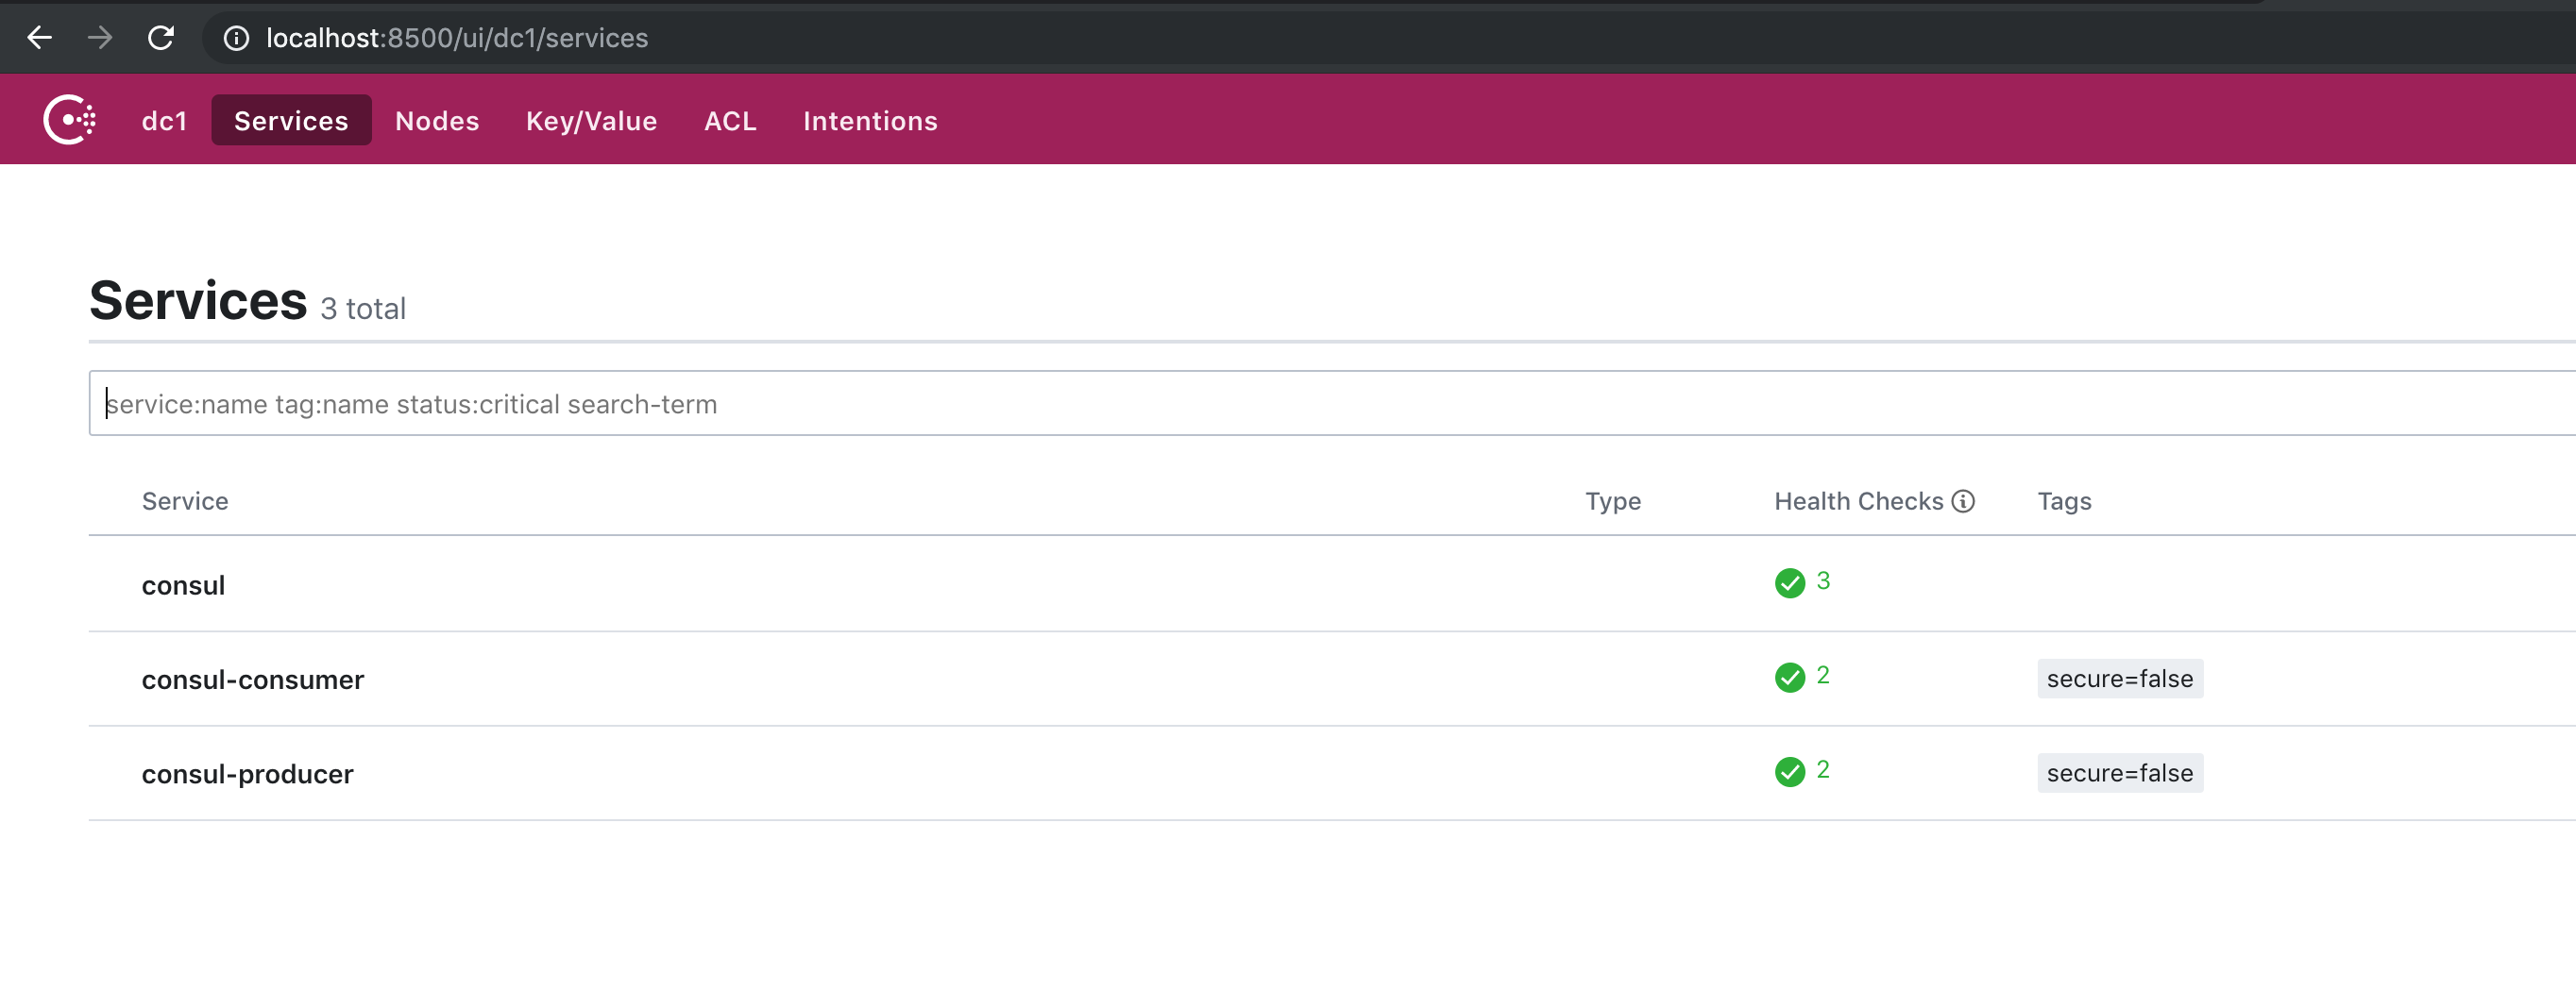
这是 consul 注册中心的页面效果,生产者和消费者都已经注册到 consul 了。
调用效果

源代码
https://github.com/fxtxz2/consul-springboot
参考
- Spring Cloud Consul

docker 带参数启动 配合 springboot profile
dockerfile
FROM frolvlad/alpine-oraclejdk8:slim
VOLUME /tmp
ADD test-push-service-0.0.1-SNAPSHOT.jar app.jar
RUN sh -c ''touch /app.jar''
ENV CE=$CE
ENV JAVA_OPTS=$JAVA_OPTS
ENTRYPOINT [ "sh", "-c", "java $JAVA_OPTS -Djava.security.egd=file:/dev/./urandom -jar /app.jar --spring.config.name=application-$CE" ]
运行镜像:
sudo docker run -it -d --restart unless-stopped -p 8001:8001 --net host  -e CE="dev" -e JAVA_OPTS="-Xmx128m -Xss512k"  -v /opt/docker/test-push-service/log/:/tmp/   -m 500m --memory-reservation 500m
 $Image Name:$Image Tag


QA: CE="dev" ,test= CE="test"

Maven 之 profile 与Spring boot 的 profile
一、概述
不同的环境(测试环境、开发环境)有不同的配置,目前希望在打包的时候,就直接打出针对不同环境的包(内含有某个环境的配置)。Maven本身在 pom.xml 中就提供了 profile 标签进行配置;
spring boot 开发的软件,其也有不同的配置,在结合 maven 打出对应的包的时候,也需要 指定 spring.profiles.active 表示使用的是哪份配置;
二、知识点
1、maven 不同环境配置
(1) profile 的定义位置
我们可以有多个地方定义profile。定义的地方不同,它的作用范围也不同。
- 针对于特定项目的profile配置我们可以定义在该项目的pom.xml中。
- 针对于特定用户的profile配置,我们可以在用户的settings.xml文件中定义profile。该文件在用户家目录下的“.m2”目录下。
- 全局的profile配置。全局的profile是定义在Maven安装目录下的“conf/settings.xml”文件中的。
(2) profile 中能定义的信息
profile中能够定义的配置信息跟profile所处的位置是相关的。以下就分两种情况来讨论,一种是定义在settings.xml中,另一种是定义在pom.xml中。
a) 定义在Setting.xml
当profile定义在settings.xml中时意味着该profile是全局的,它会对所有项目(文件在 Maven 安装目录下)或者某一用户(文件在 用户目录下)的所有项目都产生作用。
此时 Setting.xml 中 profile 下可定义的标签主要有:
- repositories
- pluginRepositories
- properties:定义在<properties>里面的键值对可以在pom.xml中使用
b) 定义在pom.xml中(文件在项目里面)
此时 pom.xml 中标签主要有:
- repositories
- pluginReponsitories
- dependencies
- plugins
- properties
- dependencyManagement
- distributionManagement
(3) profile 的激活方式
a) settings.xml 中 使用 activeProfiles ,指定激活的 profile。
<profiles>
    <profile>
        <id>profileTest1</id>
        <properties>
            <hello>world</hello>
        </properties>
    </profile>

    <profile>
        <id>profileTest2</id>
        <properties>
            <hello>andy</hello>
        </properties>
    </profile>
</profiles>
<activeProfiles>
    <activeProfile>profileTest2</activeProfile>
    <activeProfile>profileTest1</activeProfile>
</activeProfiles>
一般情况下,activeProfiles 就定义一个 activeProfile ,但会出现如上定义了两个,此时生效两个 profile,pom.xml 在使用 hello 这个 property的时候,是按照 profile 定义的先后顺序来进行覆盖取值的,然后后面定义的会覆盖前面定义的。
而在上面的这个例子中,pom.xml 中 若使用了 ${hello},表示使用 hello 的值,那么此时会使用 andy。
默认激活的 profile 在任何项目打包中都会被激活,它是全局的。
b) pom.xml 中激活方式
- activeByDefault
<profiles>
    <profile>
        <id>profileTest1</id>
        <properties>
            <hello>world</hello>
        </properties>
        <activation>
            <activeByDefault>true</activeByDefault>
        </activation>
    </profile>
</profiles>
当执行maven 命令进行打包时,未指定 -P profile,则表示使用 activeByDefault 声明的 profile,若使用了 吗,mvn clean package -pl artificaId -PanotherProfile,此时就是执行指定的profile,但是settings.xml 中的 默认激活的 profile会默认一致执行,而且是先执行,后执行 pom.xml 中的 profile。
若不想默认执行settings,xml 中激活的 profile,可以使用 mvn -P !profile 命令即可。
- 根据环境来激活 profile
- 根据当前环境中的 jdk 来激活 profile
<profiles>
    <profile>
        <id>profileTest1</id>
        <jdk>1.5</jdk>    //JDK版本的前缀匹配,当JDK的版本号以"1.5"开头时, 该配置将被触发
    </profile>
<profiles>
<profiles>
    <profile>
        <id>profileTest1</id>
        <jdk>[1.3,1.6)</jdk>    //JDK版本的前缀匹配,当JDK的版本号以"1.3\1.4\1.5"开头时, 该配置将被触发
    </profile>
<profiles>
-
- 根据操作系统来激活profile
<profiles>
   <profile>
       <activation>
            <os>
                 <name>Windows XP</name>
                  <family>Windows</family>
                  <arch>x86</arch>
                  <version>5.1.2600</version>
            </os>
       </activation>
   </profile>
</profiles>
-
- 基于环境变量(用户\系统变量)
<profiles>
   <profile>
       <activation>
            <property>
                 <name>debug</name>    //系统属性 debug,无论为何值,都会触发生效该配置
            </property>
       </activation>
   </profile>
</profiles>
<profiles>
   <profile>
       <activation>
            <property>
                 <name>environment</name>
                  <value>test</value>    //系统属性 environment,值为test 时,会触发生效该配置,可以使用  mvn groupId:artifactId:goal -Denvironment=test  触发
            </property>
       </activation>
   </profile>
</profiles>
-
- 现在\缺失 文件
<profiles>
   <profile>
       <activation>
            <file>
                 <missing>target/config.xml</missing>
            </file>
       </activation>
   </profile>
</profiles>
- 显示使用命令激活
mvn groupId:artifactId:goal -P profile-1,profile-2
(4) 当settings.xml 和 pom.xml (本工程、从 父pom.xml 继承下来的profile)混合用的时候生效的结果
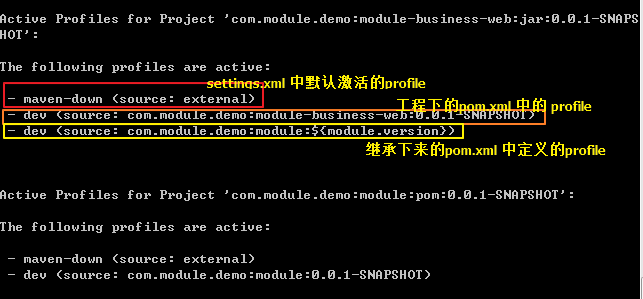
设定场景:
- settings.xml 中 有 profile 为 test1、test2
- 父pom.xml 中有 profile 为 test1、test2、test3
- 本工程 pom.xml 中有 profile 为test1、test2、test3
- 以下表格是 maven 打包时 查找需要执行 profile 的列表,打包时 查找文件顺序为:settings.xml -> 本工程pom.xml -> 父pom.xml
实际生效profile
(顺序 : settings.xml ->
本工程pom.xml ->
父pom.xml)
test1、
test3、
test4
test1、
test2、
teset5
profile 生效规则如下
- 针对每份文件(settings.xml \ 本工程 pom.xml \ 父工程 pom.xml),打包时指定了 profile,若文件 中有指定的 profile 直接激活 指定的 profile,没有则使用默认激活的 profile;
- 针对每份文件(settings.xml \ 本工程 pom.xml \ 父工程 pom.xml),打包时未指定 profile,若文件 中有默认激活的 profile 则使用默认激活的 profile,若没有则不使用该文件中的任何 profile;
- 不同文件激活的多个 profile,出现 property 相同 key时,生效的是第一个激活profile 中的 property;
- pom.xml 中的 activeByDefault 的 profile 若定义了 dependencies ,则依赖的包在任何打包形式下都会被依赖进来;
(5)查看当前处于激活状态的 profile
使用 mvn help:active-profiles
2、spring boot 不同环境配置
(1) 在工程中配置不同环境配置文件
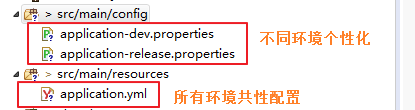
其中:application.yml 内容如下
spring:
  application:
    name: web
  profiles:
    active: "@package.env@"

server:
  port: 8090
(2) pom.xml 配置如下:
 <resources>
            <resource>
                <directory>src/main/resources</directory>
                <filtering>true</filtering>
                <includes>
                    <include>**/*.yml</include>
                    <include>**/*.yaml</include>
                    <include>**/*.properties</include>
                    <include>**/*.xml</include>
                </includes>
            </resource>
            <resource>
                <directory>src/main/resources</directory>
                <filtering>false</filtering>
                <excludes>
                    <exclude>**/*.yml</exclude>
                    <exclude>**/*.yaml</exclude>
                    <exclude>**/*.properties</exclude>
                    <exclude>**/*.xml</exclude>
                </excludes>
            </resource>
            <resource>
                <directory>src/main/config</directory>
                <filtering>true</filtering>
                <includes>
                    <include>**/*.yml</include>
                    <include>**/*.yaml</include>
                    <include>**/*.properties</include>
                    <include>**/*.xml</include>
                </includes>
            </resource>
            <resource>
                <directory>src/main/config</directory>
                <filtering>false</filtering>
                <excludes>
                    <exclude>**/*.yml</exclude>
                    <exclude>**/*.yaml</exclude>
                    <exclude>**/*.properties</exclude>
                    <exclude>**/*.xml</exclude>
                </excludes>
            </resource>
        </resources>

<plugin>
     <groupId>org.springframework.boot</groupId>
     <artifactId>spring-boot-maven-plugin</artifactId>
     <configuration>
           <executable>true</executable>
     </configuration>
</plugin>
可以把 src/main/config 及 src/main/resources 下的配置文件 打包过程中打入。
(3) 激活
在运行的时候,传入参数:-Dspring.profiles.active=dev,表示使用dev 环境配置;
3、不同环境配置 spring boot 与 maven结合
- application.yml 要配置成上图所示的,spring.profiles.active=占位符属性,占位符属性值 在 pom.xml 中的 profile 指定
- pom.xml 中定义 profile ,如下,在本工程中定义内容:
<!-- 多环境的不同配置,在运行时需指明使用哪个环境配置 -->
    <profiles>
        <profile>
            <id>dev</id>
            <activation>
                <activeByDefault>true</activeByDefault>   <!-- 运行时未指明 profile,则使用默认的,该配置表示 dev为默认配置 -->
            </activation>
            <properties>
                <package.env>dev</package.env>
            </properties>
        </profile>
        <profile>
            <id>release</id>
            <properties>
                <package.env>release</package.env>
            </properties>
        </profile>
    </profiles>
- pom.xml 中的 resource 标签若没有上面的示例配置复杂,也一定要有以下内容,才能让 maven 将其 property 写入到指定的配置文件中。
 <resource>
       <directory>src/main/resources</directory>     // 需要将 maven 的 property 写入 src/main/resources 下所有的配置文件中(只要该配置文件中使用了propetry对应的占位符,如上面 application.yml 配置的那样
        <filtering>true</filtering>
</resource>
- 激活
此时,执行命令:mvn groupId:artifactId:goal -P dev 时,maven 的 dev profile 生效,其中定义的 package.env 属性值为dev,此时打开 target 下的 application.yml,其内容已变成,如下:
spring:
  application:
    name: web
  profiles:
    active: "dev"

server:
  port: 8090
问题:
在做上述例子的时候,发现按照如上配置之后,执行mvn命令,打开 target 下的 application.yml @package.dev@ 还是没有替换成对应值,该原因为:
- maven 默认可识别的配置文件占位符 符号为 ${};
- 若 pom.xml 有通过 parent 标签继承别的 pom.xml ,此时需打开父pom.xml 查看,如,本实例继承了 spring boot 的pom.
<parent>
    <groupId>org.springframework.boot</groupId>
    <artifactId>spring-boot-starter-parent</artifactId>
    <version>2.1.7.RELEASE</version>
</parent>
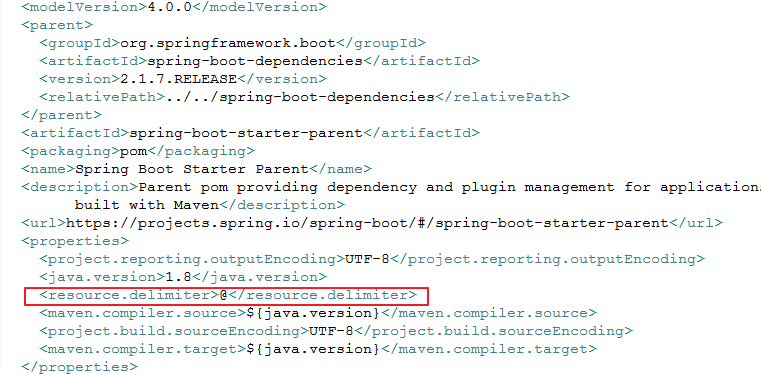
因此 spring boot 继承过来的这种形式,配置文件中要使用 @ 作为占位符,但是若是使用 dependency 这种方式继承 spring boot 的话,直接使用 ${},作为占位符即可。
PS: 以上参考内容:
https://www.cnblogs.com/wxgblogs/p/6696229.html
https://www.cnblogs.com/lddbupt/p/5531885.html
https://www.jianshu.com/p/929b9aa70dc8
关于Spring Boot服务注入到doFiler和springboot注入service的问题就给大家分享到这里,感谢你花时间阅读本站内容,更多关于5、SpringBoot 的 Profile 功能、Consul+Spring boot 的服务注册和服务注销、docker 带参数启动 配合 springboot profile、Maven 之 profile 与Spring boot 的 profile等相关知识的信息别忘了在本站进行查找喔。
本文标签:


