在本文中,您将会了解到关于使用Thymeleaf,SpringBoot的动态下拉菜单的新资讯,同时我们还将为您解释springboot下拉框怎么做的相关在本文中,我们将带你探索使用Thymeleaf,
在本文中,您将会了解到关于使用Thyme leaf,SpringBoot的动态下拉菜单的新资讯,同时我们还将为您解释springboot下拉框怎么做的相关在本文中,我们将带你探索使用Thyme leaf,SpringBoot的动态下拉菜单的奥秘,分析springboot下拉框怎么做的特点,并给出一些关于spriingboot使用thymeleaf、Spring Boot 使用Thymeleaf、Spring Boot使用thymeleaf模板、spring boot使用thymeleaf跳转页面实例代码my thymeleaf indexpage的实用技巧。
本文目录一览:- 使用Thyme leaf,SpringBoot的动态下拉菜单(springboot下拉框怎么做)
- spriingboot使用thymeleaf
- Spring Boot 使用Thymeleaf
- Spring Boot使用thymeleaf模板
- spring boot使用thymeleaf跳转页面实例代码my thymeleaf indexpage
")
使用Thyme leaf,SpringBoot的动态下拉菜单(springboot下拉框怎么做)
我有3个下拉菜单(其中一个填充城市,一个包含代理商,一个包含服务)。如果我选择一个城市,则第二个下拉列表应加载数据(代理商),如果我选择一个城市,则3个下拉列表应加载数据(服务)。我能够填充第一个下拉列表(城市),但是我不知道如何填充第二个和第三个下拉列表。
我应该为每个下拉菜单编写一个控制器并返回值吗?如果答案是肯定的,我该如何返回该值?我读过Thymeleaf不是组件技术,而是像JSP这样的模板技术。因此,Thymeleaf中没有组件或内置机制可以进行客户端-
服务器通信。因此,我需要使用简单的旧HTML表单或AJAX调用对通信进行编程。如何使用普通的旧HTML进行编程?
我尝试使用表单,但是我只单击一次提交,这不是我所需要的。我阅读了有关下拉菜单的帖子,但找不到任何有用的信息。我看到简单的方法是使用jQuery,但我不知道jQuery。有什么办法可以只使用百里香和弹簧靴吗?谢谢!我将在下面发布我的代码。
Appointment.html
<form th:action="@{/appointment/create}" method="post" id="appointmentForm"> <input type="hidden" name="id" th:value="${appointment.id}"/><div> <label for="location">Alege orasul:</label> <selectrequired="required" th:value="${appointment.location}" name="location" id="location"> <option disabled="disabled" selected="selected" > -- alege orasul --</option> <option th:each="city : ${cities}" th:value="${city.id}" th:text="${city.name}" ></option> </select> </div> </form> <form th:action="@{/appointment/agency}" method="post" id="appointmentForm"> <input type="hidden" name="id" th:value="${appointment.id}"/> <div> <label for="location">Alege agentia:</label> <selectth:value="${appointment.agency}" name="agency" id="agency" required="required"> <option disabled="disabled" selected="selected" > -- alege agentia --</option> <option th:each="agency : ${agencies}" th:value="${agency.id}" th:text="${agency.name}" ></option> </select> </div> </form> <form th:action="@{/appointment/service}" method="post" id="appointmentForm"> <input type="hidden" name="id" th:value="${appointment.id}"/> <div> <label for="location">Alege serviciul:</label> <selectth:value="${appointment.service}" name="service" id="service" required="required"> <option disabled="disabled" selected="selected" > -- alege serviciul --</option> <option th:each="service : ${services}" th:value="${service.id}" th:text="${service.name}" ></option> </select> </div> </form>AppController.java
@Controller@RequestMapping("/appointment")public class AppointmentController {@AutowiredUserService userService; AppointmentService appointmentService; CityService cityService;AgencyService agencyService;SerService serService;private ModelAndView mav;@RequestMapping(value="/create", method=RequestMethod.GET)public String createAppointmentPost(Model model, @ModelAttribute("city") City city, @ModelAttribute("agency") Agency agency){ Appointment appointment=new Appointment(); model.addAttribute("appointment", appointment); model.addAttribute("dateString", ""); model.addAttribute("cities", cityService.findAll()); //getAllAgencies(model, city); getAllServices(model,agency); return "appointment";}@RequestMapping(value="/agency", method=RequestMethod.GET)public String getAllAgencies(Model model, @ModelAttribute("city") City city){ model.addAttribute("agencies", agencyService.listAllAgencies(city)); return "redirect:/appointment/create";}public void getAllServices(Model model, @ModelAttribute("agency") Agency agency){ if(agency==null){ return; } model.addAttribute("services", serService.listAllServices(agency));}答案1
小编典典因此,我能够使用jQuery解决此问题。
这是一个有用的链接:http : //www.rockhoppertech.com/blog/spring-
mvc-3-cascading-selects-using-
jquery/ 我将在下面发布我的代码,也许会帮助某人
-mycontroller
@RequestMapping(value="/create", method=RequestMethod.GET)public String createAppointmentPost(Model model, @ModelAttribute("city") City city, @ModelAttribute("agency") Agency agency){ Appointment appointment=new Appointment(); model.addAttribute("appointment", appointment); model.addAttribute("dateString", ""); model.addAttribute("cities", cityService.findAll()); return "appointment";}@RequestMapping(value = "/agencies", method = RequestMethod.GET)public @ResponseBodyList<Agency> findAllAgencies( @RequestParam(value = "cityId", required = true) Long cityId) { City city = cityService.findCity(cityId); return agencyService.listAllAgencies(city);}-Thyme leaf
<div> <label for="location">Alege orasul:</label> <selectrequired="required" th:value="${appointment.location}" name="location" id="location"> <option disabled="disabled" selected="selected" > -- alege orasul -- </option> <option th:each="city : ${cities}" th:value="${city.id}" th:text="${city.name}" > </option> </select></div><div> <label for="location">Alege agentia:</label> <selectth:value="${appointment.agency}" name="agency" id="agency" required="required"> <option disabled="disabled" selected="selected" > --alege agentia --</option> </select></div>jQuery-一个下拉菜单
$(''#location'').change( function() { $.getJSON("http://localhost:8181/appointment/agencies", { cityId : $(this).val(), ajax : ''true'' }, function(data) { var html = ''<option value="">--alege agentia--</option>''; var len = data.length; for ( var i = 0; i < len; i++) { html += ''<option value="'' + data[i].nume + ''">'' + data[i].nume + ''</option>''; } html += ''</option>''; $(''#agency'').html(html); }); });
spriingboot使用thymeleaf
1 添加jar包
<dependency>
            <groupId>org.springframework.boot</groupId>
            <artifactId>spring-boot-starter-web</artifactId>
        </dependency>
        <dependency>
            <groupId>org.springframework.boot</groupId>
            <artifactId>spring-boot-starter-thymeleaf</artifactId>
        </dependency>
2 配置文件
server.port=8090
spring.thymeleaf.prefix=classpath:/templates/
spring.thymeleaf.suffix=.html
spring.thymeleaf.mode=HTML5
spring.thymeleaf.encoding=UTF-8
spring.thymeleaf.cache=false
spring.resources.chain.strategy.content.enabled=true
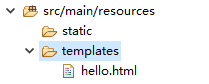
spring.resources.chain.strategy.content.paths=/**3 在templates下新建hello.html
4 新建测试TestController.java
@Controller
public class TestController {
    @RequestMapping("/hello")
    public String toHello() {
        return "hello";
    }
}
5 访问页面

6 完成

Spring Boot 使用Thymeleaf
1、引入thymeleaf;
<dependency>
    <groupId>org.springframework.boot</groupId>
    <artifactId>spring‐boot‐starter‐thymeleaf</artifactId>
</dependency>
切换thymeleaf版本
<properties>
    <thymeleaf.version>3.0.9.RELEASE</thymeleaf.version>
    <!‐‐ 布局功能的支持程序  thymeleaf3主程序  layout2以上版本 ‐‐>
    <!‐‐ thymeleaf2   layout1‐‐>
    <thymeleaf‐layout‐dialect.version>2.2.2</thymeleaf‐layout‐dialect.version>
</properties>
2、Thymeleaf使用
@ConfigurationProperties(prefix = "spring.thymeleaf")
public class ThymeleafProperties {
private static final Charset DEFAULT_ENCODING = Charset.forName("UTF‐8");
private static final MimeType DEFAULT_CONTENT_TYPE = MimeType.valueOf("text/html");
public static final String DEFAULT_PREFIX = "classpath:/templates/";
public static final String DEFAULT_SUFFIX = ".html";
   //
只要我们把HTML页面放在classpath:/templates/,thymeleaf就能自动渲染;
使用:
导入thymeleaf的名称空间
<html lang="en" xmlns:th="http://www.thymeleaf.org">3、语法规则
标签
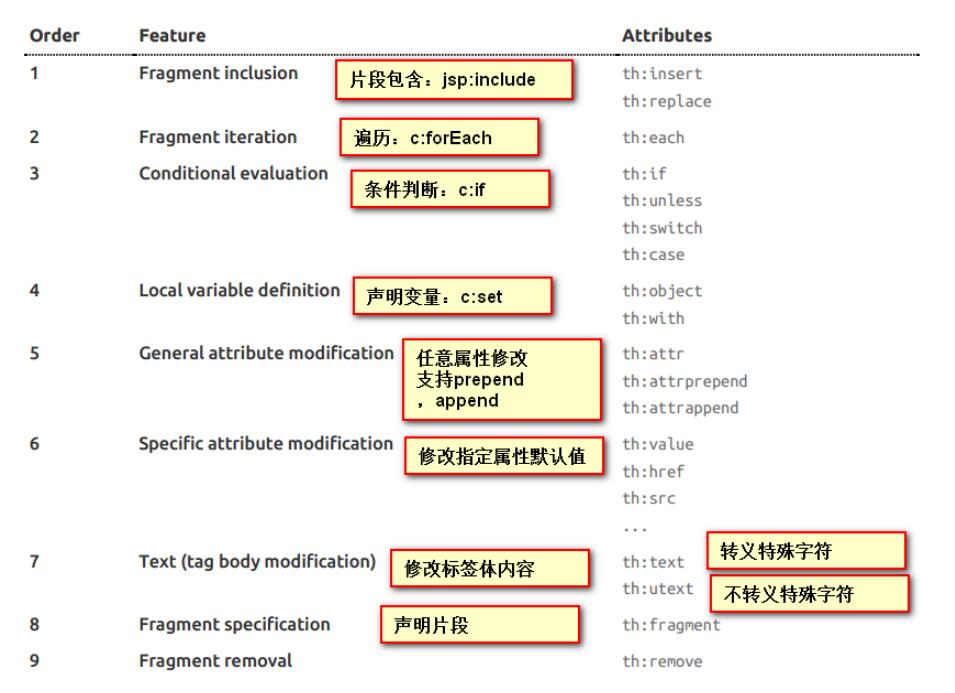
表达式
Simple expressions:(表达式语法)
    Variable Expressions: ${...}:获取变量值;OGNL;
     1)、获取对象的属性、调用方法
     2)、使用内置的基本对象:
     #ctx : the context object.
     #vars: the context variables.
                #locale : the context locale.
                #request : (only in Web Contexts) the HttpServletRequest object.
                #response : (only in Web Contexts) the HttpServletResponse object.
                #session : (only in Web Contexts) the HttpSession object.
                #servletContext : (only in Web Contexts) the ServletContext object.

                ${session.foo}
            3)、内置的一些工具对象:
#execInfo : information about the template being processed.
#messages : methods for obtaining externalized messages inside variables expressions, in the
same way as they would be obtained using #{…} syntax.
#uris : methods for escaping parts of URLs/URIs
#conversions : methods for executing the configured conversion service (if any).
#dates : methods for java.util.Date objects: formatting, component extraction, etc.
#calendars : analogous to #dates , but for java.util.Calendar objects.
#numbers : methods for formatting numeric objects.
#strings : methods for String objects: contains, startsWith, prepending/appending, etc.
#objects : methods for objects in general.
#bools : methods for boolean evaluation.
#arrays : methods for arrays.
#lists : methods for lists.
#sets : methods for sets.
#maps : methods for maps.
#aggregates : methods for creating aggregates on arrays or collections.
#ids : methods for dealing with id attributes that might be repeated (for example, as a
result of an iteration).
    Selection Variable Expressions: *{...}:选择表达式:和${}在功能上是一样;
     补充:配合 th:object="${session.user}:
   <div th:object="${session.user}">
    <p>Name: <span th:text="*{firstName}">Sebastian</span>.</p>
    <p>Surname: <span th:text="*{lastName}">Pepper</span>.</p>
    <p>Nationality: <span th:text="*{nationality}">Saturn</span>.</p>
    </div>

    Message Expressions: #{...}:获取国际化内容
    Link URL Expressions: @{...}:定义URL;
     @{/order/process(execId=${execId},execType=''FAST'')}
    Fragment Expressions: ~{...}:片段引用表达式
     <div th:insert="~{commons :: main}">...</div>

Literals(字面量)
      Text literals: ''one text'' , ''Another one!'' ,…
      Number literals: 0 , 34 , 3.0 , 12.3 ,…
      Boolean literals: true , false
      Null literal: null
      Literal tokens: one , sometext , main ,…
Text operations:(文本操作)
    String concatenation: +
    Literal substitutions: |The name is ${name}|
Arithmetic operations:(数学运算)
    Binary operators: + , ‐ , * , / , %
Minus sign (unary operator): ‐
Boolean operations:(布尔运算)
    Binary operators: and , or
    Boolean negation (unary operator): ! , not
Comparisons and equality:(比较运算)
    Comparators: > , < , >= , <= ( gt , lt , ge , le )
    Equality operators: == , != ( eq , ne )
Conditional operators:条件运算(三元运算符)
    If‐then: (if) ? (then)
    If‐then‐else: (if) ? (then) : (else)
    Default: (value) ?: (defaultvalue)
Special tokens:
    No‐Operation: _

Spring Boot使用thymeleaf模板
Thymeleaf是个XML/XHTML/HTML5模板引擎,可以用于Web与非Web应用。Thymeleaf的主要目标在于提供一种可被浏览器正确显示的、格式良好的模板创建方式,因此也可以用作静态建模。可以完全替代JSP。
Thymeleaf 在有网络和无网络的环境下皆可运行,即它可以让美工在浏览器查看页面的静态效果,也可以让程序员在服务器查看带数据的动态页面效果。这是由于它支持 html 原型,然后在 html 标签里增加额外的属性来达到模板+数据的展示方式。浏览器解释 html 时会忽略未定义的标签属性,所以 thymeleaf 的模板可以静态地运行;当有数据返回到页面时,Thymeleaf 标签会动态地替换掉静态内容,使页面动态显示。
那么Spring Boot怎样和thymeleaf整合呢?
首先新建maven项目,导入spring boot的依赖
<parent>
	<groupId>org.springframework.boot</groupId>
	<artifactId>spring-boot-starter-parent</artifactId>
	<version>1.3.8.RELEASE</version>
</parent>
导入thymeleaf starter pom依赖
<dependency>
	<groupId>org.springframework.boot</groupId>
	<artifactId>spring-boot-starter-thymeleaf</artifactId>
</dependency>
在src/main/resources下新建static目录(存放js、css、图片等静态资源)和templates目录(存放展示模板,如html等),将bootstrap相关的js、css放入到static下

新建Person类,作为数据载体
package com.spring.boot.web.model;

public class Person {

	private String name;

	private int age;

	public Person(String name,int age) {
		this.name = name;
		this.age = age;
	}

	public String getName() {
		return name;
	}
	public void setName(String name) {
		this.name = name;
	}
	public int getAge() {
		return age;
	}
	public void setAge(int age) {
		this.age = age;
	}
}
新建WebController类,指定入口方法,向模板填充数据
package com.spring.boot.web.controller;

import java.util.ArrayList;
import java.util.List;

import org.springframework.stereotype.Controller;
import org.springframework.ui.Model;
import org.springframework.web.bind.annotation.RequestMapping;

import com.spring.boot.web.model.Person;

@Controller
public class WebController {

	@RequestMapping("/")
	public String index(Model model){
		Person onePerson = new Person("微儿博客", 18);

		List<Person> list = new ArrayList<Person>();
		Person p1 = new Person("张三", 18);
		Person p2 = new Person("李四", 19);
		Person p3 = new Person("王五", 20);
		list.add(p1);
		list.add(p2);
		list.add(p3);

		model.addAttribute("oneperson", onePerson);//向模板传数据
		model.addAttribute("people", list);
		return "index";//找到名为index.*的模板
	}
}
在src/main/resources/templates下新建index.html
<!DOCTYPE html>
<html xmlns:th="http://www.thymeleaf.org">
<head>
<meta charset="UTF-8"/>
<title>test</title>
<link th:href="@{css/bootstrap.min.css}" rel="stylesheet"/>
</head>
<body>
	<div >
		<div >
			<h3 >访问model</h3>
		</div>
		<div >
			<span th:text="${oneperson.name}"></span>
		</div>
	</div>
	<div th:if="${not #lists.isEmpty(people)}">
		<div >
			<div >
				<h3 >列表</h3>
			</div>
			<div >
				<ul >
					<li  th:each="person:${people}">
						<span th:text="${person.name}"></span>
						<span th:text="${person.age}"></span>
						<button  th:onclick="''getName(\''''+${person.name}+''\'');''">获取名字</button>
					</li>
				</ul>
			</div>
		</div>
	</div>
	<script type="text/javascript" th:src="@{js/jquery-1.12.3.min.js}"></script>
	<script type="text/javascript" th:src="@{js/bootstrap.min.js}"></script>
	<script th:inline="javascript">
		function getName(name){
			alert(name);
		}
	</script>
</body>
</html>
创建执行类Main
package com.spring.boot.web;

import org.springframework.boot.SpringApplication;
import org.springframework.boot.autoconfigure.SpringBootApplication;

@SpringBootApplication
public class Main {

	public static void main(String[] args) {
		SpringApplication.run(Main.class, args);
	}
}
执行,访问localhost:8080

更多文章请访问 http://www.weare.net.cn

spring boot使用thymeleaf跳转页面实例代码my thymeleaf indexpage
本篇文章主要介绍了spring boot使用thymeleaf跳转页面,实例介绍了thymeleaf的原理和介绍,有兴趣的可以了解一下。
前言
在学习springboot 之后想结合着html做个小demo,无奈一直没掌握窍门,在多番的搜索和尝试下终于找到了配置的方法,使用thymeleaf做事前端页面模板,不能使用纯html.
thymeleaf介绍
Thymeleaf是面向Web和独立环境的现代服务器端Java模板引擎。
Thymeleaf的主要目标是为您的开发工作流程带来优雅的自然模板 - 可以在浏览器中正确显示HTML,还可以作为静态原型工作,从而在开发团队中进行更强大的协作。
使用Spring Framework的模块,与您最喜爱的工具进行大量集成,以及插入自己的功能的能力,Thymeleaf是现代HTML5 JVM Web开发的理想选择,尽管它可以做的更多。
实战
项目结构

thymeleaf pom依赖
org.springframework.bootspring-boot-starter-weborg.springframework.bootspring-boot-starter-thymeleaf
模板页面
注意使用模板作为页面时候必须要把模板页面放在templates文件夹下
index.html
demo
my thymeleaf indexpage
更多详情controller
@Controller public class PageController { @RequestMapping("/page") public String page3(Model model){ model.addAttribute("userName","张三"); return "hello"; } @RequestMapping("info/more") public String page2(){ return "hello2"; } @RequestMapping("sys/index") public String page(){ return "sys/index"; } }
测试

点击更多详情

项目源码: github地址
以上就是本文的全部内容,希望对大家的学习有所帮助,也希望大家多多支持小编。
我们今天的关于使用Thyme leaf,SpringBoot的动态下拉菜单和springboot下拉框怎么做的分享已经告一段落,感谢您的关注,如果您想了解更多关于spriingboot使用thymeleaf、Spring Boot 使用Thymeleaf、Spring Boot使用thymeleaf模板、spring boot使用thymeleaf跳转页面实例代码my thymeleaf indexpage的相关信息,请在本站查询。
本文标签:


![[转帖]Ubuntu 安装 Wine方法(ubuntu如何安装wine)](https://www.gvkun.com/zb_users/cache/thumbs/4c83df0e2303284d68480d1b1378581d-180-120-1.jpg)

