本篇文章给大家谈谈Python单元测试-与assertRaises相反吗?,以及python中testcase的知识点,同时本文还将给你拓展assertRaises为什么不使用pythonunitte
本篇文章给大家谈谈Python单元测试-与assertRaises相反吗?,以及python中testcase的知识点,同时本文还将给你拓展assertRaises为什么不使用python unittest捕获我的属性错误?、Django中的单元测试以及Python单元测试、Python unittest - 与 assertRaises 相反?、Python unittest - 与assertRaises相反?等相关知识,希望对各位有所帮助,不要忘了收藏本站喔。
本文目录一览:- Python单元测试-与assertRaises相反吗?(python中testcase)
- assertRaises为什么不使用python unittest捕获我的属性错误?
- Django中的单元测试以及Python单元测试
- Python unittest - 与 assertRaises 相反?
- Python unittest - 与assertRaises相反?
")
Python单元测试-与assertRaises相反吗?(python中testcase)
我想编写一个测试来确定在给定的情况下不引发异常。
测试是否引发异常 很简单…
sInvalidPath=AlwaysSuppliesAnInvalidPath()self.assertRaises(PathIsNotAValidOne, MyObject, sInvalidPath)…但是你怎么做 相反 。
像这样的东西我在追求…
sValidPath=AlwaysSuppliesAValidPath()self.assertNotRaises(PathIsNotAValidOne, MyObject, sValidPath)答案1
小编典典def run_test(self): try: myFunc() except ExceptionType: self.fail("myFunc() raised ExceptionType unexpectedly!")
assertRaises为什么不使用python unittest捕获我的属性错误?
我正在尝试运行此测试:self.assertRaises(AttributeError,branch[0].childrennodes)和和branch[0没有属性childrennodes,因此它应该抛出anAttributeError,assertRaises应该捕获该属性,但是当我运行测试时,测试失败了,因为它抛出了AttributeError。
Traceback (most recent call last): File "/home/tttt/../tttt/tests.py", line 504, in test_get_categories_branch self.assertRaises(AttributeError, branch[0].children_nodes)AttributeError: ''Category'' object has no attribute ''children_nodes''有任何想法吗?
答案1
小编典典我认为是因为assert引发仅接受可赎回。它评估看可调用对象是否引发异常,而不是语句本身是否引发异常。
self.assertRaises(AttributeError, getattr, branch[0], "childrennodes")应该管用。
编辑:
正如THC4k正确地说的那样,它在收集时收集语句,然后将出错,而不是在测试时。
这也是为什么我喜欢鼻子的原因,它有一个装饰器(提花器),对于这种测试有用且更清晰。
@raises(AttributeError)def test_1(self) branch[0].childrennodes
Django中的单元测试以及Python单元测试
Python单元测试
是用来对一个模块、一个函数或者一个类进行正确性检验的测试工作。
在Python中unittest是它内置的单元测试框架,单元测试与功能测试都是日常开发中必不可少的部分。
比如对函数abs(),我们可以编写出一下几个测试用例:
- 输入正数,比如1,1.2,0.99,我们期待返回值与输入相同
- 输入负数,比如-1,-1.2,-0.99,我们期待返回值与输入值相反
- 输入0,我们期待返回0
- 输入非数值类型,比如None,[],{},我们期待抛出TypeError
把上面的测试用例放到一个测试模块里,就是一个完整的单元测试。
一个简单的测试用例
定义一个类,简单的实现add、sub两方法,并对其进行单元测试
待测试文件m1.py
 1 #!/usr/bin/env python
 2 # -*- coding:utf-8 -*-
 3
 4
 5 class MyClass(object):
 6     def __init__(self, x, y):
 7         self.x = int(x)
 8         self.y = int(y)
 9
10     def add(self):
11         return self.x + self.y
12
13     def sub(self):
14         return self.x - self.y
在m1.py同级目录下创建test.py测试文件,使用unittest单元测试框架对MyClass的方法进行测试
 1 #!/usr/bin/env python
 2 # -*- coding:utf-8 -*-
 3
 4 import unittest
 5 from m1 import MyClass
 6
 7
 8 class MyclassTest(unittest.TestCase):
 9     def setUp(self):
10         self.calc = MyClass(7, 5)
11
12     def tearDown(self):
13         pass
14
15     def test_add(self):
16         ret = self.calc.add()
17         self.assertEqual(ret, 12)
18
19     def test_sub(self):
20         ret = self.calc.sub()
21         self.assertEqual(ret, 2)
22
23
24 # if __name__ == ''__main__'':
25 #     suite = unittest.TestSuite()
26 #     suite.addTest(MyclassTest(''test_add''))
27 #     suite.addTest(MyclassTest(''test_sub''))
28 #
29 #     runner = unittest.TextTestRunner()
30 #     runner.run(suite)
31
32 if __name__ == ''__main__'':
33     unittest.main()
运行测试
1 python -m unittest test
2 ..
3 ----------------------------------------------------------------------
4 Ran 2 tests in 0.000s
5
6 OK
总结:
编写单元测试时,我们需要编写一个测试类,从unittest.TestCase继承,unittest.TestCase提供了很多内置的条件判断,我们只需要调用这些方法就可以断言输出是否是我们所期望的。最常用的断言就是assertEqual()方法
运行单元测试:
1 一旦编写好单元测试,我们就可以运行单元测试。最简单的运行方式是在test.py的最后加上两行代码:
2 if __name__ == ''__main__'':
3     unittest.main()
4 这样就可以把test.py当做正常的python脚本运行:
5 $ python test.py
6 另一种方法是在命令行通过参数-m unittest直接运行单元测试:
7 $ python -m unittest test
unittest框架小知识点梳理
1. test fixture:是初始化和清理测试数据及环境,通过重写TestCase的setUp()和tearDown()方法实现
两方法使用:设想你的测试需要启动一个数据库,这时,就可以在setUp()方法中连接数据库,在tearDown()方法中关闭数据库,这样,不必在每个测试方法中重复相同的代码:
1 class MyclassTest(unittest.TestCase):
2
3     def setUp(self):
4         print(''setUp...'')
5
6     def tearDown(self):
7         print(''tearDown...'')
2.test case:是测试用例
3.test suite:是测试用例的集合,通过addTest加载TestCase到TestSuite中,返回一个TestSuite实例
4.test runner:是运行测试用例并返回结果,通过TextTestRunner类提供的run()方法来执行test suite或test case
注意:
单元测试通过了并不意味着程序就没有bug了,但是不通过程序肯定有bug
Django中的单元测试
在创建app的时候,在app目录下自动生成tests.py文件
Model部分单元测试用例
1 from django.db import models
2
3 # Create your models here.
4
5
6 class Book(models.Model):
7     title = models.CharField(max_length=32)
8     price = models.DecimalField(max_digits=10, decimal_places=2)
测试用例代码
 1 from django.test import TestCase
 2 from app01.models import Book
 3 # Create your tests here.
 4
 5
 6 class BookModelTest(TestCase):
 7     def setUp(self):
 8         Book.objects.create(title=''斗破苍穹'', price=10.99)
 9
10     def test_book_model(self):
11         from decimal import Decimal
12         result = Book.objects.get(title=''斗破苍穹'')
13         self.assertEqual(result.price, Decimal(''10.99''))
运行测试在项目目录下运行:
1 python manage.py test
2 Creating test database for alias ''default''...
3 System check identified no issues (0 silenced).
4 .
5 ----------------------------------------------------------------------
6 Ran 1 test in 0.002s
7
8 OK
9 Destroying test database for alias ''default''...
视图部分单元测试用例
1 from django.shortcuts import render
2
3 # Create your views here.
4
5
6 def index(request):
7     return render(request, ''index.html'')
在app01/tests.py文件中添加测试用例代码:
1 class IndexPageTest(TestCase):
2     """测试index页面"""
3     def test_index_page_renders_index_template(self):
4         """测试index视图"""
5         response = self.client.get(''/index/'')
6         self.assertEqual(response.status_code, 200)  # 判断状态码
7         self.assertTemplateUsed(response, ''index.html'')  # 判断渲染的模板是否正确
运行单元测试:
1 python manage.py test
2 Creating test database for alias ''default''...
3 System check identified no issues (0 silenced).
4 ..
5 ----------------------------------------------------------------------
6 Ran 2 tests in 0.044s
7
8 OK
9 Destroying test database for alias ''default''...

Python unittest - 与 assertRaises 相反?

我想编写一个测试来确定在给定的环境中不会引发异常。
它的简单测试是否将引发异常 ...
sInvalidPath=AlwaysSuppliesAnInvalidPath()
self.assertRaises(PathIsNotAValidOne, MyObject, sInvalidPath)
...... 但你怎么能做相反的事情。
像我这样的东西,我在追求...
sValidPath=AlwaysSuppliesAValidPath()
self.assertNotRaises(PathIsNotAValidOne, MyObject, sValidPath)
#1 楼
只需调用该函数即可。 如果它引发异常,单元测试框架会将此标记为错误。 您可能想添加评论,例如:
sValidPath=AlwaysSuppliesAValidPath()
# Check PathIsNotAValidOne not thrown
MyObject(sValidPath)
#2 楼
def run_test(self):
    try:
        myFunc()
    except ExceptionType:
        self.fail("myFunc() raised ExceptionType unexpectedly!")
#3 楼
嗨 - 我想编写一个测试来确定在特定情况下不会引发异常。
这是默认假设 - 不会引发异常。
如果你别说什么,那就是在每一次测试中都假设的。
您不必为此实际编写任何断言。
#4 楼
我是原始海报,我在没有首先在代码中使用它的情况下接受了 DGH 的上述答案。
一旦我使用了,我意识到需要做一些调整才能真正做我需要做的事情(对 DGH 来说,他 / 她确实说 “或类似的东西”!)。
为了别人的利益,我认为值得在这里发布调整:
    try:
        a = Application("abcdef", "")
    except pySourceAidExceptions.PathIsNotAValidOne:
        pass
    except:
        self.assertTrue(False)
我在这里尝试做的是确保如果尝试使用第二个空格参数实例化 Application 对象,则会引发 pySourceAidExceptions.PathIsNotAValidOne。
我相信使用上面的代码(主要基于 DGH 的答案)会这样做。
#5 楼
我发现猴子补丁 unittest 有用如下:
def assertMayRaise(self, exception, expr):
  if exception is None:
    try:
      expr()
    except:
      info = sys.exc_info()
      self.fail(''%s raised'' % repr(info[0]))
  else:
    self.assertRaises(exception, expr)

unittest.TestCase.assertMayRaise = assertMayRaise
在测试没有异常时,这澄清了意图:
self.assertMayRaise(None, does_not_raise)
这也简化了循环中的测试,我经常发现自己在做:
# ValueError is raised only for op(x,x), op(y,y) and op(z,z).
for i,(a,b) in enumerate(itertools.product([x,y,z], [x,y,z])):
  self.assertMayRaise(None if i%4 else ValueError, lambda: op(a, b))

Python unittest - 与assertRaises相反?
我想编写一个测试来确定在给定情况下不会引发异常。
测试是否引发异常 很 简单......
sInvalidPath=AlwaysSuppliesAnInvalidPath()
self.assertRaises(PathIsNotAValidOne,MyObject,sInvalidPath)
…但你怎么能做 相反 的事情。
像这样的东西我追求的是什么......
sValidPath=AlwaysSuppliesAValidPath()
self.assertNotRaises(PathIsNotAValidOne,sValidPath)
今天关于Python单元测试-与assertRaises相反吗?和python中testcase的介绍到此结束,谢谢您的阅读,有关assertRaises为什么不使用python unittest捕获我的属性错误?、Django中的单元测试以及Python单元测试、Python unittest - 与 assertRaises 相反?、Python unittest - 与assertRaises相反?等更多相关知识的信息可以在本站进行查询。
在本文中,您将会了解到关于TensorFlow:用我自己的图像训练的新资讯,同时我们还将为您解释用tensorflow对图像进行训练的相关在本文中,我们将带你探索TensorFlow:用我自己的图像训练的奥秘,分析用tensorflow对图像进行训练的特点,并给出一些关于21个项目玩转深度学习:基于TensorFlow的实践详解03—打造自己的图像识别模型、C#使用TensorFlow.NET训练自己的数据集的方法、SSD-Tensorflow: 3 步运行 TensorFlow 单图片多盒目标检测器、TensorFlow (十七):训练自己的图片分类模型的实用技巧。
本文目录一览:- TensorFlow:用我自己的图像训练(用tensorflow对图像进行训练)
- 21个项目玩转深度学习:基于TensorFlow的实践详解03—打造自己的图像识别模型
- C#使用TensorFlow.NET训练自己的数据集的方法
- SSD-Tensorflow: 3 步运行 TensorFlow 单图片多盒目标检测器
- TensorFlow (十七):训练自己的图片分类模型
")
TensorFlow:用我自己的图像训练(用tensorflow对图像进行训练)
我是TensorFlow的新手。我正在寻找有关图像识别的帮助,可以在其中 训练自己的图像 数据集。
有没有训练新数据集的示例?
答案1
小编典典如果您对如何在TensorFlow中输入自己的数据感兴趣,可以查看本教程。
我也写与CS230的最佳做法指南在斯坦福这里。
新答案(带有tf.data)和带有标签
随着tf.datain的引入r1.4,我们可以创建一批没有占位符且没有队列的图像。步骤如下:
- 创建一个包含图像文件名的列表和相应的标签列表
- 创建
tf.data.Dataset读取这些文件名和标签 - 预处理数据
- 从创建一个迭代器,该迭代器
tf.data.Dataset将产生下一批
代码是:
# step 1filenames = tf.constant([''im_01.jpg'', ''im_02.jpg'', ''im_03.jpg'', ''im_04.jpg''])labels = tf.constant([0, 1, 0, 1])# step 2: create a dataset returning slices of `filenames`dataset = tf.data.Dataset.from_tensor_slices((filenames, labels))# step 3: parse every image in the dataset using `map`def _parse_function(filename, label): image_string = tf.read_file(filename) image_decoded = tf.image.decode_jpeg(image_string, channels=3) image = tf.cast(image_decoded, tf.float32) return image, labeldataset = dataset.map(_parse_function)dataset = dataset.batch(2)# step 4: create iterator and final input tensoriterator = dataset.make_one_shot_iterator()images, labels = iterator.get_next()现在我们可以直接运行,sess.run([images, labels])而无需通过占位符提供任何数据。
旧答案(使用TensorFlow队列)
概括起来,您有多个步骤:
- 创建文件名列表(例如:图像的路径)
- 创建一个TensorFlow 文件名队列
- 读取和解码每个图像,将它们调整为固定大小(批处理必需)
- 输出一批这些图像
最简单的代码是:
# step 1filenames = [''im_01.jpg'', ''im_02.jpg'', ''im_03.jpg'', ''im_04.jpg'']# step 2filename_queue = tf.train.string_input_producer(filenames)# step 3: read, decode and resize imagesreader = tf.WholeFileReader()filename, content = reader.read(filename_queue)image = tf.image.decode_jpeg(content, channels=3)image = tf.cast(image, tf.float32)resized_image = tf.image.resize_images(image, [224, 224])# step 4: Batchingimage_batch = tf.train.batch([resized_image], batch_size=8)
21个项目玩转深度学习:基于TensorFlow的实践详解03—打造自己的图像识别模型
书籍源码:https://github.com/hzy46/Deep-Learning-21-Examples
CNN的发展已经很多了,ImageNet引发的一系列方法,LeNet,GoogLeNet,VGGNet,ResNet每个方法都有很多版本的衍生,tensorflow中带有封装好各方法和网络的函数,只要喂食自己的训练集就可以完成自己的模型,感觉超方便!!!激动!!!因为虽然原理流程了解了,但是要写出来真的。。。。好难,臣妾做不到啊~~~~~~~~
START~~~~
1.数据准备
首先了解下微调的概念: 以VGG为例
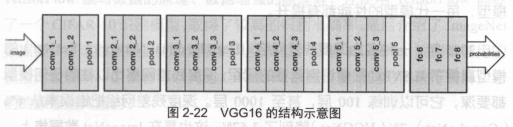
他的结构是卷积+全连接,卷积层分为5个部分共13层,conv1~conv5。还有三层全连接,即fc6,fc7,fc8。总共16层,因此被称为VGG16。
a.如果要将VGG16的结构用于一个新的数据集,首先要去掉fc8,因为fc8原本的输出是1000类的概率。需要改为符合自身训练集的输出类别数。
b.训练的时候,网络的参数的初始值并不是随机化生成的,而是采用VGG16在ImageNet上已经训练好的参数作为训练的初始值。因为已经训练过的VGG16中的参数已经包含了大量有用的卷积过滤器,这样做不仅节约大量训练时间,而且有助于分类器性能的提高。
载入VGG16的参数后,即可开始训练。此时需要指定训练层数的范围。一般而言,可以选择以下几种:
- 只训练fc8:训练范围一定要包含fc8这一层。这样的选择一般性能都不会太好,但速度很快;因为他只训练fc8,保持其他层的参数不动,相当于把VGG16当成一个“特征提取器”,用fc7层提取的特征做一个softmax的模型分类。
- 训练所有参数:耗时较慢,但能取得较高性能。
- 训练部分参数:通常是固定浅层参数不变,训练深层参数。如固定conv1、conv2部分的参数不训练,只训练conv3、conv4、conv5、fc6、fc7、fc8的参数。
这种训练方法就是对神经网络做微调。
1.1 切分train&test
书中提供了卫星图像数据集,有6个类别,分别是森林(wood),水域(water),岩石(rock),农田(wetland),冰川(glacier),城市区域(urban)
保存结构为data_prepare/pic,再下层有两个文件夹train和validation,各文件夹下有6个文件夹,放的是该类别下的图片。
1.2 转换成tfrecord格式
python data_convert.py -t pic/ \
  --train-shards 2 \
  --validation-shards 2 \
  --num-threads 2 \
  --dataset-name satellite
参数解释:
-t pic/ :表示转换pic文件夹下的数据,该文件夹必须与上面的文件结构保持一致
--train-shards 2 :把训练集分成两块,即最后的训练数据就是两个tfrecord格式的文件。若数据集更大,可以分更多数据块
--validation-shards 2 :把验证集分成两块
--num-thread 2 :用两个线程来产生数据。注意线程数必须要能整除train-shards和validation-shards,来保证每个线程处理的数据块是相同的。
--dataset-name :给生成的数据集起个名字,即表示最后生成文件的开头是satellite_train和satellite_validation
运行上述命令后,就可以在 pic 文件夹中找到 5 个新生成的文件 ,分别是:
- 训练数据 satellite_train_00000-of-00002.tfrecord、satellite_train_00001-of-00002.tfrecord,
- 验证数据 satellite_validation_00000-of-00002.tfrecord、satellite_validation_00001-of-00002.tfrecord。
- label.txt 它表示图片的内部标签(数字)到真实类别(字符串)之间的映射顺序 。 如图片在 tfrecord 中的标签为 0 ,那么就对应 label.txt 第一行的类别,在 tfrecord的标签为1,就对应 label.txt 中第二行的类别,依此类推。
2.训练模型
2.1 TensorFlow Slim
Google 公司公布的一个图像分类工具包,它不仅定义了一些方便的接口,还提供了很多 ImageNet 数据集上常用的网络结构和预训练模型 。
截至2017年7月,Slim 提供包括 VGG16、VGG19、Inception V1 ~ V4、ResNet 50、ResNet 101、MobileNet 在内大多数常用模型的结构以及预训练模型,更多的模型还会被持续添加进来。
源码地址: https://github.com/tensorflow/models/tree/master/research/slim
可以通过执行 git clone https://github.corn/tensorflow/models.git 来获取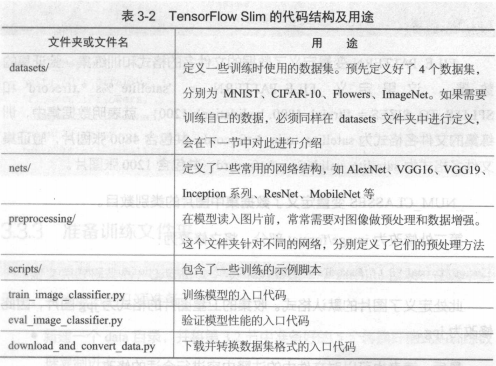
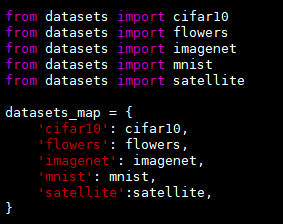
2.2 定义新的datasets文件<修改slim源码>
在slim/datasets中,定义了所有可以使用的数据库,为了使用之前生成的 tfrecord 数据进行训练,必须要在datasets 中定义新的数据库。
- 在 datasets/目录下新建一个文件 satellite,并将 flowers.py 文件中的内容复制到 satellite.py 中。
修改两处代码:


- 在同目录的 dataset_factory. py 文件中注册 satellite 数据库
2.3 准备训练文件夹
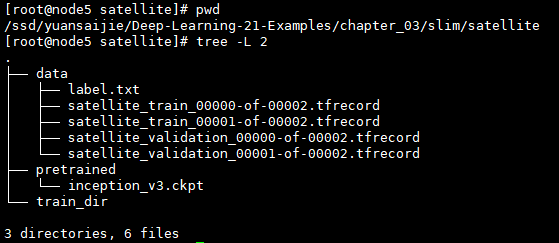
在slim文件下新建satellite文件夹,按照上图结构准备各个文件和数据,模型下载地址:http://download.tensorflow.org/models/inception_v3_2016_08_28.tar.gz,也可以在slim的github地址上找到其他模型的下载链接。
2.4 开始训练
python train_image_classifier.py \
  --train_dir=satellite/train_dir \
  --dataset_name=satellite \
  --dataset_split_name=train \
  --dataset_dir=satellite/data \
  --model_name=inception_v3 \
  --checkpoint_path=satellite/pretrained/inception_v3.ckpt \
  --checkpoint_exclude_scopes=InceptionV3/Logits,InceptionV3/AuxLogits \
  --trainable_scopes=InceptionV3/Logits,InceptionV3/AuxLogits \
  --max_number_of_steps=100000 \
  --batch_size=32 \
  --learning_rate=0.001 \
  --learning_rate_decay_type=fixed \
  --save_interval_secs=300 \
  --save_summaries_secs=2 \
  --log_every_n_steps=10 \
  --optimizer=rmsprop \
  --weight_decay=0.00004
参数解释:
--trainable_scopes=InceptionV3/Logits,InceptionV3/AuxLogits:首先来解释参数trainable_scopes 的作用,因为它非常重要。 trainable_scopes 规定了在模型中微调变量的范围 。这里的设定表示只对InceptionV3/Logits,InceptionV3/AuxLogits 两个变量进行微调,其他变量都保持不动 。InceptionV3/Logits,InceptionV3/AuxLogits 就相当于之前所讲的 fc8 ,它们是 Inception V3 的“末端层” 。如果不设定 trainable_scopes ,就会对模型中所有的参数进行训练。
--train_dir=satellite/train_dir : 表明会在 satellite/train_dir 目录下保存日志和 checkpoint 。可通过tensorboard --logdir satellite/train_dir来可视化参数变化。
--dataset_name=satellite 、--dataset_split_name=train : 指定训练的数据集 。之前定义的新的 dataset 就是在这里发挥用处的 。
--dataset_dir=satellite/data :指定训练数据集保存的位置 。
--model_name=inception_v3 :使用的模型名称 。
--checkpoint_path=satellite/pretrained/inception_v3.ckpt :预训练模型的保存位置 。
--checkpoint_exclude_scopes=InceptionV3/Logits,InceptionV3/AuxLogits : 在恢复预训练模型时,不恢复这两层。正如之前所说,这两层是 InceptionV3 模型的末端层,对应着 ImageNet 数据集的 1000 类,和当前的数据集不符 ,因此不要去恢复它 。
--max_number_of_steps 100000 :最大的执行步数 。
--batch_size=32 :每步使用的 batch 数量 。
--learning_rate=0.001 :学习率 。
--learning_rate_decay_type=fixed :学习率是否自动下降,此处使用固定的学习率 。
--save_interval_secs=300 :每隔 300s ,程序会把当前模型保存到 train_dir 中 。 此处就是目录 satellite/train_dir 。
--save_summaries_secs=2 :每隔 2s ,就会将日志写入到 train_dir 中 。 可以用 TensorBoard 查看该日志 。 此处为了方便观察,设定的时间间隔较多,实际训练时,为了性能考虑,可以设定较长的时间间隔 。
--log_every_n_steps=10 :每隔 10 步,就会在屏幕上打出训练信息。
--optimize=rmsprop:表示选定的优化器 。
--weight_decay=0.00004 :选定的 weight_decay 值 。 即模型中所有参数的二次正则化超参数 。
如果想要对所有层训练,去掉--trainable_scopes参数即可。
训练结果:
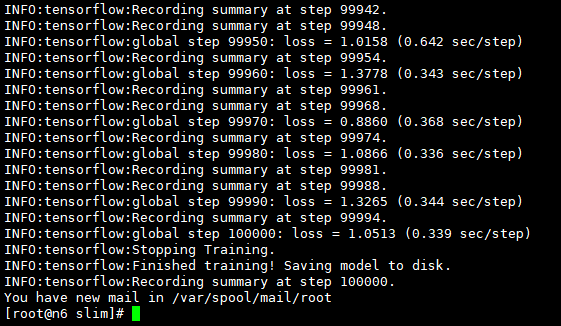
程序开始运行时,会先读取train_dir下的模型,若没有,则去读checkpoint_path目录下的预训练模型,以5min的频率保留模型(仅保留最新的5个模型)。
若程序中断再次训练,读取train_dir下的模型,不存在则依旧去找预训练模型,若存在,则以该模型的参数为起点进行参数微调。
3.验证准确率
python eval_image_classifier.py \
  --checkpoint_path=satellite/train_dir \
  --eval_dir=satellite/eval_dir \
  --dataset_name=satellite \
  --dataset_split_name=validation \
  --dataset_dir=satellite/data \
  --model_name=inception_v3
参数说明:
--checkpoint_path=satellite/train_dir :这个参数既可以接收一个目录的路径,也可以接收一个文件的路径。 如果接收的是一个目录的路径,如这里的 satellite/train_dir ,就会在这个目录中寻找最新保存的模型文件,执行验证。也可以指定一个模型进行验证,以第 300 步的模型为例,在satellite/train_dir 文件夹下它被保存为 model.ckpt-300.meta 、model.ckpt-300.index 、 model.ckpt-300.data-00000-of-OOOO1 三个文件 。 此时,如果要对它执行验证,给 checkpoint_path 传递的参数应该为satellite/train_dir/model.ckpt-300 。
--eval_dir=satellite/eval_dir:执行结果的曰志就保存在 eval_dir 中,同样可以通过 TensorBoard 查看。
--dataset_name=satellite、--dataset_split_name=validation : 指定需要执行的数据集 。 注意此处是使用验证集( validation )执行验证。
--dataset dir=satellite/data :数据集保存的位置 。
--model_name=inception_v3 :使用的模型。
运行结果:
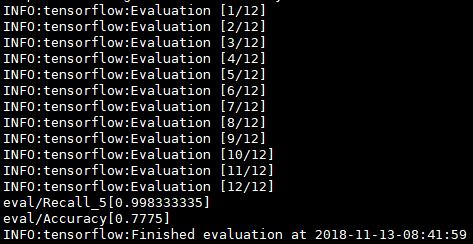
Accuracy表示模型的分类准确率,Recall_5表示Top5的准确率,即输出的各类别概率中,正确的类别只要落在前5个中则算对。由于此处类别数不多,可尝试改成Top2或者Top3.
修改eval_image_classifier.py

可再次执行上述验证语句查看预测结果。
前面有讲到可以训练所有层的参数,再进行测试,发现Accuracy的值,在训练所有层的时候可达82%,效果更佳。
4.导出模型并对单张图片分类
4.1 生成.pb文件
在slim文件夹下有 export_inference_graph.py 文件,运行它会生成一个 inception_v3_inf_graph.pb 文件。该文件中仅保存了Inception V3的网络结构,后续需要把checkpoint中的模型参数保存进来。
python export_inference_graph.py \
  --alsologtostderr \
  --model_name=inception_v3 \
  --output_file=satellite/inception_v3_inf_graph.pb \
  --dataset_name satellite
4.2 保存模型参数
在chapter_3文件下有 freeze_graph.py 文件,运行它会生成一个 frozen_graph.pb 文件(一个用于识别的模型)。之后就可以用该文件对单张图片进行预测。
python freeze_graph.py \
  --input_graph slim/satellite/inception_v3_inf_graph.pb \
  --input_checkpoint slim/satellite/train_dir/model.ckpt-5271 \
  --input_binary true \
  --output_node_names InceptionV3/Predictions/Reshape_1 \
  --output_graph slim/satellite/frozen_graph.pb
需将5271改成train_dir中保存的实际的模型训练步数
--input_graph slim/satellite/inception_v3_inf_graph.pb:这个参数很好理解 ,它表示使用的网络结构文件,即之前已经导出的inception_v3_inf_graph.pb 。
--input_checkpoint slim/satellite/train_dir/model.ckpt-5271:具体将哪一个checkpoint 的参数载入到网络结构中 。这里使用的是训练文件夹 train_dir中的第 5271 步模型文件 。 读者需要根据训练文件夹下 checkpoint 的实际步数,将 5271 修改成对应的数值。
--input_binary true:导入的 inception_v3_inf_graph.pb 实际是一个 protobuf 文件 。 而 protobuf 文件有两种保存格式,一种是文本形式,一种是二进制形式。 inception_v3_inf_graph.pb 是二进制形式,所以对应的参数是--input_binary true。初学的话对此可以不用深究,若有兴趣的话可以参考资料。
--output_node_names InceptionV3/Predictions/Reshape_1:在导出的模型中,指定一个输出结点, InceptionV3/Predictions/Reshape_1是 Inception V3最后的输出层 。
--output_graph slim/satellite/frozen_graph.pb:最后导出的模型保存为 slim/satellite/frozen_graph.pb 文件。
4.3 单张图片预测
python classify_image_inception_v3.py \
  --model_path slim/satellite/frozen_graph.pb \
  --label_path slim/satellite/data/label.txt \
  --image_file test_image.jpg
运行结果如下:
[root@node5 chapter_03]# python3 classify_image_inception_v3.py   --model_path slim/satellite/frozen_graph.pb   --label_path slim/satellite/data/label.txt  --image_file test_image.jpg
2018-11-15 11:21:39.435166: I tensorflow/core/platform/cpu_feature_guard.cc:141] Your CPU supports instructions that this TensorFlow binary was not compiled to use: AVX2 FMA
water (score = 3.25221)
wetland (score = 1.97180)
urban (score = 1.33430)
wood (score = 0.53297)
rock (score = -0.41706)
score是各个类别对应的Logit。
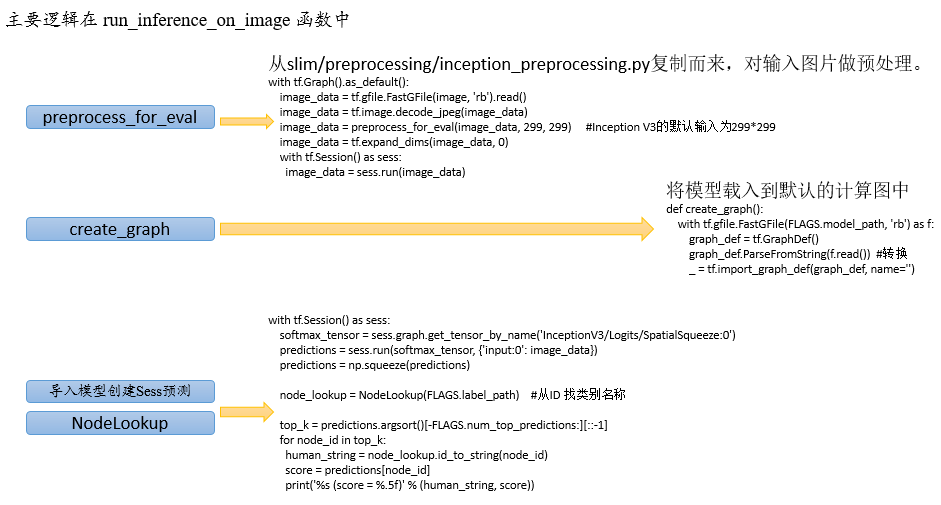
代码逻辑实现:
拓展阅读
- TensorFlow Slim 是TensorFlow 中用于定义、训练和验证复杂网络的 高层API。官方已经使用TF-Slim 定义了一些常用的图像识别模型, 如AlexNet、VGGNet、Inception模型、ResNet等。本章介绍的Inception V3 模型也是其中之一, 详细文档请参考: https://github.com/tensorflow/models/tree/master/research/slim。
- 在第3.2节中,将图片数据转换成了TFRecord文件。TFRecord 是 TensorFlow 提供的用于高速读取数据的文件格式。读者可以参考博文( http://warmspringwinds.github.io/tensorflow/tf-slim/2016/12/21/tfrecords-guide/ )详细了解如何将数据转换为TFRecord 文件,以及 如何从TFRecord 文件中读取数据。
- Inception V3 是Inception 模型(即GoogLeNet)的改进版,可以参考论文Rethinking the Inception Architecture for Computer Vision 了解 其结构细节。
THE END~~~~

C#使用TensorFlow.NET训练自己的数据集的方法
今天,我结合代码来详细介绍如何使用 SciSharp STACK 的 TensorFlow.NET 来训练CNN模型,该模型主要实现 图像的分类 ,可以直接移植该代码在 CPU 或 GPU 下使用,并针对你们自己本地的图像数据集进行训练和推理。TensorFlow.NET是基于 .NET Standard 框架的完整实现的TensorFlow,可以支持 .NET Framework 或 .NET CORE , TensorFlow.NET 为广大.NET开发者提供了完美的机器学习框架选择。
SciSharp STACK:https://github.com/SciSharp
什么是TensorFlow.NET?
TensorFlow.NET 是 SciSharp STACK

开源社区团队的贡献,其使命是打造一个完全属于.NET开发者自己的机器学习平台,特别对于C#开发人员来说,是一个“0”学习成本的机器学习平台,该平台集成了大量API和底层封装,力图使TensorFlow的Python代码风格和编程习惯可以无缝移植到.NET平台,下图是同样TF任务的Python实现和C#实现的语法相似度对比,从中读者基本可以略窥一二。

由于TensorFlow.NET在.NET平台的优秀性能,同时搭配SciSharp的NumSharp、SharpCV、Pandas.NET、Keras.NET、Matplotlib.Net等模块,可以完全脱离Python环境使用,目前已经被微软ML.NET官方的底层算法集成,并被谷歌写入TensorFlow官网教程推荐给全球开发者。
SciSharp 产品结构

微软 ML.NET底层集成算法

谷歌官方推荐.NET开发者使用
URL: https://www.tensorflow.org/versions/r2.0/api_docs

项目说明
本文利用TensorFlow.NET构建简单的图像分类模型,针对工业现场的印刷字符进行单字符OCR识别,从工业相机获取原始大尺寸的图像,前期使用OpenCV进行图像预处理和字符分割,提取出单个字符的小图,送入TF进行推理,推理的结果按照顺序组合成完整的字符串,返回至主程序逻辑进行后续的生产线工序。
实际使用中,如果你们需要训练自己的图像,只需要把训练的文件夹按照规定的顺序替换成你们自己的图片即可。支持GPU或CPU方式,该项目的完整代码在GitHub如下:
https://github.com/SciSharp/SciSharp-Stack-Examples/blob/master/src/TensorFlowNET.Examples/ImageProcessing/CnnInYourOwnData.cs
模型介绍
本项目的CNN模型主要由 2个卷积层&池化层 和 1个全连接层 组成,激活函数使用常见的Relu,是一个比较浅的卷积神经网络模型。其中超参数之一"学习率",采用了自定义的动态下降的学习率,后面会有详细说明。具体每一层的Shape参考下图:

数据集说明
为了模型测试的训练速度考虑,图像数据集主要节选了一小部分的OCR字符(X、Y、Z),数据集的特征如下:
分类数量:3 classes 【X/Y/Z】
图像尺寸:Width 64 × Height 64
图像通道:1 channel(灰度图)
数据集数量:
- train:X - 384pcs ; Y - 384pcs ; Z - 384pcs
- validation:X - 96pcs ; Y - 96pcs ; Z - 96pcs
- test:X - 96pcs ; Y - 96pcs ; Z - 96pcs
其它说明:数据集已经经过 随机 翻转/平移/缩放/镜像 等预处理进行增强
整体数据集情况如下图所示:


代码说明
环境设置
- .NET 框架:使用.NET Framework 4.7.2及以上,或者使用.NET CORE 2.2及以上
- CPU 配置: Any CPU 或 X64 皆可
- GPU 配置:需要自行配置好CUDA和环境变量,建议 CUDA v10.1,Cudnn v7.5
类库和命名空间引用
从NuGet安装必要的依赖项,主要是SciSharp相关的类库,如下图所示:
注意事项:尽量安装最新版本的类库,CV须使用 SciSharp 的 SharpCV 方便内部变量传递
<PackageReference Include="Colorful.Console" Version="1.2.9" />
<PackageReference Include="Newtonsoft.Json" Version="12.0.3" />
<PackageReference Include="SciSharp.TensorFlow.Redist" Version="1.15.0" />
<PackageReference Include="SciSharp.TensorFlowHub" Version="0.0.5" />
<PackageReference Include="SharpCV" Version="0.2.0" />
<PackageReference Include="SharpZipLib" Version="1.2.0" />
<PackageReference Include="System.Drawing.Common" Version="4.7.0" />
<PackageReference Include="TensorFlow.NET" Version="0.14.0" />
引用命名空间,包括 NumSharp、Tensorflow 和 SharpCV ;
using NumSharp;
using NumSharp.Backends;
using NumSharp.Backends.Unmanaged;
using SharpCV;
using System;
using System.Collections;
using System.Collections.Generic;
using System.Diagnostics;
using System.IO;
using System.Linq;
using System.Runtime.CompilerServices;
using Tensorflow;
using static Tensorflow.Binding;
using static SharpCV.Binding;
using System.Collections.Concurrent;
using System.Threading.Tasks;
主逻辑结构
主逻辑:
准备数据
创建计算图
训练
预测
public bool Run()
{
PrepareData();
BuildGraph();
using (var sess = tf.Session())
{
Train(sess);
Test(sess);
}
TestDataOutput();
return accuracy_test > 0.98;
}
数据集载入
数据集下载和解压
数据集地址:https://github.com/SciSharp/SciSharp-Stack-Examples/blob/master/data/data_CnnInYourOwnData.zip
数据集下载和解压代码 ( 部分封装的方法请参考 GitHub完整代码 ):
string url = "https://github.com/SciSharp/SciSharp-Stack-Examples/blob/master/data/data_CnnInYourOwnData.zip";
Directory.CreateDirectory(Name);
Utility.Web.Download(url, Name, "data_CnnInYourOwnData.zip");
Utility.Compress.UnZip(Name + "\\data_CnnInYourOwnData.zip", Name);
字典创建
读取目录下的子文件夹名称,作为分类的字典,方便后面One-hot使用
private void FillDictionaryLabel(string DirPath)
 {
  string[] str_dir = Directory.GetDirectories(DirPath, "*", SearchOption.TopDirectoryOnly);
  int str_dir_num = str_dir.Length;
  if (str_dir_num > 0)
  {
   Dict_Label = new Dictionary<Int64, string>();
   for (int i = 0; i < str_dir_num; i++)
   {
    string label = (str_dir[i].Replace(DirPath + "\\", "")).Split(''\\'').First();
    Dict_Label.Add(i, label);
    print(i.ToString() + " : " + label);
   }
   n_classes = Dict_Label.Count;
  }
 }
文件List读取和打乱
从文件夹中读取train、validation、test的list,并随机打乱顺序。
读取目录
ArrayFileName_Train = Directory.GetFiles(Name + "\\train", "*.*", SearchOption.AllDirectories); ArrayLabel_Train = GetLabelArray(ArrayFileName_Train); ArrayFileName_Validation = Directory.GetFiles(Name + "\\validation", "*.*", SearchOption.AllDirectories); ArrayLabel_Validation = GetLabelArray(ArrayFileName_Validation); ArrayFileName_Test = Directory.GetFiles(Name + "\\test", "*.*", SearchOption.AllDirectories); ArrayLabel_Test = GetLabelArray(ArrayFileName_Test);
获得标签
private Int64[] GetLabelArray(string[] FilesArray)
{
 Int64[] ArrayLabel = new Int64[FilesArray.Length];
 for (int i = 0; i < ArrayLabel.Length; i++)
 {
  string[] labels = FilesArray[i].Split(''\\'');
  string label = labels[labels.Length - 2];
  ArrayLabel[i] = Dict_Label.Single(k => k.Value == label).Key;
 }
 return ArrayLabel;
}
随机乱序
public (string[], Int64[]) ShuffleArray(int count, string[] images, Int64[] labels)
{
ArrayList mylist = new ArrayList();
string[] new_images = new string[count];
Int64[] new_labels = new Int64[count];
Random r = new Random();
for (int i = 0; i < count; i++)
{
mylist.Add(i);
}
for (int i = 0; i < count; i++)
{
int rand = r.Next(mylist.Count);
new_images[i] = images[(int)(mylist[rand])];
new_labels[i] = labels[(int)(mylist[rand])];
mylist.RemoveAt(rand);
}
print("shuffle array list: " + count.ToString());
return (new_images, new_labels);
}
部分数据集预先载入
Validation/Test数据集和标签一次性预先载入成NDArray格式。
private void LoadImagesToNDArray()
{
 //Load labels
 y_valid = np.eye(Dict_Label.Count)[new NDArray(ArrayLabel_Validation)];
 y_test = np.eye(Dict_Label.Count)[new NDArray(ArrayLabel_Test)];
 print("Load Labels To NDArray : OK!");

 //Load Images
 x_valid = np.zeros(ArrayFileName_Validation.Length, img_h, img_w, n_channels);
 x_test = np.zeros(ArrayFileName_Test.Length, img_h, img_w, n_channels);
 LoadImage(ArrayFileName_Validation, x_valid, "validation");
 LoadImage(ArrayFileName_Test, x_test, "test");
 print("Load Images To NDArray : OK!");
}
private void LoadImage(string[] a, NDArray b, string c)
{
 for (int i = 0; i < a.Length; i++)
 {
  b[i] = ReadTensorFromImageFile(a[i]);
  Console.Write(".");
 }
 Console.WriteLine();
 Console.WriteLine("Load Images To NDArray: " + c);
}
private NDArray ReadTensorFromImageFile(string file_name)
{
 using (var graph = tf.Graph().as_default())
 {
  var file_reader = tf.read_file(file_name, "file_reader");
  var decodeJpeg = tf.image.decode_jpeg(file_reader, channels: n_channels, name: "DecodeJpeg");
  var cast = tf.cast(decodeJpeg, tf.float32);
  var dims_expander = tf.expand_dims(cast, 0);
  var resize = tf.constant(new int[] { img_h, img_w });
  var bilinear = tf.image.resize_bilinear(dims_expander, resize);
  var sub = tf.subtract(bilinear, new float[] { img_mean });
  var normalized = tf.divide(sub, new float[] { img_std });

  using (var sess = tf.Session(graph))
  {
   return sess.run(normalized);
  }
 }
}
计算图构建
构建CNN静态计算图,其中学习率每n轮Epoch进行1次递减。
#region BuildGraph
public Graph BuildGraph()
{
 var graph = new Graph().as_default();

 tf_with(tf.name_scope("Input"), delegate
   {
    x = tf.placeholder(tf.float32, shape: (-1, img_h, img_w, n_channels), name: "X");
    y = tf.placeholder(tf.float32, shape: (-1, n_classes), name: "Y");
   });

 var conv1 = conv_layer(x, filter_size1, num_filters1, stride1, name: "conv1");
 var pool1 = max_pool(conv1, ksize: 2, stride: 2, name: "pool1");
 var conv2 = conv_layer(pool1, filter_size2, num_filters2, stride2, name: "conv2");
 var pool2 = max_pool(conv2, ksize: 2, stride: 2, name: "pool2");
 var layer_flat = flatten_layer(pool2);
 var fc1 = fc_layer(layer_flat, h1, "FC1", use_relu: true);
 var output_logits = fc_layer(fc1, n_classes, "OUT", use_relu: false);

 //Some important parameter saved with graph , easy to load later
 var img_h_t = tf.constant(img_h, name: "img_h");
 var img_w_t = tf.constant(img_w, name: "img_w");
 var img_mean_t = tf.constant(img_mean, name: "img_mean");
 var img_std_t = tf.constant(img_std, name: "img_std");
 var channels_t = tf.constant(n_channels, name: "img_channels");

 //learning rate decay
 gloabl_steps = tf.Variable(0, trainable: false);
 learning_rate = tf.Variable(learning_rate_base);

 //create train images graph
 tf_with(tf.variable_scope("LoadImage"), delegate
   {
    decodeJpeg = tf.placeholder(tf.@byte, name: "DecodeJpeg");
    var cast = tf.cast(decodeJpeg, tf.float32);
    var dims_expander = tf.expand_dims(cast, 0);
    var resize = tf.constant(new int[] { img_h, img_w });
    var bilinear = tf.image.resize_bilinear(dims_expander, resize);
    var sub = tf.subtract(bilinear, new float[] { img_mean });
    normalized = tf.divide(sub, new float[] { img_std }, name: "normalized");
   });

 tf_with(tf.variable_scope("Train"), delegate
   {
    tf_with(tf.variable_scope("Loss"), delegate
      {
       loss = tf.reduce_mean(tf.nn.softmax_cross_entropy_with_logits(labels: y, logits: output_logits), name: "loss");
      });

    tf_with(tf.variable_scope("Optimizer"), delegate
      {
       optimizer = tf.train.AdamOptimizer(learning_rate: learning_rate, name: "Adam-op").minimize(loss, global_step: gloabl_steps);
      });

    tf_with(tf.variable_scope("Accuracy"), delegate
      {
       var correct_prediction = tf.equal(tf.argmax(output_logits, 1), tf.argmax(y, 1), name: "correct_pred");
       accuracy = tf.reduce_mean(tf.cast(correct_prediction, tf.float32), name: "accuracy");
      });

    tf_with(tf.variable_scope("Prediction"), delegate
      {
       cls_prediction = tf.argmax(output_logits, axis: 1, name: "predictions");
       prob = tf.nn.softmax(output_logits, axis: 1, name: "prob");
      });
   });
 return graph;
}

/// <summary>
/// Create a 2D convolution layer
/// </summary>
/// <param name="x">input from previous layer</param>
/// <param name="filter_size">size of each filter</param>
/// <param name="num_filters">number of filters(or output feature maps)</param>
/// <param name="stride">filter stride</param>
/// <param name="name">layer name</param>
/// <returns>The output array</returns>
private Tensor conv_layer(Tensor x, int filter_size, int num_filters, int stride, string name)
{
 return tf_with(tf.variable_scope(name), delegate
     {

      var num_in_channel = x.shape[x.NDims - 1];
      var shape = new[] { filter_size, filter_size, num_in_channel, num_filters };
      var W = weight_variable("W", shape);
      // var tf.summary.histogram("weight", W);
      var b = bias_variable("b", new[] { num_filters });
      // tf.summary.histogram("bias", b);
      var layer = tf.nn.conv2d(x, W,
            strides: new[] { 1, stride, stride, 1 },
            padding: "SAME");
      layer += b;
      return tf.nn.relu(layer);
     });
}

/// <summary>
/// Create a max pooling layer
/// </summary>
/// <param name="x">input to max-pooling layer</param>
/// <param name="ksize">size of the max-pooling filter</param>
/// <param name="stride">stride of the max-pooling filter</param>
/// <param name="name">layer name</param>
/// <returns>The output array</returns>
private Tensor max_pool(Tensor x, int ksize, int stride, string name)
{
 return tf.nn.max_pool(x,
       ksize: new[] { 1, ksize, ksize, 1 },
       strides: new[] { 1, stride, stride, 1 },
       padding: "SAME",
       name: name);
}

/// <summary>
/// Flattens the output of the convolutional layer to be fed into fully-connected layer
/// </summary>
/// <param name="layer">input array</param>
/// <returns>flattened array</returns>
private Tensor flatten_layer(Tensor layer)
{
 return tf_with(tf.variable_scope("Flatten_layer"), delegate
     {
      var layer_shape = layer.TensorShape;
      var num_features = layer_shape[new Slice(1, 4)].size;
      var layer_flat = tf.reshape(layer, new[] { -1, num_features });

      return layer_flat;
     });
}

/// <summary>
/// Create a weight variable with appropriate initialization
/// </summary>
/// <param name="name"></param>
/// <param name="shape"></param>
/// <returns></returns>
private RefVariable weight_variable(string name, int[] shape)
{
 var initer = tf.truncated_normal_initializer(stddev: 0.01f);
 return tf.get_variable(name,
       dtype: tf.float32,
       shape: shape,
       initializer: initer);
}

/// <summary>
/// Create a bias variable with appropriate initialization
/// </summary>
/// <param name="name"></param>
/// <param name="shape"></param>
/// <returns></returns>
private RefVariable bias_variable(string name, int[] shape)
{
 var initial = tf.constant(0f, shape: shape, dtype: tf.float32);
 return tf.get_variable(name,
       dtype: tf.float32,
       initializer: initial);
}

/// <summary>
/// Create a fully-connected layer
/// </summary>
/// <param name="x">input from previous layer</param>
/// <param name="num_units">number of hidden units in the fully-connected layer</param>
/// <param name="name">layer name</param>
/// <param name="use_relu">boolean to add ReLU non-linearity (or not)</param>
/// <returns>The output array</returns>
private Tensor fc_layer(Tensor x, int num_units, string name, bool use_relu = true)
{
 return tf_with(tf.variable_scope(name), delegate
     {
      var in_dim = x.shape[1];

      var W = weight_variable("W_" + name, shape: new[] { in_dim, num_units });
      var b = bias_variable("b_" + name, new[] { num_units });

      var layer = tf.matmul(x, W) + b;
      if (use_relu)
       layer = tf.nn.relu(layer);

      return layer;
     });
}
#endregion
模型训练和模型保存
Batch数据集的读取,采用了 SharpCV 的cv2.imread,可以直接读取本地图像文件至NDArray,实现CV和Numpy的无缝对接;
使用.NET的异步线程安全队列BlockingCollection<T>,实现TensorFlow原生的队列管理器FIFOQueue;
在训练模型的时候,我们需要将样本从硬盘读取到内存之后,才能进行训练。我们在会话中运行多个线程,并加入队列管理器进行线程间的文件入队出队操作,并限制队列容量,主线程可以利用队列中的数据进行训练,另一个线程进行本地文件的IO读取,这样可以实现数据的读取和模型的训练是异步的,降低训练时间。
模型的保存,可以选择每轮训练都保存,或最佳训练模型保存
#region Train
public void Train(Session sess)
{
 // Number of training iterations in each epoch
 var num_tr_iter = (ArrayLabel_Train.Length) / batch_size;

 var init = tf.global_variables_initializer();
 sess.run(init);

 var saver = tf.train.Saver(tf.global_variables(), max_to_keep: 10);

 path_model = Name + "\\MODEL";
 Directory.CreateDirectory(path_model);

 float loss_val = 100.0f;
 float accuracy_val = 0f;

 var sw = new Stopwatch();
 sw.Start();
 foreach (var epoch in range(epochs))
 {
  print($"Training epoch: {epoch + 1}");
  // Randomly shuffle the training data at the beginning of each epoch
  (ArrayFileName_Train, ArrayLabel_Train) = ShuffleArray(ArrayLabel_Train.Length, ArrayFileName_Train, ArrayLabel_Train);
  y_train = np.eye(Dict_Label.Count)[new NDArray(ArrayLabel_Train)];

  //decay learning rate
  if (learning_rate_step != 0)
  {
   if ((epoch != 0) && (epoch % learning_rate_step == 0))
   {
    learning_rate_base = learning_rate_base * learning_rate_decay;
    if (learning_rate_base <= learning_rate_min) { learning_rate_base = learning_rate_min; }
    sess.run(tf.assign(learning_rate, learning_rate_base));
   }
  }

  //Load local images asynchronously,use queue,improve train efficiency
  BlockingCollection<(NDArray c_x, NDArray c_y, int iter)> BlockC = new BlockingCollection<(NDArray C1, NDArray C2, int iter)>(TrainQueueCapa);
  Task.Run(() =>
     {
      foreach (var iteration in range(num_tr_iter))
      {
       var start = iteration * batch_size;
       var end = (iteration + 1) * batch_size;
       (NDArray x_batch, NDArray y_batch) = GetNextBatch(sess, ArrayFileName_Train, y_train, start, end);
       BlockC.Add((x_batch, y_batch, iteration));
      }
      BlockC.CompleteAdding();
     });

  foreach (var item in BlockC.GetConsumingEnumerable())
  {
   sess.run(optimizer, (x, item.c_x), (y, item.c_y));

   if (item.iter % display_freq == 0)
   {
    // Calculate and display the batch loss and accuracy
    var result = sess.run(new[] { loss, accuracy }, new FeedItem(x, item.c_x), new FeedItem(y, item.c_y));
    loss_val = result[0];
    accuracy_val = result[1];
    print("CNN:" + ($"iter {item.iter.ToString("000")}: Loss={loss_val.ToString("0.0000")}, Training Accuracy={accuracy_val.ToString("P")} {sw.ElapsedMilliseconds}ms"));
    sw.Restart();
   }
  }

  // Run validation after every epoch
  (loss_val, accuracy_val) = sess.run((loss, accuracy), (x, x_valid), (y, y_valid));
  print("CNN:" + "---------------------------------------------------------");
  print("CNN:" + $"gloabl steps: {sess.run(gloabl_steps) },learning rate: {sess.run(learning_rate)}, validation loss: {loss_val.ToString("0.0000")}, validation accuracy: {accuracy_val.ToString("P")}");
  print("CNN:" + "---------------------------------------------------------");

  if (SaverBest)
  {
   if (accuracy_val > max_accuracy)
   {
    max_accuracy = accuracy_val;
    saver.save(sess, path_model + "\\CNN_Best");
    print("CKPT Model is save.");
   }
  }
  else
  {
   saver.save(sess, path_model + string.Format("\\CNN_Epoch_{0}_Loss_{1}_Acc_{2}", epoch, loss_val, accuracy_val));
   print("CKPT Model is save.");
  }
 }
 Write_Dictionary(path_model + "\\dic.txt", Dict_Label);
}
private void Write_Dictionary(string path, Dictionary<Int64, string> mydic)
{
 FileStream fs = new FileStream(path, FileMode.Create);
 StreamWriter sw = new StreamWriter(fs);
 foreach (var d in mydic) { sw.Write(d.Key + "," + d.Value + "\r\n"); }
 sw.Flush();
 sw.Close();
 fs.Close();
 print("Write_Dictionary");
}
private (NDArray, NDArray) Randomize(NDArray x, NDArray y)
{
 var perm = np.random.permutation(y.shape[0]);
 np.random.shuffle(perm);
 return (x[perm], y[perm]);
}
private (NDArray, NDArray) GetNextBatch(NDArray x, NDArray y, int start, int end)
{
 var slice = new Slice(start, end);
 var x_batch = x[slice];
 var y_batch = y[slice];
 return (x_batch, y_batch);
}
private unsafe (NDArray, NDArray) GetNextBatch(Session sess, string[] x, NDArray y, int start, int end)
{
 NDArray x_batch = np.zeros(end - start, img_h, img_w, n_channels);
 int n = 0;
 for (int i = start; i < end; i++)
 {
  NDArray img4 = cv2.imread(x[i], IMREAD_COLOR.IMREAD_GRAYSCALE);
  x_batch[n] = sess.run(normalized, (decodeJpeg, img4));
  n++;
 }
 var slice = new Slice(start, end);
 var y_batch = y[slice];
 return (x_batch, y_batch);
}
#endregion
测试集预测
训练完成的模型对test数据集进行预测,并统计准确率
计算图中增加了一个提取预测结果Top-1的概率的节点,最后测试集预测的时候可以把详细的预测数据进行输出,方便实际工程中进行调试和优化。
public void Test(Session sess)
{
 (loss_test, accuracy_test) = sess.run((loss, accuracy), (x, x_test), (y, y_test));
 print("CNN:" + "---------------------------------------------------------");
 print("CNN:" + $"Test loss: {loss_test.ToString("0.0000")}, test accuracy: {accuracy_test.ToString("P")}");
 print("CNN:" + "---------------------------------------------------------");

 (Test_Cls, Test_Data) = sess.run((cls_prediction, prob), (x, x_test));

}
private void TestDataOutput()
{
 for (int i = 0; i < ArrayLabel_Test.Length; i++)
 {
  Int64 real = ArrayLabel_Test[i];
  int predict = (int)(Test_Cls[i]);
  var probability = Test_Data[i, predict];
  string result = (real == predict) ? "OK" : "NG";
  string fileName = ArrayFileName_Test[i];
  string real_str = Dict_Label[real];
  string predict_str = Dict_Label[predict];
  print((i + 1).ToString() + "|" + "result:" + result + "|" + "real_str:" + real_str + "|"
    + "predict_str:" + predict_str + "|" + "probability:" + probability.GetSingle().ToString() + "|"
    + "fileName:" + fileName);
 }
}
总结
本文主要是.NET下的TensorFlow在实际工业现场视觉检测项目中的应用,使用SciSharp的TensorFlow.NET构建了简单的CNN图像分类模型,该模型包含输入层、卷积与池化层、扁平化层、全连接层和输出层,这些层都是CNN分类模型的必要的层,针对工业现场的实际图像进行了分类,分类准确性较高。
完整代码可以直接用于大家自己的数据集进行训练,已经在工业现场经过大量测试,可以在GPU或CPU环境下运行,只需要更换tensorflow.dll文件即可实现训练环境的切换。
同时,训练完成的模型文件,可以使用 “CKPT+Meta” 或 冻结成“PB” 2种方式,进行现场的部署,模型部署和现场应用推理可以全部在.NET平台下进行,实现工业现场程序的无缝对接。摆脱了以往Python下 需要通过Flask搭建服务器进行数据通讯交互 的方式,现场部署应用时无需配置Python和TensorFlow的环境【无需对工业现场的原有PC升级安装一大堆环境】,整个过程全部使用传统的.NET的DLL引用的方式。
到此这篇关于C#使用TensorFlow.NET训练自己的数据集的方法的文章就介绍到这了,更多相关C# TensorFlow.NET训练数据集内容请搜索以前的文章或继续浏览下面的相关文章希望大家以后多多支持!
- c# 使用OpenCV识别硬币
- c#预处理指令分析
- C#中变量、常量、枚举、预处理器指令知多少
- C#中的预处理器指令详解
- C#预处理器指令的用法实例分析
- C#预处理指令之#line,#pragma warning 详细解析
- C#使用SQL Dataset数据集代码实例
- C#使用linq查询大数据集的方法
- C#中遍历DataSet数据集对象实例
- c# 预处理识别硬币的数据集

SSD-Tensorflow: 3 步运行 TensorFlow 单图片多盒目标检测器
昨天类似的 YOLO: https://www.v2ex.com/t/392671#reply0
下载这个项目
https://github.com/balancap/SSD-Tensorflow
解压 checkpoint files in ./checkpoint
unzip ssd_300_vgg.ckpt.zip
运行 jupyter 文件命令
jupyter notebook notebooks/ssd_notebook.ipynb
项目说明: http://www.tensorflownews.com/2017/09/22/ssd-single-shot-multibox-detector-in-tensorflow/
项目地址: https://github.com/balancap/SSD-Tensorflow
更多 TensorFlow 教程: http://www.tensorflownews.com
:训练自己的图片分类模型")
TensorFlow (十七):训练自己的图片分类模型
(一)下载 inception-v3-- 见 TensorFlow (十四)
(二)准备训练用的图片集,因为我没有图片集,所以写了个自动抓取百度图片的脚本 - 见抓取百度图片
(三)创建 retrain.py 文件,进行重训练。(因为之前遇到不同版本上的不同,遇到过坑,上源码)


# -*- coding: utf-8 -*-
# @Author : Felix Wang
# @time : 2018/6/27 11:46
# Copyright 2015 The TensorFlow Authors. All Rights Reserved.
#
# Licensed under the Apache License, Version 2.0 (the "License");
# you may not use this file except in compliance with the License.
# You may obtain a copy of the License at
#
# http://www.apache.org/licenses/LICENSE-2.0
#
# Unless required by applicable law or agreed to in writing, software
# distributed under the License is distributed on an "AS IS" BASIS,
# WITHOUT WARRANTIES OR CONDITIONS OF ANY KIND, either express or implied.
# See the License for the specific language governing permissions and
# limitations under the License.
# ==============================================================================
r"""Simple transfer learning with Inception v3 or Mobilenet models.
With support for TensorBoard.
This example shows how to take a Inception v3 or Mobilenet model trained on
ImageNet images, and train a new top layer that can recognize other classes of
images.
The top layer receives as input a 2048-dimensional vector (1001-dimensional for
Mobilenet) for each image. We train a softmax layer on top of this
representation. Assuming the softmax layer contains N labels, this corresponds
to learning N + 2048*N (or 1001*N) model parameters corresponding to the
learned biases and weights.
Here''s an example, which assumes you have a folder containing class-named
subfolders, each full of images for each label. The example folder flower_photos
should have a structure like this:
~/flower_photos/daisy/photo1.jpg
~/flower_photos/daisy/photo2.jpg
...
~/flower_photos/rose/anotherphoto77.jpg
...
~/flower_photos/sunflower/somepicture.jpg
The subfolder names are important, since they define what label is applied to
each image, but the filenames themselves don''t matter. Once your images are
prepared, you can run the training with a command like this:
bash:
bazel build tensorflow/examples/image_retraining:retrain && \
bazel-bin/tensorflow/examples/image_retraining/retrain \
--image_dir ~/flower_photos
Or, if you have a pip installation of tensorflow, `retrain.py` can be run
without bazel:
bash:
python tensorflow/examples/image_retraining/retrain.py \
--image_dir ~/flower_photos
You can replace the image_dir argument with any folder containing subfolders of
images. The label for each image is taken from the name of the subfolder it''s
in.
This produces a new model file that can be loaded and run by any TensorFlow
program, for example the label_image sample code.
By default this script will use the high accuracy, but comparatively large and
slow Inception v3 model architecture. It''s recommended that you start with this
to validate that you have gathered good training data, but if you want to deploy
on resource-limited platforms, you can try the `--architecture` flag with a
Mobilenet model. For example:
bash:
python tensorflow/examples/image_retraining/retrain.py \
--image_dir ~/flower_photos --architecture mobilenet_1.0_224
There are 32 different Mobilenet models to choose from, with a variety of file
size and latency options. The first number can be ''1.0'', ''0.75'', ''0.50'', or
''0.25'' to control the size, and the second controls the input image size, either
''224'', ''192'', ''160'', or ''128'', with smaller sizes running faster. See
https://research.googleblog.com/2017/06/mobilenets-open-source-models-for.html
for more information on Mobilenet.
To use with TensorBoard:
By default, this script will log summaries to /tmp/retrain_logs directory
Visualize the summaries with this command:
tensorboard --logdir /tmp/retrain_logs
"""
from __future__ import absolute_import
from __future__ import division
from __future__ import print_function
import argparse
from datetime import datetime
import hashlib
import os.path
import random
import re
import sys
import tarfile
import numpy as np
from six.moves import urllib
import tensorflow as tf
from tensorflow.python.framework import graph_util
from tensorflow.python.framework import tensor_shape
from tensorflow.python.platform import gfile
from tensorflow.python.util import compat
FLAGS = None
# These are all parameters that are tied to the particular model architecture
# we''re using for Inception v3. These include things like tensor names and their
# sizes. If you want to adapt this script to work with another model, you will
# need to update these to reflect the values in the network you''re using.
MAX_NUM_IMAGES_PER_CLASS = 2 ** 27 - 1 # ~134M
def create_image_lists(image_dir, testing_percentage, validation_percentage):
"""Builds a list of training images from the file system.
Analyzes the sub folders in the image directory, splits them into stable
training, testing, and validation sets, and returns a data structure
describing the lists of images for each label and their paths.
Args:
image_dir: String path to a folder containing subfolders of images.
testing_percentage: Integer percentage of the images to reserve for tests.
validation_percentage: Integer percentage of images reserved for validation.
Returns:
A dictionary containing an entry for each label subfolder, with images split
into training, testing, and validation sets within each label.
"""
if not gfile.Exists(image_dir):
tf.logging.error("Image directory ''" + image_dir + "'' not found.")
return None
result = {}
sub_dirs = [x[0] for x in gfile.Walk(image_dir)]
# The root directory comes first, so skip it.
is_root_dir = True
for sub_dir in sub_dirs:
if is_root_dir:
is_root_dir = False
continue
extensions = [''jpg'', ''jpeg'', ''JPG'', ''JPEG'']
file_list = []
dir_name = os.path.basename(sub_dir)
if dir_name == image_dir:
continue
tf.logging.info("Looking for images in ''" + dir_name + "''")
for extension in extensions:
file_glob = os.path.join(image_dir, dir_name, ''*.'' + extension)
file_list.extend(gfile.Glob(file_glob))
if not file_list:
tf.logging.warning(''No files found'')
continue
if len(file_list) < 20:
tf.logging.warning(
''WARNING: Folder has less than 20 images, which may cause issues.'')
elif len(file_list) > MAX_NUM_IMAGES_PER_CLASS:
tf.logging.warning(
''WARNING: Folder {} has more than {} images. Some images will ''
''never be selected.''.format(dir_name, MAX_NUM_IMAGES_PER_CLASS))
label_name = re.sub(r''[^a-z0-9]+'', '' '', dir_name.lower())
training_images = []
testing_images = []
validation_images = []
for file_name in file_list:
base_name = os.path.basename(file_name)
# We want to ignore anything after ''_nohash_'' in the file name when
# deciding which set to put an image in, the data set creator has a way of
# grouping photos that are close variations of each other. For example
# this is used in the plant disease data set to group multiple pictures of
# the same leaf.
hash_name = re.sub(r''_nohash_.*$'', '''', file_name)
# This looks a bit magical, but we need to decide whether this file should
# go into the training, testing, or validation sets, and we want to keep
# existing files in the same set even if more files are subsequently
# added.
# To do that, we need a stable way of deciding based on just the file name
# itself, so we do a hash of that and then use that to generate a
# probability value that we use to assign it.
hash_name_hashed = hashlib.sha1(compat.as_bytes(hash_name)).hexdigest()
percentage_hash = ((int(hash_name_hashed, 16) %
(MAX_NUM_IMAGES_PER_CLASS + 1)) *
(100.0 / MAX_NUM_IMAGES_PER_CLASS))
if percentage_hash < validation_percentage:
validation_images.append(base_name)
elif percentage_hash < (testing_percentage + validation_percentage):
testing_images.append(base_name)
else:
training_images.append(base_name)
result[label_name] = {
''dir'': dir_name,
''training'': training_images,
''testing'': testing_images,
''validation'': validation_images,
}
return result
def get_image_path(image_lists, label_name, index, image_dir, category):
""""Returns a path to an image for a label at the given index.
Args:
image_lists: Dictionary of training images for each label.
label_name: Label string we want to get an image for.
index: Int offset of the image we want. This will be moduloed by the
available number of images for the label, so it can be arbitrarily large.
image_dir: Root folder string of the subfolders containing the training
images.
category: Name string of set to pull images from - training, testing, or
validation.
Returns:
File system path string to an image that meets the requested parameters.
"""
if label_name not in image_lists:
tf.logging.fatal(''Label does not exist %s.'', label_name)
label_lists = image_lists[label_name]
if category not in label_lists:
tf.logging.fatal(''Category does not exist %s.'', category)
category_list = label_lists[category]
if not category_list:
tf.logging.fatal(''Label %s has no images in the category %s.'',
label_name, category)
mod_index = index % len(category_list)
base_name = category_list[mod_index]
sub_dir = label_lists[''dir'']
full_path = os.path.join(image_dir, sub_dir, base_name)
return full_path
def get_bottleneck_path(image_lists, label_name, index, bottleneck_dir,
category, architecture):
""""Returns a path to a bottleneck file for a label at the given index.
Args:
image_lists: Dictionary of training images for each label.
label_name: Label string we want to get an image for.
index: Integer offset of the image we want. This will be moduloed by the
available number of images for the label, so it can be arbitrarily large.
bottleneck_dir: Folder string holding cached files of bottleneck values.
category: Name string of set to pull images from - training, testing, or
validation.
architecture: The name of the model architecture.
Returns:
File system path string to an image that meets the requested parameters.
"""
return get_image_path(image_lists, label_name, index, bottleneck_dir,
category) + ''_'' + architecture + ''.txt''
def create_model_graph(model_info):
""""Creates a graph from saved GraphDef file and returns a Graph object.
Args:
model_info: Dictionary containing information about the model architecture.
Returns:
Graph holding the trained Inception network, and various tensors we''ll be
manipulating.
"""
with tf.Graph().as_default() as graph:
model_path = os.path.join(FLAGS.model_dir, model_info[''model_file_name''])
with gfile.FastGFile(model_path, ''rb'') as f:
graph_def = tf.GraphDef()
graph_def.ParseFromString(f.read())
bottleneck_tensor, resized_input_tensor = (tf.import_graph_def(
graph_def,
name='''',
return_elements=[
model_info[''bottleneck_tensor_name''],
model_info[''resized_input_tensor_name''],
]))
return graph, bottleneck_tensor, resized_input_tensor
def run_bottleneck_on_image(sess, image_data, image_data_tensor,
decoded_image_tensor, resized_input_tensor,
bottleneck_tensor):
"""Runs inference on an image to extract the ''bottleneck'' summary layer.
Args:
sess: Current active TensorFlow Session.
image_data: String of raw JPEG data.
image_data_tensor: Input data layer in the graph.
decoded_image_tensor: Output of initial image resizing and preprocessing.
resized_input_tensor: The input node of the recognition graph.
bottleneck_tensor: Layer before the final softmax.
Returns:
Numpy array of bottleneck values.
"""
# First decode the JPEG image, resize it, and rescale the pixel values.
resized_input_values = sess.run(decoded_image_tensor,
{image_data_tensor: image_data})
# Then run it through the recognition network.
bottleneck_values = sess.run(bottleneck_tensor,
{resized_input_tensor: resized_input_values})
bottleneck_values = np.squeeze(bottleneck_values)
return bottleneck_values
def maybe_download_and_extract(data_url):
"""Download and extract model tar file.
If the pretrained model we''re using doesn''t already exist, this function
downloads it from the TensorFlow.org website and unpacks it into a directory.
Args:
data_url: Web location of the tar file containing the pretrained model.
"""
dest_directory = FLAGS.model_dir
if not os.path.exists(dest_directory):
os.makedirs(dest_directory)
filename = data_url.split(''/'')[-1]
filepath = os.path.join(dest_directory, filename)
if not os.path.exists(filepath):
def _progress(count, block_size, total_size):
sys.stdout.write(''\r>> Downloading %s %.1f%%'' %
(filename,
float(count * block_size) / float(total_size) * 100.0))
sys.stdout.flush()
filepath, _ = urllib.request.urlretrieve(data_url, filepath, _progress)
print()
statinfo = os.stat(filepath)
tf.logging.info(''Successfully downloaded'', filename, statinfo.st_size,
''bytes.'')
tarfile.open(filepath, ''r:gz'').extractall(dest_directory)
def ensure_dir_exists(dir_name):
"""Makes sure the folder exists on disk.
Args:
dir_name: Path string to the folder we want to create.
"""
if not os.path.exists(dir_name):
os.makedirs(dir_name)
bottleneck_path_2_bottleneck_values = {}
def create_bottleneck_file(bottleneck_path, image_lists, label_name, index,
image_dir, category, sess, jpeg_data_tensor,
decoded_image_tensor, resized_input_tensor,
bottleneck_tensor):
"""Create a single bottleneck file."""
tf.logging.info(''Creating bottleneck at '' + bottleneck_path)
image_path = get_image_path(image_lists, label_name, index,
image_dir, category)
if not gfile.Exists(image_path):
tf.logging.fatal(''File does not exist %s'', image_path)
image_data = gfile.FastGFile(image_path, ''rb'').read()
try:
bottleneck_values = run_bottleneck_on_image(
sess, image_data, jpeg_data_tensor, decoded_image_tensor,
resized_input_tensor, bottleneck_tensor)
except Exception as e:
raise RuntimeError(''Error during processing file %s (%s)'' % (image_path,
str(e)))
bottleneck_string = '',''.join(str(x) for x in bottleneck_values)
with open(bottleneck_path, ''w'') as bottleneck_file:
bottleneck_file.write(bottleneck_string)
def get_or_create_bottleneck(sess, image_lists, label_name, index, image_dir,
category, bottleneck_dir, jpeg_data_tensor,
decoded_image_tensor, resized_input_tensor,
bottleneck_tensor, architecture):
"""Retrieves or calculates bottleneck values for an image.
If a cached version of the bottleneck data exists on-disk, return that,
otherwise calculate the data and save it to disk for future use.
Args:
sess: The current active TensorFlow Session.
image_lists: Dictionary of training images for each label.
label_name: Label string we want to get an image for.
index: Integer offset of the image we want. This will be modulo-ed by the
available number of images for the label, so it can be arbitrarily large.
image_dir: Root folder string of the subfolders containing the training
images.
category: Name string of which set to pull images from - training, testing,
or validation.
bottleneck_dir: Folder string holding cached files of bottleneck values.
jpeg_data_tensor: The tensor to feed loaded jpeg data into.
decoded_image_tensor: The output of decoding and resizing the image.
resized_input_tensor: The input node of the recognition graph.
bottleneck_tensor: The output tensor for the bottleneck values.
architecture: The name of the model architecture.
Returns:
Numpy array of values produced by the bottleneck layer for the image.
"""
label_lists = image_lists[label_name]
sub_dir = label_lists[''dir'']
sub_dir_path = os.path.join(bottleneck_dir, sub_dir)
ensure_dir_exists(sub_dir_path)
bottleneck_path = get_bottleneck_path(image_lists, label_name, index,
bottleneck_dir, category, architecture)
if not os.path.exists(bottleneck_path):
create_bottleneck_file(bottleneck_path, image_lists, label_name, index,
image_dir, category, sess, jpeg_data_tensor,
decoded_image_tensor, resized_input_tensor,
bottleneck_tensor)
with open(bottleneck_path, ''r'') as bottleneck_file:
bottleneck_string = bottleneck_file.read()
did_hit_error = False
try:
bottleneck_values = [float(x) for x in bottleneck_string.split('','')]
except ValueError:
tf.logging.warning(''Invalid float found, recreating bottleneck'')
did_hit_error = True
if did_hit_error:
create_bottleneck_file(bottleneck_path, image_lists, label_name, index,
image_dir, category, sess, jpeg_data_tensor,
decoded_image_tensor, resized_input_tensor,
bottleneck_tensor)
with open(bottleneck_path, ''r'') as bottleneck_file:
bottleneck_string = bottleneck_file.read()
# Allow exceptions to propagate here, since they shouldn''t happen after a
# fresh creation
bottleneck_values = [float(x) for x in bottleneck_string.split('','')]
return bottleneck_values
def cache_bottlenecks(sess, image_lists, image_dir, bottleneck_dir,
jpeg_data_tensor, decoded_image_tensor,
resized_input_tensor, bottleneck_tensor, architecture):
"""Ensures all the training, testing, and validation bottlenecks are cached.
Because we''re likely to read the same image multiple times (if there are no
distortions applied during training) it can speed things up a lot if we
calculate the bottleneck layer values once for each image during
preprocessing, and then just read those cached values repeatedly during
training. Here we go through all the images we''ve found, calculate those
values, and save them off.
Args:
sess: The current active TensorFlow Session.
image_lists: Dictionary of training images for each label.
image_dir: Root folder string of the subfolders containing the training
images.
bottleneck_dir: Folder string holding cached files of bottleneck values.
jpeg_data_tensor: Input tensor for jpeg data from file.
decoded_image_tensor: The output of decoding and resizing the image.
resized_input_tensor: The input node of the recognition graph.
bottleneck_tensor: The penultimate output layer of the graph.
architecture: The name of the model architecture.
Returns:
Nothing.
"""
how_many_bottlenecks = 0
ensure_dir_exists(bottleneck_dir)
for label_name, label_lists in image_lists.items():
for category in [''training'', ''testing'', ''validation'']:
category_list = label_lists[category]
for index, unused_base_name in enumerate(category_list):
get_or_create_bottleneck(
sess, image_lists, label_name, index, image_dir, category,
bottleneck_dir, jpeg_data_tensor, decoded_image_tensor,
resized_input_tensor, bottleneck_tensor, architecture)
how_many_bottlenecks += 1
if how_many_bottlenecks % 100 == 0:
tf.logging.info(
str(how_many_bottlenecks) + '' bottleneck files created.'')
def get_random_cached_bottlenecks(sess, image_lists, how_many, category,
bottleneck_dir, image_dir, jpeg_data_tensor,
decoded_image_tensor, resized_input_tensor,
bottleneck_tensor, architecture):
"""Retrieves bottleneck values for cached images.
If no distortions are being applied, this function can retrieve the cached
bottleneck values directly from disk for images. It picks a random set of
images from the specified category.
Args:
sess: Current TensorFlow Session.
image_lists: Dictionary of training images for each label.
how_many: If positive, a random sample of this size will be chosen.
If negative, all bottlenecks will be retrieved.
category: Name string of which set to pull from - training, testing, or
validation.
bottleneck_dir: Folder string holding cached files of bottleneck values.
image_dir: Root folder string of the subfolders containing the training
images.
jpeg_data_tensor: The layer to feed jpeg image data into.
decoded_image_tensor: The output of decoding and resizing the image.
resized_input_tensor: The input node of the recognition graph.
bottleneck_tensor: The bottleneck output layer of the CNN graph.
architecture: The name of the model architecture.
Returns:
List of bottleneck arrays, their corresponding ground truths, and the
relevant filenames.
"""
class_count = len(image_lists.keys())
bottlenecks = []
ground_truths = []
filenames = []
if how_many >= 0:
# Retrieve a random sample of bottlenecks.
for unused_i in range(how_many):
label_index = random.randrange(class_count)
label_name = list(image_lists.keys())[label_index]
image_index = random.randrange(MAX_NUM_IMAGES_PER_CLASS + 1)
image_name = get_image_path(image_lists, label_name, image_index,
image_dir, category)
bottleneck = get_or_create_bottleneck(
sess, image_lists, label_name, image_index, image_dir, category,
bottleneck_dir, jpeg_data_tensor, decoded_image_tensor,
resized_input_tensor, bottleneck_tensor, architecture)
ground_truth = np.zeros(class_count, dtype=np.float32)
ground_truth[label_index] = 1.0
bottlenecks.append(bottleneck)
ground_truths.append(ground_truth)
filenames.append(image_name)
else:
# Retrieve all bottlenecks.
for label_index, label_name in enumerate(image_lists.keys()):
for image_index, image_name in enumerate(
image_lists[label_name][category]):
image_name = get_image_path(image_lists, label_name, image_index,
image_dir, category)
bottleneck = get_or_create_bottleneck(
sess, image_lists, label_name, image_index, image_dir, category,
bottleneck_dir, jpeg_data_tensor, decoded_image_tensor,
resized_input_tensor, bottleneck_tensor, architecture)
ground_truth = np.zeros(class_count, dtype=np.float32)
ground_truth[label_index] = 1.0
bottlenecks.append(bottleneck)
ground_truths.append(ground_truth)
filenames.append(image_name)
return bottlenecks, ground_truths, filenames
def get_random_distorted_bottlenecks(
sess, image_lists, how_many, category, image_dir, input_jpeg_tensor,
distorted_image, resized_input_tensor, bottleneck_tensor):
"""Retrieves bottleneck values for training images, after distortions.
If we''re training with distortions like crops, scales, or flips, we have to
recalculate the full model for every image, and so we can''t use cached
bottleneck values. Instead we find random images for the requested category,
run them through the distortion graph, and then the full graph to get the
bottleneck results for each.
Args:
sess: Current TensorFlow Session.
image_lists: Dictionary of training images for each label.
how_many: The integer number of bottleneck values to return.
category: Name string of which set of images to fetch - training, testing,
or validation.
image_dir: Root folder string of the subfolders containing the training
images.
input_jpeg_tensor: The input layer we feed the image data to.
distorted_image: The output node of the distortion graph.
resized_input_tensor: The input node of the recognition graph.
bottleneck_tensor: The bottleneck output layer of the CNN graph.
Returns:
List of bottleneck arrays and their corresponding ground truths.
"""
class_count = len(image_lists.keys())
bottlenecks = []
ground_truths = []
for unused_i in range(how_many):
label_index = random.randrange(class_count)
label_name = list(image_lists.keys())[label_index]
image_index = random.randrange(MAX_NUM_IMAGES_PER_CLASS + 1)
image_path = get_image_path(image_lists, label_name, image_index, image_dir,
category)
if not gfile.Exists(image_path):
tf.logging.fatal(''File does not exist %s'', image_path)
jpeg_data = gfile.FastGFile(image_path, ''rb'').read()
# Note that we materialize the distorted_image_data as a numpy array before
# sending running inference on the image. This involves 2 memory copies and
# might be optimized in other implementations.
distorted_image_data = sess.run(distorted_image,
{input_jpeg_tensor: jpeg_data})
bottleneck_values = sess.run(bottleneck_tensor,
{resized_input_tensor: distorted_image_data})
bottleneck_values = np.squeeze(bottleneck_values)
ground_truth = np.zeros(class_count, dtype=np.float32)
ground_truth[label_index] = 1.0
bottlenecks.append(bottleneck_values)
ground_truths.append(ground_truth)
return bottlenecks, ground_truths
def should_distort_images(flip_left_right, random_crop, random_scale,
random_brightness):
"""Whether any distortions are enabled, from the input flags.
Args:
flip_left_right: Boolean whether to randomly mirror images horizontally.
random_crop: Integer percentage setting the total margin used around the
crop box.
random_scale: Integer percentage of how much to vary the scale by.
random_brightness: Integer range to randomly multiply the pixel values by.
Returns:
Boolean value indicating whether any distortions should be applied.
"""
return (flip_left_right or (random_crop != 0) or (random_scale != 0) or
(random_brightness != 0))
def add_input_distortions(flip_left_right, random_crop, random_scale,
random_brightness, input_width, input_height,
input_depth, input_mean, input_std):
"""Creates the operations to apply the specified distortions.
During training it can help to improve the results if we run the images
through simple distortions like crops, scales, and flips. These reflect the
kind of variations we expect in the real world, and so can help train the
model to cope with natural data more effectively. Here we take the supplied
parameters and construct a network of operations to apply them to an image.
Cropping
~~~~~~~~
Cropping is done by placing a bounding box at a random position in the full
image. The cropping parameter controls the size of that box relative to the
input image. If it''s zero, then the box is the same size as the input and no
cropping is performed. If the value is 50%, then the crop box will be half the
width and height of the input. In a diagram it looks like this:
< width >
+---------------------+
| |
| width - crop% |
| < > |
| +------+ |
| | | |
| | | |
| | | |
| +------+ |
| |
| |
+---------------------+
Scaling
~~~~~~~
Scaling is a lot like cropping, except that the bounding box is always
centered and its size varies randomly within the given range. For example if
the scale percentage is zero, then the bounding box is the same size as the
input and no scaling is applied. If it''s 50%, then the bounding box will be in
a random range between half the width and height and full size.
Args:
flip_left_right: Boolean whether to randomly mirror images horizontally.
random_crop: Integer percentage setting the total margin used around the
crop box.
random_scale: Integer percentage of how much to vary the scale by.
random_brightness: Integer range to randomly multiply the pixel values by.
graph.
input_width: Horizontal size of expected input image to model.
input_height: Vertical size of expected input image to model.
input_depth: How many channels the expected input image should have.
input_mean: Pixel value that should be zero in the image for the graph.
input_std: How much to divide the pixel values by before recognition.
Returns:
The jpeg input layer and the distorted result tensor.
"""
jpeg_data = tf.placeholder(tf.string, name=''DistortJPGInput'')
decoded_image = tf.image.decode_jpeg(jpeg_data, channels=input_depth)
decoded_image_as_float = tf.cast(decoded_image, dtype=tf.float32)
decoded_image_4d = tf.expand_dims(decoded_image_as_float, 0)
margin_scale = 1.0 + (random_crop / 100.0)
resize_scale = 1.0 + (random_scale / 100.0)
margin_scale_value = tf.constant(margin_scale)
resize_scale_value = tf.random_uniform(tensor_shape.scalar(),
minval=1.0,
maxval=resize_scale)
scale_value = tf.multiply(margin_scale_value, resize_scale_value)
precrop_width = tf.multiply(scale_value, input_width)
precrop_height = tf.multiply(scale_value, input_height)
precrop_shape = tf.stack([precrop_height, precrop_width])
precrop_shape_as_int = tf.cast(precrop_shape, dtype=tf.int32)
precropped_image = tf.image.resize_bilinear(decoded_image_4d,
precrop_shape_as_int)
precropped_image_3d = tf.squeeze(precropped_image, squeeze_dims=[0])
cropped_image = tf.random_crop(precropped_image_3d,
[input_height, input_width, input_depth])
if flip_left_right:
flipped_image = tf.image.random_flip_left_right(cropped_image)
else:
flipped_image = cropped_image
brightness_min = 1.0 - (random_brightness / 100.0)
brightness_max = 1.0 + (random_brightness / 100.0)
brightness_value = tf.random_uniform(tensor_shape.scalar(),
minval=brightness_min,
maxval=brightness_max)
brightened_image = tf.multiply(flipped_image, brightness_value)
offset_image = tf.subtract(brightened_image, input_mean)
mul_image = tf.multiply(offset_image, 1.0 / input_std)
distort_result = tf.expand_dims(mul_image, 0, name=''DistortResult'')
return jpeg_data, distort_result
def variable_summaries(var):
"""Attach a lot of summaries to a Tensor (for TensorBoard visualization)."""
with tf.name_scope(''summaries''):
mean = tf.reduce_mean(var)
tf.summary.scalar(''mean'', mean)
with tf.name_scope(''stddev''):
stddev = tf.sqrt(tf.reduce_mean(tf.square(var - mean)))
tf.summary.scalar(''stddev'', stddev)
tf.summary.scalar(''max'', tf.reduce_max(var))
tf.summary.scalar(''min'', tf.reduce_min(var))
tf.summary.histogram(''histogram'', var)
def add_final_training_ops(class_count, final_tensor_name, bottleneck_tensor,
bottleneck_tensor_size):
"""Adds a new softmax and fully-connected layer for training.
We need to retrain the top layer to identify our new classes, so this function
adds the right operations to the graph, along with some variables to hold the
weights, and then sets up all the gradients for the backward pass.
The set up for the softmax and fully-connected layers is based on:
https://www.tensorflow.org/versions/master/tutorials/mnist/beginners/index.html
Args:
class_count: Integer of how many categories of things we''re trying to
recognize.
final_tensor_name: Name string for the new final node that produces results.
bottleneck_tensor: The output of the main CNN graph.
bottleneck_tensor_size: How many entries in the bottleneck vector.
Returns:
The tensors for the training and cross entropy results, and tensors for the
bottleneck input and ground truth input.
"""
with tf.name_scope(''input''):
bottleneck_input = tf.placeholder_with_default(
bottleneck_tensor,
shape=[None, bottleneck_tensor_size],
name=''BottleneckInputPlaceholder'')
ground_truth_input = tf.placeholder(tf.float32,
[None, class_count],
name=''GroundTruthInput'')
# Organizing the following ops as `final_training_ops` so they''re easier
# to see in TensorBoard
layer_name = ''final_training_ops''
with tf.name_scope(layer_name):
with tf.name_scope(''weights''):
initial_value = tf.truncated_normal(
[bottleneck_tensor_size, class_count], stddev=0.001)
layer_weights = tf.Variable(initial_value, name=''final_weights'')
variable_summaries(layer_weights)
with tf.name_scope(''biases''):
layer_biases = tf.Variable(tf.zeros([class_count]), name=''final_biases'')
variable_summaries(layer_biases)
with tf.name_scope(''Wx_plus_b''):
logits = tf.matmul(bottleneck_input, layer_weights) + layer_biases
tf.summary.histogram(''pre_activations'', logits)
final_tensor = tf.nn.softmax(logits, name=final_tensor_name)
tf.summary.histogram(''activations'', final_tensor)
with tf.name_scope(''cross_entropy''):
cross_entropy = tf.nn.softmax_cross_entropy_with_logits(
labels=ground_truth_input, logits=logits)
with tf.name_scope(''total''):
cross_entropy_mean = tf.reduce_mean(cross_entropy)
tf.summary.scalar(''cross_entropy'', cross_entropy_mean)
with tf.name_scope(''train''):
optimizer = tf.train.GradientDescentOptimizer(FLAGS.learning_rate)
train_step = optimizer.minimize(cross_entropy_mean)
return (train_step, cross_entropy_mean, bottleneck_input, ground_truth_input,
final_tensor)
def add_evaluation_step(result_tensor, ground_truth_tensor):
"""Inserts the operations we need to evaluate the accuracy of our results.
Args:
result_tensor: The new final node that produces results.
ground_truth_tensor: The node we feed ground truth data
into.
Returns:
Tuple of (evaluation step, prediction).
"""
with tf.name_scope(''accuracy''):
with tf.name_scope(''correct_prediction''):
prediction = tf.argmax(result_tensor, 1)
correct_prediction = tf.equal(
prediction, tf.argmax(ground_truth_tensor, 1))
with tf.name_scope(''accuracy''):
evaluation_step = tf.reduce_mean(tf.cast(correct_prediction, tf.float32))
tf.summary.scalar(''accuracy'', evaluation_step)
return evaluation_step, prediction
def save_graph_to_file(sess, graph, graph_file_name):
output_graph_def = graph_util.convert_variables_to_constants(
sess, graph.as_graph_def(), [FLAGS.final_tensor_name])
with gfile.FastGFile(graph_file_name, ''wb'') as f:
f.write(output_graph_def.SerializeToString())
return
def prepare_file_system():
# Setup the directory we''ll write summaries to for TensorBoard
if tf.gfile.Exists(FLAGS.summaries_dir):
tf.gfile.DeleteRecursively(FLAGS.summaries_dir)
tf.gfile.MakeDirs(FLAGS.summaries_dir)
if FLAGS.intermediate_store_frequency > 0:
ensure_dir_exists(FLAGS.intermediate_output_graphs_dir)
return
def create_model_info(architecture):
"""Given the name of a model architecture, returns information about it.
There are different base image recognition pretrained models that can be
retrained using transfer learning, and this function translates from the name
of a model to the attributes that are needed to download and train with it.
Args:
architecture: Name of a model architecture.
Returns:
Dictionary of information about the model, or None if the name isn''t
recognized
Raises:
ValueError: If architecture name is unknown.
"""
architecture = architecture.lower()
if architecture == ''inception_v3'':
# pylint: disable=line-too-long
data_url = ''http://download.tensorflow.org/models/image/imagenet/inception-2015-12-05.tgz''
# pylint: enable=line-too-long
bottleneck_tensor_name = ''pool_3/_reshape:0''
bottleneck_tensor_size = 2048
input_width = 299
input_height = 299
input_depth = 3
resized_input_tensor_name = ''Mul:0''
model_file_name = ''classify_image_graph_def.pb''
input_mean = 128
input_std = 128
elif architecture.startswith(''mobilenet_''):
parts = architecture.split(''_'')
if len(parts) != 3 and len(parts) != 4:
tf.logging.error("Couldn''t understand architecture name ''%s''",
architecture)
return None
version_string = parts[1]
if (version_string != ''1.0'' and version_string != ''0.75'' and
version_string != ''0.50'' and version_string != ''0.25''):
tf.logging.error(
""""The Mobilenet version should be ''1.0'', ''0.75'', ''0.50'', or ''0.25'',
but found ''%s'' for architecture ''%s''""",
version_string, architecture)
return None
size_string = parts[2]
if (size_string != ''224'' and size_string != ''192'' and
size_string != ''160'' and size_string != ''128''):
tf.logging.error(
"""The Mobilenet input size should be ''224'', ''192'', ''160'', or ''128'',
but found ''%s'' for architecture ''%s''""",
size_string, architecture)
return None
if len(parts) == 3:
is_quantized = False
else:
if parts[3] != ''quantized'':
tf.logging.error(
"Couldn''t understand architecture suffix ''%s'' for ''%s''", parts[3],
architecture)
return None
is_quantized = True
data_url = ''http://download.tensorflow.org/models/mobilenet_v1_''
data_url += version_string + ''_'' + size_string + ''_frozen.tgz''
bottleneck_tensor_name = ''MobilenetV1/Predictions/Reshape:0''
bottleneck_tensor_size = 1001
input_width = int(size_string)
input_height = int(size_string)
input_depth = 3
resized_input_tensor_name = ''input:0''
if is_quantized:
model_base_name = ''quantized_graph.pb''
else:
model_base_name = ''frozen_graph.pb''
model_dir_name = ''mobilenet_v1_'' + version_string + ''_'' + size_string
model_file_name = os.path.join(model_dir_name, model_base_name)
input_mean = 127.5
input_std = 127.5
else:
tf.logging.error("Couldn''t understand architecture name ''%s''", architecture)
raise ValueError(''Unknown architecture'', architecture)
return {
''data_url'': data_url,
''bottleneck_tensor_name'': bottleneck_tensor_name,
''bottleneck_tensor_size'': bottleneck_tensor_size,
''input_width'': input_width,
''input_height'': input_height,
''input_depth'': input_depth,
''resized_input_tensor_name'': resized_input_tensor_name,
''model_file_name'': model_file_name,
''input_mean'': input_mean,
''input_std'': input_std,
}
def add_jpeg_decoding(input_width, input_height, input_depth, input_mean,
input_std):
"""Adds operations that perform JPEG decoding and resizing to the graph..
Args:
input_width: Desired width of the image fed into the recognizer graph.
input_height: Desired width of the image fed into the recognizer graph.
input_depth: Desired channels of the image fed into the recognizer graph.
input_mean: Pixel value that should be zero in the image for the graph.
input_std: How much to divide the pixel values by before recognition.
Returns:
Tensors for the node to feed JPEG data into, and the output of the
preprocessing steps.
"""
jpeg_data = tf.placeholder(tf.string, name=''DecodeJPGInput'')
decoded_image = tf.image.decode_jpeg(jpeg_data, channels=input_depth)
decoded_image_as_float = tf.cast(decoded_image, dtype=tf.float32)
decoded_image_4d = tf.expand_dims(decoded_image_as_float, 0)
resize_shape = tf.stack([input_height, input_width])
resize_shape_as_int = tf.cast(resize_shape, dtype=tf.int32)
resized_image = tf.image.resize_bilinear(decoded_image_4d,
resize_shape_as_int)
offset_image = tf.subtract(resized_image, input_mean)
mul_image = tf.multiply(offset_image, 1.0 / input_std)
return jpeg_data, mul_image
def main(_):
# Needed to make sure the logging output is visible.
# See https://github.com/tensorflow/tensorflow/issues/3047
tf.logging.set_verbosity(tf.logging.INFO)
# Prepare necessary directories that can be used during training
prepare_file_system()
# Gather information about the model architecture we''ll be using.
model_info = create_model_info(FLAGS.architecture)
if not model_info:
tf.logging.error(''Did not recognize architecture flag'')
return -1
# Set up the pre-trained graph.
maybe_download_and_extract(model_info[''data_url''])
graph, bottleneck_tensor, resized_image_tensor = (
create_model_graph(model_info))
# Look at the folder structure, and create lists of all the images.
image_lists = create_image_lists(FLAGS.image_dir, FLAGS.testing_percentage,
FLAGS.validation_percentage)
class_count = len(image_lists.keys())
if class_count == 0:
tf.logging.error(''No valid folders of images found at '' + FLAGS.image_dir)
return -1
if class_count == 1:
tf.logging.error(''Only one valid folder of images found at '' +
FLAGS.image_dir +
'' - multiple classes are needed for classification.'')
return -1
# See if the command-line flags mean we''re applying any distortions.
do_distort_images = should_distort_images(
FLAGS.flip_left_right, FLAGS.random_crop, FLAGS.random_scale,
FLAGS.random_brightness)
with tf.Session(graph=graph) as sess:
# Set up the image decoding sub-graph.
jpeg_data_tensor, decoded_image_tensor = add_jpeg_decoding(
model_info[''input_width''], model_info[''input_height''],
model_info[''input_depth''], model_info[''input_mean''],
model_info[''input_std''])
if do_distort_images:
# We will be applying distortions, so setup the operations we''ll need.
(distorted_jpeg_data_tensor,
distorted_image_tensor) = add_input_distortions(
FLAGS.flip_left_right, FLAGS.random_crop, FLAGS.random_scale,
FLAGS.random_brightness, model_info[''input_width''],
model_info[''input_height''], model_info[''input_depth''],
model_info[''input_mean''], model_info[''input_std''])
else:
# We''ll make sure we''ve calculated the ''bottleneck'' image summaries and
# cached them on disk.
cache_bottlenecks(sess, image_lists, FLAGS.image_dir,
FLAGS.bottleneck_dir, jpeg_data_tensor,
decoded_image_tensor, resized_image_tensor,
bottleneck_tensor, FLAGS.architecture)
# Add the new layer that we''ll be training.
(train_step, cross_entropy, bottleneck_input, ground_truth_input,
final_tensor) = add_final_training_ops(
len(image_lists.keys()), FLAGS.final_tensor_name, bottleneck_tensor,
model_info[''bottleneck_tensor_size''])
# Create the operations we need to evaluate the accuracy of our new layer.
evaluation_step, prediction = add_evaluation_step(
final_tensor, ground_truth_input)
# Merge all the summaries and write them out to the summaries_dir
merged = tf.summary.merge_all()
train_writer = tf.summary.FileWriter(FLAGS.summaries_dir + ''/train'',
sess.graph)
validation_writer = tf.summary.FileWriter(
FLAGS.summaries_dir + ''/validation'')
# Set up all our weights to their initial default values.
init = tf.global_variables_initializer()
sess.run(init)
# Run the training for as many cycles as requested on the command line.
for i in range(FLAGS.how_many_training_steps):
# Get a batch of input bottleneck values, either calculated fresh every
# time with distortions applied, or from the cache stored on disk.
if do_distort_images:
(train_bottlenecks,
train_ground_truth) = get_random_distorted_bottlenecks(
sess, image_lists, FLAGS.train_batch_size, ''training'',
FLAGS.image_dir, distorted_jpeg_data_tensor,
distorted_image_tensor, resized_image_tensor, bottleneck_tensor)
else:
(train_bottlenecks,
train_ground_truth, _) = get_random_cached_bottlenecks(
sess, image_lists, FLAGS.train_batch_size, ''training'',
FLAGS.bottleneck_dir, FLAGS.image_dir, jpeg_data_tensor,
decoded_image_tensor, resized_image_tensor, bottleneck_tensor,
FLAGS.architecture)
# Feed the bottlenecks and ground truth into the graph, and run a training
# step. Capture training summaries for TensorBoard with the `merged` op.
train_summary, _ = sess.run(
[merged, train_step],
feed_dict={bottleneck_input: train_bottlenecks,
ground_truth_input: train_ground_truth})
train_writer.add_summary(train_summary, i)
# Every so often, print out how well the graph is training.
is_last_step = (i + 1 == FLAGS.how_many_training_steps)
if (i % FLAGS.eval_step_interval) == 0 or is_last_step:
train_accuracy, cross_entropy_value = sess.run(
[evaluation_step, cross_entropy],
feed_dict={bottleneck_input: train_bottlenecks,
ground_truth_input: train_ground_truth})
tf.logging.info(''%s: Step %d: Train accuracy = %.1f%%'' %
(datetime.now(), i, train_accuracy * 100))
tf.logging.info(''%s: Step %d: Cross entropy = %f'' %
(datetime.now(), i, cross_entropy_value))
validation_bottlenecks, validation_ground_truth, _ = (
get_random_cached_bottlenecks(
sess, image_lists, FLAGS.validation_batch_size, ''validation'',
FLAGS.bottleneck_dir, FLAGS.image_dir, jpeg_data_tensor,
decoded_image_tensor, resized_image_tensor, bottleneck_tensor,
FLAGS.architecture))
# Run a validation step and capture training summaries for TensorBoard
# with the `merged` op.
validation_summary, validation_accuracy = sess.run(
[merged, evaluation_step],
feed_dict={bottleneck_input: validation_bottlenecks,
ground_truth_input: validation_ground_truth})
validation_writer.add_summary(validation_summary, i)
tf.logging.info(''%s: Step %d: Validation accuracy = %.1f%% (N=%d)'' %
(datetime.now(), i, validation_accuracy * 100,
len(validation_bottlenecks)))
# Store intermediate results
intermediate_frequency = FLAGS.intermediate_store_frequency
if (intermediate_frequency > 0 and (i % intermediate_frequency == 0)
and i > 0):
intermediate_file_name = (FLAGS.intermediate_output_graphs_dir +
''intermediate_'' + str(i) + ''.pb'')
tf.logging.info(''Save intermediate result to : '' +
intermediate_file_name)
save_graph_to_file(sess, graph, intermediate_file_name)
# We''ve completed all our training, so run a final test evaluation on
# some new images we haven''t used before.
test_bottlenecks, test_ground_truth, test_filenames = (
get_random_cached_bottlenecks(
sess, image_lists, FLAGS.test_batch_size, ''testing'',
FLAGS.bottleneck_dir, FLAGS.image_dir, jpeg_data_tensor,
decoded_image_tensor, resized_image_tensor, bottleneck_tensor,
FLAGS.architecture))
test_accuracy, predictions = sess.run(
[evaluation_step, prediction],
feed_dict={bottleneck_input: test_bottlenecks,
ground_truth_input: test_ground_truth})
tf.logging.info(''Final test accuracy = %.1f%% (N=%d)'' %
(test_accuracy * 100, len(test_bottlenecks)))
if FLAGS.print_misclassified_test_images:
tf.logging.info(''=== MISCLASSIFIED TEST IMAGES ==='')
for i, test_filename in enumerate(test_filenames):
if predictions[i] != test_ground_truth[i].argmax():
tf.logging.info(''%70s %s'' %
(test_filename,
list(image_lists.keys())[predictions[i]]))
# Write out the trained graph and labels with the weights stored as
# constants.
save_graph_to_file(sess, graph, FLAGS.output_graph)
with gfile.FastGFile(FLAGS.output_labels, ''w'') as f:
f.write(''\n''.join(image_lists.keys()) + ''\n'')
if __name__ == ''__main__'':
parser = argparse.ArgumentParser()
parser.add_argument(
''--image_dir'',
type=str,
default='''',
help=''Path to folders of labeled images.''
)
parser.add_argument(
''--output_graph'',
type=str,
default=''/tmp/output_graph.pb'',
help=''Where to save the trained graph.''
)
parser.add_argument(
''--intermediate_output_graphs_dir'',
type=str,
default=''/tmp/intermediate_graph/'',
help=''Where to save the intermediate graphs.''
)
parser.add_argument(
''--intermediate_store_frequency'',
type=int,
default=0,
help="""\
How many steps to store intermediate graph. If "0" then will not
store.\
"""
)
parser.add_argument(
''--output_labels'',
type=str,
default=''/tmp/output_labels.txt'',
help=''Where to save the trained graph\''s labels.''
)
parser.add_argument(
''--summaries_dir'',
type=str,
default=''/tmp/retrain_logs'',
help=''Where to save summary logs for TensorBoard.''
)
parser.add_argument(
''--how_many_training_steps'',
type=int,
default=4000,
help=''How many training steps to run before ending.''
)
parser.add_argument(
''--learning_rate'',
type=float,
default=0.01,
help=''How large a learning rate to use when training.''
)
parser.add_argument(
''--testing_percentage'',
type=int,
default=10,
help=''What percentage of images to use as a test set.''
)
parser.add_argument(
''--validation_percentage'',
type=int,
default=10,
help=''What percentage of images to use as a validation set.''
)
parser.add_argument(
''--eval_step_interval'',
type=int,
default=10,
help=''How often to evaluate the training results.''
)
parser.add_argument(
''--train_batch_size'',
type=int,
default=100,
help=''How many images to train on at a time.''
)
parser.add_argument(
''--test_batch_size'',
type=int,
default=-1,
help="""\
How many images to test on. This test set is only used once, to evaluate
the final accuracy of the model after training completes.
A value of -1 causes the entire test set to be used, which leads to more
stable results across runs.\
"""
)
parser.add_argument(
''--validation_batch_size'',
type=int,
default=100,
help="""\
How many images to use in an evaluation batch. This validation set is
used much more often than the test set, and is an early indicator of how
accurate the model is during training.
A value of -1 causes the entire validation set to be used, which leads to
more stable results across training iterations, but may be slower on large
training sets.\
"""
)
parser.add_argument(
''--print_misclassified_test_images'',
default=False,
help="""\
Whether to print out a list of all misclassified test images.\
""",
action=''store_true''
)
parser.add_argument(
''--model_dir'',
type=str,
default=''/tmp/imagenet'',
help="""\
Path to classify_image_graph_def.pb,
imagenet_synset_to_human_label_map.txt, and
imagenet_2012_challenge_label_map_proto.pbtxt.\
"""
)
parser.add_argument(
''--bottleneck_dir'',
type=str,
default=''/tmp/bottleneck'',
help=''Path to cache bottleneck layer values as files.''
)
parser.add_argument(
''--final_tensor_name'',
type=str,
default=''final_result'',
help="""\
The name of the output classification layer in the retrained graph.\
"""
)
parser.add_argument(
''--flip_left_right'',
default=False,
help="""\
Whether to randomly flip half of the training images horizontally.\
""",
action=''store_true''
)
parser.add_argument(
''--random_crop'',
type=int,
default=0,
help="""\
A percentage determining how much of a margin to randomly crop off the
training images.\
"""
)
parser.add_argument(
''--random_scale'',
type=int,
default=0,
help="""\
A percentage determining how much to randomly scale up the size of the
training images by.\
"""
)
parser.add_argument(
''--random_brightness'',
type=int,
default=0,
help="""\
A percentage determining how much to randomly multiply the training image
input pixels up or down by.\
"""
)
parser.add_argument(
''--architecture'',
type=str,
default=''inception_v3'',
help="""\
Which model architecture to use. ''inception_v3'' is the most accurate, but
also the slowest. For faster or smaller models, chose a MobileNet with the
form ''mobilenet_<parameter size>_<input_size>[_quantized]''. For example,
''mobilenet_1.0_224'' will pick a model that is 17 MB in size and takes 224
pixel input images, while ''mobilenet_0.25_128_quantized'' will choose a much
less accurate, but smaller and faster network that''s 920 KB on disk and
takes 128x128 images. See https://research.googleblog.com/2017/06/mobilenets-open-source-models-for.html
for more information on Mobilenet.\
""")
FLAGS, unparsed = parser.parse_known_args()
tf.app.run(main=main, argv=[sys.argv[0]] + unparsed)(四)写一个.bat 的批处理文件


python C:/Users/FELIX/Desktop/tensor_study/retrain/d/retrain.py ^
--bottleneck_dir bottleneck ^
--how_many_training_steps 200 ^
--model_dir C:/Users/FELIX/Desktop/tensor_study/inception_model/ ^
--output_graph output_graph.pb ^
--output_labels output_labels.txt ^
--image_dir retain_img/imgs/
pause


注释:第一行为运行retrain.py脚本,路径为全路径
        第二行为训练节点的文件,自己在当前目录创建一个bottleneck文件夹
        第三行为训练次数,我默认训练200次,看自己要求
        第四行为inception-v3文件所在的目录
        第五行为输出训练模型的文件
        第六行为输出标签的文件
        第七行为训练图片的目录。(所有图片的所在文件夹都不能有大写)
注意:上面所有的路径中不能包含中文。(五)运行批处理文件后,模型自动训练。
训练完效果如下:
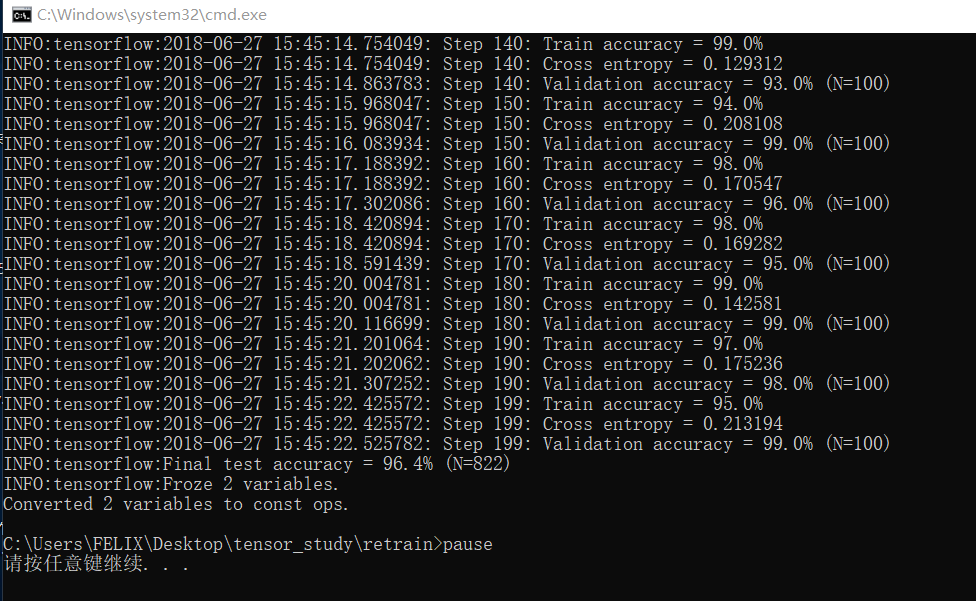
然后在当前文件夹下产生了一个模型文件和一个标签文件:
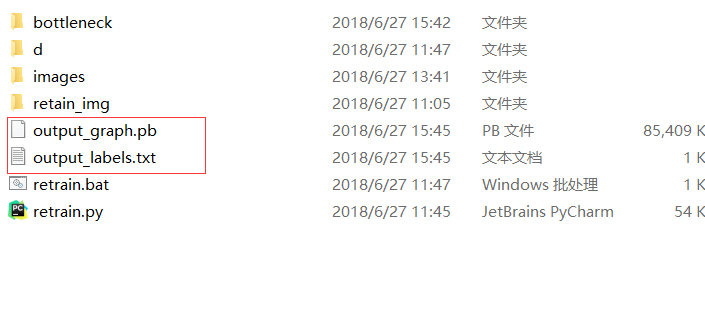
(六)检测模型的效果:


import tensorflow as tf
import os
import numpy as np
import re
from PIL import Image
import matplotlib.pyplot as plt


lines = tf.gfile.GFile(''retrain/output_labels.txt'').readlines() # 读取标签
uid_to_human = {}
#一行一行读取数据
for uid,line in enumerate(lines) :
    #去掉换行符
    line=line.strip(''\n'')
    uid_to_human[uid] = line

def id_to_string(node_id):
    if node_id not in uid_to_human:
        return ''''
    return uid_to_human[node_id]


#创建一个图来存放google训练好的模型
with tf.gfile.FastGFile(''retrain/output_graph.pb'', ''rb'') as f: # 读取模型
    graph_def = tf.GraphDef()
    graph_def.ParseFromString(f.read())
    tf.import_graph_def(graph_def, name='''')


with tf.Session() as sess:
    softmax_tensor = sess.graph.get_tensor_by_name(''final_result:0'')
    #遍历目录
    for root,dirs,files in os.walk(''retrain/images/''):  # 存放需要测试的图片的路径
        for file in files:
            #载入图片
            image_data = tf.gfile.FastGFile(os.path.join(root,file), ''rb'').read()
            predictions = sess.run(softmax_tensor,{''DecodeJpeg/contents:0'': image_data})#图片格式是jpg格式
            predictions = np.squeeze(predictions)#把结果转为1维数据

            #打印图片路径及名称
            image_path = os.path.join(root,file)
            print(image_path)
            #显示图片
            img=Image.open(image_path)
            plt.imshow(img)
            plt.axis(''off'')
            plt.show()

            #排序
            top_k = predictions.argsort()[::-1]
            print(top_k)
            for node_id in top_k:
                #获取分类名称
                human_string = id_to_string(node_id)
                #获取该分类的置信度
                score = predictions[node_id]
                print(''%s (score = %.5f)'' % (human_string, score))
print()最后的效果:从效果可以看出识别率还是挺高的。
retrain/images/1.jpg
[2 1 3 4 0]
guitar (score = 0.99594)
automobile (score = 0.00116)
house (score = 0.00107)
rabbit (score = 0.00105)
aircraft (score = 0.00078)

retrain/images/2.jpg
[2 1 0 3 4]
guitar (score = 0.97631)
automobile (score = 0.00619)
aircraft (score = 0.00588)
house (score = 0.00582)
rabbit (score = 0.00580)

retrain/images/3.jpeg
[4 1 3 2 0]
rabbit (score = 0.97687)
automobile (score = 0.00887)
house (score = 0.00531)
guitar (score = 0.00481)
aircraft (score = 0.00413)

retrain/images/4.jpg
[4 3 1 2 0]rabbit (score = 0.97040)
house (score = 0.00882)
automobile (score = 0.00788)
guitar (score = 0.00719)
aircraft (score = 0.00570)
retrain/images/5.jpg
[1 2 4 3 0]
automobile (score = 0.95874)
guitar (score = 0.01244)
rabbit (score = 0.01133)
house (score = 0.01015)
aircraft (score = 0.00734)

retrain/images/6.jpg
[3 1 4 2 0]
house (score = 0.96955)
automobile (score = 0.01128)
rabbit (score = 0.00844)
guitar (score = 0.00675)
aircraft (score = 0.00397)

retrain/images/7.jpg
[1 3 4 2 0]
automobile (score = 0.30635)
house (score = 0.30294)
rabbit (score = 0.22484)
guitar (score = 0.10563)
aircraft (score = 0.06024)

retrain/images/8.jpg
[0 4 1 2 3]
aircraft (score = 0.94436)
rabbit (score = 0.01547)
automobile (score = 0.01387)
guitar (score = 0.01333)
house (score = 0.01296)
我们今天的关于TensorFlow:用我自己的图像训练和用tensorflow对图像进行训练的分享就到这里,谢谢您的阅读,如果想了解更多关于21个项目玩转深度学习:基于TensorFlow的实践详解03—打造自己的图像识别模型、C#使用TensorFlow.NET训练自己的数据集的方法、SSD-Tensorflow: 3 步运行 TensorFlow 单图片多盒目标检测器、TensorFlow (十七):训练自己的图片分类模型的相关信息,可以在本站进行搜索。
本文将为您提供关于python的site-packages目录是什么?的详细介绍,我们还将为您解释python的site package的相关知识,同时,我们还将为您提供关于(pyasn1 0.1.6 (/usr/lib/python2.7/site-packages),、dist-packages 和 site-packages 有什么区别?、dist-packages和site-packages有什么区别?、django 的时区冲突错误 /usr/lib/python2.7/site-packages/...的实用信息。
本文目录一览:- python的site-packages目录是什么?(python的site package)
- (pyasn1 0.1.6 (/usr/lib/python2.7/site-packages),
- dist-packages 和 site-packages 有什么区别?
- dist-packages和site-packages有什么区别?
- django 的时区冲突错误 /usr/lib/python2.7/site-packages/...
")
python的site-packages目录是什么?(python的site package)
site-packages在各种与Python相关的文章中都提到了该目录。它是什么?如何使用它?
答案1
小编典典site-packages是手动构建的Python软件包的 目标目录 。从源代码构建和安装Python软件包时(使用 distutils
,可能通过执行python setup.py install),site-packages默认情况下会找到已安装的模块。
有标准位置:
- Unix(纯)1:
prefix/lib/pythonX.Y/site-packages - Unix(非纯):
exec-prefix/lib/pythonX.Y/site-packages - 视窗:
prefix\Lib\site-packages
1 Pure 表示该模块仅使用Python代码。 非纯 也可以包含C / C ++代码。
site-packages是默认情况下是Python 搜索路径的一部分 ,因此之后可以轻松导入在那里安装的模块。
有用的阅读
- 安装Python模块(适用于Python 2)
- 安装Python模块(适用于Python 3)
,")
(pyasn1 0.1.6 (/usr/lib/python2.7/site-packages),
ubuntu14.04 下安装爬虫工具 scrapy
scrapy 是目前准备要学习的爬虫框架,其在 ubuntu14.04 下的安装过程如下:
ubuntu14.04 下默认安装了 2.7 的 python 以及 setuptools,若未安装,可通过下面指令安装:
sudo apt-get install pythonsudo apt-get install python-setuptools然后安装 Twisted:
sudo apt-get install python-twisted然后是 Scrapy:
sudo apt-get install python-scrapy安装完成后,如果直接键入 scrapy 启动的话会报类似如下错误:
File "/usr/local/bin/scrapy", line 5, in <module>
    from pkg_resources import load_entry_point

......

pkg_resources.ContextualVersionConflict: (pyasn1 0.1.7 (/usr/lib/python2.7/dist-packages), Requirement.parse(''pyasn1>=0.1.8''), set([''pyasn1-modules'']))
按提示是个版本依赖的错误。
此时先安装 pip:
sudo apt-get install python-pip升级 pip:
sudo pip install --upgrade pip然后对提示的 pyasn1 升级:
sudo pip install --upgrade pyasn1再启动 scrapy 就可以成功了:
Scrapy 1.0.3 - no active project

Usage:
  scrapy <command> [options] [args]

Available commands:
  bench         Run quick benchmark test
  commands
  fetch         Fetch a URL using the Scrapy downloader
  runspider     Run a self-contained spider (without creating a project)
  settings      Get settings values
  shell         Interactive scraping console
  startproject  Create new project
  version       Print Scrapy version
  view          Open URL in browser, as seen by Scrapy

  [ more ]      More commands available when run from project directory

Use "scrapy <command> -h" to see more info about a command
dist-packages 和 site-packages 有什么区别?
我对 python 包安装过程有点恼火。具体来说,安装在 dist-packages 目录和 site-packages 目录中的包有什么区别?

dist-packages和site-packages有什么区别?
我对python软件包的安装过程有点不满意。具体来说,安装在dist-packages目录和site-packages目录中的软件包有什么区别?

django 的时区冲突错误 /usr/lib/python2.7/site-packages/...
这个错误大概不会影响你的一些主要功能,但是在终端会显示 warning 的。
错误的原因比较明显,就是 DateTimeField received a naive datetime while time zone support is active. 所谓的数据库中存储 DateTimeField 类型项的时候,收到一个本地的时间,但是 django 的时区是动态的(默认一般是 US 的时区)。
修这个 bug 很简单,就是在 settings.py 中,找到,将 USE_TZ 的值改为 False 就可以了:
# If you set this to False, Django will not use timezone-aware datetimes.
USE_TZ = False
关于python的site-packages目录是什么?和python的site package的介绍现已完结,谢谢您的耐心阅读,如果想了解更多关于(pyasn1 0.1.6 (/usr/lib/python2.7/site-packages),、dist-packages 和 site-packages 有什么区别?、dist-packages和site-packages有什么区别?、django 的时区冲突错误 /usr/lib/python2.7/site-packages/...的相关知识,请在本站寻找。
本文标签:


![[转帖]Ubuntu 安装 Wine方法(ubuntu如何安装wine)](https://www.gvkun.com/zb_users/cache/thumbs/4c83df0e2303284d68480d1b1378581d-180-120-1.jpg)

