在本文中,我们将带你了解get_dummies在这篇文章中,我们将为您详细介绍get_dummies的方方面面,并解答Pandas和OneHotEncoder常见的疑惑,同时我们还将给您一些技巧,以帮
在本文中,我们将带你了解get_dummies在这篇文章中,我们将为您详细介绍get_dummies的方方面面,并解答Pandas和OneHotEncoder常见的疑惑,同时我们还将给您一些技巧,以帮助您实现更有效的ci框架的优缺点是什么?、didChangeDependencies和initState之间的区别是什么?、get_dummies python jupyternotebook出现内存错误、Numpy、Pandas、Matplotlib、Keras、scikit-learn速查表。
本文目录一览:- get_dummies(Pandas)和OneHotEncoder(Scikit-learn)之间的优缺点是什么?(pandas的get_dummies的作用)
- ci框架的优缺点是什么?
- didChangeDependencies和initState之间的区别是什么?
- get_dummies python jupyternotebook出现内存错误
- Numpy、Pandas、Matplotlib、Keras、scikit-learn速查表
和OneHotEncoder(Scikit-learn)之间的优缺点是什么?(pandas的get_dummies的作用)")
get_dummies(Pandas)和OneHotEncoder(Scikit-learn)之间的优缺点是什么?(pandas的get_dummies的作用)
我正在学习将机器学习分类器将分类变量转换为数字的不同方法。我遇到了这种pd.get_dummies方法,sklearn.preprocessing.OneHotEncoder()我想看看它们在性能和用法上有何不同。
我发现关于如何使用教程OneHotEncoder()上https://xgdgsc.wordpress.com/2015/03/20/note-on-
using-onehotencoder-in-scikit-learn-to-work-on-categorical-
features/自该sklearn文档对该功能的帮助不是很大。我有一种感觉,我做得不正确…但是
有人能解释一下使用pd.dummiesover的利弊sklearn.preprocessing.OneHotEncoder()吗?我知道这OneHotEncoder()为您提供了一个稀疏矩阵,但除此之外,我不确定该如何使用以及该pandas方法有什么好处。我使用效率低下吗?
import pandas as pdimport numpy as npfrom sklearn.datasets import load_irissns.set()%matplotlib inline#Iris Plotiris = load_iris()n_samples, m_features = iris.data.shape#Load DataX, y = iris.data, iris.targetD_target_dummy = dict(zip(np.arange(iris.target_names.shape[0]), iris.target_names))DF_data = pd.DataFrame(X,columns=iris.feature_names)DF_data["target"] = pd.Series(y).map(D_target_dummy)#sepal length (cm) sepal width (cm) petal length (cm) petal width (cm) \#0 5.1 3.5 1.4 0.2 #1 4.9 3.0 1.4 0.2 #2 4.7 3.2 1.3 0.2 #3 4.6 3.1 1.5 0.2 #4 5.0 3.6 1.4 0.2 #5 5.4 3.9 1.7 0.4DF_dummies = pd.get_dummies(DF_data["target"])#setosa versicolor virginica#0 1 0 0#1 1 0 0#2 1 0 0#3 1 0 0#4 1 0 0#5 1 0 0from sklearn.preprocessing import OneHotEncoder, LabelEncoderdef f1(DF_data): Enc_ohe, Enc_label = OneHotEncoder(), LabelEncoder() DF_data["Dummies"] = Enc_label.fit_transform(DF_data["target"]) DF_dummies2 = pd.DataFrame(Enc_ohe.fit_transform(DF_data[["Dummies"]]).todense(), columns = Enc_label.classes_) return(DF_dummies2)%timeit pd.get_dummies(DF_data["target"])#1000 loops, best of 3: 777 µs per loop%timeit f1(DF_data)#100 loops, best of 3: 2.91 ms per loop答案1
小编典典OneHotEncoder无法直接处理字符串值。如果名义特征是字符串,则需要首先将它们映射为整数。
pandas.get_dummies相反。默认情况下,除非指定了列,否则它仅将字符串列转换为一键表示。

ci框架的优缺点是什么?

CI外文名为CodeIgniter,是一个小巧但功能强大的PHP框架,是一套给 PHP 网站开发者使用的应用程序开发框架和工具包。它提供一套丰富的标准库以及简单的接口和逻辑结构,其目的是使开发人员更快速地进行项目开发。
使用 CodeIgniter 可以减少代码的编写量,并将你的精力投入到项目的创造性开发上。
CodeIgniter(简称CI)框架的优缺点
-
优点:
框架配置简单,执行效率高,有基本的路由功能,能够进行一定程度的路由,有初步的layout功能,可以制作一定程度的界面外观,数据库功能封装的不错,具有MVC的功能,快速简洁,代码不多,简单易学,容易上手,适合php新人,用于小应用开发,学习成本低。文档详细。具有简单好用的library
-
缺点:
缺乏扩展能力,内部结构混乱,只能做小应用,对于中大型应该不能满足。设计模式简单。
更多相关知识,请访问 PHP中文网!!

didChangeDependencies和initState之间的区别是什么?
我是不熟悉的人,当我想在InitState中调用上下文时,会抛出一个错误:即将发生,BuildContext.inheritFromWidgetOfExactType 但随后我使用didChangeDependencies即可正常工作。
现在我有两个问题:
1-为什么我们不能在initState中调用上下文,但是didChangeDependencies没有问题?(因为我在官方文档中读过This methodis also called immediately after [initState],并且在build方法之前都将调用它们。)
2-为什么我们可以在build方法之外访问上下文(因为这里有build(BuildContextcontext),我们可以使用我们的上下文,但是在didChangeDependencies中我们没有类似的东西didChangeDependencies(BuildContextcontext),因此我们可以从哪里调用上下文来使用它)?
答案1
小编典典从状态加载其依赖项的那一刻起,我们就可以使用状态的上下文。
在调用build时,上下文可供我们使用,并作为参数传递。
现在继续前进,在状态加载其依赖项之前会调用initstate,因此,如果没有上下文可用,并且如果您在initstate中使用上下文,则会收到错误消息。但是,在状态加载其依赖关系后不久,didChangeDependencies就被调用,此时上下文可以使用,因此您可以在这里使用上下文。
但是,在调用build之前先调用它们。唯一的区别是,一个在状态加载其依赖项之前被调用,而另一个在状态加载其依赖项之后被调用。

get_dummies python jupyternotebook出现内存错误
如何解决get_dummies python jupyternotebook出现内存错误?
我正在尝试在大型数据集(220k行140列)上实现apriori算法,并且在数据集上使用get_dummies函数时遇到内存错误。 有什么方法可以减少数据帧单元的内存,以便该功能可以顺利运行?还是另一种解决方案? 我正在使用8G RAM笔记本电脑和64位处理器(1.8GHz)。在Jupyter Notebook中使用Python 3。 有什么建议?需要更多信息?让我知道。谢谢!
解决方法
暂无找到可以解决该程序问题的有效方法,小编努力寻找整理中!
如果你已经找到好的解决方法,欢迎将解决方案带上本链接一起发送给小编。
小编邮箱:dio#foxmail.com (将#修改为@)

Numpy、Pandas、Matplotlib、Keras、scikit-learn速查表
Numpy

Pandas

Matplotlib

Keras

Scikit-Learn
本篇文章由一文多发平台ArtiPub自动发布

我们今天的关于get_dummies和Pandas和OneHotEncoder的分享就到这里,谢谢您的阅读,如果想了解更多关于ci框架的优缺点是什么?、didChangeDependencies和initState之间的区别是什么?、get_dummies python jupyternotebook出现内存错误、Numpy、Pandas、Matplotlib、Keras、scikit-learn速查表的相关信息,可以在本站进行搜索。
本文将介绍排序Python`import x`和`from x import y`语句的正确方法是什么?的详细情况,特别是关于python import顺序的相关信息。我们将通过案例分析、数据研究等多种方式,帮助您更全面地了解这个主题,同时也将涉及一些关于isort 2.6.0 发布,Python 的 import 语句排序、mac os 使用 from scipy.misc import imread ImportError: cannot import name ''imread''、pycharm 有效!——关于python的包导入问题from . import失败,或者import找不到文件、python -v后出现import _frozen_importlib # frozen import _imp # builtin等一堆乱七八糟的内容的知识。
本文目录一览:- 排序Python`import x`和`from x import y`语句的正确方法是什么?(python import顺序)
- isort 2.6.0 发布,Python 的 import 语句排序
- mac os 使用 from scipy.misc import imread ImportError: cannot import name ''imread''
- pycharm 有效!——关于python的包导入问题from . import失败,或者import找不到文件
- python -v后出现import _frozen_importlib # frozen import _imp # builtin等一堆乱七八糟的内容
")
排序Python`import x`和`from x import y`语句的正确方法是什么?(python import顺序)
该蟒蛇风格指南建议对进口组这样的:
导入应按以下顺序分组:
- 标准库导入
- 相关第三方进口
- 本地应用程序/特定于库的导入
但是,它没有提及应如何布置两种不同的进口方式的内容:
from foo import barimport foo对它们进行排序有多种方法(假设所有这些导入都属于同一组):
首先
from..import,然后importfrom g import ggfrom x import xx
import abc
import def
import x首先
import,然后from..importimport abcimport def
import x
from g import gg
from x import xx按模块名称的字母顺序,忽略导入的类型
import abcimport def
from g import gg
import x
from xx import xx
PEP8没有提到此命令的首选顺序,某些IDE的“清理导入”功能可能只是该工具的开发人员所做的任何事情。
我正在寻找另一个PEP来澄清此问题,或从
BDFL(或另一个Python核心开发人员)
那里 获得相关的评论/电子邮件 。
请不要发布主观答案来说明您的个人偏好。
答案1
小编典典进口商品通常按字母顺序排序,并在PEP 8旁边的不同位置进行描述。
按字母顺序排序的模块更易于阅读和搜索 。毕竟python都是关于可读性的。同样,更容易验证是否导入了某些内容,并避免了重复的导入
PEP 8中没有关于排序的任何信息,因此所有关于选择所用内容的信息都是如此。
根据知名站点和存储库中也很少使用的参考文献,按字母顺序排序是这种方式。
例如:
import httplibimport loggingimport randomimport StringIOimport timeimport unittestfrom nova.api import openstackfrom nova.auth import usersfrom nova.endpoint import cloud要么
import a_standardimport b_standardimport a_third_partyimport b_third_partyfrom a_soc import ffrom a_soc import gfrom b_soc import dReddit官方存储库还指出,通常应使用PEP-8导入顺序。但是有一些补充是
for each imported group the order of imports should be:import <package>.<module> style lines in alphabetical orderfrom <package>.<module> import <symbol> style in alphabetical order参考文献:
- https://code.google.com/p/soc/wiki/PythonStyleGuide
- https://github.com/reddit/reddit/wiki/PythonImportGuidelines
- http://docs.openstack.org/developer/hacking/
- http://developer.plone.org/reference_manuals/external/plone.api/contribute/conventions.html#grouping-and-sorting
PS:isort实用程序会自动对您的导入进行排序。

isort 2.6.0 发布,Python 的 import 语句排序
isort 2.6.0 支持强制讲所有 imports 独立一行。
isort 可自动对 Python 的 import 语句进行排序和分段。可将大量的 import 结构转成非常适合阅读的排版。提供一个命令行工具、Python 库和 Kate 插件。
使用方法:
from isort import SortImports

SortImports("pythonfile.py")
mac os 使用 from scipy.misc import imread ImportError: cannot import name ''imread''
mac os 使用 from scipy.misc import imread ImportError: cannot import name ''imread''
问题 1:
我原先安装了 pillow 仍然会报错,我看了一下 pillow 的版本,默认安装 Pillow==6.0.0 这个版本的 scipy.misc 里面没有 imread。
pip3 install Pillow==4.3.0问题 2:
安装 Pillow==4.3.0 错误:
Looking in indexes: https://mirrors.aliyun.com/pypi/simple/
Collecting Pillow==3.3.1
  Downloading https://mirrors.aliyun.com/pypi/packages/7b/32/e6978aed8fba6398c00eec25f12798fb57647a6cef4f85db1567e3d086ef/Pillow-3.3.1.tar.gz (10.6MB)
     |████████████████████████████████| 10.6MB 7.5MB/s
Building wheels for collected packages: Pillow
  Building wheel for Pillow (setup.py) ... error
  ERROR: Complete output from command /Library/Frameworks/Python.framework/Versions/3.7/bin/python3 -u -c ''import setuptools, tokenize;__file__=''"''"''/private/var/folders/zy/fjrb7rqn1vd88h7fs111k3j00000gn/T/pip-install-6rx_ulqm/Pillow/setup.py''"''"'';f=getattr(tokenize, ''"''"''open''"''"'', open)(__file__);code=f.read().replace(''"''"''\r\n''"''"'', ''"''"''\n''"''"'');f.close();exec(compile(code, __file__, ''"''"''exec''"''"''))'' bdist_wheel -d /private/var/folders/zy/fjrb7rqn1vd88h7fs111k3j00000gn/T/pip-wheel-37mrjey0 --python-tag cp37:
  ERROR: running bdist_wheel
  running build
  running build_py
  creating build
  creating build/lib.macosx-10.9-x86_64-3.7
  creating build/lib.macosx-10.9-x86_64-3.7/PIL
  copying PIL/MpoImagePlugin.py -> build/lib.macosx-10.9-x86_64-3.7/PIL
  copying PIL/ImageMode.py -> build/lib.macosx-10.9-x86_64-3.7/PIL
  copying PIL/PngImagePlugin.py -> build/lib.macosx-10.9-x86_64-3.7/PIL
  copying PIL/XbmImagePlugin.py -> build/lib.macosx-10.9-x86_64-3.7/PIL
  copying PIL/PcxImagePlugin.py -> build/lib.macosx-10.9-x86_64-3.7/PIL
  copying PIL/SunImagePlugin.py -> build/lib.macosx-10.9-x86_64-3.7/PIL
  copying PIL/ImageFile.py -> build/lib.macosx-10.9-x86_64-3.7/PIL
  copying PIL/SpiderImagePlugin.py -> build/lib.macosx-10.9-x86_64-3.7/PIL
  copying PIL/TarIO.py -> build/lib.macosx-10.9-x86_64-3.7/PIL
  copying PIL/FitsStubImagePlugin.py -> build/lib.macosx-10.9-x86_64-3.7/PIL
  copying PIL/MpegImagePlugin.py -> build/lib.macosx-10.9-x86_64-3.7/PIL
  copying PIL/BdfFontFile.py -> build/lib.macosx-10.9-x86_64-3.7/PIL
  copying PIL/GribStubImagePlugin.py -> build/lib.macosx-10.9-x86_64-3.7/PIL
  copying PIL/ImageStat.py -> build/lib.macosx-10.9-x86_64-3.7/PIL
  copying PIL/PixarImagePlugin.py -> build/lib.macosx-10.9-x86_64-3.7/PIL
  copying PIL/GimpPaletteFile.py -> build/lib.macosx-10.9-x86_64-3.7/PIL
  copying PIL/ImageColor.py -> build/lib.macosx-10.9-x86_64-3.7/PIL
  copying PIL/ContainerIO.py -> build/lib.macosx-10.9-x86_64-3.7/PIL
  copying PIL/MspImagePlugin.py -> build/lib.macosx-10.9-x86_64-3.7/PIL
  copying PIL/MicImagePlugin.py -> build/lib.macosx-10.9-x86_64-3.7/PIL
  copying PIL/ImtImagePlugin.py -> build/lib.macosx-10.9-x86_64-3.7/PIL
  copying PIL/GifImagePlugin.py -> build/lib.macosx-10.9-x86_64-3.7/PIL
  copying PIL/PalmImagePlugin.py -> build/lib.macosx-10.9-x86_64-3.7/PIL
  copying PIL/ImageQt.py -> build/lib.macosx-10.9-x86_64-3.7/PIL
  copying PIL/ImageMath.py -> build/lib.macosx-10.9-x86_64-3.7/PIL
  copying PIL/PaletteFile.py -> build/lib.macosx-10.9-x86_64-3.7/PIL
  copying PIL/FontFile.py -> build/lib.macosx-10.9-x86_64-3.7/PIL
  copying PIL/ExifTags.py -> build/lib.macosx-10.9-x86_64-3.7/PIL
  copying PIL/ImageCms.py -> build/lib.macosx-10.9-x86_64-3.7/PIL
  copying PIL/FpxImagePlugin.py -> build/lib.macosx-10.9-x86_64-3.7/PIL
  copying PIL/ImageChops.py -> build/lib.macosx-10.9-x86_64-3.7/PIL
  copying PIL/BufrStubImagePlugin.py -> build/lib.macosx-10.9-x86_64-3.7/PIL
  copying PIL/PSDraw.py -> build/lib.macosx-10.9-x86_64-3.7/PIL
  copying PIL/PcdImagePlugin.py -> build/lib.macosx-10.9-x86_64-3.7/PIL
  copying PIL/ImageFilter.py -> build/lib.macosx-10.9-x86_64-3.7/PIL
  copying PIL/ImageDraw2.py -> build/lib.macosx-10.9-x86_64-3.7/PIL
  copying PIL/ImagePath.py -> build/lib.macosx-10.9-x86_64-3.7/PIL
  copying PIL/DcxImagePlugin.py -> build/lib.macosx-10.9-x86_64-3.7/PIL
  copying PIL/__init__.py -> build/lib.macosx-10.9-x86_64-3.7/PIL
  copying PIL/JpegPresets.py -> build/lib.macosx-10.9-x86_64-3.7/PIL
  copying PIL/Hdf5StubImagePlugin.py -> build/lib.macosx-10.9-x86_64-3.7/PIL
  copying PIL/features.py -> build/lib.macosx-10.9-x86_64-3.7/PIL
  copying PIL/ImageDraw.py -> build/lib.macosx-10.9-x86_64-3.7/PIL
  copying PIL/GimpGradientFile.py -> build/lib.macosx-10.9-x86_64-3.7/PIL
  copying PIL/ImageWin.py -> build/lib.macosx-10.9-x86_64-3.7/PIL
  copying PIL/IcoImagePlugin.py -> build/lib.macosx-10.9-x86_64-3.7/PIL
  copying PIL/_tkinter_finder.py -> build/lib.macosx-10.9-x86_64-3.7/PIL
  copying PIL/EpsImagePlugin.py -> build/lib.macosx-10.9-x86_64-3.7/PIL
  copying PIL/TgaImagePlugin.py -> build/lib.macosx-10.9-x86_64-3.7/PIL
  copying PIL/ImageMorph.py -> build/lib.macosx-10.9-x86_64-3.7/PIL
  copying PIL/Jpeg2KImagePlugin.py -> build/lib.macosx-10.9-x86_64-3.7/PIL
  copying PIL/WalImageFile.py -> build/lib.macosx-10.9-x86_64-3.7/PIL
  copying PIL/PcfFontFile.py -> build/lib.macosx-10.9-x86_64-3.7/PIL
  copying PIL/ImageTk.py -> build/lib.macosx-10.9-x86_64-3.7/PIL
  copying PIL/GbrImagePlugin.py -> build/lib.macosx-10.9-x86_64-3.7/PIL
  copying PIL/ImageOps.py -> build/lib.macosx-10.9-x86_64-3.7/PIL
  copying PIL/PdfImagePlugin.py -> build/lib.macosx-10.9-x86_64-3.7/PIL
  copying PIL/ImageShow.py -> build/lib.macosx-10.9-x86_64-3.7/PIL
  copying PIL/ImageEnhance.py -> build/lib.macosx-10.9-x86_64-3.7/PIL
  copying PIL/WmfImagePlugin.py -> build/lib.macosx-10.9-x86_64-3.7/PIL
  copying PIL/ImageGrab.py -> build/lib.macosx-10.9-x86_64-3.7/PIL
  copying PIL/WebPImagePlugin.py -> build/lib.macosx-10.9-x86_64-3.7/PIL
  copying PIL/FliImagePlugin.py -> build/lib.macosx-10.9-x86_64-3.7/PIL
  copying PIL/TiffTags.py -> build/lib.macosx-10.9-x86_64-3.7/PIL
  copying PIL/CurImagePlugin.py -> build/lib.macosx-10.9-x86_64-3.7/PIL
  copying PIL/_util.py -> build/lib.macosx-10.9-x86_64-3.7/PIL
  copying PIL/GdImageFile.py -> build/lib.macosx-10.9-x86_64-3.7/PIL
  copying PIL/TiffImagePlugin.py -> build/lib.macosx-10.9-x86_64-3.7/PIL
  copying PIL/IptcImagePlugin.py -> build/lib.macosx-10.9-x86_64-3.7/PIL
  copying PIL/ImagePalette.py -> build/lib.macosx-10.9-x86_64-3.7/PIL
  copying PIL/BmpImagePlugin.py -> build/lib.macosx-10.9-x86_64-3.7/PIL
  copying PIL/ImageTransform.py -> build/lib.macosx-10.9-x86_64-3.7/PIL
  copying PIL/IcnsImagePlugin.py -> build/lib.macosx-10.9-x86_64-3.7/PIL
  copying PIL/McIdasImagePlugin.py -> build/lib.macosx-10.9-x86_64-3.7/PIL
  copying PIL/XpmImagePlugin.py -> build/lib.macosx-10.9-x86_64-3.7/PIL
  copying PIL/OleFileIO.py -> build/lib.macosx-10.9-x86_64-3.7/PIL
  copying PIL/DdsImagePlugin.py -> build/lib.macosx-10.9-x86_64-3.7/PIL
  copying PIL/ImageSequence.py -> build/lib.macosx-10.9-x86_64-3.7/PIL
  copying PIL/PyAccess.py -> build/lib.macosx-10.9-x86_64-3.7/PIL
  copying PIL/_binary.py -> build/lib.macosx-10.9-x86_64-3.7/PIL
  copying PIL/Image.py -> build/lib.macosx-10.9-x86_64-3.7/PIL
  copying PIL/XVThumbImagePlugin.py -> build/lib.macosx-10.9-x86_64-3.7/PIL
  copying PIL/SgiImagePlugin.py -> build/lib.macosx-10.9-x86_64-3.7/PIL
  copying PIL/ImImagePlugin.py -> build/lib.macosx-10.9-x86_64-3.7/PIL
  copying PIL/PsdImagePlugin.py -> build/lib.macosx-10.9-x86_64-3.7/PIL
  copying PIL/JpegImagePlugin.py -> build/lib.macosx-10.9-x86_64-3.7/PIL
  copying PIL/ImageFont.py -> build/lib.macosx-10.9-x86_64-3.7/PIL
  copying PIL/PpmImagePlugin.py -> build/lib.macosx-10.9-x86_64-3.7/PIL
  copying PIL/FtexImagePlugin.py -> build/lib.macosx-10.9-x86_64-3.7/PIL
  running egg_info
  writing Pillow.egg-info/PKG-INFO
  writing dependency_links to Pillow.egg-info/dependency_links.txt
  writing top-level names to Pillow.egg-info/top_level.txt
  reading manifest file ''Pillow.egg-info/SOURCES.txt''
  reading manifest template ''MANIFEST.in''
  warning: no files found matching ''*.sh''
  no previously-included directories found matching ''docs/_static''
  warning: no previously-included files found matching ''.coveragerc''
  warning: no previously-included files found matching ''.editorconfig''
  warning: no previously-included files found matching ''.landscape.yaml''
  warning: no previously-included files found matching ''appveyor.yml''
  warning: no previously-included files found matching ''build_children.sh''
  warning: no previously-included files found matching ''tox.ini''
  warning: no previously-included files matching ''.git*'' found anywhere in distribution
  warning: no previously-included files matching ''*.pyc'' found anywhere in distribution
  warning: no previously-included files matching ''*.so'' found anywhere in distribution
  writing manifest file ''Pillow.egg-info/SOURCES.txt''
  copying PIL/OleFileIO-README.md -> build/lib.macosx-10.9-x86_64-3.7/PIL
  running build_ext
  Traceback (most recent call last):
    File "<string>", line 1, in <module>
    File "/private/var/folders/zy/fjrb7rqn1vd88h7fs111k3j00000gn/T/pip-install-6rx_ulqm/Pillow/setup.py", line 753, in <module>
      zip_safe=not debug_build(), )
    File "/Library/Frameworks/Python.framework/Versions/3.7/lib/python3.7/site-packages/setuptools/__init__.py", line 145, in setup
      return distutils.core.setup(**attrs)
    File "/Library/Frameworks/Python.framework/Versions/3.7/lib/python3.7/distutils/core.py", line 148, in setup
      dist.run_commands()
    File "/Library/Frameworks/Python.framework/Versions/3.7/lib/python3.7/distutils/dist.py", line 966, in run_commands
      self.run_command(cmd)
    File "/Library/Frameworks/Python.framework/Versions/3.7/lib/python3.7/distutils/dist.py", line 985, in run_command
      cmd_obj.run()
    File "/Library/Frameworks/Python.framework/Versions/3.7/lib/python3.7/site-packages/wheel/bdist_wheel.py", line 192, in run
      self.run_command(''build'')
    File "/Library/Frameworks/Python.framework/Versions/3.7/lib/python3.7/distutils/cmd.py", line 313, in run_command
      self.distribution.run_command(command)
    File "/Library/Frameworks/Python.framework/Versions/3.7/lib/python3.7/distutils/dist.py", line 985, in run_command
      cmd_obj.run()
    File "/Library/Frameworks/Python.framework/Versions/3.7/lib/python3.7/distutils/command/build.py", line 135, in run
      self.run_command(cmd_name)
    File "/Library/Frameworks/Python.framework/Versions/3.7/lib/python3.7/distutils/cmd.py", line 313, in run_command
      self.distribution.run_command(command)
    File "/Library/Frameworks/Python.framework/Versions/3.7/lib/python3.7/distutils/dist.py", line 985, in run_command
      cmd_obj.run()
    File "/Library/Frameworks/Python.framework/Versions/3.7/lib/python3.7/distutils/command/build_ext.py", line 340, in run
      self.build_extensions()
    File "/private/var/folders/zy/fjrb7rqn1vd88h7fs111k3j00000gn/T/pip-install-6rx_ulqm/Pillow/setup.py", line 521, in build_extensions
      '' using --disable-%s, aborting'' % (f, f))
  ValueError: jpeg is required unless explicitly disabled using --disable-jpeg, aborting
  ----------------------------------------
  ERROR: Failed building wheel for Pillow
  Running setup.py clean for Pillow
Failed to build Pillow
Installing collected packages: Pillow
  Running setup.py install for Pillow ... error
    ERROR: Complete output from command /Library/Frameworks/Python.framework/Versions/3.7/bin/python3 -u -c ''import setuptools, tokenize;__file__=''"''"''/private/var/folders/zy/fjrb7rqn1vd88h7fs111k3j00000gn/T/pip-install-6rx_ulqm/Pillow/setup.py''"''"'';f=getattr(tokenize, ''"''"''open''"''"'', open)(__file__);code=f.read().replace(''"''"''\r\n''"''"'', ''"''"''\n''"''"'');f.close();exec(compile(code, __file__, ''"''"''exec''"''"''))'' install --record /private/var/folders/zy/fjrb7rqn1vd88h7fs111k3j00000gn/T/pip-record-l9wo3iyw/install-record.txt --single-version-externally-managed --compile:
    ERROR: running install
    running build
    running build_py
    creating build
    creating build/lib.macosx-10.9-x86_64-3.7
    creating build/lib.macosx-10.9-x86_64-3.7/PIL
    copying PIL/MpoImagePlugin.py -> build/lib.macosx-10.9-x86_64-3.7/PIL
    copying PIL/ImageMode.py -> build/lib.macosx-10.9-x86_64-3.7/PIL
    copying PIL/PngImagePlugin.py -> build/lib.macosx-10.9-x86_64-3.7/PIL
    copying PIL/XbmImagePlugin.py -> build/lib.macosx-10.9-x86_64-3.7/PIL
    copying PIL/PcxImagePlugin.py -> build/lib.macosx-10.9-x86_64-3.7/PIL
    copying PIL/SunImagePlugin.py -> build/lib.macosx-10.9-x86_64-3.7/PIL
    copying PIL/ImageFile.py -> build/lib.macosx-10.9-x86_64-3.7/PIL
    copying PIL/SpiderImagePlugin.py -> build/lib.macosx-10.9-x86_64-3.7/PIL
    copying PIL/TarIO.py -> build/lib.macosx-10.9-x86_64-3.7/PIL
    copying PIL/FitsStubImagePlugin.py -> build/lib.macosx-10.9-x86_64-3.7/PIL
    copying PIL/MpegImagePlugin.py -> build/lib.macosx-10.9-x86_64-3.7/PIL
    copying PIL/BdfFontFile.py -> build/lib.macosx-10.9-x86_64-3.7/PIL
    copying PIL/GribStubImagePlugin.py -> build/lib.macosx-10.9-x86_64-3.7/PIL
    copying PIL/ImageStat.py -> build/lib.macosx-10.9-x86_64-3.7/PIL
    copying PIL/PixarImagePlugin.py -> build/lib.macosx-10.9-x86_64-3.7/PIL
    copying PIL/GimpPaletteFile.py -> build/lib.macosx-10.9-x86_64-3.7/PIL
    copying PIL/ImageColor.py -> build/lib.macosx-10.9-x86_64-3.7/PIL
    copying PIL/ContainerIO.py -> build/lib.macosx-10.9-x86_64-3.7/PIL
    copying PIL/MspImagePlugin.py -> build/lib.macosx-10.9-x86_64-3.7/PIL
    copying PIL/MicImagePlugin.py -> build/lib.macosx-10.9-x86_64-3.7/PIL
    copying PIL/ImtImagePlugin.py -> build/lib.macosx-10.9-x86_64-3.7/PIL
    copying PIL/GifImagePlugin.py -> build/lib.macosx-10.9-x86_64-3.7/PIL
    copying PIL/PalmImagePlugin.py -> build/lib.macosx-10.9-x86_64-3.7/PIL
    copying PIL/ImageQt.py -> build/lib.macosx-10.9-x86_64-3.7/PIL
    copying PIL/ImageMath.py -> build/lib.macosx-10.9-x86_64-3.7/PIL
    copying PIL/PaletteFile.py -> build/lib.macosx-10.9-x86_64-3.7/PIL
    copying PIL/FontFile.py -> build/lib.macosx-10.9-x86_64-3.7/PIL
    copying PIL/ExifTags.py -> build/lib.macosx-10.9-x86_64-3.7/PIL
    copying PIL/ImageCms.py -> build/lib.macosx-10.9-x86_64-3.7/PIL
    copying PIL/FpxImagePlugin.py -> build/lib.macosx-10.9-x86_64-3.7/PIL
    copying PIL/ImageChops.py -> build/lib.macosx-10.9-x86_64-3.7/PIL
    copying PIL/BufrStubImagePlugin.py -> build/lib.macosx-10.9-x86_64-3.7/PIL
    copying PIL/PSDraw.py -> build/lib.macosx-10.9-x86_64-3.7/PIL
    copying PIL/PcdImagePlugin.py -> build/lib.macosx-10.9-x86_64-3.7/PIL
    copying PIL/ImageFilter.py -> build/lib.macosx-10.9-x86_64-3.7/PIL
    copying PIL/ImageDraw2.py -> build/lib.macosx-10.9-x86_64-3.7/PIL
    copying PIL/ImagePath.py -> build/lib.macosx-10.9-x86_64-3.7/PIL
    copying PIL/DcxImagePlugin.py -> build/lib.macosx-10.9-x86_64-3.7/PIL
    copying PIL/__init__.py -> build/lib.macosx-10.9-x86_64-3.7/PIL
    copying PIL/JpegPresets.py -> build/lib.macosx-10.9-x86_64-3.7/PIL
    copying PIL/Hdf5StubImagePlugin.py -> build/lib.macosx-10.9-x86_64-3.7/PIL
    copying PIL/features.py -> build/lib.macosx-10.9-x86_64-3.7/PIL
    copying PIL/ImageDraw.py -> build/lib.macosx-10.9-x86_64-3.7/PIL
    copying PIL/GimpGradientFile.py -> build/lib.macosx-10.9-x86_64-3.7/PIL
    copying PIL/ImageWin.py -> build/lib.macosx-10.9-x86_64-3.7/PIL
    copying PIL/IcoImagePlugin.py -> build/lib.macosx-10.9-x86_64-3.7/PIL
    copying PIL/_tkinter_finder.py -> build/lib.macosx-10.9-x86_64-3.7/PIL
    copying PIL/EpsImagePlugin.py -> build/lib.macosx-10.9-x86_64-3.7/PIL
    copying PIL/TgaImagePlugin.py -> build/lib.macosx-10.9-x86_64-3.7/PIL
    copying PIL/ImageMorph.py -> build/lib.macosx-10.9-x86_64-3.7/PIL
    copying PIL/Jpeg2KImagePlugin.py -> build/lib.macosx-10.9-x86_64-3.7/PIL
    copying PIL/WalImageFile.py -> build/lib.macosx-10.9-x86_64-3.7/PIL
    copying PIL/PcfFontFile.py -> build/lib.macosx-10.9-x86_64-3.7/PIL
    copying PIL/ImageTk.py -> build/lib.macosx-10.9-x86_64-3.7/PIL
    copying PIL/GbrImagePlugin.py -> build/lib.macosx-10.9-x86_64-3.7/PIL
    copying PIL/ImageOps.py -> build/lib.macosx-10.9-x86_64-3.7/PIL
    copying PIL/PdfImagePlugin.py -> build/lib.macosx-10.9-x86_64-3.7/PIL
    copying PIL/ImageShow.py -> build/lib.macosx-10.9-x86_64-3.7/PIL
    copying PIL/ImageEnhance.py -> build/lib.macosx-10.9-x86_64-3.7/PIL
    copying PIL/WmfImagePlugin.py -> build/lib.macosx-10.9-x86_64-3.7/PIL
    copying PIL/ImageGrab.py -> build/lib.macosx-10.9-x86_64-3.7/PIL
    copying PIL/WebPImagePlugin.py -> build/lib.macosx-10.9-x86_64-3.7/PIL
    copying PIL/FliImagePlugin.py -> build/lib.macosx-10.9-x86_64-3.7/PIL
    copying PIL/TiffTags.py -> build/lib.macosx-10.9-x86_64-3.7/PIL
    copying PIL/CurImagePlugin.py -> build/lib.macosx-10.9-x86_64-3.7/PIL
    copying PIL/_util.py -> build/lib.macosx-10.9-x86_64-3.7/PIL
    copying PIL/GdImageFile.py -> build/lib.macosx-10.9-x86_64-3.7/PIL
    copying PIL/TiffImagePlugin.py -> build/lib.macosx-10.9-x86_64-3.7/PIL
    copying PIL/IptcImagePlugin.py -> build/lib.macosx-10.9-x86_64-3.7/PIL
    copying PIL/ImagePalette.py -> build/lib.macosx-10.9-x86_64-3.7/PIL
    copying PIL/BmpImagePlugin.py -> build/lib.macosx-10.9-x86_64-3.7/PIL
    copying PIL/ImageTransform.py -> build/lib.macosx-10.9-x86_64-3.7/PIL
    copying PIL/IcnsImagePlugin.py -> build/lib.macosx-10.9-x86_64-3.7/PIL
    copying PIL/McIdasImagePlugin.py -> build/lib.macosx-10.9-x86_64-3.7/PIL
    copying PIL/XpmImagePlugin.py -> build/lib.macosx-10.9-x86_64-3.7/PIL
    copying PIL/OleFileIO.py -> build/lib.macosx-10.9-x86_64-3.7/PIL
    copying PIL/DdsImagePlugin.py -> build/lib.macosx-10.9-x86_64-3.7/PIL
    copying PIL/ImageSequence.py -> build/lib.macosx-10.9-x86_64-3.7/PIL
    copying PIL/PyAccess.py -> build/lib.macosx-10.9-x86_64-3.7/PIL
    copying PIL/_binary.py -> build/lib.macosx-10.9-x86_64-3.7/PIL
    copying PIL/Image.py -> build/lib.macosx-10.9-x86_64-3.7/PIL
    copying PIL/XVThumbImagePlugin.py -> build/lib.macosx-10.9-x86_64-3.7/PIL
    copying PIL/SgiImagePlugin.py -> build/lib.macosx-10.9-x86_64-3.7/PIL
    copying PIL/ImImagePlugin.py -> build/lib.macosx-10.9-x86_64-3.7/PIL
    copying PIL/PsdImagePlugin.py -> build/lib.macosx-10.9-x86_64-3.7/PIL
    copying PIL/JpegImagePlugin.py -> build/lib.macosx-10.9-x86_64-3.7/PIL
    copying PIL/ImageFont.py -> build/lib.macosx-10.9-x86_64-3.7/PIL
    copying PIL/PpmImagePlugin.py -> build/lib.macosx-10.9-x86_64-3.7/PIL
    copying PIL/FtexImagePlugin.py -> build/lib.macosx-10.9-x86_64-3.7/PIL
    running egg_info
    writing Pillow.egg-info/PKG-INFO
    writing dependency_links to Pillow.egg-info/dependency_links.txt
    writing top-level names to Pillow.egg-info/top_level.txt
    reading manifest file ''Pillow.egg-info/SOURCES.txt''
    reading manifest template ''MANIFEST.in''
    warning: no files found matching ''*.sh''
    no previously-included directories found matching ''docs/_static''
    warning: no previously-included files found matching ''.coveragerc''
    warning: no previously-included files found matching ''.editorconfig''
    warning: no previously-included files found matching ''.landscape.yaml''
    warning: no previously-included files found matching ''appveyor.yml''
    warning: no previously-included files found matching ''build_children.sh''
    warning: no previously-included files found matching ''tox.ini''
    warning: no previously-included files matching ''.git*'' found anywhere in distribution
    warning: no previously-included files matching ''*.pyc'' found anywhere in distribution
    warning: no previously-included files matching ''*.so'' found anywhere in distribution
    writing manifest file ''Pillow.egg-info/SOURCES.txt''
    copying PIL/OleFileIO-README.md -> build/lib.macosx-10.9-x86_64-3.7/PIL
    running build_ext
    Traceback (most recent call last):
      File "<string>", line 1, in <module>
      File "/private/var/folders/zy/fjrb7rqn1vd88h7fs111k3j00000gn/T/pip-install-6rx_ulqm/Pillow/setup.py", line 753, in <module>
        zip_safe=not debug_build(), )
      File "/Library/Frameworks/Python.framework/Versions/3.7/lib/python3.7/site-packages/setuptools/__init__.py", line 145, in setup
        return distutils.core.setup(**attrs)
      File "/Library/Frameworks/Python.framework/Versions/3.7/lib/python3.7/distutils/core.py", line 148, in setup
        dist.run_commands()
      File "/Library/Frameworks/Python.framework/Versions/3.7/lib/python3.7/distutils/dist.py", line 966, in run_commands
        self.run_command(cmd)
      File "/Library/Frameworks/Python.framework/Versions/3.7/lib/python3.7/distutils/dist.py", line 985, in run_command
        cmd_obj.run()
      File "/Library/Frameworks/Python.framework/Versions/3.7/lib/python3.7/site-packages/setuptools/command/install.py", line 61, in run
        return orig.install.run(self)
      File "/Library/Frameworks/Python.framework/Versions/3.7/lib/python3.7/distutils/command/install.py", line 545, in run
        self.run_command(''build'')
      File "/Library/Frameworks/Python.framework/Versions/3.7/lib/python3.7/distutils/cmd.py", line 313, in run_command
        self.distribution.run_command(command)
      File "/Library/Frameworks/Python.framework/Versions/3.7/lib/python3.7/distutils/dist.py", line 985, in run_command
        cmd_obj.run()
      File "/Library/Frameworks/Python.framework/Versions/3.7/lib/python3.7/distutils/command/build.py", line 135, in run
        self.run_command(cmd_name)
      File "/Library/Frameworks/Python.framework/Versions/3.7/lib/python3.7/distutils/cmd.py", line 313, in run_command
        self.distribution.run_command(command)
      File "/Library/Frameworks/Python.framework/Versions/3.7/lib/python3.7/distutils/dist.py", line 985, in run_command
        cmd_obj.run()
      File "/Library/Frameworks/Python.framework/Versions/3.7/lib/python3.7/distutils/command/build_ext.py", line 340, in run
        self.build_extensions()
      File "/private/var/folders/zy/fjrb7rqn1vd88h7fs111k3j00000gn/T/pip-install-6rx_ulqm/Pillow/setup.py", line 521, in build_extensions
        '' using --disable-%s, aborting'' % (f, f))
    ValueError: jpeg is required unless explicitly disabled using --disable-jpeg, aborting
    ----------------------------------------
ERROR: Command "/Library/Frameworks/Python.framework/Versions/3.7/bin/python3 -u -c ''import setuptools, tokenize;__file__=''"''"''/private/var/folders/zy/fjrb7rqn1vd88h7fs111k3j00000gn/T/pip-install-6rx_ulqm/Pillow/setup.py''"''"'';f=getattr(tokenize, ''"''"''open''"''"'', open)(__file__);code=f.read().replace(''"''"''\r\n''"''"'', ''"''"''\n''"''"'');f.close();exec(compile(code, __file__, ''"''"''exec''"''"''))'' install --record /private/var/folders/zy/fjrb7rqn1vd88h7fs111k3j00000gn/T/pip-record-l9wo3iyw/install-record.txt --single-version-externally-managed --compile" failed with error code 1 in /private/var/folders/zy/fjrb7rqn1vd88h7fs111k3j00000gn/T/pip-install-6rx_ulqm/Pillow/
最后一行红色是重点:
Command "/Library/Frameworks/Python.framework/Versions/3.7/bin/python3 -u -c ''import setuptools, tokenize;__file__=''"''"''/private/var/folders/zy/fjrb7rqn1vd88h7fs111k3j00000gn/T/pip-install-6rx_ulqm/Pillow/setup.py''"''"'';f=getattr(tokenize, ''"''"''open''"''"'', open)(__file__);code=f.read().replace(''"''"''\r\n''"''"'', ''"''"''\n''"''"'');f.close();exec(compile(code, __file__, ''"''"''exec''"''"''))'' install --record /private/var/folders/zy/fjrb7rqn1vd88h7fs111k3j00000gn/T/pip-record-l9wo3iyw/install-record.txt --single-version-externally-managed --compile" failed with error code 1 in /private/var/folders/zy/fjrb7rqn1vd88h7fs111k3j00000gn/T/pip-install-6rx_ulqm/Pillow/
原因及解决办法:
###### 解决办法:
###### 这是因为缺少openjpeg这个库的问题,可以使用安装:
> brew install openjpeg
> pip3 install Pillow==5.2.0问题3:发现还是没有 cannot import name ''imread''
解决:
3.1查看pillow和scipy安装目录是否一致,不一致卸载
sudo pip3 install pillow
sudo pip install scipy
3.2 重新安装
sudo pip install scipy==1.1.0
sudo pip3 install pillow==5.2.0
3.3 测试
python3 -c "from scipy.misc import imread "

pycharm 有效!——关于python的包导入问题from . import失败,或者import找不到文件
python的包导入问题from . import失败,或者import找不到文件
这其实是因为pycharm没有把这个项目当作一个代码包来解析,如果出现类似的问题,不是代码原因,仅仅需要在pycharm上修改一下设置让IDE识别项目包就好,步骤如下:
1,鼠标邮件点击你的项目文件,然后一次点击选择:Mark Directory as>>Sources Root。
2,然后你会发现你的文件夹变了颜色,如图:
3,现在就可以成功找到自己的文件,并且使用from…import…或者import语句导入文件了
PS:这种处理方式对pycharm的公司开发的其他IDE同样适用。
JetBrains的IDE产品:http://www.jetbrains.com/
AppCode
CLion
Datalore
Datagrip
GoLand
IntelliJ IDEA
PHPStorm
PyCharm
Rider
Rubymine
WebStorm
————————————————
版权声明:本文为CSDN博主「欧晨」的原创文章,遵循CC 4.0 BY-SA版权协议,转载请附上原文出处链接及本声明。
原文链接:https://blog.csdn.net/xiao_yi_xiao/article/details/101793655

python -v后出现import _frozen_importlib # frozen import _imp # builtin等一堆乱七八糟的内容
本来想看一下python版本,结果输了python -v之后出现了以下界面:
@H_301_4@
后来查看文档发现,要用python -V(v要大写)
今天关于排序Python`import x`和`from x import y`语句的正确方法是什么?和python import顺序的介绍到此结束,谢谢您的阅读,有关isort 2.6.0 发布,Python 的 import 语句排序、mac os 使用 from scipy.misc import imread ImportError: cannot import name ''imread''、pycharm 有效!——关于python的包导入问题from . import失败,或者import找不到文件、python -v后出现import _frozen_importlib # frozen import _imp # builtin等一堆乱七八糟的内容等更多相关知识的信息可以在本站进行查询。
本文将分享了解scikit CountVectorizer中的min_df和max_df的详细内容,并且还将对df.mean()进行详尽解释,此外,我们还将为大家带来关于2 python 文本特征提取 CountVectorizer, TfidfVectorizer、ColumnTransformer 因管道中的 CountVectorizer/HashingVectorizer 而失败(多个文本特征)、CountVectorizer().适合scikit-learn Python给出内存错误、CountVectorizer()类解析的相关知识,希望对你有所帮助。
本文目录一览:- 了解scikit CountVectorizer中的min_df和max_df(df.mean())
- 2 python 文本特征提取 CountVectorizer, TfidfVectorizer
- ColumnTransformer 因管道中的 CountVectorizer/HashingVectorizer 而失败(多个文本特征)
- CountVectorizer().适合scikit-learn Python给出内存错误
- CountVectorizer()类解析
)")
了解scikit CountVectorizer中的min_df和max_df(df.mean())
我有五个输入到CountVectorizer的文本文件。为CountVectorizer实例指定min_df和max_df时,最小/最大文档频率到底是什么意思?是某个单词在其特定文本文件中的出现频率,还是整个整体语料库(5个txt文件)中该单词的出现频率?
当min_df和max_df作为整数或浮点数提供时有何不同?
该文档似乎没有提供详尽的解释,也没有提供示例来演示min_df和/或max_df的用法。有人可以提供说明或示例来演示min_df或max_df。
答案1
小编典典max_df用于删除出现 频率太高的 术语,也称为“特定于语料库的停用词”。例如:
max_df = 0.50表示“忽略出现在 50%以上文档中的 术语”。max_df = 25表示“忽略出现在 25个以上文档中的 术语”。
默认max_df值为1.0,表示“忽略出现在 100%以上文档中的 术语”。因此,默认设置不会忽略任何术语。
min_df用于删除 不太常见的 术语。例如:
min_df = 0.01表示“忽略出现在 少于1%的文档中的 术语”。min_df = 5表示“忽略 少于5个文档 中出现的术语”。
默认min_df值为1,表示“忽略 少于1个文档 中出现的术语”。因此,默认设置不会忽略任何术语。

2 python 文本特征提取 CountVectorizer, TfidfVectorizer
1. TF-IDF概述
TF-IDF(term frequency–inverse document frequency)是一种用于资讯检索与文本挖掘的常用加权技术。TF-IDF是一种统计方法,用以评估一字词对于一个文件集或一个语料库中的其中一份文件的重要程度。字词的重要性随着它在文件中出现的次数成正比增加,但同时会随着它在语料库中出现的频率成反比下降。TF-IDF加权的各种形式常被搜索引擎应用,作为文件与用户查询之间相关程度的度量或评级。除了TF-IDF以外,互联网上的搜索引擎还会使用基于连结分析的评级方法,以确定文件在搜寻结果中出现的顺序。
(1)TF
TF: Term Frequency, 用于衡量一个词在一个文件中的出现频率。因为每个文档的长度的差别可以很大,因而一个词在某个文档中出现的次数可能远远大于另一个文档,所以词频通常就是一个词出现的次数除以文档的总长度,相当于是做了一次归一化。
TF(t) = (词t在文档中出现的总次数) / (文档的词总数).
(2)IDF
IDF: 逆向文件频率,用于衡量一个词的重要性。计算词频TF的时候,所有的词语都被当做一样重要的,但是某些词,比如”is”, “of”, “that”很可能出现很多很多次,但是可能根本并不重要,因此我们需要减轻在多个文档中都频繁出现的词的权重。
ID(t) = log(总文档数/词t出现的文档数)
TF-IDF:上面两个乘起来,就是TF-IDF TF-IDF = TF * IDF
sklearn.feature_extraction.text.TfidfVectorizer:可以把一大堆文档转换成TF-IDF特征的矩阵。
Convert a collection of raw documents to a matrix of TF-IDF features.
Equivalent to CountVectorizer followed by TfidfTransformer.

 举例:
# 初始化TfidfVectorizer
vectorizer = TfidfVectorizer(tokenizer=tok,stop_words=stop_words)
labels = list()

# 特征提取
data = vectorizer.fit_transform(load_data(labels))

# 初始化LogisticRegression模型
log_reg= LogisticRegression(class_weight="balanced")

# 训练模型
log_reg.fit(data, numpy.asarray(labels))

# 根据输入预测
log_reg.predict_proba(input)
2.文本特征提取:
将文本数据转化成特征向量的过程,比较常用的文本特征表示法为词袋法
词袋法: 不考虑词语出现的顺序,每个出现过的词汇单独作为一列特征 这些不重复的特征词汇集合为词表 每一个文本都可以在很长的词表上统计出一个很多列的特征向量 如果每个文本都出现的词汇,一般被标记为 停用词 不计入特征向量
3.TF-IDF的预处理
在scikit-learn中,有两种方法进行TF-IDF的预处理。
第一种方法是在用CountVectorizer类向量化之后再调用TfidfTransformer类进行预处理。
CountVectorizer:只考虑词汇在文本中出现的频率
TfidfVectorizer:除了考量某词汇在文本出现的频率,还关注包含这个词汇的所有文本的数量,能够削减高频没有意义的词汇出现带来的影响, 挖掘更有意义的特征(1)CountVectorizer
CountVectorizer单独求词频
from sklearn.feature_extraction.text import CountVectorizer
corpus = [
     ''This is the first document.'',
     ''This document is the second document.'',
     ''And this is the third one.'',
     ''Is this the first document?'',
]
vectorizer = CountVectorizer()
X = vectorizer.fit_transform(corpus)
print(type(X))
print(vectorizer.get_feature_names())![]()
print(X.toarray())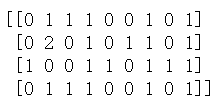
X的第一行5个1显示了corpus的第一行数据在排列中的相应位置,数字表示出现的次数。
CountVectorizer和TfidfTransformer搭配计算TF-IDF
from sklearn.feature_extraction.text import TfidfTransformer
from sklearn.feature_extraction.text import CountVectorizer
corpus=["I come to China to travel",
"This is a car polupar in China",
"I love tea and Apple ",
"The work is to write some papers in science"]
vectorizer=CountVectorizer()
transformer = TfidfTransformer()
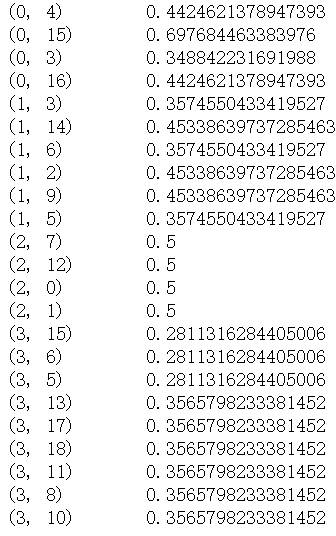
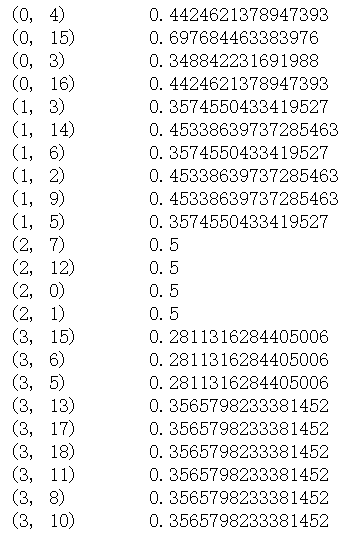
tfidf = transformer.fit_transform(vectorizer.fit_transform(corpus))
print (tfidf) 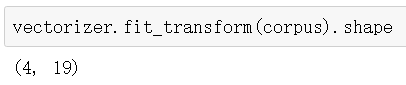
tfidf结果如下:
(2)TfidfVectorizer
第二种方法是直接用TfidfVectorizer完成向量化与TF-IDF预处理。
from sklearn.feature_extraction.text import TfidfVectorizer
tfidf2 = TfidfVectorizer()
re = tfidf2.fit_transform(corpus)
print(re)
由于第二种方法比较的简洁,因此在实际应用中推荐使用,一步到位完成向量化,TF-IDF与标准化。
4. TF-IDF小结
TF-IDF是非常常用的文本挖掘预处理基本步骤,但是如果预处理中使用了Hash Trick,则一般就无法使用TF-IDF了,因为Hash Trick后我们已经无法得到哈希后的各特征的IDF的值。使用了TF-IDF并标准化以后,我们就可以使用各个文本的词特征向量作为文本的特征,进行分类或者聚类分析。当然TF-IDF不光可以用于文本挖掘,在信息检索等很多领域都有使用。因此值得好好的理解这个方法的思想。
参考文献:
【1】使用不同的方法计算TF-IDF值
")
ColumnTransformer 因管道中的 CountVectorizer/HashingVectorizer 而失败(多个文本特征)
如何解决ColumnTransformer 因管道中的 CountVectorizer/HashingVectorizer 而失败(多个文本特征)?
与此问题类似 (ColumnTransformer fails with CountVectorizer in a pipeline),我想在管道中使用 CountVectorizer/HashingVectorizer 将 ColumnTransformer 应用于具有文本特征的列。但我没有只有一个文本特征,而是多个。如果我传递单个功能(不是作为列表,就像在另一个问题的解决方案中建议的那样)它可以正常工作,我该如何为多个功能做到这一点?
numeric_features = [''x0'',''x1'',''y0'',''y1'']
categorical_features = []
text_features = [''text_feature'',''another_text_feature'']

numeric_transformer = Pipeline(steps=[(''scaler'',StandardScaler())])
categorical_transformer = Pipeline(steps=[(''encoder'',OneHotEncoder())])
text_transformer = Pipeline(steps=[(''hashing'',HashingVectorizer())])

preprocessor = ColumnTransformer(transformers=[
    (''numeric'',numeric_transformer,numeric_features),(''categorical'',categorical_transformer,categorical_features),(''text'',text_transformer,text_features)
])

steps = [(''preprocessor'',preprocessor),(''clf'',SGDClassifier())]

pipeline = Pipeline(steps=steps)

pipeline.fit(X_train,y_train)
解决方法
只需为每个文本特征使用单独的转换器即可。
preprocessor = ColumnTransformer(transformers=[
    (''numeric'',numeric_transformer,numeric_features),(''categorical'',categorical_transformer,categorical_features),(''text'',text_transformer,''text_feature''),(''more_text'',''another_text_feature''),])
(变压器在拟合过程中被克隆,所以你会有两个单独的 text_transformer 副本,一切都很好。如果你担心像这样指定同一个变压器两次,你总是可以复制/克隆它在指定 ColumnTransformer 之前手动手动。)
.适合scikit-learn Python给出内存错误")
CountVectorizer().适合scikit-learn Python给出内存错误
path = ''data/products.tsv'' products = pd.read_table(path,header= None,names = [''label'',''entry''])
X = products.entry
y = products.label
X_train,X_test,y_train,y_test = train_test_split(X,y,random_state=1)

# Vectorizing the Dataset
vect = CountVectorizer()
vect.fit(X_train.values.astype(''U''))
X_train_dtm = vect.transform(X_train)
X_test_dtm = vect.transform(X_test)
解决方法
正确的值实际上取决于任务,因此您应将其视为超参数并尝试对其进行调整.在NLP(英语)中,人们通常使用~10,000作为词汇量.您也可以使用HashVectorizer执行相同操作,但是您冒着哈希共谋的风险,这会导致多个单词增加相同的计数器.
path = ''data/products.tsv'' products = pd.read_table(path,random_state=1)

# Vectorizing the Dataset
vect = CountVectorizer(max_features=10000)
vect.fit(X_train.values.astype(''U''))
X_train_dtm = vect.transform(X_train)
X_test_dtm = vect.transform(X_test)
类解析")
CountVectorizer()类解析
主要可以参考下面几个链接:
1.sklearn文本特征提取
2.使用scikit-learn tfidf计算词语权重
3.sklearn官方中文文档
4.sklearn.feature_extraction.text.CountVectorizer
补充一下:CounterVectorizer()类的函数transfome()的用法
它主要是把新的文本转化为特征矩阵,只不过,这些特征是已经确定过的。而这个特征序列是前面的fit_transfome()输入的语料库确定的特征。见例子:
1 >>>from sklearn.feature_extraction.text import CountVectorizer
2 >>>vec=CountVectrizer()
3 >>>vec.transform([''Something completely new.'']).toarray()
错误返回 ,sklearn.exceptions.NotFittedError: CountVectorizer - Vocabulary wasn''t fitted.表示没有对应的词汇表,这个文本无法转换。其实就是没有建立vocabulary表,没法对文本按照矩阵索引来统计词的个位数
corpus = [
     ''This is the first document.'',
    ''This is the second second document.'',
   ''And the third one.'',
   ''Is this the first document?'']
X = vec.fit_transform(corpus)
X.toarray()
vocabulary列表
>>>vec.get_feature_names()
 [''and'', ''document'', ''first'', ''is'', ''one'', ''second'', ''the'', ''third'', ''this'']
得到的稀疏矩阵是
array([[0, 1, 1, 1, 0, 0, 1, 0, 1],
       [0, 1, 0, 1, 0, 2, 1, 0, 1],
       [1, 0, 0, 0, 1, 0, 1, 1, 0],
       [0, 1, 1, 1, 0, 0, 1, 0, 1]], dtype=int64)
建立vocabulary后可以用transform()来对新文本进行矩阵化了
>>>vec.transform([''this is'']).toarray()
 array([[0, 0, 0, 1, 0, 0, 0, 0, 1]], dtype=int64)
>>>vec.transform([''too bad'']).toarray()
array([[0, 0, 0, 0, 0, 0, 0, 0, 0]], dtype=int64)
简单分析''this is''在vocabulary表里面,则对应词统计数量,形成矩阵。而''too bad''在vocabulary表中没有这两词,所以矩阵都为0.
今天关于了解scikit CountVectorizer中的min_df和max_df和df.mean()的分享就到这里,希望大家有所收获,若想了解更多关于2 python 文本特征提取 CountVectorizer, TfidfVectorizer、ColumnTransformer 因管道中的 CountVectorizer/HashingVectorizer 而失败(多个文本特征)、CountVectorizer().适合scikit-learn Python给出内存错误、CountVectorizer()类解析等相关知识,可以在本站进行查询。
此处将为大家介绍关于谁能解释我StandardScaler?的详细内容,并且为您解答有关谁能解释我国一将军神奇八字的相关问题,此外,我们还将为您介绍关于.transform()在sklearn StandardScaler中到底做什么?、: Failed to start component [StandardEngine[Catalina].StandardHost[localhost].StandardContext[/solr]]、Dask-ml StandardScaler 内存泄漏和极端内存使用、Failed to start component [StandardEngine[Catalina].StandardHost[localhost].StandardContext的有用信息。
本文目录一览:- 谁能解释我StandardScaler?(谁能解释我国一将军神奇八字)
- .transform()在sklearn StandardScaler中到底做什么?
- : Failed to start component [StandardEngine[Catalina].StandardHost[localhost].StandardContext[/solr]]
- Dask-ml StandardScaler 内存泄漏和极端内存使用
- Failed to start component [StandardEngine[Catalina].StandardHost[localhost].StandardContext
")
谁能解释我StandardScaler?(谁能解释我国一将军神奇八字)
我无法理解网页的StandardScaler的文档中sklearn。
谁能简单地向我解释一下?
答案1
小编典典背后的想法StandardScaler是它将转换您的数据,使其分布的平均值为0,标准差为1。
对于多变量数据,这是按功能进行的(换句话说,独立于数据的每一列) 。
给定数据的分布,数据集中的每个值都将减去平均值,然后除以整个数据集(或多变量情况下的特征)的标准差。
在sklearn StandardScaler中到底做什么?")
.transform()在sklearn StandardScaler中到底做什么?
如果单击右侧的[source],则可以看到source code。从796行到807行,您将看到
if sparse.issparse(X):
    if self.with_mean:
        raise ValueError(
            "Cannot center sparse matrices: pass `with_mean=False` "
            "instead. See docstring for motivation and alternatives.")
    if self.scale_ is not None:
        inplace_column_scale(X,1 / self.scale_)
else:
    if self.with_mean:
        X -= self.mean_
    if self.with_std:
        X /= self.scale_
您可以看到它在if-else块中执行了标准化。
,标准缩放器函数具有公式:
z = (x - u) / s
在这里
x: Element
u: Mean
s: Standard Deviation
此元素转换是按列进行的。
因此,当您调用来拟合mean和standard_deviation的值时。
例如:
from sklearn.preprocessing import StandardScaler
import numpy as np

x = np.random.randint(50,size = (10,2))
x
输出:
array([[26,9],[29,39],[23,26],22],[28,41],[11,6],[42,40],[ 1,25],[ 0,[44,45]])
现在,安装标准洁牙机
scale = StandardScaler()
scale.fit(x)
您可以使用StandardScaler对象的内置方法查看平均值和标准偏差
# Mean
scale.mean_   # array([23.3,29.2])

# Standard Deviation
scale.scale_  # array([14.36697602,13.12859475])
您可以使用transform方法转换这些值。
scale.transform(x)
输出:
array([[ 0.18793099,-1.53862621],[ 0.3967432,0.74646222],[-0.02088122,-0.24374277],-0.54842122],[ 0.32713913,0.89880145],[-0.85613006,-1.76713506],[ 1.3015961,0.82263184],[-1.55217075,-0.31991238],[-1.62177482,[ 1.44080424,1.20347991]])
第一个元素的计算:
z = (26 - 23.3) /  14.36697602
z = 0.18793099
![: Failed to start component [StandardEngine[Catalina].StandardHost[localhost].StandardContext[/solr]]](http://www.gvkun.com/zb_users/upload/2025/02/195822e9-1e48-41fb-a8f7-b301b0c6e1471739444837987.jpg ": Failed to start component [StandardEngine[Catalina].StandardHost[localhost].StandardContext[/solr]]")
: Failed to start component [StandardEngine[Catalina].StandardHost[localhost].StandardContext[/solr]]
java.util.concurrent.ExecutionException: org.apache.catalina.LifecycleException: Failed to start component [StandardEngine[Catalina].StandardHost[localhost].StandardContext[/solr]]
at java.util.concurrent.FutureTask.report(FutureTask.java:122)
at java.util.concurrent.FutureTask.get(FutureTask.java:192)
at org.apache.catalina.core.ContainerBase.startInternal(ContainerBase.java:1122)
at org.apache.catalina.core.StandardHost.startInternal(StandardHost.java:819)
at org.apache.catalina.util.LifecycleBase.start(LifecycleBase.java:150)
at org.apache.catalina.core.ContainerBase$StartChild.call(ContainerBase.java:1574)
at org.apache.catalina.core.ContainerBase$StartChild.call(ContainerBase.java:1564)
at java.util.concurrent.FutureTask.run(FutureTask.java:266)
at java.util.concurrent.ThreadPoolExecutor.runWorker(ThreadPoolExecutor.java:1142)
at java.util.concurrent.ThreadPoolExecutor$Worker.run(ThreadPoolExecutor.java:617)
at java.lang.Thread.run(Thread.java:745)
Caused by: org.apache.catalina.LifecycleException: Failed to start component [StandardEngine[Catalina].StandardHost[localhost].StandardContext[/solr]]
at org.apache.catalina.util.LifecycleBase.start(LifecycleBase.java:154)
... 6 more
Caused by: org.apache.catalina.LifecycleException: Error in resourceStart()
at org.apache.catalina.core.StandardContext.startInternal(StandardContext.java:5320)
at org.apache.catalina.util.LifecycleBase.start(LifecycleBase.java:150)
... 6 more


Jun 06, 2016 11:32:05 AM org.apache.catalina.core.ContainerBase startInternal
SEVERE: A child container failed during start
java.util.concurrent.ExecutionException: org.apache.catalina.LifecycleException: Failed to start component [StandardEngine[Catalina].StandardHost[localhost]]
at java.util.concurrent.FutureTask.report(FutureTask.java:122)
at java.util.concurrent.FutureTask.get(FutureTask.java:192)
at org.apache.catalina.core.ContainerBase.startInternal(ContainerBase.java:1122)
at org.apache.catalina.core.StandardEngine.startInternal(StandardEngine.java:300)
at org.apache.catalina.util.LifecycleBase.start(LifecycleBase.java:150)
at org.apache.catalina.core.StandardService.startInternal(StandardService.java:443)
at org.apache.catalina.util.LifecycleBase.start(LifecycleBase.java:150)
at org.apache.catalina.core.StandardServer.startInternal(StandardServer.java:739)
at org.apache.catalina.util.LifecycleBase.start(LifecycleBase.java:150)
at org.apache.catalina.startup.Catalina.start(Catalina.java:689)
at sun.reflect.NativeMethodAccessorImpl.invoke0(Native Method)
at sun.reflect.NativeMethodAccessorImpl.invoke(NativeMethodAccessorImpl.java:62)
at sun.reflect.DelegatingMethodAccessorImpl.invoke(DelegatingMethodAccessorImpl.java:43)
at java.lang.reflect.Method.invoke(Method.java:497)
at org.apache.catalina.startup.Bootstrap.start(Bootstrap.java:294)
at org.apache.catalina.startup.Bootstrap.main(Bootstrap.java:428)
Caused by: org.apache.catalina.LifecycleException: Failed to start component [StandardEngine[Catalina].StandardHost[localhost]]
at org.apache.catalina.util.LifecycleBase.start(LifecycleBase.java:154)
at org.apache.catalina.core.ContainerBase$StartChild.call(ContainerBase.java:1574)
at org.apache.catalina.core.ContainerBase$StartChild.call(ContainerBase.java:1564)
at java.util.concurrent.FutureTask.run(FutureTask.java:266)
at java.util.concurrent.ThreadPoolExecutor.runWorker(ThreadPoolExecutor.java:1142)
at java.util.concurrent.ThreadPoolExecutor$Worker.run(ThreadPoolExecutor.java:617)
at java.lang.Thread.run(Thread.java:745)
Caused by: org.apache.catalina.LifecycleException: A child container failed during start
at org.apache.catalina.core.ContainerBase.startInternal(ContainerBase.java:1130)
at org.apache.catalina.core.StandardHost.startInternal(StandardHost.java:819)
at org.apache.catalina.util.LifecycleBase.start(LifecycleBase.java:150)
... 6 more


Jun 06, 2016 11:32:05 AM org.apache.catalina.startup.Catalina start
SEVERE: The required Server component failed to start so Tomcat is unable to start.
org.apache.catalina.LifecycleException: Failed to start component [StandardServer[8005]]
at org.apache.catalina.util.LifecycleBase.start(LifecycleBase.java:154)
at org.apache.catalina.startup.Catalina.start(Catalina.java:689)
at sun.reflect.NativeMethodAccessorImpl.invoke0(Native Method)
at sun.reflect.NativeMethodAccessorImpl.invoke(NativeMethodAccessorImpl.java:62)
at sun.reflect.DelegatingMethodAccessorImpl.invoke(DelegatingMethodAccessorImpl.java:43)
at java.lang.reflect.Method.invoke(Method.java:497)
at org.apache.catalina.startup.Bootstrap.start(Bootstrap.java:294)
at org.apache.catalina.startup.Bootstrap.main(Bootstrap.java:428)
Caused by: org.apache.catalina.LifecycleException: Failed to start component [StandardService[Catalina]]
at org.apache.catalina.util.LifecycleBase.start(LifecycleBase.java:154)
at org.apache.catalina.core.StandardServer.startInternal(StandardServer.java:739)
at org.apache.catalina.util.LifecycleBase.start(LifecycleBase.java:150)
... 7 more
Caused by: org.apache.catalina.LifecycleException: Failed to start component [StandardEngine[Catalina]]
at org.apache.catalina.util.LifecycleBase.start(LifecycleBase.java:154)
at org.apache.catalina.core.StandardService.startInternal(StandardService.java:443)
at org.apache.catalina.util.LifecycleBase.start(LifecycleBase.java:150)
... 9 more
Caused by: org.apache.catalina.LifecycleException: A child container failed during start
at org.apache.catalina.core.ContainerBase.startInternal(ContainerBase.java:1130)
at org.apache.catalina.core.StandardEngine.startInternal(StandardEngine.java:300)
at org.apache.catalina.util.LifecycleBase.start(LifecycleBase.java:150)
... 11 more

Dask-ml StandardScaler 内存泄漏和极端内存使用
如何解决Dask-ml StandardScaler 内存泄漏和极端内存使用?
我在使用 dask-ml StandardScaler 内存泄漏时遇到了一个问题,在非常大的(分块)阵列上导致永远无法解决问题。 这是我的代码和有关数据的信息。
from dask_ml.preprocessing import StandardScaler
import dask
from dask.distributed import Client,LocalCluster

import rioxarray

client = Client(memory_limit=''200GB'',n_workers=20,threads_per_worker=2,processes=False)
da = rioxarray.open_Rasterio(r''H:/DEV/GMS/data/raster_stack01.dat'')

da_rechunk = da.chunk({"band": 1,''x'': 5000,''y'': 5000})
在上面的结果中,我有这个:

接下来我尝试使用 StandardScaler:
scaler = StandardScaler()
scaler.fit(da_rechunk)
我收到这样的消息:
distributed.worker - WARNING - Memory use is high but worker has no data to store to disk.  Perhaps some other process is leaking memory?  Process memory: 130.39 GiB -- Worker memory limit: 186.26 GiB
distributed.worker - WARNING - Memory use is high but worker has no data to store to disk.  Perhaps some other process is leaking memory?  Process memory: 130.40 GiB -- Worker memory limit: 186.26 GiB
distributed.utils_perf - WARNING - full garbage collections took 98% cpu time recently (threshold: 10%)
distributed.worker - WARNING - gc.collect() took 3.578s. This is usually a sign that some tasks handle too many Python objects at the same time. Rechunking the work into smaller tasks might help.
在客户端仪表板上,我看到它使用了超过 4TB bytes + over 60GB spilled on disk。它在将所有块 xarrays 读入工作程序后挂起处理。
重新进入 (1,1000,1000) 无济于事。
StandardScaler 是否在 dask-ml 中实现用于此类用例?是 dask 的错误还是我做错了什么?
解决方法
暂无找到可以解决该程序问题的有效方法,小编努力寻找整理中!
如果你已经找到好的解决方法,欢迎将解决方案带上本链接一起发送给小编。
小编邮箱:dio#foxmail.com (将#修改为@)
![Failed to start component [StandardEngine[Catalina].StandardHost[localhost].StandardContext](http://www.gvkun.com/zb_users/upload/2025/02/7336b4d3-5f44-4a27-8a4b-c8c1d312f1a61739444846984.jpg "Failed to start component [StandardEngine[Catalina].StandardHost[localhost].StandardContext")
Failed to start component [StandardEngine[Catalina].StandardHost[localhost].StandardContext
使用 Eclipse 导入新的项目后,添加项目引用,但是不知道哪个包引用的问题,总是报这个错误。
A child container failed during start
java.util.concurrent.ExecutionException: org.apache.catalina.LifecycleException: Failed to start component [StandardEngine[Catalina].StandardHost[localhost].StandardContext[/LabWebServletHibernate]] at java.util.concurrent.FutureTask.report(Unknown Source) at java.util.concurrent.FutureTask.get(Unknown Source) at org.apache.catalina.core.ContainerBase.startInternal(ContainerBase.java:915) at org.apache.catalina.core.StandardHost.startInternal(StandardHost.java:871) at org.apache.catalina.util.LifecycleBase.start(LifecycleBase.java:145) at org.apache.catalina.core.ContainerBase$StartChild.call(ContainerBase.java:1407) at org.apache.catalina.core.ContainerBase$StartChild.call(ContainerBase.java:1397) at java.util.concurrent.FutureTask.run(Unknown Source) at java.util.concurrent.ThreadPoolExecutor.runWorker(Unknown Source) at java.util.concurrent.ThreadPoolExecutor$Worker.run(Unknown Source)
网上搜索到一个方案,解决了问题,在 .m2 文件夹下,将所有引用的包删除, repository,
在项目上,右键 maven -update project。
此方法解决了我的问题。
tks!
今天关于谁能解释我StandardScaler?和谁能解释我国一将军神奇八字的讲解已经结束,谢谢您的阅读,如果想了解更多关于.transform()在sklearn StandardScaler中到底做什么?、: Failed to start component [StandardEngine[Catalina].StandardHost[localhost].StandardContext[/solr]]、Dask-ml StandardScaler 内存泄漏和极端内存使用、Failed to start component [StandardEngine[Catalina].StandardHost[localhost].StandardContext的相关知识,请在本站搜索。
本文标签:


