关于pytorch学习-AUTOGRAD:AUTOMATICDIFFERENTIATION自动微分和pytorch自动求导机制理解的问题就给大家分享到这里,感谢你花时间阅读本站内容,更多关于appiu
关于pytorch 学习 - AUTOGRAD: AUTOMATIC DIFFERENTIATION 自动微分和pytorch自动求导机制理解的问题就给大家分享到这里,感谢你花时间阅读本站内容,更多关于appium - 手势密码实现 - automationName 是 automator2、asp.net-core – options的用途.AutomaticAuthenticate with UseJwtBearerAuthentication、Automatic Reference Counting、Enabling Customer Attribution Models on AWS with Automated Data Integration等相关知识的信息别忘了在本站进行查找喔。
本文目录一览:- pytorch 学习 - AUTOGRAD: AUTOMATIC DIFFERENTIATION 自动微分(pytorch自动求导机制理解)
- appium - 手势密码实现 - automationName 是 automator2
- asp.net-core – options的用途.AutomaticAuthenticate with UseJwtBearerAuthentication
- Automatic Reference Counting
- Enabling Customer Attribution Models on AWS with Automated Data Integration
")
pytorch 学习 - AUTOGRAD: AUTOMATIC DIFFERENTIATION 自动微分(pytorch自动求导机制理解)
参考:https://pytorch.org/tutorials/beginner/blitz/autograd_tutorial.html#sphx-glr-beginner-blitz-autograd-tutorial-py
AUTOGRAD: AUTOMATIC DIFFERENTIATION
PyTorch 中所有神经网络的核心是 autograd 包。让我们先简单地看一下这个,然后我们来训练我们的第一个神经网络。
autograd 包为张量上的所有操作提供自动微分。它是一个按运行定义的框架,这意味着的、该支持是由代码的运行方式定义的,并且每个迭代都可以是不同的。
让我们用更简单的术语和一些例子来看看。
Tensor
torch.Tensor 是包的中心类。如果将其属性.requires_grad 设置为 True,它将开始跟踪其上的所有操作。当你完成计算时,你可以调用 .backward () 函数并自动计算所有的梯度。这个张量的梯度将累积为.grad 属性。
要阻止张量跟踪历史,可以调用.detach () 将其从计算历史中分离出来,并防止跟踪未来的计算。
为了防止跟踪历史 (和使用内存),还可以使用 torch.no_grad (): 将代码块封装起来。这在评估模型时特别有用,因为模型可能有 requires_grad=True 的可训练参数,但我们不需要梯度。
还有一个类对 autograd 实现非常重要 —— 即函数。
张量和函数是相互联系的,并建立一个无环图,它编码了一个完整的计算历史。每个张量都有一个.grad_fn 属性,该属性引用一个创建了张量的函数 (用户创建的张量除外 —— 它们的 grad_fn 为 None)。
如果你想计算导数,你可以在一个张量上调用 .backward () 。如果张量是一个标量 (即它包含一个元素数据),你不需要指定任何参数给 .backward () ,但是如果它有更多的元素,你需要指定一个梯度参数,这是一个匹配形状的张量。
import torch创建一个 tensor x 并设置 requires_grad=True 去追踪其计算;然后进行加法操作得到 y, 这时候就能够查看 y 的.grad_fn 属性去得到其计算的说明:
#-*- coding: utf-8 -*-
from __future__ import print_function
import torch

x = torch.ones(2, 2, requires_grad=True)
print(x)

y = x + 2
print(y)

print(y.grad_fn)
返回:
(deeplearning) userdeMBP:pytorch user$ python test.py
tensor([[1., 1.],
        [1., 1.]], requires_grad=True)
tensor([[3., 3.],
        [3., 3.]], grad_fn=<AddBackward0>)
<AddBackward0 object at 0x101816358>
上面的最后的返回结果 AddBackward0 说明了该 y 是经过加法操作获得的
还可以进行更多的操作:
#-*- coding: utf-8 -*-
from __future__ import print_function
import torch

x = torch.ones(2, 2, requires_grad=True)

y = x + 2

z = y * y * 3
out = z.mean()

print(z)
print(out)
返回:
(deeplearning) userdeMBP:pytorch user$ python test.py
tensor([[27., 27.],
        [27., 27.]], grad_fn=<MulBackward0>)
tensor(27., grad_fn=<MeanBackward1>)
可以看出来 z 是乘法操作得出的,out 是求平均值操作得出的
.requires_grad_( ... ) 函数会改变现存的 Tensor 的内置 requires_grad 标签。如果没设置,这个标签默认为 False,即不计算梯度
#-*- coding: utf-8 -*-
from __future__ import print_function
import torch

a = torch.randn(2, 2)
a = ((a * 3) / (a - 1))
print(a)
print(a.requires_grad)

a.requires_grad_(True)
print(a)
print(a.requires_grad)

b = (a * a).sum()
print(b)
print(b.grad_fn)
返回:
(deeplearning) userdeMBP:pytorch user$ python test.py
tensor([[20.8490, -1.7316],
        [ 1.4831, -2.8223]])
False
tensor([[20.8490, -1.7316],
        [ 1.4831, -2.8223]], requires_grad=True)
True
tensor(447.8450, grad_fn=<SumBackward0>)
<SumBackward0 object at 0x10c381400>
Gradients 梯度
因为 out 中只包含了一个标量,out.backward () 和 out.backward (torch.tensor (1.)) 的值是相同的
#-*- coding: utf-8 -*-
from __future__ import print_function
import torch

x = torch.ones(2, 2, requires_grad=True)

y = x + 2

z = y * y * 3
out = z.mean()

print(out)
out.backward()
print(x.grad) # 得到out相对于x的梯度d(out)/dx
返回:
(deeplearning) userdeMBP:pytorch user$ python test.py
tensor(27., grad_fn=<MeanBackward1>)
tensor([[4.5000, 4.5000],
        [4.5000, 4.5000]])
省略计算步骤
你应该得到值为 4.5 的矩阵。让我们将 out 称为 Tensor "o"。o 的计算公式为 o=1/4 ∑izi,zi=3(xi+2)2 且 zi∣xi=1=27。因此 o 对 xi 求导为 ∂o/∂xi=3/2(xi+2), 带入 xi=1,则得到值 4.5.
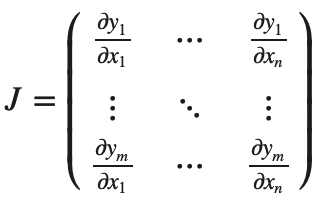
数学上,如果你有一个向量值函数 y⃗ =f(x⃗),那么 y⃗相对于 x⃗的梯度就是一个 Jacobian 矩阵:
一般来说,torch.autograd 是一个计算 vector-Jacobian 矩阵乘积的引擎。也就是说,给定任意向量 v=(v1v2⋯vm)T, 计算 vT⋅J。
如果 v 是一个标量函数 l=g(y⃗)的梯度,那么 v 为 v=(∂l/∂y1⋯∂l/∂ym)T, 根据链式法则,vector-Jacobian 矩阵乘积就是 l 相对与 x 的梯度: 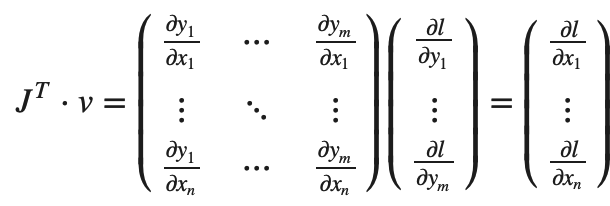
⚠️vT⋅J 给出一个行向量,通过 JT⋅v 该行向量可以被视为列向量
vector-Jacobian 矩阵乘积的这种特性使得将外部梯度输入具有非标量输出的模型变得非常方便。
现在让我们看一个 vector-Jacobian 矩阵乘积的例子:
#-*- coding: utf-8 -*-
from __future__ import print_function
import torch

x = torch.randn(3, requires_grad=True)
print(x)
y = x * 2
print(y)
while y.data.norm() < 1000: #归一化
    y = y * 2

print(y)
返回:
(deeplearning) userdeMBP:pytorch user$ python test.py
tensor([0.6542, 0.1118, 0.1979], requires_grad=True)
tensor([1.3084, 0.2236, 0.3958], grad_fn=<MulBackward0>)
tensor([1339.8406,  229.0077,  405.2867], grad_fn=<MulBackward0>)
在这种情况下,y 不再是标量。 torch.autograd 不能直接计算出整个 Jacobian 矩阵,但是如果我们只想要 vector-Jacobian 矩阵乘积,只需将向量作为参数向后传递:
#-*- coding: utf-8 -*-
from __future__ import print_function
import torch

x = torch.randn(3, requires_grad=True)
print(x)
y = x * 2
print(y)
while y.data.norm() < 1000: #归一化
    y = y * 2

v = torch.tensor([0.1, 1.0, 0.0001], dtype=torch.float)
y.backward(v)

print(x.grad)
返回:
(deeplearning) userdeMBP:pytorch user$ python test.py
tensor([-0.7163,  1.6850, -0.0286], requires_grad=True)
tensor([-1.4325,  3.3700, -0.0572], grad_fn=<MulBackward0>)
tensor([1.0240e+02, 1.0240e+03, 1.0240e-01])
你可以通过使用 with torch.no_grad(): 来封装代码块去阻止带有.requires_grad=True 配置的 Tensors 的 autograd 去追踪历史:
#-*- coding: utf-8 -*-
from __future__ import print_function
import torch

x = torch.randn(3, requires_grad=True)

print(x.requires_grad)
print((x ** 2).requires_grad)

with torch.no_grad():
    print((x ** 2).requires_grad)
返回:
(deeplearning) userdeMBP:pytorch user$ python test.py
True
True
False
有关 autograd 和 Function 的文档可见 https://pytorch.org/docs/autograd

appium - 手势密码实现 - automationName 是 automator2
上一篇博客已经说了
appium - 手势密码实现 - automationName 是 Appium 的情况
下面就说一下 automator2 的情况;
手势密码的 moveTo 方法的参数进行了改变。 参数是相对于当前的位置变化。 而不是相对于 beginX 和 beginY 变化。
ta.press(beginX, beginY).moveTo(0, 2*yStep).moveTo(0, 2*yStep).moveTo(2*xStep, 0).release().perform();
仅改变参数还不行,还需要将
TouchAction ta = new TouchAction(driver);放在for循环的里面, 即没开始一次手势密码,就new一个新的TouchAction, 否则会报错(坐标超出页面)public void setLockPattern(String id, int index) throws Exception {
String page = driver.getPageSource();
//logger.info("page = " + page);
if (page.contains(id)) {//检测是否是有手势密码出现
logger.info("检测到有手势密码");
/*
List<AndroidElement> element = driver.findElements(By.xpath(Constant.XPATH_VIEW + "[contains(@resource-id,''" + id + "'')]"));
Thread.sleep(1000);//触摸前要等待1秒
AndroidElement gelemt = element.get(0);//获取到这个元素把它当做一个对象来做
*/
AndroidElement gelemt = driver.findElement(By.xpath(Constant.XPATH_VIEW + "[contains(@resource-id,''" + id + "'')]"));
int startX = gelemt.getLocation().getX();//获取元素的起始点x坐标
int startY = gelemt.getLocation().getY();//获取元素的起始点y坐标
int height = gelemt.getSize().getHeight();//获取元素的高
int width = gelemt.getSize().getWidth();//获取元素的宽
int xStep = width / 6;//把宽分成6份
int yStep = height / 6;//把高分成6份
int beginX = startX + 3*xStep;//计算触摸起始点x坐标
int beginY = startY + yStep;//计算触摸点y坐标
logger.info("开始设置手势密码");
for(int i = 0; i < index; i++){
TouchAction ta = new TouchAction(driver); //初始化TouchAction
//appium
//ta.press(beginX, beginY).moveTo(0, beginY + 2*yStep).moveTo(0, beginY + 4*yStep).moveTo(beginX + 2*xStep, beginY + 4*yStep).release().perform();
// automator2
ta.press(beginX, beginY).moveTo(0, 2*yStep).moveTo(0, 2*yStep).moveTo(2*xStep, 0).release().perform();
sleep(2000);
}
logger.info("手势密码设置完毕");
}
}

asp.net-core – options的用途.AutomaticAuthenticate with UseJwtBearerAuthentication
Unable to cast object of type 'Newtonsoft.Json.Linq.JArray' to type 'System.IConvertible'.
到目前为止我可以看到的决定因素似乎是选项的设置.AutomaticAuthenticate.如果这是真的,那么我得到例外,否则,我没有.
什么是AutomaticAuthenticate,为什么我需要启用它?
app.UseJwtBearerAuthentication(options =>
    {
        options.AutomaticAuthenticate = true;
    }
这是完整的堆栈跟踪:
at System.Convert.ToInt32(Object value,IFormatProvider provider)
   at System.IdentityModel.Tokens.Jwt.JwtPayload.GetIntClaim(String claimType)
   at System.IdentityModel.Tokens.Jwt.JwtPayload.get_Nbf()
   at System.IdentityModel.Tokens.Jwt.JwtSecurityTokenHandler.Validatetoken(String token,TokenValidationParameters validationParameters,SecurityToken& validatedToken)
   at Microsoft.AspNet.Authentication.JwtBearer.JwtBearerHandler.<HandleAuthenticateAsync>d__1.MoveNext()
--- End of stack trace from prevIoUs location where exception was thrown ---
   at System.Runtime.ExceptionServices.ExceptiondispatchInfo.Throw()
   at Microsoft.AspNet.Authentication.JwtBearer.JwtBearerHandler.<HandleAuthenticateAsync>d__1.MoveNext()
--- End of stack trace from prevIoUs location where exception was thrown ---
   at System.Runtime.CompilerServices.TaskAwaiter.ThrowForNonSuccess(Task task)
   at System.Runtime.CompilerServices.TaskAwaiter.HandleNonSuccessAndDebuggerNotification(Task task)
   at System.Runtime.CompilerServices.TaskAwaiter`1.GetResult()
   at Microsoft.AspNet.Authentication.AuthenticationHandler`1.<InitializeAsync>d__48.MoveNext()
--- End of stack trace from prevIoUs location where exception was thrown ---
   at System.Runtime.CompilerServices.TaskAwaiter.ThrowForNonSuccess(Task task)
   at System.Runtime.CompilerServices.TaskAwaiter.HandleNonSuccessAndDebuggerNotification(Task task)
   at System.Runtime.CompilerServices.TaskAwaiter.GetResult()
   at Microsoft.AspNet.Authentication.AuthenticationMiddleware`1.<Invoke>d__18.MoveNext()
--- End of stack trace from prevIoUs location where exception was thrown ---
   at System.Runtime.CompilerServices.TaskAwaiter.ThrowForNonSuccess(Task task)
   at System.Runtime.CompilerServices.TaskAwaiter.HandleNonSuccessAndDebuggerNotification(Task task)
   at System.Runtime.CompilerServices.TaskAwaiter.GetResult()
   at Api.Startup.<<Configure>b__9_0>d.MoveNext() in ...\Startup.cs:line 156
更新根本原因
我们的代码库正在为nbf,exp和iat创建重复声明.这就解释了为什么get_Nbf在堆栈跟踪中以及关于“JArray”的抱怨,因为每个值都是数组而不是值.
解决方法
如果它没有发生,那么您需要通过在authorize属性中指定承载的方案来请求中间件设置标识.
[Authorize(AuthenticationSchemes = "YourBearerSchemeName")]
或者你在政策中设置这个;
options.AddPolicy("RequireBearer",policy =>
{
    policy.AuthenticationSchemes.Add("YourBearerSchemeName");
    policy.RequireAuthenticatedUser();

});
因此,通过将其设置为false,您实际上并没有运行持有者的东西,直到您要求它为止,您只是将异常关闭直到稍后.

Automatic Reference Counting

Enabling Customer Attribution Models on AWS with Automated Data Integration
https://amazonaws-china.com/blogs/apn/enabling-customer-attribution-models-on-aws-with-automated-data-integration/
By Charles Wang, Product Evangelist at Fivetran
 |
 |
 |
Every company wants to understand the levers that influence customers’ decisions. Doing so requires a chronology of a customer’s interactions with a company to identify the events and experiences that influence their decision to buy or not.
Attribution models allow companies to guide marketing, sales, and support efforts using data, and then custom tailor every customer’s experience for maximum effect.
In this post, I will discuss how simple data integration can be, how it enables customer analytics, and how customer data can be used to build attribution models to uncover what makes customers tick.mar
Fivetran is an AWS Partner Network (APN) Advanced Technology Partner and data pipeline tool that provides automated data connectors to integrate data into data warehouses such as Amazon Redshift. Fivetran has earned the Amazon Redshift Ready designation.
Combined together, cloud-based data pipeline tools and data warehouses form the infrastructure for integrating and centralizing data from across a company’s operations and activities, enabling business intelligence and analytics activities.
Customer Analytics Requires Data Integration
With the growth of cloud-based services, the average business now uses more than 100 applications. These systems generate an enormous volume of data that contain insights about an organization’s operations and customer interactions.
However, data can be useless to an organization that lacks the capacity to integrate and analyze it. In fact, a majority of commercial data is thought to consist of dark data, which is collected and processed but not used for analysis. To build attribution models, an organization needs to integrate and centralize data from its applications, databases, event trackers, and file systems.
As with many other business operations—e-commerce, customer relationship management, payment processing, and more—there is no need for an organization to build tools for data integration in-house when a software-as-a-service (SaaS) product that accomplishes the same tasks already exists.
Data pipeline tools like Fivetran provide data connectors to integrate data from API endpoints, database logs, event streams, and files. Every data connector is built and maintained by an expert team that understands the idiosyncrasies of the underlying data source, is stress-tested against a range of corner cases, and operates with minimal intervention by the end user.
Connectors bring data from data sources to a data warehouse on a regular sync schedule, and, when managed by a conscientious team, will automatically adapt to schema and API changes.
Similarly, data warehouses like Amazon Redshift allow organizations to maintain a single source of truth in the form of a relational database. Cloud-based data warehouses offer excellent, parallelized performance, the ability to scale computation and storage resources up and down as needed, and the ability to conduct analytics operations using SQL.
An effective data stack—with a data pipeline, data warehouse, and business intelligence tool carefully selected to meet your needs—allows you to focus on what your analysts and executives really care about, which is understanding your customers so that your organization can do its best work.
The following diagram illustrates the stack:
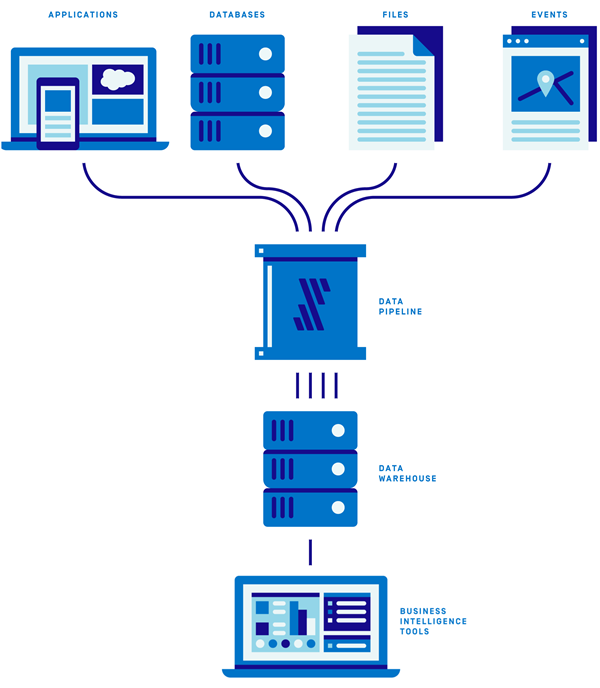
Figure 1 – A data stack consists of data sources, pipeline, data warehouse, and BI tool.
Fivetran, Redshift, and Customer Attribution in the Real World
The design and stationery company Papier relied heavily on paid marketing to drive sales. Shortly before adopting Fivetran, Papier began to use Amazon Redshift as a central repository for ad, transaction, and clickstream data.
Originally, the CTO used custom extract, transform, and load (ETL) scripts and infrastructure code to import data from ad providers and other sources.
This home-brewed approach introduced inaccuracies and inconsistencies to the data, forcing the team to frequently re-sync the data at the cost of substantial downtime. The CTO would personally spend one full working day per week resolving ETL issues.
This time investment proved untenable as Papier continued to grow and add data sources. They needed an automated solution that accommodated a wide range of data sources with a minimum of human intervention and data integrity issues.
Combining Fivetran and Redshift allowed Papier to connect data from ad providers with purchases, enabling them to calculate the lifetime value of customers and grasp the ROA and ROI on advertising campaigns. With this solution, Papier is now able to pursue product roadmaps with far greater strategic depth.
Fivetran and Amazon Redshift provide an off-the-shelf solution to the challenge of putting the relevant records into one environment. Learn more about the Fivetran and Papier case study >>
How to Integrate Data
It’s extremely simple to connect Amazon Redshift with Fivetran and begin integrating data. Before you start, you must have the following:
- Access to your AWS console so you can whitelist Fivetran IP addresses.
- Ability to connect an admin user, or have permissions to create a limited user with CREATE permissions.
- An existing Redshift instance.
Make sure you have the following information handy as well:
- If your Redshift cluster is in an Amazon Virtual Private Cloud (VPC) or an Amazon Elastic Compute Cloud (Amazon EC2) instance.
- Your host and port.
For detailed instructions on authorizing your Redshift cluster to connect with Fivetran, see the documentation.
The workflow for setting up Fivetran is extremely simple:
- Upon starting a Fivetran account, you’ll be prompted to choose an existing data warehouse or spin up a new one. Choose I already have a warehouse.
- You’ll then see a list of data warehouse options. Select Redshift.
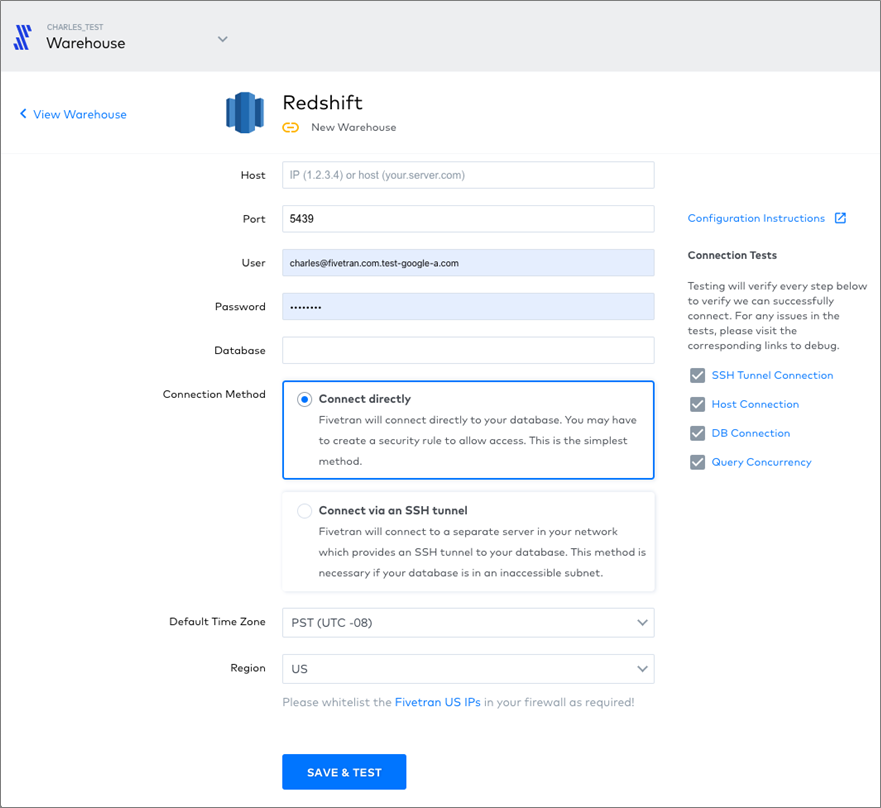
Figure 2 – Setting up Amazon Redshift data warehouse in Fivetran.
- Enter your credentials and choose whether you’ll connect directly or via SSH tunnel. Click Save and Test.
- Now, you will subsequently be able to access the Fivetran dashboard. From here, you can set up new connectors to begin syncing data to your data warehouse. Click + Connector or Create Your First Connector.
- You will be taken to a list of connectors, and you can scroll or filter by text. Click on the desired entry in the list.
To set up the connector, you must enter the credentials to the API, transactional database, event tracker, or file system. Below is an example of the interface for a transactional database connection.

Figure 3 – These fields should be familiar if you regularly work with database connections.
Below is an example of an app connection. Clicking Authorize takes you to the app itself, where you must authorize the connection.

Figure 4 – Carefully select the destination schema and table in the data warehouse.
Next, here’s an example of the interface for an event tracker.
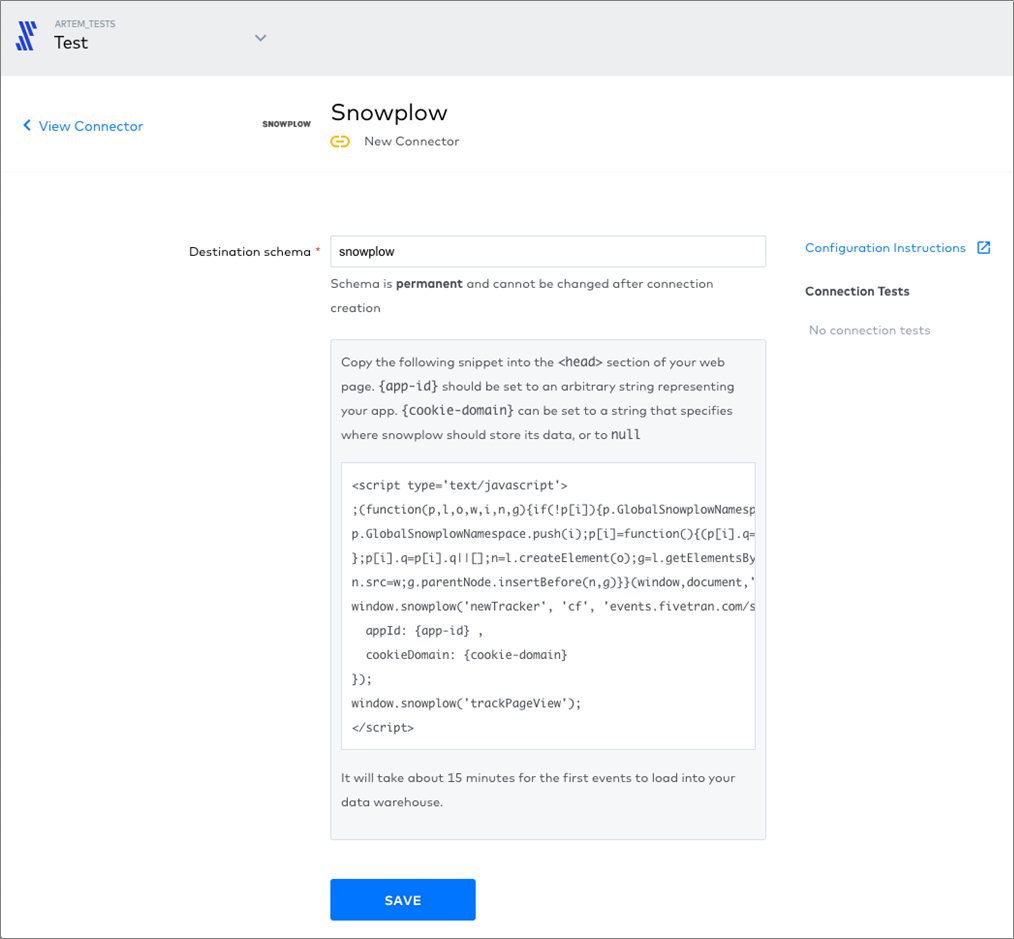
Figure 5 – Specify the destination schema, and then insert the code snippet into your HTML.
In the examples above, we have demonstrated that setting up data integration is a matter of following a relatively simple sequence of steps. But how do you actually build an attribution model?
How to Approach Customer Attribution
Depending on the particulars of an industry, your customers may interact with your company across any of the following platforms:
- Advertising
- Social media
- Website or mobile app event tracking
- Customer relationship management tools
- E-commerce
- Payment processing
Ideally, you should assemble a full chronology of the customer’s journey from the first touch all the way to purchase. This allows you to understand the inflection points that make or break a potential purchase.
Depending on the exact goods and services your organization provides, customers could conceivably have multiple journeys as they make recurring purchases.
A general representation of a customer journey consists of the following steps:
- Discovery: Customers realize they have a want or need.
- Research: Compares vendors and products.
- Engage: Enters your (virtual or brick-and-mortar) storefront, browses, and speaks with your sales staff.
- Purchase: Customer purchases the product or service.
- Retain: Returns to the vendor for future purchases.
Suppose you run an e-commerce store; concretely, a customer journey may look like this:
- Customer learns of a new type of product through their acquaintances and searches for it online.
- A social media site uses cookies from the customer’s search history and surfaces a banner ad for your company, who finds it and clicks it while browsing social media. The interaction is recorded by your social media advertising account.
- Customer arrives at your website via the banner ad and begins reading reviews and browsing your blog out of curiosity. Every page the customer visits on your site is recorded by your event tracking software.
- Customer adds items to their cart and creates an account on your site. Your e-commerce platform records the prospective transactions.
- Customer abandons the cart for a few days as other priorities draw their attention, but is reminded by your email marketing software that their cart has items. The customer clicks on a CTA to complete the order. The email marketing software records this interaction.
- Both the e-commerce platform and online payment processing platform record the transaction when the customer completes the order.
- A week or so later, the customer leaves a review on your company’s social media profile.
Note how the steps above spanned six distinct platforms operated by your company: social media advertising, website event tracking, e-commerce, email marketing, payment processing, and social media.
To build a chronology of this customer’s interactions, you must put the relevant records into one environment and attribute them to the same customer.
How to Identify Customers Across Platforms
Our example in the previous section demonstrates just how complicated the customer flow can be in terms of traversing various platforms. That’s to say nothing of the possibility your customers switch from mobile to desktop devices, or from home networks and coffee shops to office networks over the course of a single day.
There are no perfect solutions, but you can use several identifiers to distinguish between customers, devices, and campaigns across their web-based activities.
- IP addresses are unique at the network level, so all web-connected devices in the home or office might have the same IP address. If you are a B2B company and have engaged the services of a market research company, there’s a chance they can associate an IP address with the name of a company.
- Cookies are tags assigned to a browser session.
- User agents provide information about users’ browser, operating system, and device.
- Email and social media are two ways that users can register with your site, and you can use these accounts as identifiers. You’ll have to determine the trade-off between the convenience, to you, of requiring registration and login, and the convenience to users of using your website without an account.
- UTM extensions can be used to distinguish different sources of traffic. A link to a page from social media may be tagged with character suggest.
Examples of Attribution Models
Once you have assembled a chronology of customers’ interactions with your company, you’ll need to determine which steps in the process mattered most. There are several classic customer attribution models, each assigning different weights to different stages of a customer interaction.
The simplest attribution models are single-touch, and only require you to be certain of the first or last interaction your customer has with your company.
Last-Touch Attribution
Last-touch attribution attributes 100 percent of the credit for a sale to the last interaction between the customer and your company.
This is the default approach used by marketers and the simplest to implement; all you have to know is the last thing the customer did before purchasing.
First-Touch Attribution
First-touch attribution attributes 100 percent of the credit for a sale to the first interaction between the customer and your company.
Like last-touch attribution, it’s suitable to cases where your company has low brand recognition or a very short sales cycle.

U-Shaped Attribution
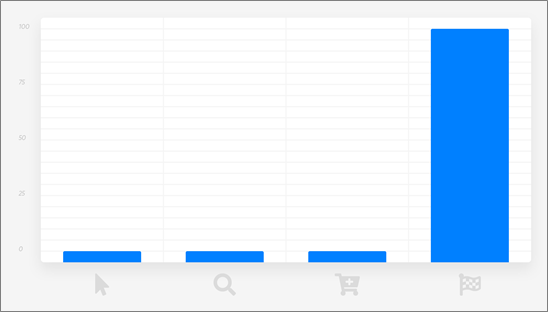
U-shaped attribution, also called “position-based,” attributes the lion’s share of credit to the first and last interactions, while dividing the remainder among the other interactions.
This allows the interactions that are generally considered the most important—the first and last—to be strongly considered without ignoring the rest.
Suppose the customer had four recorded interactions with your company. The first and last interactions might each receive 40 percent of the credit, while the two middle interactions receive 10 percent each.

.
It could also be 50/0/0/50 if you don’t care at all about the middle interactions.
.

Linear Attribution
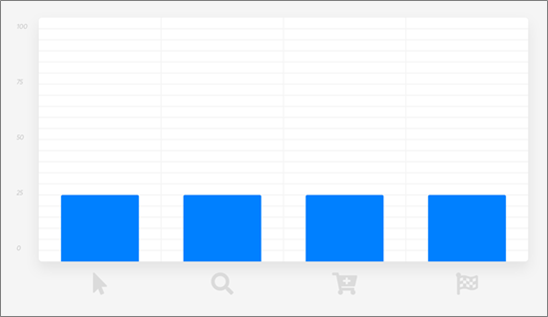
Linear attribution is strictly agnostic and assigns equal weight to every interaction. This is a good approach if you don’t have any prior, compelling beliefs about the importance of any particular interaction.
Decay Attribution
Decay attribution gradually assigns more weight the closer an interaction is to the last. It’s best suited to cases where a long-term relationship is built between your company and the customer.

Next Steps
Customer analytics does not end with the models mentioned above. More sophisticated custom models, built off of Markov chains or survival modeling, are a next step. It doesn’t hurt to sanity check quantitative work with the qualitative step of simply asking your customers what they do, either.
With the proliferation of applications, platforms, and devices, and constant growth of data, it’s hard enough to match records across the multitude of data sources and touch points your organization uses when they are already in one place.
Without a data pipeline tool like Fivetran and a data warehouse like Amazon Redshift, the task of integrating data can be insurmountable.
Summary
In this guide, we have explored how analytics depend on a robust data integration solution and offered a practical guide to getting started with data integration and customer attribution.
Customer attribution models require the ability to match entities across multiple data sources. This requires a cloud-based data pipeline tool, and a cloud data warehouse like Amazon Redshift.
You should not build your own data connectors between your data sources and data warehouse. Doing so is complicated and error-prone. You should prefer automation to manual intervention wherever possible. A good data integration solution should require a relatively simple setup procedure.
There are a number of different approaches to modeling customer journeys, identifying customers, and producing customer attribution models. Different approaches are appropriate for different use cases. Pick and choose based on your needs.
The content and opinions in this blog are those of the third party author and AWS is not responsible for the content or accuracy of this post.
.

.
Fivetran – APN Partner Spotlight
Fivetran is an Amazon Redshift Ready Partner. Its data pipeline tool provides automated data connectors to integrate data into data warehouses such as Redshift.
Contact Fivetran | Solution Overview | AWS Marketplace
*Already worked with Fivetran? Rate this Partner
*To review an APN Partner, you must be an AWS customer that has worked with them directly on a project.
我们今天的关于pytorch 学习 - AUTOGRAD: AUTOMATIC DIFFERENTIATION 自动微分和pytorch自动求导机制理解的分享已经告一段落,感谢您的关注,如果您想了解更多关于appium - 手势密码实现 - automationName 是 automator2、asp.net-core – options的用途.AutomaticAuthenticate with UseJwtBearerAuthentication、Automatic Reference Counting、Enabling Customer Attribution Models on AWS with Automated Data Integration的相关信息,请在本站查询。
本文标签:


