以上就是给各位分享GrailsInAction-03.Modelingthedomain,同时本文还将给你拓展ASM:ActiveShapeModels--TheirTrainingandApplic
以上就是给各位分享Grails In Action-03.Modeling the domain,同时本文还将给你拓展ASM: Active Shape Models--Their Training and Application、Automating model retraining and deployment using the AWS Step Functions Data Science SDK for Amaz...、Building Windows containers with AWS CodePipeline and custom actions、Enabling Customer Attribution Models on AWS with Automated Data Integration等相关知识,如果能碰巧解决你现在面临的问题,别忘了关注本站,现在开始吧!
本文目录一览:- Grails In Action-03.Modeling the domain
- ASM: Active Shape Models--Their Training and Application
- Automating model retraining and deployment using the AWS Step Functions Data Science SDK for Amaz...
- Building Windows containers with AWS CodePipeline and custom actions
- Enabling Customer Attribution Models on AWS with Automated Data Integration

Grails In Action-03.Modeling the domain
Grails In Action是使用Grails技术构建一个名叫Hubbub的博客网站,下面是第三章的代码。
第三章主要讲解构建hubbub博客需要的domain对象,重点是模型对象关系,涉及到的知识点如下:
- User和Profile是一对一的关系
- User和User自身有从属关系
- User和Tag是多对多的关系
- User和Post是多对多的关系
- Post和Tag是多对多的关系
- 验证
- 排序
- lazy
- ApplicationUser和User的验证属性继承
- spock测试,关于spock test的资料不多,不过非常值得一试。可以看看这个
构建模型
User.groovy
<!-- lang: groovy -->
package com.grailsinaction

class User {

    String loginId
    String password
    Date dateCreated

    static hasOne = [ profile : Profile ]
    static hasMany = [ posts : Post, tags : Tag, following : User ]

    static constraints = {
        loginId size: 3..20, unique: true, blank: false
        password size: 6..8, blank: false
        profile nullable: true
    }

    static mapping = {
        profile lazy: false
    }
}
Profile.groovy
<!-- lang: groovy -->
package com.grailsinaction

class Profile {
    User user
    byte[] photo
    String fullName
    String bio
    String homepage
    String email
    String timezone
    String country
    String jabberAddress

    static constraints = {
        fullName blank: false
        bio nullable: true, maxSize: 1000
        homepage url: true, nullable: true
        email email: true, nullable: false
        photo nullable: true
        country nullable: true
        timezone nullable: true
        jabberAddress email: true, nullable: true
    }
}
Post.groovy
<!-- lang: groovy -->
package com.grailsinaction

class Post {

    String content
    Date dateCreated

    static belongsTo = [ user : User ]

    static hasMany = [ tags : Tag ]

    static constraints = {
        content blank: false
    }

    static mapping = {
        sort dateCreated: "desc"
    }
}
Tag.groovy
<!-- lang: groovy -->
package com.grailsinaction

class Tag {

    String name
    User user

    static hasMany = [ posts : Post ]
    static belongsTo = [ User, Post ]

    static constraints = {
        name blank: false
    }
}
ApplicationUser.groovy
<!-- lang: groovy -->
package com.grailsinaction

class ApplicationUser {

	String applicationName
	String password
	String apiKey

	static constraints = {

	    importFrom User, include: [''password'']
	    applicationName blank: false, unique: true
	    apiKey blank: false
	}
}
集成测试
UserIntegrationSpec.groovy
<!-- lang: groovy -->
package com.grailsinaction

import grails.plugin.spock.IntegrationSpec

class UserIntegrationSpec extends IntegrationSpec {

    def "Saving our first user to the database"() {

        given: "A brand new user"
            def joe = new User(loginId: ''joe'', password: ''secret'')

        when: "the user is saved"
            joe.save()

        then: "it saved successfully and can be found in the database"
            joe.errors.errorCount == 0
            joe.id != null
            User.get(joe.id).loginId == joe.loginId
    }

    def "Deleting an existing user removes it from the database"() {

        given: "An existing user"
            def user = new User(loginId: ''joe'', password: ''secret'').save(failOnError: true)

        when: "The user is deleted"
            def foundUser = User.get(user.id)
            foundUser.delete(flush: true)

        then: "The user is removed from the database"
            !User.exists(foundUser.id)
    }

    def "Saving a user with invalid properties causes an error"() {

        given: "A user which fails several field validations"
            def user = new User(loginId: ''chuck_norris'', password: ''tiny'')

        when: "The user is validated"
            user.validate()

        then:
            user.hasErrors()

            "size.toosmall" == user.errors.getFieldError("password").code
            "tiny" == user.errors.getFieldError("password").rejectedValue
            !user.errors.getFieldError("loginId")

            // ''homepage'' is now on the Profile class, so is not validated.
    }

    def "Recovering from a failed save by fixing invalid properties"() {

        given: "A user that has invalid properties"
            def chuck = new User(loginId: ''chuck_norris'', password: ''tiny'')
            assert chuck.save() == null
            assert chuck.hasErrors()

         when: "We fix the invalid properties"
            chuck.password = "fistfist"

            // ''homepage'' is now on Profile so can''t be set on the user.

        then: "The user saves and validates fine"
            chuck.validate()
            !chuck.hasErrors()
            chuck.save()
    }

    def "Ensure a user can follow other users"() {

        given: "A set of baseline users"
            def glen = new User(loginId: ''glen'', password:''password'').save()
            def peter = new User(loginId: ''peter'', password:''password'').save()
            def sven = new User(loginId: ''sven'', password:''password'').save()

        when: "Glen follows Peter, and Sven follows Peter"
            glen.addToFollowing(peter)
            glen.addToFollowing(sven)
            sven.addToFollowing(peter)

        then: "Follower counts should match following people"
            2 == glen.following.size()
            1 == sven.following.size()
    }
}
PostIntegrationSpec.groovy
<!-- lang: groovy -->
package com.grailsinaction

import grails.plugin.spock.IntegrationSpec

class PostIntegrationSpec extends IntegrationSpec {

   def "Adding posts to user links post to user"() {

        given: "A brand new user"
            def user = new User(loginId: ''joe'',password: ''secret'').save(failOnError: true)

        when: "Several posts are added to the user"
            user.addToPosts(new Post(content: "First post... W00t!"))
            user.addToPosts(new Post(content: "Second post..."))
            user.addToPosts(new Post(content: "Third post..."))

        then: "The user has a list of posts attached"
            3 == User.get(user.id).posts.size()
   }

   def "Ensure posts linked to a user can be retrieved"() {

        given: "A user with several posts"
            def user = new User(loginId: ''joe'', password: ''secret'').save(failOnError: true)
            user.addToPosts(new Post(content: "First"))
            user.addToPosts(new Post(content: "Second"))
            user.addToPosts(new Post(content: "Third"))

        when: "The user is retrieved by their id"
            def foundUser = User.get(user.id)
            List<String> sortedPostContent = foundUser.posts.collect { it.content }.sort()

        then: "The posts appear on the retrieved user"
            sortedPostContent == [''First'', ''Second'', ''Third'']
    }

    def "Exercise tagging several posts with various tags"() {

        given: "A user with a set of tags"
            def user = new User(loginId: ''joe'', password: ''secret'').save(failOnError: true)
            def tagGroovy = new Tag(name: ''groovy'')
            def tagGrails = new Tag(name: ''grails'')
            user.addToTags(tagGroovy)
            user.addToTags(tagGrails)

        when: "The user tags two fresh posts"
            def groovyPost = new Post(content: "A groovy post")
            user.addToPosts(groovyPost)
            groovyPost.addToTags(tagGroovy)

            def bothPost = new Post(content: "A groovy and grails post")
            user.addToPosts(bothPost)
            bothPost.addToTags(tagGroovy)
            bothPost.addToTags(tagGrails)

        then:
            user.tags*.name.sort() == [''grails'', ''groovy'']
            1 == groovyPost.tags.size()
            2 == bothPost.tags.size()
    }
}
ApplicationUserIntegrationSpec.groovy
<!-- lang: groovy -->
package com.grailsinaction

import grails.plugin.spock.IntegrationSpec

class ApplicationUserIntegrationSpec extends IntegrationSpec {

    def "Recovering from a failed save by fixing invalid properties"() {

        given: "A user that has invalid properties"
            def chuck = new ApplicationUser(applicationName: ''chuck_bot'', password: ''tiny'', apiKey: ''cafebeef00'')
            assert chuck.save() == null
            assert chuck.hasErrors()

        when: "We fix the invalid properties"
            chuck.password = "fistfist"
            chuck.save(failOnError: true)

        then: "The user saves and validates fine"
            chuck.validate()
            !chuck.hasErrors()
            chuck.save()
            println chuck.findAll()
    }
}
代码下载
地址

ASM: Active Shape Models--Their Training and Application
这篇论文的前半部分基本就是论文《Training Models of Shape from Sets of Examples》的全部内容,只不过多两个应用示例,后半部分在PDM模型的基础上提出了ASM模型。
对于ASM模型的介绍在博客中有详细的说明,出于时间的考虑这里仅列出我对ASM模型的部分理解,如下:
1> 在训练ASM模型时,为了确保由于![]() 的变化产生的形状与训练集中的形状类似,需要对
的变化产生的形状与训练集中的形状类似,需要对![]() 的值进行一些限制(就是所谓的形状约束),即
的值进行一些限制(就是所谓的形状约束),即
")
其中![]() 通常为3。如果
通常为3。如果![]() 在更新过程中
在更新过程中![]() ,则使用下式对
,则使用下式对![]() 加以约束。
加以约束。
![]()
2> 在训练集上为每个特征点计算局部特征,用于根据相似度量确定每个特征点的下一个位置,即确定![]()
3> ASM的搜索策略非常重要,具体步骤如下:
a) 对平均形状进行仿射变换得到一个初始模型
![]()
其中,![]() ,是根据平均形状和PDM的参数
,是根据平均形状和PDM的参数![]() 计算得到的;
计算得到的;![]() 是中心点坐标。
是中心点坐标。
b) 根据第二点中计算得到的局部特征计算出每个特征点的新位置,可得位移向量
![]()
c) 此时已经知道初始模型和经过仿射变换后的模型,那么就可以计算出仿射变换参数的变化量![]() 、
、![]() 、
、![]() 、
、![]() 。如下:
。如下:
![]()
代入a)中表达式后可得
![]()
同时
![]()
所以有
![]()
再者,由PDM模型可知
![]()
上式减去![]() 后可得
后可得
![]()
即
![]()
至此,可以求出![]() 。
。
参数的更新顺序为![]() ,所以可以对仿射变换参数和b做如下更新:
,所以可以对仿射变换参数和b做如下更新:
") 式中
式中![]() 、
、![]() 、
、![]() 、
、![]() 是控制参数变化的权值。
是控制参数变化的权值。
此时,一次搜索过程就结束了。根据![]() 和
和![]() 即可计算出新的形状。
即可计算出新的形状。
d) 重复执行该搜索过程
e) 当ASM模型的参数(仿射变换的参数和b)变化不是很大或迭代次数达到指定的阈值时就结束该搜索过程。
参考文献:
1> ASM(Active Shape Model)算法介绍
2>人脸识别之ASM模型-Active Shape Models - ''Smart Snakes''
3> ASM(Active Shape Model)算法介绍

Automating model retraining and deployment using the AWS Step Functions Data Science SDK for Amaz...
https://amazonaws-china.com/blogs/machine-learning/automating-model-retraining-and-deployment-using-the-aws-step-functions-data-science-sdk-for-amazon-sagemaker/
As machine learning (ML) becomes a larger part of companies’ core business, there is a greater emphasis on reducing the time from model creation to deployment. In November of 2019, AWS released the AWS Step Functions Data Science SDK for Amazon SageMaker, an open-source SDK that allows developers to create Step Functions-based machine learning workflows in Python. You can now use the SDK to create reusable model deployment workflows with the same tools you use to develop models. You can find the complete notebook for this solution in the “automate_model_retraining_workflow” folder of our GitHub repo.
This post demonstrates the capabilities of the Data Science SDK with a common use case: scheduled model retraining and deployment. In this post, you create a serverless workflow to train an ML model, check the performance of the model against a validation dataset, and deploy the model to production if the model accuracy surpasses a set threshold. Finally, the post shows how to trigger a workflow based off a periodic schedule.
The following diagram shows the serverless workflow described above utilizing AWS Step Functions.

This post uses the following AWS services:
- AWS Step Functions allows you to coordinate several AWS services into a serverless workflow. You can design and run workflows in which the output of one step acts as the input to the next step, and embed error handling into the workflow.
- Amazon SageMaker is a fully managed service that provides developers and data scientists with the tools to build, train, and deploy different types of ML models.
- AWS Glue is a fully managed extract, transform, and load (ETL) service. You can point AWS Glue to a supported data store and it generates the code to extract and load it into your target data store. AWS Glue runs on a distributed Apache Spark environment, which allows you to take advantage of Spark without managing the infrastructure.
- AWS Lambda is a compute service that lets you run code without provisioning or managing servers. Lambda executes your code only when triggered and scales automatically, from a few requests per day to thousands per second.
- Amazon EventBridge is a serverless event bus that makes it easy to connect different SaaS applications, AWS services, and data from your applications.
Overview of the SDK
The SDK provides a new way to use AWS Step Functions. A Step Function is a state machine that consists of a series of discrete steps. Each step can perform work, make choices, initiate parallel execution, or manage timeouts. You can develop individual steps and use Step Functions to handle the triggering, coordination, and state of the overall workflow. Before the Data Science SDK, you had to define Step Functions using the JSON-based Amazon States Language. With the SDK, you can now easily create, execute, and visualize Step Functions using Python code.
This post provides an overview of the SDK, including how to create Step Function steps, work with parameters, integrate service-specific capabilities, and link these steps together to create and visualize a workflow. You can find several code examples throughout the post; however, we created a detailed Amazon SageMaker notebook of the entire process. For more information, see our GitHub repo.
Steps, parameters, and dynamic workflows
Within a Step Function, each step passes its output to the next. You can use these outputs in the following steps to create dynamic workflows. You can also pass input parameters for each Step Function execution. Parameters allow you to keep your workflow general so it can support other projects.
To use the SDK to define the required input parameters for your workflow, see the following code:
execution_input = ExecutionInput(schema={
    ''TrainingJobName'': str,
    ''GlueJobName'': str,
    ''ModelName'': str,
    ''EndpointName'': str,
    ''LambdaFunctionName'': str
})
Built-in service integrations
The Data Science SDK integrates with several AWS services. The integrations allow you to directly control the supported services, without needing to write API calls. This post uses the AWS Glue, Lambda, and Amazon SageMaker integrations. For more information, see AWS Step Functions Service Integrations.
For model retraining, you first need to retrieve the latest data. You also need to enrich raw data while saving it to a file type and location supported by your ML model. AWS Glue connects to most data stores, supports custom scripting in Python, and doesn’t require management of servers. Use AWS Glue to start your workflow by reading data from your production data store and writing the transformed data to Amazon S3.
The Data Science SDK makes it easy to add an AWS Glue job to your workflow. The AWS Glue job itself specifies the data source location, Python code for ETL, and file destination to use. All the SDK requires is the name of the AWS Glue job as a parameter for the GlueStartJobRunStep. For more information, see Getting Started with AWS Glue ETL on YouTube.
Use an input parameter so you can choose your AWS Glue job at runtime:
etl_step = steps.GlueStartJobRunStep(
    ''Extract, Transform, Load'',
    parameters={"JobName": execution_input[''GlueJobName'']}
)
After you extract and save the input data, train a model using the SDK’s TrainingStep. Amazon SageMaker handles the underlying compute resources, but you need to specify the algorithm, hyperparameters, and data sources for training. See the following code:
training_step = steps.TrainingStep(
    ''Model Training'',
    estimator=xgb,
    data={
      ''train'': sagemaker.s3_input(train_data, content_type=''csv''),
      ''validation'': sagemaker.s3_input(validation_data, content_type=''csv'')},
    job_name=execution_input[''TrainingJobName'']
)
The estimator in the preceding code, xgb, encapsulates the XGBoost algorithm and its hyperparameters. For more information about how to define an estimator, see the GitHub repo.
The Step Function workflow remains in the training step until training completes. Afterwards, it needs to retrieve the training results so that your workflow can branch based on the accuracy of the new model. Use a Step Functions LambdaStep to call Lambda to run a simple Python function that queries the Amazon SageMaker training job and returns the results. To add a Lambda state with the SDK, specify the function name and payload. This post uses JSON paths to select the TrainingJobName in the Lambda function payload so it knows which training job to query. See the following code:
lambda_step = steps.compute.LambdaStep(
    ''Query Training Results'',
    parameters={"FunctionName": execution_input[''LambdaFunctionName''],
        ''Payload'':{"TrainingJobName.$": "$.TrainingJobName"}
    }
)
To deploy the model after training, you need to create a model object and deployment configuration from the training artifacts using the ModelStep and EndpointConfigStep from the SDK. See the following code:
model_step = steps.ModelStep(
    ''Save Model'',
    model=training_step.get_expected_model(),
    model_name=execution_input[''ModelName''],
    result_path=''$.ModelStepResults''
)

endpoint_config_step = steps.EndpointConfigStep(
    "Create Model Endpoint Config",
    endpoint_config_name=execution_input[''ModelName''],
    model_name=execution_input[''ModelName''],
    initial_instance_count=1,
    instance_type=''ml.m4.xlarge''
)
Finally, the workflow can deploy the new model as a managed API endpoint using the EndpointStep. The “update” parameter causes it to update an existing Amazon SageMaker endpoint as opposed to creating a new one. See the following code:
endpoint_step = steps.EndpointStep(
    ''Update Model Endpoint'',
    endpoint_name=execution_input[''EndpointName''],
    endpoint_config_name=execution_input[''ModelName''],
    update=True
)
Control flow and linking states
The Step Functions SDK’s Choice state supports branching logic based on the outputs from previous steps. You can create dynamic and complex workflows by adding this state.
This post creates a step that branches based on the results of your Amazon SageMaker training step. See the following code:
check_accuracy_step = steps.states.Choice(
    ''Accuracy > 90%''
)
Add the branches and branching logic to the step. Choice states support multiple data types and compound Boolean expressions. However, for this post, you want to compare two numeric values. The first is a set threshold value of 0.90, the second is the model accuracy on the validation dataset from the TrainingStep. The training results show the error of the model, which is calculated as (#wrong cases)/(#all cases). As a result, model accuracy is over 90% if the measured error is less than 10% (.10).
For more information, see Choice Rules.
Add the following comparison rule:
threshold_rule = steps.choice_rule.ChoiceRule.NumericLessThan(variable=lambda_step.output()[''Payload''][''trainingMetrics''][0][''Value''], value=.10)

check_accuracy_step.add_choice(rule=threshold_rule, next_step=endpoint_config_step)
check_accuracy_step.default_choice(next_step=fail_step)
The choice rule specifies the next step in the workflow if the rule passes successfully. So far, you have created your steps but haven’t linked them to create an order of execution. You can link steps together in two different ways using the SDK. Firstly, you can use the next() method to specify the next step for an individual step. See the following code:
endpoint_config_step.next(endpoint_step)You can also use the Chain() method to link multiple steps together all at once. See the following code:
workflow_definition = steps.Chain([
    etl_step,
    training_step,
    model_step,
    lambda_step,
    check_accuracy_step
])
Workflow creation
After you define and order all your steps, create the Step Function itself with the following code:
workflow = Workflow(
    name=''MyInferenceRoutine_{}''.format(id),
    definition=workflow_definition,
    role=workflow_execution_role,
    execution_input=execution_input
)

workflow.create()
After you create the workflow, workflow.render_graph() returns a diagram of the workflow, similar to what you would see in the Step Functions console which is shown below.

You are now ready to run your new deployment pipeline. You can run the model manually using the SDK with the execute() method, or you can automate this task.
Scheduling a workflow using an EventBridge trigger
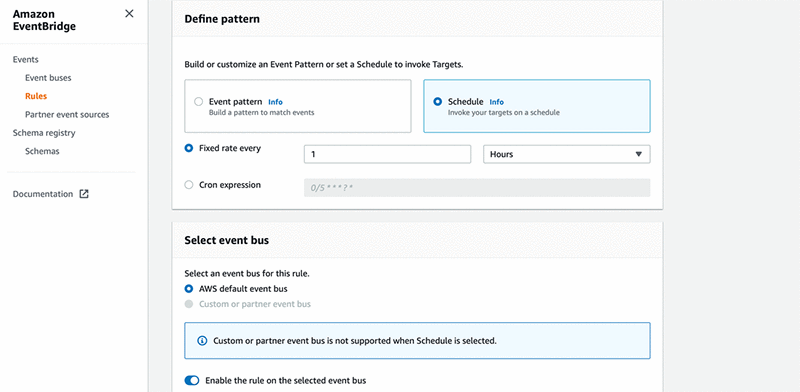
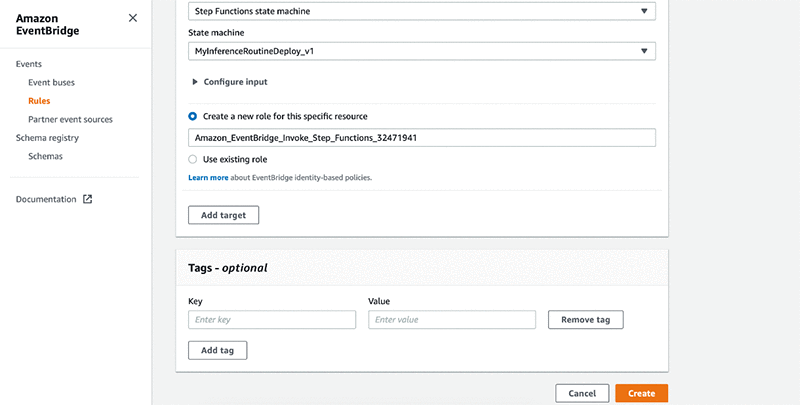
You can schedule your workflow using EventBridge triggers. This post shows how to create a rule within EventBridge to invoke the target Step Function on a set schedule. For more information, see Creating an EventBridge Rule that Triggers on an Event from an AWS Resource.
Complete the following steps:
- On the AWS Management Console, under Services, choose Amazon EventBridge.
- Choose Rules.
- Choose Create rule.
- Under Name and description, for Name, enter the name of your rule. This post enters the name
automate-model-retraining-trigger. - As an optional step, for Description, enter a description of your step.
- For Define pattern, select Schedule.

- For Fix rate every, choose
1 Hours. - Under Select event bus, select AWS default event bus.
- Select Enable the rule on the selected event bus.
- Under Select targets, for Target, choose Step Functions state machine.
- For State machine, choose your machine.
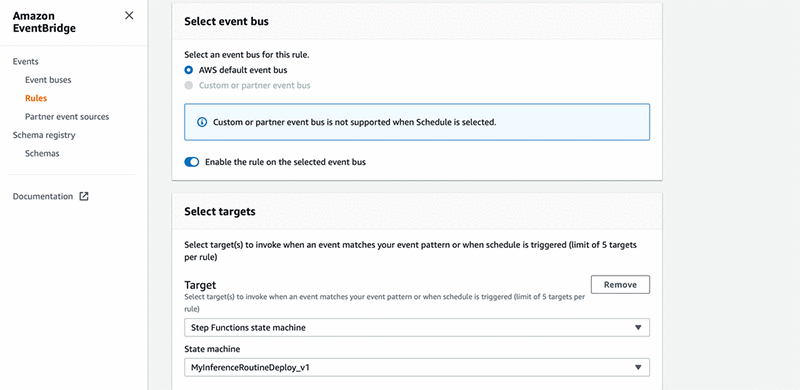
- Select Configure input then Constant (JSON text).
- Enter the input parameters to the workflow as JSON text.
- Select Create a new role for this specific resource.
- Enter the name of your role. If you have an existing role, select Use existing role instead.
- Choose Create.
Summary
This post provided an overview of the AWS Step Functions Data Science SDK for Amazon SageMaker. It showed how to create a reusable deployment model workflow using Python. The workflow included an AWS Glue job to extract and transform your data, a training step to train your ML model with new data, a Lambda step to query the training results, a model step to create model artifacts, an endpoint configuration step to define the deployment parameters, and an endpoint step to deploy the updated model to an existing endpoint. The post also provided an overview of how to use EventBridge to trigger the workflow automatically according to a given schedule.
For additional technical documentation and example notebooks related to the SDK, please see the AWS Step Functions Data Science SDK for Amazon SageMaker announcement page.
If you have questions or suggestions, please leave a comment.
About the authors
 Sean Wilkinson is a Solutions Architect at AWS focusing on serverless and machine learning.
 Julia Soscia is a Solutions Architect at Amazon Web Services based out of New York City. Her main focus is to help customers create well-architected environments on the AWS cloud platform. She is an experienced data analyst with a focus in Analytics and Machine Learning.

Building Windows containers with AWS CodePipeline and custom actions
https://amazonaws-china.com/blogs/devops/building-windows-containers-with-aws-codepipeline-and-custom-actions/
Dmitry Kolomiets, DevOps Consultant, Professional Services
AWS CodePipeline and AWS CodeBuild are the primary AWS services for building CI/CD pipelines. AWS CodeBuild supports a wide range of build scenarios thanks to various built-in Docker images. It also allows you to bring in your own custom image in order to use different tools and environment configurations. However, there are some limitations in using custom images.
Considerations for custom Docker images:
- AWS CodeBuild has to download a new copy of the Docker image for each build job, which may take longer time for large Docker images.
- AWS CodeBuild provides a limited set of instance types to run the builds. You might have to use a custom image if the build job requires higher memory, CPU, graphical subsystems, or any other functionality that is not part of the out-of-the-box provided Docker image.
Windows-specific limitations
- AWS CodeBuild supports Windows builds only in a limited number of AWS regions at this time.
- AWS CodeBuild executes Windows Server containers using Windows Server 2016 hosts, which means that build containers are huge—it is not uncommon to have an image size of 15 GB or more (with .NET Framework SDK installed). Windows Server 2019 containers, which are almost half as small, cannot be used due to host-container mismatch.
- AWS CodeBuild runs build jobs inside Docker containers. You should enable privileged mode in order to build and publish Linux Docker images as part of your build job. However, DIND is not supported on Windows and, therefore, AWS CodeBuild cannot be used to build Windows Server container images.
The last point is the critical one for microservice type of applications based on Microsoft stacks (.NET Framework, Web API, IIS). The usual workflow for this kind of applications is to build a Docker image, push it to ECR and update ECS / EKS cluster deployment.
Here is what I cover in this post:
- How to address the limitations stated above by implementing AWS CodePipeline custom actions (applicable for both Linux and Windows environments).
- How to use the created custom action to define a CI/CD pipeline for Windows Server containers.
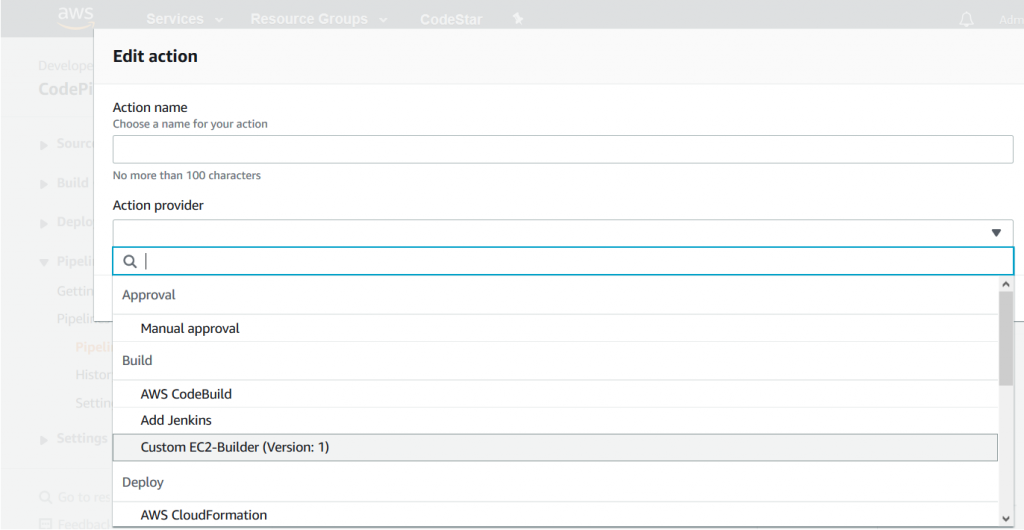
CodePipeline custom actions
By using Amazon EC2 instances, you can address the limitations with Windows Server containers and enable Windows build jobs in the regions where AWS CodeBuild does not provide native Windows build environments. To accommodate the specific needs of a build job, you can pick one of the many Amazon EC2 instance types available.
The downside of this approach is additional management burden—neither AWS CodeBuild nor AWS CodePipeline support Amazon EC2 instances directly. There are ways to set up a Jenkins build cluster on AWS and integrate it with CodeBuild and CodeDeploy, but these options are too “heavy” for the simple task of building a Docker image.
There is a different way to tackle this problem: AWS CodePipeline provides APIs that allow you to extend a build action though custom actions. This example demonstrates how to add a custom action to offload a build job to an Amazon EC2 instance.
Here is the generic sequence of steps that the custom action performs:
- Acquire EC2 instance (see the Notes on Amazon EC2 build instances section).
- Download AWS CodePipeline artifacts from Amazon S3.
- Execute the build command and capture any errors.
- Upload output artifacts to be consumed by subsequent AWS CodePipeline actions.
- Update the status of the action in AWS CodePipeline.
- Release the Amazon EC2 instance.
Notice that most of these steps are the same regardless of the actual build job being executed. However, the following parameters will differ between CI/CD pipelines and, therefore, have to be configurable:
- Instance type (t2.micro, t3.2xlarge, etc.)
- AMI (builds could have different prerequisites in terms of OS configuration, software installed, Docker images downloaded, etc.)
- Build command line(s) to execute (MSBuild script, bash, Docker, etc.)
- Build job timeout
Serverless custom action architecture
CodePipeline custom build action can be implemented as an agent component installed on an Amazon EC2 instance. The agent polls CodePipeline for build jobs and executes them on the Amazon EC2 instance. There is an example of such an agent on GitHub, but this approach requires installation and configuration of the agent on all Amazon EC2 instances that carry out the build jobs.
Instead, I want to introduce an architecture that enables any Amazon EC2 instance to be a build agent without additional software and configuration required. The architecture diagram looks as follows:

There are multiple components involved:
- An Amazon CloudWatch Event triggers an AWS Lambda function when a custom CodePipeline action is to be executed.
- The Lambda function retrieves the action’s build properties (AMI, instance type, etc.) from CodePipeline, along with location of the input artifacts in the Amazon S3 bucket.
- The Lambda function starts a Step Functions state machine that carries out the build job execution, passing all the gathered information as input payload.
- The Step Functions flow acquires an Amazon EC2 instance according to the provided properties, waits until the instance is up and running, and starts an AWS Systems Manager command. The Step Functions flow is also responsible for handling all the errors during build job execution and releasing the Amazon EC2 instance once the Systems Manager command execution is complete.
- The Systems Manager command runs on an Amazon EC2 instance, downloads CodePipeline input artifacts from the Amazon S3 bucket, unzips them, executes the build script, and uploads any output artifacts to the CodePipeline-provided Amazon S3 bucket.
- Polling Lambda updates the state of the custom action in CodePipeline once it detects that the Step Function flow is completed.
The whole architecture is serverless and requires no maintenance in terms of software installed on Amazon EC2 instances thanks to the Systems Manager command, which is essential for this solution. All the code, AWS CloudFormation templates, and installation instructions are available on the GitHub project. The following sections provide further details on the mentioned components.
Custom Build Action
The custom action type is defined as an AWS::CodePipeline::CustomActionType resource as follows:
  Ec2BuildActionType:
    Type: AWS::CodePipeline::CustomActionType
    Properties:
      Category: !Ref CustomActionProviderCategory
      Provider: !Ref CustomActionProviderName
      Version: !Ref CustomActionProviderVersion
      ConfigurationProperties:
        - Name: ImageId
          Description: AMI to use for EC2 build instances.
          Key: true
          Required: true
          Secret: false
          Queryable: false
          Type: String
        - Name: InstanceType
          Description: Instance type for EC2 build instances.
          Key: true
          Required: true
          Secret: false
          Queryable: false
          Type: String
        - Name: Command
          Description: Command(s) to execute.
          Key: true
          Required: true
          Secret: false
          Queryable: false
          Type: String
        - Name: WorkingDirectory
          Description: Working directory for the command to execute.
          Key: true
          Required: false
          Secret: false
          Queryable: false
          Type: String
        - Name: OutputArtifactPath
          Description: Path of the file(-s) or directory(-es) to use as custom action output artifact.
          Key: true
          Required: false
          Secret: false
          Queryable: false
          Type: String
      InputArtifactDetails:
        MaximumCount: 1
        MinimumCount: 0
      OutputArtifactDetails:
        MaximumCount: 1
        MinimumCount: 0
      Settings:
        EntityUrlTemplate: !Sub "https://${AWS::Region}.console.aws.amazon.com/systems-manager/documents/${RunBuildJobOnEc2Instance}"
        ExecutionUrlTemplate: !Sub "https://${AWS::Region}.console.aws.amazon.com/states/home#/executions/details/{ExternalExecutionId}"
The custom action type is uniquely identified by Category, Provider name, and Version.
Category defines the stage of the pipeline in which the custom action can be used, such as build, test, or deploy. Check the AWS documentation for the full list of allowed values.
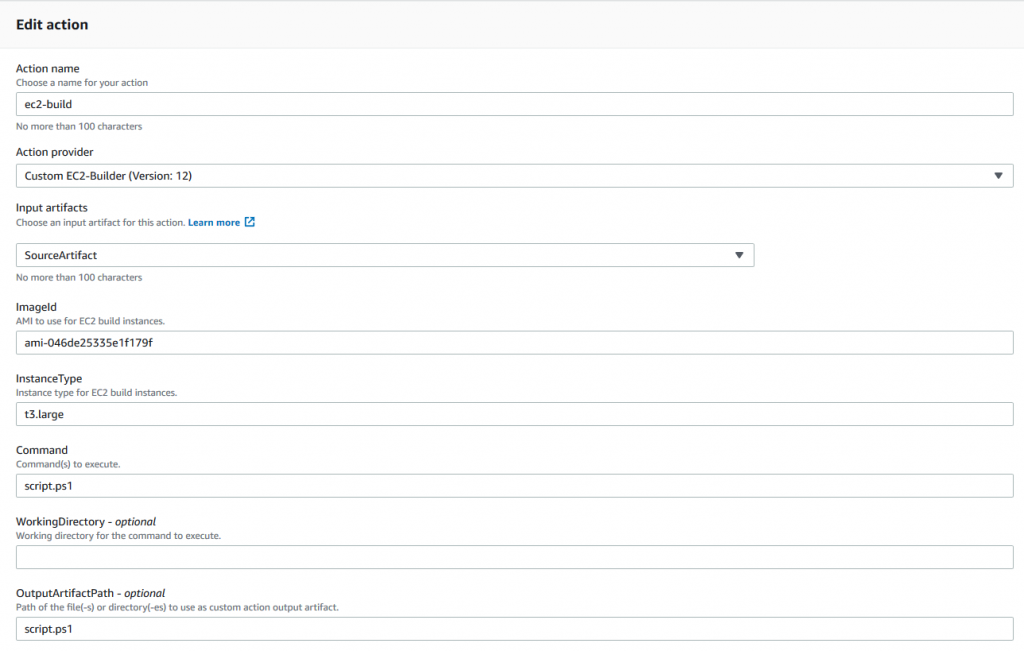
Provider name and Version are the values used to identify the custom action type in the CodePipeline console or AWS CloudFormation templates. Once the custom action type is installed, you can add it to the pipeline, as shown in the following screenshot:
The custom action type also defines a list of user-configurable properties—these are the properties identified above as specific for different CI/CD pipelines:
- AMI Image ID
- Instance Type
- Command
- Working Directory
- Output artifacts
The properties are configurable in the CodePipeline console, as shown in the following screenshot:
Note the last two settings in the Custom Action Type AWS CloudFormation definition: EntityUrlTemplate and ExecutionUrlTemplate.
EntityUrlTemplate defines the link to the AWS Systems Manager document that carries over the build actions. The link is visible in AWS CodePipeline console as shown in the following screenshot:
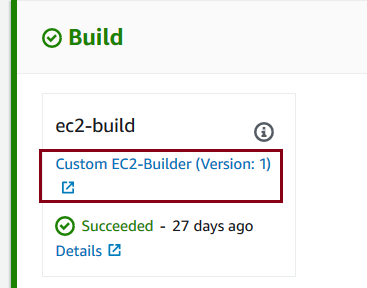
ExecutionUrlTemplate defines the link to additional information related to a specific execution of the custom action. The link is also visible in the CodePipeline console, as shown in the following screenshot:

This URL is defined as a link to the Step Functions execution details page, which provides high-level information about the custom build step execution, as shown in the following screenshot:

This page is a convenient visual representation of the custom action execution flow and may be useful for troubleshooting purposes as it gives an immediate access to error messages and logs.
The polling Lambda function
The Lambda function polls CodePipeline for custom actions when it is triggered by the following CloudWatch event:
  source:
    - "aws.codepipeline"
  detail-type:
    - "CodePipeline Action Execution State Change"
  detail:
    state:
      - "STARTED"
The event is triggered for every CodePipeline action started, so the Lambda function should verify if, indeed, there is a custom action to be processed.
The rest of the lambda function is trivial and relies on the following APIs to retrieve or update CodePipeline actions and deal with instances of Step Functions state machines:
CodePipeline API
- poll_for_jobs
- acknowledge_job
- put_job_success_result
- put_job_failure_result
AWS Step Functions API
- start_execution
- describe_execution
You can find the complete source of the Lambda function on GitHub.
Step Functions state machine
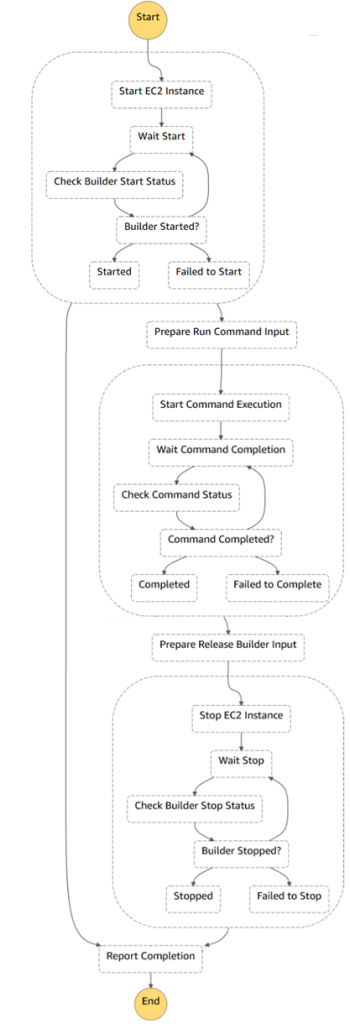
The following diagram shows complete Step Functions state machine. There are three main blocks on the diagram:
- Acquiring an Amazon EC2 instance and waiting while the instance is registered with Systems Manager
- Running a Systems Manager command on the instance
- Releasing the Amazon EC2 instance
Note that it is necessary to release the Amazon EC2 instance in case of error or exception during Systems Manager command execution, relying on Fallback States to guarantee that.
You can find the complete definition of the Step Function state machine on GitHub.
Systems Manager Document
The AWS Systems Manager Run Command does all the magic. The Systems Manager agent is pre-installed on AWS Windows and Linux AMIs, so no additional software is required. The Systems Manager run command executes the following steps to carry out the build job:
- Download input artifacts from Amazon S3.
- Unzip artifacts in the working folder.
- Run the command.
- Upload output artifacts to Amazon S3, if any; this makes them available for the following CodePipeline stages.
The preceding steps are operating-system agnostic, and both Linux and Windows instances are supported. The following code snippet shows the Windows-specific steps.
You can find the complete definition of the Systems Manager document on GitHub.
mainSteps:
  - name: win_enable_docker
    action: aws:configureDocker
    inputs:
      action: Install

  # Windows steps
  - name: windows_script
    precondition:
      StringEquals: [platformType, Windows]
    action: aws:runPowerShellScript
    inputs:
      runCommand:
        # Ensure that if a command fails the script does not proceed to the following commands
        - "$ErrorActionPreference = \"Stop\""

        - "$jobDirectory = \"{{ workingDirectory }}\""
        # Create temporary folder for build artifacts, if not provided
        - "if ([string]::IsNullOrEmpty($jobDirectory)) {"
        - "    $parent = [System.IO.Path]::GetTempPath()"
        - "    [string] $name = [System.Guid]::NewGuid()"
        - "    $jobDirectory = (Join-Path $parent $name)"
        - "    New-Item -ItemType Directory -Path $jobDirectory"
                # Set current location to the new folder
        - "    Set-Location -Path $jobDirectory"
        - "}"

        # Download/unzip input artifact
        - "Read-S3Object -BucketName {{ inputBucketName }} -Key {{ inputObjectKey }} -File artifact.zip"
        - "Expand-Archive -Path artifact.zip -DestinationPath ."

        # Run the build commands
        - "$directory = Convert-Path ."
        - "$env:PATH += \";$directory\""
        - "{{ commands }}"
        # We need to check exit code explicitly here
        - "if (-not ($?)) { exit $LASTEXITCODE }"

        # Compress output artifacts, if specified
        - "$outputArtifactPath  = \"{{ outputArtifactPath }}\""
        - "if ($outputArtifactPath) {"
        - "    Compress-Archive -Path $outputArtifactPath -DestinationPath output-artifact.zip"
                # Upload compressed artifact to S3
        - "    $bucketName = \"{{ outputBucketName }}\""
        - "    $objectKey = \"{{ outputObjectKey }}\""
        - "    if ($bucketName -and $objectKey) {"
                    # Don''t forget to encrypt the artifact - CodePipeline bucket has a policy to enforce this
        - "        Write-S3Object -BucketName $bucketName -Key $objectKey -File output-artifact.zip -ServerSideEncryption aws:kms"
        - "    }"
        - "}"
      workingDirectory: "{{ workingDirectory }}"
      timeoutSeconds: "{{ executionTimeout }}"
CI/CD pipeline for Windows Server containers
Once you have a custom action that offloads the build job to the Amazon EC2 instance, you may approach the problem stated at the beginning of this blog post: how to build and publish Windows Server containers on AWS.
With the custom action installed, the solution is quite straightforward. To build a Windows Server container image, you need to provide the value for Windows Server with Containers AMI, the instance type to use, and the command line to execute, as shown in the following screenshot:
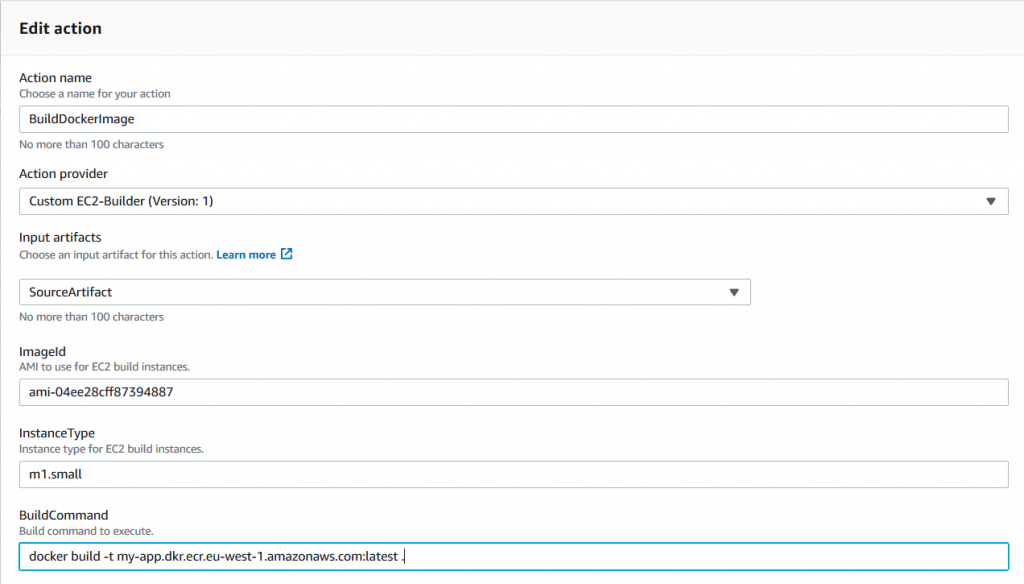
This example executes the Docker build command on a Windows instance with the specified AMI and instance type, using the provided source artifact. In real life, you may want to keep the build script along with the source code and push the built image to a container registry. The following is a PowerShell script example that not only produces a Docker image but also pushes it to AWS ECR:
# Authenticate with ECR
Invoke-Expression -Command (Get-ECRLoginCommand).Command

# Build and push the image
docker build -t <ecr-repository-url>:latest .
docker push <ecr-repository-url>:latest

return $LASTEXITCODE
You can find a complete example of the pipeline that produces the Windows Server container image and pushes it to Amazon ECR on GitHub.
Notes on Amazon EC2 build instances
There are a few ways to get Amazon EC2 instances for custom build actions. Let’s take a look at a couple of them below.
Start new EC2 instance per job and terminate it at the end
This is a reasonable default strategy that is implemented in this GitHub project. Each time the pipeline needs to process a custom action, you start a new Amazon EC2 instance, carry out the build job, and terminate the instance afterwards.
This approach is easy to implement. It works well for scenarios in which you don’t have many builds and/or builds take some time to complete (tens of minutes). In this case, the time required to provision an instance is amortized. Conversely, if the builds are fast, instance provisioning time could be actually longer than the time required to carry out the build job.
Use a pool of running Amazon EC2 instances
There are cases when it is required to keep builder instances “warm”, either due to complex initialization or merely to reduce the build duration. To support this scenario, you could maintain a pool of always-running instances. The “acquisition” phase takes a warm instance from the pool and the “release” phase returns it back without terminating or stopping the instance. A DynamoDB table can be used as a registry to keep track of “busy” instances and provide waiting or scaling capabilities to handle high demand.
This approach works well for scenarios in which there are many builds and demand is predictable (e.g. during work hours).
Use a pool of stopped Amazon EC2 instances
This is an interesting approach, especially for Windows builds. All AWS Windows AMIs are generalized using a sysprep tool. The important implication of this is that the first start time for Windows EC2 instances is quite long: it could easily take more than 5 minutes. This is generally unacceptable for short-living build jobs (if your build takes just a minute, it is annoying to wait 5 minutes to start the instance).
Interestingly, once the Windows instance is initialized, subsequent starts take less than a minute. To utilize this, you could create a pool of initialized and stopped Amazon EC2 instances. In this case, for the acquisition phase, you start the instance, and when you need to release it, you stop or hibernate it.
This approach provides substantial improvements in terms of build start-up time.
The downside is that you reuse the same Amazon EC2 instance between the builds—it is not completely clean environment. Build jobs have to be designed to expect the presence of artifacts from the previous executions on the build instance.
Using an Amazon EC2 fleet with spot instances
Another variation of the previous strategies is to use Amazon EC2 Fleet to make use of cost-efficient spot instances for your build jobs.
Amazon EC2 Fleet makes it possible to combine on-demand instances with spot instances to deliver cost-efficient solution for your build jobs. On-demand instances can provide the minimum required capacity and spot instances provide a cost-efficient way to improve performance of your build fleet.
Note that since spot instances could be terminated at any time, the Step Functions workflow has to support Amazon EC2 instance termination and restart the build on a different instance transparently for CodePipeline.
Limits and Cost
The following are a few final thoughts.
Custom action timeouts
The default maximum execution time for CodePipeline custom actions is one hour. If your build jobs require more than an hour, you need to request a limit increase for custom actions.
Cost of running EC2 build instances
Custom Amazon EC2 instances could be even more cost effective than CodeBuild for many scenarios. However, it is difficult to compare the total cost of ownership of a custom-built fleet with CodeBuild. CodeBuild is a fully managed build service and you pay for each minute of using the service. In contrast, with Amazon EC2 instances you pay for the instance either per hour or per second (depending on instance type and operating system), EBS volumes, Lambda, and Step Functions. Please use the AWS Simple Monthly Calculator to get the total cost of your projected build solution.
Cleanup
If you are running the above steps as a part of workshop / testing, then you may delete the resources to avoid any further charges to be incurred. All resources are deployed as part of CloudFormation stack, so go to the Services, CloudFormation, select the specific stack and click delete to remove the stack.
Conclusion
The CodePipeline custom action is a simple way to utilize Amazon EC2 instances for your build jobs and address a number of CodePipeline limitations.
With AWS CloudFormation template available on GitHub you can import the CodePipeline custom action with a simple Start/Terminate instance strategy into your account and start using the custom action in your pipelines right away.
The CodePipeline custom action with a simple Start/Terminate instance strategy is available on GitHub as an AWS CloudFormation stack. You could import the stack to your account and start using the custom action in your pipelines right away.
An example of the pipeline that produces Windows Server containers and pushes them to Amazon ECR can also be found on GitHub.
I invite you to clone the repositories to play with the custom action, and to make any changes to the action definition, Lambda functions, or Step Functions flow.
Feel free to ask any questions or comments below, or file issues or PRs on GitHub to continue the discussion.

Enabling Customer Attribution Models on AWS with Automated Data Integration
https://amazonaws-china.com/blogs/apn/enabling-customer-attribution-models-on-aws-with-automated-data-integration/
By Charles Wang, Product Evangelist at Fivetran
 |
 |
 |
Every company wants to understand the levers that influence customers’ decisions. Doing so requires a chronology of a customer’s interactions with a company to identify the events and experiences that influence their decision to buy or not.
Attribution models allow companies to guide marketing, sales, and support efforts using data, and then custom tailor every customer’s experience for maximum effect.
In this post, I will discuss how simple data integration can be, how it enables customer analytics, and how customer data can be used to build attribution models to uncover what makes customers tick.mar
Fivetran is an AWS Partner Network (APN) Advanced Technology Partner and data pipeline tool that provides automated data connectors to integrate data into data warehouses such as Amazon Redshift. Fivetran has earned the Amazon Redshift Ready designation.
Combined together, cloud-based data pipeline tools and data warehouses form the infrastructure for integrating and centralizing data from across a company’s operations and activities, enabling business intelligence and analytics activities.
Customer Analytics Requires Data Integration
With the growth of cloud-based services, the average business now uses more than 100 applications. These systems generate an enormous volume of data that contain insights about an organization’s operations and customer interactions.
However, data can be useless to an organization that lacks the capacity to integrate and analyze it. In fact, a majority of commercial data is thought to consist of dark data, which is collected and processed but not used for analysis. To build attribution models, an organization needs to integrate and centralize data from its applications, databases, event trackers, and file systems.
As with many other business operations—e-commerce, customer relationship management, payment processing, and more—there is no need for an organization to build tools for data integration in-house when a software-as-a-service (SaaS) product that accomplishes the same tasks already exists.
Data pipeline tools like Fivetran provide data connectors to integrate data from API endpoints, database logs, event streams, and files. Every data connector is built and maintained by an expert team that understands the idiosyncrasies of the underlying data source, is stress-tested against a range of corner cases, and operates with minimal intervention by the end user.
Connectors bring data from data sources to a data warehouse on a regular sync schedule, and, when managed by a conscientious team, will automatically adapt to schema and API changes.
Similarly, data warehouses like Amazon Redshift allow organizations to maintain a single source of truth in the form of a relational database. Cloud-based data warehouses offer excellent, parallelized performance, the ability to scale computation and storage resources up and down as needed, and the ability to conduct analytics operations using SQL.
An effective data stack—with a data pipeline, data warehouse, and business intelligence tool carefully selected to meet your needs—allows you to focus on what your analysts and executives really care about, which is understanding your customers so that your organization can do its best work.
The following diagram illustrates the stack:
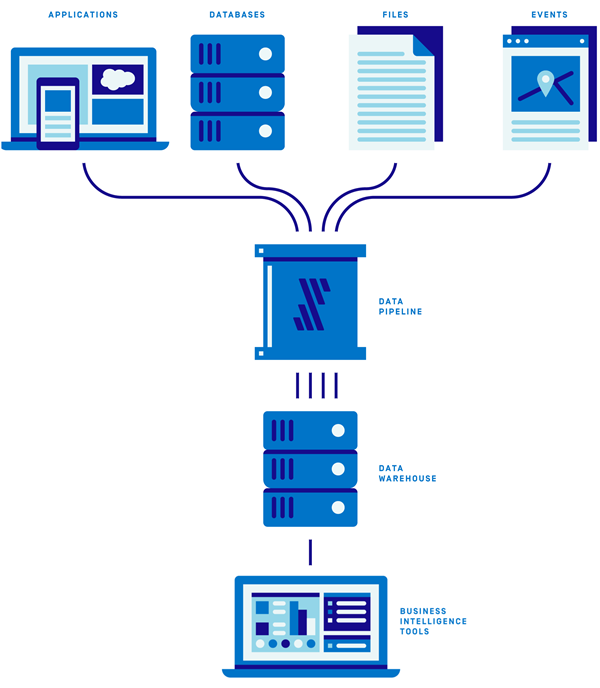
Figure 1 – A data stack consists of data sources, pipeline, data warehouse, and BI tool.
Fivetran, Redshift, and Customer Attribution in the Real World
The design and stationery company Papier relied heavily on paid marketing to drive sales. Shortly before adopting Fivetran, Papier began to use Amazon Redshift as a central repository for ad, transaction, and clickstream data.
Originally, the CTO used custom extract, transform, and load (ETL) scripts and infrastructure code to import data from ad providers and other sources.
This home-brewed approach introduced inaccuracies and inconsistencies to the data, forcing the team to frequently re-sync the data at the cost of substantial downtime. The CTO would personally spend one full working day per week resolving ETL issues.
This time investment proved untenable as Papier continued to grow and add data sources. They needed an automated solution that accommodated a wide range of data sources with a minimum of human intervention and data integrity issues.
Combining Fivetran and Redshift allowed Papier to connect data from ad providers with purchases, enabling them to calculate the lifetime value of customers and grasp the ROA and ROI on advertising campaigns. With this solution, Papier is now able to pursue product roadmaps with far greater strategic depth.
Fivetran and Amazon Redshift provide an off-the-shelf solution to the challenge of putting the relevant records into one environment. Learn more about the Fivetran and Papier case study >>
How to Integrate Data
It’s extremely simple to connect Amazon Redshift with Fivetran and begin integrating data. Before you start, you must have the following:
- Access to your AWS console so you can whitelist Fivetran IP addresses.
- Ability to connect an admin user, or have permissions to create a limited user with CREATE permissions.
- An existing Redshift instance.
Make sure you have the following information handy as well:
- If your Redshift cluster is in an Amazon Virtual Private Cloud (VPC) or an Amazon Elastic Compute Cloud (Amazon EC2) instance.
- Your host and port.
For detailed instructions on authorizing your Redshift cluster to connect with Fivetran, see the documentation.
The workflow for setting up Fivetran is extremely simple:
- Upon starting a Fivetran account, you’ll be prompted to choose an existing data warehouse or spin up a new one. Choose I already have a warehouse.
- You’ll then see a list of data warehouse options. Select Redshift.
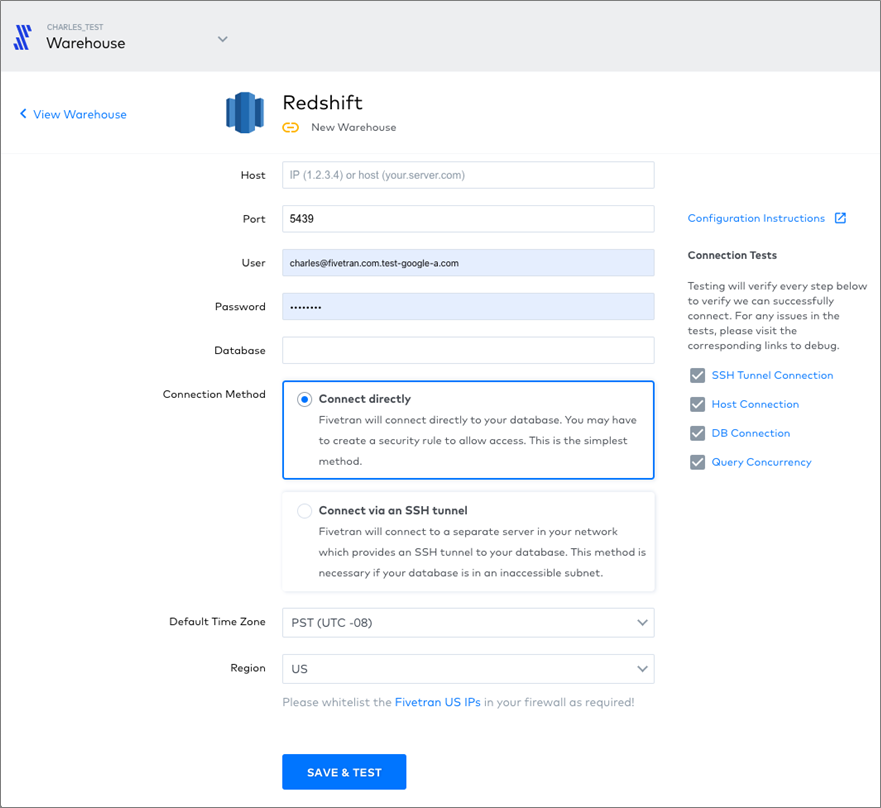
Figure 2 – Setting up Amazon Redshift data warehouse in Fivetran.
- Enter your credentials and choose whether you’ll connect directly or via SSH tunnel. Click Save and Test.
- Now, you will subsequently be able to access the Fivetran dashboard. From here, you can set up new connectors to begin syncing data to your data warehouse. Click + Connector or Create Your First Connector.
- You will be taken to a list of connectors, and you can scroll or filter by text. Click on the desired entry in the list.
To set up the connector, you must enter the credentials to the API, transactional database, event tracker, or file system. Below is an example of the interface for a transactional database connection.

Figure 3 – These fields should be familiar if you regularly work with database connections.
Below is an example of an app connection. Clicking Authorize takes you to the app itself, where you must authorize the connection.

Figure 4 – Carefully select the destination schema and table in the data warehouse.
Next, here’s an example of the interface for an event tracker.
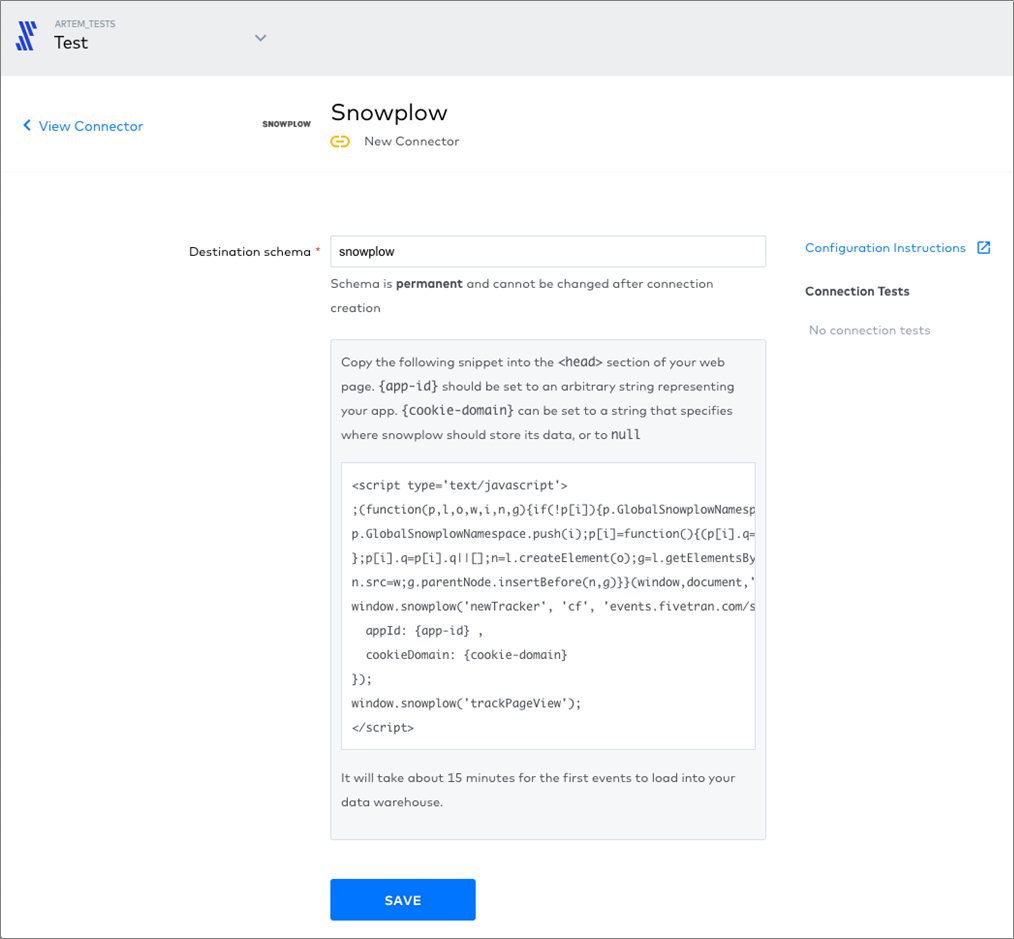
Figure 5 – Specify the destination schema, and then insert the code snippet into your HTML.
In the examples above, we have demonstrated that setting up data integration is a matter of following a relatively simple sequence of steps. But how do you actually build an attribution model?
How to Approach Customer Attribution
Depending on the particulars of an industry, your customers may interact with your company across any of the following platforms:
- Advertising
- Social media
- Website or mobile app event tracking
- Customer relationship management tools
- E-commerce
- Payment processing
Ideally, you should assemble a full chronology of the customer’s journey from the first touch all the way to purchase. This allows you to understand the inflection points that make or break a potential purchase.
Depending on the exact goods and services your organization provides, customers could conceivably have multiple journeys as they make recurring purchases.
A general representation of a customer journey consists of the following steps:
- Discovery: Customers realize they have a want or need.
- Research: Compares vendors and products.
- Engage: Enters your (virtual or brick-and-mortar) storefront, browses, and speaks with your sales staff.
- Purchase: Customer purchases the product or service.
- Retain: Returns to the vendor for future purchases.
Suppose you run an e-commerce store; concretely, a customer journey may look like this:
- Customer learns of a new type of product through their acquaintances and searches for it online.
- A social media site uses cookies from the customer’s search history and surfaces a banner ad for your company, who finds it and clicks it while browsing social media. The interaction is recorded by your social media advertising account.
- Customer arrives at your website via the banner ad and begins reading reviews and browsing your blog out of curiosity. Every page the customer visits on your site is recorded by your event tracking software.
- Customer adds items to their cart and creates an account on your site. Your e-commerce platform records the prospective transactions.
- Customer abandons the cart for a few days as other priorities draw their attention, but is reminded by your email marketing software that their cart has items. The customer clicks on a CTA to complete the order. The email marketing software records this interaction.
- Both the e-commerce platform and online payment processing platform record the transaction when the customer completes the order.
- A week or so later, the customer leaves a review on your company’s social media profile.
Note how the steps above spanned six distinct platforms operated by your company: social media advertising, website event tracking, e-commerce, email marketing, payment processing, and social media.
To build a chronology of this customer’s interactions, you must put the relevant records into one environment and attribute them to the same customer.
How to Identify Customers Across Platforms
Our example in the previous section demonstrates just how complicated the customer flow can be in terms of traversing various platforms. That’s to say nothing of the possibility your customers switch from mobile to desktop devices, or from home networks and coffee shops to office networks over the course of a single day.
There are no perfect solutions, but you can use several identifiers to distinguish between customers, devices, and campaigns across their web-based activities.
- IP addresses are unique at the network level, so all web-connected devices in the home or office might have the same IP address. If you are a B2B company and have engaged the services of a market research company, there’s a chance they can associate an IP address with the name of a company.
- Cookies are tags assigned to a browser session.
- User agents provide information about users’ browser, operating system, and device.
- Email and social media are two ways that users can register with your site, and you can use these accounts as identifiers. You’ll have to determine the trade-off between the convenience, to you, of requiring registration and login, and the convenience to users of using your website without an account.
- UTM extensions can be used to distinguish different sources of traffic. A link to a page from social media may be tagged with character suggest.
Examples of Attribution Models
Once you have assembled a chronology of customers’ interactions with your company, you’ll need to determine which steps in the process mattered most. There are several classic customer attribution models, each assigning different weights to different stages of a customer interaction.
The simplest attribution models are single-touch, and only require you to be certain of the first or last interaction your customer has with your company.
Last-Touch Attribution
Last-touch attribution attributes 100 percent of the credit for a sale to the last interaction between the customer and your company.
This is the default approach used by marketers and the simplest to implement; all you have to know is the last thing the customer did before purchasing.
First-Touch Attribution
First-touch attribution attributes 100 percent of the credit for a sale to the first interaction between the customer and your company.
Like last-touch attribution, it’s suitable to cases where your company has low brand recognition or a very short sales cycle.

U-Shaped Attribution
U-shaped attribution, also called “position-based,” attributes the lion’s share of credit to the first and last interactions, while dividing the remainder among the other interactions.
This allows the interactions that are generally considered the most important—the first and last—to be strongly considered without ignoring the rest.
Suppose the customer had four recorded interactions with your company. The first and last interactions might each receive 40 percent of the credit, while the two middle interactions receive 10 percent each.

.
It could also be 50/0/0/50 if you don’t care at all about the middle interactions.
.

Linear Attribution
Linear attribution is strictly agnostic and assigns equal weight to every interaction. This is a good approach if you don’t have any prior, compelling beliefs about the importance of any particular interaction.
Decay Attribution
Decay attribution gradually assigns more weight the closer an interaction is to the last. It’s best suited to cases where a long-term relationship is built between your company and the customer.

Next Steps
Customer analytics does not end with the models mentioned above. More sophisticated custom models, built off of Markov chains or survival modeling, are a next step. It doesn’t hurt to sanity check quantitative work with the qualitative step of simply asking your customers what they do, either.
With the proliferation of applications, platforms, and devices, and constant growth of data, it’s hard enough to match records across the multitude of data sources and touch points your organization uses when they are already in one place.
Without a data pipeline tool like Fivetran and a data warehouse like Amazon Redshift, the task of integrating data can be insurmountable.
Summary
In this guide, we have explored how analytics depend on a robust data integration solution and offered a practical guide to getting started with data integration and customer attribution.
Customer attribution models require the ability to match entities across multiple data sources. This requires a cloud-based data pipeline tool, and a cloud data warehouse like Amazon Redshift.
You should not build your own data connectors between your data sources and data warehouse. Doing so is complicated and error-prone. You should prefer automation to manual intervention wherever possible. A good data integration solution should require a relatively simple setup procedure.
There are a number of different approaches to modeling customer journeys, identifying customers, and producing customer attribution models. Different approaches are appropriate for different use cases. Pick and choose based on your needs.
The content and opinions in this blog are those of the third party author and AWS is not responsible for the content or accuracy of this post.
.

.
Fivetran – APN Partner Spotlight
Fivetran is an Amazon Redshift Ready Partner. Its data pipeline tool provides automated data connectors to integrate data into data warehouses such as Redshift.
Contact Fivetran | Solution Overview | AWS Marketplace
*Already worked with Fivetran? Rate this Partner
*To review an APN Partner, you must be an AWS customer that has worked with them directly on a project.
今天的关于Grails In Action-03.Modeling the domain的分享已经结束,谢谢您的关注,如果想了解更多关于ASM: Active Shape Models--Their Training and Application、Automating model retraining and deployment using the AWS Step Functions Data Science SDK for Amaz...、Building Windows containers with AWS CodePipeline and custom actions、Enabling Customer Attribution Models on AWS with Automated Data Integration的相关知识,请在本站进行查询。
本文标签:


