想了解Kong网关部署的新动态吗?本文将为您提供详细的信息,我们还将为您解答关于kong网关架构的相关问题,此外,我们还将为您介绍关于API网关Kong、API网关Kong(一):Nginx、Open
想了解Kong 网关部署的新动态吗?本文将为您提供详细的信息,我们还将为您解答关于kong网关架构的相关问题,此外,我们还将为您介绍关于API 网关 Kong、API网关Kong(一):Nginx、OpenResty和Kong的基本概念与使用方法、API网关Kong(二):Kong与Kubernetes集成的方法、API网关之Kong网关简介的新知识。
本文目录一览:- Kong 网关部署(kong网关架构)
- API 网关 Kong
- API网关Kong(一):Nginx、OpenResty和Kong的基本概念与使用方法
- API网关Kong(二):Kong与Kubernetes集成的方法
- API网关之Kong网关简介
")
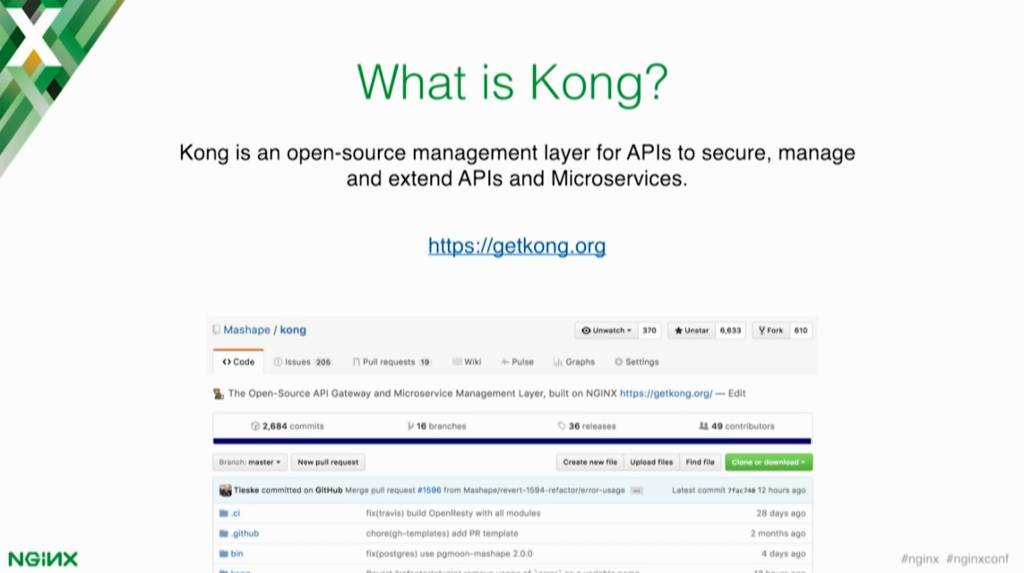
Kong 网关部署(kong网关架构)
- 安装 cassandra
docker run -d --name kong-database -p 9042:9042 cassandra:3
2。 初始化库
docker run --rm --link kong-database:kong-database -e "KONG_DATABASE=cassandra" -e "KONG_PG_HOST=kong-database" -e "KONG_CASSANDRA_CONTACT_POINTS=kong-database" kong kong migrations up
3. 安装 Kong
docker run -d --name kong --link kong-database:kong-database -e "KONG_DATABASE=cassandra" -e "KONG_CASSANDRA_CONTACT_POINTS=kong-database" -e "KONG_PROXY_ACCESS_LOG=/dev/stdout" -e "KONG_ADMIN_ACCESS_LOG=/dev/stdout" -e "KONG_PROXY_ERROR_LOG=/dev/stderr" -e "KONG_ADMIN_ERROR_LOG=/dev/stderr" -e "KONG_ADMIN_LISTEN=0.0.0.0:8001" -e "KONG_ADMIN_LISTEN_SSL=0.0.0.0:8444" -p 8000:8000 -p 8443:8443 -p 8001:8001 -p 8444:8444 kong
4. 安装 dashbord
docker run --rm -p 10180:8080 pgbi/kong-dashboard start --kong-url http://106.14.69.75:8001

API 网关 Kong
什么是 API 网关?
所谓网关,主要作用就是连接两个不同网络的设备,而今天所讲的 API 网关是指承接和分发客户端所有请求的网关层。

为什么需要网关层?最初是单体服务时,客户端发起的所有请求都可以直接请求到该服务,但随着产品用户越来越多,单体应用存在显而易见的单点问题,除此之外,当单体应用大小升至几个 G 时,持续发布将会非常缓慢,所以服务的拆分成为了必然趋势。

当服务拆分为多个之后,我们不得不面临一个问题,就是如何控制用户请求到对应服务节点,于是网关层应运而生,它不仅可以负责负载均衡,还可以让它处理认证校验、请求限流、日志记录以及监控服务节点等等。

当然,网关层并不需要我们手动实现,市面上有很多 API 网关开源项目,比如 Zuul、Kong、Tyk 等,今天主要介绍 Kong。
安装 Kong
Kong 是一个在 Nginx 中运行的 Lua 程序,由 lua-nginx-module 实现,和 Openresty 一起打包发行,支持多种操作环境下的安装,可以用来做 HTTP 基本认证、密钥认证、TCP、UDP、文件日志、API 请求限流、请求转发等等。
第一步,创建一个 docker 网络。
$ docker network create kong-net创建用于存储 Kong 数据的数据库,可以使用 Cassandra 或 PostgreSQL,本示例采用 Cassandra。
Cassandra 是由 Facebook 开发的分布式 NoSQL 数据库。
$ docker run -d --name kong-database \
               --network=kong-net \
               -p 9042:9042 \
               cassandra:3
初始化数据到 Cassandra 数据库。
$ docker run --rm \
    --network=kong-net \
    -e "KONG_DATABASE=cassandra" \
    -e "KONG_PG_HOST=kong-database" \
    -e "KONG_PG_PASSWORD=kong" \
    -e "KONG_CASSANDRA_CONTACT_POINTS=kong-database" \
    kong:latest kong migrations bootstrap
启动 Kong 容器连接数据库。
 $ docker run -d --name kong \
     --network=kong-net \
     -e "KONG_DATABASE=cassandra" \
     -e "KONG_PG_HOST=kong-database" \
     -e "KONG_PG_PASSWORD=kong" \
     -e "KONG_CASSANDRA_CONTACT_POINTS=kong-database" \
     -e "KONG_PROXY_ACCESS_LOG=/dev/stdout" \
     -e "KONG_ADMIN_ACCESS_LOG=/dev/stdout" \
     -e "KONG_PROXY_ERROR_LOG=/dev/stderr" \
     -e "KONG_ADMIN_ERROR_LOG=/dev/stderr" \
     -e "KONG_ADMIN_LISTEN=0.0.0.0:8001, 0.0.0.0:8444 ssl" \
     -p 8000:8000 \
     -p 8443:8443 \
     -p 0.0.0.0:8001:8001 \
     -p 0.0.0.0:8444:8444 \
     kong:latest
通过 curl 模拟请求本地 8001 端口可以获取 Kong 的详细信息。截止目前整个 kong 服务就跑起来了,接下来可以注册服务节点到 kong 中。
$ curl -i http://localhost:8001/注册服务
注册名为 baidu-service 的服务到 kong,如果请求匹配到该服务会跳转至 url。
$ curl -i -X POST \
  --url http://localhost:8001/services/ \
  --data ''name=baidu-service'' \
  --data ''url=http://baidu.com''
注册成功之后会得到如下提示。
HTTP/1.1 201 Created
Date: Sat, 16 May 2020 06:35:56 GMT
Content-Type: application/json; charset=utf-8
Connection: keep-alive
Access-Control-Allow-Origin: *
Server: kong/2.0.4
Content-Length: 292
X-Kong-Admin-Latency: 103

{"host":"baidu.com","created_at":1589610956,"connect_timeout":60000,"id":"6660aaa7-5afa-4f02-85f8-11dfb81fba84","protocol":"http","name":"baidu-service","read_timeout":60000,"port":80,"path":null,"updated_at":1589610956,"retries":5,"write_timeout":60000,"tags":null,"client_certificate":null}
服务配置路由
服务添加成功后,需要告知 kong 什么样的请求才使用该服务,而这个规则被称为 route,也就是路由,路由的作用是按规则匹配客户端的请求,然后转发到对应的 service,每个 route 都对应一个 service,一个 service 可能有多个 route。
$ curl -i -X POST \
  --url http://localhost:8001/services/baidu-service/routes \
  --data ''hosts[]=baidu.com''
以上代码的作用是当请求域名是 baidu.com 时,则将请求转发到 baidu-service 指定的 url,我们可以通过 curl 模拟测试。
$ curl -i -X GET \
  --url http://localhost:8000/ \
  --header ''Host: baidu.com''
HTTP/1.1 200 OK
Content-Type: text/html; charset=UTF-8
Content-Length: 81
Connection: keep-alive
Date: Sat, 16 May 2020 06:45:12 GMT
Server: Apache
Last-Modified: Tue, 12 Jan 2010 13:48:00 GMT
ETag: "51-47cf7e6ee8400"
Accept-Ranges: bytes
Cache-Control: max-age=86400
Expires: Sun, 17 May 2020 06:45:12 GMT
X-Kong-Upstream-Latency: 92
X-Kong-Proxy-Latency: 17
Via: kong/2.0.4
<html>
<meta http-equiv="refresh" content="0;url=http://www.baidu.com/">
</html>负载均衡配置
与 nginx 同理,先创建一个 upstream,名为 hello。
$ curl -X POST http://localhost:8001/upstreams --data "name=hello"{"created_at":1589633009,"hash_on":"none","id":"3bab80bb-7e62-40c8-8b7c-7efdcc329675","algorithm":"round-robin","name":"hello","tags":null,"hash_fallback_header":null,"hash_fallback":"none","hash_on_cookie":null,"host_header":null,"hash_on_cookie_path":"\/","healthchecks":{"threshold":0,"active":{"https_verify_certificate":true,"type":"http","http_path":"\/","timeout":1,"unhealthy":{"http_statuses":[429,404,500,501,502,503,504,505],"tcp_failures":0,"timeouts":0,"http_failures":0,"interval":0},"healthy":{"http_statuses":[200,302],"interval":0,"successes":0},"https_sni":null,"concurrency":10},"passive":{"unhealthy":{"http_failures":0,"http_statuses":[429,500,503],"tcp_failures":0,"timeouts":0},"healthy":{"http_statuses":[200,201,202,203,204,205,206,207,208,226,300,301,302,303,304,305,306,307,308],"successes":0},"type":"http"}},"hash_on_header":null,"slots":10000}为 upstream 添加两个负载均衡的节点,我就拿京东和淘宝来做测试了。
curl -X POST http://localhost:8001/upstreams/hello/targets --data "target=jd.com" --data "weight=100"
curl -X POST http://localhost:8001/upstreams/hello/targets --data "target=taobao.com" --data "weight=50"
如上配置就相当于 nginx 中的
upstream hello {
    server jd.com weight=100;
    server taobao.com weight=50;
}
接下来创建一个 service 指向 upstream,host 即对应 upstream 名。
curl -X POST http://localhost:8001/services --data "name=hello" --data "host=hello"为 service 创建路由,凡是包含 /hello 的地址全部走 hello upstream。
curl -i -X POST --url http://localhost:8001/services/hello/routes --data ''paths[]=/hello''
curl -X POST --url http://localhost:8001/routes --data ''paths[]=/hello'' --data ''service.id=8ad06aa5-be0a-4763-a84d-90b8046765f5''
现在访问 localhost:8000 就可以看到已经成功做了负载均衡。
限流
因为服务器不能处理无限量的请求,为了避免请求数高到服务器无法处理,必须做限流操作。关于限流,kong 使用了 rate-limiting 插件,它可以在 service、route、consumer 不同粒度上控制请求,配置非常简单。
curl -X POST http://kong:8001/services/{service}/plugins \
    --data "name=rate-limiting"
    --data "config.second=5" \
    --data "config.hour=10000"
config.second 代表一秒钟内处理的最大请求次数,config.hour 表示一小时内最大请求次数。
Route 的示例
curl -X POST http://kong:8001/routes/{route}/plugins \
    --data "name=rate-limiting"
    --data "config.second=5" \
    --data "config.hour=10000"
Consumer 的示例
curl -X POST http://kong:8001/consumers/{consumer}/plugins \
    --data "name=rate-limiting-advanced" \
    --data "config.second=5" \
    --data "config.hour=10000"
原文首发:https://pingyeaa.com/2020/05/...
我是平也,这有一个专注Gopher技术成长的开源项目「go home」
感谢大家的观看,如果觉得文章对你有所帮助,欢迎关注公众号「平也」,聚焦Go语言与技术原理。

:Nginx、OpenResty和Kong的基本概念与使用方法")
API网关Kong(一):Nginx、OpenResty和Kong的基本概念与使用方法
- 说明
- Nginx
- Nginx配置文件,指令与变量
- Nginx作为TCP/UDP负载均衡器
- Nginx模块
- OpenResty
- OpenResty安装
- OpenResty使用
- 用resty直接执行lua代码
- 执行配置文件中的lua代码
- Kong
- Kong编译安装
- 启动Kong
- 部署Kong Dashboard
- Kong的使用
- 注册API:添加服务、配置路由
- 插件启用方法
- Kong的插件
- Kong与Kubernetes的集成
- 遇到的问题
- ERROR: module ‘socket’ not found:No LuaRocks module found for socket
- ERROR: function to_regclass(unknown) does not exist (8)
- nginx: [emerg] unknown directive “real_ip_header” in /usr/local/kong/nginx-kong.conf:73
- 参考
说明
这是API网关Kong的系列教程中的一篇,使用过程中遇到的问题和解决方法记录在API网关Kong的使用过程中遇到的问题以及解决方法。
Nginx、OpenRestry、Kong这三个项目紧密相连: Nginx是模块化设计的反向代理软件,C语言开发; OpenResty是以Nginx为核心的Web开发平台,可以解析执行Lua脚本(OpenResty与Lua的关系,类似于Jvm与Java,不过Java可以做的事情太多了,OpenResty主要用来做Web、API等); Kong是一个OpenResty应用,是一个api gateway,具有API管理和请求代理的功能。
Nginx
Nginx是HTTP Server、反向代理服务器、邮件代理服务器、通用的TCP/UDP代理服务器。nginx features详细列出了nginx的功能特性。
Nginx配置文件,指令与变量
Nginx的配置文件由单指令(simple directive)和块指令(block directive)组成,单指令只有一行,以“;”结尾,块指令后面是用“{ }”包裹的多行内容。
有些块指令后的花括号中可以继续包含单指令,这样的块指令被成为配置上下文(context),这样的指令有:events、http、server、location等。
context是嵌套的,最外层的context是main context,配置文件中不在{}的中指令都是位于main context中。
events和http指令位于main context,server位于http context,location位于server context:
main context
- events
- http
  - server
    - location
配置文件示例见: Beginner’s Guide,例如:
http {
    server {
        listen 8080;           # server监听端口,不指定默认80
        root /data/up1;        # 默认文件查找根目录

        # 将请求按照uri进行分组处理
        location / {           # 选择最常匹配的location,如果不匹配任何location,返回404
            root /data/www;    # 文件查找根目录,覆盖server中的root配置
        }

        # uri路径匹配,优先级低于下面的正则匹配!
        location /images/ {
            root /data;
        }

        # 使用正则表达式匹配(必须带有"~ "前缀):匹配文件后缀名
        location ~ \.(gif|jpg|png)$ {        # 优先级高于uri路径匹配
            root /data/images;
        }

        # 作为代理服务器的配置方法
        location /proxy/ {                   # 将uri匹配的请求转发到proxy_pass指定的地址
            proxy_pass http://IP地址:8080;
        }

        # 将请求代理到FastCGI
        # fastcgi_param是按照FastCGI的要求传递的参数,可以有多个,后面的`$XXX`是Nginx变量,拼成了参数的值
        location /fastcgi/ {
            fastcgi_pass  localhost:9000;                                       # fastCGI服务的地址
            fastcgi_param SCRIPT_FILENAME $document_root$fastcgi_script_name;   # 传给fastCGI服务的参数: SCRIPT_FILENAME
            fastcgi_param QUERY_STRING    $query_string;                        # 传给fastCGI服务的参数: QUERY_STRING
        }
    }
}
上面的例子中的proxy_pass和factcgi_pass分别是nginx的http proxy module和http fastcgi moudle中指令。
Nginx有很多的module,在Nginx Documents中可以查看每个modules的用法。
Nginx: Alphabetical index of directives中列出了Nginx的所有指令。
Nginx: Alphabetical index of variables中列出了可以在配置文件中使用的所有变量。
在查看Nginx指令用法的时候,注意指令的context:
Syntax:     gzip on | off;
Default:    gzip off;
Context:    http, server, location, if in location   # 可以使用gzip指令的地方
一个最常用的模块是ngx_http_upstream_module,使用该模块后,可以用upstream指令选定一组server:
resolver 10.0.0.1;

upstream dynamic {
    zone upstream_dynamic 64k;

    server backend1.example.com      weight=5;
    server backend2.example.com:8080 fail_timeout=5s slow_start=30s;
    server 192.0.2.1                 max_fails=3;
    server backend3.example.com      resolve;
    server backend4.example.com      service=http resolve;

    server backup1.example.com:8080  backup;
    server backup2.example.com:8080  backup;
}

server {
    location / {
        proxy_pass http://dynamic;
        health_check;
    }
}
Nginx作为TCP/UDP负载均衡器
Nginx原本只能做7层(http)代理,在1.9.0版本中增加了4层(TCP/UDP)代理功能。
4层代理功能在Nginx的ngx_stream_core_module模块中实现,但默认没有编译,需要在编译时指定: –with-stream。
使用配置如下:
worker_processes auto;

error_log /var/log/nginx/error.log info;

events {
    worker_connections  1024;
}

stream {
    upstream backend {
        hash $remote_addr consistent;

        server backend1.example.com:12345 weight=5;
        server 127.0.0.1:12345            max_fails=3 fail_timeout=30s;
        server unix:/tmp/backend3;
    }

    upstream dns {
       server 192.168.0.1:53535;
       server dns.example.com:53;
    }

    server {
        listen 12345;
        proxy_connect_timeout 1s;
        proxy_timeout 3s;
        proxy_pass backend;
    }

    server {
        listen 127.0.0.1:53 udp reuseport;
        proxy_timeout 20s;
        proxy_pass dns;
    }

    server {
        listen [::1]:12345;
        proxy_pass unix:/tmp/stream.socket;
    }
}
Nginx模块
理解Nginx Module很重要,因为后面的OpenResty就是标准的Nginx加上很多Nginx Module。
Nginx是用C语言开发软件,采用模块化设计,可以通过开发模块扩展Nginx的功能。
Nginx Development guide中介绍了Nginx模块开发的方法Nginx Module develop。
插件可以编译成.so以后动态加载,也可以直接编译到nginx中,编译是通过--add-module指定要集成的模块。
例如lua-nginx-module:
./configure --prefix=/opt/nginx \
	 --with-ld-opt="-Wl,-rpath,/path/to/luajit-or-lua/lib" \
	 --add-module=/path/to/ngx_devel_kit \
	 --add-module=/path/to/lua-nginx-module
OpenResty
OpenResty是一个集成了Nginx、LuaJIT和其它很多moudels的平台,用来托管完整的web应用——包含业务逻辑,而不单纯是静态文件服务器:
OpenResty® aims to run your server-side web app completely in the Nginx server,
leveraging Nginx''s event model to do non-blocking I/O not only with the HTTP
clients, but also with remote backends like MySQL, PostgreSQL, Memcached, and Redis.
OpenResty Components中列出了OpenResty集成的组件,数量不少,这里就不列出来了。
先通过OpenResty Getting Started感受一下OpenResty是咋回事。
OpenResty集成了LuaJit,一个Lua代码的实时编译器,支持使用Lua代码。
OpenResty安装
Centos安装方式:
sudo yum install yum-utils
sudo yum-config-manager --add-repo https://openresty.org/package/centos/openresty.repo
sudo yum install openresty
sudo yum install openresty-resty
通过源代码编译:
wget https://openresty.org/download/openresty-1.13.6.2.tar.gz
tar -xvf openresty-1.13.6.2.tar.gz
cd openresty-1.13.6.2/
./configure --with-pcre-jit --with-http_ssl_module --with-http_realip_module --with-http_stub_status_module --with-http_v2_module --prefix=/usr/local/bin/openresty
make -j2
make install     //默认安装在--prefix指定的目录:/usr/local/bin/openresty
export PATH=/usr/local/openresty/bin:$PATH
为了后面顺利的使用kong,执行./configure时要指定kong依赖的模块。
OpenResty使用
OpenResty的安装目录包含以下文件:
$ tree -L 2 /usr/local/openresty/
/usr/local/openresty/
|-- bin
|   |-- md2pod.pl
|   |-- nginx-xml2pod
|   |-- openresty -> /usr/local/openresty/nginx/sbin/nginx
|   |-- opm
|   |-- resty
|   |-- restydoc
|   `-- restydoc-index
|-- COPYRIGHT
|-- luajit
|   |-- bin
|   |-- include
|   |-- lib
|   `-- share
...
注意openresty命令就是nginx命令,OpenResty可以理解为一个集成了很多模块的定制版nginx:
$ openresty -h
nginx version: openresty/1.13.6.2
Usage: nginx [-?hvVtTq] [-s signal] [-c filename] [-p prefix] [-g directives]

Options:
  -?,-h         : this help
  -v            : show version and exit
  -V            : show version and configure options then exit
  -t            : test configuration and exit
  -T            : test configuration, dump it and exit
  -q            : suppress non-error messages during configuration testing
  -s signal     : send signal to a master process: stop, quit, reopen, reload
  -p prefix     : set prefix path (default: /usr/local/openresty/nginx/)
  -c filename   : set configuration file (default: conf/nginx.conf)
  -g directives : set global directives out of configuration file
nginx集成了很多模块之后,可以执行lua代码。
用resty直接执行lua代码
OpenResty的安装目录中有一个resty文件,它是一个perl脚本,可以直接给它传入lua代码:
$ resty -e ''print("hello, world!")''
hello, world!
查看resty文件/usr/local/openresty/bin/resty,会发现最后的执行者还是nginx命令:
my $nginx_path = ''/usr/local/openresty/nginx/sbin/nginx'';
...
my @cmd = ($nginx_path, ''-p'', "$prefix_dir/", ''-c'', "conf/nginx.conf");
...
OpenResty本质上就是一个定制的nginx,通过支持在配置文件中使用lua代码,成为一个完善的应用开发平台。
API网关Kong是一个典型的OpenResty应用,它的数据平面实现中,直接生成了一个使用了kong模块的nginx.conf文件,然后直接给nginx指定这个配置启动。
这时候的nginx有点类似于可以加载执行lua代码的解释器。
执行配置文件中的lua代码
OpenResty的配置文件中也可以写入lua代码:
$ cat nginx.conf
worker_processes  1;
error_log logs/error.log;
events {
    worker_connections 1024;
}
http {
    server {
        listen 8080;
        location / {
            default_type text/html;
            content_by_lua ''
                ngx.say("<p>hello, world</p>")
            '';
        }
    }
}
启动:
openresty -p `pwd` -c nginx.conf
然后访问”127.0.0.1:8080”,可以看到输出:
$ curl 127.0.0.1:8080
<p>hello, world</p>
Kong
Kong是一个基于OpenResty的应用,是一个API网关。
Kong编译安装
Kong编译安装时需要先安装OpenResty。
还需要lua包管理工具luarocks:
git clone git://github.com/luarocks/luarocks.git
./configure --lua-suffix=jit --with-lua=/usr/local/openresty/luajit --with-lua-include=/usr/local/openresty/luajit/include/luajit-2.1
make install
下载kong代码编译:
git clone https://github.com/Kong/kong.git
cd kong
make install
编译完成之后会在当前目录生成一个bin目录:
$ ls bin/
busted  kong
查看bin/kong的内容,可以发现这是一个用resty执行的脚本文件:
$ cat bin/kong
#!/usr/bin/env resty

require "luarocks.loader"

package.path = "./?.lua;./?/init.lua;" .. package.path

require("kong.cmd.init")(arg)
启动Kong
先准备数据库,kong支持PostgreSQL和Cassandra 3.x.x,这里使用PostgreSQL(需要版本在9.4及以上):
注意,如果使用其它版本的PostgreSQL,将下面的9.6换成对应版本号。
yum install https://download.postgresql.org/pub/repos/yum/9.6/redhat/rhel-7-x86_64/pgdg-centos96-9.6-3.noarch.rpm
yum install postgresql96
yum install postgresql96-server
export PATH=$PATH:/usr/pgsql-9.6/bin/
postgresql96-setup initdb
systemctl start postgresql-9.6
su - postgres
psql
CREATE USER kong; CREATE DATABASE kong OWNER kong;
alter user kong with encrypted password ''123456'';
\q
在/var/lib/pgsql/9.6/data/pg_hba.conf的开始处添加规则下面规则:
host kong kong 127.0.0.1/32 md5
然后重启PostgreSQL,确保下面的命令能登陆PostgreSQL:
# psql -h 127.0.0.1 -U kong kong -W
Password for user kong:
psql (9.6.10)
Type "help" for help.

kong=>
PostgreSQL的部署使用和通过密码登陆方式的设置参考:PostgresSQL数据库的基本使用、PostgreSQL的用户到底是这么回事?新用户怎样才能用密码登陆?。
准备kong的配置文件,
cp kong.conf.default kong.conf
# 在kong.conf中填入数据地址、用户、密码等
创建kong的数据库:
./bin/kong migrations up -c ./kong.conf
启动kong:
./bin/kong start -c ./kong.conf
kong默认的代理地址是:
proxy_listen = 0.0.0.0:8000, 0.0.0.0:8443
默认的管理地址是:
admin_listen = 127.0.0.1:8001, 127.0.0.1:8444 ssl
返回的是json字符串:
$ curl -i http://localhost:8001/
HTTP/1.1 200 OK
Date: Sat, 29 Sep 2018 08:56:51 GMT
Content-Type: application/json; charset=utf-8
Connection: keep-alive
Access-Control-Allow-Origin: *
Server: kong/0.14.1
Content-Length: 5667

{"plugins":{"enabled_in_cluster":[],"availab...
部署Kong Dashboard
PGBI/kong-dashboard是一个第三方的Dashboard。
docker run --rm -p 8080:8080 pgbi/kong-dashboard start \
  --kong-url http://kong:8001
  --basic-auth user1=password1 user2=password2
Kong的使用
停止:
kong stop
重新加载:
kong reload
注册API:添加服务、配置路由
添加服务Configuring a Service。
添加一个名为example-service的服务,服务地址是http://mockbin.org:
 curl -i -X POST \
  --url http://localhost:8001/services/ \
  --data ''name=example-service'' \
  --data ''url=http://mockbin.org''
执行后返回:
{
    "connect_timeout": 60000,
    "created_at": 1538213979,
    "host": "mockbin.org",
    "id": "ebed2707-e2fb-4694-9e8e-fb66fe9dd7c8",
    "name": "example-service",
    "path": null,
    "port": 80,
    "protocol": "http",
    "read_timeout": 60000,
    "retries": 5,
    "updated_at": 1538213979,
    "write_timeout": 60000
}
为example-service添加一个route,满足route的请求将被转发给example-service,执行:
 curl -i -X POST \
  --url http://localhost:8001/services/example-service/routes \
  --data ''hosts[]=example.com''
这里配置的route条件是:host为example.com。
返回:
{
    "created_at": 1538185340,
    "hosts": [
        "example.com"
    ],
    "id": "4738ae2c-b64a-4fe5-9e2a-5855e769a9e8",
    "methods": null,
    "paths": null,
    "preserve_host": false,
    "protocols": [
        "http",
        "https"
    ],
    "regex_priority": 0,
    "service": {
        "id": "ebed2707-e2fb-4694-9e8e-fb66fe9dd7c8"
    },
    "strip_path": true,
    "updated_at": 1538185340
}
这时候访问kong的proxy地址时,如果host为example.com,请求被转发到http://mockbin.org:
curl -i -X GET \
  --url http://localhost:8000/ \
  --header ''Host: example.com''
可以在/etc/hostsname中将example.com地址配置为kong所在的机器的地址:
10.10.192.35 example.com
然后就可以通过example.com:8000打开http://mockbin.org。
插件启用方法
插件是用来扩展API的,例如为API添加认证、设置ACL、限制速率等、集成oauth、ldap等。
Kong Plugins中列出了已有的所有插件。
这里演示key-auth插件的用法,Kong Enabling Plugins,。
 curl -i -X POST \
  --url http://localhost:8001/services/example-service/plugins/ \
  --data ''name=key-auth''
返回:
{
    "config": {
        "anonymous": "",
        "hide_credentials": false,
        "key_in_body": false,
        "key_names": [
            "apikey"
        ],
        "run_on_preflight": true
    },
    "created_at": 1538218948000,
    "enabled": true,
    "id": "f25f3952-d0d4-4923-baac-860554fc2fc1",
    "name": "key-auth",
    "service_id": "ebed2707-e2fb-4694-9e8e-fb66fe9dd7c8"
}
这时候直接访问example.com,会返回401:
curl -i -X GET \
>   --url http://localhost:8000/ \
>   --header ''Host: example.com''
HTTP/1.1 401 Unauthorized
Date: Sat, 29 Sep 2018 11:03:55 GMT
Content-Type: application/json; charset=utf-8
Connection: keep-alive
WWW-Authenticate: Key realm="kong"
Server: kong/0.14.1
Content-Length: 41
在kong中创建一个名为Jason的用户:
curl -i -X POST \
  --url http://localhost:8001/consumers/ \
  --data "username=Jason"
返回:
{
    "created_at": 1538219225,
    "custom_id": null,
    "id": "f2450962-e4bb-477f-8df6-85984eb94e09",
    "username": "Jason"
}
将Jason的密码设置为123456:
curl -i -X POST \
  --url http://localhost:8001/consumers/Jason/key-auth/ \
  --data ''key=123456''
返回:
{
    "consumer_id": "f2450962-e4bb-477f-8df6-85984eb94e09",
    "created_at": 1538219311000,
    "id": "0332d36f-61b9-425a-b563-510c11a85e85",
    "key": "123456"
}
这时候可以用Jason的key访问API:
 curl -i -X GET \
  --url http://localhost:8000 \
  --header "Host: example.com" \
  --header "apikey: 123456"
返回的是mockbin.org的首页。
key-auth插件的详细用法参考Kong Plugin: key-auth。插件的作用范围可以是全局(global)、服务(service)、路由(router)。
启用key-auth后,通过认证的请求被转发给上游服务时,key-auth会增设下面的字段:
X-Consumer-ID, the ID of the Consumer on Kong
X-Consumer-Custom-ID, the custom_id of the Consumer (if set)
X-Consumer-Username, the username of the Consumer (if set)
X-Credential-Username, the username of the Credential (only if the consumer is not the ''anonymous'' consumer)
X-Anonymous-Consumer, will be set to true when authentication failed, and the ''anonymous'' consumer was set instead.
Kong的插件
Kong Plugins中列出了已有的所有插件,有些插件只能在企业版使用,有些插件是社区成员开发的,大部分是Kong公司开发,并集成到社区版中。
下面是社区版集成的、Kong公司维护的插件(2018-09-30 14:33:03):
认证插件:
Basic Auth
HMAC Auth
JWT Auth
Key Auth
LDAP Auth
OAuth 2.0 Auth
安全插件:
Bot Detection (机器人检测)
CORS (跨域请求)
IP Restriction (IP限制)
流控插件:
ACL (访问控制)
Rate Limiting (限速)
Request Size Limiting
Request Termination
Response Rate Limiting
微服务插件:
AWS Lambda
Azure Functions
Apache OpenWhisk
Serverless Functions
分析和监控插件:
Datadog
Prometheus
Zipkin
内容修改插件(Transformations):
Correlation ID
Request Transformer
Response Transformer
日志插件:
File Log
HTTP Log
Loggly
StatsD
Syslog
TCP Log
UDP Log
Kong与Kubernetes的集成
经过前面的学习,对Api网关是什么,以及Kong能够做什么已经有了足够的了解。现在Kubernetes一统计算资源与应用发布编排的趋势已经形成,我们更关心Kong能否和Kubernetes结合。
Kong是一个Api网关,也是一个特性更丰富的反向代理,既然它有代理流量的功能,那么能不能直接成为Kubernetes的流量入口?使Kubernetes内部的服务都通过Kong发布。
Kong实现了一个Kubernetes Ingress Controller来做这件事。在Kubernetes中部署kong的方法见Kong CE or EE on Kubernetes。
这部分内容比较多,单独开篇了: Kubernetes与API网关Kong的集成。
遇到的问题
ERROR: module ‘socket’ not found:No LuaRocks module found for socket
启动的时候:
# ./bin/kong start -c ./kong.conf
...
ERROR: ./kong/globalpatches.lua:63: module ''socket'' not found:No LuaRocks module found for socket
...
这是因为编译kong之后,重新编译了luarocks,并且将luarocks安装在了其它位置。重新编译kong之后解决。
ERROR: function to_regclass(unknown) does not exist (8)
创建数据库的时候:
# kong migrations up -c ./kong.conf
...
[postgres error] could not retrieve current migrations: [postgres error] ERROR: function to_regclass(unknown) does not exist (8)
...
这是因为PostgreSQL的版本太低了,to_regclass在PostgreSQL 9.4及以上的版本中才存在。
yum install https://download.postgresql.org/pub/repos/yum/9.6/redhat/rhel-7-x86_64/pgdg-centos96-9.6-3.noarch.rpm
yum install postgresql96
yum install postgresql96-server
nginx: [emerg] unknown directive “real_ip_header” in /usr/local/kong/nginx-kong.conf:73
nginx: [emerg] unknown directive "real_ip_header" in /usr/local/kong/nginx-kong.conf:73
这是因为编译的openresty的时候,没有指定--with-http_realip_module,重新编译安装:
./configure --with-pcre-jit --with-http_ssl_module --with-http_realip_module --with-http_stub_status_module --with-http_v2_module
make -j2
make install     //默认安装在/usr/local/bin/openresty
export PATH=/usr/local/openresty/bin:$PATH
参考
- nginx website
- OpenResty website
- Kong website
- Kong Compile Source
- nginx features
- nginx documentation
- Nginx Example Configuration & Directives
- Nginx: Alphabetical index of directives
- Nginx: Alphabetical index of variables
- Beginner’s Guide
- Nginx: ngx_http_fastcgi_module
- Nginx: ngx_http_proxy_module
- Nginx Documents
- Nginx: Module ngx_stream_core_module
- OpenResty website
- OpenResty Components
- OpenResty Getting Started
- Nginx Development guide
- Nginx Module develop
- PostgreSQL的用户到底是这么回事?新用户怎样才能用密码登陆?
- PostgresSQL数据库的基本使用
- Kong Enabling Plugins
- Kong Plugin: key-auth
- Kong Plugins
- Kong CE or EE on Kubernetes
- Kong/kubernetes-ingress-controller
- PGBI/kong-dashboard
:Kong与Kubernetes集成的方法")
API网关Kong(二):Kong与Kubernetes集成的方法
- 说明
- 先说组成
- 控制平面与数据平面
- CustomResourceDefinitions
- 开始部署
- 使用演示
- 参考
说明
这是API网关Kong的系列教程中的一篇,使用过程中遇到的问题和解决方法记录在API网关Kong的使用过程中遇到的问题以及解决方法。
经过前面的学习(Nginx、OpenResty和Kong的基本概念与使用方法),对Api网关是什么,以及Kong能够做什么已经有了足够的了解。 现在Kubernetes一统计算资源与应用发布编排的趋势已经形成,我们更关心Kong能否和Kubernetes结合。
Kong是一个Api网关,也是一个特性更丰富的反向代理。既然它有代理流量的功能,那么能不能直接成为Kubernetes的流量入口?使Kubernetes上托管的服务都通过Kong发布。
Kong实现了一个Kubernetes Ingress Controller(后面用kong-ingress-controller指代这个项目)来做这件事。另外把整个Kong部署在Kubernetes中也是可行的,见Kong CE or EE on Kubernetes。
先说组成
Kubernetes Ingress Controller for Kong中介绍了在kubernetes中的部署方法,总共有三部分。
第一部分是数据库。kong不支持mysql,使用的数据库只能是9.4及以上版本的postgres,或者Cassandra 3.x.x。
第二部分是ingress-controller.yaml,是一个Deployment,Pod中有三个容器:
第一个容器是InitContainer,负责初始化数据库;

第二个容器是kong-proxy,只开放了admin接口,负责提供Kong的管理API;

第三个容器是kong-ingress-controller,负责Kubernetes资源与Kong的衔接,监测Kubernetes资源的变动,及时调用Kong的管理API,更新Kong的配置。
第三部分是kong.yaml,可以是Deployment,也可以是Daemonset,pod中只有一个kong-proxy容器,禁用了admin接口,只提供代理服务。
控制平面与数据平面
ingress-controller.yaml是控制平面,提供管理接口、下发规则;kong.yaml是数据平面,反向代理对API的请求。
下面是kong-ingress-controller中给出的示意图,红色箭头表示控制信息的流动,绿色箭头表示API请求的流动,dataplane就是属于kong.yaml的多个Pod:

CustomResourceDefinitions
Kubernetes支持自定义资源Extend the Kubernetes API with CustomResourceDefinitions,kong-ingress-controller充分利用了这个简称为CRD的特性。
Cluster-types.yml中定义了KongPlugin、KongConsumer、KongCredential和KongIngress四种CRD资源(@2018-09-30 17:19:38)。
Kong ingress controller: custom types对这四种CRD资源做了说明:
KongConsumer:   kong的用户
KongPlugin:     kong的插件的配置项
KongCredential: kong用户的认证凭证
KongIngress:    对用户创建的ingress的补充配置
KongConsumer定义了kong的用户:
apiVersion: configuration.konghq.com/v1
kind: KongConsumer
metadata:
  name: <object name>
  namespace: <object namespace>
username: <user name>
custom_id: <custom ID>
例如:
apiVersion: configuration.konghq.com/v1
kind: KongConsumer
metadata:
  name: consumer-team-x
username: team-X
custom_id: my_team_x # optional and not recommended, please use `username`
KongCredential是用户的认证凭证,它的type与kong支持的认证方式一一对应:
apiVersion: configuration.konghq.com/v1
kind: KongCredential
metadata:
  name: credential-team-x
consumerRef: consumer-team-x
type: key-auth
config:
  key: 62eb165c070a41d5c1b58d9d3d725ca1
KongPlugin是可以具体到用户的插件配置,注意它可是全局配置,也可以是针对某个用户的配置(consumerRef关联到特定用户):
apiVersion: configuration.konghq.com/v1
kind: KongPlugin
metadata:
  name: <object name>
  namespace: <object namespace>
  labels:
    global: "true" # optional, please note the quotes around true
consumerRef: <optional, name of an existing consumer> # optional
disabled: <boolean>  # optional
config:
    key: value
plugin: <name-of-plugin>
例如:
apiVersion: configuration.konghq.com/v1
kind: KongPlugin
metadata:
  name: http-svc-consumer-ratelimiting
consumerRef: consumer-team-x
config:
  hour: 1000
  limit_by: ip
  second: 100
plugin: rate-limiting
KongIngress是对已经存在的ingress的补充。 Kong-ingress-controller会主动监测kuernetes集群中所有的ingress,为每个配置了host的ingress在kong中创建一个router,为每个被ingress使用的backend在kong中创建一个service。 Ingress是kubernetes定义的(Kubernetes Ingress定义),对于那些与kong相关但是Ingress不支持的配置项,需要在KongIngress中配置。
下面是一个完成的KongIngress定义,包含upstream、proxy和route三部分:
apiVersion: configuration.konghq.com/v1
kind: KongIngress
metadata:
  name: configuration-demo
upstream:
  hash_on: none
  hash_fallback: none
  healthchecks:
    active:
      concurrency: 10
      healthy:
        http_statuses:
        - 200
        - 302
        interval: 0
        successes: 0
      http_path: "/"
      timeout: 1
      unhealthy:
        http_failures: 0
        http_statuses:
        - 429
        interval: 0
        tcp_failures: 0
        timeouts: 0
    passive:
      healthy:
        http_statuses:
        - 200
        successes: 0
      unhealthy:
        http_failures: 0
        http_statuses:
        - 429
        - 503
        tcp_failures: 0
        timeouts: 0
    slots: 10
proxy:
  protocol: http
  path: /
  connect_timeout: 10000
  retries: 10
  read_timeout: 10000
  write_timeout: 10000
route:
  methods:
  - POST
  - GET
  regex_priority: 0
  strip_path: false
  preserve_host: true
  protocols:
  - http
  - https
它们的用法在后面章节演示。
开始部署
这里主要是学习,直接使用了Master分支中提供的yaml文件(commit: 34e9b4165ab64318d00028f42b797e77dac65e24),不是正式的Release版本。
创建custerm-types:
wget https://raw.githubusercontent.com/Kong/kubernetes-ingress-controller/master/deploy/manifests/custom-types.yaml
kubectl create -f custom-types.yaml
创建名为kong的namespace,后面yaml描述的任务部署在这个namespace中:
wget https://raw.githubusercontent.com/Kong/kubernetes-ingress-controller/master/deploy/manifests/namespace.yaml
kubectl create -f namespace.yaml
设置RBAC,为kong namespace中的serivceaccount绑定角色,并赋予权限:
wget https://raw.githubusercontent.com/Kong/kubernetes-ingress-controller/master/deploy/manifests/rbac.yaml
kubectl create -f rbac.yaml
部署postgre,这里为了方便直接在Kubernetes部署了,在操作系统上的部署方法参考:PostgresSQL数据库的基本使用。
wget https://raw.githubusercontent.com/Kong/kubernetes-ingress-controller/master/deploy/manifests/postgres.yaml
kubectl create -f postgres.yaml
注意postgres.yaml是一个statfulset,并且要为每个Pod绑定PV,如果你的集群不支持,且纯粹试用可以注释掉(这样postgre的pod重建时,数据会丢失):
...
      volumes:
      - name: datadir
        persistentVolumeClaim:
          claimName: datadir
  volumeClaimTemplates:
  - metadata:
      name: datadir
    spec:
      accessModes:
        - "ReadWriteOnce"
      resources:
        requests:
          storage: 1Gi
部署kube-ingress-controller:
wget https://raw.githubusercontent.com/Kong/kubernetes-ingress-controller/master/deploy/manifests/ingress-controller.yaml
kubectl create -f ingress-controller.yaml
部署kong:
wget https://raw.githubusercontent.com/Kong/kubernetes-ingress-controller/master/deploy/manifests/kong.yaml
kubectl create -f kong.yaml
kong.yaml中少了一个service(commit: 34e9b4165ab64318d00028f42b797e77dac65e24),需要加上:
---
apiVersion: v1
kind: Service
metadata:
  name: kong-proxy
  namespace: kong
spec:
  type: NodePort
  ports:
  - name: kong-proxy
    port: 80
    targetPort: 8000
    protocol: TCP
  - name: kong-proxy-ssl
    port: 443
    targetPort: 8443
    protocol: TCP
  selector:
    app: kong
确保所有的Pod正常运行:
$ kubectl -n kong get pod -o wide
NAME                                     READY     STATUS    RESTARTS   AGE       IP             NODE
kong-54875c6bd7-8ttgf                    1/1       Running   0          15s       192.168.78.8   10.10.173.203
kong-ingress-controller-cfc7dc7d-vnp64   2/2       Running   7          15m       192.168.78.6   10.10.173.203
postgres-0                               1/1       Running   0          17m       192.168.78.5   10.10.173.203
相关Service的状态:
$ kubectl -n kong get svc
NAME                      TYPE        CLUSTER-IP      EXTERNAL-IP   PORT(S)                      AGE
kong-ingress-controller   NodePort    10.254.147.53   <none>        8001:31627/TCP               27m
kong-proxy                NodePort    10.254.237.61   <none>        80:32057/TCP,443:31552/TCP   52s
postgres                  ClusterIP   10.254.77.113   <none>        5432/TCP                     47m
然后可以部署一个第三方提供的Dashboard:PGBI/kong-dashboard:
---
apiVersion: v1
kind: Service
metadata:
  name: kong-dashboard
  namespace: kong
spec:
  type: NodePort
  ports:
  - name: kong-dashboard
    port: 80
    targetPort: 8080
    protocol: TCP
  selector:
    app: dashboard
---

apiVersion: extensions/v1beta1
kind: Deployment
metadata:
  name: dashboard
  namespace: kong
spec:
  template:
    metadata:
      labels:
        name: dashboard
        app: dashboard
    spec:
      containers:
      - name: kong-dashboard
        args:
        - start
        - --kong-url http://kong-ingress-controller:8001
        - --basic-auth admin=admin
        image: pgbi/kong-dashboard:latest
        ports:
        - name: http
          containerPort: 8080
          protocol: TCP
使用演示
在另一个namespaces中创建一个完整应用:webshell-all-in-one.yaml。
$ kubectl create -f https://raw.githubusercontent.com/introclass/kubernetes-yamls/master/all-in-one/webshell-all-in-one.yaml
namespace "demo-webshell" created
ingress "webshell-ingress" created
service "webshell" created
deployment "webshell" created
上面的yaml文件,在demo-webshellnamespaces中,创建了deployment、serivce和ingress。
创建成功之后,在kong的dashboard中,可以看到自动创建了为demo-webshell.webshell.80 的Route:
Service                     Methods    Protocols    Hosts          Paths    Priority
demo-webshell.webshell.80   (none)     http         webshell.com   /        0
和一个同名的service:
Name                        Protocol    Host                         Port    PATH
demo-webshell.webshell.80   http        demo-webshell.webshell.80    80      /
之后可以通过kong-proxy服务访问webshell:
// kong-proxy的采用NodePort方式,端口是32057
kong-proxy                NodePort    10.254.237.61   <none>        80:32057/TCP,443:31552/TCP   52s
访问效果如下,10.10.173.203是kubernetes一个node的IP:
$ curl -v -H "Host: webshell.com" 10.10.173.203:32057
* About to connect() to 10.10.173.203 port 32057 (#0)
*   Trying 10.10.173.203...
* Connected to 10.10.173.203 (10.10.173.203) port 32057 (#0)
> GET / HTTP/1.1
> User-Agent: curl/7.29.0
> Accept: */*
> Host: webshell.com
>
< HTTP/1.1 200 OK < Content-Type: text/html; charset=utf-8 < Content-Length: 382 < Connection: keep-alive < Date: Mon, 08 Oct 2018 10:59:08 GMT < X-Kong-Upstream-Latency: 3 < X-Kong-Proxy-Latency: 9 < Via: kong/0.14.1 < <html> <head> <meta content="text/html; charset=utf-8"> <title>WebShell</title> </head> <body> <form method="post" accept-charset="utf-8"> Command: <input type="text" name="command" width="40%" value="hostname"> Params : <input type="text" name="params" width="80%" value=""> <input type="submit" value="submit"> </form> <pre> webshell-cc785f4f8-2vp6c </pre> </body> </html>
参考
- Kong CE or EE on Kubernetes
- Kong/kubernetes-ingress-controller
- Nginx、OpenResty和Kong的基本概念与使用方法
- Kubernetes Ingress Controller for Kong
- Deployment: ingress-controller.yaml
- Deployment: Kong
- Extend the Kubernetes API with CustomResourceDefinitions
- Kong ingress controller: custom types
- Kong postgres.yaml
- PostgresSQL数据库的基本使用
- Kong Custom Resource Definitions
- Nginx、OpenResty和Kong的基本概念与使用方法: Kong的插件
- PGBI/kong-dashboard
- Kubernetes Ingress
- Kong: router
- Kong: service

API网关之Kong网关简介
1. Kong简介
那么,Kong是一个什么东东呢?它是一个开源的API网关,或者你可以认为它是一个针对API的一个管理工具。你可以在那些上游service之上,额外去实现一些功能。Kong是开源的,所以你可以在Github找到它,你现在就可以下载使用。
Kong是一款基于OpenResty(Nginx + Lua模块)编写的高可用、易扩展的,由Mashape公司开源的API Gateway项目。Kong是基于NGINX和Apache Cassandra或PostgreSQL构建的,能提供易于使用的RESTful API来操作和配置API管理系统,所以它可以水平扩展多个Kong服务器,通过前置的负载均衡配置把请求均匀地分发到各个Server,来应对大批量的网络请求。
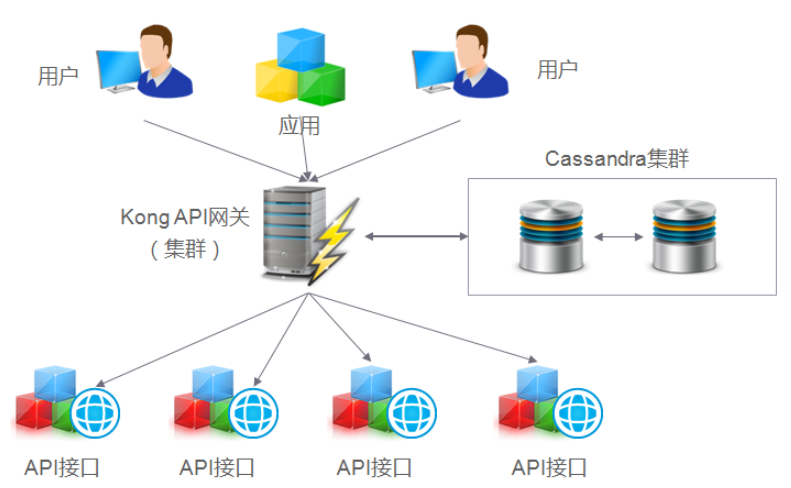
Kong主要有三个组件:
-
Kong Server :基于nginx的服务器,用来接收API请求。
-
Apache Cassandra/PostgreSQL :用来存储操作数据。
-
Kong dashboard:官方推荐UI管理工具,当然,也可以使用 restfull 方式 管理admin api。
Kong采用插件机制进行功能定制,插件集(可以是0或N个)在API请求响应循环的生命周期中被执行。插件使用Lua编写,目前已有几个基础功能:HTTP基本认证、密钥认证、CORS(Cross-Origin Resource Sharing,跨域资源共享)、TCP、UDP、文件日志、API请求限流、请求转发以及Nginx监控。
2. Kong网关的特性
Kong网关具有以下的特性:
-
可扩展性: 通过简单地添加更多的服务器,可以轻松地进行横向扩展,这意味着您的平台可以在一个较低负载的情况下处理任何请求;
-
模块化: 可以通过添加新的插件进行扩展,这些插件可以通过RESTful Admin API轻松配置;
-
在任何基础架构上运行: Kong网关可以在任何地方都能运行。您可以在云或内部网络环境中部署Kong,包括单个或多个数据中心设置,以及public,private 或invite-only APIs。

-
Kong核心基于OpenResty构建,实现了请求/响应的Lua处理化;
-
Kong插件拦截请求/响应,如果接触过Java Servlet,等价于拦截器,实现请求/响应的AOP处理;
-
Kong Restful 管理API提供了API/API消费者/插件的管理;
-
数据中心用于存储Kong集群节点信息、API、消费者、插件等信息,目前提供了PostgreSQL和Cassandra支持,如果需要高可用建议使用Cassandra;
-
Kong集群中的节点通过gossip协议自动发现其他节点,当通过一个Kong节点的管理API进行一些变更时也会通知其他节点。每个Kong节点的配置信息是会缓存的,如插件,那么当在某一个Kong节点修改了插件配置时,需要通知其他节点配置的变更。
3. Kong网关插件
-
身份认证插件:Kong提供了Basic Authentication、Key authentication、OAuth2.0 authentication、HMAC authentication、JWT、LDAP authentication认证实现。
-
安全控制插件:ACL(访问控制)、CORS(跨域资源共享)、动态SSL、IP限制、爬虫检测实现。
-
流量控制插件:请求限流(基于请求计数限流)、上游响应限流(根据upstream响应计数限流)、请求大小限制。限流支持本地、Redis和集群限流模式。
-
分析监控插件:Galileo(记录请求和响应数据,实现API分析)、Datadog(记录API Metric如请求次数、请求大小、响应状态和延迟,可视化API Metric)、Runscope(记录请求和响应数据,实现API性能测试和监控)。
-
协议转换插件:请求转换(在转发到upstream之前修改请求)、响应转换(在upstream响应返回给客户端之前修改响应)。
-
日志应用插件:TCP、UDP、HTTP、File、Syslog、StatsD、Loggly等。
4. Kong网关请求流程
为了更好地理解系统,这是使用Kong网关的API接口的典型请求工作流程:

当Kong运行时,每个对API的请求将先被Kong命中,然后这个请求将会被代理转发到最终的API接口。在请求(Requests)和响应(Responses)之间,Kong将会执行已经事先安装和配置好的任何插件,授权您的API访问操作。Kong是每个API请求的入口点(Endpoint)。
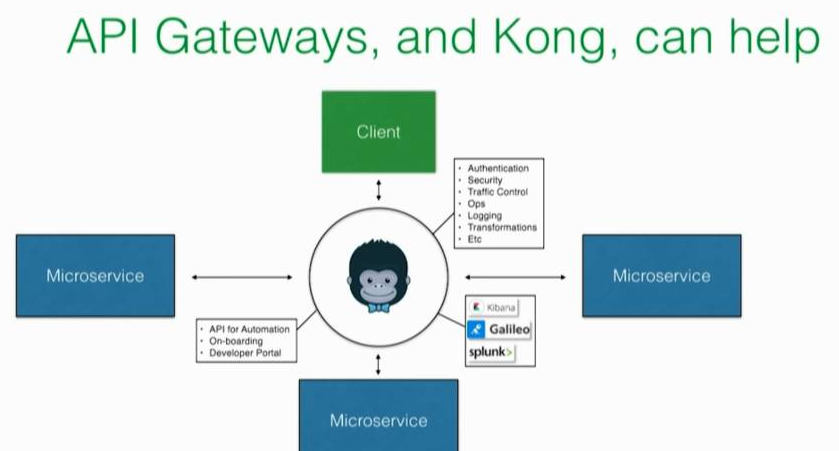
API网关和Kong能为你做些什么
API 网关可以通过实现一些中间件来解决一些问题,这些中间件的功能你就不用再到每个service中实现了。你也是知道的,不同的团队使用不同的方式来实现了不同的微服务。
如果你不去做一些中心化和抽象化的事情,你将会死于不同的认证方式以及不同的速率限制实现,五花八门。你肯定希望避免这样的糟糕局面。
API网关不仅可以帮你解决API的管理部分,而且还可以解决下面两件事情:
- 分析(Analytics) – API网关可以和你的分析基础设施保持透明的交互和通信,因为API网关是每个请求(request)的入口,必经地。API网关可以看到所有的数据,可以知道经过你的service的流量。这就相当于你有一个集中的地方,你可以把所有的这些信息push到你的监控或分析工具,比如Kibana或者Splunk。
- 自动化(Automation) –网关还有助于自动化部署,还可以帮助你实现自动化登入验证(on boarding)。 什么是登入(on boarding)呢? 如果你有API,并且你希望有身份验证,你可能需要一些功能可以允许用户为该API创建登入凭据(credentials)然后开始使用(消费)API。 开发人员门户网站或你的文档中心等都可以与网关集成来配置这些凭据(credentials),这样你就不用从头开始构建一些功能了。
5. 总结
Kong作为API网关提供了API管理功能,及围绕API管理实现了一些默认的插件,另外还具备集群水平扩展能力,从而提升整体吞吐量。Kong本身是基于OpenResty,可以在现有Kong的基础上进行一些扩展,从而实现更复杂的特性。
虽然有一些特性Kong默认是缺失的,如API级别的超时、重试、fallback策略、缓存、API聚合、AB测试等,这些功能插件需要企业开发人员通过Lua语言进行定制和扩展。
综上所述,Kong API网关默认提供的插件比较丰富, 适应针对企业级的API网关定位。
关于Kong 网关部署和kong网关架构的问题就给大家分享到这里,感谢你花时间阅读本站内容,更多关于API 网关 Kong、API网关Kong(一):Nginx、OpenResty和Kong的基本概念与使用方法、API网关Kong(二):Kong与Kubernetes集成的方法、API网关之Kong网关简介等相关知识的信息别忘了在本站进行查找喔。
本文标签:


