本文将分享Spring的IoC容器实现原理(一)#loadBeanDefinition的详细内容,并且还将对spring中的ioc容器进行详尽解释,此外,我们还将为大家带来关于loadBeanDefi
本文将分享Spring 的 IoC 容器实现原理 (一)#loadBeanDefinition的详细内容,并且还将对spring中的ioc容器进行详尽解释,此外,我们还将为大家带来关于loadBeanDefinitions方法源码跟踪(一)、loadBeanDefinitions方法源码跟踪(二)、RootBeanDefinition、ChildBeanDefinition、GenericBeanDefinition的区别、Spring 5 中文解析核心篇-IoC容器之BeanDefinition继承与容器拓展点的相关知识,希望对你有所帮助。
本文目录一览:- Spring 的 IoC 容器实现原理 (一)#loadBeanDefinition(spring中的ioc容器)
- loadBeanDefinitions方法源码跟踪(一)
- loadBeanDefinitions方法源码跟踪(二)
- RootBeanDefinition、ChildBeanDefinition、GenericBeanDefinition的区别
- Spring 5 中文解析核心篇-IoC容器之BeanDefinition继承与容器拓展点
#loadBeanDefinition(spring中的ioc容器)")
Spring 的 IoC 容器实现原理 (一)#loadBeanDefinition(spring中的ioc容器)
Spring 有十几个组件,核心组件为 bean (演员)-context (舞台)-core (道具)
bean 包装的是 object,而 object 中肯定要有数据,如何给这些数据提供生存环境就是 context 要解决的问题,对于 context 来说他就是要发现每个 bean 之间的关系,为他们建立起来并维护好这些关系。所以 context 就是一个 bean 关系的集合,这个关系集合就是我们常说的 IOC 容器。core 组件就是发现、建立和维护每个 bean 之间的关系所需要的一些工具,把 core 叫做 util 更为贴切。
IOC 的基础
下面我们从 IOC/AOP 开始,它们是 Spring 平台实现的核心部分;虽然,我们一开始大多只是在这个层面上,做一些配置和外部特性的使用工作,但对这两个核心模块工作原理和运作机制的理解,对深入理解 Spring 平台,却是至关重要的;因为,它们同时也是 Spring 其他模块实现的基础。从 Spring 要做到的目标,也就是从简化 Java EE 开发的出发点来看,简单的来说,它是通过对 POJO 开发的支持,来具体实现的;具体的说,Spring 通过为应用开发提供基于 POJO 的开发模式,把应用开发和复杂的 Java EE 服务,实现解耦,并通过提高单元测试的覆盖率,从而有效的提高整个应用的开发质量。这样一来,实际上,就需要把为 POJO 提供支持的,各种 Java EE 服务支持抽象到应用平台中去,去封装起来;而这种封装功能的实现,在 Spring 中,就是由 IOC 容器以及 AOP 来具体提供的,这两个模块,在很大程度上,体现了 Spring 作为应用开发平台的核心价值。它们的实现,是 Rod.Johnson 在他的另一本著作《Expert One-on-One J2EE Development without EJB》 中,所提到 Without EJB 设计思想的体现;同时也深刻的体现了 Spring 背后的设计理念。
从更深一点的技术层面上来看,因为 Spring 是一个基于 Java 语言的应用平台,如果我们能够对 Java 计算模型,比如像 JVM 虚拟机实现技术的基本原理有一些了解,会让我们对 Spring 实现的理解,更加的深入,这些 JVM 虚拟机的特性使用,包括像反射机制,代理类,字节码技术等等。它们都是在 Spring 实现中,涉及到的一些 Java 计算环境的底层技术;尽管对应用开发人员来说,可能不会直接去涉及这些 JVM 虚拟机底层实现的工作,但是了解这些背景知识,或多或少,对我们了解整个 Spring 平台的应用背景有很大的帮助;打个比方来说,就像我们在大学中,学习的那些关于计算机组织和系统方面的基本知识,比如像数字电路,计算机组成原理,汇编语言,操作系统等等这些基本课程的学习。虽然,坦率的来说,对我们这些大多数课程的学习者,在以后的工作中,可能并没有太多的机会,直接从事这么如此底层的技术开发工作;但具备这些知识背景,为我们深入理解基于这些基础技术构架起来的应用系统,毫无疑问,是不可缺少的。随着 JVM 虚拟机技术的发展,可以设想到的是,更多虚拟机级别的基本特性,将会持续的被应用平台开发者所关注和采用,这也是我们在学习平台实现的过程中,非常值得注意的一点,因为这些底层技术实现,毫无疑问,会对 Spring 应用平台的开发路线,产品策略产生重大的影响。同时,在使用 Spring 作为应用平台的时候,如果需要更深层次的开发和性能调优,这些底层的知识,也是我们知识库中不可缺少的部分。有了这些底层知识,理解整个系统,想来就应该障碍不大了。
IOC 的一点认识
对 Spring IOC 的理解离不开对依赖反转模式的理解,我们知道,关于如何反转对依赖的控制,把控制权从具体业务对象手中转交到平台或者框架中,是解决面向对象系统设计复杂性和提高面向对象系统可测试性的一个有效的解决方案。这个问题触发了 IoC 设计模式的发展,是 IoC 容器要解决的核心问题。同时,也是产品化的 IoC 容器出现的推动力。而我觉得 Spring 的 IoC 容器,就是一个开源的实现依赖反转模式的产品。
那具体什么是 IoC 容器呢?它在 Spring 框架中到底长什么样?说了这么多,其实对 IoC 容器的使用者来说,我们常常接触到的 BeanFactory 和 ApplicationContext 都可以看成是容器的具体表现形式。这些就是 IoC 容器,或者说在 Spring 中提 IoC 容器,从实现来说,指的是一个容器系列。这也就是说,我们通常所说的 IoC 容器,如果深入到 Spring 的实现去看,会发现 IoC 容器实际上代表着一系列功能各异的容器产品。只是容器的功能有大有小,有各自的特点。打个比方来说,就像是百货商店里出售的商品,我们举水桶为例子,在商店中出售的水桶有大有小;制作材料也各不相同,有金属的,有塑料的等等,总之是各式各样,但只要能装水,具备水桶的基本特性,那就可以作为水桶来出售来让用户使用。这在 Spring 中也是一样,它有各式各样的 IoC 容器的实现供用户选择和使用;使用什么样的容器完全取决于用户的需要,但在使用之前如果能够了解容器的基本情况,那会对容器的使用是非常有帮助的;就像我们在购买商品时进行的对商品的考察和挑选那样。
我们从最基本的 XmlBeanFactory 看起,它是容器系列的最底层实现,这个容器的实现与我们在 Spring 应用中用到的那些上下文相比,有一个非常明显的特点,它只提供了最基本的 IoC 容器的功能。从它的名字中可以看出,这个 IoC 容器可以读取以 XML 形式定义的 BeanDefinition。理解这一点有助于我们理解 ApplicationContext 与基本的 BeanFactory 之间的区别和联系。我们可以认为直接的 BeanFactory 实现是 IoC 容器的基本形式,而各种 ApplicationContext 的实现是 IoC 容器的高级表现形式。
仔细阅读 XmlBeanFactory 的源码,在一开始的注释里面已经对 XmlBeanFactory 的功能做了简要的说明,从代码的注释还可以看到,这是 Rod Johnson 在 2001 年就写下的代码,可见这个类应该是 Spring 的元老类了。它是继承 DefaultListableBeanFactory 这个类的,这个 DefaultListableBeanFactory 就是一个很值得注意的容器!

- public class XmlBeanFactory extends DefaultListableBeanFactory {
- private final XmlBeanDefinitionReader reader = new XmlBeanDefinitionReader(this);
- public XmlBeanFactory(Resource resource) throws BeansException {
- this(resource, null);
- }
- public XmlBeanFactory(Resource resource, BeanFactory parentBeanFactory) throws BeansException {
- super(parentBeanFactory);
- this.reader.loadBeanDefinitions(resource);
- }
- }
BeanFactory 测试:
public class BeanFactoryTest {

    public static void main(String[] args) {
        ResourcePatternResolver resolver = new PathMatchingResourcePatternResolver();
        Resource res = resolver.getResource("classpath:spring-test.xml");
        BeanFactory bf = new XmlBeanFactory(res);
        System.out.println("init BeanFactory");

        Mars mars = bf.getBean("mars", Mars.class);
        System.out.println(mars.getCnName() + ":" + mars.getAge());
    }
}
XmlBeanFactory 的功能是建立在 DefaultListableBeanFactory 这个基本容器的基础上的,在这个基本容器的基础上实现了其他诸如 XML 读取的附加功能。对于这些功能的实现原理,看一看 XmlBeanFactory 的代码实现就能很容易地理解。在如下的代码中可以看到,在 XmlBeanFactory 构造方法中需要得到 Resource 对象。对 XmlBeanDefinitionReader 对象的初始化,以及使用这个这个对象来完成 loadBeanDefinitions 的调用,就是这个调用启动了从 Resource 中载入 BeanDefinitions 的过程,这个 loadBeanDefinitions 同时也是 IoC 容器初始化的重要组成部分。
简单来说,IoC 容器的初始化包括 BeanDefinition 的 Resouce 定位、载入和注册这三个基本的过程。我觉得重点是在载入和对 BeanDefinition 做解析的这个过程。可以从 DefaultListableBeanFactory 来入手看看 IoC 容器是怎样完成 BeanDefinition 载入的。在 refresh 调用完成以后,可以看到 loadDefinition 的调用:
- public abstract class AbstractXmlApplicationContext extends AbstractRefreshableConfigApplicationContext {
- public AbstractXmlApplicationContext() {
- }
- public AbstractXmlApplicationContext(ApplicationContext parent) {
- super(parent);
- }
- // 这里是实现 loadBeanDefinitions 的地方
- protected void loadBeanDefinitions(DefaultListableBeanFactory beanFactory) throws IOException {
- // Create a new XmlBeanDefinitionReader for the given BeanFactory.
- // 创建 XmlBeanDefinitionReader,并通过回调设置到 BeanFactory 中去,创建 BeanFactory 的使用的也是 DefaultListableBeanFactory。
- XmlBeanDefinitionReader beanDefinitionReader = new XmlBeanDefinitionReader(beanFactory);
- // Configure the bean definition reader with this context''s
- // resource loading environment.
- // 这里设置 XmlBeanDefinitionReader, 为 XmlBeanDefinitionReader 配置 ResourceLoader,因为 DefaultResourceLoader 是父类,所以 this 可以直接被使用
- beanDefinitionReader.setResourceLoader(this);
- beanDefinitionReader.setEntityResolver(new ResourceEntityResolver(this));
- // Allow a subclass to provide custom initialization of the reader,
- // then proceed with actually loading the bean definitions.
- // 这是启动 Bean 定义信息载入的过程
- initBeanDefinitionReader(beanDefinitionReader);
- loadBeanDefinitions(beanDefinitionReader);
- }
- protected void initBeanDefinitionReader(XmlBeanDefinitionReader beanDefinitionReader) {
- }
这里使用 XmlBeanDefinitionReader 来载入 BeanDefinition 到容器中,如以下代码清单所示:
- // 这里是调用的入口。
- public int loadBeanDefinitions(Resource resource) throws BeanDefinitionStoreException {
- return loadBeanDefinitions(new EncodedResource(resource));
- }
- // 这里是载入 XML 形式的 BeanDefinition 的地方。
- public int loadBeanDefinitions(EncodedResource encodedResource) throws BeanDefinitionStoreException {
- Assert.notNull(encodedResource, "EncodedResource must not be null");
- if (logger.isInfoEnabled()) {
- logger.info("Loading XML bean definitions from " + encodedResource.getResource());
- }
- Set<EncodedResource> currentResources = this.resourcesCurrentlyBeingLoaded.get();
- if (currentResources == null) {
- currentResources = new HashSet<EncodedResource>(4);
- this.resourcesCurrentlyBeingLoaded.set(currentResources);
- }
- if (!currentResources.add(encodedResource)) {
- throw new BeanDefinitionStoreException(
- "Detected recursive loading of " + encodedResource + " - check your import definitions!");
- }
- // 这里得到 XML 文件,并得到 IO 的 InputSource 准备进行读取。
- try {
- InputStream inputStream = encodedResource.getResource().getInputStream();
- try {
- InputSource inputSource = new InputSource(inputStream);
- if (encodedResource.getEncoding() != null) {
- inputSource.setEncoding(encodedResource.getEncoding());
- }
- return doLoadBeanDefinitions(inputSource, encodedResource.getResource());
- }
- finally {
- inputStream.close();
- }
- }
- catch (IOException ex) {
- throw new BeanDefinitionStoreException(
- "IOException parsing XML document from " + encodedResource.getResource(), ex);
- }
- finally {
- currentResources.remove(encodedResource);
- if (currentResources.isEmpty()) {
- this.resourcesCurrentlyBeingLoaded.set(null);
- }
- }
- }
- // 具体的读取过程可以在 doLoadBeanDefinitions 方法中找到:
- // 这是从特定的 XML 文件中实际载入 BeanDefinition 的地方
- protected int doLoadBeanDefinitions(InputSource inputSource, Resource resource)
- throws BeanDefinitionStoreException {
- try {
- int validationMode = getValidationModeForResource(resource);
- // 这里取得 XML 文件的 Document 对象,这个解析过程是由 documentLoader 完成的,这个 documentLoader 是 DefaultDocumentLoader, 在定义 documentLoader 的地方创建
- Document doc = this.documentLoader.loadDocument(
- inputSource, getEntityResolver(), this.errorHandler, validationMode, isNamespaceAware());
- // 这里启动的是对 BeanDefinition 解析的详细过程,这个解析会使用到 Spring 的 Bean 配置规则,是我们下面需要详细关注的地方。
- return registerBeanDefinitions(doc, resource);
- }
- catch (BeanDefinitionStoreException ex) {
- throw ex;
- }
- catch (SAXParseException ex) {
- throw new XmlBeanDefinitionStoreException(resource.getDescription(),
- "Line " + ex.getLineNumber() + " in XML document from " + resource + " is invalid", ex);
- }
- catch (SAXException ex) {
- throw new XmlBeanDefinitionStoreException(resource.getDescription(),
- "XML document from " + resource + " is invalid", ex);
- }
- catch (ParserConfigurationException ex) {
- throw new BeanDefinitionStoreException(resource.getDescription(),
- "Parser configuration exception parsing XML from " + resource, ex);
- }
- catch (IOException ex) {
- throw new BeanDefinitionStoreException(resource.getDescription(),
- "IOException parsing XML document from " + resource, ex);
- }
- catch (Throwable ex) {
- throw new BeanDefinitionStoreException(resource.getDescription(),
- "Unexpected exception parsing XML document from " + resource, ex);
- }
- }
protected EntityResolver getEntityResolver() {
		if (this.entityResolver == null) {
			// Determine default EntityResolver to use.
			ResourceLoader resourceLoader = getResourceLoader();
			if (resourceLoader != null) {
				this.entityResolver = new ResourceEntityResolver(resourceLoader);
			}
			else {
				this.entityResolver = new DelegatingEntityResolver(getBeanClassLoader());
			}
		}
		return this.entityResolver;
	}
public DelegatingEntityResolver(ClassLoader classLoader) {
		this.dtdResolver = new BeansDtdResolver();
		this.schemaResolver = new PluggableSchemaResolver(classLoader);
	}
public PluggableSchemaResolver(ClassLoader classLoader) {
		this.classLoader = classLoader;
		this.schemaMappingsLocation = DEFAULT_SCHEMA_MAPPINGS_LOCATION; // "META-INF/spring.schemas"
	}
关于具体的 Spring BeanDefinition 的解析,是在 BeanDefinitionParserDelegate 中完成的。这个类里包含了各种 Spring Bean 定义规则的处理,感兴趣的同学可以仔细研究。我们举一个例子来分析这个处理过程,比如我们最熟悉的对 Bean 元素的处理是怎样完成的,也就是我们在 XML 定义文件中出现的 <bean></bean > 这个最常见的元素信息是怎样被处理的。在这里,我们会看到那些熟悉的 BeanDefinition 定义的处理,比如 id、name、aliase 等属性元素。把这些元素的值从 XML 文件相应的元素的属性中读取出来以后,会被设置到生成的 BeanDefinitionHolder 中去。这些属性的解析还是比较简单的。对于其他元素配置的解析,比如各种 Bean 的属性配置,通过一个较为复杂的解析过程,这个过程是由 parseBeanDefinitionElement 来完成的。解析完成以后,会把解析结果放到 BeanDefinition 对象中并设置到 BeanDefinitionHolder 中去,如以下清单所示:
#DefaultBeanDefinitionDocumentReader
/**
	 * Parse the elements at the root level in the document:
	 * "import", "alias", "bean".
	 * @param root the DOM root element of the document
	 */
	protected void parseBeanDefinitions(Element root, BeanDefinitionParserDelegate delegate) {
		if (delegate.isDefaultNamespace(root)) {
			NodeList nl = root.getChildNodes();
			for (int i = 0; i < nl.getLength(); i++) {
				Node node = nl.item(i);
				if (node instanceof Element) {
					Element ele = (Element) node;
					if (delegate.isDefaultNamespace(ele)) {
                  // 解析import, alias, beans等默认标签
						parseDefaultElement(ele, delegate);
					}
					else {
                  // 解析aop, mvc, dubbo等自定义标签,这部分在文末解释
						delegate.parseCustomElement(ele);
					}
				}
			}
		}
		else {
			delegate.parseCustomElement(root);
		}
	}
/**
* Process the given bean element, parsing the bean definition
* and registering it with the registry.
*/
protected void processBeanDefinition(Element ele, BeanDefinitionParserDelegate delegate) {
BeanDefinitionHolder bdHolder = delegate.parseBeanDefinitionElement(ele);
if (bdHolder != null) {
bdHolder = delegate.decorateBeanDefinitionIfRequired(ele, bdHolder);
try {
// Register the final decorated instance.
BeanDefinitionReaderUtils.registerBeanDefinition(bdHolder, getReaderContext().getRegistry());
}
catch (BeanDefinitionStoreException ex) {
getReaderContext().error("Failed to register bean definition with name ''" +
bdHolder.getBeanName() + "''", ele, ex);
}
// Send registration event.
getReaderContext().fireComponentRegistered(new BeanComponentDefinition(bdHolder));
}
}#BeanDefinitionReaderUtils
public static void registerBeanDefinition(
			BeanDefinitionHolder definitionHolder, BeanDefinitionRegistry registry)
			throws BeanDefinitionStoreException {

		// Register bean definition under primary name.
		String beanName = definitionHolder.getBeanName();
		registry.registerBeanDefinition(beanName, definitionHolder.getBeanDefinition());

		// Register aliases for bean name, if any.
		String[] aliases = definitionHolder.getAliases();
		if (aliases != null) {
			for (String aliase : aliases) {
				registry.registerAlias(beanName, aliase);
			}
		}
	}
#BeanDefinitionParserDelegate
- public BeanDefinitionHolder parseBeanDefinitionElement(Element ele, BeanDefinition containingBean) {
- // 这里取得在 <bean> 元素中定义的 id、name 和 aliase 属性的值
- String id = ele.getAttribute(ID_ATTRIBUTE);
- String nameAttr = ele.getAttribute(NAME_ATTRIBUTE);
- List<String> aliases = new ArrayList<String>();
- if (StringUtils.hasLength(nameAttr)) {
- String[] nameArr = StringUtils.tokenizeToStringArray(nameAttr, BEAN_NAME_DELIMITERS);
- aliases.addAll(Arrays.asList(nameArr));
- }
- String beanName = id;
- if (!StringUtils.hasText(beanName) && !aliases.isEmpty()) {
- beanName = aliases.remove(0);
- if (logger.isDebugEnabled()) {
- logger.debug("No XML ''id'' specified - using ''" + beanName +
- "'' as bean name and " + aliases + " as aliases");
- }
- }
- if (containingBean == null) {
- checkNameUniqueness(beanName, aliases, ele);
- }
- // 这个方法会引发对 bean 元素的详细解析
- AbstractBeanDefinition beanDefinition = parseBeanDefinitionElement(ele, beanName, containingBean);
- if (beanDefinition != null) {
- if (!StringUtils.hasText(beanName)) {
- try {
- if (containingBean != null) {
- beanName = BeanDefinitionReaderUtils.generateBeanName(
- beanDefinition, this.readerContext.getRegistry(), true);
- }
- else {
- beanName = this.readerContext.generateBeanName(beanDefinition);
- // Register an alias for the plain bean class name, if still possible,
- // if the generator returned the class name plus a suffix.
- // This is expected for Spring 1.2/2.0 backwards compatibility.
- String beanClassName = beanDefinition.getBeanClassName();
- if (beanClassName != null &&
- beanName.startsWith(beanClassName) && beanName.length() > beanClassName.length() &&
- !this.readerContext.getRegistry().isBeanNameInUse(beanClassName)) {
- aliases.add(beanClassName);
- }
- }
- if (logger.isDebugEnabled()) {
- logger.debug("Neither XML ''id'' nor ''name'' specified - " +
- "using generated bean name [" + beanName + "]");
- }
- }
- catch (Exception ex) {
- error(ex.getMessage(), ele);
- return null;
- }
- }
- String[] aliasesArray = StringUtils.toStringArray(aliases);
- return new BeanDefinitionHolder(beanDefinition, beanName, aliasesArray);
- }
- return null;
- }
在具体生成 BeanDefinition 以后。我们举一个对 property 进行解析的例子来完成对整个 BeanDefinition 载入过程的分析,还是在类 BeanDefinitionParserDelegate 的代码中,它对 BeanDefinition 中的定义一层一层地进行解析,比如从属性元素集合到具体的每一个属性元素,然后才是对具体的属性值的处理。根据解析结果,对这些属性值的处理会封装成 PropertyValue 对象并设置到 BeanDefinition 对象中去,如以下代码清单所示。
- /**
- * 这里对指定 bean 元素的 property 子元素集合进行解析。
- */
- public void parsePropertyElements(Element beanEle, BeanDefinition bd) {
- // 遍历所有 bean 元素下定义的 property 元素
- NodeList nl = beanEle.getChildNodes();
- for (int i = 0; i < nl.getLength(); i++) {
- Node node = nl.item(i);
- if (node instanceof Element && DomUtils.nodeNameEquals(node, PROPERTY_ELEMENT)) {
- // 在判断是 property 元素后对该 property 元素进行解析的过程
- parsePropertyElement((Element) node, bd);
- }
- }
- }
- public void parsePropertyElement(Element ele, BeanDefinition bd) {
- // 这里取得 property 的名字
- String propertyName = ele.getAttribute(NAME_ATTRIBUTE);
- if (!StringUtils.hasLength(propertyName)) {
- error("Tag ''property'' must have a ''name'' attribute", ele);
- return;
- }
- this.parseState.push(new PropertyEntry(propertyName));
- try {
- // 如果同一个 bean 中已经有同名的存在,则不进行解析,直接返回。也就是说,如果在同一个 bean 中有同名的 property 设置,那么起作用的只是第一个。
- if (bd.getPropertyValues().contains(propertyName)) {
- error("Multiple ''property'' definitions for property ''" + propertyName + "''", ele);
- return;
- }
- // 这里是解析 property 值的地方,返回的对象对应对 Bean 定义的 property 属性设置的解析结果,这个解析结果会封装到 PropertyValue 对象中,然后设置到 BeanDefinitionHolder 中去。
- Object val = parsePropertyValue(ele, bd, propertyName);
- PropertyValue pv = new PropertyValue(propertyName, val);
- parseMetaElements(ele, pv);
- pv.setSource(extractSource(ele));
- bd.getPropertyValues().addPropertyValue(pv);
- }
- finally {
- this.parseState.pop();
- }
- }
- /**
- * 这里取得 property 元素的值,也许是一个 list 或其他。
- */
- public Object parsePropertyValue(Element ele, BeanDefinition bd, String propertyName) {
- String elementName = (propertyName != null) ?
- "<property> element for property ''" + propertyName + "''" :
- "<constructor-arg> element";
- // Should only have one child element: ref, value, list, etc.
- NodeList nl = ele.getChildNodes();
- Element subElement = null;
- for (int i = 0; i < nl.getLength(); i++) {
- Node node = nl.item(i);
- if (node instanceof Element && !DomUtils.nodeNameEquals(node, DESCRIPTION_ELEMENT) &&
- !DomUtils.nodeNameEquals(node, META_ELEMENT)) {
- // Child element is what we''re looking for.
- if (subElement != null) {
- error(elementName + " must not contain more than one sub-element", ele);
- }
- else {
- subElement = (Element) node;
- }
- }
- }
- // 这里判断 property 的属性,是 ref 还是 value, 不允许同时是 ref 和 value。
- boolean hasRefAttribute = ele.hasAttribute(REF_ATTRIBUTE);
- boolean hasValueAttribute = ele.hasAttribute(VALUE_ATTRIBUTE);
- if ((hasRefAttribute && hasValueAttribute) ||
- ((hasRefAttribute || hasValueAttribute) && subElement != null)) {
- error(elementName +
- " is only allowed to contain either ''ref'' attribute OR ''value'' attribute OR sub-element", ele);
- }
- // 如果是 ref,创建一个 ref 的数据对象 RuntimeBeanReference, 这个对象封装了 ref 的信息。
- if (hasRefAttribute) {
- String refName = ele.getAttribute(REF_ATTRIBUTE);
- if (!StringUtils.hasText(refName)) {
- error(elementName + " contains empty ''ref'' attribute", ele);
- }
- RuntimeBeanReference ref = new RuntimeBeanReference(refName);
- ref.setSource(extractSource(ele));
- return ref;
- } // 如果是 value,创建一个 value 的数据对象 TypedStringValue , 这个对象封装了 value 的信息。
- else if (hasValueAttribute) {
- TypedStringValue valueHolder = new TypedStringValue(ele.getAttribute(VALUE_ATTRIBUTE));
- valueHolder.setSource(extractSource(ele));
- return valueHolder;
- } // 如果还有子元素,触发对子元素的解析
- else if (subElement != null) {
- return parsePropertySubElement(subElement, bd);
- }
- else {
- // Neither child element nor "ref" or "value" attribute found.
- error(elementName + " must specify a ref or value", ele);
- return null;
- }
- }
比如,再往下看,我们看到像 List 这样的属性配置是怎样被解析的,依然在 BeanDefinitionParserDelegate 中:返回的是一个 List 对象,这个 List 是 Spring 定义的 ManagedList,作为封装 List 这类配置定义的数据封装,如以下代码清单所示。
- public List parseListElement(Element collectionEle, BeanDefinition bd) {
- String defaultElementType = collectionEle.getAttribute(VALUE_TYPE_ATTRIBUTE);
- NodeList nl = collectionEle.getChildNodes();
- ManagedList<Object> target = new ManagedList<Object>(nl.getLength());
- target.setSource(extractSource(collectionEle));
- target.setElementTypeName(defaultElementType);
- target.setMergeEnabled(parseMergeAttribute(collectionEle));
- // 具体的 List 元素的解析过程。
- parseCollectionElements(nl, target, bd, defaultElementType);
- return target;
- }
- protected void parseCollectionElements(
- NodeList elementNodes, Collection<Object> target, BeanDefinition bd, String defaultElementType) {
- // 遍历所有的元素节点,并判断其类型是否为 Element。
- for (int i = 0; i < elementNodes.getLength(); i++) {
- Node node = elementNodes.item(i);
- if (node instanceof Element && !DomUtils.nodeNameEquals(node, DESCRIPTION_ELEMENT)) {
- // 加入到 target 中去,target 是一个 ManagedList,同时触发对下一层子元素的解析过程,这是一个递归的调用。
- target.add(parsePropertySubElement((Element) node, bd, defaultElementType));
- }
- }
- }
经过这样一层一层的解析,我们在 XML 文件中定义的 BeanDefinition 就被整个给载入到了 IoC 容器中,并在容器中建立了数据映射。在 IoC 容器中建立了对应的数据结构,或者说可以看成是 POJO 对象在 IoC 容器中的映像,这些数据结构可以以 AbstractBeanDefinition 为入口,让 IoC 容器执行索引、查询和操作。
在我的感觉中,对核心数据结构的定义和处理应该可以看成是一个软件的核心部分了。所以,这里的 BeanDefinition 的载入可以说是 IoC 容器的核心,如果说 IoC 容器是 Spring 的核心,那么这些 BeanDefinition 就是 Spring 的核心的核心了!
呵呵,这部分代码数量不小,但如果掌握这条主线,其他都可以举一反三吧,就像我们掌握了操作系统启动的过程,以及在操作系统设计中的核心数据结构像进程数据结构,文件系统数据结构,网络协议数据结构的设计和处理一样,对整个系统的设计原理,包括移植,驱动开发和应用开发,是非常有帮助的!
让我们回到牛逼的 delegate:
public BeanDefinition parseCustomElement(Element ele) {
		return parseCustomElement(ele, null);
	}

	public BeanDefinition parseCustomElement(Element ele, BeanDefinition containingBd) {
		String namespaceUri = getNamespaceURI(ele);
		NamespaceHandler handler = this.readerContext.getNamespaceHandlerResolver().resolve(namespaceUri);
		if (handler == null) {
			error("Unable to locate Spring NamespaceHandler for XML schema namespace [" + namespaceUri + "]", ele);
			return null;
		}
		return handler.parse(ele, new ParserContext(this.readerContext, this, containingBd));
	}
public class DefaultNamespaceHandlerResolver implements NamespaceHandlerResolver {

	/**
	 * The location to look for the mapping files. Can be present in multiple JAR files.
	 */
	public static final String DEFAULT_HANDLER_MAPPINGS_LOCATION = "META-INF/spring.handlers";

        public DefaultNamespaceHandlerResolver() {
		this(null, DEFAULT_HANDLER_MAPPINGS_LOCATION);
	}

/**
	 * Locate the {@link NamespaceHandler} for the supplied namespace URI
	 * from the configured mappings.
	 * @param namespaceUri the relevant namespace URI
	 * @return the located {@link NamespaceHandler}, or {@code null} if none found
	 */
	public NamespaceHandler resolve(String namespaceUri) {
		Map<String, Object> handlerMappings = getHandlerMappings();
		Object handlerOrClassName = handlerMappings.get(namespaceUri);
		if (handlerOrClassName == null) {
			return null;
		}
		else if (handlerOrClassName instanceof NamespaceHandler) {
			return (NamespaceHandler) handlerOrClassName;
		}
		else {
			String className = (String) handlerOrClassName;
			try {
				Class<?> handlerClass = ClassUtils.forName(className, this.classLoader);
				if (!NamespaceHandler.class.isAssignableFrom(handlerClass)) {
					throw new FatalBeanException("Class [" + className + "] for namespace [" + namespaceUri +
							"] does not implement the [" + NamespaceHandler.class.getName() + "] interface");
				}
				NamespaceHandler namespaceHandler = (NamespaceHandler) BeanUtils.instantiateClass(handlerClass);
				namespaceHandler.init();
				handlerMappings.put(namespaceUri, namespaceHandler);
				return namespaceHandler;
			}
			catch (ClassNotFoundException ex) {
				throw new FatalBeanException("NamespaceHandler class [" + className + "] for namespace [" +
						namespaceUri + "] not found", ex);
			}
			catch (LinkageError err) {
				throw new FatalBeanException("Invalid NamespaceHandler class [" + className + "] for namespace [" +
						namespaceUri + "]: problem with handler class file or dependent class", err);
			}
		}
	}
}
我们自定义标签时,需要做的是在 META-INF 下建两个文件 spring.handlers, spring.schemas,然后实现我们自己的 NamespaceHandler 和 BeanDefinitionParser.
public class AopNamespaceHandler extends NamespaceHandlerSupport {

	/**
	 * Register the {@link BeanDefinitionParser BeanDefinitionParsers} for the
	 * ''{@code config}'', ''{@code spring-configured}'', ''{@code aspectj-autoproxy}''
	 * and ''{@code scoped-proxy}'' tags.
	 */
	public void init() {
		// In 2.0 XSD as well as in 2.1 XSD.
		registerBeanDefinitionParser("config", new ConfigBeanDefinitionParser());
		registerBeanDefinitionParser("aspectj-autoproxy", new AspectJAutoProxyBeanDefinitionParser());
		registerBeanDefinitionDecorator("scoped-proxy", new ScopedProxyBeanDefinitionDecorator());

		// Only in 2.0 XSD: moved to context namespace as of 2.1
		registerBeanDefinitionParser("spring-configured", new SpringConfiguredBeanDefinitionParser());
	}

}
#AspectJAutoProxyBeanDefinitionParser
public BeanDefinition parse(Element element, ParserContext parserContext) {
		AopNamespaceUtils.registerAspectJAnnotationAutoProxyCreatorIfNecessary(parserContext, element);
		extendBeanDefinition(element, parserContext);
		return null;
	}
# AopNamespaceUtils
public static void registerAspectJAnnotationAutoProxyCreatorIfNecessary(
			ParserContext parserContext, Element sourceElement) {

		BeanDefinition beanDefinition = AopConfigUtils.registerAspectJAnnotationAutoProxyCreatorIfNecessary(
				parserContext.getRegistry(), parserContext.extractSource(sourceElement));
		useClassProxyingIfNecessary(parserContext.getRegistry(), sourceElement);
		registerComponentIfNecessary(beanDefinition, parserContext);
	}
#AopConfigUtils
public static BeanDefinition registerAspectJAnnotationAutoProxyCreatorIfNecessary(BeanDefinitionRegistry registry, Object source) {
		return registerOrEscalateApcAsRequired(AnnotationAwareAspectJAutoProxyCreator.class, registry, source);
	}

private static BeanDefinition registerOrEscalateApcAsRequired(Class cls, BeanDefinitionRegistry registry, Object source) {
		Assert.notNull(registry, "BeanDefinitionRegistry must not be null");
		if (registry.containsBeanDefinition(AUTO_PROXY_CREATOR_BEAN_NAME)) {
			BeanDefinition apcDefinition = registry.getBeanDefinition(AUTO_PROXY_CREATOR_BEAN_NAME);
			if (!cls.getName().equals(apcDefinition.getBeanClassName())) {
				int currentPriority = findPriorityForClass(apcDefinition.getBeanClassName());
				int requiredPriority = findPriorityForClass(cls);
				if (currentPriority < requiredPriority) {
					apcDefinition.setBeanClassName(cls.getName());
				}
			}
			return null;
		}
		RootBeanDefinition beanDefinition = new RootBeanDefinition(cls);
		beanDefinition.setSource(source);
		beanDefinition.getPropertyValues().add("order", Ordered.HIGHEST_PRECEDENCE);
		beanDefinition.setRole(BeanDefinition.ROLE_INFRASTRUCTURE);
                // 看这里!
		registry.registerBeanDefinition(AUTO_PROXY_CREATOR_BEAN_NAME, beanDefinition);
		return beanDefinition;
	}
另外,基于注解的配置,
<context:component-scan base-package="com.itlong.whatsmars.spring"/>处理过程参见 ComponentScanBeanDefinitionParser,
public BeanDefinition parse(Element element, ParserContext parserContext) {
		String[] basePackages = StringUtils.tokenizeToStringArray(element.getAttribute(BASE_PACKAGE_ATTRIBUTE),
				ConfigurableApplicationContext.CONFIG_LOCATION_DELIMITERS);

		// Actually scan for bean definitions and register them.
		ClassPathBeanDefinitionScanner scanner = configureScanner(parserContext, element);
		Set<BeanDefinitionHolder> beanDefinitions = scanner.doScan(basePackages);
		registerComponents(parserContext.getReaderContext(), beanDefinitions, element);

		return null;
	}
")
loadBeanDefinitions方法源码跟踪(一)
看这篇文章之前可以先了解之前的跟踪流程,https://www.jianshu.com/p/4934233f0ead
代码过宽,可以shift + 鼠标滚轮 左右滑动查看
AbstractBeanDefinitionReader类中loadBeanDefinitions方法,该方法会对DOM文档对象进行解析,生成BeanDefinition对象,这篇文章只讲这个方法。
/**
* Load bean definitions from the specified resources.
* @param resources the resource descriptors 资源处理器,也叫做资源描述符
* @return the number of bean definitions found 返回发现的bean definition数量
*
* 从指定资源中加载bean definitions
*/
@Override
public int loadBeanDefinitions(Resource... resources) throws BeanDefinitionStoreException {
    Assert.notNull(resources, "Resource array must not be null");
    int counter = 0;

    //因为我的web.xml中配置contextConfigLocation不管classpath前缀还是后半部分
    //都没有使用 * 或者 ?等表达式,所以只有一个Resource--资源描述符,或者
    //称作资源处理器
    for (Resource resource : resources) {

        //调用的子类XmlBeanDefinitionReader方法,进入查看
        counter += loadBeanDefinitions(resource);
    }
    return counter;
}

/**
* 此方法在AbstractBeanDefinitionReader的子类XmlBeanDefinitionReader中
*
* Load bean definitions from the specified XML file.
* 从指定的xml文件中加载bean definitions
*/
@Override
public int loadBeanDefinitions(Resource resource) throws BeanDefinitionStoreException {
    return loadBeanDefinitions(new EncodedResource(resource));
}


public int loadBeanDefinitions(EncodedResource encodedResource) throws BeanDefinitionStoreException {
    Assert.notNull(encodedResource, "EncodedResource must not be null");
    if (logger.isInfoEnabled()) {
        logger.info("Loading XML bean definitions from " + encodedResource.getResource());
    }

	//resourcesCurrentlyBeingLoaded是一个ThreadLocal,里面存放Resource包装类的set集合
    Set<EncodedResource> currentResources = this.resourcesCurrentlyBeingLoaded.get();
    if (currentResources == null) {
        currentResources = new HashSet<EncodedResource>(4);
        this.resourcesCurrentlyBeingLoaded.set(currentResources);
    }

    //如果set中已有这个元素则返回false,进入该条件抛出异常
    if (!currentResources.add(encodedResource)) {
        throw new BeanDefinitionStoreException(

            //检测到循环加载某个Resource,需要检查导入的definitions
            "Detected cyclic loading of " + encodedResource + " - check your import definitions!");
    }
    try {
        InputStream inputStream = encodedResource.getResource().getInputStream();
        try {
            InputSource inputSource = new InputSource(inputStream);

            //没有设置编码集,跳过
            if (encodedResource.getEncoding() != null) {
                inputSource.setEncoding(encodedResource.getEncoding());
            }

            //进入这个方法查看
            return doLoadBeanDefinitions(inputSource, encodedResource.getResource());
        }
        finally {
            inputStream.close();
        }
    }
    catch (IOException ex) {
        throw new BeanDefinitionStoreException(
            "IOException parsing XML document from " + encodedResource.getResource(), ex);
    }
    finally {

        //资源加载完毕,移除该Resource
        currentResources.remove(encodedResource);

        //如果集合中已经没有了其他Resource,移除集合
        if (currentResources.isEmpty()) {
            this.resourcesCurrentlyBeingLoaded.remove();
        }
    }
}
doLoadBeanDefinitions(零)
此方法在XmlBeanDefinitionReader类中,分两部分跟踪
/**
* Actually load bean definitions from the specified XML file.
*
* 真正的从指定xml文件中加载bean definitions
*/
protected int doLoadBeanDefinitions(InputSource inputSource, Resource resource)
    throws BeanDefinitionStoreException {
    try {

        //根据不同的xml约束(dtd,xsd等),将xml文件生成对应的文档对象
        //1.这个方法里面涉及xml的解析
        Document doc = doLoadDocument(inputSource, resource);

	    //2.主要就是看这个方法,bean definitions的注册
        return registerBeanDefinitions(doc, resource);
    }

    //看下抛出异常的提示,都是项目运行时可能出现的错误
    catch (BeanDefinitionStoreException ex) {
        throw ex;
    }
    catch (SAXParseException ex) {
        throw new XmlBeanDefinitionStoreException(resource.getDescription(),
                                                  "Line " + ex.getLineNumber() + " in XML document from " + resource + " is invalid", ex);
    }
    catch (SAXException ex) {
        throw new XmlBeanDefinitionStoreException(resource.getDescription(),
                                                  "XML document from " + resource + " is invalid", ex);
    }
    catch (ParserConfigurationException ex) {
        throw new BeanDefinitionStoreException(resource.getDescription(),
                                               "Parser configuration exception parsing XML from " + resource, ex);
    }
    catch (IOException ex) {
        throw new BeanDefinitionStoreException(resource.getDescription(),
                                               "IOException parsing XML document from " + resource, ex);
    }
    catch (Throwable ex) {
        throw new BeanDefinitionStoreException(resource.getDescription(),
                                               "Unexpected exception parsing XML document from " + resource, ex);
    }
}
1.doLoadDocument
跟踪标记1的方法
此方法在XmlBeanDefinitionReader类中
//1.这个方法里面涉及xml的解析
Document doc = doLoadDocument(inputSource, resource);


/**
* Actually load the specified document using the configured DocumentLoader.
* @param inputSource the SAX InputSource to read from --从中读取的SAX输入源
* @param resource the resource descriptor for the XML file --xml文件的资源描述符
* @return the DOM Document DOM文档对象
*
* 使用配置好的DocumentLoader文档加载器加载指定的文档
*/
protected Document doLoadDocument(InputSource inputSource, Resource resource) throws Exception {
    return this.documentLoader.loadDocument(inputSource, getEntityResolver(), this.errorHandler,
                                            getValidationModeForResource(resource), isNamespaceAware());
}
上面方法入参说明一下:
参一
inputSource 由上一层方法传递过来。
参二
getEntityResolver() 方法返回 XmlBeanDefinitionReader 类的 entityResolver 属性。 entityResolver 属性在 loadBeanDefinitions(DefaultListableBeanFactory beanFactory) 方法中被赋值。
beanDefinitionReader.setEntityResolver(new ResourceEntityResolver(this));
this拿的是根web应用上下文,查看ResourceEntityResolver的构造方法
/**
* Create a ResourceEntityResolver for the specified ResourceLoader
* (usually, an ApplicationContext).
* @param resourceLoader the ResourceLoader (or ApplicationContext)
* to load XML entity includes with
*
* 为指定的ResourceLoade(通常是应用上下文)r创建一个ResourceEntityResolver
*/
public ResourceEntityResolver(ResourceLoader resourceLoader) {
    super(resourceLoader.getClassLoader());

    //此处解析器拿到了上下文的引用
    this.resourceLoader = resourceLoader;
}
调用了父类构造,再跟进一层
/**
* Create a new DelegatingEntityResolver that delegates to
* a default {@link BeansDtdResolver} and a default {@link PluggableSchemaResolver}.
* <p>Configures the {@link PluggableSchemaResolver} with the supplied
* {@link ClassLoader}.
* @param classLoader the ClassLoader to use for loading
* (can be {@code null}) to use the default ClassLoader)
*/
public DelegatingEntityResolver(ClassLoader classLoader) {

    //这两个解析器和约束的类型有关,DTD
    this.dtdResolver = new BeansDtdResolver();

    //可插拔的Schema解析器,拿的上下文的类加载器
    this.schemaResolver = new PluggableSchemaResolver(classLoader);
}
参三
再看doLoadDocument方法的另外一个入参 this.errorHandler,这个属性随着XmlBeanDefinitionReader类被初始化而初始化
private ErrorHandler errorHandler = new SimpleSaxErrorHandler(logger);
参四
然后是getValidationModeForResource(resource)入参。
/**
* Gets the validation mode for the specified {@link Resource}. If no explicit
* validation mode has been configured then the validation mode is
* {@link #detectValidationMode detected}.
* <p>Override this method if you would like full control over the validation
* mode, even when something other than {@link #VALIDATION_AUTO} was set.
*
* 通过给定Resource给出验证模式。如果没有明确配置验证模式,那么调用detectValidationMode方法去检测。
*/
protected int getValidationModeForResource(Resource resource) {

    //默认自动验证,为1
    int validationModeToUse = getValidationMode();

    //如果有给出具体验证方式,则返回结果
    if (validationModeToUse != VALIDATION_AUTO) {
        return validationModeToUse;
    }

    //检测验证模式,进入这个方法
    int detectedMode = detectValidationMode(resource);
    if (detectedMode != VALIDATION_AUTO) {
        return detectedMode;
    }

    // Hmm, we didn''t get a clear indication... Let''s assume XSD,
    // since apparently no DTD declaration has been found up until
    // detection stopped (before finding the document''s root tag).

    // 如果实在不能判断验证模式是那种就使用XSD方式,
    // 因为检测完后还是没有发现DTD模式的声明(在查找document的根标签之前)。
    // 值为3
    return VALIDATION_XSD;
}
进入下面这个方法,这个方法由XmlBeanDefinitionReader实现
int detectedMode = detectValidationMode(resource);

/**
* Detects which kind of validation to perform on the XML file identified
* by the supplied {@link Resource}. If the file has a {@code DOCTYPE}
* definition then DTD validation is used otherwise XSD validation is assumed.
* <p>Override this method if you would like to customize resolution
* of the {@link #VALIDATION_AUTO} mode.
*
* 检测执行xml文件时该用哪种验证方式,这个xml由Resource对象提供
* 如果这个文件有DOCTYPE声明,那么就用DTD验证,否则就假定使用XSD。
* 如果你想要自定义自动验证模式的解决方式,你可以覆盖这个方法
*/
protected int detectValidationMode(Resource resource) {

    //默认false
    if (resource.isOpen()) {
        throw new BeanDefinitionStoreException(
            "Passed-in Resource [" + resource + "] contains an open stream: " +
            "cannot determine validation mode automatically. Either pass in a Resource " +
            "that is able to create fresh streams, or explicitly specify the validationMode " +
            "on your XmlBeanDefinitionReader instance.");
    }

    InputStream inputStream;
    try {
        inputStream = resource.getInputStream();
    }
    catch (IOException ex) {
        throw new BeanDefinitionStoreException(
            "Unable to determine validation mode for [" + resource + "]: cannot open InputStream. " +
            "Did you attempt to load directly from a SAX InputSource without specifying the " +
            "validationMode on your XmlBeanDefinitionReader instance?", ex);
    }

    try {

        //进入这个方法查看
        return this.validationModeDetector.detectValidationMode(inputStream);
    }
    catch (IOException ex) {
        throw new BeanDefinitionStoreException("Unable to determine validation mode for [" +
                                               resource + "]: an error occurred whilst reading from the InputStream.", ex);
    }
}
XmlBeanDefinitionReader的validationModeDetector属性有默认实现
private final XmlValidationModeDetector validationModeDetector = new XmlValidationModeDetector();
validationModeDetector调用detectValidationMode方法
/**
* Detect the validation mode for the XML document in the supplied {@link InputStream}.
* Note that the supplied {@link InputStream} is closed by this method before returning.
*
* 在提供的InputStream中检测XML文档的验证模式
* 注意,提供的InputStream在这个方法return之前会被关闭
*/
public int detectValidationMode(InputStream inputStream) throws IOException {

    // Peek into the file to look for DOCTYPE.
    // 查找文件的DOCTYPE
    BufferedReader reader = new BufferedReader(new InputStreamReader(inputStream));
    try {
        boolean isDtdValidated = false;
        String content;
        while ((content = reader.readLine()) != null) {

            //读一行字符串就干掉字符串里面的注释,如果全是注释全干掉
            //主要为了剥离注释,因为非注释内容要么是DOCTYPE声明要么是文档的根元素对象
            content = consumeCommentTokens(content);

            //剥离注释后完全没内容就继续循环
            if (this.inComment || !StringUtils.hasText(content)) {
                continue;
            }

            //有DOCTYPE声明,就跳出去
            if (hasDoctype(content)) {
                isDtdValidated = true;
                break;
            }

            //注释不能进去。开头是"<",后面第一个字符是字母,就进入。
            //比如''<beans xmlns="http://www.springframework.org/schema/beans"''
            //进去后跳出循环
            if (hasOpeningTag(content)) {

                // End of meaningful data...
                break;
            }
        }

        //当遍历到名称空间了也就是"<beans xmlns=...>"还没有DOCTYPE声明,
        //那么就判定他为XSD验证
        return (isDtdValidated ? VALIDATION_DTD : VALIDATION_XSD);
    }
    catch (CharConversionException ex) {

        // Choked on some character encoding...
        // Leave the decision up to the caller.
        return VALIDATION_AUTO;
    }
    finally {
        //关流
        reader.close();
    }
}
我这么里用的XSD验证。也就是值为3,传递给loadDocument的入参
参五
最后一个入参,isNamespaceAware()
/**
* Return whether or not the XML parser should be XML namespace aware.
*
* XML解析器是否支持XML名称空间
*/
public boolean isNamespaceAware() {
    return this.namespaceAware;
}
默认false
看完五个参数后进入正主,loadDocument方法。
return this.documentLoader.loadDocument(inputSource, getEntityResolver(), this.errorHandler,
				getValidationModeForResource(resource), isNamespaceAware());
documentLoader属性默认实现:
private DocumentLoader documentLoader = new DefaultDocumentLoader();
进入DefaultDocumentLoader类的loadDocument方法
/**
* Load the {@link Document} at the supplied {@link InputSource} using the standard JAXP-configured
* XML parser.
*
* 使用标准JAXP配置XML解析器加载InputSource的Document对象
*/
@Override
public Document loadDocument(InputSource inputSource, EntityResolver entityResolver,
                             ErrorHandler errorHandler, int validationMode, boolean namespaceAware) throws Exception {

    //创建文档构建器工厂对象,并初始化一些属性
    //如果验证模式为XSD,那么强制支持XML名称空间,并加上schema属性
    DocumentBuilderFactory factory = createDocumentBuilderFactory(validationMode, namespaceAware);
    if (logger.isDebugEnabled()) {
        logger.debug("Using JAXP provider [" + factory.getClass().getName() + "]");
    }

    //创建一个JAXP文档构建器
    DocumentBuilder builder = createDocumentBuilder(factory, entityResolver, errorHandler);

    //按照XML文档解析给定inputSource的内容,然后返回一个新的DOM对象
    return builder.parse(inputSource);
}
这样就拿到了Document对象
回到XmlBeanDefinitionReader类的doLoadBeanDefinitions方法
2.registerBeanDefinitions
跟踪标记2的方法
//2.主要就是看这个方法,bean definitions的注册
return registerBeanDefinitions(doc, resource);


/**
* Register the bean definitions contained in the given DOM document.
* Called by {@code loadBeanDefinitions}.
* <p>Creates a new instance of the parser class and invokes
* {@code registerBeanDefinitions} on it.
*
* 注册包含在给定DOM文档对象中的 bean definition
* 被loadBeanDefinitions方法所调用
* 解析class后创建一个新的实例,并调用registerBeanDefinitions方法
*/
public int registerBeanDefinitions(Document doc, Resource resource) throws BeanDefinitionStoreException {

    BeanDefinitionDocumentReader documentReader = createBeanDefinitionDocumentReader();

    //getRegistry()方法拿的是bean工厂对象,beanDefinition注册在工厂中
    //这个方法就是返回已经被注册在工厂中的beanDefinitions数量
    int countBefore = getRegistry().getBeanDefinitionCount();

    //进入这个方法查看
    documentReader.registerBeanDefinitions(doc, createReaderContext(resource));

    //返回上个方法真正注册在工厂中的beanDefinition数量
    return getRegistry().getBeanDefinitionCount() - countBefore;
}


/**
* 这个方法在刚创建的DefaultBeanDefinitionDocumentReader中
*
* This implementation parses bean definitions according to the "spring-beans" XSD
* (or DTD, historically).
* <p>Opens a DOM Document; then initializes the default settings
* specified at the {@code <beans/>} level; then parses the contained bean definitions.
*
* 根据“spring-beans"的XSD(或者DTD)去解析bean definition
* 打开一个DOM文档,然后初始化在<beans/>层级上指定的默认设置,然后解析包含在其中的bean definitions
*/
@Override
public void registerBeanDefinitions(Document doc, XmlReaderContext readerContext) {

    //入参时创建的XmlReaderContext对象
    this.readerContext = readerContext;
    logger.debug("Loading bean definitions");

    //拿到了xml文档对象的根元素
    Element root = doc.getDocumentElement();

    //进入这个方法进行查看
    doRegisterBeanDefinitions(root);
}
查看DefaultBeanDefinitionDocumentReader类的doRegisterBeanDefinitions方法。
/**
* Register each bean definition within the given root {@code <beans/>} element.
*
* 在给定的根元素对象<beans/>中,注册每一个bean definition
*/
protected void doRegisterBeanDefinitions(Element root) {
    // Any nested <beans> elements will cause recursion in this method. In
    // order to propagate and preserve <beans> default-* attributes correctly,
    // keep track of the current (parent) delegate, which may be null. Create
    // the new (child) delegate with a reference to the parent for fallback purposes,
    // then ultimately reset this.delegate back to its original (parent) reference.
    // this behavior emulates a stack of delegates without actually necessitating one.

    // 任何被嵌套的<beans>元素都会导致此方法的递归。为了正确的传播和保存<beans>的默认属性、
    // 保持当前(父)代理的跟踪,它可能为null
    // 为了能够回退,新的(子)代理具有父的引用,最终会重置this.delegate回到它的初始(父)引用。
    // 这个行为模拟了一堆代理,但实际上并不需要一个代理
    BeanDefinitionParserDelegate parent = this.delegate;

    //2.1创建一个新的代理,并初始化一些默认值
    this.delegate = createDelegate(getReaderContext(), root, parent);

    //默认名称空间是"http://www.springframework.org/schema/beans"
    if (this.delegate.isDefaultNamespace(root)) {
        String profileSpec = root.getAttribute(PROFILE_ATTRIBUTE);

        //我的xml文件中没有设置"profile",所以跳过
        if (StringUtils.hasText(profileSpec)) {
            String[] specifiedProfiles = StringUtils.tokenizeToStringArray(
                profileSpec, BeanDefinitionParserDelegate.MULTI_VALUE_ATTRIBUTE_DELIMITERS);
            if (!getReaderContext().getEnvironment().acceptsProfiles(specifiedProfiles)) {
                if (logger.isInfoEnabled()) {
                    logger.info("Skipped XML bean definition file due to specified profiles [" + profileSpec +
                                "] not matching: " + getReaderContext().getResource());
                }
                return;
            }
        }
    }

    //xml预处理,子类没有重写里面就是空实现
    preProcessXml(root);

    //2.2生成BeanDefinition,并注册在工厂中
    parseBeanDefinitions(root, this.delegate);

    //xml后处理,子类没有重写里面就是空实现
    postProcessXml(root);

    this.delegate = parent;
}
2.1 createDelegate
跟踪标记2.1的方法
此方法在DefaultBeanDefinitionDocumentReader类中
入参 getReaderContext() 方法返回的是先前创建的 XmlReaderContext 对象
//2.1创建一个新的代理,并初始化一些默认值
this.delegate = createDelegate(getReaderContext(), root, parent);


protected BeanDefinitionParserDelegate createDelegate(
    XmlReaderContext readerContext, Element root, BeanDefinitionParserDelegate parentDelegate) {

    //用来解析XML bean definition的有状态代理类,用来被主解析器和其他扩展使用
    BeanDefinitionParserDelegate delegate = new BeanDefinitionParserDelegate(readerContext);

    //进入此方法
    delegate.initDefaults(root, parentDelegate);
    return delegate;
}
进入BeanDefinitionParserDelegate类的initDefaults方法
/**
* Initialize the default lazy-init, autowire, dependency check settings,
* init-method, destroy-method and merge settings. Support nested ''beans''
* element use cases by falling back to the given parent in case the
* defaults are not explicitly set locally.
*
* 初始化默认值 default :·······等
* 通过使用 parent default,来解决嵌套的''beans''元素情况,以防 default 在局部设定不明确
*/
public void initDefaults(Element root, BeanDefinitionParserDelegate parent) {

    //进入此方法
    populateDefaults(this.defaults, (parent != null ? parent.defaults : null), root);

    //默认没做任何实现
    this.readerContext.fireDefaultsRegistered(this.defaults);
}
populateDefaults方法跟踪
入参this.defaults有默认实现
private final DocumentDefaultsDefinition defaults = new DocumentDefaultsDefinition();
第二个入参:当第一次进入此方法时,parent为null。
进入方法
/**
* Populate the given DocumentDefaultsDefinition instance with the default lazy-init,
* autowire, dependency check settings, init-method, destroy-method and merge settings.
* Support nested ''beans'' element use cases by falling back to <literal>parentDefaults</literal>
* in case the defaults are not explicitly set locally.
*
* 用默认的值填充DocumentDefaultsDefinition实例
* 通过使用parentDefaults(父代理的default属性),来解决嵌套的''beans''元素情况,以防默认值在局部设定不明确
*/
protected void populateDefaults(DocumentDefaultsDefinition defaults, DocumentDefaultsDefinition parentDefaults, Element root) {

    //根元素上如果没有设定值,则返回"default"字符串
    String lazyInit = root.getAttribute(DEFAULT_LAZY_INIT_ATTRIBUTE);

    //如果为"default",先看parentDefaults有没有,有用它的,没有用"false"
    if (DEFAULT_VALUE.equals(lazyInit)) {

        // Potentially inherited from outer <beans> sections, otherwise falling back to false.

        // 可能从外部<beans>继承,否则返回false
        lazyInit = (parentDefaults != null ? parentDefaults.getLazyInit() : FALSE_VALUE);
    }
    defaults.setLazyInit(lazyInit);

    String merge = root.getAttribute(DEFAULT_MERGE_ATTRIBUTE);
    if (DEFAULT_VALUE.equals(merge)) {

        // Potentially inherited from outer <beans> sections, otherwise falling back to false.
        merge = (parentDefaults != null ? parentDefaults.getMerge() : FALSE_VALUE);
    }
    defaults.setMerge(merge);

    String autowire = root.getAttribute(DEFAULT_AUTOWIRE_ATTRIBUTE);
    if (DEFAULT_VALUE.equals(autowire)) {

        // Potentially inherited from outer <beans> sections, otherwise falling back to ''no''.
        autowire = (parentDefaults != null ? parentDefaults.getAutowire() : AUTOWIRE_NO_VALUE);
    }
    defaults.setAutowire(autowire);

    // Don''t fall back to parentDefaults for dependency-check as it''s no longer supported in
    // <beans> as of 3.0. Therefore, no nested <beans> would ever need to fall back to it.

    // 依赖检查不会采用parentDefaults,因为在3.0之后已不再支持。因此,嵌套的<beans>不会使用parentDefaults
    defaults.setDependencyCheck(root.getAttribute(DEFAULT_DEPENDENCY_CHECK_ATTRIBUTE));

    if (root.hasAttribute(DEFAULT_AUTOWIRE_CANDIDATES_ATTRIBUTE)) {
        defaults.setAutowireCandidates(root.getAttribute(DEFAULT_AUTOWIRE_CANDIDATES_ATTRIBUTE));
    }
    else if (parentDefaults != null) {
        defaults.setAutowireCandidates(parentDefaults.getAutowireCandidates());
    }

    if (root.hasAttribute(DEFAULT_INIT_METHOD_ATTRIBUTE)) {
        defaults.setInitMethod(root.getAttribute(DEFAULT_INIT_METHOD_ATTRIBUTE));
    }
    else if (parentDefaults != null) {
        defaults.setInitMethod(parentDefaults.getInitMethod());
    }

    if (root.hasAttribute(DEFAULT_DESTROY_METHOD_ATTRIBUTE)) {
        defaults.setDestroyMethod(root.getAttribute(DEFAULT_DESTROY_METHOD_ATTRIBUTE));
    }
    else if (parentDefaults != null) {
        defaults.setDestroyMethod(parentDefaults.getDestroyMethod());
    }

	//extractSource方法这里没有做任何实现,默认返回null
    defaults.setSource(this.readerContext.extractSource(root));
}
2.2 parseBeanDefinitions
跟踪标记2.2的方法
在DefaultBeanDefinitionDocumentReader类中
//2.2生成BeanDefinition,并注册在工厂中
parseBeanDefinitions(root, this.delegate);

/**
* Parse the elements at the root level in the document:
* "import", "alias", "bean".
*
* 解析在文档中根层级的元素:"import", "alias", "bean".
*/
protected void parseBeanDefinitions(Element root, BeanDefinitionParserDelegate delegate) {

    //默认名称空间是"http://www.springframework.org/schema/beans"
    //进入条件
    if (delegate.isDefaultNamespace(root)) {

        //获取根元素下的子Node,注意,Node不一定是子标签,可能是回车,可能是注释
        NodeList nl = root.getChildNodes();
        for (int i = 0; i < nl.getLength(); i++) {
            Node node = nl.item(i);
            if (node instanceof Element) {

                //拿到了<beans>下的子标签
                Element ele = (Element) node;
                if (delegate.isDefaultNamespace(ele)) {

                    //3.如果该标签属于beans的名称空间,则进入这个方法
                    //xmlns="http://www.springframework.org/schema/beans"
                    parseDefaultElement(ele, delegate);
                }
                else {

                    //4.如果该标签属于其他的名称空间比如:context,aop等
                    //xmlns:aop="http://www.springframework.org/schema/aop"
                    //xmlns:context="http://www.springframework.org/schema/context"
                    delegate.parseCustomElement(ele);
                }
            }
        }
    }
    else {
        delegate.parseCustomElement(root);
    }
}
一个名称空间对应一个处理器。
比如在spring的配置文件applicatinoContext.xml中加入了这行代码:
<!-- 启用注解 -->
<context:annotation-config />
可以知道,标签annotation-config属于名称空间context。
那么context就对应着一个处理器。
解析的时候会先获取context对应的处理器。处理器中又会初始化一些解析器出来,一个解析器就对应着一个标签,像annotation-config就有对应自己的解析器。
不同的名称空间、不同的标签导致解析的方式非常的多,这里只拿两个常见的配置进行跟踪。
因为字数超过了限制,所以分成了三篇,点击下篇继续阅读 https://www.jianshu.com/p/46e27afd7d96
总结
- 解析 Resource 对象,生成DOM文档对象
- 2 注册BeanDefinitions
——————————————————————————————————
- 2
- 创建新的 delegate 对象,delegate 中有 defaults 属性,它是标签元素属性的一个集合。如果当前 Reader 对象中也有 delegate ,将其作为 parent 。取 parent 的 defaults ,作为未指定标签元素属性的情况下,新 defaults 的默认值。
- 根据名称空间不同,分为
beans默认名称空间的元素解析,和其他自定义元素解析。一般来说,一个名称空间对应一个处理器,处理器中又会初始化一些解析器出来。一个解析器就对应着一个标签,可以对不同的情况进行解析。
")
loadBeanDefinitions方法源码跟踪(二)
因为字数超过了限制,所以分成了三篇,承接上篇: https://www.jianshu.com/p/a0cfaedf3fc5
代码过宽,可以shift + 鼠标滚轮 左右滑动查看
3.parseDefaultElement
先跟踪一个bean标签,下面是对应的配置文件
<!--配置mapper.java扫描-->
<bean>
    <property name="basePackage" value="cn.mrdear.mapper"/>
    <property name="properties">
        <value>
            mappers=tk.mybatis.mapper.common.Mapper
        </value>
    </property>
    <property name="sqlSessionFactoryBeanName" value="sqlSessionFactory"/>
</bean>
因为是bean标签,走的默认的名称空间方法,所以走这个标签的方法:
//3.如果该标签属于beans的名称空间,则进入这个方法
//xmlns="http://www.springframework.org/schema/beans"
parseDefaultElement(ele, delegate);
这个方法的实现在DefaultBeanDefinitionDocumentReader类中,因为<beans>标签下有多个子标签,所以每个子标签对应着一个方法
private void parseDefaultElement(Element ele, BeanDefinitionParserDelegate delegate) {

    //<import>标签进入这个方法
    if (delegate.nodeNameEquals(ele, IMPORT_ELEMENT)) {
        importBeanDefinitionResource(ele);
    }

    //<alias>标签进入这个方法
    else if (delegate.nodeNameEquals(ele, ALIAS_ELEMENT)) {
        processAliasRegistration(ele);
    }

    //<bean>标签进入这个方法
    else if (delegate.nodeNameEquals(ele, BEAN_ELEMENT)) {
        //进入这个方法
        processBeanDefinition(ele, delegate);
    }

    //又嵌套一层<beans>标签进入这个方法
    else if (delegate.nodeNameEquals(ele, NESTED_BEANS_ELEMENT)) {

        // recurse
        // 如果是嵌套的beans,那么就会重新调用标记2中的一个方法进行递归
        doRegisterBeanDefinitions(ele);
    }
}


/**
* Process the given bean element, parsing the bean definition
* and registering it with the registry.
*
* 处理bean元素,解析成bean definition并注册到工厂中
*/
protected void processBeanDefinition(Element ele, BeanDefinitionParserDelegate delegate) {

    //3.1通过代理解析bean元素
    BeanDefinitionHolder bdHolder = delegate.parseBeanDefinitionElement(ele);
    if (bdHolder != null) {

        //3.2如果有要求的话渲染beanDefinition
        bdHolder = delegate.decorateBeanDefinitionIfRequired(ele, bdHolder);
        try {

            // Register the final decorated instance.
            //3.3注册最终被渲染的实例到工厂中
            BeanDefinitionReaderUtils.registerBeanDefinition(bdHolder, getReaderContext().getRegistry());
        }
        catch (BeanDefinitionStoreException ex) {
            getReaderContext().error("Failed to register bean definition with name ''" +
                                     bdHolder.getBeanName() + "''", ele, ex);
        }

        // Send registration event.
        // 发送注册事件
        // 这里是空实现
        getReaderContext().fireComponentRegistered(new BeanComponentDefinition(bdHolder));
    }
}
3.1 parseBeanDefinitionElement
跟踪3.1标记的方法
进入BeanDefinitionParserDelegate类的parseBeanDefinitionElement方法
//3.1通过代理解析bean元素
BeanDefinitionHolder bdHolder = delegate.parseBeanDefinitionElement(ele);


/**
* Parses the supplied {@code <bean>} element. May return {@code null}
* if there were errors during parse. Errors are reported to the
* {@link org.springframework.beans.factory.parsing.ProblemReporter}.
*
* 解析bean元素。如果解析过程中发生错误则返回空
*/
public BeanDefinitionHolder parseBeanDefinitionElement(Element ele) {
    return parseBeanDefinitionElement(ele, null);
}


public BeanDefinitionHolder parseBeanDefinitionElement(Element ele, BeanDefinition containingBean) {

    //拿bean标签上的id
    String id = ele.getAttribute(ID_ATTRIBUTE);

    //拿bean标签上的name属性
    String nameAttr = ele.getAttribute(NAME_ATTRIBUTE);

    List<String> aliases = new ArrayList<String>();

    //有name属性进入
    if (StringUtils.hasLength(nameAttr)) {

        //name属性对应的name值如果有分隔符",; ",那么切分成数组
        String[] nameArr = StringUtils.tokenizeToStringArray(nameAttr, MULTI_VALUE_ATTRIBUTE_DELIMITERS);

        //这些name值就是别名
        aliases.addAll(Arrays.asList(nameArr));
    }

    //指定了id就用id值作为bean名称
    String beanName = id;

    //如果没有id,但是指定了name,就用name值作为bean名称
    if (!StringUtils.hasText(beanName) && !aliases.isEmpty()) {

        //拿第一个name值作为bean名称,其余的还是别名
        beanName = aliases.remove(0);
        if (logger.isDebugEnabled()) {
            logger.debug("No XML ''id'' specified - using ''" + beanName +
                         "'' as bean name and " + aliases + " as aliases");
        }
    }

    if (containingBean == null) {

        //检查bean名称和别名是否已经被使用了,如果用了就报错
        //同时把这个bean的名称和别名加入代理的usedNames属性中
        //private final Set<String> usedNames = new HashSet<String>();
        checkNameUniqueness(beanName, aliases, ele);
    }

    //直接进入这个方法
    AbstractBeanDefinition beanDefinition = parseBeanDefinitionElement(ele, beanName, containingBean);
    if (beanDefinition != null) {

        //既没有指定id,也没有指定name就走这里面
        if (!StringUtils.hasText(beanName)) {
            try {

                //前面containingBean传递时为null,这里不走这个方法
                if (containingBean != null) {
                    beanName = BeanDefinitionReaderUtils.generateBeanName(
                        beanDefinition, this.readerContext.getRegistry(), true);
                }
                else {

                    //生成一个bean名称,beanName
                    //如果这个bean是内部bean,全限定名后加#号再加哈希值
                    //如果是顶层bean,那么后面加#号再从0开始加数字,id已被注册数字就增1,直到唯一
                    //比如:tk.mybatis.spring.mapper.MapperScannerConfigurer#0
                    beanName = this.readerContext.generateBeanName(beanDefinition);

                    // Register an alias for the plain bean class name, if still possible,
                    // if the generator returned the class name plus a suffix.
                    // This is expected for Spring 1.2/2.0 backwards compatibility.

                    //如果可能的话,如果生成器返回类名加后缀,则注册一个别名,这个别名就是该类的类名。
                    //这是为了向后兼容
                    String beanClassName = beanDefinition.getBeanClassName();
                    if (beanClassName != null &&
                        beanName.startsWith(beanClassName) && beanName.length() > beanClassName.length() &&
                        !this.readerContext.getRegistry().isBeanNameInUse(beanClassName)) {

                        //如果该类名没有被使用,那么注册该类名作为别名,比如:
                        //tk.mybatis.spring.mapper.MapperScannerConfigurer作为
                        //tk.mybatis.spring.mapper.MapperScannerConfigurer#0的别名
                        aliases.add(beanClassName);
                    }
                }
                if (logger.isDebugEnabled()) {
                    logger.debug("Neither XML ''id'' nor ''name'' specified - " +
                                 "using generated bean name [" + beanName + "]");
                }
            }
            catch (Exception ex) {
                error(ex.getMessage(), ele);
                return null;
            }
        }
        String[] aliasesArray = StringUtils.toStringArray(aliases);

        //返回beanDefinition的持有者
        return new BeanDefinitionHolder(beanDefinition, beanName, aliasesArray);
    }

    return null;
}


/**
* Parse the bean definition itself, without regard to name or aliases. May return
* {@code null} if problems occurred during the parsing of the bean definition.
*
* 不关注名称和别名,只解析bean definition自身
*/
public AbstractBeanDefinition parseBeanDefinitionElement(
    Element ele, String beanName, BeanDefinition containingBean) {

	//解析的时候放入,解析完成弹出,这里放入bean标签,
    //如果还嵌套有子标签,则后续放入子标签
    //子标签先弹出
    this.parseState.push(new BeanEntry(beanName));

    String className = null;
    if (ele.hasAttribute(CLASS_ATTRIBUTE)) {

        //如果有指定class属性,则拿到class属性值
        className = ele.getAttribute(CLASS_ATTRIBUTE).trim();
    }

    try {
        String parent = null;
        if (ele.hasAttribute(PARENT_ATTRIBUTE)) {

            //如果有指定parent属性,则拿到parent属性值
            parent = ele.getAttribute(PARENT_ATTRIBUTE);
        }

        //3.1.1创建BeanDefinition并设置两属性
        AbstractBeanDefinition bd = createBeanDefinition(className, parent);

	    //3.1.2将bean标签上的属性设置到bean definition中
        parseBeanDefinitionAttributes(ele, beanName, containingBean, bd);

        //如果bean标签下有子标签为description,拿到标签中的文本,设置到bean definition中
        bd.setDescription(DomUtils.getChildElementValueByTagName(ele, DESCRIPTION_ELEMENT));

	    //如果bean标签下有子标签为meta,拿到他的key和value属性,设置到bean definition中
        parseMetaElements(ele, bd);

        //如果bean标签下有子标签为lookup-method,拿到他的name和bean属性,设置到bean definition中
        parseLookupOverrideSubElements(ele, bd.getMethodOverrides());

        //如果bean标签下有子标签为replaced-method,设置bean definition
        parseReplacedMethodSubElements(ele, bd.getMethodOverrides());

	    //如果bean标签下有子标签为constructor-arg,设置bean definition的构造方式
        parseConstructorArgElements(ele, bd);

        //这个标签比较常用,为Property标签
        //3.1.3解析Property的属性设置到bean definition中
        parsePropertyElements(ele, bd);

        //有qualifier子标签才走这个方法
        parseQualifierElements(ele, bd);

	    //设置资源
        bd.setResource(this.readerContext.getResource());

        //这里为null
        bd.setSource(extractSource(ele));

        return bd;
    }
    catch (ClassNotFoundException ex) {
        error("Bean class [" + className + "] not found", ele, ex);
    }
    catch (NoClassDefFoundError err) {
        error("Class that bean class [" + className + "] depends on not found", ele, err);
    }
    catch (Throwable ex) {
        error("Unexpected failure during bean definition parsing", ele, ex);
    }
    finally {

        //解析的时候放入,解析完成弹出
        this.parseState.pop();
    }

    return null;
}
3.1.1 createBeanDefinition
跟踪标记3.1.1
//3.1.1创建BeanDefinition并设置两属性
AbstractBeanDefinition bd = createBeanDefinition(className, parent);

/**
* Create a bean definition for the given class name and parent name.
*
* 通过给定的className和parentName创建beanDefinition
*/
protected AbstractBeanDefinition createBeanDefinition(String className, String parentName)
    throws ClassNotFoundException {

    return BeanDefinitionReaderUtils.createBeanDefinition(
        parentName, className, this.readerContext.getBeanClassLoader());
}

/**
* 此方法是BeanDefinitionReaderUtils的静态方法
*
* Create a new GenericBeanDefinition for the given parent name and class name,
* eagerly loading the bean class if a ClassLoader has been specified.
*
* 通过给定的parentName和className穿件一个新的GenericBeanDefinition
* 如果指定了ClassLoader,就提前加载bean class
*/
public static AbstractBeanDefinition createBeanDefinition(
    String parentName, String className, ClassLoader classLoader) throws ClassNotFoundException {

    GenericBeanDefinition bd = new GenericBeanDefinition();
    bd.setParentName(parentName);
    if (className != null) {
        if (classLoader != null) {

            //接受的属性是Object类型
            bd.setBeanClass(ClassUtils.forName(className, classLoader));
        }
        else {

            //接受的属性是Object类型
            bd.setBeanClassName(className);
        }
    }
    return bd;
}
3.1.2 parseBeanDefinitionAttributes
跟踪标记方法3.1.2
此方法在BeanDefinitionParserDelegate类中
//3.1.2将bean标签上的属性设置到bean definition中
parseBeanDefinitionAttributes(ele, beanName, containingBean, bd);

/**
* Apply the attributes of the given bean element to the given bean * definition.
*
* 将bean标签上的属性设置到bean definition中
*/
public AbstractBeanDefinition parseBeanDefinitionAttributes(Element ele, String beanName,
                                                            BeanDefinition containingBean, AbstractBeanDefinition bd) {

	//bean标签上已经没有singleton属性了,用scope代替,所以出现就报错
    if (ele.hasAttribute(SINGLETON_ATTRIBUTE)) {
        error("Old 1.x ''singleton'' attribute in use - upgrade to ''scope'' declaration", ele);
    }

    //如果设置了scope就拿其值
    else if (ele.hasAttribute(SCOPE_ATTRIBUTE)) {
        bd.setScope(ele.getAttribute(SCOPE_ATTRIBUTE));
    }

    //此处containingBean为空
    else if (containingBean != null) {

        // Take default from containing bean in case of an inner bean definition.
        // 如果是一个内部的bean definition,用包含的bean的default
        bd.setScope(containingBean.getScope());
    }

	//是否有abstract属性
    if (ele.hasAttribute(ABSTRACT_ATTRIBUTE)) {
        bd.setAbstract(TRUE_VALUE.equals(ele.getAttribute(ABSTRACT_ATTRIBUTE)));
    }

    String lazyInit = ele.getAttribute(LAZY_INIT_ATTRIBUTE);

    //lazyInit如果没有设置则为默认值,默认值用的代理类中defaults属性,
    //也就是this.defaults
    if (DEFAULT_VALUE.equals(lazyInit)) {
        lazyInit = this.defaults.getLazyInit();
    }

    bd.setLazyInit(TRUE_VALUE.equals(lazyInit));

	//默认值用的代理类中defaults属性,不进行autowire
    String autowire = ele.getAttribute(AUTOWIRE_ATTRIBUTE);
    bd.setAutowireMode(getAutowireMode(autowire));

	//默认不进行依赖检查
    String dependencyCheck = ele.getAttribute(DEPENDENCY_CHECK_ATTRIBUTE);
    bd.setDependencyCheck(getDependencyCheck(dependencyCheck));

	//是否有depends-on属性
    if (ele.hasAttribute(DEPENDS_ON_ATTRIBUTE)) {
        String dependsOn = ele.getAttribute(DEPENDS_ON_ATTRIBUTE);
        bd.setDependsOn(StringUtils.tokenizeToStringArray(dependsOn, MULTI_VALUE_ATTRIBUTE_DELIMITERS));
    }

	//是否有autowire-candidate属性,没有或者为默认则不设置
    String autowireCandidate = ele.getAttribute(AUTOWIRE_CANDIDATE_ATTRIBUTE);
    if ("".equals(autowireCandidate) || DEFAULT_VALUE.equals(autowireCandidate)) {
        String candidatePattern = this.defaults.getAutowireCandidates();
        if (candidatePattern != null) {
            String[] patterns = StringUtils.commaDelimitedListToStringArray(candidatePattern);
            bd.setAutowireCandidate(PatternMatchUtils.simpleMatch(patterns, beanName));
        }
    }
    else {
        bd.setAutowireCandidate(TRUE_VALUE.equals(autowireCandidate));
    }

	//是否有primary属性
    if (ele.hasAttribute(PRIMARY_ATTRIBUTE)) {
        bd.setPrimary(TRUE_VALUE.equals(ele.getAttribute(PRIMARY_ATTRIBUTE)));
    }

	//是否有init-method属性
    if (ele.hasAttribute(INIT_METHOD_ATTRIBUTE)) {
        String initMethodName = ele.getAttribute(INIT_METHOD_ATTRIBUTE);
        if (!"".equals(initMethodName)) {
            bd.setInitMethodName(initMethodName);
        }
    }
    else {

        //没有init-method属性,就拿代理类defaults属性的
        if (this.defaults.getInitMethod() != null) {
            bd.setInitMethodName(this.defaults.getInitMethod());
            bd.setEnforceInitMethod(false);
        }
    }

	//是否有destroy-method属性
    if (ele.hasAttribute(DESTROY_METHOD_ATTRIBUTE)) {
        String destroyMethodName = ele.getAttribute(DESTROY_METHOD_ATTRIBUTE);
        bd.setDestroyMethodName(destroyMethodName);
    }
    else {

        //没有destroy-method属性,就拿代理类defaults属性的
        if (this.defaults.getDestroyMethod() != null) {
            bd.setDestroyMethodName(this.defaults.getDestroyMethod());
            bd.setEnforceDestroyMethod(false);
        }
    }

	//是否有factory-method属性
    if (ele.hasAttribute(FACTORY_METHOD_ATTRIBUTE)) {
        bd.setFactoryMethodName(ele.getAttribute(FACTORY_METHOD_ATTRIBUTE));
    }

    //是否有factory-bean属性
    if (ele.hasAttribute(FACTORY_BEAN_ATTRIBUTE)) {
        bd.setFactoryBeanName(ele.getAttribute(FACTORY_BEAN_ATTRIBUTE));
    }

    return bd;
}
这样,bean标签上的属性也就解析完成了,对其属性的描述不管设置了还是没有设置的,都有相应的值对应到bean definition中。接下来就要解析,bean标签下的子标签了。
3.1.3 parsePropertyElements
跟踪3.1.3标记的方法
此方法在BeanDefinitionParserDelegate类中实现
//3.1.3解析Property的属性设置到bean definition中
parsePropertyElements(ele, bd);


/**
* Parse property sub-elements of the given bean element.
* 解析bean标签下property子标签
*/
public void parsePropertyElements(Element beanEle, BeanDefinition bd) {
    NodeList nl = beanEle.getChildNodes();
    for (int i = 0; i < nl.getLength(); i++) {
        Node node = nl.item(i);
        if (isCandidateElement(node) && nodeNameEquals(node, PROPERTY_ELEMENT)) {

            //标签名为property才能进入,进入这个方法
            parsePropertyElement((Element) node, bd);
        }
    }
}


/**
* Parse a property element.
*/
public void parsePropertyElement(Element ele, BeanDefinition bd) {

    //拿到property标签的name属性
    String propertyName = ele.getAttribute(NAME_ATTRIBUTE);
    if (!StringUtils.hasLength(propertyName)) {
        error("Tag ''property'' must have a ''name'' attribute", ele);
        return;
    }

    //解析的时候放入,解析完成弹出,这里放入property标签,
    //这里面还存有bean父标签,子标签解析完成后先弹出
    this.parseState.push(new PropertyEntry(propertyName));
    try {

        //bean标签下可以有多个property,但是不能重复name属性
        if (bd.getPropertyValues().contains(propertyName)) {
            error("Multiple ''property'' definitions for property ''" + propertyName + "''", ele);
            return;
        }

        //进入这个方法,查看是怎么解析property标签属性的
        Object val = parsePropertyValue(ele, bd, propertyName);

        //将name属性和对应的value放入
        PropertyValue pv = new PropertyValue(propertyName, val);

        //解析property标签的子标签meta,
        //拿到meta的key和value属性,设置到PropertyValue中
        parseMetaElements(ele, pv);

        //这里没有实现,为null
        pv.setSource(extractSource(ele));

        //将PropertyValue添加到bean definition中
        bd.getPropertyValues().addPropertyValue(pv);
    }
    finally {

        //解析的时候放入,解析完成弹出,这里放入property标签
        this.parseState.pop();
    }
}


/**
* Get the value of a property element. May be a list etc.
* Also used for constructor arguments, "propertyName" being null in this case.
*
* 拿到property标签的value值,可能是list
* 也被constructor标签使用,这种情况propertyName为null
*/
public Object parsePropertyValue(Element ele, BeanDefinition bd, String propertyName) {

    //如果propertyName为null,则是constructor-arg标签
    //否则为property标签
    String elementName = (propertyName != null) ?
        "<property> element for property ''" + propertyName + "''" :
    "<constructor-arg> element";


    // Should only have one child element: ref, value, list, etc.
    //不管是哪种标签,下面都应该只有一个子标签: ref, value, list等.
    NodeList nl = ele.getChildNodes();
    Element subElement = null;
    for (int i = 0; i < nl.getLength(); i++) {
        Node node = nl.item(i);
        if (node instanceof Element && !nodeNameEquals(node, DESCRIPTION_ELEMENT) &&
            !nodeNameEquals(node, META_ELEMENT)) {

            // Child element is what we''re looking for.
            //除开description和meta标签,子标签最多只能有一个
            if (subElement != null) {
                error(elementName + " must not contain more than one sub-element", ele);
            }
            else {
                subElement = (Element) node;
            }
        }
    }

	//看标签属性用的是value还是ref
    boolean hasRefAttribute = ele.hasAttribute(REF_ATTRIBUTE);
    boolean hasValueAttribute = ele.hasAttribute(VALUE_ATTRIBUTE);

    //value和ref属性不能同时存在,如果有子标签,则value和ref都不能存在,否则报错
    if ((hasRefAttribute && hasValueAttribute) ||
        ((hasRefAttribute || hasValueAttribute) && subElement != null)) {
        error(elementName +
              " is only allowed to contain either ''ref'' attribute OR ''value'' attribute OR sub-element", ele);
    }

	//用的ref的情况
    if (hasRefAttribute) {
        String refName = ele.getAttribute(REF_ATTRIBUTE);
        if (!StringUtils.hasText(refName)) {
            error(elementName + " contains empty ''ref'' attribute", ele);
        }
        RuntimeBeanReference ref = new RuntimeBeanReference(refName);
        ref.setSource(extractSource(ele));
        return ref;
    }

    //用的value的情况
    else if (hasValueAttribute) {
        TypedStringValue valueHolder = new TypedStringValue(ele.getAttribute(VALUE_ATTRIBUTE));
        valueHolder.setSource(extractSource(ele));
        return valueHolder;
    }

    //子标签不为null的情况,进入这个方法查看
    else if (subElement != null) {
        return parsePropertySubElement(subElement, bd);
    }
    else {

        // Neither child element nor "ref" or "value" attribute found.
        //没指定ref或者value或者子标签,返回null
        error(elementName + " must specify a ref or value", ele);
        return null;
    }
}


/**
* 这个方法还是在BeanDefinitionParserDelegate中
*/
public Object parsePropertySubElement(Element ele, BeanDefinition bd) {
    return parsePropertySubElement(ele, bd, null);
}

/**
* Parse a value, ref or collection sub-element of a property or
* constructor-arg element.
*
* 解析property或者constructor-arg标签的子标签,可能为value, ref或者集合
*/
public Object parsePropertySubElement(Element ele, BeanDefinition bd, String defaultValueType) {

    //如果这个子标签不属于beans的名称空间,则走这个方法
    if (!isDefaultNamespace(ele)) {
        return parseNestedCustomElement(ele, bd);
    }

    //如果是bean子标签,则走这个方法
    else if (nodeNameEquals(ele, BEAN_ELEMENT)) {
        BeanDefinitionHolder nestedBd = parseBeanDefinitionElement(ele, bd);
        if (nestedBd != null) {
            nestedBd = decorateBeanDefinitionIfRequired(ele, nestedBd, bd);
        }
        return nestedBd;
    }

    //如果是ref子标签,则走这个方法
    else if (nodeNameEquals(ele, REF_ELEMENT)) {

        // A generic reference to any name of any bean.
        String refName = ele.getAttribute(BEAN_REF_ATTRIBUTE);
        boolean toParent = false;
        if (!StringUtils.hasLength(refName)) {

            // A reference to the id of another bean in the same XML file.
            refName = ele.getAttribute(LOCAL_REF_ATTRIBUTE);
            if (!StringUtils.hasLength(refName)) {

                // A reference to the id of another bean in a parent context.
                refName = ele.getAttribute(PARENT_REF_ATTRIBUTE);
                toParent = true;
                if (!StringUtils.hasLength(refName)) {
                    error("''bean'', ''local'' or ''parent'' is required for <ref> element", ele);
                    return null;
                }
            }
        }
        if (!StringUtils.hasText(refName)) {
            error("<ref> element contains empty target attribute", ele);
            return null;
        }
        RuntimeBeanReference ref = new RuntimeBeanReference(refName, toParent);
        ref.setSource(extractSource(ele));
        return ref;
    }

    //如果是idref子标签,则走这个方法
    else if (nodeNameEquals(ele, IDREF_ELEMENT)) {
        return parseIdRefElement(ele);
    }

    //如果是value子标签,则走这个方法
    else if (nodeNameEquals(ele, VALUE_ELEMENT)) {

        //以这个方法作为演示,其他的方法都是大同小异,进入。
        return parseValueElement(ele, defaultValueType);
    }

    //如果是null子标签,则走这个方法
    else if (nodeNameEquals(ele, NULL_ELEMENT)) {

        // It''s a distinguished null value. Let''s wrap it in a TypedStringValue
        // object in order to preserve the source location.
        TypedStringValue nullHolder = new TypedStringValue(null);
        nullHolder.setSource(extractSource(ele));
        return nullHolder;
    }

    //如果是array子标签,则走这个方法
    else if (nodeNameEquals(ele, ARRAY_ELEMENT)) {
        return parseArrayElement(ele, bd);
    }

    //如果是list子标签,则走这个方法
    else if (nodeNameEquals(ele, LIST_ELEMENT)) {
        return parseListElement(ele, bd);
    }

    //如果是set子标签,则走这个方法
    else if (nodeNameEquals(ele, SET_ELEMENT)) {
        return parseSetElement(ele, bd);
    }

    //如果是map子标签,则走这个方法
    else if (nodeNameEquals(ele, MAP_ELEMENT)) {
        return parseMapElement(ele, bd);
    }

    //如果是props子标签,则走这个方法
    else if (nodeNameEquals(ele, PROPS_ELEMENT)) {
        return parsePropsElement(ele);
    }

    //否则返回null,报错
    else {
        error("Unknown property sub-element: [" + ele.getNodeName() + "]", ele);
        return null;
    }
}


/**
* Return a typed String value Object for the given value element.
*
* 通过指定的value标签,返回指定的字符串value对象
*/
public Object parseValueElement(Element ele, String defaultTypeName) {

    // It''s a literal value.
    //拿到value中的文本,包括回车、tab制表符、空格
    String value = DomUtils.getTextValue(ele);

    //有无type属性
    String specifiedTypeName = ele.getAttribute(TYPE_ATTRIBUTE);
    String typeName = specifiedTypeName;
    if (!StringUtils.hasText(typeName)) {

        //没有就用入参defaultTypeName
        typeName = defaultTypeName;
    }
    try {
        TypedStringValue typedValue = buildTypedStringValue(value, typeName);

        //这里设置为空
        typedValue.setSource(extractSource(ele));

        //这里为空字符串
        typedValue.setSpecifiedTypeName(specifiedTypeName);

        //返回typedValue
        return typedValue;
    }
    catch (ClassNotFoundException ex) {
        error("Type class [" + typeName + "] not found for <value> element", ele, ex);
        return value;
    }
}
3.2 decorateBeanDefinitionIfRequired
在生成了BeanDefinitionHolder以后,如果需要的话应该通过代理类对bean definition进行渲染。
跟踪标记3.2的方法
该方法的实现在BeanDefinitionParserDelegate类中
//3.2如果有要求的话渲染beanDefinition
bdHolder = delegate.decorateBeanDefinitionIfRequired(ele, bdHolder);


public BeanDefinitionHolder decorateBeanDefinitionIfRequired(Element ele, BeanDefinitionHolder definitionHolder) {
    return decorateBeanDefinitionIfRequired(ele, definitionHolder, null);
}


public BeanDefinitionHolder decorateBeanDefinitionIfRequired(
    Element ele, BeanDefinitionHolder definitionHolder, BeanDefinition containingBd) {

    BeanDefinitionHolder finalDefinition = definitionHolder;

    // Decorate based on custom attributes first.
    // 首先基于自定义属性进行渲染
    // 也就是bean标签上的属性,也就是node
    // 只有当这个node不属于名称空间beans才会进行渲染,这里就不进去看了
    NamedNodeMap attributes = ele.getAttributes();
    for (int i = 0; i < attributes.getLength(); i++) {
        Node node = attributes.item(i);
        finalDefinition = decorateIfRequired(node, finalDefinition, containingBd);
    }

    // Decorate based on custom nested elements.
    // 然后根据标签内嵌套的子标签进行渲染
    // 这里是不属于名称空间beans的子标签才会进行渲染
    NodeList children = ele.getChildNodes();
    for (int i = 0; i < children.getLength(); i++) {
        Node node = children.item(i);
        if (node.getNodeType() == Node.ELEMENT_NODE) {
            finalDefinition = decorateIfRequired(node, finalDefinition, containingBd);
        }
    }
    return finalDefinition;
}
3.3 registerBeanDefinition
最终将完成的bean definition注册到工厂中
跟踪标记3.3的方法
//3.3注册最终被渲染的实例到工厂中
BeanDefinitionReaderUtils.registerBeanDefinition(bdHolder, getReaderContext().getRegistry());

/**
* Register the given bean definition with the given bean factory.
*
* 注册bean definition
*/
public static void registerBeanDefinition(
    BeanDefinitionHolder definitionHolder, BeanDefinitionRegistry registry)
    throws BeanDefinitionStoreException {

    // Register bean definition under primary name.

    // 3.3.1注册bean definition的beanName
    // 比如tk.mybatis.spring.mapper.MapperScannerConfigurer#0
    String beanName = definitionHolder.getBeanName();

    registry.registerBeanDefinition(beanName, definitionHolder.getBeanDefinition());

    // Register aliases for bean name, if any.

    // 如果有别名的话,为bean name注册别名
    String[] aliases = definitionHolder.getAliases();
    if (aliases != null) {
        for (String alias : aliases) {

            //3.3.2注册别名
            registry.registerAlias(beanName, alias);
        }
    }
}
3.3.1 registerBeanDefinition
跟踪标记3.3.1的方法
// 3.3.1注册bean definition的beanName
registry.registerBeanDefinition(beanName, definitionHolder.getBeanDefinition());

@Override
public void registerBeanDefinition(String beanName, BeanDefinition beanDefinition)
    throws BeanDefinitionStoreException {

    Assert.hasText(beanName, "Bean name must not be empty");
    Assert.notNull(beanDefinition, "BeanDefinition must not be null");

    if (beanDefinition instanceof AbstractBeanDefinition) {
        try {

            //做一个验证,静态工厂方法和覆盖方法不能组合使用
            //如果bean definition中的beanClass属性不是String类型而是Class类型
            //那么就要验证和准备这个bean定义的覆盖方法,检查指定名称的方法是否存在
            ((AbstractBeanDefinition) beanDefinition).validate();
        }
        catch (BeanDefinitionValidationException ex) {
            throw new BeanDefinitionStoreException(beanDefinition.getResourceDescription(), beanName,
                                                   "Validation of bean definition failed", ex);
        }
    }

    BeanDefinition oldBeanDefinition;

	//查看beanName是否已经被注册在工厂的beanDefinitionMap属性中
    oldBeanDefinition = this.beanDefinitionMap.get(beanName);

    //已经被注册走这个方法,这里不查看
    if (oldBeanDefinition != null) {
        if (!isAllowBeanDefinitionOverriding()) {
            throw new BeanDefinitionStoreException(beanDefinition.getResourceDescription(), beanName,
                                                   "Cannot register bean definition [" + beanDefinition + "] for bean ''" + beanName +
                                                   "'': There is already [" + oldBeanDefinition + "] bound.");
        }
        else if (oldBeanDefinition.getRole() < beanDefinition.getRole()) {

            // e.g. was ROLE_APPLICATION, now overriding with ROLE_SUPPORT or ROLE_INFRASTRUCTURE
            if (this.logger.isWarnEnabled()) {
                this.logger.warn("Overriding user-defined bean definition for bean ''" + beanName +
                                 "'' with a framework-generated bean definition: replacing [" +
                                 oldBeanDefinition + "] with [" + beanDefinition + "]");
            }
        }
        else if (!beanDefinition.equals(oldBeanDefinition)) {
            if (this.logger.isInfoEnabled()) {
                this.logger.info("Overriding bean definition for bean ''" + beanName +
                                 "'' with a different definition: replacing [" + oldBeanDefinition +
                                 "] with [" + beanDefinition + "]");
            }
        }
        else {
            if (this.logger.isDebugEnabled()) {
                this.logger.debug("Overriding bean definition for bean ''" + beanName +
                                  "'' with an equivalent definition: replacing [" + oldBeanDefinition +
                                  "] with [" + beanDefinition + "]");
            }
        }
        this.beanDefinitionMap.put(beanName, beanDefinition);
    }
    else {

        //这里面代表beanName还没有被注册
        //然后根据阶段不同又有一层判断
        if (hasBeanCreationStarted()) {

            //这个阶段是bean已经开始创建
            // Cannot modify startup-time collection elements anymore (for stable iteration)
            synchronized (this.beanDefinitionMap) {
                this.beanDefinitionMap.put(beanName, beanDefinition);
                List<String> updatedDefinitions = new ArrayList<String>(this.beanDefinitionNames.size() + 1);
                updatedDefinitions.addAll(this.beanDefinitionNames);
                updatedDefinitions.add(beanName);
                this.beanDefinitionNames = updatedDefinitions;
                if (this.manualSingletonNames.contains(beanName)) {
                    Set<String> updatedSingletons = new LinkedHashSet<String>(this.manualSingletonNames);
                    updatedSingletons.remove(beanName);
                    this.manualSingletonNames = updatedSingletons;
                }
            }
        }
        else {

            // Still in startup registration phase

            // 仍然处于启动时的注册阶段
            // 所以这里走这个方法
            //beanDefinitionMap是工厂的一个属性,ConcurrentHashMap类型
            //他保存所有解析好的bean Definition的名称和实例的映射
            this.beanDefinitionMap.put(beanName, beanDefinition);

            //beanName也单独使用了一个ArrayList来保存,方便遍历
            this.beanDefinitionNames.add(beanName);

            //如果该bean definition是手动注册的,还要从manualSingletonNames中
            //移除bean definition的beanName,还要从manualSingletonNames中是LinkedHashSet
            this.manualSingletonNames.remove(beanName);
        }
        this.frozenBeanDefinitionNames = null;
    }

	//这里跳过
    if (oldBeanDefinition != null || containsSingleton(beanName)) {
        resetBeanDefinition(beanName);
    }
}
3.3.2 registerAlias
跟踪3.3.2方法
//3.3.2注册别名
registry.registerAlias(beanName, alias);

@Override
public void registerAlias(String name, String alias) {
    Assert.hasText(name, "''name'' must not be empty");
    Assert.hasText(alias, "''alias'' must not be empty");
    if (alias.equals(name)) {

        //移除别名中的beanName
        //aliasMap是ConcurrentHashMap类型,保存别名和beanName的映射
        this.aliasMap.remove(alias);
    }
    else {
        String registeredName = this.aliasMap.get(alias);

        //如果别名对应beanName已经被注册,则不需要再注册一次
        //别名不允许被覆盖
        if (registeredName != null) {
            if (registeredName.equals(name)) {

                // An existing alias - no need to re-register
                return;
            }
            if (!allowAliasOverriding()) {
                throw new IllegalStateException("Cannot register alias ''" + alias + "'' for name ''" +
                                                name + "'': It is already registered for name ''" + registeredName + "''.");
            }
        }

        //再检查一遍,aliasMap中不能已经存在name和alias
        checkForAliasCircle(name, alias);

        //工厂的aliasMap属性保存别名,那么alias已被注册
        this.aliasMap.put(alias, name);
    }
}
这样,spring配置文件中为bean标签的解析和加载,也就跟踪完了。
然后再看下非默认名称空间的标签的解析和加载。
因为字数超过了限制,所以分成了三篇,点击下篇继续阅读 https://www.jianshu.com/p/6e0f6fd1cbbd
总结
3
- 走解析默认元素的方法。根据
beans名称空间下,不同的标签有不同的子方法,对于<bean>标签来说,主要分为三步:- 3.1 通过代理 delegate 解析 bean 元素生成 BeanDefinitionHolder
- 如果有必要的话,利用非默认名称空间的属性和子标签,渲染 BeanDefinitionHolder 中的 BeanDefinition
- 注册最终被渲染的实例到工厂中。分两步,一步注册 BeanDefinition ,其实就是将 beanName 和 BeanDefinition 放入 beanDefinitionMap 中,beanName 放入 beanDefinitionNames中;一步注册别名,将 alias、name放入到 aliasMap 中
——————————————————————————————————
- 3.1
- 获取元素上的 id、name 属性,id 作为 beanName,name 作为别名。如果没有指定 id,取 name 的一个值作为 beanName,别名中移除该值。
- 解析元素生成 BeanDefinition
- 如果属性没有指定 id 也没有指定 name,利用 beanDefinition 生成一个 beanName。当这个bean是内部bean,类的全限定名加#号再加哈希值;当是顶层bean,类的全限定名加#号再从0开始加数字,id已被注册数字就增1,直到唯一。有了 beanName,再以类的全限定名作为别名。
- 利用 BeanDefinition ,beanName ,别名,生成 BeanDefinitionHolder 并返回
——————————————————————————————————
- 解析元素生成 BeanDefinition
- 根据 bean 元素中的 class 属性和 parent 属性创建 BeanDefinition
- 将 bean 标签上的属性设置到 BeanDefinition 中,一些未明确指定的属性采用代理 delegate 中的 defaults 值
- 解析 bean 标签下的子标签,如 Property 、constructor-arg 等,将其键值对添加到 BeanDefinition 中
- 返回 BeanDefinition

RootBeanDefinition、ChildBeanDefinition、GenericBeanDefinition的区别
从这个继承图可以看出,这三个类都是继承与 AbstractBeanDefinition,下面说说这三个类的区别。
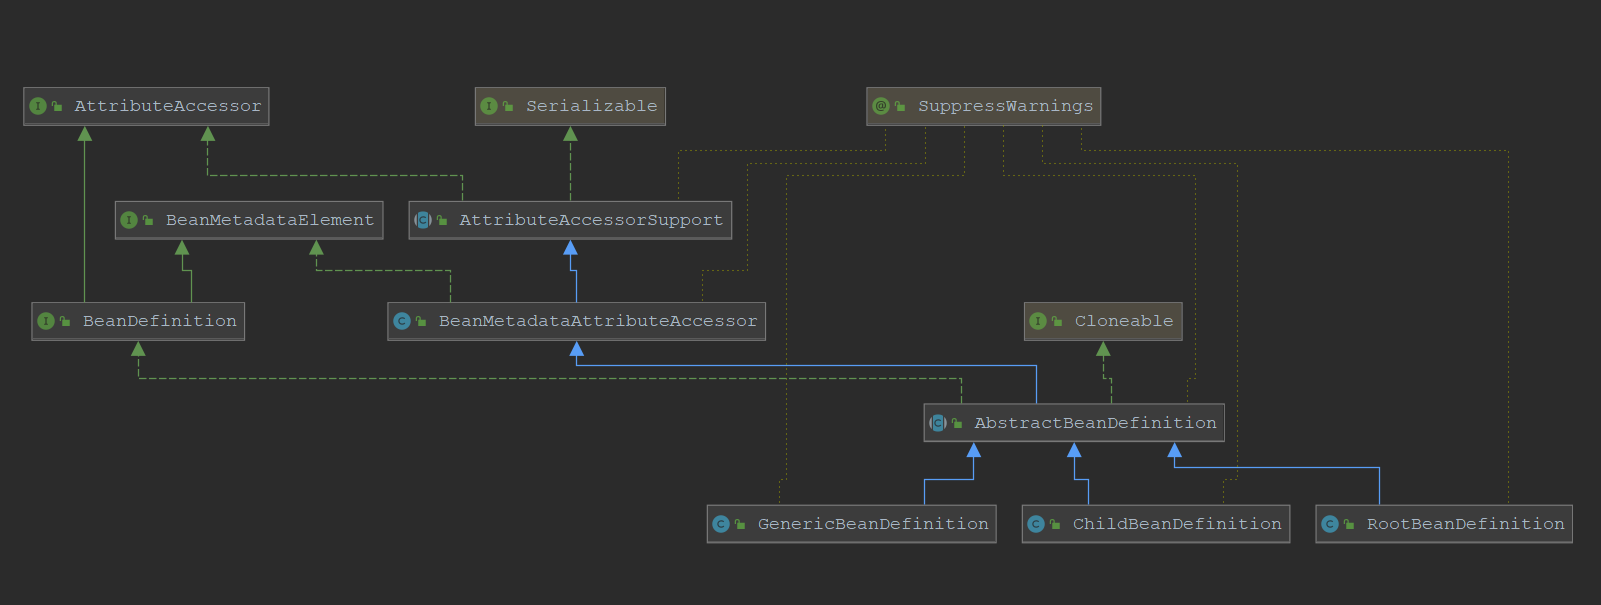
RootBeanDefinition、ChildBeanDefinition
RootBeanDefinition可以单独作为一个BeanDefinition,也可以作为其他BeanDefinition的父类。但是他不能作为其他BeanDefinition的子类(可以去看源码,在setParentName的时候,会抛出一个异常)。
ChildBeanDefinition相当于一个子类,不可以单独存在,必须要依赖一个父BeanDetintion。(最大的区别他的parentName属性是通过构造方法设置的,而且并没有提供一个无参构造方法给我们。)
// 演示代码public class AdminService {
private String name;
private Integer age;
public void setName(String name) {
this.name = name;
}
public void setAge(int age) {
this.age = age;
}
@Override
public String toString() {
return "AdminService{" + "name=''" + name + ''\'''' + ", age=" + age + ''}'';
}
}
public class TestDemo {
public static void main(String[] args) {
AnnotationConfigApplicationContext applicationContext = new AnnotationConfigApplicationContext();
// 自定义BeanDefinition,给其设置属性值,并且注册到Spring当中。
RootBeanDefinition rootBeanDefinition = new RootBeanDefinition();
rootBeanDefinition.getPropertyValues().add("name", "micheal");
rootBeanDefinition.setBeanClass(AdminService.class);
// 注意,这里必须要提供一个父BeanDefinition
ChildBeanDefinition childBeanDefinition = new ChildBeanDefinition("a1");
childBeanDefinition.getPropertyValues().add("age", 18);
applicationContext.registerBeanDefinition("a1", rootBeanDefinition);
applicationContext.registerBeanDefinition("a2", childBeanDefinition);
applicationContext.refresh();
     System.out.println("a1:" + applicationContext.getBean("a1"));
     System.out.println("a2:" + applicationContext.getBean("a2"));
} }
=====================================输出结果====================================
a1:AdminService{name=''micheal'', age=null}
a2:AdminService{name=''micheal'', age=18}

Spring 5 中文解析核心篇-IoC容器之BeanDefinition继承与容器拓展点
1.7 Bean Definition继承
bean定义包含一些配置信息,包括构造函数参数、属性值、和容器特定信息,例如初始化方法、静态工厂方法名等等。子bean定义继承父bean定义配置数据。子bean定义能够覆盖一些值或者增加其他需要。使用父bean和子bean定义能够保存一些类型。实际上,这是一种模版模式。
如果你编程式使用ApplicationContext接口,子bean定义通过ChildBeanDefinition类描述。大多数用户不在这个级别使用(备注:应用开发人员一般不会接触)。相反,它们在例如ClassPathXmlApplicationContext之类的类中声明性地配置bean定义。当你使用基于XML配置元数据,你可以通过使用parent属性指示一个子bean的定义,指定parent bean作为这个属性的值。下面例子显示怎样做:
<bean id="inheritedTestBean" abstract="true">
    <property name="name" value="parent"/>
    <property name="age" value="1"/>
</bean>
<!--parent指定继承父类-->
<bean id="inheritsWithDifferentClass"parent="inheritedTestBean" init-method="initialize">
    <property name="name" value="override"/>
    <!-- the age property value of 1 will be inherited from parent -->
</bean>如果没有指定,子bean定义将使用父定义中的bean类,但也可以覆盖它。在后面这种情况下,子bean类必须兼容父bean定义(也就是说,必须接受父bean的属性值)。
子bean定义继承作用域、构造参数值、属性值、和覆盖父类方法,并可以添加新值。任何作用域、初始化方法、销毁方法或static工厂方法设置都会覆盖对应的父bean设置。
其余设置始终从子bean定义中获取:依赖、自动装配、依赖检查、单例和懒加载。
前面的例子通过使用abstract属性显示标记父bean定义作用一个抽象,如果父bean定义没有指定类,显示地标记父bean定义为abstract是需要的,像下面例子展示:
<bean id="inheritedTestBeanWithoutClass" abstract="true">
    <property name="name" value="parent"/>
    <property name="age" value="1"/>
</bean>

<bean id="inheritsWithClass"parent="inheritedTestBeanWithoutClass" init-method="initialize">
    <property name="name" value="override"/>
    <!-- age will inherit the value of 1 from the parent bean definition-->
</bean>父bean不能被实例化,因为它是不完整的,并且它被显示的标记为abstract。当一个定义是abstract,它仅仅作为一个bean定义的模版且父bean定义为子bean定义服务。尝试自己使用这样的抽象父bean,通过将其引用为另一个bean的ref属性或使用父bean ID进行显式的getBean()调用将返回错误。类似地,容器的内部preInstantiateSingletons()方法将忽略定义为抽象的bean定义。
默认情况下,ApplicationContext会预先实例化所有单例。因此,重要的是(至少对于单例bean),如果有一个(父)bean定义仅打算用作模板,并且此定义指定了一个类,则必须确保将abstract属性设置为true,否则应用程序上下文将实际上(试图)预先实例化抽象Bean。参考实例:
com.liyong.ioccontainer.starter.XmlBeanDefinitionInheritanceContainer
1.8 容器拓展点
典型地,应用程序开发者不需要实现ApplicationContext类。相反,Spring IoC容器通过插件实现指定的集成接口去扩展。下面的章节描述这些接口的集成。
1.8.1 通过使用BeanPostProcessor自定义bean
BeanPostProcessor接口定义回调方法,你可以实现这个接口提供你自己的(或者覆盖容器的默认设置)初始化逻辑、依赖解析逻辑等等。如果你想实现一些自定义逻辑,在Spring容器完成实例化、配置、初始化bean之后,你可以插入一个或多个自定义BeanPostProcessor实现。
你可以配置多个BeanPostProcessor实例并且你可以通过设置order属性来控制这些BeanPostProcessor实例的执行顺序。仅仅BeanPostProcessor实现Ordered接口是可以设置这个属性。如果自己实现BeanPostProcessor,你应该考虑实现Ordered接口。更多详情,查看 BeanPostProcessor和Ordered接口。参见有关以编程方式注册BeanPostProcessor实例的说明。
BeanPostProcessor接口在bean(对象)实例上操作。也就是说,Spring IoC容器实例化一个bean实例,然后BeanPostProcessor实例执行它们的工作。(备注:在Spring容器初始化bean过程中执行相关的回调操作)
BeanPostProcessor实例是按容器划分作用域。仅仅在使用继承容器才有意义。如果在一个容器中定义BeanPostProcessor,仅仅在那个容器中的bean被后置处理。换句话说,定义在一个容器中的bean不会被在其他容器定义的BeanPostProcessor所处理,即使两个容器都属于同一层次结构。改变实际
bean定义(也就是定义bean的蓝图),你需要使用BeanFactoryPostProcessor,如使用BeanFactoryPostProcessor自定义配置元数据中所述。
org.springframework.beans.factory.config.BeanPostProcessor接口恰好地由两个回调方法组成。当一个类作为后置处理起被注册到容器中时,对于每个被容器创建bean实例,后置处理器从容器初始化方法(例如:InitializingBean.afterPropertiesSet()或者任何被声明init方法)被调用之前,并且任何bean初始化回调之后获得回调。后置处理器能够处理bean实例任何操作,包括忽略所有的回调。Bean后处理器通常检查回调接口,或者可以用代理包装Bean。Spring AOP基础设施类中实现bean的后置处理去提供一个代理包装逻辑。
ApplicationContext自动的检查所有bean,这些bean在配置元数据中实现了BeanPostProcessor接口。ApplicationContext注册这些bean作为后置处理器,以便以后在创建bean时可以调用它们。Bean后处理器可以与其他bean相同的方式部署在容器中。
注意,当通过在类上使用@Bean工厂方法声明BeanPostProcessor时,工厂方法返回类型应该是实现类本身或只是实现org.springframework.beans.factory.config.BeanPostProcessor接口,清晰地表明该bean的后处理器性质。否则,ApplicationContext无法在完全创建之前按类型自动检测它。由于BeanPostProcessor需要及早实例化才能应用于上下文中其他bean的初始化,因此这种早期类型检测至关重要。
编程式地注册BeanPostProcessor实例推荐的去注册
BeanPostProcessor方式是通过ApplicationContext自动检测(前面描述),可以使用addBeanPostProcessor方法以编程方式针对ConfigurableBeanFactory注册它们。当注册之前你需要评估条件逻辑甚至需要跨层次结构的上下文复制后置处理器时,这是非常有用的。注意,然而,BeanPostProcessor实例编程式的添加不遵循Ordered排序接口。在这里,注册的顺序决定了执行的顺序。<u>需要注意是编程式的注册BeanPostProcessor实例总是在这些通过自动检测的后置处理器之后被处理,而不管显示的顺序</u>。BeanPostProcessor实例和AOP自定代理
实现
BeanPostProcessor接口的类是特殊的,并且容器对它们的处理方式有所不同。在启动时会实例化它们直接引用的所有BeanPostProcessor实例和Bean,这是ApplicationContext特殊启动阶段的一部分。接下来,以排序方式注册所有BeanPostProcessor实例,并将其应用于容器中的所有其他bean。因为AOP自动代理是作为BeanPostProcessor本身实现的,所以BeanPostProcessor实例或它们直接引用的bean都不适合进行自动代理,因此,没有编织的方面。对于任何这样的
bean,你应该查看日志消息:
Bean someBean is not eligible for getting processed by all BeanPostProcessor interfaces (for example: not eligible for auto-proxying).如果你有通过使用自动装配或
@Resource注入bean到BeanPostProcessor中(可能回退到自动装配),当搜索类型匹配的依赖项候选者时,Spring可能会访问意外的Bean,因此使它们不适合进行自动代理或其他类型的Bean后处理。例如,如果你有一个用@Resource标注的依赖项,其中字段或Setter名称不直接与bean的声明名称相对应,并且不使用name属性,那么Spring将访问其他bean以按类型匹配它们。
下面的例子展示了在ApplicationContext中怎样去编写、注册和使用BeanPostProcessor接口。
例子:Hello World
第一个例子说明基础的使用。这个例子展示一个自定义BeanPostProcessor实现并调用通过容器创建的每个bean的toString()方法并且打印结果字符串到控制台。
下面的清单展示了自定义BeanPostProcessor实现类定义:
package scripting;

import org.springframework.beans.factory.config.BeanPostProcessor;

public class InstantiationTracingBeanPostProcessor implements BeanPostProcessor {

    // simply return the instantiated bean as-is
    public Object postProcessBeforeInitialization(Object bean, String beanName) {
        return bean; // we could potentially return any object reference here...
    }

    public Object postProcessAfterInitialization(Object bean, String beanName) {
      //打印bean信息
        System.out.println("Bean ''" + beanName + "'' created : " + bean.toString());
        return bean;
    }
}下面beans元素使用InstantiationTracingBeanPostProcessor:
<?xml version="1.0" encoding="UTF-8"?>
<beans xmlns="http://www.springframework.org/schema/beans"
    xmlns:xsi="http://www.w3.org/2001/XMLSchema-instance"
    xmlns:lang="http://www.springframework.org/schema/lang"
    xsi:schemaLocation="http://www.springframework.org/schema/beans
        https://www.springframework.org/schema/beans/spring-beans.xsd
        http://www.springframework.org/schema/lang
        https://www.springframework.org/schema/lang/spring-lang.xsd">

    <lang:groovy id="messenger"
            script-source="classpath:org/springframework/scripting/groovy/Messenger.groovy">
        <lang:property name="message" value="Fiona Apple Is Just So Dreamy."/>
    </lang:groovy>

    <!--
    when the above bean (messenger) is instantiated, this custom
    BeanPostProcessor implementation will output the fact to the system console
    -->
    <bean/>

</beans>注意怎样定义InstantiationTracingBeanPostProcessor。它甚至没有名字,并且它是一个bean,可以像其他bean一样被依赖注入。(前面的配置还定义了一个由Groovy脚本支持的bean。Spring动态语言支持详情在“动态语言支持”一章中。)
下面的Java应用程序运行前面的代码和配置:
import org.springframework.context.ApplicationContext;
import org.springframework.context.support.ClassPathXmlApplicationContext;
import org.springframework.scripting.Messenger;

public final class Boot {

    public static void main(final String[] args) throws Exception {
        ApplicationContext ctx = new ClassPathXmlApplicationContext("scripting/beans.xml");
        Messenger messenger = ctx.getBean("messenger", Messenger.class);
        System.out.println(messenger);
    }

}
前面的应用输出结果类似下面:
Bean ''messenger'' created : org.springframework.scripting.groovy.GroovyMessenger@272961
org.springframework.scripting.groovy.GroovyMessenger@272961
例子:RequiredAnnotationBeanPostProcessor
将回调接口或与自定义BeanPostProcessor实现结合使用是扩展Spring IoC容器常用方法。Spring的RequiredAnnotationBeanPostProcessor是一个示例,它是Spring发行版附带的BeanPostProcessor实现,可以确保标有(任意)注解的bean上的JavaBean属性实际上(配置为)依赖注入了一个值。说明:就是常用的依赖注入。
参考代码:com.liyong.ioccontainer.starter.XmlBeanPostProcessorIocContainer
1.8.2 BeanFactoryPostProcessor自定义配置元数据
下一个拓展点是org.springframework.beans.factory.config.BeanFactoryPostProcessor。这个接口语义类似BeanPostProcessor,一个重要的不同点:BeanFactoryPostProcessor是操作在bean的配置元数据上。也就是说,Spring IoC容器允许除BeanFactoryPostProcessor实例外其他任何bean被BeanFactoryPostProcessor读取配置元数据和改变它。
你可以配置多个BeanFactoryPostProcessor实例,并且你可以通过设置order属性在这些BeanFactoryPostProcessor实例上来控制顺序。然而,如果BeanFactoryPostProcessor实现Ordered接口才能设置这个属性。如果你写自己的BeanFactoryPostProcessor,你应该考虑实现Ordered接口。更多关于BeanFactoryPostProcessor和 Ordered接口详细信息。
如果想去改变实际bean实例(也就是,这个对象是从配置元数据被创建的),你需要使用BeanPostProcessor(前面描述通过使用BeanPostProcessor自定义bean)。从技术上讲,可以在BeanFactoryPostProcessor中使用Bean实例(例如,通过使用BeanFactory.getBean()),这样做导致过早的初始化bean,违反了标准容器生命周期。这会导致负面的影响,例如:绕过后置处理。同样,
BeanFactoryPostProcessor实例是按容器划分。(如果你使用分层的容器才会有意义) <u>如果你定义在容器中定义一个BeanFactoryPostProcessor,它仅适用于该容器中的bean定义。在一个容器中的bean定义不会被其他的容器中BeanFactoryPostProcessor后置处理,即使两个容器在同一个层级</u>。
Bean工厂后处理器在ApplicationContext中声明时会自动执行,以便将更改应用于定义容器的配置元数据。Spring包括一些预定义的工厂后置处理器,例如PropertyOverrideConfigurer和
PropertySourcesPlaceholderConfigurer。你可以使用一个自定义的BeanFactoryPostProcessor-例如,注册一个自定义属性编辑器。
ApplicationContext自动地检测任何部署到容器中并实现BeanFactoryPostProcessor接口的实例bean。使用这些bean作为bean工厂后置处理器,在适当的时间。你可以像其他ban一样部署这些后置处理器。
与BeanPostProcessors一样,通常不希望配置BeanFactoryPostProcessors进行延迟初始。如果没有其他bean引用Bean(Factory)PostProcessor,这个后置处理器不会被初始化。因此,标记它为延迟初始化将被忽略并且Bean(Factory)PostProcessor将被提前初始化即使你的<beans />声明default-lazy-init属性为true。参考代码:
com.liyong.ioccontainer.starter.XmlBeanFactoryPostProcessorIocContainer
例如:类名替换PropertySourcesPlaceholderConfigurer
可以使用PropertySourcesPlaceholderConfigurer通过使用标准Java属性格式将属性值从bean定义外部化到一个单独的文件中(意思是:bean配置数据可以配置到一个单独文件中)。这样做使部署应用程序的人员可以自定义特定于环境的属性,例如数据库URL和密码,而无需为修改容器的主要XML定义文件而复杂或冒风险。
考虑下面基于XML配置元数据片段,DataSource使用占位符值定义:
<bean>
    <property name="locations" value="classpath:com/something/jdbc.properties"/>
</bean>

<bean id="dataSource" destroy-method="close">
    <property name="driverClassName" value="${jdbc.driverClassName}"/>
    <property name="url" value="${jdbc.url}"/>
    <property name="username" value="${jdbc.username}"/>
    <property name="password" value="${jdbc.password}"/>
</bean>这个例子显示从外部化Properties文件的属性配置。在运行时,PropertySourcesPlaceholderConfigurer应用元数据替换DataSource的属性值。将要替换的值指定为$ {property-name}格式的占位符,该格式遵循Ant、log4j和JSPEL样式。
真实值来自于标准的Properties格式的其他文件:
jdbc.driverClassName=org.hsqldb.jdbcDriver
jdbc.url=jdbc:hsqldb:hsql://production:9002
jdbc.username=sa
jdbc.password=root因此,${jdbc.username}字符串在运行时被替换为sa值,并且同样应用到其他的占位符在properties文件中匹配这些key。PropertySourcesPlaceholderConfigurer检查Bean定义的大多数属性和属性中的占位符。此外,你可以自定义占位符的前缀和后缀。
context命名空间在Spring2.5中被引入,你可以配置一个专用配置元素的占位符。在location属性中你可以提供一个或多个location通过逗号分隔,类似下面例子:
<context:property-placeholder location="classpath:com/something/jdbc.properties"/>PropertySourcesPlaceholderConfigurer不仅仅在你指定的Properties中查找属性。默认情况,如果在指定的属性文件中没有找到属性,它会再次检查Spring Environment属性和常规的Java System属性。
你可以使用
PropertySourcesPlaceholderConfigurer去替代类名称,有时候者非常有用,当你在运行时必须选择一个特定的实现类。下面例子展示怎样去做:<bean> <property name="locations"> <value>classpath:com/something/strategy.properties</value> </property> <property name="properties"> <value>custom.strategy.class=com.something.DefaultStrategy</value> </property> </bean> <bean id="serviceStrategy"/>如果在运行时无法将类解析为有效的类,则在即将创建bean时,即在非
lazy-initbean的ApplicationContext的preInstantiateSingletons()阶段,bean的解析将失败。参考代码:
com.liyong.ioccontainer.starter.XmlPropertySourcesPlaceholderConfigurerIocContainer
例子:PropertyOverrideConfigurer
另一个bean工厂后处理器PropertyOverrideConfigurer类似于PropertySourcesPlaceholderConfigurer,但与后者不同,原始定义可以具有bean属性的默认值,也可以完全没有值。如果覆盖的属性文件对于一些bean属性没有符合内容,默认的上下文定义被使用。
注意:bean定义没有意识到被覆盖,因此从XML定义文件中不能立即看出覆盖的配置正在被使用。由于存在覆盖机制,在多个PropertyOverrideConfigurer实例情况下对应相同bean属性不同的值,最后一个将被使用。
属性文件配置格式:
beanName.property=value下面清单显示格式化例子:
dataSource.driverClassName=com.mysql.jdbc.Driver
dataSource.url=jdbc:mysql:mydb此示例文件可与容器定义一起使用,容器定义包含一个名为dataSource的bean,该bean具有driver和url属性。
复合属性名也是被支持的,只要路径的每个组件(被覆盖的最终属性除外)都是非空的(可能是由构造函数初始化的)。下面的例子,bean的tom属性fred的sammy属性设置只123:
tom.fred.bob.sammy=123指定的重写值总是文本值。它们没有被转译为bean引用。当XML bean定义中的原始值指定bean引用时,这种约定也适用。
context命名空间在Spring2.5中被引入,可以使用专用配置元素配置属性覆盖,类似下面例子:
<context:property-override location="classpath:override.properties"/>参考代码:com.liyong.ioccontainer.starter.XmlPropertyOverrideConfigurerIocContainer1.8.3 FactoryBean自定义初始化逻辑
可以为本身就是工厂的对象实现org.springframework.beans.factory.FactoryBean接口。
这个FactoryBean接口是Spring IoC容器的实例化逻辑可插拔点。如果你有一个复杂的初始化代码在Java中比冗余XML更好的表达,你可以创建你自己的FactoryBean,在实现类中写复杂的初始化逻辑,然后插入你的自定义FactoryBean到容器中。
FactoryBean接口提供三个方法:
Object getObject():返回这个工厂创建的一个实例。这个实例可能被共享,依赖于这个工厂返回的是单例或原型。boolean isSingleton():如果FactoryBean返回一个单例返回true否则为falseClass getObjectType():返回由getObject()方法返回的对象类型;如果类型未知,则返回null
FactoryBean概念和接口在Spring框架中一些地方被使用到。Spring有超过50个FactoryBean接口的实现。
当你需要向容器获取一个实际的FactoryBean实例本身而不是由它产生的bean时请在调用ApplicationContext的getBean()方法时在该bean的ID前面加上一个&符号。因此,对于id为myBean的给定FactoryBean,在容器上调用getBean(“myBean”)将返回FactoryBean的产生的bean,而调用getBean(“&myBean”)将返回FactoryBean实例本身。
参考代码:com.liyong.ioccontainer.service.CustomFactorBean作者
个人从事金融行业,就职过易极付、思建科技、某网约车平台等重庆一流技术团队,目前就职于某银行负责统一支付系统建设。自身对金融行业有强烈的爱好。同时也实践大数据、数据存储、自动化集成和部署、分布式微服务、响应式编程、人工智能等领域。同时也热衷于技术分享创立公众号和博客站点对知识体系进行分享。
博客地址: http://youngitman.tech
CSDN: https://blog.csdn.net/liyong1...
微信公众号:

技术交流群:

今天关于Spring 的 IoC 容器实现原理 (一)#loadBeanDefinition和spring中的ioc容器的分享就到这里,希望大家有所收获,若想了解更多关于loadBeanDefinitions方法源码跟踪(一)、loadBeanDefinitions方法源码跟踪(二)、RootBeanDefinition、ChildBeanDefinition、GenericBeanDefinition的区别、Spring 5 中文解析核心篇-IoC容器之BeanDefinition继承与容器拓展点等相关知识,可以在本站进行查询。
本文标签:


