想了解Stellarprivatenetworksetupandwalletapptutorial的新动态吗?本文将为您提供详细的信息,此外,我们还将为您介绍关于(OK)NCTUns(EstiNet)
想了解Stellar private network setup and wallet app tutorial的新动态吗?本文将为您提供详细的信息,此外,我们还将为您介绍关于(OK) NCTUns (EstiNet) --- a high-fidelity and extensible network simulator and emulator、(PatchGANs)Pecomputed Real-time Texture Synthesis With Markovian Generative Adversarial Networks、(转) Ensemble Methods for Deep Learning Neural Networks to Reduce Variance and Improve Performance、A modular InnoSetup script to download and install all available .NET Framework versions and much mo的新知识。
本文目录一览:- Stellar private network setup and wallet app tutorial
- (OK) NCTUns (EstiNet) --- a high-fidelity and extensible network simulator and emulator
- (PatchGANs)Pecomputed Real-time Texture Synthesis With Markovian Generative Adversarial Networks
- (转) Ensemble Methods for Deep Learning Neural Networks to Reduce Variance and Improve Performance
- A modular InnoSetup script to download and install all available .NET Framework versions and much mo

Stellar private network setup and wallet app tutorial
Stellar - the blockchain network based on a federated consensus protocol - is cool but it comes with a lot of complexities. However, as far as I researched, I found it’s not as stable as Ethereum. Builds have bugs (check out the issue list here) but the good news is, they have very active and well-managed support. A separate forumis there for that. You can ask or checkout questions there.
If you want to understand the core concept that lies behind the Stellar then you can check out their docs here, here and here. If you want to understand more, like how its consensus works then its better to take a look into its whitepaper. Developers who want to build applications on top of Stellar’s public or test network might want to take a look at this and this link.
Objective of this doc
Recently, I got a chance to explore Stellar. I am coming from Ethereum and Bitcoin background. Which means that I have considerable amount of understanding of how these public chains work or even how blockchain technology works under the hood. Having said that, let us admit one thing, that Stellar network setup is complex and is in the development phase so unstable too. It has several different components, primarily Stellar-Core, Horizon, Stellar-SDK etc, unlike Ethereum which has just Geth and Web3. I think this is the reason that there is no single documentation (consolidated one) out there on the web for setting up the Stellar private network (or at least I could not find one)
Folks, if you haven’t explored Ethereum or Bitcoin as of now, then I would suggest you NOT to explore Stellar first.
My primary goal in this blog to simplify the process of Stellar network setup. I will also try to compare the installation with Geth so that people coming from an Ethereum background can understand it better. Also to make thing simple, I won’t talk about the concepts of Quorum or Quorum slices.
Before we go forward let me tell you few disclaimers : - All setups are done on Ubuntu - 18.04 system. - These are the basic configurations, if you want complexities you can checkout official docs. - Codes written for wallet app may NOT be optimised and can have security issues.
Basic Architecture

Let us understand the basic architecture of Stellar. The core component of the Stellar network is the Stellar-Core which is the backbone of the Stellar network. Its work is to validate and agree with other instance of Core on the status of every transaction through the Stellar consensus protocol(SCP). The network itself is a collection of Stellar Cores run by various individuals.
Some instances have a Stellar-Horizon server(a RESTful HTTP API server) you can communicate with, while others exist only to add reliability to the overall network, which means that not all cores must have the Horizon server. Applications interact with the Stellar network through Horizon servers using Stellar-SDK.
Applications connect with the Horizon server using javascript, java, Go-based SDKs, called Stellar-SDK.
Stellar uses a relational database system, Postgres, for storing data. Stellar-Coreand Stellar-Horizon will have separate databases.
What we will do exactly?
We will divide our goal into 2 parts: 1. Setup a private network with 2 nodes. 2. Implement a simple Node Js wallet app to do some transactions.
Setup Private Network
- Installations
- Install Stellar-Core
- Install Horizon Server
- Install Postgres DB
- Setups
- We will setup node01, a Stellar-Core along with its Postgres DB,
stellar_node01_db. - We will setup node02, a Stellar-Core along with its Postgres DB,
stellar_node02_db. - We will change the configuration files of both nodes to make them peers.
- We will set up Horizon server along with its Postgres DB,
stellar_horizon01_dband will connect it to the node01 core. After this setup, we will get an Horizon-endpoint for our SDK to connect with.
- We will setup node01, a Stellar-Core along with its Postgres DB,
Install Stellar-Core
The first thing we will do is to install Stellar-Core. This is most time taking part and I suggest you do it very carefully otherwise you might end up wasting time.
Follow these steps:
git clone --single-branch --branch prod https://github.com/stellar/stellar-core.git
cd stellar-core
git submodule init
git submodule update
./autogen.sh
./configure
make
sudo make install
stellar-core --version # to verify the installation
Basically what we are doing here, cloning the repo (the prod one not the master) and building the source code and then installing it.
Install Horizon server
- Go to this link and download the latest version of Horizon
- Extract it and place it somewhere (I usually put software inside
/toolsyou can put where ever you want) - Update the
./profilefile in$HOMEexport PATH=$PATH:/tools/horizonyou can do according to your configuration.
- In the terminal type
horizon versionto verify the installation.
Install Postgres DB
sudo apt install postgresql postgresql-contrib
Follow this doc for the Postgres DB installation.
Setup node01
- Create a folder called
node01 - cd into it and create a file
touch stellar-core.cfg -
Open the file and paste the code below
vim stellar-core.cfg# What port stellar-core listens for commands on. This is for Horizon server. HTTP_PORT=11626 PUBLIC_HTTP_PORT=false # If it is true, It prevents you from trying to connect to other peers RUN_STANDALONE=false # A phrase for your network. All nodes should have the same network phrase. NETWORK_PASSPHRASE="Standalone Pramati Network ; Oct 2018" # The seed used for generating the public key this node will be identified within SCP. NODE_SEED="XXXXXXXXXXXXXXXXXXXXXXXXXXXXXXXXXXXXXXX self" # Only nodes that want to participate in SCP should set NODE_IS_VALIDATOR=true. # Most instances should operate in observer mode with NODE_IS_VALIDATOR=false. NODE_IS_VALIDATOR=true # Comma separated peers list KNOWN_PEERS=["127.0.0.1:11635"] # Postgres DB URL DATABASE="postgresql://dbname=stellar_node01_db host=localhost user=your_user_name password=your_user_password" # The port other instances of stellar-core can connect to you on. PEER_PORT=11625 # Log level setup COMMANDS=["ll?level=trace"] FAILURE_SAFETY=0 UNSAFE_QUORUM=true #The public keys of the Stellar servers [QUORUM_SET] THRESHOLD_PERCENT=100 # comma sepearted validator list VALIDATORS=["$self"] [HISTORY.vs] get="cp /tmp/stellar-core/history/vs/{0} {1}" put="cp {0} /tmp/stellar-core/history/vs/{1}" mkdir="mkdir -p /tmp/stellar-core/history/vs/{0}"The above is minimum configuration needed. Most of parameters are self explanatory. Full details of all configuration can be found here
-
Let’s create the seed phrase for this network.
stellar-core --genseed- Copy the
Secret seedand paste intoNODE_SEEDin the configuration file.
-
Set up the database for node01.
sudo su postgrespsql- Create user
CREATE USER someuser WITH PASSWORD ''somepass''; - Give him admin access
ALTER USER someuser WITH SUPERUSER; - Create database for node01
CREATE DATABASE stellar_node01_db; - Grant permission to this user in database
GRANT ALL PRIVILEGES ON DATABASE stellar_node01_db TO stellar_node_user; - Set the
DATABASEurl (db, host, username, password) in the configuration file.
-
Set
PEER_PORTandHTTP_PORTas well. -
Set
NETWORK_PASSPHRASE. -
Notice that in
KNOWN_PEERSarray, I have added a url127.0.0.1:11635, I am going to setPEER_PORTvalue for node02 as11635. -
Initliaze database - basically creating meta data.
stellar-core --newdb- Notice that it gives us
Root account seed. Just make a note of it somewhere, we will have to use the root account later.
-
Set a flag to force the node to start SCP immediately.
stellar-core --forcescp
-
Run the node01
stellar-core
Setup node02
- All steps are same as of node01 but change the values of these parameters in node02’s config file:
PEER_PORT: 11635HTTP_PORT: 11636KNOWN_PEERS: KNOWN_PEERS=[“127.0.0.1:11625”]NODE_SEED
- Create database
stellar_node02_dband grant access to the user which we created earlier. - Set the
DATABASEurl (db, host, username, password) in the configuration file. - Run the node
stellar-core
Note*: Make sure to put the value of NETWORK_PASSPHRASE for node02 same as node01. Also notice Root Account created after running command stellar-core --newdb for this node, its same as of the 1st one and I do not know the reason for that.
Making them peers
After doing the above steps, they should become peers. The peer configuration is done in KNOWN_PEERS parameter in the config file. Notice I have exchanged the urls of nodes in here. Also, you can check if nodes are synced by running command stellar-core --c ''info''
Setup Horizon server
- Create database
stellar_horizon_dband grant access to the user which we created earlier. - Initialise Horizon DB
DATABASE_URL="postgresql://someuser:somepass@localhost:5432/stellar_horizon_db" horizon db init
- Run Horizon server
horizon \ --port 8000 \ --ingest=true \ --db-url "postgresql://someuser:somepass@localhost:5432/stellar_horizon_db" \ --stellar-core-db-url "postgresql://someuser:somepass@localhost:5432/stellar_node01_db" \ --stellar-core-url "http://127.0.0.1:11626"Remember, we want to connect this horizon server with node01. That is why we are giving http url (HTTP_PORTwe set in config of node01) and db-url for node01. - Horizon endpoint to connect with :
http://127.0.0.1:8000- you can browse this URL to verify that its connected to same network or not.
In this way we will have a proper private network setup with 2 nodes running (self-validating) and one REST server running. Now we will move towards developing our wallet app to do some transactions.
Developing wallet app
This wallet is going to be a simple application built on NodeJS using Express, I hope you have basic knowledge of this technology. Basically, it’s going to be APIs which will interact with Stellar-Horizon server within turns, is interacting with the blockchain.
Steps which we will follow : 1. Create 2 accounts. (API: /newAccount) 2. Get some money from Root Account in both of these accounts. (API: /faucet) 3. Check the balance of accounts. (API: /balance) 4. Send some money from account01 to account02. (API: /payment)
For implementing these APIs we are going to make use of stellar-SDK, which is a javascript library. - Create a folder mkdir stellar-wallet - cd into it. - npm init - touch index.js - Copy paste this code - npm i - Run the app node index.js
const express = require(''express'')
const bodyParser = require(''body-parser'')
const rp = require(''request-promise'')
const port = process.env.PORT || 4000
const app = express()
const Stellar = require(''stellar-sdk'')

app.use(bodyParser.json())
app.use(bodyParser.urlencoded({ extended: true }))

const HORIZON_ENDPOINT = ''http://127.0.0.1:8000''
const NETWORK_PASSPHRASE = "Standalone Pramati Network ; Oct 2018"

// Getting instance of Stellar blockchain
Stellar.Network.use(new Stellar.Network(NETWORK_PASSPHRASE));
var opts = new Stellar.Config.setAllowHttp(true);
var server = new Stellar.Server(HORIZON_ENDPOINT, opts);

let accounts = []

// Creating new account
const creatingAccount = async (req,res) =>{
    try{
        console.log(`creatingAccount method got called`)
        let pair = Stellar.Keypair.random()
        let account = {
            pk : pair.publicKey(),
            sk : pair.secret()
        }
        accounts.push(account)
        res.send(account);
    }catch(err){
        res.send({"Msg" : "ERROR : " + err})
    }
}

// Get 100 coins from root account
const getFromFaucet = async (req,res) =>{
    try{
        const pk = req.body.pk
        if(pk){
            // faucet is our root account. Make sure you replace this value with your key
            let sourceKeys = Stellar.Keypair.fromSecret("SDJ5AQWLIAYT22TCYSKOQALI3SNUMPAR63SEL73ASALDP6PYDN54FARM");
            // loading root account
            server.loadAccount(sourceKeys.publicKey())
            .then(function(sourceAccount) {
                let txn = new Stellar.TransactionBuilder(sourceAccount)
                            .addOperation(
                                Stellar.Operation.createAccount({
                                destination: pk,
                                startingBalance: "100"}))
                            .addMemo(Stellar.Memo.text(''Test Transaction''))
                            .build();
                txn.sign(sourceKeys);
                return server.submitTransaction(txn);
                })
            .then(function(result) {
                res.send({"Msg" : `SUCCESS : ${JSON.stringify(result)}`})
            })
            .catch(function(error) {
                console.error(''Something went wrong!'', error);
                res.send({"Msg" : `ERROR : ${error}`})
            });
        }else{
            res.send({"Msg" : "ERROR : please provide public key!"})
        }
    }catch(err){
        res.send({"Msg" : `ERROR : ${error}`})
    }
}

// Fetch all created accounts
const getAccounts =  async (req,res) =>{
    res.send(accounts);
}

// Get balance of an account
const getBalance = async (req, res) =>{
    try{
        const pk = req.body.pk;
        let balance = 0;
        // Load newly created accounts
        account = await server.loadAccount(pk)
        // check the balances
        account.balances.forEach((bal) => {
            balance = balance + bal.balance;
        })
        res.send({"Msg" : balance})
    }catch(err){
        res.send({"Msg" : "ERROR : " + err})
    }
}

// Do transactions
const makePayment = async (req,res) => {

    const {from, to, value} =  req.body;
    //Let get the secret of the spender
    const spender = accounts.find((acc) => {
        if(acc.pk === from) return acc;
    })
    if(spender && spender != null){
        // First, check to make sure that the destination account exists.
        // You could skip this, but if the account does not exist, you will be charged
        // the transaction fee when the transaction fails.
        server.loadAccount(to)
        .catch((err)=>{
            res.send({"Msg" : `Error : receiever ${to} not found!`})
        })
        .then(() =>{
            // lets load spender account
            return server.loadAccount(from);
        })
        .then((spenderAccount) => {
            // Start building the transaction.
            const transaction = new Stellar.TransactionBuilder(spenderAccount)
            .addOperation(Stellar.Operation.payment({
                destination: to,
                // Because Stellar allows transaction in many currencies, you must
                // specify the asset type. The special "native" asset represents Lumens.
                asset: Stellar.Asset.native(),
                amount: value
            }))
            // A memo allows you to add your own metadata to a transaction. It''s
            // optional and does not affect how Stellar treats the transaction.
            .addMemo(Stellar.Memo.text(''Test Transaction''))
            .build()
            // get the key pair for signing the transaction
            const pairA =  Stellar.Keypair.fromSecret(spender.sk);
            // Sign the transaction to prove you are actually the person sending it
            transaction.sign(pairA)
            return server.submitTransaction(transaction);
        })
        .then((result)=>{
            res.send({"Msg" : JSON.stringify(result, null, 2)})
        })
        .catch((err)=>{
            res.send({"Msg" : `Error : Somethis went wrong : ${JSON.stringify(err.response.data.extras)}`})
        })
    }else{
        res.send({"Msg" : `Error : spender  ${to} not found!`})
    }
}
/* CORS */
app.use((req, res, next) => {
    // Website you wish to allow to connect
    res.setHeader(''Access-Control-Allow-Origin'', ''*'')

    // Request methods you wish to allow
    res.setHeader(''Access-Control-Allow-Methods'', ''GET, POST, OPTIONS, PUT, PATCH, DELETE'')

    // Request headers you wish to allow
    res.setHeader(''Access-Control-Allow-Headers'', ''Origin,X-Requested-With,content-type'')

    // Pass to next layer of middleware
    next()
})

/* API Routes */
app.get(''/newAccount'', creatingAccount)
app.get(''/accounts'', getAccounts)
app.post(''/faucet'',getFromFaucet)
app.post(''/balance'', getBalance)
app.post(''/payment'', makePayment)

/* Serve API */
app.listen(port, () => {
  console.log(`Stellar test app listening on port ${port}!`)
})
You must be wondering why I called /faucet API for both of the accounts. Only one-time call would be enough right? The problem is when you create a new key-pair, blockchain does not know about it unless until you callStellar.Operation.createAccount operation, which we are doing it in /faucet API while building transaction. Of course we can handle this problem in a better way but right now I too lazy to do so :D That is why for both of the accounts you have to call /faucet API to register the account in the blockchain so that next time when you do payment blockchain recognises these accounts and does not throw error. Also, do not forget to replace root account in getFromFaucet()
Full list of API calls are here:
# APIs

/* API Routes */
app.get(''/newAccount'', creatingAccount)
app.get(''/accounts'', getAccounts)
app.post(''/faucet'',getFromFaucet)
app.post(''/balance'', getBalance)
app.post(''/payment'', makePayment)

# New Account

Method : GET
URL : http://localhost:4000/newAccount
Response :
{
    "pk": "GBVLTVGDDO3CAEZQQEDBZCTHZKXZUT7LDIGGXD7W5R2YKOQLPFMV3WLK",
    "sk": "SBYHYPWNC5ZVWPH73VHBVWF2D4PDXV4466GLL2WQNZQKHQTJJSQPGZBM"
}

# All Accounts

Method : GET
URL : http://localhost:4000/accounts
Response :
[
    {
        "pk": "GCMIEBN26ACIUJVBGB3XT2ZAGIPZTG3SCV5K2FCBUY2AMYGBOOKOF4P6",
        "sk": "SB6DP7TKZW777PGOC7IATGHQ52SBS4SCSKTSNWA2VTBXJG5YERYXL3ZQ"
    },
    {
        "pk": "GCVVJY5EXBTKIG76PFZCULLIWJGAYBTHGBPQVRWZHJC7FGUJMSYVZ675",
        "sk": "SA5OOHTOTO3RSTRZ2ZZLVXHTP2AASV3P22ZP44CURJMBLTXUGVZRKWTH"
    }
]

# Earn money from faucet

Method : POST
URL : http://localhost:4000/faucet
Format : JSON
Request :
{
	"pk" : "GCVVJY5EXBTKIG76PFZCULLIWJGAYBTHGBPQVRWZHJC7FGUJMSYVZ675"
}
Response :
{
    "Msg": "010000.0000000"
}

# Get balance of an account

Method : POST
URL : http://localhost:4000/balance
Format : JSON
Request :
{
	"pk" : "GCVVJY5EXBTKIG76PFZCULLIWJGAYBTHGBPQVRWZHJC7FGUJMSYVZ675"
}
Response :
{
    "Msg": "010000.0000000"
}

# Make payment

Method : POST
URL : http://localhost:4000/payment
Format : JSON
Request :
{
	"from" : "GCMIEBN26ACIUJVBGB3XT2ZAGIPZTG3SCV5K2FCBUY2AMYGBOOKOF4P6",
	"to" : "GCVVJY5EXBTKIG76PFZCULLIWJGAYBTHGBPQVRWZHJC7FGUJMSYVZ675",
	"value" : "20"
}
Response :
{
    "Msg": "{\n  \"_links\": {\n    \"transaction\": {\n      \"href\": \"http://172.18.0.2:8000/transactions/f9c2425af28995d8ba0f8751fe8a0c5c77f7388b768cfc28b1206d2a8fce346e\"\n    }\n  },\n  \"hash\": \"f9c2425af28995d8ba0f8751fe8a0c5c77f7388b768cfc28b1206d2a8fce346e\",\n  \"ledger\": 18454,\n  \"envelope_xdr\": \"AAAAAJiCBbrwBIomoTB3eesgMh+Zm3IVeq0UQaY0BmDBc5TiAAAAZAAASA8AAAABAAAAAAAAAAEAAAAQVGVzdCBUcmFuc2FjdGlvbgAAAAEAAAAAAAAAAQAAAACrVOOkuGakG/55ciotaLJMDAZnMF8Kxtk6RfKaiWSxXAAAAAAAAAAAC+vCAAAAAAAAAAABwXOU4gAAAEA6DJsf9db07hMIZ8FhYQ+o5ptErY8OaDwBBw+RopZO2xfP+dwtxKqT/ubPocWvyObAkJCGRFS2EA59rdCKEzQD\",\n  \"result_xdr\": \"AAAAAAAAAGQAAAAAAAAAAQAAAAAAAAABAAAAAAAAAAA=\",\n  \"result_meta_xdr\": \"AAAAAQAAAAIAAAADAABIFgAAAAAAAAAAmIIFuvAEiiahMHd56yAyH5mbchV6rRRBpjQGYMFzlOIAAAAXSHbnnAAASA8AAAAAAAAAAAAAAAAAAAAAAAAAAAEAAAAAAAAAAAAAAAAAAAAAAAABAABIFgAAAAAAAAAAmIIFuvAEiiahMHd56yAyH5mbchV6rRRBpjQGYMFzlOIAAAAXSHbnnAAASA8AAAABAAAAAAAAAAAAAAAAAAAAAAEAAAAAAAAAAAAAAAAAAAAAAAABAAAABAAAAAMAAEgWAAAAAAAAAACYggW68ASKJqEwd3nrIDIfmZtyFXqtFEGmNAZgwXOU4gAAABdIduecAABIDwAAAAEAAAAAAAAAAAAAAAAAAAAAAQAAAAAAAAAAAAAAAAAAAAAAAAEAAEgWAAAAAAAAAACYggW68ASKJqEwd3nrIDIfmZtyFXqtFEGmNAZgwXOU4gAAABc8iyWcAABIDwAAAAEAAAAAAAAAAAAAAAAAAAAAAQAAAAAAAAAAAAAAAAAAAAAAAAMAAEgSAAAAAAAAAACrVOOkuGakG/55ciotaLJMDAZnMF8Kxtk6RfKaiWSxXAAAABdIdugAAABIEgAAAAAAAAAAAAAAAAAAAAAAAAAAAQAAAAAAAAAAAAAAAAAAAAAAAAEAAEgWAAAAAAAAAACrVOOkuGakG/55ciotaLJMDAZnMF8Kxtk6RfKaiWSxXAAAABdUYqoAAABIEgAAAAAAAAAAAAAAAAAAAAAAAAAAAQAAAAAAAAAAAAAAAAAAAA==\"\n}"
}
Note*: You can follow these links for references. - create accounts - key-pair - friendbot-for-faucet - transactions
Stellar Laboratory
Do not want to go through pain of implementing the Wallet-app? Fine! You can work on and test out with your private network using Stellar Laboratory
You just have to click on custom button in top-right and configure your network (basically horizon endpoint) there and start playing around.
Stellar Explorer
If you want to setup a proper user interface for your network to view transactions , operations, ledger etc., you can do that using Stellar Explorer. Its similar to Ether Scan for Ethereum.
Steps to setup: - git clone https://github.com/chatch/stellarexplorer - cd into directory. - npm i - npm start - This app will automatically connect to your horizon endpoint (http://localhost:8000 by default). If you want to change the endpoint, then click on Set Custom Network button and configure.
Well, there could be many disclaimers in this tutorials but let’s overlook those to learn just the basics of the Stellar blockchain. I hope this tutorial would definitely help you out getting started with Stellar. Cheers!
 NCTUns (EstiNet) --- a high-fidelity and extensible network simulator and emulator")
(OK) NCTUns (EstiNet) --- a high-fidelity and extensible network simulator and emulator
http://blog.sciencenet.cn/blog-388967-570863.html
今天看到一个仿真与模拟软件NCTUns(http://csie.nqu.edu.tw/smallko/nctuns/nctuns.htm),可惜只免费到到6.0,以后的版本因为该软件的成功而升级为商业版本--EstiNet7.0,且不再提供老版本的免费下载。从该网站的介绍看,该软件还是不错的,可以提供以下几方面的功能,某些方面可以说比NS2/OPNet要方便,不足的地方就是只“完美”支持Fedora12(虽然也有在Ubuntu下做的,不过问题不少!),且在应用层能支持的东东不是很多,权且收下,抽空好好看看。
NCTUns(http://csie.nqu.edu.tw/smallko/nctuns/nctuns.htm)
EstiNet7.0
(2)Introduction:
TheNCTUns is a high-fidelity and extensible network simulator and emulator capableof simulating various protocols used in both wired and wireless IP networks. Its core technology is basedon the novel kernel re-entering methodology invented by Prof. S.Y. Wang [1, 2]when he was pursuing his Ph.D. degree at Harvard University.Due to this novel methodology, NCTUns provides many unique advantages thatcannot be easily achieved by traditional network simulators such as ns-2 [3]and OPNET [4].
After obtaining hisPh.D. degree from Harvard University in September 1999, Prof. S.Y. Wangreturned to Taiwan and became a professor in the Department of ComputerScience, National Chiao Tung University (NCTU), Taiwan, where he founded his“Network and System Laboratory.” Since that time, Prof. S.Y. Wang has beenleading and working with his students to design and implement NCTUns (the NCTUNetwork Simulator) for more than nine years.
The NCTUns networksimulator and emulator has many useful features listed below:
· It can be easily used as anemulator. An external host in the real world canexchange packets (e.g., set up a TCP connection) with nodes (e.g., host,router, or mobile station) in a network simulated by NCTUns. Two external hostsin the real world can also exchange their packets via a network simulated byNCTUns. This feature is very useful as the function and performance ofreal-world devices can be tested under various simulated network conditions.
· It supports distributedemulation of a large network over multiple machines.When the emulated network has many nodes,many real-world applications need to run on these nodes, many real-worlddevices need to connect to the emulated network, or the amount of real-worldpackets exchanged among real-world devices over the emulated network is large,a single machine may not have enough CPU power and main memory to run theemulation in real time. In such a condition, NCTUns can partition the emulatednetwork into several smaller parts and let each part be emulated by a NCTUnsmachine. The usage of a distributed emulation is totally automatic and the userwon’t notice that the emulation is carried out over multiple machines.
· It supports seamless integrationof emulation and simulation. A complicatednetwork simulated by NCTUns can be seamlessly integrated with a real-lifenetwork. Real-life network traffic can pass through a complicated simulatednetwork and interact with simulated network traffic.
· It directly uses the real-lifeLinux TCP/IP protocol stack to generate high-fidelity simulation results. By using a novel kernel re-enteringsimulation methodology, a real-life Linux kernel’s protocol stack is directlyused to generate high-fidelity simulation results.
· It can run any real-life UNIXapplication program on a simulated node without any modification. Any real-life program (e.g., P2P BitTorrent or Javaprograms) can be run on a simulated host, router, mobile node, etc. to generaterealistic network traffic. This capability also enables a researcher toevaluate the functionality and performance of a distributed application orsystem under various network conditions. Another important advantage of thisfeature is that application programs developed during simulation studies can bedirectly deployed and run on real-world UNIX machines after simulation studiesare finished. This eliminates the time and effort required to port a simulationprototype to a real-world implementation if traditional network simulators wereused.
· It can use any real-life UNIXnetwork configuration and monitoring tools. For example, the UNIX route, ifconfig, netstat,tcpdump, traceroute commands can be run on a simulated network to configure ormonitor the simulated network.
· Its setup and usage of asimulated network and application programs are exactly the same as those usedin real-life IP networks.For example, each layer-3 interface has an IP address automatically assigned toit by the GUI and application programs directly use these IP addresses tocommunicate with each other. For this reason, any person who is familiar withreal-life IP networks will easily learn and operate NCTUns in just a fewminutes. For the same reason, NCTUns can be used as an educational tool toteach students how to configure and operate a real-life network.
· It simulates various importantnetworks. Thesupported networks include Ethernet-based fixed Internet, IEEE 802.11(b)wireless LANs, mobile ad hoc (sensor) networks, GPRS cellular networks, opticalnetworks (including both circuit-switching and busrt-switching networks), IEEE802.11(b) dual-radio wireless mesh networks, IEEE 802.11(e) QoS wireless LANs,Tactical and active mobile ad hoc networks, 3dB beamwidth 60-degree and90-degree steerable and directional antennas, IEEE 802.16(d) WiMAX wirelessnetworks (including the PMP and mesh modes), DVB-RCS satellite networks,wireless vehicular networks for Intelligent Transportation Systems (includingV2V and V2I), multi-interface mobile nodes for heterogeneous wireless networks,IEEE 802.16(e) mobile WiMAX networks, IEEE 802.11(p)/1609 WAVE wirelessvehicular networks, various realistic wireless channel models, IEEE 802.16(j)transparent mode and non-transparent mode WiMAX networks, etc.
· It simulates various importantprotocols. For example, IEEE 802.3 CSMA/CD MAC, IEEE802.11 (b) CSMA/CA MAC, IEEE 802.11(e) QoS MAC, IEEE 802.11(b) wireless meshnetwork routing protocol, IEEE 802.16(d)(e)( j) WiMAXwireless MAC and PHY, DVB-RCSsatellite MAC and PHY,learning bridge protocol, spanning tree protocol, IP, Mobile IP, Diffserv(QoS), RIP, OSPF, UDP, TCP, RTP/RTCP/SDP, HTTP, FTP, Telnet, BitTorrent, etc.
· It finishes a network simulationcase quickly. By combining thekernel re-entering methodology with the discrete-event simulation methodology,a simulation job can be finished quickly.
· It generates repeatablesimulation results.If the user fixes the random number seed for a simulation case, the simulationresults of a case are the same across different simulation runs even if thereare some other activities (e.g., disk I/O) occurring on the simulation machine.
· It provides a highly-integratedand professional GUI environment.This GUI can help a user to quickly (1) draw network topologies, (2) configurethe protocol modules used inside a node, (3) specify the moving paths of mobilenodes, (4) plot network performance graphs, (5) play back the animation of alogged packet transfer trace, etc. All of these operations can be easily,intuitively, and quickly done with the GUI.
· Its simulation engine adopts anopen-system architecture and is open source. By using a set of module APIs provided by thesimulation engine, a protocol developer can easily implement his (her) protocoland integrate it into the simulation engine. NCTUns uses a simple andeasy-to-understand syntax to describe the settings and configurations of asimulation job. These descriptions are generated by the GUI and stored in asuite of files. Normally the GUI will automatically transfer these files to thesimulation engine for execution. However, if a researcher wants to try his(her) novel device or network configurations that the current GUI does notsupport, he (she) can totally bypass the GUI and generate the suite ofdescription files by himself (herself) using any text editor (or scriptprogram). The non-GUI-generated suite of files can then be manually fed to thesimulation engine for execution.
· It supports remote andconcurrent simulations. NCTUns adopts adistributed architecture. The GUI and simulation engine are separatelyimplemented and use the client-server model to communicate. Therefore, a remoteuser using the GUI program can remotely submit his (her) simulation job to aserver running the simulation engine. The server will run the submittedsimulation job and later return the results back to the remote GUI program foranalyses. This scheme can easily support the cluster computing model in whichmultiple simulation jobs are performed in parallel on different servermachines. Thiscan increase the total simulation throughput.
· It provides complete and high-qualitydocumentations. TheGUI user manual and the protocol developer manual provide detailed informationabout how to use NCTUns. The NCTUns package provides 83 example simulationcases and their demo video clips to help a user easily understand how to run upa simulation case.
· It is continuously supported, maintained, and improved. New functions and network types arecontinuously added to NCTUns to enhance its functions, speed, and capabilities.(3)Relatedpapers:
S.Y.Wang, and Y.M. Huang, “ NCTUns Distributed Network Emulator,” Internet Journal, Vol. 4, Num. 2, pp. 61-94, Nova Science Publisher (ISSN 1937-3805), 2012
S.Y.Wang, P.F. Wang, Y.W. Li, and L.C. Lau, “Design and Implementation of A More Realistic Radio Propagation Model for WirelessVehicular Networks over the NCTUns Network Simulator,” IEEE WCNC 2011 (Wireless Communications and Networking Conference 2011),March 28 – 31, 2011, Cancun, Mexico.
S.Y.Wang, C.C. Lin, and C.C. Huang, “NCTUnsTool for Evaluating the Performances of Real-life P2P Applications,” achapter of the “Peer-to-Peer Networksand Internet Policies” book, (ISBN 978-1-60876-287-3, published by Nova Science Publishers in 2010)
S.Y. Wang, H.Y. Chen, and S.W.Chuang, “NCTUns Tool for IEEE 802.16j Mobile WiMAXRelay Network Simulations,” a chapter of the “Computer Science Research and Technology” book, (ISBN: 978-1-61728-688-9, published by Nova Science Publishers in 2009)
S.Y. Wang and C.L. Chou, “NCTUns Tool for WirelessVehicular Communication Network Researches,” SimulationModelling Practice and Theory, Vol. 17, No. 7, pp. 1211-1226, August 2009.
S.Y.Wang and R.M. Huang, “NCTUns Tool for Innovative NetworkEmulations,” a chapter of the “Computer-Aided Design and OtherComputing Research Developments” book, (ISBN: 978-1-60456-860-8, published by Nova Science Publishers in2009)
S.Y. Wang and C.C. Lin, "NCTUns5.0: A Network Simulator for IEEE 802.11(p) and 1609 Wireless Vehicular NetworkResearches," 2nd IEEE International Symposium on Wireless VehicularCommunications, September 21–22, 2008, Calgary, Canada. (demo paper)
S.Y. Wang and C.L.Chou, "NCTUns Simulator for Wireless Vehicular AdHoc Network Research", a chapter of the "Ad Hoc Networks: New Research"book (Nova Science Publishers,ISBN: 978-1-60456-895-0)
S.M. Huang, Y.C.Sung, S.Y. Wang, and Y.B. Lin, “NCTUns Simulation Toolfor WiMAX Modeling,” Third Annual International Wireless InternetConference, October 22 – 24, 2007, Austin, Texas, USA. (EI and ISI indexed,sponsored by ICST, ACM, EURASIP)
S.Y.Wang, C.L. Chou, Y.H. Chiu, Y.S.Tseng, M.S. Hsu, Y.W. Cheng, W.L. Liu, and T.W. Ho,“NCTUns 4.0: An Integrated SimulationPlatform for Vehicular Traffic, Communication, and Network Researches,”1st IEEE International Symposium on Wireless VehicularCommunications, September 30 – October 1, 2007, Baltimore, MD, USA
S.Y. Wang,C.L. Chou, C.C. Lin, “The Design andImplementation of the NCTUns Network Simulation Engine”,Elsevier Simulation Modelling Practice and Theory, 15 (2007) 57 – 81.
S.Y. Wang and K.C. Liao, “InnovativeNetwork Emulations using the NCTUns Tool”, as a book chapter of the “Computer Networking and Networks”book, (ISBN1-59454-830-7,publishedby Nova Science Publishers in 2006)
S.Y. Wang and Y.B. Lin, “NCTUnsNetwork Simulation and Emulation for Wireless Resource Management”, WileyWireless Communications and Mobile Computing,Vol.5, Issue 8, December 2005, pp. 899–916.
S.Y. Wang, C.L. Chou, C.H. Huang,C.C. Hwang, Z.M. Yang, C.C. Chiou, and C.C. Lin, "The Design andImplementation of the NCTUns 1.0 Network Simulator", ComputerNetworks, Vol. 42, Issue 2, June 2003, pp. 175-197.
S.Y. Wang, “NCTUns 1.0”, in the column “Software Tools forNetworking”, IEEE Networks, Vol. 17, No. 4, July 2003.
S.Y. Wang and H.T. Kung, "ANew Methodology for Easily Constructing Extensible and High-Fidelity TCP/IPNetwork Simulators", Computer Networks, Vol. 40, Issue 2, October2002, pp. 257-278.
S.Y. Wang and H.T. Kung, "ASimple Methodology for Constructing Extensible and High-Fidelity TCP/IP NetworkSimulators", IEEE INFOCOM''99, March 21-25, 1999, New York, USA.
Pecomputed Real-time Texture Synthesis With Markovian Generative Adversarial Networks")
(PatchGANs)Pecomputed Real-time Texture Synthesis With Markovian Generative Adversarial Networks
Introduction:
Deconvolution; Computational costs; Strided convolutional nets; Markov patches;
1. Q: The task of texture synthesis have considerable computational costs becuase of a numerical deconvolution in previous work.
2. A: the author propose to procompute a feed-forwaed, strided convolutional network :
This framework can -
1. capture statistics of Markov patches.
2. directly generate output of arbitrary dimensions.
3. this method have considerable advantage in the fact of time-computation.
4. traditional complexity constraints(复杂性约束) using Markov random field that characterizes(表征) images by statistics of local patches of pixels(局部像素快的统计信息).
5. Deep architectures capture appearance variations in object classes beyond the abilities of pixel-level ap-
proaches.(深层架构能够捕获外表形状的变化的能力超过了基于像素水平的方法)
6.two main class of deep generative models:
1. full images models, often including specially trained ''auto-encoder'', which limited fidelity(精确度) in details.
2. deep Markov models, capture the statistics of local patches, and assemble them to high-resolution.
Advantage:Markov model have good fidelity of details.
Disadvantage:
如果不重要的的全局结构要被产生, 则需要额外的辅助指导;
high time computation
这自然地提供了the blending of patches,并允许重用复杂的、紧急的多层特征表示的 大 型、有区别地训练的神经网络,如VGG网络[30],重新利用它们进行图像合成wih deconvolution framwork.
Objective: to improve the effciency of deep Markovian texture synthesis.
The key idea:
To precompute the inversion of strided the network by fitting a convolutional network [31,29] to the inversion process, which operates purely in a feed-forward fashion.(关键思想是通过将跨步卷积网络拟合到反演过程来预先计算网络的反演,该反演过程纯粹以前馈方式运行)
尽管在固定大小的patch上进行训练,得到的网络可以生成任意尺寸的连续图像,而不需要任何额外的优化或混合,从而产生一个具有特殊风格和高性能的高质量纹理合成器.
The model:
the framework of DCGANs is applied, nonetheless(然而).相同(be equivalent to )
Related work
1.Xie et al. [34] have proved that a generative random field model can be derived from used discriminative networks, and show applications to unguided texture synthesis.(Xie等人的[34]已经证明了从所使用的判别网络中可以导出一个生成的随机场模型,并展示了它在非制导纹理合成中的应用。)
2.full image method with auto-encoders as generative nets.
DCGANs stabilzed the performance of GANs and shows the generator have vector arithmeric properties(向量运算性质).生成器具备了“向量运算”的神奇性质,类似于word embedding可以操纵向量,并且能够按照“语义”生成新内容。
Adversarial nets offer perceptual metrics(感知指标) that allow AEs to be trianing effciency.
3. this PatchGANs is the use of feature-patch statistics rather than learn Gaussian distributions of individual feature vectors.(本文的主要概念差异是使用了Li等人的[21]特征-patch统计量,而不是学习单个特征向量的高斯分布,这在更忠实地再现纹理方面提供了一些好处。)
Model

Motivation:
1.As figure shown,real data does not always comly with(遵守) a Gaussian distribution(a), but a complex nonlinear monifold(复杂的非线性流体)(b), We adversarially learn a mapping to project contextually related patches to that manifold.
2. Statistics based mehods match the disribution of input and target with a Gaussian model.
3. Adversarial training (GANs) can recognize such manifold with its discriminative network. and strengthen its generative power with a projection on the manifold.
4. to improve adversarial training with contextually corresponding Markovian patches(上下文对应的马尔可夫patches),to focus on depictions(描述) of same context.
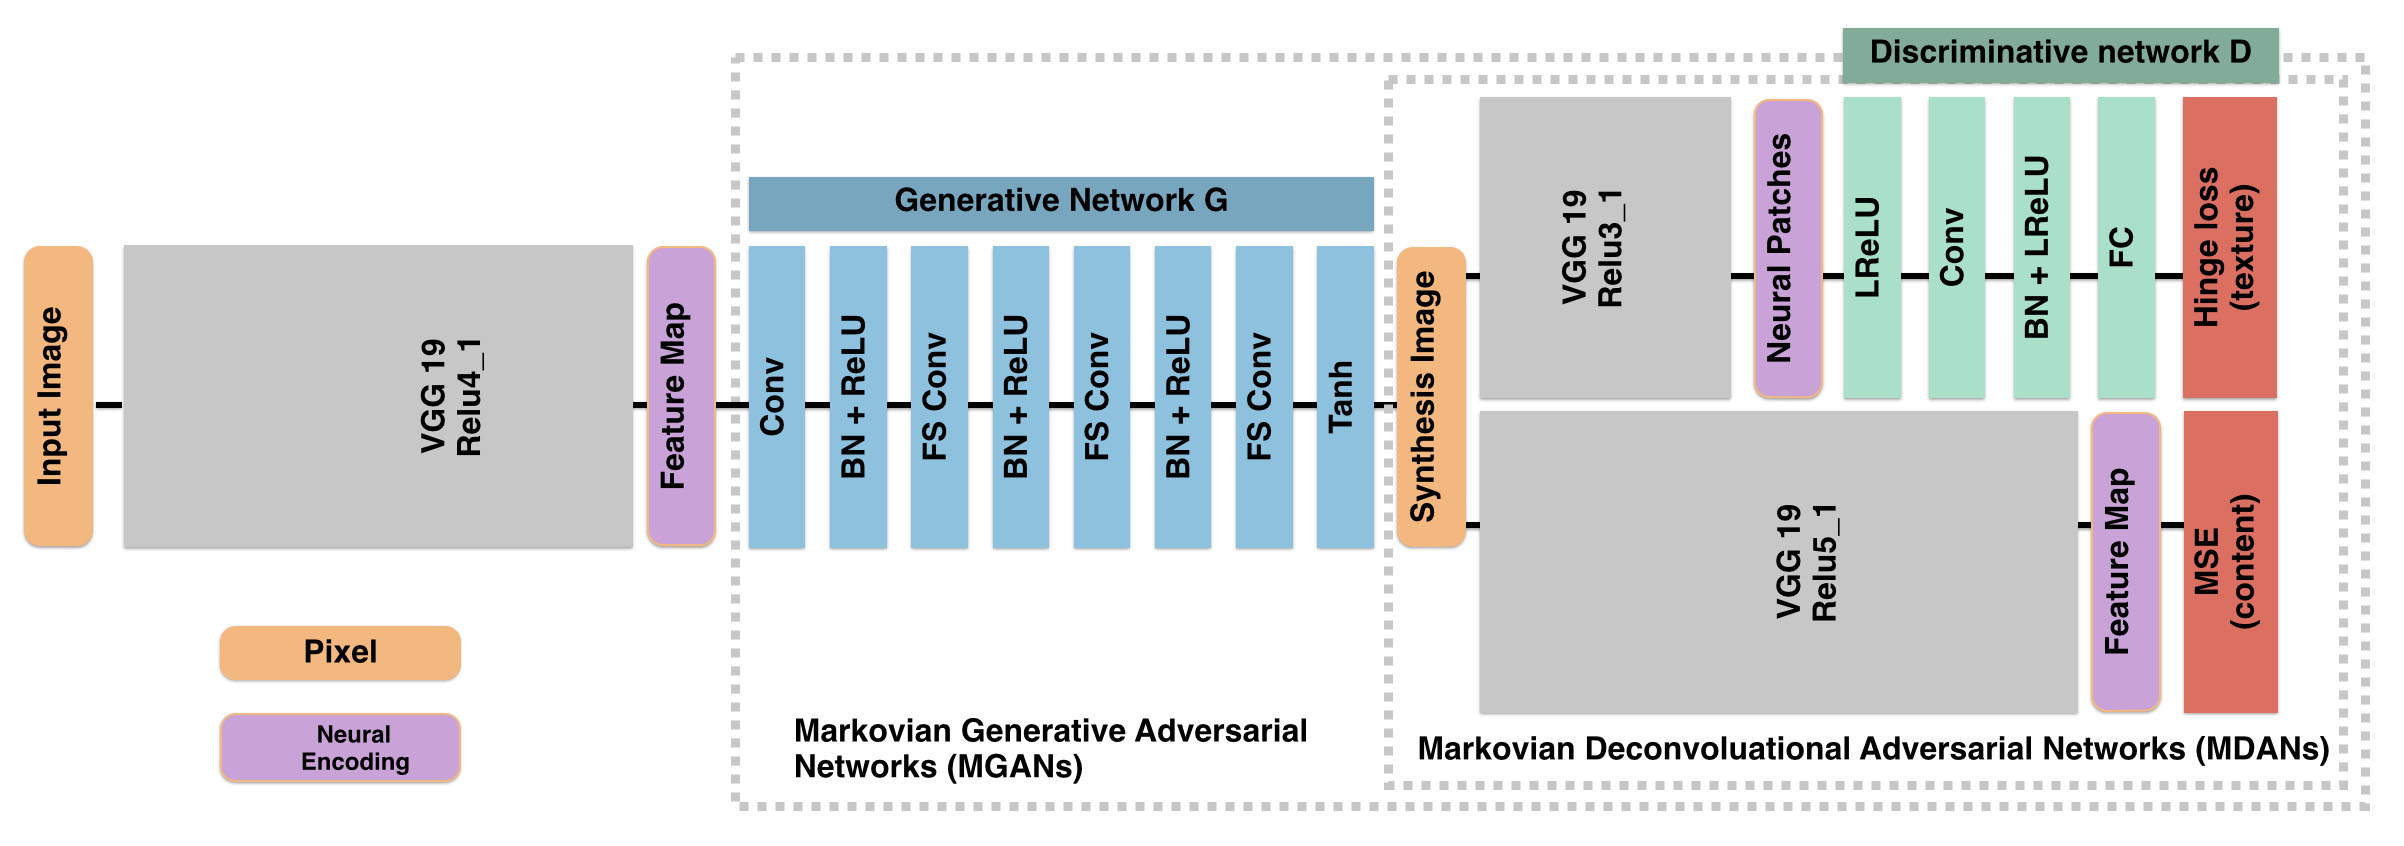
Model Depictions:
for D:
D (green blocks) that learns to distinguish actual feature patches (on VGG 19 layer Relu3 1, purple block) from inappropriately synthesized ones(不当的合成的patches).
第二次比较(管道下面的D)与VGG 19编码相同的图像在较高的,更抽象的层Relu5 1可以选择用于指导the distinguish of content.
for G:
encoding with VGG19_Relu4_1 and decodes it to pixels of the synthesis image
for MDANs: with a deconvolutional process is driven by adversarial traning
1. D (green blocks) is trained to distinguish between "neural patches" sampled from the synthesis image and sampled from the example image.
2. the score (1-s) is its texture loss.
with loss function:

$E_{t}$ denotes the loss between example texture image and synthsized image.
We initialize $x$ with random noise for un-guided synthesis, or an content image $x_{c}$ for guided synthesis.
with Hinge loss :
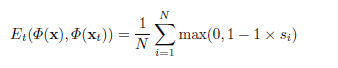
Here $s_{i}$ denotes the classi cation score of i-th neural patch, and $N$ is the total
number of sampled patches.
for MGANs
1. G decodes a picture through a ordinary convolution followed by a cascade(级联) of fractional-strided convolutions(分数阶跃卷积) (FS Conv).
Although being trained with fixed size input, the generator naturally extends to arbitrary size images.
2. 欧式距离的损失函数会使 产生(yield)的图像过于平滑(over-smooth)
3.compared with GANs, PatchGans do not operate on full images, but neural patches. in order to make learning easier with contextual correspondence between the patches
4. replace sigmoid by hinge loss.
Experiment detail
1. augment dataset with rotations and scales
2. samle subwindow of 128-by-128, where neural patches are sampled from its relu3_1 encoding as the input of D.
for Training
The training process has three main steps:
- Use MDAN to generate training images (MDAN_wrapper.lua).
- Data Augmentation (AG_wrapper.lua).
- Train MGAN (MDAN_wrapper.lua).
 Ensemble Methods for Deep Learning Neural Networks to Reduce Variance and Improve Performance")
(转) Ensemble Methods for Deep Learning Neural Networks to Reduce Variance and Improve Performance
Ensemble Methods for Deep Learning Neural Networks to Reduce Variance and Improve Performance
2018-12-19 13:02:45
This blog is copied from: https://machinelearningmastery.com/ensemble-methods-for-deep-learning-neural-networks/
Deep learning neural networks are nonlinear methods.
They offer increased flexibility and can scale in proportion to the amount of training data available. A downside of this flexibility is that they learn via a stochastic training algorithm which means that they are sensitive to the specifics of the training data and may find a different set of weights each time they are trained, which in turn produce different predictions.
Generally, this is referred to as neural networks having a high variance and it can be frustrating when trying to develop a final model to use for making predictions.
A successful approach to reducing the variance of neural network models is to train multiple models instead of a single model and to combine the predictions from these models. This is called ensemble learning and not only reduces the variance of predictions but also can result in predictions that are better than any single model.
In this post, you will discover methods for deep learning neural networks to reduce variance and improve prediction performance.
After reading this post, you will know:
- Neural network models are nonlinear and have a high variance, which can be frustrating when preparing a final model for making predictions.
- Ensemble learning combines the predictions from multiple neural network models to reduce the variance of predictions and reduce generalization error.
- Techniques for ensemble learning can be grouped by the element that is varied, such as training data, the model, and how predictions are combined.
Let’s get started.

Ensemble Methods to Reduce Variance and Improve Performance of Deep Learning Neural Networks
Photo by University of San Francisco’s Performing Arts, some rights reserved.
Overview
This tutorial is divided into four parts; they are:
- High Variance of Neural Network Models
- Reduce Variance Using an Ensemble of Models
- How to Ensemble Neural Network Models
- Summary of Ensemble Techniques
High Variance of Neural Network Models
Training deep neural networks can be very computationally expensive.
Very deep networks trained on millions of examples may take days, weeks, and sometimes months to train.
Google’s baseline model […] was a deep convolutional neural network […] that had been trained for about six months using asynchronous stochastic gradient descent on a large number of cores.
— Distilling the Knowledge in a Neural Network, 2015.
After the investment of so much time and resources, there is no guarantee that the final model will have low generalization error, performing well on examples not seen during training.
… train many different candidate networks and then to select the best, […] and to discard the rest. There are two disadvantages with such an approach. First, all of the effort involved in training the remaining networks is wasted. Second, […] the network which had best performance on the validation set might not be the one with the best performance on new test data.
— Pages 364-365, Neural Networks for Pattern Recognition, 1995.
Neural network models are a nonlinear method. This means that they can learn complex nonlinear relationships in the data. A downside of this flexibility is that they are sensitive to initial conditions, both in terms of the initial random weights and in terms of the statistical noise in the training dataset.
This stochastic nature of the learning algorithm means that each time a neural network model is trained, it may learn a slightly (or dramatically) different version of the mapping function from inputs to outputs, that in turn will have different performance on the training and holdout datasets.
As such, we can think of a neural network as a method that has a low bias and high variance. Even when trained on large datasets to satisfy the high variance, having any variance in a final model that is intended to be used to make predictions can be frustrating.
Want Better Results with Deep Learning?
Take my free 7-day email crash course now (with sample code).
Click to sign-up and also get a free PDF Ebook version of the course.
Download Your FREE Mini-Course
Reduce Variance Using an Ensemble of Models
A solution to the high variance of neural networks is to train multiple models and combine their predictions.
The idea is to combine the predictions from multiple good but different models.
A good model has skill, meaning that its predictions are better than random chance. Importantly, the models must be good in different ways; they must make different prediction errors.
The reason that model averaging works is that different models will usually not make all the same errors on the test set.
— Page 256, Deep Learning, 2016.
Combining the predictions from multiple neural networks adds a bias that in turn counters the variance of a single trained neural network model. The results are predictions that are less sensitive to the specifics of the training data, choice of training scheme, and the serendipity of a single training run.
In addition to reducing the variance in the prediction, the ensemble can also result in better predictions than any single best model.
… the performance of a committee can be better than the performance of the best single network used in isolation.
— Page 365, Neural Networks for Pattern Recognition, 1995.
This approach belongs to a general class of methods called “ensemble learning” that describes methods that attempt to make the best use of the predictions from multiple models prepared for the same problem.
Generally, ensemble learning involves training more than one network on the same dataset, then using each of the trained models to make a prediction before combining the predictions in some way to make a final outcome or prediction.
In fact, ensembling of models is a standard approach in applied machine learning to ensure that the most stable and best possible prediction is made.
For example, Alex Krizhevsky, et al. in their famous 2012 paper titled “Imagenet classification with deep convolutional neural networks” that introduced very deep convolutional neural networks for photo classification (i.e. AlexNet) used model averaging across multiple well-performing CNN models to achieve state-of-the-art results at the time. Performance of one model was compared to ensemble predictions averaged over two, five, and seven different models.
Averaging the predictions of five similar CNNs gives an error rate of 16.4%. […] Averaging the predictions of two CNNs that were pre-trained […] with the aforementioned five CNNs gives an error rate of 15.3%.
Ensembling is also the approach used by winners in machine learning competitions.
Another powerful technique for obtaining the best possible results on a task is model ensembling. […] If you look at machine-learning competitions, in particular on Kaggle, you’ll see that the winners use very large ensembles of models that inevitably beat any single model, no matter how good.
— Page 264, Deep Learning With Python, 2017.
How to Ensemble Neural Network Models
Perhaps the oldest and still most commonly used ensembling approach for neural networks is called a “committee of networks.”
A collection of networks with the same configuration and different initial random weights is trained on the same dataset. Each model is then used to make a prediction and the actual prediction is calculated as the average of the predictions.
The number of models in the ensemble is often kept small both because of the computational expense in training models and because of the diminishing returns in performance from adding more ensemble members. Ensembles may be as small as three, five, or 10 trained models.
The field of ensemble learning is well studied and there are many variations on this simple theme.
It can be helpful to think of varying each of the three major elements of the ensemble method; for example:
- Training Data: Vary the choice of data used to train each model in the ensemble.
- Ensemble Models: Vary the choice of the models used in the ensemble.
- Combinations: Vary the choice of the way that outcomes from ensemble members are combined.
Let’s take a closer look at each element in turn.
Varying Training Data
The data used to train each member of the ensemble can be varied.
The simplest approach would be to use k-fold cross-validation to estimate the generalization error of the chosen model configuration. In this procedure, k different models are trained on k different subsets of the training data. These k models can then be saved and used as members of an ensemble.
Another popular approach involves resampling the training dataset with replacement, then training a network using the resampled dataset. The resampling procedure means that the composition of each training dataset is different with the possibility of duplicated examples allowing the model trained on the dataset to have a slightly different expectation of the density of the samples, and in turn different generalization error.
This approach is called bootstrap aggregation, or bagging for short, and was designed for use with unpruned decision trees that have high variance and low bias. Typically a large number of decision trees are used, such as hundreds or thousands, given that they are fast to prepare.
… a natural way to reduce the variance and hence increase the prediction accuracy of a statistical learning method is to take many training sets from the population, build a separate prediction model using each training set, and average the resulting predictions. […] Of course, this is not practical because we generally do not have access to multiple training sets. Instead, we can bootstrap, by taking repeated samples from the (single) training data set.
— Pages 216-317, An Introduction to Statistical Learning with Applications in R, 2013.
An equivalent approach might be to use a smaller subset of the training dataset without regularization to allow faster training and some overfitting.
The desire for slightly under-optimized models applies to the selection of ensemble members more generally.
… the members of the committee should not individually be chosen to have optimal trade-off between bias and variance, but should have relatively smaller bias, since the extra variance can be removed by averaging.
— Page 366, Neural Networks for Pattern Recognition, 1995.
Other approaches may involve selecting a random subspace of the input space to allocate to each model, such as a subset of the hyper-volume in the input space or a subset of input features.
Varying Models
Training the same under-constrained model on the same data with different initial conditions will result in different models given the difficulty of the problem, and the stochastic nature of the learning algorithm.
This is because the optimization problem that the network is trying to solve is so challenging that there are many “good” and “different” solutions to map inputs to outputs.
Most neural network algorithms achieve sub-optimal performance specifically due to the existence of an overwhelming number of sub-optimal local minima. If we take a set of neural networks which have converged to local minima and apply averaging we can construct an improved estimate. One way to understand this fact is to consider that, in general, networks which have fallen into different local minima will perform poorly in different regions of feature space and thus their error terms will not be strongly correlated.
— When networks disagree: Ensemble methods for hybrid neural networks, 1995.
This may result in a reduced variance, but may not dramatically improve generalization error. The errors made by the models may still be too highly correlated because the models all have learned similar mapping functions.
An alternative approach might be to vary the configuration of each ensemble model, such as using networks with different capacity (e.g. number of layers or nodes) or models trained under different conditions (e.g. learning rate or regularization).
The result may be an ensemble of models that have learned a more heterogeneous collection of mapping functions and in turn have a lower correlation in their predictions and prediction errors.
Differences in random initialization, random selection of minibatches, differences in hyperparameters, or different outcomes of non-deterministic implementations of neural networks are often enough to cause different members of the ensemble to make partially independent errors.
— Pages 257-258, Deep Learning, 2016.
Such an ensemble of differently configured models can be achieved through the normal process of developing the network and tuning its hyperparameters. Each model could be saved during this process and a subset of better models chosen to comprise the ensemble.
Slightly inferiorly trained networks are a free by-product of most tuning algorithms; it is desirable to use such extra copies even when their performance is significantly worse than the best performance found. Better performance yet can be achieved through careful planning for an ensemble classification by using the best available parameters and training different copies on different subsets of the available database.
— Neural Network Ensembles, 1990.
In cases where a single model may take weeks or months to train, another alternative may be to periodically save the best model during the training process, called snapshot or checkpoint models, then select ensemble members among the saved models. This provides the benefits of having multiple models trained on the same data, although collected during a single training run.
Snapshot Ensembling produces an ensemble of accurate and diverse models from a single training process. At the heart of Snapshot Ensembling is an optimization process which visits several local minima before converging to a final solution. We take model snapshots at these various minima, and average their predictions at test time.
— Snapshot Ensembles: Train 1, get M for free, 2017.
A variation on the Snapshot ensemble is to save models from a range of epochs, perhaps identified by reviewing learning curves of model performance on the train and validation datasets during training. Ensembles from such contiguous sequences of models are referred to as horizontal ensembles.
First, networks trained for a relatively stable range of epoch are selected. The predictions of the probability of each label are produced by standard classifiers [over] the selected epoch[s], and then averaged.
— Horizontal and vertical ensemble with deep representation for classification, 2013.
A further enhancement of the snapshot ensemble is to systematically vary the optimization procedure during training to force different solutions (i.e. sets of weights), the best of which can be saved to checkpoints. This might involve injecting an oscillating amount of noise over training epochs or oscillating the learning rate during training epochs. A variation of this approach called Stochastic Gradient Descent with Warm Restarts (SGDR) demonstrated faster learning and state-of-the-art results for standard photo classification tasks.
Our SGDR simulates warm restarts by scheduling the learning rate to achieve competitive results […] roughly two to four times faster. We also achieved new state-of-the-art results with SGDR, mainly by using even wider [models] and ensembles of snapshots from SGDR’s trajectory.
— SGDR: Stochastic Gradient Descent with Warm Restarts, 2016.
A benefit of very deep neural networks is that the intermediate hidden layers provide a learned representation of the low-resolution input data. The hidden layers can output their internal representations directly, and the output from one or more hidden layers from one very deep network can be used as input to a new classification model. This is perhaps most effective when the deep model is trained using an autoencoder model. This type of ensemble is referred to as a vertical ensemble.
This method ensembles a series of classifiers whose inputs are the representation of intermediate layers. A lower error rate is expected because these features seem diverse.
— Horizontal and vertical ensemble with deep representation for classification, 2013.
Varying Combinations
The simplest way to combine the predictions is to calculate the average of the predictions from the ensemble members.
This can be improved slightly by weighting the predictions from each model, where the weights are optimized using a hold-out validation dataset. This provides a weighted average ensemble that is sometimes called model blending.
… we might expect that some members of the committee will typically make better predictions than other members. We would therefore expect to be able to reduce the error still further if we give greater weight to some committee members than to others. Thus, we consider a generalized committee prediction given by a weighted combination of the predictions of the members …
— Page 367, Neural Networks for Pattern Recognition, 1995.
One further step in complexity involves using a new model to learn how to best combine the predictions from each ensemble member.
The model could be a simple linear model (e.g. much like the weighted average), but could be a sophisticated nonlinear method that also considers the specific input sample in addition to the predictions provided by each member. This general approach of learning a new model is called model stacking, or stacked generalization.
Stacked generalization works by deducing the biases of the generalizer(s) with respect to a provided learning set. This deduction proceeds by generalizing in a second space whose inputs are (for example) the guesses of the original generalizers when taught with part of the learning set and trying to guess the rest of it, and whose output is (for example) the correct guess. […] When used with a single generalizer, stacked generalization is a scheme for estimating (and then correcting for) the error of a generalizer which has been trained on a particular learning set and then asked a particular question.
— Stacked generalization, 1992.
There are more sophisticated methods for stacking models, such as boosting where ensemble members are added one at a time in order to correct the mistakes of prior models. The added complexity means this approach is less often used with large neural network models.
Another combination that is a little bit different is to combine the weights of multiple neural networks with the same structure. The weights of multiple networks can be averaged, to hopefully result in a new single model that has better overall performance than any original model. This approach is called model weight averaging.
… suggests it is promising to average these points in weight space, and use a network with these averaged weights, instead of forming an ensemble by averaging the outputs of networks in model space
— Averaging Weights Leads to Wider Optima and Better Generalization, 2018.
Summary of Ensemble Techniques
In summary, we can list some of the more common and interesting ensemble methods for neural networks organized by each element of the method that can be varied, as follows:
- Varying Training Data
- k-fold Cross-Validation Ensemble
- Bootstrap Aggregation (bagging) Ensemble
- Random Training Subset Ensemble
- Varying Models
- Multiple Training Run Ensemble
- Hyperparameter Tuning Ensemble
- Snapshot Ensemble
- Horizontal Epochs Ensemble
- Vertical Representational Ensemble
- Varying Combinations
- Model Averaging Ensemble
- Weighted Average Ensemble
- Stacked Generalization (stacking) Ensemble
- Boosting Ensemble
- Model Weight Averaging Ensemble
There is no single best ensemble method; perhaps experiment with a few approaches or let the constraints of your project guide you.
Further Reading
This section provides more resources on the topic if you are looking to go deeper.
Books
- Section 9.6 Committees of networks, Neural Networks for Pattern Recognition, 1995.
- Section 7.11 Bagging and Other Ensemble Methods, Deep Learning, 2016.
- Section 7.3.3 Model ensembling, Deep Learning With Python, 2017.
- Section 8.2 Bagging, Random Forests, Boosting, An Introduction to Statistical Learning with Applications in R, 2013.
Papers
- Neural Network Ensembles, 1990.
- Neural Network Ensembles, Cross Validation, and Active Learning, 1994.
- When networks disagree: Ensemble methods for hybrid neural networks, 1995.
- Snapshot Ensembles: Train 1, get M for free, 2017.
- SGDR: Stochastic Gradient Descent with Warm Restarts, 2016.
- Horizontal and vertical ensemble with deep representation for classification, 2013.
- Stacked generalization, 1992.
- Averaging Weights Leads to Wider Optima and Better Generalization, 2018.
Articles
- Ensemble learning, Wikipedia.
- Bootstrap aggregating, Wikipedia.
- Boosting (machine learning), Wikipedia.
Summary
In this post, you discovered ensemble methods for deep learning neural networks to reduce variance and improve prediction performance.
Specifically, you learned:
- Neural network models are nonlinear and have a high variance, which can be frustrating when preparing a final model for making predictions.
- Ensemble learning combines the predictions from multiple neural network models to reduce the variance of predictions and reduce generalization error.
- Techniques for ensemble learning can be grouped by the element that is varied, such as training data, the model, and how predictions are combined.
Do you have any questions?
Ask your questions in the comments below and I will do my best to answer.

A modular InnoSetup script to download and install all available .NET Framework versions and much mo
总结
以上是小编为你收集整理的A modular InnoSetup script to download and install all available .NET Framework versions and much mo全部内容。
如果觉得小编网站内容还不错,欢迎将小编网站推荐给好友。
关于Stellar private network setup and wallet app tutorial的介绍已经告一段落,感谢您的耐心阅读,如果想了解更多关于(OK) NCTUns (EstiNet) --- a high-fidelity and extensible network simulator and emulator、(PatchGANs)Pecomputed Real-time Texture Synthesis With Markovian Generative Adversarial Networks、(转) Ensemble Methods for Deep Learning Neural Networks to Reduce Variance and Improve Performance、A modular InnoSetup script to download and install all available .NET Framework versions and much mo的相关信息,请在本站寻找。
本文标签:


