这篇文章主要围绕SpringSecurityOAuth2接受JSON和spring接收json展开,旨在为您提供一份详细的参考资料。我们将全面介绍SpringSecurityOAuth2接受JSON的
这篇文章主要围绕Spring Security OAuth2接受JSON和spring接收json展开,旨在为您提供一份详细的参考资料。我们将全面介绍Spring Security OAuth2接受JSON的优缺点,解答spring接收json的相关问题,同时也会为您带来OAuth 2 开发人员指南(Spring security oauth2)、OAuth2 协议与 Spring Security OAuth2 集成、Oauth2的遇坑一点提示(Spring Security Oauth2 / Cloud)、Spring Cloud :: Security :: OAuth2 - ⓪ OAuth2模型详述的实用方法。
本文目录一览:- Spring Security OAuth2接受JSON(spring接收json)
- OAuth 2 开发人员指南(Spring security oauth2)
- OAuth2 协议与 Spring Security OAuth2 集成
- Oauth2的遇坑一点提示(Spring Security Oauth2 / Cloud)
- Spring Cloud :: Security :: OAuth2 - ⓪ OAuth2模型详述
")
Spring Security OAuth2接受JSON(spring接收json)
我从Spring OAuth2开始。我想将用户名和密码以application / json格式发送到POST正文中的/ oauth / token端点。
curl -X POST -H "Authorization: Basic YWNtZTphY21lc2VjcmV0" -H "Content-Type: application/json" -d ''{"username": "user","password": "password","grant_type": "password"}'' "http://localhost:9999/api/oauth/token"那可能吗?
你能给我个建议吗?
答案1
小编典典解决方案(不确定是否正确,但表明它正在工作):
资源服务器配置:
@Configurationpublic class ServerEndpointsConfiguration extends ResourceServerConfigurerAdapter { @Autowired JsonToUrlEncodedAuthenticationFilter jsonFilter; @Override public void configure(HttpSecurity http) throws Exception { http .addFilterBefore(jsonFilter, ChannelProcessingFilter.class) .csrf().and().httpBasic().disable() .authorizeRequests() .antMatchers("/test").permitAll() .antMatchers("/secured").authenticated(); }}过滤:
@Component@Order(value = Integer.MIN_VALUE)public class JsonToUrlEncodedAuthenticationFilter implements Filter { @Override public void init(FilterConfig filterConfig) throws ServletException { } @Override public void doFilter(ServletRequest request, ServletResponse response, FilterChain chain) throws IOException, ServletException { if (Objects.equals(request.getContentType(), "application/json") && Objects.equals(((RequestFacade) request).getServletPath(), "/oauth/token")) { InputStream is = request.getInputStream(); ByteArrayOutputStream buffer = new ByteArrayOutputStream(); int nRead; byte[] data = new byte[16384]; while ((nRead = is.read(data, 0, data.length)) != -1) { buffer.write(data, 0, nRead); } buffer.flush(); byte[] json = buffer.toByteArray(); HashMap<String, String> result = new ObjectMapper().readValue(json, HashMap.class); HashMap<String, String[]> r = new HashMap<>(); for (String key : result.keySet()) { String[] val = new String[1]; val[0] = result.get(key); r.put(key, val); } String[] val = new String[1]; val[0] = ((RequestFacade) request).getMethod(); r.put("_method", val); HttpServletRequest s = new MyServletRequestWrapper(((HttpServletRequest) request), r); chain.doFilter(s, response); } else { chain.doFilter(request, response); } } @Override public void destroy() { }}请求包装器:
public class MyServletRequestWrapper extends HttpServletRequestWrapper { private final HashMap<String, String[]> params; public MyServletRequestWrapper(HttpServletRequest request, HashMap<String, String[]> params) { super(request); this.params = params; } @Override public String getParameter(String name) { if (this.params.containsKey(name)) { return this.params.get(name)[0]; } return ""; } @Override public Map<String, String[]> getParameterMap() { return this.params; } @Override public Enumeration<String> getParameterNames() { return new Enumerator<>(params.keySet()); } @Override public String[] getParameterValues(String name) { return params.get(name); }}授权服务器配置(对/ oauth / token端点禁用基本身份验证:
@Configurationpublic class AuthorizationServerConfiguration extends AuthorizationServerConfigurerAdapter { ... @Override public void configure(AuthorizationServerSecurityConfigurer oauthServer) throws Exception { oauthServer.allowFormAuthenticationForClients(); // Disable /oauth/token Http Basic Auth } ...}")
OAuth 2 开发人员指南(Spring security oauth2)
OAuth 2 开发人员指南(Spring security oauth2) 博客分类: 架构入门
这是支持 OAuth2.0 的用户指南。对于 OAuth1.0,一切都是不同的,所以看它的用户指南。
本用户指南分为两个部分,第一部分是 OAuth2.0 提供端(OAuth 2.0 Provider),第二部分是 OAuth2.0 的客户端(OAuth 2.0 Client)
OAuth2.0 提供端
OAuth2.0 的提供端的用途是负责将受保护的资源暴露出去。配置包括建立一个可以访问受保护的资源的客户端代表。提供端是通过管理和验证可用于访问受保护的资源的 OAuth 2 令牌来做的。在适当的地方,提供端也必须为用户提供一个用于确认客户端 是否能够访问受保护的资源的接口(也就是一个页面或是一个窗口)。
在 OAuth 2 提供者其实是分成授权服务和资源服务两个角色的,而这两个角色有时是存在于同一个应用程序中的,通过 Spring Security OAuth 你可以有选择的将它们分裂到两个应用程序中,也可以有选择的给授权服务配置多个资源服务。获取令牌(Tokens)的请求是由 Spring MVC 的控制器端点来处理的,访问受保护的资源是通过标准的 Spring Security 请求过滤器来处理的。
下面列举的端点是 Spring Security 过滤器链实现 OAuth 2 授权服务器必须的端点:
-
AuthorizationEndpoint 是用于授权服务请求的。默认的 URL 是:/oauth/authrize。
-
TokenEndpoint 是用于获取访问令牌(Access Tokens)的请求。默认的 URL 是:/oauth/token。
下面过滤器是实现一个 OAuth2 资源服务器所必须的:
-
OAuth2AuthenticationProcessingFilter 这个过滤器是用于加载请求提供的一个授权了的访问令牌是否有效。
对于所有的 OAuth 2.0 的提供端,通过使用 Spring OAuth 专门的 @Configuration 适配器来简化配置。也可以通过 XML 命名空间来配置 OAuth,XML 的 schema 存在:http://www.springframework.org/schema/security/spring-security-oauth2.xsd。命令空间是 http://www.springframework.org/schema/security/oauth2
授权服务器配置
配置授权服务器时,您必须考虑的 grant 类型,从终端用户那,客户端会使用获取到的访问令牌 (如授权代码、用户凭证、刷新令牌)。服务器的配置是用于提供一些实现,像客户端细节服务和令牌服务还有启用或禁用某些方面的全球机制。但是请注意,每个客户端可以专门配置权限能够使用某些授权机制和访问授权。即仅仅因为您的提供者配置为支持 “客户证书” grant 类型,并不意味着一个特定的客户端被授权使用 grant 类型。
@EnableAuthorizationServer 注释用于配置 OAuth 2.0 授权服务器机制,加上任意一个 @Beans 去实现 AuthorizationServerConfigurer (这是一个 hander 适配器实现的空方法)。以下功能委托给由 spring 创造的独立 configurers 而且传递到 AuthorizationServerConfigurer:
-
ClientDetailsServiceConfigurer: 这个 configurer 定义了客户端细节服务。客户详细信息可以被初始化,或者你可以参考现有的商店。
-
AuthorizationServerSecurityConfigurer: 在令牌端点上定义了安全约束。
-
AuthorizationServerEndpointsConfigurer: 定义了授权和令牌端点和令牌服务
提供端配置中重要的一项是提供给 OAuth 客户端的授权码。 OAuth 客户端通过将终端用户导向一个可以输入证书 / 口令的授权验证页面来获取授权码,然后,将授权码传递给提供端授权服务器,服务器验证后重定向页面。 在 OAuth 2 说明文档中有详细的示例。
在 xml 配置文件中,可以使用 <authorization-server/> 节点配置 OAuth 2.0 授权服务器。
配置客户端详细步骤
ClientDetailsServiceConfigurer 类(AuthorizationServerConfigurer 类中的一个调用类)可以用来定义一个基于内存的或者 JDBC 的客户端信息服务。
客户端对象重要的属性有:
-
clientId:(必须)客户端 id。
-
secret:(对于可信任的客户端是必须的)客户端的私密信息。
-
scope:客户端的作用域。如果 scope 未定义或者为空(默认值),则客户端作用域不受限制。
-
authorizedGrantTypes:授权给客户端使用的权限类型。默认值为空。
-
authorities:授权给客户端的权限(Spring 普通的安全权限)。
在运行的应用中,可以通过直接访问隐藏的存储文件(如:JdbcClientDetailsService 中用到的数据库表)或者通过实现 ClientDetailsManager 接口(也可以实现 ClientDetailsService 接口,或者实现两个接口)来更新客户端信息。
管理令牌
AuthorizationServerTokenServices 接口里定义了 OAuth 2.0 令牌的操作方法。 注意以下几点:
-
创建一个访问令牌时,必须保存权限信息,这样后续令牌才可以引用它。
-
访问令牌用于加载创建令牌时的授权信息。
创建 AuthorizationServerTokenServices 接口的实现类时,你可以考虑使用 DefaultTokenServices 类,它使用随机值创建令牌,并处理除永久令牌以外的所有令牌,对于永久令牌,它委托 TokenStore 类进行处理。 令牌默认采用基于内存实现的存储方式,但也有一些其它的存储方式。 下面是其中一些方式的简介:
-
默认的 InMemoryTokenStore 处理类对于单服务器场景非常适用(优点有:低阻塞,宕机时无需热切换到备份服务器)。大部分项目可以在开始时或者在开发模式下使用这种方式,这样比较容易启动一个没有其它依赖的服务器。
-
JdbcTokenStore 类是实现存储令牌的 JDBC 版本,它将令牌信息保存到关系型数据库中。 如果服务器间共享数据库或者同一个服务器有多个实例或者授权服务器、资源服务器有多个组件,那么可以使用 JDBC 方式存储令牌。 使用 JdbcTokenStore 类时,需要将 spring-jdbc 组件 jar 包添加到工程的编译路径中。
-
JSON 网页令牌(JWT)可以加密所有令牌授权访问的数据(因此不需要在后台存储数据,这就是 JWT 一个重要的优点)。 缺点是你不能方便地撤销一个已授权的令牌(因此一般它们被授权的有效期较短,撤销授权的操作在刷新令牌中进行)。 另一个缺点是存储的令牌数据会越来越大因为在令牌里面存储了大量的用户证书信息。 JwtTokenStore 类不是一个真正的存储类,它未持久化(保存)任何数据,但是它在传输令牌信息和授权信息(在 DefaultTokenServices 类中实现)中扮演了同样的角色。 JwtTokenStore(接口)类依赖 JwtAccessTokenConverter 类,授权服务器和资源服务器都需要接口的实现类(因此他们可以安全地使用相同的数据并进行解码)。 令牌以默认方式进行签名,资源服务器为了能够验证这些签名,它需要有与授权服务器相同的对称密钥(服务器共享对称密钥),或者它需要有可以匹配签名私钥的公钥(公有私有密钥或混合密钥)。 为了使用 JwtTokenStore 类,你需要在工程编译路径下添加 spring-security-jwt 组件 jar 包(你可以在 Spring OAuth 的 github 资源库中找到,但是两者的版本号是不一致的)。
Grant 类型
AuthorizationEndpoint 通过 AuthorizationServerEndpointsConfigurer 可以配置支持 Grant 类型。默认情况下支持所有的 grant 类型,除了密码 (有关详细信息,请参阅下面的信息如何开启和关闭)。以下属性影响 grant 类型:
・authenticationManager:密码授予被注入一个 authenticationManager 开启。
・authorizationCodeServices:为了身份验证代码授予定义了授权代码服务 (org.springframework.security.oauth2.provider.code.AuthorizationCodeServices 实例).
・implicitGrantService:在隐式授予管理状态。
・tokenGranter:TokenGranter (完全掌控的授予和忽略上面的其他属性)
在 XML grant 类型包括 authorization-server 的子元素。
配置端点的 URL
AuthorizationServerEndpointsConfigurer 有一个 pathMapping () 方法。该方法有两个参数:
-
defaultPath 默认的端点 URL
-
customPath 自定义的 URL
框架自己提供的 URL 路径是 /oauth/authorize(授权端),/oauth/token (令牌端),/oauth/confirm_access (用户发送确认授权到这里),还有 /oauth/error (用户呈现授权服务器授权出错的请求)。
注意:授权端 /oauth/authorize(或者是它的影射)应该是受 Spring Security 保护的,所以它只能被已授权的用户访问。令牌端默认是通过使用支持使用 HTTP 基本身份验证客户机的秘密的注解 @Configuration,被 Spring Oauth 保护的,但不是使用 XML 文件的(所以在这种情况下它被保护是很明确的)。
使用 XML 的 <authorization-server/> 元素可以使用一些属性来达到改变默认的端点 URL。
自定义错误处理
授权服务器上错误处理使用标准的 Spring MVC 功能,即 @ExceptionHandler 端点本身的方法。用户还可以提供一个 WebResponseExceptionTranslator 端点本身,最好的办法是改变响应的内容而不是他们呈现的方式。异常的呈现代表 HttpMesssageConverters (这个可以添加到 MVC 的配置中) 令牌的端点和 OAuth 的错误视图 (/ OAuth /error) 的授权端点。提供一个 whitelabel 错误端点,但是用户可能需要提供一个自定义的实现 (例如,就添加一个 @Controller,它的请求映射是 @RequestMapping (“/oauth/error”))。
配置资源服务器
资源服务器(可能和授权服务器或者一个单独的应用程序在同一台主机上)提供被 OAuth2 令牌保护的资源。 Spring OAuth 提供一个 Spring Security 授权过滤器,它实现保护资源的功能。在 @Configuration 类中,你可以使用 @EnableResourceServer 来开启 / 关闭过滤器,使用 ResourceServerConfigurer 来配置它。 下面是可配置的属性:
-
tokenServices:定义令牌服务的实体(ResourceServerTokenServices 类的实例)。
-
resourceId:资源 ID(可选的,建议配置,如果不为空,授权服务器会对它进行验证)。
@EnableResourceServer 注解把一个 OAuth2AuthenticationProcessingFilter 类型过滤器添加到 Spring Security 过滤链中。
在 XML 中,有一个 <resource-server/> 元素,它有一个 id 属性 – 这是 servlet 过滤器的 bean id,它过滤哪些可以被添加到 Spring Security 链中。
配置 OAuth-Aware 表达式处理器
你可能想要使用 Spring Security 的使用表达式语言配置访问控制的优点。 表达式处理器在 @EnableResourceServer 配置中以默认方式进行注册。 表达式包括#oauth2.clientHasRole,#oauth2.clientHasAnyRole, 和 #oath2.denyClient,这些可以提供基于 oauth 客户端角色的访问控制(详细列表见 OAuth2SecurityExpressionMethods)。 在 XML 中,你可以在 <http/> 安全配置节点内使用 expression-handler 元素注册一个 oauth-aware 表达式处理器。
OAuth 2.0 客户端
OAuth 2.0 客户端控制着 OAuth 2.0 保护的其它服务器的资源的访问权限。 配置包括建立相关受保护资源与有权限访问资源的用户之间的连接。 客户端也需要实现存储用户的授权代码和访问令牌的功能。
受保护资源的配置
受保护的资源(或称为远程资源)可以使用 OAuth2ProtectedResourceDetails 类型的实体 bean 定义。 一个受保护的资源有以下属性:
-
id:资源 id。它仅在客户端搜索资源的时候使用;在 OAuth 协议中它从未被用到。它也被用作 bean 的 id。
-
clientId:OAuth 客户端 id。OAuth 提供端依赖这个 id 来识别客户端。
-
clientSecret:与资源有关的秘密。默认情况下,该值不为空。
-
accessTokenUri:提供访问口令的 OAuth 提供者终端的统一资源标识符(URI)。
-
scope:以逗号分隔的字符串列表,标识可访问资源的范围。默认情况下,该值为空。
-
clientAuthenticationScheme: 客户端对访问的令牌终端授权时使用的机制。 建议值: "http_basic" 和 "form"。 默认值: "http_basic"。 见 OAuth 2 帮助文档 2.1 节。
不同的授权类型有不同的实现 OAuth2ProtectedResourceDetails (对于 client_credentials 授权类型,使用 ClientCredentialsResource )的方式。对于需要进行用户身份验证的授权类型,还有一个属性:
-
userAuthorizationUri: 用户访问资源需要身份验证时跳转页面的 URI。 注意这个字段不是必填的,它依赖于被支持的 OAuth 2 的配置文件类型。
在 XML 中,可以使用 <resource/> 元素创建一个 OAuth2ProtectedResourceDetails 类型的实体 bean。 它有上面提到的所有的属性。
使用 @EnableOAuth2Client 对 OAuth2.0 的客户端的配置比较简单。主要要做两件事情:
-
创建一个过滤 bean (用 oauth2ClientContextFilter) 来存储当前的请求和上下文。在这种情况下需要在请求期间授权,来管理从重定向的位置和 OAuth 已认证的 url。
-
在请求作用域中创建一个 AccessTokenRequest 类型的 bean。这个类型的 bean 可以在个人用户的冲突中被识别码识别(或隐式的),授权客户端保持授权状态。
这个过滤器需要能够连接到应用(例如,使用 Servlet 初始化程序或者 web.xml 配置文件配置 一个和 DelegatingFilterProxy 相同名称的代理)。
在一个 OAuth2RestTemplate 中 AccessTokenRequest 可以这样使用:
@Autowired
private OAuth2ClientContext oauth2Context;

@Bean
public OAuth2RestTemplate sparklrRestTemplate() {
    return new OAuth2RestTemplate(sparklr(), oauth2Context);
}
OAuth2ClientContext 可以在 Session 的作用域中保持不同用户不同的状态。如果没有这个功能,你需要在你自己的服务强上管理等效的数据结构,映射不用用户进来的请求并且用相互隔离的 OAuth2ClientContext 实例连接各个用户。
在 XML 文件中,有一个带有 id 属性的 <client/> 标签用于表示 servlet 的 Filter 的 bean id,这个必须映射成一个和 DelegatingFilterProxy 有相同名称的 @Configuration 注解。
访问受保护的资源
一旦,你已经提供了所有的资源服务器配置时,现在你可以访问这些资源。建议的访问这些资源是通过使用在 Spring3 中提到的 RestTemplate。Spring Security OAuth 已经提供了一个扩展的 RestTemplate,只需要提供一个 OAuth2ProtectedResourceDetails 的实例。使用它与 user-tokens (授权代码授予) 你应该考虑使用 @EnableOAuth2Client 配置 (或 XML 等价 < oauth:rest-template / >), 造成了一些请求和会话作用域上下文对象,要求不同的用户在运行时不发生冲突。
客户端持久化访问令牌
客户端不需要持久化令牌,但是它可以很好的用户不需要批准一个新的令牌格兰特每次重新启动客户机应用程序。ClientTokenServices 接口定义所需的操作持续 OAuth 2.0 为特定用户令牌。提供一个 JDBC 实现,但是如果你喜欢的话你可以实现自己的服务以存储的访问令牌持久数据库和相关的验证实例。如果你想使用此功能,你需要提供一个专门配置 TokenProvider theOAuth2RestTemplate 如
@Bean@Scope(value = "session", proxyMode = ScopedProxyMode.INTERFACES)public OAuth2RestOperations restTemplate() {
    OAuth2RestTemplate template = new OAuth2RestTemplate(resource(), new DefaultOAuth2ClientContext(accessTokenRequest));
    AccessTokenProviderChain provider = new AccessTokenProviderChain(Arrays.asList(new AuthorizationCodeAccessTokenProvider()));
    provider.setClientTokenServices(clientTokenServices());
    return template;}
为外部 OAuth2 提供者定制客户端
一些外部 OAuth2 提供商 (如 Facebook) 不完全实现正确规范,否则他们只是困在一个旧版本比 Spring Security OAuth 的规范。在您的客户机应用程序使用这些供应商可能需要适应客户端基础设施的各个部分。
使用 Facebook 作为一个例子,有一个 Facebook 功能 tonr2 应用程序 (您需要更改配置添加你自己的,有效的,客户机 id 和秘密,他们很容易生成在 Facebook 网站上)。
Facebook 响应令牌也包含一个不一致的、有失效时间的 JSON 实体 (他们使用到期而不是 expires_in), 所以如果你想在应用程序中使用失效时间你将不得不使用一个自定义 OAuth2SerializationService 手动解码。
本文地址:http://www.oschina.net/translate/oauth-2-developers-guide
原文地址:https://github.com/spring-projects/spring-security-oauth/blob/master/docs/oauth2.md
http://www.open-open.com/lib/view/open1412731740452.html

OAuth2 协议与 Spring Security OAuth2 集成
OAuth 2.0 允许第三方应用程序访问受限的HTTP资源的授权协议,像平常大家使用 Github 、 Google 账号来登陆其他系统时使用的就是 OAuth 2.0 授权框架,下图就是使用 Github 账号登陆 Coding 系统的授权页面图:
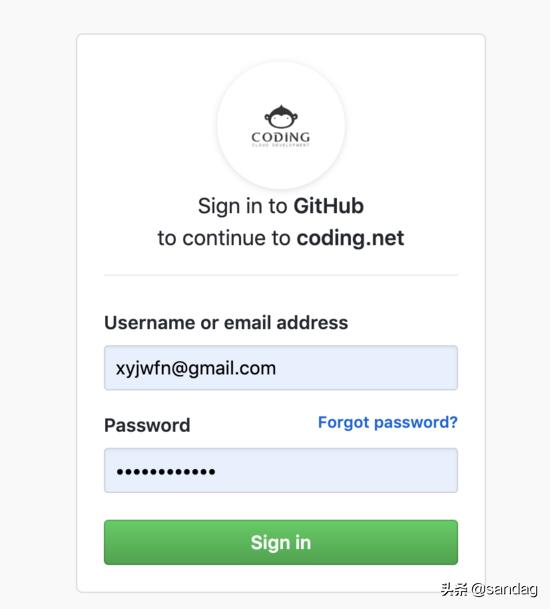
类似使用 OAuth 2.0 授权的还有很多,本文将介绍 OAuth 2.0 相关的概念如:角色、授权类型等知识,以下是我整理一张 OAuth 2.0 授权的脑头,希望对大家了解 OAuth 2.0 授权协议有帮助。

文章将以脑图中的内容展开 OAuth 2.0 协议同时除了 OAuth 2.0 外,还会配合 Spring Security OAuth2 来搭建 OAuth2客户端 ,这也是学习 OAuth 2.0 的目的,直接应用到实际项目中,加深对 OAuth 2.0 和 Spring Security 的理解。
OAuth 2.0 角色
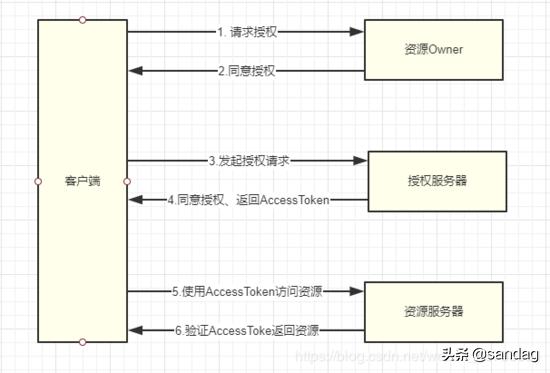
OAuth 2.0 中有四种类型的角色分别为: 资源Owner 、 授权服务 、 客户端 、 资源服务 ,这四个角色负责不同的工作,为了方便理解先给出一张大概的流程图,细节部分后面再分别展开:
OAuth 2.0 大概授权流程
资源 Owner
资源 Owner可以理解为一个用户,如之前提到使用 Github 登陆 Coding 中的例子中,用户使用GitHub账号登陆Coding,Coding就需要知道用户在GitHub系统中的的头像、用户名、email等信息,这些账户信息都是属于用户的这样就不难理解 资源 Owner 了。在Coding请求从GitHub中获取想要的用户信息时也是没那容易的,GitHub为了安全起见,至少要通过用户(资源 Owner)的同意才行。
资源服务器
明白 资源 Owner 后,相信你已经知道什么是 资源服务器 ,在这个例子中用户账号的信息都存放在GitHub的服务器中,所以这里的资源服务器就是GitHub服务器。GitHub服务器负责保存、保护用户的资源,任何其他第三方系统想到使用这些信息的系统都需要经过 资源 Owner 授权,同时依照 OAuth 2.0 授权流程进行交互。
客户端
知道 资源 Owner 和 资源服务器 后,OAuth中的客户端角色也相对容易理解了,简单的说 客户端就是想要获取资源的系统 ,如例子中的使用GitHub登陆Coding时,Coding就是OAuth中的客户端。客户端主要负责发起授权请求、获取AccessToken、获取用户资源。
授权服务器
有了 资源 Owner 、 资源服务器 、 客户端 还不能完成OAuth授权的,还需要有 授权服务器 。在OAuth中授权服务器除了负责与用户(资源 Owner)、客房端(Coding)交互外,还要生成AccessToken、验证AccessToken等功能,它是OAuth授权中的非常重要的一环,在例子中授权服务器就是GitHub的服务器。
小结
OAuth中: 资源Owner 、 授权服务 、 客户端 、 资源服务 有四个角色在使用GitHub登陆Coding的例子中分别表示:
- 资源Owner:GitHub用户
- 授权服务:GitHub服务器
- 客户端:Coding系统
- 资源服务:GitHub服务器
其中授权服务服务器、资源服务器可以单独搭建(鬼知道GitHub怎么搭建的)。在微服务器架构中可单独弄一个授权服务,资源服务服务可以多个如:用户资源、仓库资源等,可根据需求自由分服务。
OAuth2 Endpoint
OAuth2有三个重要的Endpoint其中 授权 Endpoint 、 Token Endpoint 结点在授权服务器中,还有一个可选的 重定向 Endpoint 在客户端中。
授权 Endpoint重定向 Endpoint授权类型
通过四个OAuth角色,应该对OAuth协议有一个大概的认识,不过可能还是一头雾水不知道OAuth中的角色是如何交互的,没关系继续往下看一下 授权类型 就知道OAuth中的角色是如何完成自己的职责,进一步对OAuth的理解。在OAuth中定义了四种 授权类型 ,分别为:
- 授权码授权
- 客房端凭证授权
- 资源Owner的密码授权
- 隐式的授权
不同的 授权类型 可以使用在不同的场景中。
授权码授权
这种形式就是我们常见的授权形式(如使用GitHub账号登陆Coding),在整个授权流程中会有 资源Owner 、 授权服务器 、 客户端 三个OAuth角色参与,之所以叫做 授权码授权 是因为在交互流程中授权服务器会给客房端发放一个 code ,随后客房端拿着授权服务器发放的code继续进行授权如:请求授权服务器发放AccessToken。
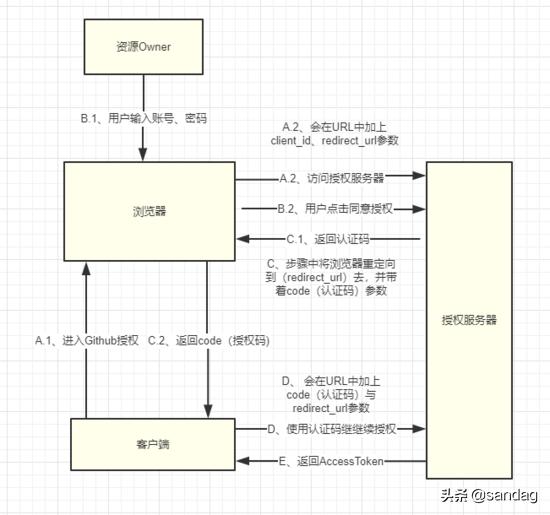
为方便理解再将上图的内容带进真实的场景中,用文字表述一下整个流程:
- A.1、用户访问Coding登陆页( https://coding.net/login ),点击Github登陆按钮;
- A.2、Coding服务器将浏览器重定向到Github的授权页( https://github.com/login/oauth/authorize?client_id=a5ce5a6c7e8c39567ca0&scope=user:email&redirect_uri=https://coding.net/api/oauth/github/callback&response_type=code ),同时URL带上 client_id 和 redirect_uri 参数;
- B.1、用户输入用户名、密码登陆Github;
- B.2、用户点击 授权按钮 ,同意授权;
- C.1、Github授权服务器返回 code ;
- C.2、Github通过将浏览器重定向到 A.2 步骤中传递的 redirect_uri 地址(https://coding.net/api/oauth/github/callback&response_type=code);
- D、Coding拿到code后,调用Github授权服务器API获取AccessToken,由于这一步是在Coding服务器后台做的浏览器中捕获不到,基本就是使用 code 访问github的access_token节点获取AccessToken;
以上是大致的 授权码授权 流程,大部分是客户端与授权服务器的交互,整个过程中有几个参数说明如下:
- client_id:在Github中注册的Appid,用于标记客户端
- redirect_uri:可以理解一个 callback ,授权服务器验证完客户端与用户名等信息后将浏览器重定向到此地址并带上 code 参数
- code:由授权服务器返回的一个凭证,用于获取AccessToken
- state:由客户端传递给授权服务器,授权服务器一般到调用 redirect_uri 时原样返回
授权码授权请求
在使用授权码授权的模式中,作为客户端请求授权的的时候都需要按规范请求,以下是使用授权码授权发起授权时所需要的参数 :

如使用Github登陆Coding例子中的 https://github.com/login/oauth/authorize?client_id=a5ce5a6c7e8c39567ca0&scope=user:email&redirect_uri=https://coding.net/api/oauth/github/callback&response_type=code 授权请求URL,就有 client_id 、 redirect_uri 参数,至于为啥没有 response_type 在下猜想是因为Github给省了吧。
授权码授权响应
如果用户同意授权,那授权服务器也会返回标准的OAuth授权响应:

如Coding登陆中的 https://coding.net/api/oauth/github/callback&response_type=code ,用户同意授权后Github授权服务器回调Coding的回调地址,同时返回 code 、 state 参数。
客户端凭证授权
客房端凭证授权 授权的过程中只会涉及客户端与授权服务器交互,相比较其他三种授权类型是比较简单的。一般这种授权模式是用于服务之间授权,如在AWS中两台服务器分别为应用服务器(A)和数据服务器(B),A 服务器需要访问 B 服务器就需要通过授权服务器授权,然后才能去访问 B 服务器获取数据。

简单二步就可以完成 客房端凭证授权 啦,不过在使用 客房端凭证授权 时客户端是直接访问的授权服务器中获取AccessToken接口。
客户端凭证授权请求
客房端凭证授权中客户端会直接发起获取AccessToken请求授权服务器的 AccessToken Endpoint,请求参数如下:

注意:在OAuth中 AccessToken Endpoint是使用HTTP Basic认证,在请求时还需要携带 Authorization 请求头,如使用 postman 测试请求时:
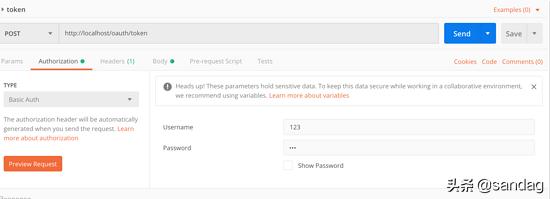
其中的 username 和 password 参数对于OAuth协议中的 client_id 和 client_secret , client_id 和 client_secret 都是由授权服务器生成的。
客户端凭证授权响应
授权服务器验证完 client_id 和 client_secret 后返回token:
{ "access_token":"2YotnFZFEjr1zCsicMWpAA", "token_type":"example", "expires_in":3600, "example_parameter":"example_value" }用户凭证授权
用户凭证授权 与 客户端凭证授权 类似,不同的地方是进行授权时要提供用户名和用户的密码。

基本流程如下:
- A、客户端首先需要知道用户的凭证
- B、使用用户凭证获取AccessToken
- C、授权服务器验证客户端与用户凭证,返回AccessToken
用户凭证授权请求
用户凭证授权请求参数要比客户端凭证授权多 username 和 pwssword 参数:
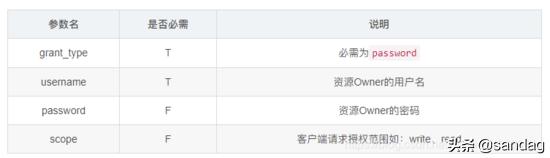
注意: 获取Token时使用HTTP Basic认证,与客户端凭证授权一样。
用户凭证授权响应
用户凭证授权响应与客户端凭证授权差不多:
{ "access_token":"2YotnFZFEjr1zCsicMWpAA", "token_type":"example", "expires_in":3600, "refresh_token":"tGzv3JOkF0XG5Qx2TlKWIA", "example_parameter":"example_value" }隐式授权
隐式授权用于获取AccessToken,但是获取的方式与 用户凭证授权 和 客户端授权 不同的是,它是在访问 授权Endpoint 的时候就会获取AccessToken而不是访问 Token Endpoing ,而且AccessToken的会作为 redirect_uri 的Segment返回。
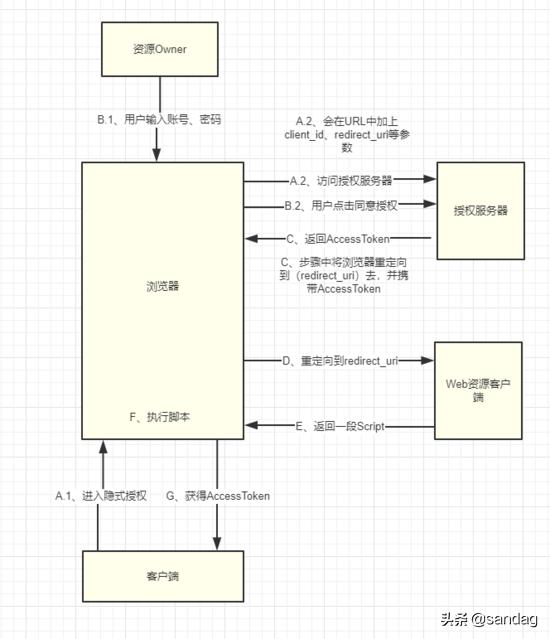
- A.1、A.2、浏览器访问支持隐式授权的服务器的授权Endpoint;
- B.1、用户输入账号密码;
- B.2、用户点击 授权按钮 ,同意授权;
- C、授权服务器使用 redirect_uri 返回AccessToken;
- D、授权服务器将浏览器重定向到 redirect_uri ,并携带AccessToken如: http://example.com/cb#access_token=2YotnFZFEjr1zCsicMWpAA&state=xyz&token_type=example&expires_in=3600 ;
- D、 redirect_uri 的地址是指向一个 Web资源客户端
- E、 Web资源客户端 返回一段脚本
- F、浏览器执行脚本
- D、客户端获得AccessToken
隐式授权不太好理解,但是仔细比较 客户端凭证授权 和 用户凭证授权 会发现 隐式授权 不需要知道 用户凭证 或 客户端凭证 ,这样做相对更安全。
隐式授权请求
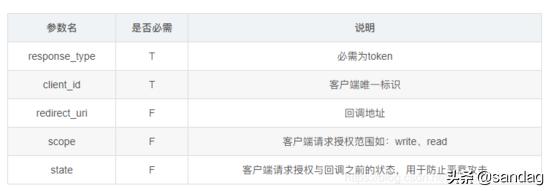
再使用 隐式授权 时,所需要请求参数如下:
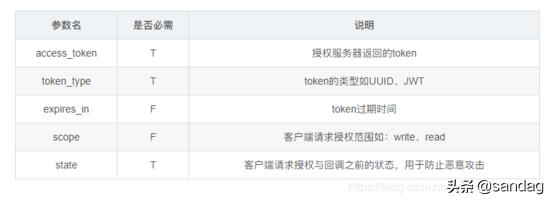
隐式授权响应
隐式授权响应参数是通过 redirect_uri 回调返回的,如 http://example.com/cb#access_token=2YotnFZFEjr1zCsicMWpAA &state=xyz&token_type=example&expires_in=3600 就是隐式授权响应参数,其中需要注意的是响应的参数是使用Segment的形式的,而不是普通的URL参数。
OAuth2 客户端
前面提到过OAuth协议中有四个角色,这一节使用Spring Boot实现一个登陆 GitHub 的 OAuthClient ,要使用OAuth2协议登陆GitHub首先要云GitHub里面申请:
申请 OAuth App
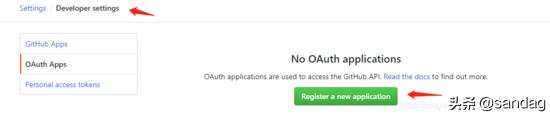
填写必需的信息
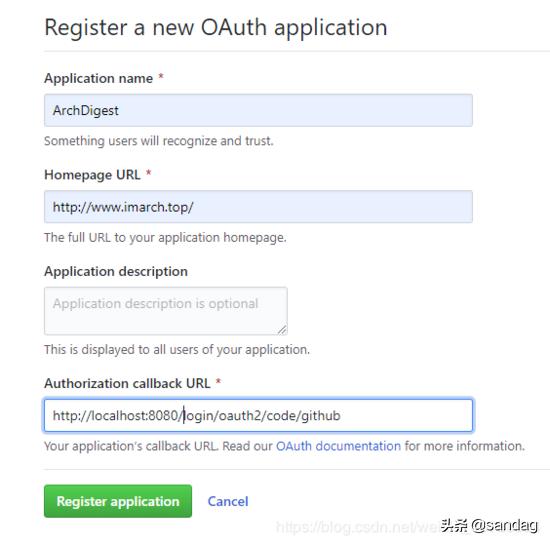
上图中的 Authorization callback URL 就是 redirect_uri 用户同意授权后GitHub会将浏览器重定向到该地址,因此先要在本地的OAuth客户端服务中添加一个接口响应GitHub的重定向请求。
配置OAuthClient
熟悉OAuth2协议后,我们在使用 Spring Security OAuth2 配置一个GitHub授权客户端,使用 认证码 授权流程(可以先去看一遍认证码授权流程图),示例工程依赖:
<dependency> <groupId>org.springframework.boot</groupId> <artifactId>spring-boot-starter-oauth2-client</artifactId> </dependency> <dependency> <groupId>org.springframework.boot</groupId> <artifactId>spring-boot-starter-web</artifactId> </dependency>Spring Security OAuth2 默认集成了Github、Goolge等常用的授权服务器,因为这些常用的授权服务的配置信息都是公开的,Spring Security OAuth2 已经帮我们配置了,开发都只需要指定必需的信息就行如:clientId、clientSecret。
Spring Security OAuth2 使用 Registration 作为客户端的的配置实体:
public static class Registration { //授权服务器提供者名称 private String provider; //客户端id private String clientId; //客户端凭证 private String clientSecret; ....下面是之前注册好的 GitHub OAuth App 的信息:
spring.security.oauth2.client.registration.github.clientId=5fefca2daccf85bede32spring.security.oauth2.client.registration.github.clientSecret=01dde7a7239bd18bd8a83de67f99dde864fb6524``配置redirect_uri
Spring Security OAuth2 内置了一个redirect_uri模板: {baseUrl}/login/oauth2/code/{registrationId} ,其中的 registrationId 是在从配置中提取出来的:
spring.security.oauth2.client.registration.[registrationId].clientId=xxxxx如在上面的GitHub客户端的配置中,因为指定的 registrationId 是 github ,所以重定向uri地址就是:
{baseUrl}/login/oauth2/code/github启动服务器
OAuth2客户端和重定向Uri配置好后,将服务器启动,然后打开浏览器进入: http://localhost:8080/ 。第一次打开因为没有认证会将浏览器重客向到GitHub的 授权Endpoint :

常用授权服务器(CommonOAuth2Provider)
Spring Security OAuth2 内置了一些常用的授权服务器的配置,这些配置都在 CommonOAuth2Provider 中:
public enum CommonOAuth2Provider { GOOGLE { @Override public Builder getBuilder(String registrationId) { ClientRegistration.Builder builder = getBuilder(registrationId, ClientAuthenticationMethod.BASIC, DEFAULT_REDIRECT_URL); builder.scope("openid", "profile", "email"); builder.authorizationUri("https://accounts.google.com/o/oauth2/v2/auth"); builder.tokenUri("https://www.googleapis.com/oauth2/v4/token"); builder.jwkSetUri("https://www.googleapis.com/oauth2/v3/certs"); builder.userInfoUri("https://www.googleapis.com/oauth2/v3/userinfo"); builder.userNameAttributeName(IdTokenClaimNames.SUB); builder.clientName("Google"); return builder; } }, GITHUB { @Override public Builder getBuilder(String registrationId) { ClientRegistration.Builder builder = getBuilder(registrationId, ClientAuthenticationMethod.BASIC, DEFAULT_REDIRECT_URL); builder.scope("read:user"); builder.authorizationUri("https://github.com/login/oauth/authorize"); builder.tokenUri("https://github.com/login/oauth/access_token"); builder.userInfoUri("https://api.github.com/user"); builder.userNameAttributeName("id"); builder.clientName("GitHub"); return builder; } }, FACEBOOK { @Override public Builder getBuilder(String registrationId) { ClientRegistration.Builder builder = getBuilder(registrationId, ClientAuthenticationMethod.POST, DEFAULT_REDIRECT_URL); builder.scope("public_profile", "email"); builder.authorizationUri("https://www.facebook.com/v2.8/dialog/oauth"); builder.tokenUri("https://graph.facebook.com/v2.8/oauth/access_token"); builder.userInfoUri("https://graph.facebook.com/me?fields=id,name,email"); builder.userNameAttributeName("id"); builder.clientName("Facebook"); return builder; } }, OKTA { @Override public Builder getBuilder(String registrationId) { ClientRegistration.Builder builder = getBuilder(registrationId, ClientAuthenticationMethod.BASIC, DEFAULT_REDIRECT_URL); builder.scope("openid", "profile", "email"); builder.userNameAttributeName(IdTokenClaimNames.SUB); builder.clientName("Okta"); return builder; } }; private static final String DEFAULT_REDIRECT_URL = "{baseUrl}/{action}/oauth2/code/{registrationId}";}CommonOAuth2Provider 中有四个授权服务器配置: OKTA 、 FACEBOOK 、 GITHUB 、 GOOGLE 。在OAuth2协议中的配置项 redirect_uri 、 Token Endpoint 、 授权 Endpoint 、 scope 都会在这里配置:
GITHUB { @Override public Builder getBuilder(String registrationId) { ClientRegistration.Builder builder = getBuilder(registrationId, ClientAuthenticationMethod.BASIC, DEFAULT_REDIRECT_URL); builder.scope("read:user"); builder.authorizationUri("https://github.com/login/oauth/authorize"); builder.tokenUri("https://github.com/login/oauth/access_token"); builder.userInfoUri("https://api.github.com/user"); builder.userNameAttributeName("id"); builder.clientName("GitHub"); return builder; } }重定向Uri拦截
脑瓜子有点蒙了,感觉自己就配置了 clientid 和 clientSecret 一个OAuth2客户端就完成了,其中的一些原由还没搞明白啊。。。,最好奇的是重定向Uri是怎么被处理的。
Spring Security OAuth2 是基于 Spring Security 的,之前看过 Spring Security 文章,知道它的处理原理是基于过滤器的,如果你不知道的话推荐看这篇文章: 《Spring Security 架构》 。在源码中找了一下,发现一个可疑的Security 过滤器:
- OAuth2LoginAuthenticationFilter:处理OAuth2授权的过滤器
这个 Security 过滤器有个常量:
public static final String DEFAULT_FILTER_PROCESSES_URI = "/login/oauth2/code/*";是一个匹配器,之前提到过 Spring Security OAuth2 中有一个默认的redirect_uri模板: {baseUrl}/{action}/oauth2/code/{registrationId} , /login/oauth2/code/* 正好能与redirect_uri模板匹配成功,所以 OAuth2LoginAuthenticationFilter 会在用户同意授权后执行,它的构造方法如下:
public OAuth2LoginAuthenticationFilter(ClientRegistrationRepository clientRegistrationRepository, OAuth2AuthorizedClientService authorizedClientService) { this(clientRegistrationRepository, authorizedClientService, DEFAULT_FILTER_PROCESSES_URI);}OAuth2LoginAuthenticationFilter 主要将授权服务器返回的 code 拿出来,然后通过AuthenticationManager 来认证(获取AccessToken),下来是移除部分代码后的源代码:
@Override public Authentication attemptAuthentication(HttpServletRequest request, HttpServletResponse response) throws AuthenticationException { MultiValueMap<String, String> params = OAuth2AuthorizationResponseUtils.toMultiMap(request.getParameterMap()); //检查没code与state if (!OAuth2AuthorizationResponseUtils.isAuthorizationResponse(params)) { OAuth2Error oauth2Error = new OAuth2Error(OAuth2ErrorCodes.INVALID_REQUEST); throw new OAuth2AuthenticationException(oauth2Error, oauth2Error.toString()); } //获取 OAuth2AuthorizationRequest OAuth2AuthorizationRequest authorizationRequest = this.authorizationRequestRepository.removeAuthorizationRequest(request, response); if (authorizationRequest == null) { OAuth2Error oauth2Error = new OAuth2Error(AUTHORIZATION_REQUEST_NOT_FOUND_ERROR_CODE); throw new OAuth2AuthenticationException(oauth2Error, oauth2Error.toString()); } //取出 ClientRegistration String registrationId = authorizationRequest.getAttribute(OAuth2ParameterNames.REGISTRATION_ID); ClientRegistration clientRegistration = this.clientRegistrationRepository.findByRegistrationId(registrationId); if (clientRegistration == null) { OAuth2Error oauth2Error = new OAuth2Error(CLIENT_REGISTRATION_NOT_FOUND_ERROR_CODE, "Client Registration not found with Id: " + registrationId, null); throw new OAuth2AuthenticationException(oauth2Error, oauth2Error.toString()); } String redirectUri = UriComponentsBuilder.fromHttpUrl(UrlUtils.buildFullRequestUrl(request)) .replaceQuery(null) .build() .toUriString(); //认证、获取AccessToken OAuth2AuthorizationResponse authorizationResponse = OAuth2AuthorizationResponseUtils.convert(params, redirectUri); Object authenticationDetails = this.authenticationDetailsSource.buildDetails(request); OAuth2LoginAuthenticationToken authenticationRequest = new OAuth2LoginAuthenticationToken( clientRegistration, new OAuth2AuthorizationExchange(authorizationRequest, authorizationResponse)); authenticationRequest.setDetails(authenticationDetails); OAuth2LoginAuthenticationToken authenticationResult = (OAuth2LoginAuthenticationToken) this.getAuthenticationManager().authenticate(authenticationRequest); ... return oauth2Authentication; }获取AccessToken
前面提到 OAuth2LoginAuthenticationFilter 是使用 AuthenticationManager 来进行OAuth2认证的,一般情况下在 Spring Security 中的 AuthenticationManager 都是使用的 ProviderManager 来进行认证的,所以对应在 Spring Security OAuth2 中有一个 OAuth2LoginAuthenticationProvider 用于获取AccessToken:
public class OAuth2LoginAuthenticationProvider implements AuthenticationProvider { private final OAuth2AccessTokenResponseClient<OAuth2AuthorizationCodeGrantRequest> accessTokenResponseClient; private final OAuth2UserService<OAuth2UserRequest, OAuth2User> userService; private GrantedAuthoritiesMapper authoritiesMapper = (authorities -> authorities); .... @Override public Authentication authenticate(Authentication authentication) throws AuthenticationException { OAuth2LoginAuthenticationToken authorizationCodeAuthentication = (OAuth2LoginAuthenticationToken) authentication; // Section 3.1.2.1 Authentication Request - https://openid.net/specs/openid-connect-core-1_0.html#AuthRequest // scope // REQUIRED. OpenID Connect requests MUST contain the "openid" scope value. if (authorizationCodeAuthentication.getAuthorizationExchange() .getAuthorizationRequest().getScopes().contains("openid")) { // This is an OpenID Connect Authentication Request so return null // and let OidcAuthorizationCodeAuthenticationProvider handle it instead return null; } OAuth2AccessTokenResponse accessTokenResponse; try { OAuth2AuthorizationExchangeValidator.validate( authorizationCodeAuthentication.getAuthorizationExchange()); //访问GitHub TokenEndpoint获取Token accessTokenResponse = this.accessTokenResponseClient.getTokenResponse( new OAuth2AuthorizationCodeGrantRequest( authorizationCodeAuthentication.getClientRegistration(), authorizationCodeAuthentication.getAuthorizationExchange())); } catch (OAuth2AuthorizationException ex) { OAuth2Error oauth2Error = ex.getError(); throw new OAuth2AuthenticationException(oauth2Error, oauth2Error.toString()); } ... return authenticationResult; } @Override public boolean supports(Class<?> authentication) { return OAuth2LoginAuthenticationToken.class.isAssignableFrom(authentication); }}参考资料
- OAuth 2 Developers Guide
- draft-ietf-oauth-v
")
Oauth2的遇坑一点提示(Spring Security Oauth2 / Cloud)
1)使用@EnableOAuth2Sso的网页客户端,登录是成功的可是总是像没成功一样。
提示错误:没有
症结:context-path没设置,或者设置为/(ROOT)
参考资料:https://spring.io/guides/tutorials/spring-boot-oauth2/#_social_login_simple

简单说就是服务器和客户机都在localhost上时,cookie会区分不了。。
2)认证服务器,跳转授权都没问题,但是token就是没法取,不是401就是莫名其妙出先一个登录页面。(旧版没发现,在GreenWich/boot 2.1.4上发现的)
提示错误:WARN- Encoded password does not look like BCrypt
症结:client_secret需要BCrypt加密。(旧版可以不加密)
例如:withClient("client1").secret(passwordEncoder.encode("secret1"))
参考资料:https://github.com/spring-projects/spring-boot/wiki/Spring-Boot-2.0-Migration-Guide
https://docs.spring.io/spring-boot/docs/current-SNAPSHOT/reference/html/spring-boot-features.html#boot-features-security-oauth2
https://docs.spring.io/spring-security-oauth2-boot/docs/current/reference/htmlsingle/
https://blog.csdn.net/m0_37834471/article/details/81162121?utm_source=blogxgwz5

Spring Cloud :: Security :: OAuth2 - ⓪ OAuth2模型详述
本系列文章
Spring Cloud :: Security :: Oauth2 - ⓪ OAuth2模型详述
Spring Cloud :: Security :: Oauth2 - ① 待定
...写在前面
文中很多专有名词在初次使用时我会标注一下中文,但是在后面使用过程中我还是会使用英文来表示,因为所有的标准的出处都是英文,中文的翻译并没有标准,用英文会减少歧义通俗易懂。
_/ _/ _/ _/ _/ _/ _/ _/ _/ _/ _/ _/ _/ _/ _/ _/ _/ _/ _/ _/ _/ _/ _/ _/ _/ _/ _/ _/ _/ _/ _/ _/ _/ _/ _/ _/ _/ _/ _/ _/ _/ _/ _/ _/ _/ _/ _/ _/ _/ _/ _/ _/
背景
最近在做基于Spring Cloud的一系列架构,在认证、权限这一块准备采用OAuth2来做,Spring Cloud本身对于OAuth2的支持很不错,这一块叫做Spring Cloud Security,默认就是使用OAuth2的模型来支持。本文把自己做架构过程中积累的技术以及插图分享出来。
概述
介绍OAuth2模型
本文主要描述OAuth2的模型以及基本运行原理,内容略略抽象,尽最大限度用图来描述,结合后续的基于Spring Cloud的代码和架构图理解会更为便捷。
正文
OAuth2
我们经常所说的OAuth2,顾名思义,就是OAuth模型的第二版。此版本允许第三方应用获取资源访问权限,并且在很多大型互联网企业中进行使用。
基础知识
Roles 角色
OAuth2定义的4个角色
- Resource Owner :资源拥有者,电脑前的你。
- Resource Server :资源服务器,托管受保护的数据的服务器。
- Client :客户端,请求访问资源服务器的应用。可以是网站,可以是javascript脚本,也可以是任何app等。
- Authorization Server :授权服务器,向Client(客户端)发放token(令牌)的服务器,token用于Client请求Resource Server。
佛系图解释一下(来源于RFC6749)https://tools.ietf.org/html/r...
  +--------+                                           +---------------+
  |        |--(A)------- Authorization Grant --------->|               |
  |        |                                           |               |
  |        |<-(B)----------- Access Token -------------|               |
  |        |                                           |               |
  |        |                                           |               |
  |        |                            +----------+   |               |
  |        |--(C)---- Access Token ---->|          |   |               |
  |        |                            |          |   |               |
  |        |<-(D)- Protected Resource --| Resource |   | Authorization |
  | Client |                            |  Server  |   |     Server    |
  |        |                            |          |   |               |
  |        |                            |          |   |               |
  |        |                            |          |   |               |
  |        |                            +----------+   |               |
  |        |                                           |               |
  |        |                                           |               |
  |        |                                           |               |
  |        |                                           |               |
  +--------+                                           +---------------+
- (A):授权
- (B):获得token
- (C):使用token访问Resource Server
- (D):获得受保护的数据
这张图中没有Resource Owner出现,我们姑且认为这个过程都是系统自动的,不需要人的参与。
Token 令牌
Token(令牌)是Authorization Server生成的一段类似于uuid的随机字符串,在Client请求的时候生成并返回。
令牌的类型
- Access Token : 访问令牌。允许第三方应用程序使用并访问用户的数据。此token由Client作为参数或者请求header发送到Resource Server,并且应具有有限的生命周期,过期时限由Authorization Server决定。
- Refresh Token : 刷新令牌。与access token一并生成,但与access token不同的是,它不会在每一个向Resource Server请求数据的时候发送给服务器。仅仅用于服务器过期时发送给服务器来更新access token。
Authorization grant types 授权类型
OAuth2定义了4种授权的类型,具体选用哪一种类型取决于不同的场景以及需求。
Authorization Code Grant 授予授权代码
何时使用
如果Client是Web服务器,那么默认应该使用这种模式,这也是OAuth2默认的方式。这种模式允许Client长期访问Token,并且刷新Token的续订,即使用Refresh Token。
例如:
- Resource Owner : 你
- Resource Server: Google服务器
- Client: Facebook网站
- Authorization Server:Google服务器
场景
- 网站希望获得你的Google个人资料的信息。
- 你将被Client(网站)重定向到Authorization Server(Google)
- 如果你授权访问,Authorization Server会在回调中向Client发送Authorization Code
- 使用Authorization Code向Authorization Server申请Access Token
- Client可以使用Access Token查询Resource Server并获取你的个人资料信息。
佛系架构图 参考(http://goo.gl/hbl1B)
题外话,http://www.websequencediagram... 真的很棒
『 Legend 』:
┏━━━━━━━━━━━━━━━━━━━━━━━━━━━━━━━━━━━━━━━━━━━━━━━━━━━━━━━━━━━━━━━━━━━━━━━━━━━━━━━━━━━━━━━━━━━┓
┃ >=========> : Http POST request.                                                          ┃
┃ <~~~~~~~~~< : Response from server.                                                       ┃
┃ >---------> : Forward or redirect to.                                                     ┃
┗━━━━━━━━━━━━━━━━━━━━━━━━━━━━━━━━━━━━━━━━━━━━━━━━━━━━━━━━━━━━━━━━━━━━━━━━━━━━━━━━━━━━━━━━━━━┛


『 Sequence Diagram 』:


           ┏━━━━━━━━━━━━━━━┓   ┏━━━━━━┓                          ┏━━━━━━━━━━━━━━━━━━━━┓            ┏━━━━━━━━━━━━━━━━┓
           ┃Ressource Owner┃   ┃Client┃                          ┃Authorization Server┃            ┃Resource Server ┃
           ┗━━━━━━━━━━━━━━━┛   ┗━━━━━━┛                          ┗━━━━━━━━━━━━━━━━━━━━┛            ┗━━━━━━━━━━━━━━━━┛
                   ┃               ┃                                        ┃                               ┃
                   ┃               ┃ Authorization Code Request            ┏━┓                              ┃
                   ┃               ┃ >===================================> ┃ ┃                              ┃
                   ┃               ┃                +----------------------------------+                    ┃
                   ┃               ┃                | Needs client_id,redirect_uri,    |                    ┃
                   ┃                                | reponse_type=code[,scope,state]  |                    ┃
                   ┃   Login & Consent              +----------------------------------+                    ┃
                   ┃ >===================================================> ┃ ┃                              ┃
                   ┃               ┃                                       ┃ ┃                              ┃
                   ┃               ┃  Authorization Code Reponse           ┃ ┃                              ┃
                   ┃               ┃ <~~~~~~~~~~~~~~~~~~~~~~~~~~~~~~~~~~~< ┃ ┃                              ┃
                   ┃               ┃                                       ┃ ┃                              ┃
                   ┃               ┃                                       ┗━┛                              ┃
                   ┃               ┃                                        ┃                               ┃
                   ┃               ┃                                       ┏━┓                              ┃
                   ┃               ┃  Exchange Code For Access Token       ┃ ┃                              ┃
                   ┃               ┃ >===================================> ┃ ┃                              ┃
                   ┃               ┃         +--------------------------------------------+                 ┃
                   ┃               ┃         | Needs client_id,client_secret,redirect_uri |                 ┃
                   ┃               ┃         | grant_type=authorization_code,code         |                 ┃
                   ┃               ┃         +--------------------------------------------+                 ┃
                   ┃               ┃   Access Token [+ Refresh Token]      ┃ ┃                              ┃
                   ┃               ┃  <~~~~~~~~~~~~~~~~~~~~~~~~~~~~~~~~~~< ┗━┛                              ┃
                   ┃               ┃                                        ┃                               ┃
                   ┃               ┃                                        ┃                               ┃
    ┏━━━━┳━━━━━━━━━━━━━━━━━━━━━━━━━━━━━━━━━━━━━━━━━━━━━━━━━━━━━━━━━━━━━━━━━━━━━━━━━━━━━━━━━━━━━━━━━━━━━━━━━━━━━━━━━┓
    ┃loop┃         ┃               ┃                                        ┃                               ┃      ┃
    ┣━━━━╋         ┃               ┃                                        ┃                               ┃      ┃
    ┃              ┃               ┃  Call API with Access Token            ┃                              ┏━┓     ┃
    ┃              ┃               ┃ >===================================================================> ┃ ┃     ┃
    ┃              ┃               ┃                                        ┃                              ┃ ┃     ┃
    ┃              ┃               ┃                                        ┃       Reponse with Data      ┃ ┃     ┃
    ┃              ┃               ┃ <~~~~~~~~~~~~~~~~~~~~~~~~~~~~~~~~~~~~~~~~~~~~~~~~~~~~~~~~~~~~~~~~~~~< ┃ ┃     ┃
    ┃              ┃               ┃                                        ┃                              ┗━┛     ┃
    ┃              ┃               ┃                                        ┃                               ┃      ┃
    ┃              ┃               ┃                                        ┃                               ┃      ┃
    ┗━━━━━━━━━━━━━━━━━━━━━━━━━━━━━━━━━━━━━━━━━━━━━━━━━━━━━━━━━━━━━━━━━━━━━━━━━━━━━━━━━━━━━━━━━━━━━━━━━━━━━━━━━━━━━━┛
                   ┃               ┃                                        ┃                               ┃
                   ┃               ┃                                        ┃                               ┃
           ┏━━━━━━━━━━━━━━━┓   ┏━━━━━━┓                          ┏━━━━━━━━━━━━━━━━━━━━┓            ┏━━━━━━━━━━━━━━━━┓
           ┃Ressource Owner┃   ┃Client┃                          ┃Authorization Server┃            ┃Resource Server ┃
           ┗━━━━━━━━━━━━━━━┛   ┗━━━━━━┛                          ┗━━━━━━━━━━━━━━━━━━━━┛            ┗━━━━━━━━━━━━━━━━┛
Implicit Grant 隐性授权
何时使用
与Authorization Code Grant的方式不同的是,Client不是一个Web Server,而是嵌入在浏览器的脚本语言,比如javascript。
例如:
- Resource Owner: 你
- Resource Server: Google服务器
- Client: 使用Jquery或Angular js的客户端
- Authorization Server: Google服务器
场景:
- Client的js端希望获得Google的个人资料信息
- 你会被重定向到Google的Authorization Server
- 如果你授权使用自己的Google个人信息资料给Client,则Authorization Server会把Access Token异步回调给js的Client
- Client可以使用Access Token查询Resource Server并获取你的个人资料信息(通过js的异步调用)。
佛系架构图
『 Legend 』:
┏━━━━━━━━━━━━━━━━━━━━━━━━━━━━━━━━━━━━━━━━━━━━━━━━━━━━━━━━━━━━━━━━━━━━━━━━━━━━━━━━━━━━━━━━━━━┓
┃ >=========> : Http POST request.                                                          ┃
┃ <~~~~~~~~~< : Response from server.                                                       ┃
┃ >---------> : Forward or redirect to.                                                     ┃
┗━━━━━━━━━━━━━━━━━━━━━━━━━━━━━━━━━━━━━━━━━━━━━━━━━━━━━━━━━━━━━━━━━━━━━━━━━━━━━━━━━━━━━━━━━━━┛


『 Sequence Diagram 』:


           ┏━━━━━━━━━━━━━━━┓ ┏━━━━━━━━━━━━━━━━━━━━━━┓             ┏━━━━━━━━━━━━━━━━━━━━┓            ┏━━━━━━━━━━━━━━━━┓
           ┃Ressource Owner┃ ┃Client(Javascript App)┃             ┃Authorization Server┃            ┃Resource Server ┃
           ┗━━━━━━━━━━━━━━━┛ ┗━━━━━━━━━━━━━━━━━━━━━━┛             ┗━━━━━━━━━━━━━━━━━━━━┛            ┗━━━━━━━━━━━━━━━━┛
                   ┃               ┃                                        ┃                               ┃
                   ┃               ┃ Authorization Token Request           ┏━┓                              ┃
                   ┃               ┃ >===================================> ┃ ┃                              ┃
                   ┃               ┃                +----------------------------------+                    ┃
                   ┃               ┃                | Needs client_id,redirect_uri,    |                    ┃
                   ┃                                | reponse_type=token[,scope,state] |                    ┃
                   ┃   Login & Consent              +----------------------------------+                    ┃
                   ┃ >===================================================> ┃ ┃                              ┃
                   ┃               ┃                                       ┃ ┃                              ┃
                   ┃               ┃                       Access Token    ┃ ┃                              ┃
                   ┃               ┃ <~~~~~~~~~~~~~~~~~~~~~~~~~~~~~~~~~~~< ┃ ┃                              ┃
                   ┃               ┃                                       ┃ ┃                              ┃
                   ┃               ┃                                       ┗━┛                              ┃
                   ┃               ┃                                        ┃                               ┃
                   ┃               ┃                                       ┏━┓                              ┃
                   ┃               ┃  Access Token Info Request            ┃ ┃                              ┃
                   ┃               ┃ >===================================> ┃ ┃                              ┃
                   ┃               ┃                                       ┃ ┃                              ┃
                   ┃               ┃                Access Token Info      ┃ ┃                              ┃
                   ┃               ┃ <~~~~~~~~~~~~~~~~~~~~~~~~~~~~~~~~~~~< ┗━┛                              ┃
                   ┃               ┃                                        ┃                               ┃
                   ┃               ┃                                        ┃                               ┃
    ┏━━━━┳━━━━━━━━━━━━━━━━━━━━━━━━━━━━━━━━━━━━━━━━━━━━━━━━━━━━━━━━━━━━━━━━━━━━━━━━━━━━━━━━━━━━━━━━━━━━━━━━━━━━━━━━━┓
    ┃loop┃         ┃               ┃                                        ┃                               ┃      ┃
    ┣━━━━╋         ┃               ┃                                        ┃                               ┃      ┃
    ┃              ┃               ┃  Call API with Access Token            ┃                              ┏━┓     ┃
    ┃              ┃               ┃ >===================================================================> ┃ ┃     ┃
    ┃              ┃               ┃                                        ┃                              ┃ ┃     ┃
    ┃              ┃               ┃                                        ┃      +-----------------------------+ ┃
    ┃              ┃               ┃                                        ┃      | Implement CORS For Cross    | ┃
    ┃              ┃               ┃                                        ┃      | Domain Requests             | ┃
    ┃              ┃               ┃                                        ┃      +-----------------------------+ ┃
    ┃              ┃               ┃                                        ┃                              ┃ ┃     ┃
    ┃              ┃               ┃                                        ┃       Reponse with Data      ┃ ┃     ┃
    ┃              ┃               ┃ <~~~~~~~~~~~~~~~~~~~~~~~~~~~~~~~~~~~~~~~~~~~~~~~~~~~~~~~~~~~~~~~~~~~< ┃ ┃     ┃
    ┃              ┃               ┃                                        ┃                              ┗━┛     ┃
    ┃              ┃               ┃                                        ┃                               ┃      ┃
    ┃              ┃               ┃                                        ┃                               ┃      ┃
    ┗━━━━━━━━━━━━━━━━━━━━━━━━━━━━━━━━━━━━━━━━━━━━━━━━━━━━━━━━━━━━━━━━━━━━━━━━━━━━━━━━━━━━━━━━━━━━━━━━━━━━━━━━━━━━━━┛
                   ┃               ┃                                        ┃                               ┃
                   ┃               ┃                                        ┃                               ┃
           ┏━━━━━━━━━━━━━━━┓   ┏━━━━━━━━━━━━━━━━━━━━━━┓          ┏━━━━━━━━━━━━━━━━━━━━┓            ┏━━━━━━━━━━━━━━━━┓
           ┃Ressource Owner┃   ┃Client(Javascript App)┃          ┃Authorization Server┃            ┃Resource Server ┃
           ┗━━━━━━━━━━━━━━━┛   ┗━━━━━━━━━━━━━━━━━━━━━━┛          ┗━━━━━━━━━━━━━━━━━━━━┛            ┗━━━━━━━━━━━━━━━━┛
Resource Owner Password Credentials 授予资源拥有者密码凭证
何时使用
利用这种方式,你的凭证,一般来讲就是密码,会先发送给Client,然后通过Client发送给Authorization Server。通过这种方式可以看出,Client与Authorization Server之间应该有着绝对的信任,一般情况下,Client与Authorization Server是同等权限体系的,换句话说,应该是client.example.com与auth.example.com相同网站的不同resource级别的关系,由于用户的密码都是属于example.com体系下的,所以在client.example.com或者任何xxx.example.com中输入密码,去resource.example.com获取数据都是可以接受的。
例如:
- Resource Owner: 你
- Resource Server:resource.example.com服务器
- Client: new.example.com的服务器,需要调用自己网站的认证系统
- Authorization Server: auth.example.com服务器
场景:
- example公司开发了新的new.example.com的子系统
- 调用自己公司的auth.example.com认证
- 认证成功后从Authorization Server获取Access Token
- 利用Access Token去调用自己的resource.example.com的api获取相应数据
佛系架构图
『 Legend 』:
┏━━━━━━━━━━━━━━━━━━━━━━━━━━━━━━━━━━━━━━━━━━━━━━━━━━━━━━━━━━━━━━━━━━━━━━━━━━━━━━━━━━━━━━━━━━━┓
┃ >=========> : Http POST request.                                                          ┃
┃ <~~~~~~~~~< : Response from server.                                                       ┃
┃ >---------> : Forward or redirect to.                                                     ┃
┗━━━━━━━━━━━━━━━━━━━━━━━━━━━━━━━━━━━━━━━━━━━━━━━━━━━━━━━━━━━━━━━━━━━━━━━━━━━━━━━━━━━━━━━━━━━┛


『 Sequence Diagram 』:


           ┏━━━━━━━━━━━━━━━┓      ┏━━━━━━━┓                          ┏━━━━━━━━━━━━━━━━━━━━┓            ┏━━━━━━━━━━━━━━━━┓
           ┃Ressource Owner┃      ┃Client ┃                          ┃Authorization Server┃            ┃Resource Server ┃
           ┗━━━━━━━━━━━━━━━┛      ┗━━━━━━━┛                          ┗━━━━━━━━━━━━━━━━━━━━┛            ┗━━━━━━━━━━━━━━━━┛
                   ┃ Authorization    ┃                                        ┃                               ┃
                   ┃>================>┃                                        ┃                               ┃
                   ┃ with Credentials ┃                                        ┃                               ┃
                   ┃                  ┃ Access Token Request                  ┏━┓                              ┃
                   ┃                  ┃ >===================================> ┃ ┃                              ┃
                   ┃                  ┃                +-------------------------------------+                 ┃
                   ┃                  ┃                | Needs client_id,redirect_uri,       |                 ┃
                   ┃                                   | reponse_type=password[,scope,state] |                 ┃
                   ┃   Login & Consent                 +-------------------------------------+                 ┃
                   ┃ >======================================================> ┃ ┃                              ┃
                   ┃                  ┃                                       ┃ ┃                              ┃
                   ┃                  ┃                       Access Token    ┃ ┃                              ┃
                   ┃                  ┃ <~~~~~~~~~~~~~~~~~~~~~~~~~~~~~~~~~~~< ┃ ┃                              ┃
                   ┃                  ┃                                       ┃ ┃                              ┃
                   ┃                  ┃                                       ┗━┛                              ┃
                   ┃                  ┃                                        ┃                               ┃
                   ┃                  ┃                                       ┏━┓                              ┃
                   ┃                  ┃  Access Token Info Request            ┃ ┃                              ┃
                   ┃                  ┃ >===================================> ┃ ┃                              ┃
                   ┃                  ┃                                       ┃ ┃                              ┃
                   ┃                  ┃                Access Token Info      ┃ ┃                              ┃
                   ┃                  ┃ <~~~~~~~~~~~~~~~~~~~~~~~~~~~~~~~~~~~< ┗━┛                              ┃
                   ┃                  ┃                                        ┃                               ┃
                   ┃                  ┃                                        ┃                               ┃
    ┏━━━━┳━━━━━━━━━━━━━━━━━━━━━━━━━━━━━━━━━━━━━━━━━━━━━━━━━━━━━━━━━━━━━━━━━━━━━━━━━━━━━━━━━━━━━━━━━━━━━━━━━━━━━━━━━┓
    ┃loop┃         ┃                  ┃                                        ┃                               ┃   ┃
    ┣━━━━╋         ┃                  ┃                                        ┃                               ┃   ┃
    ┃              ┃                  ┃  Call API with Access Token            ┃                              ┏━┓  ┃
    ┃              ┃                  ┃ >===================================================================> ┃ ┃  ┃
    ┃              ┃                  ┃                                        ┃                              ┃ ┃  ┃
    ┃              ┃                  ┃                                        ┃                              ┃ ┃  ┃
    ┃              ┃                  ┃                                        ┃       Reponse with Data      ┃ ┃  ┃
    ┃              ┃                  ┃ <~~~~~~~~~~~~~~~~~~~~~~~~~~~~~~~~~~~~~~~~~~~~~~~~~~~~~~~~~~~~~~~~~~~< ┃ ┃  ┃
    ┃              ┃                  ┃                                        ┃                              ┗━┛  ┃
    ┃              ┃                  ┃                                        ┃                               ┃   ┃
    ┃              ┃                  ┃                                        ┃                               ┃   ┃
    ┗━━━━━━━━━━━━━━━━━━━━━━━━━━━━━━━━━━━━━━━━━━━━━━━━━━━━━━━━━━━━━━━━━━━━━━━━━━━━━━━━━━━━━━━━━━━━━━━━━━━━━━━━━━━━━━┛
                   ┃                  ┃                                        ┃                               ┃
           ┏━━━━━━━━━━━━━━━┓      ┏━━━━━━━┓                          ┏━━━━━━━━━━━━━━━━━━━━┓            ┏━━━━━━━━━━━━━━━━┓
           ┃Ressource Owner┃      ┃Client ┃                          ┃Authorization Server┃            ┃Resource Server ┃
           ┗━━━━━━━━━━━━━━━┛      ┗━━━━━━━┛                          ┗━━━━━━━━━━━━━━━━━━━━┛            ┗━━━━━━━━━━━━━━━━┛
Client Credentials Grant 授权客户凭证
何时使用
当Client自身是Resource Owner的场合,这时只需要认证client_id即可,本身不产生其他的授权认证。
例如:
- Resource Owner: 任何一家网站
- Resource Server:Google服务器
- Client: =Resource Owner
- Authorization Server: Google服务器
场景:
- 网站A保存自己的所有files在Google的云存储服务器
- 网站A需要通过Google Api进行files的操作,操作前必须在Authorization Server中认证
- 一旦认证成功,网站A获取Access Token来访问Google的Resource Server
- Authorization Server不会授权其他的权限给Resource Owner
佛系架构图
『 Legend 』:
┏━━━━━━━━━━━━━━━━━━━━━━━━━━━━━━━━━━━━━━━━━━━━━━━━━━━━━━━━━━━━━━━━━━━━━━━━━━━━━━━━━━━━━━━━━━━┓
┃ >=========> : Http POST request.                                                          ┃
┃ <~~~~~~~~~< : Response from server.                                                       ┃
┃ >---------> : Forward or redirect to.                                                     ┃
┗━━━━━━━━━━━━━━━━━━━━━━━━━━━━━━━━━━━━━━━━━━━━━━━━━━━━━━━━━━━━━━━━━━━━━━━━━━━━━━━━━━━━━━━━━━━┛


『 Sequence Diagram 』:


       ┏━━━━━━━━━━━━━━━━━━━━━━┓                                      ┏━━━━━━━━━━━━━━━━━━━━┓            ┏━━━━━━━━━━━━━━━━┓
       ┃Client(Resource Owner)┃                                      ┃Authorization Server┃            ┃Resource Server ┃
       ┗━━━━━━━━━━━━━━━━━━━━━━┛                                      ┗━━━━━━━━━━━━━━━━━━━━┛            ┗━━━━━━━━━━━━━━━━┛
                   ┃                                                           ┃                               ┃
                   ┃                                                           ┃                               ┃
                   ┃                                                           ┃                               ┃
                   ┃  Access Token Request                                    ┏━┓                              ┃
                   ┃>=======================================================> ┃ ┃                              ┃
                   ┃                                   +-----------------------------------------------+       ┃
                   ┃                                   | Needs client_id,redirect_uri,                 |       ┃
                   ┃                                   | reponse_type=client_credentials[,scope,state] |       ┃
                   ┃                                   +-----------------------------------------------+       ┃
                   ┃                                                          ┃ ┃                              ┃
                   ┃                                                          ┃ ┃                              ┃
                   ┃                                                          ┃ ┃                              ┃
                   ┃  Access Token                                            ┃ ┃                              ┃
                   ┃<~~~~~~~~~~~~~~~~~~~~~~~~~~~~~~~~~~~~~~~~~~~~~~~~~~~~~~~< ┃ ┃                              ┃
                   ┃                                                          ┗━┛                              ┃
                   ┃                                                           ┃                               ┃
                   ┃                                                           ┃                               ┃
                   ┃                                                           ┃                               ┃
    ┏━━━━┳━━━━━━━━━━━━━━━━━━━━━━━━━━━━━━━━━━━━━━━━━━━━━━━━━━━━━━━━━━━━━━━━━━━━━━━━━━━━━━━━━━━━━━━━━━━━━━━━━━━━━━━━━┓
    ┃loop┃         ┃                                                           ┃                               ┃   ┃
    ┣━━━━╋         ┃                                                           ┃                               ┃   ┃
    ┃              ┃    Call API with Access Token                             ┃                              ┏━┓  ┃
    ┃              ┃ >=====================================================================================>  ┃ ┃  ┃
    ┃              ┃                                                           ┃                              ┃ ┃  ┃
    ┃              ┃                                                           ┃                              ┃ ┃  ┃
    ┃              ┃                                                           ┃       Reponse with Data      ┃ ┃  ┃
    ┃              ┃ <~~~~~~~~~~~~~~~~~~~~~~~~~~~~~~~~~~~~~~~~~~~~~~~~~~~~~~~~~~~~~~~~~~~~~~~~~~~~~~~~~~~~~<  ┃ ┃  ┃
    ┃              ┃                                                           ┃                              ┗━┛  ┃
    ┃              ┃                                                           ┃                               ┃   ┃
    ┃              ┃                                                           ┃                               ┃   ┃
    ┗━━━━━━━━━━━━━━━━━━━━━━━━━━━━━━━━━━━━━━━━━━━━━━━━━━━━━━━━━━━━━━━━━━━━━━━━━━━━━━━━━━━━━━━━━━━━━━━━━━━━━━━━━━━━━━┛
                   ┃                                                           ┃                               ┃
       ┏━━━━━━━━━━━━━━━━━━━━━━┓                                      ┏━━━━━━━━━━━━━━━━━━━━┓            ┏━━━━━━━━━━━━━━━━┓
       ┃Client(Resource Owner)┃                                      ┃Authorization Server┃            ┃Resource Server ┃
       ┗━━━━━━━━━━━━━━━━━━━━━━┛                                      ┗━━━━━━━━━━━━━━━━━━━━┛            ┗━━━━━━━━━━━━━━━━┛
今天关于Spring Security OAuth2接受JSON和spring接收json的讲解已经结束,谢谢您的阅读,如果想了解更多关于OAuth 2 开发人员指南(Spring security oauth2)、OAuth2 协议与 Spring Security OAuth2 集成、Oauth2的遇坑一点提示(Spring Security Oauth2 / Cloud)、Spring Cloud :: Security :: OAuth2 - ⓪ OAuth2模型详述的相关知识,请在本站搜索。
本文标签:


