对于想了解ubuntu下ngin(accesskey+sessionsticky+fair)编译安装笔记的读者,本文将是一篇不可错过的文章,我们将详细介绍ubuntusingle,并且为您提供关于Ac
对于想了解ubuntu下ngin(accesskey+session sticky+fair)编译安装笔记的读者,本文将是一篇不可错过的文章,我们将详细介绍ubuntu single,并且为您提供关于Access restriction: is not accessible、Access restriction: The constructor SunJCE() is not accessib、Access restriction: The constructor SunJCE() is not accessible、Access restriction: The type XXX is not accessi...的有价值信息。
本文目录一览:- ubuntu下ngin(accesskey+session sticky+fair)编译安装笔记(ubuntu single)
- Access restriction: is not accessible
- Access restriction: The constructor SunJCE() is not accessib
- Access restriction: The constructor SunJCE() is not accessible
- Access restriction: The type XXX is not accessi...
编译安装笔记(ubuntu single)")
ubuntu下ngin(accesskey+session sticky+fair)编译安装笔记(ubuntu single)
ubuntu下nginx(含第三方模块:ngx_http_upstream_fair_module、HttpAccessKeyModule、nginx-upstream-jvm-route)的编译安装。一、下载
nginx: http://nginx.org/en/download.html
ngx_http_upstream_fair_module:http://wiki.nginx.org/HttpUpstreamFairModule
HttpAccessKeyModule: http://wiki.nginx.org/NginxHttpAccessKeyModule
nginx-upstream-jvm-route http://code.google.com/p/nginx-upstream-jvm-route
二、编译安装环境准备
sudo apt-get install build-essential libpcre3-dev libssl-dev libxslt-dev libgd2-xpm-dev libgeoip-dev
三、安装
将nginx及第三方模块tar压缩包解压。
1、进入HttpAccessKeyModule的源码文件夹,修改config文件:
将 "$HTTP_ACCESSKEY_MODULE" 改为 "ngx_http_accesskey_module"
2、进入nginx源码目录,执行:
patch -p0 < /path/to/this/directory/jvm_route.patch
其中/path/to/this/directory/指的是nginx-upstream-jvm-route的源码文件夹绝对路径
3、进入nginx源码目录执行configure:
---------------------------------------------------------
./configure --conf-path=/etc/nginx/nginx.conf \
--error-log-path=/var/log/nginx/error.log \
--pid-path=/var/run/nginx.pid \
--lock-path=/var/lock/nginx.lock \
--http-log-path=/var/log/nginx/access.log \
--http-client-body-temp-path=/var/lib/nginx/body \
--http-proxy-temp-path=/var/lib/nginx/proxy \
--http-fastcgi-temp-path=/var/lib/nginx/fastcgi \
--with-debug \
--with-http_stub_status_module \
--with-http_flv_module \
--with-http_ssl_module \
--with-http_dav_module \
--with-http_gzip_static_module \
--with-mail \
--with-mail_ssl_module \
--with-ipv6 \
--with-http_realip_module \
--with-http_geoip_module \
--with-http_xslt_module \
--with-http_image_filter_module \
--with-sha1=/usr/include/openssl \
--with-md5=/usr/include/openssl \
--add-module=/home/aiks/nginx-install/nginx-accesskey-2.0.3 \
--add-module=/home/aiks/nginx-install/gnosek-nginx-upstream-fair-2131c73 \
--add-module=/home/aiks/nginx-install/nginx_upstream_jvm_route
---------------------------------------------------------
注意--add-module后面的路径为模块源码目录所在位置。
4、编译:
sudo make
5、手工建立目录/var/lib/nginx
6、安装
sudo make install
四、配置
1、站点配置在/etc/nginx下(略)
2、建立shell 脚本 /etc/init.d/nginx
---------------------------------------------
#! /bin/sh


### BEGIN INIT INFO
# Provides:          nginx
# Required-Start:    $all
# Required-Stop:     $all
# Default-Start:     2 3 4 5
# Default-Stop:      0 1 6
# Short-Description: starts the nginx web server
# Description:       starts nginx using start-stop-daemon
### END INIT INFO


PATH=/usr/local/sbin:/usr/local/bin:/sbin:/bin:/usr/sbin:/usr/bin
DAEMON=/usr/local/nginx/sbin/nginx
NAME=nginx
DESC=nginx


test -x $DAEMON || exit 0


# Include nginx defaults if available
if [ -f /etc/default/nginx ] ; then
        . /etc/default/nginx
fi


set -e


case "$1" in
  start)
        echo -n "Starting $DESC: "
        start-stop-daemon --start --quiet --pidfile /var/run/$NAME.pid \
                --exec $DAEMON -- $DAEMON_OPTS
        echo "$NAME."
        ;;
  stop)
        echo -n "Stopping $DESC: "
        start-stop-daemon --stop --quiet --pidfile /var/run/$NAME.pid \
                --exec $DAEMON
        echo "$NAME."
        ;;
  restart|force-reload)
        echo -n "Restarting $DESC: "
        start-stop-daemon --stop --quiet --pidfile \
                /var/run/$NAME.pid --exec $DAEMON
        sleep 1
        start-stop-daemon --start --quiet --pidfile \
                /var/run/$NAME.pid --exec $DAEMON -- $DAEMON_OPTS
        echo "$NAME."
        ;;
  reload)
      echo -n "Reloading $DESC configuration: "
      start-stop-daemon --stop --signal HUP --quiet --pidfile /var/run/$NAME.pid \
          --exec $DAEMON
      echo "$NAME."
      ;;
  *)
        N=/etc/init.d/$NAME
        echo "Usage: $N {start|stop|restart|force-reload}" >&2
        exit 1
        ;;
esac


exit 0
---------------------------------------------
3、并执行命令:
sudo update-rc.d -f nginx defaults
更新 rc 后,即可使用:
sudo /etc/init.d/nginx start
sudo /etc/init.d/nginx stop
sudo /etc/init.d/nginx restart

Access restriction: is not accessible
最近在做关于图片操作的问题,但是发现在eclipse中,对于某些rt.jar里面的方法访问的时候,会出现错误提示: Access restriction: XXXXXXXXX is not accessible due to restriction on required library XXXXX本例的错误信息为 : 程序包com.sun.image.codec.jpeg不存在
一下所引入的包也有可能会发生问题: 例如 import sun.misc.BASE64Decoder; import com.sun.image.codec.jpeg.JPEGCodec;
会发现有一些解决方案:
解决办法一:
1. Open project properties.
2. Select Java Build Path node.
3. Select Libraries tab.
4. Remove JRE System Library 一次
5. 再次 Add Library JRE System Library
解决方案二:
Window-->Preferences-->Java-->Compiler-->Error/Warnings-->Deprecated and Restricted API 改为 warning
其实如果是操作某些非公开的JDK API的话,会出现这些问题,可以使用上述的解决方案,但是建议使用其他的方案代替,例如下例所给出的解决方案,用scaleImage2 代替 scaleImage 不使用受保护的方法
package com.zy.common.util;

import java.awt.Image;
import java.awt.image.BufferedImage;
import java.io.File;
import java.io.FileOutputStream;
import java.io.IOException;

import javax.imageio.ImageIO;

import com.sun.image.codec.jpeg.JPEGCodec;
import com.sun.image.codec.jpeg.JPEGEncodeParam;
import com.sun.image.codec.jpeg.JPEGImageEncoder;


public class ImagesUtil {

	/**
     * 缩略图片
     * @param oldpath 原图片
     * @param newpath 新生成的图片存放地址
     * @param wdith   缩略后的宽
     * @param height  缩略后的高
     */
    public static void scaleImage(String oldpath, String newpath, int wdith, int height) {
    	// 获取老的图片
    	File oldimg = new File(oldpath);
		try {
			BufferedImage bi = ImageIO.read(oldimg);
			Image Itemp = bi.getScaledInstance(wdith, height, BufferedImage.SCALE_SMOOTH);
			BufferedImage thumbnail = new BufferedImage(wdith, height, BufferedImage.TYPE_INT_RGB);
			thumbnail.getGraphics().drawImage(Itemp, 0, 0, null);
			// 缩略后的图片路径
			File newimg = new File(newpath);
			//FileOutputStream out = new FileOutputStream(newimg);
			// 绘图
			//JPEGImageEncoder encoder = JPEGCodec.createJPEGEncoder(out);
			//JPEGEncodeParam param = encoder.getDefaultJPEGEncodeParam(thumbnail);
			//param.setQuality(1.0f, false);
			//encoder.encode(thumbnail);
			//out.close();
			String formatName = newpath.substring(newpath.lastIndexOf(".") + 1);
			ImageIO.write(thumbnail,  formatName , new File(newpath) );
			bi.flush();
			bi = null;
		} catch (IOException e) {
			System.out.println(e.getStackTrace());
		}
    }

    /**
     * 缩略图片
     * @param oldpath 原图片
     * @param newpath 新生成的图片存放地址
     * @param wdith   缩略后的宽
     * @param height  缩略后的高
     */
    public static void scaleImage2(String oldpath, String newpath, int wdith, int height) {
    	// 获取老的图片
    	File oldimg = new File(oldpath);
		try {
			BufferedImage bi = ImageIO.read(oldimg);
			Image Itemp = bi.getScaledInstance(wdith, height, BufferedImage.SCALE_SMOOTH);
			BufferedImage thumbnail = new BufferedImage(wdith, height, BufferedImage.TYPE_INT_RGB);
			thumbnail.getGraphics().drawImage(Itemp, 0, 0, null);
			// 缩略后的图片路径
			File newimg = new File(newpath);
			FileOutputStream out = new FileOutputStream(newimg);
			// 绘图
			JPEGImageEncoder encoder = JPEGCodec.createJPEGEncoder(out);
			JPEGEncodeParam param = encoder.getDefaultJPEGEncodeParam(thumbnail);
			param.setQuality(1.0f, false);
			encoder.encode(thumbnail);
			out.close();
			bi.flush();
			bi = null;
		} catch (IOException e) {
			System.out.println(e.getStackTrace());
		}
    }

}
 is not accessib")
Access restriction: The constructor SunJCE() is not accessib
问题现象: Access restriction: The constructor SunJCE() is not
问题现象:
Access restriction: The constructor SunJCE() is not accessible due to restriction on required library
原因分析:
大致意识是依赖库 SunJCE() 构造函数被限制访问;
解决思路:
方案一:Window -> Preferences -> Java -> Compiler -> Errors/Warnings -> Deprecated and restricted API -> Forbidden reference (access rules) -> Warnings
 未完待续....
 is not accessible")
Access restriction: The constructor SunJCE() is not accessible
Description Resource Path Location Type
Access restriction: The constructor SunJCE() is not accessible due to restriction on required library D:\Program Files (x86)\Java\jdk1.6.0_29\jre\lib\ext\sunjce_provider.jar CCi.java line 22 Java Problem
解决办法:将 Errors/Warnings 中的 Forbidden reference (access rules): 由 Error 修改为 Warning 即可

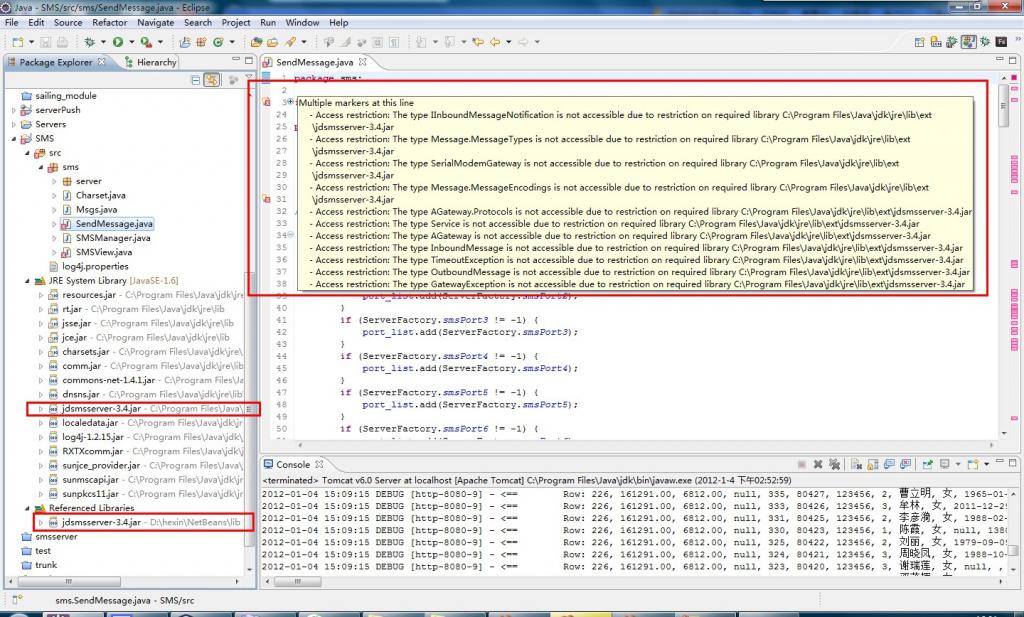
Access restriction: The type XXX is not accessi...
- Access restriction: The type IInboundMessageNotification is not accessible due to restriction on required library C:\Program Files\Java\jdk\jre\lib\ext
\jdsmsserver-3.4.jar
google了一下 下面是解决方法:
Eclipse 默认把这些受访问限制的API设成了ERROR。只要把Windows-Preferences-Java-Complicer- Errors/Warnings里面的Deprecated and restricted API中的Forbidden references(access rules)选为Warning就可以编译通过。
不过这个不好,如果你的jre目录里面有你项目需要引用的jar包 ,而你又引用了外部jar包,也就是说引用了两次,
如果你想让起作用的是手动引用的外部jar包 这个时候需要把 "Referenced Library" 调整到 "JRE System Library"上面
引用的顺序是从上到下
改变顺序前的效果:
build path

最后效果
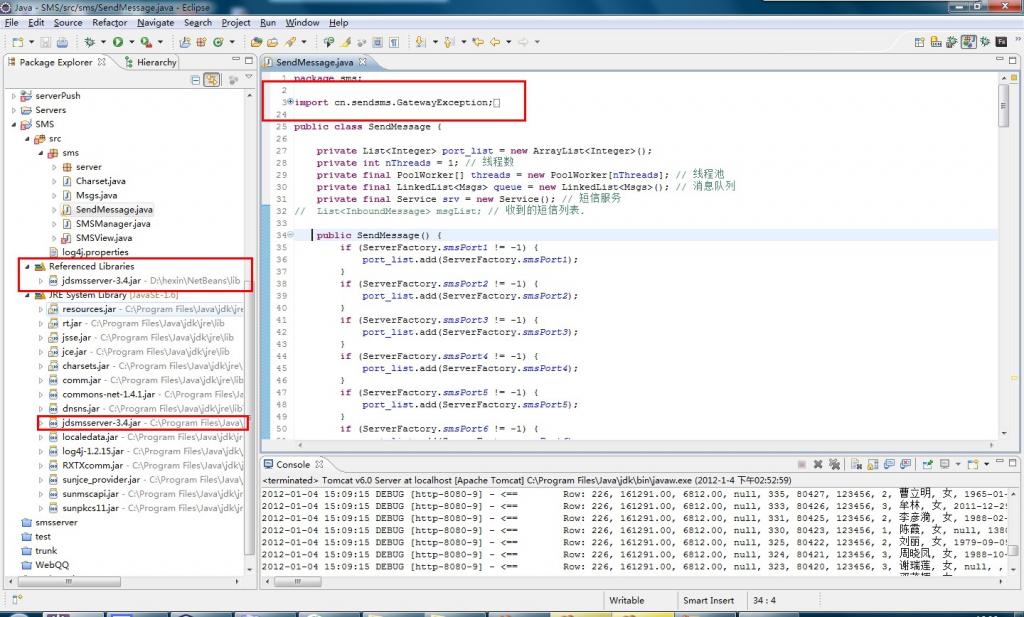
OK 一切正常...
关于ubuntu下ngin(accesskey+session sticky+fair)编译安装笔记和ubuntu single的问题我们已经讲解完毕,感谢您的阅读,如果还想了解更多关于Access restriction: is not accessible、Access restriction: The constructor SunJCE() is not accessib、Access restriction: The constructor SunJCE() is not accessible、Access restriction: The type XXX is not accessi...等相关内容,可以在本站寻找。
本文标签:


