如果您想了解如何将Daemon实施设置为Windows服务的知识,那么本篇文章将是您的不二之选。同时我们将深入剖析.net–为Windows服务设置环境变量、.NET:如何将Windows窗体转换为W
如果您想了解如何将Daemon实施设置为Windows服务的知识,那么本篇文章将是您的不二之选。同时我们将深入剖析.net – 为Windows服务设置环境变量、.NET:如何将Windows窗体转换为Windows控件、Anaconda设置为Windows默认的python解释器pandas报错问题、C# 创建Windows服务demo的各个方面,并给出实际的案例分析,希望能帮助到您!
本文目录一览:- 如何将Daemon实施设置为Windows服务
- .net – 为Windows服务设置环境变量
- .NET:如何将Windows窗体转换为Windows控件
- Anaconda设置为Windows默认的python解释器pandas报错问题
- C# 创建Windows服务demo

如何将Daemon实施设置为Windows服务
我没有找到关于如何注册一个将org.apache.commons.daemon.Daemon接口实现为Windows服务的类的非常好的示例(实际上我没有找到一个示例)。
我是否必须使用procrun注册该实现?但是实现该接口似乎没有意义,因为procrun可以将任何程序注册为Windows服务。
此外,procrun页面(http://commons.apache.org/proper/commons-
daemon/procrun.html)上似乎存在一个docu-bug :
的的描述--StartMethod参数状态:
注意:在jvm模式下,在调用stop方法之前,start方法不应返回。
但是,在“在jvm模式下使用Procrun”部分中的页面下方:
请注意,方法处理服务启动应创建并启动一个单独的线程来执行处理,然后返回。从不同的线程调用start和stop方法。
我读错了还是有点矛盾?静态start(String [] args)方法的正确行为是什么?
最好的祝福
答案1
小编典典记录:
我是否必须使用procrun注册该实现?但是实现该接口似乎没有意义,因为procrun可以将任何程序注册为Windows服务。
是的,该服务需要使用prunsrv在Windows中注册。例如,使用以下调用:
prunsrv.exe //IS//MyTestService ^ --DisplayName="My Test Service" --Description="Doesn''t really do anything" ^ --Install=@@PATH_TO_PRUNSRV@@\prunsrv.exe ^ --Startup=manual ^ --Jvm=auto ^ --Classpath="@@PUT_FULL_CLASSPATH_HERE@@" ^ --StartMode=jvm ^ --StartClass==com.stackoverflow.questions.31556478.ServiceLauncher ^ --StartParams="@@PUT_ANY_START_ARGUMENTS_HERE@@" ^ --StartMethod=start ^ --StopMode=jvm ^ --StopClass=com.stackoverflow.questions.31556478.ServiceLauncher ^ --StopMethod=stop之后,可以通过以下方式启动服务
prunsrv //ES//MyTestSevice静态start(String [] args)方法的正确行为是什么?
测试这两种变体,只有实现可行,并且停留在启动方法中,并且不会产生其他线程。那是一个可以在上面的prunsrv调用中注册的启动器实现,看起来像这样(没有任何保证):
package com.stackoverflow.questions.31556478;import java.util.Arrays;import org.slf4j.Logger;import org.slf4j.LoggerFactory;public class ServiceLauncher{ private static final Logger LOGGER = LoggerFactory.getLogger(ServiceLauncher.class); private static SomeServer mServer; public static void start(final String[] args) { LOGGER.debug("Start called: {}", Arrays.toString(args)); try { mServer = new SomeServer(args); mServer.start(); } catch (final Exception e) { LOGGER.error("Terminating due to Exception: ", e); } } public static void stop(final String[] args) throws Exception { LOGGER.debug("Stop called: {}", Arrays.toString(args)); synchronized (ServiceLauncher.class) { if (mServer != null) { mServer.stop(); } } }}
.net – 为Windows服务设置环境变量
sc serverName start serviceName
当我启动时,我想为该服务设置一个环境变量,类似于你为子进程执行它的方式.我怎么能用Windows服务呢?
为了澄清,我不想设置任何全局环境变量,只为该特定过程设置一个.而且我无权访问实际的服务代码.
解决方法
protected override void OnStart(string[] args)
包含字符串数组中的params.所以开始你的服务
sc serverName start serviceName param1 param2
会做的.

.NET:如何将Windows窗体转换为Windows控件
谢谢

Anaconda设置为Windows默认的python解释器pandas报错问题
我在Win7上想把Anaconda设置为Windows默认的python解释器,但是引用pandas包的时候系统报错
“DLL load failed:”无法启动。后经过搜索stackoverflow找到答案顺利解决,需要把一下路径都加入到path中
C:\Users\<myusername>\AppData\Local\Continuum\Anaconda3\Scripts\
C:\Users\<myusername>\AppData\Local\Continuum\Anaconda3\Library\
C:\Users\<myusername>\AppData\Local\Continuum\Anaconda3\Library\bin\
C:\Users\<myusername>\AppData\Local\Continuum\Anaconda3\Library\mingw-w64\bin\
C# 创建Windows服务demo
一、准备工作
1.操作系统:Windows 10 X64
2.开发环境:VS2017
3.编程语言:C#
4. .NET版本:.NET Framework 4.5
二、创建Windows Service
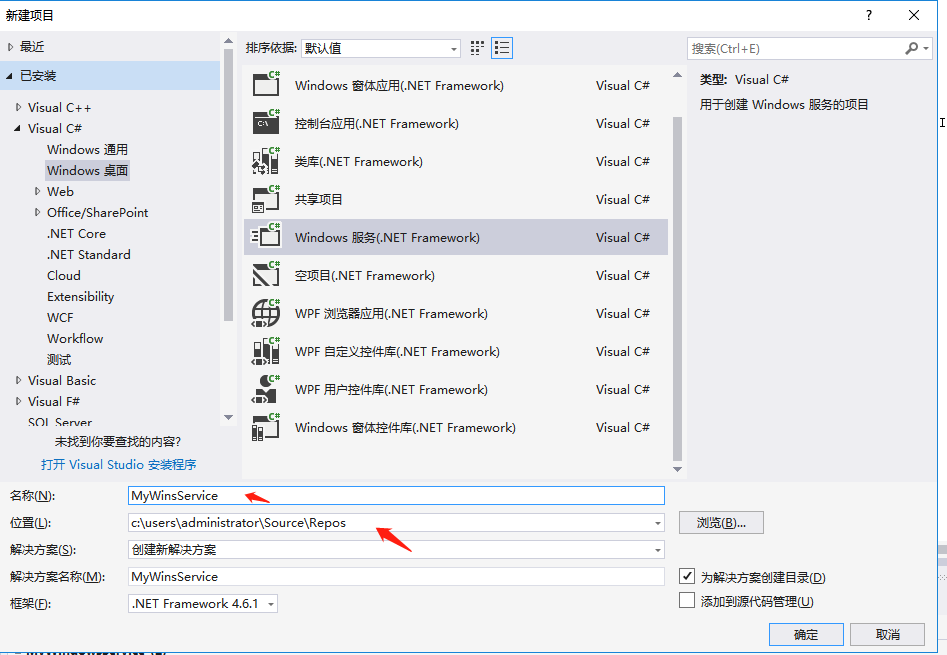
1.新建一个Windows Service,并将项目名称改为“MyWinsService”,程序保存路径自己选一个,如下图所示:
2、在解决方案资源管理器内将Service1.cs改为MyService1.cs后,右键“查看代码”图标按钮进入代码编辑器界面,下面直接贴代码:
string filePath = $"{Application.StartupPath}\\MyserviceLog.txt";
protected override void OnStart(string[] args)
{
using (FileStream stream = new FileStream(filePath, FileMode.Append))
using (StreamWriter writer=new StreamWriter(stream))
{
writer.WriteLine(DateTime.Now +" "+"启动服务!");
}
}
protected override void OnStop()
{
using (FileStream stream = new FileStream(filePath, FileMode.Append))
using (StreamWriter writer = new StreamWriter(stream))
{
writer.WriteLine(DateTime.Now + " " + "停止服务!");
}
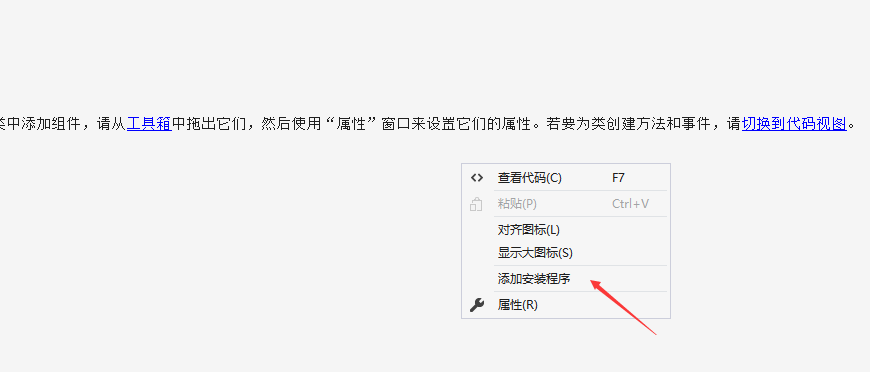
}3.双击项目“MyWindowsService”进入“MyService”设计界面,在空白位置右击鼠标弹出上下文菜单,选中“添加安装程序”,如下图所示:
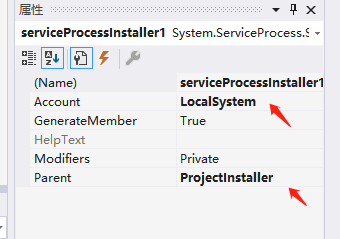
4、进入页面之后就会看到serviceProcessInstaller1和serviceInstaller1;
点击“serviceProcessInstaller1”,在“属性”窗体将Account改为LocalSystem(服务属性系统级别),如下图所示:
5.点击“serviceInstaller1”,在“属性”窗体将ServiceName改为MyService,Description改为我的服务,StartType保持为Manual,如下图所示:

6.鼠标右键点击项目“MyWinsService”,在弹出的上下文菜单中选择“生成”按钮,生成我们自己的windows服务了。
三、创建安装、启动、停止、卸载服务的Windows窗体
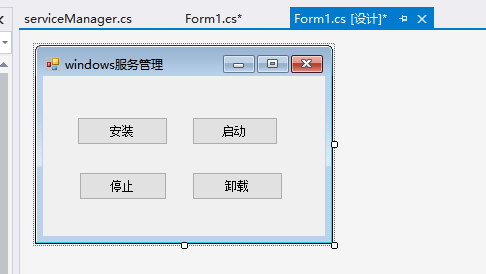
1.我们以winform为例子吧,建一个简单的界面,这里命名为ServiveMan,修改属性text为windows服务管理,拖入四个Button,分别命名为安装、启动、停止、卸载
2.整理了一个Windows服务管理的类,这里我采用的是单例模式,如果有不理解的,我下一篇文章就分享一下单例模式。
/// <summary>
    /// Windows服务管理
    /// </summary>
    public class serviceManager
    {
        private static serviceManager mSingle = null;
     //
        public static serviceManager GetInstance()
        {
            if (mSingle == null)
                mSingle = new serviceManager();
            return mSingle;
        }
    //判断服务是否存在
        private bool IsServiceExisted(string serviceName)
        {
            ServiceController[] services = ServiceController.GetServices();
            foreach (ServiceController sc in services)
            {
                if (sc.ServiceName.ToLower() == serviceName.ToLower())
                {
                    return true;
                }
            }
            return false;
        }

        //安装服务
        private void InstallService(string serviceFilePath)
        {
            using (AssemblyInstaller installer = new AssemblyInstaller())
            {
                installer.UseNewContext = true;
                installer.Path = serviceFilePath;
                IDictionary savedState = new Hashtable();
                installer.Install(savedState);
                installer.Commit(savedState);
            }
        }

        //卸载服务
        private void UninstallService(string serviceFilePath)
        {
            using (AssemblyInstaller installer = new AssemblyInstaller())
            {
                installer.UseNewContext = true;
                installer.Path = serviceFilePath;
                installer.Uninstall(null);
            }
        }
        //启动服务
        private void ServiceStart(string serviceName)
        {
            using (ServiceController control = new ServiceController(serviceName))
            {
                if (control.Status == ServiceControllerStatus.Stopped)
                {
                    control.Start();
                }
            }
        }

        //停止服务
        private void ServiceStop(string serviceName)
        {
            using (ServiceController control = new ServiceController(serviceName))
            {
                if (control.Status == ServiceControllerStatus.Running)
                {
                    control.Stop();
                }
            }
        }
  }
3.接下来贴,windows服务管理类的使用方法,直接看代码,代码上都有注释
public partial class Form1 : Form
    {
        public Form1()
        {
            InitializeComponent();
        }
        string serviceFilePath = $"{Application.StartupPath}\\MyWindowsService.exe";
        string serviceName = "MyService";

        /// <summary>
        /// 事件:安装服务
        /// </summary>
        /// <param name="sender"></param>
        /// <param name="e"></param>
        private void button1_Click(object sender, EventArgs e)
        {
            //判断是否存在服务 - 存在则开启服务
            if (serviceManager.GetInstance().IsServiceExisted(serviceName))
            {
                try
                {
                    serviceManager.GetInstance().ServiceStart(serviceName); //启动服务
                }
                catch (Exception ex)
                {
                    Console.WriteLine(ex.Message);
                }
            }
            serviceManager.GetInstance().InstallService(serviceFilePath);//否则安装服务
        }

        /// <summary>
        /// 事件:启动Windows服务
        /// </summary>
        /// <param name="sender"></param>
        /// <param name="e"></param>
        private void button2_Click(object sender, EventArgs e)
        {
            //启动Windows服务前判断是否存在Windows服务
            if (serviceManager.GetInstance().IsServiceExisted(serviceName))
            {
                try
                {
                    serviceManager.GetInstance().ServiceStart(serviceName);//开启Windows服务
                }
                catch (Exception ex)
                {
                    Console.WriteLine(ex.Message);
                }
            }
            else
            {
                //服务未安装
                DialogResult dr = MessageBox.Show("该服务尚未安装,是否安装服务?", "提示", MessageBoxButtons.OKCancel, MessageBoxIcon.Question);
                if (dr == DialogResult.OK)
                {
                    serviceManager.GetInstance().InstallService(serviceFilePath);//安装服务
                }
                else
                {
                    return;
                }
            }
        }

        /// <summary>
        /// 事件:停止Windows服务
        /// </summary>
        /// <param name="sender"></param>
        /// <param name="e"></param>
        private void button3_Click(object sender, EventArgs e)
        {
            if (serviceManager.GetInstance().IsServiceExisted(serviceName))
            {
                try
                {
                    serviceManager.GetInstance().ServiceStop(serviceName);//停止Windows服务
                }
                catch (Exception ex)
                {
                    Console.WriteLine(ex.Message);
                }
            }
        }

        /// <summary>
        /// 事件:卸载Windows服务
        /// </summary>
        /// <param name="sender"></param>
        /// <param name="e"></param>
        private void button4_Click(object sender, EventArgs e)
        {
            if (serviceManager.GetInstance().IsServiceExisted(serviceName))
            {
                serviceManager.GetInstance().ServiceStop(serviceName);//停止Windows服务
                serviceManager.GetInstance().UninstallService(serviceFilePath);//卸载Windows服务
            }
        }
  }
4、为了后续调试服务及安装卸载服务的需要,将已生成的MyWinsService.exe引用到本Windows窗体,右键添加引用,选择项目添加就可以了。这里就不上图了。
5. 安装服务,需要使用UAC中Administrator的权限,鼠标右击项目,在弹出的上下文菜单中选择“添加”->“新建项”,在弹出的选择窗体中选择“应用程序清单文件”并单击确定,如下图所示:

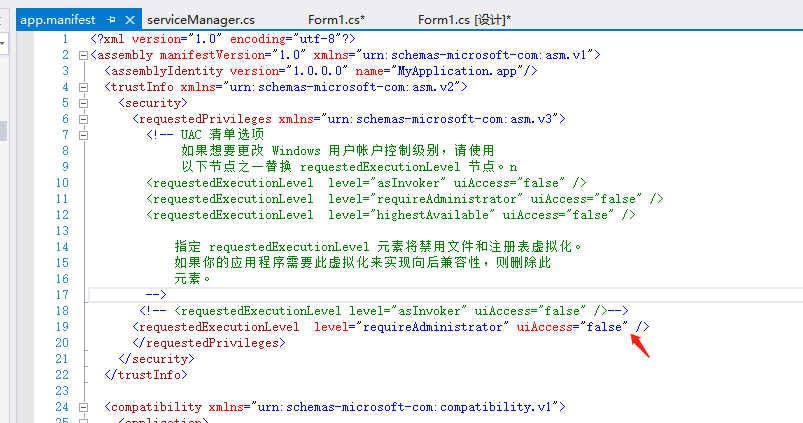
5.打开该文件,并将<requestedExecutionLevel level="asInvoker" uiAccess="false" />改为<requestedExecutionLevel level="requireAdministrator" uiAccess="false" />,如下图所示:
6.整个过程完成了,现在我们可以启动项目了,启动后可能会弹出如下所示的窗体(有的系统因UAC配置有可能不显示),需要用管理员权限打开:
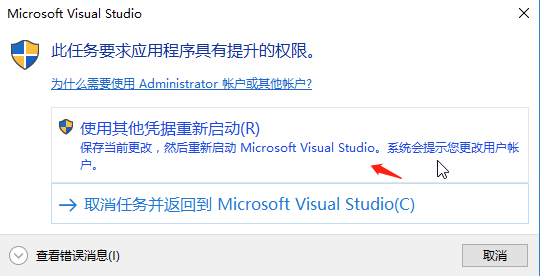
7.重启项目之后就可以了。
8、使用WIN+R的方式打开运行窗体,并在窗体内输入services.msc后打开服务,就可以看到下图:
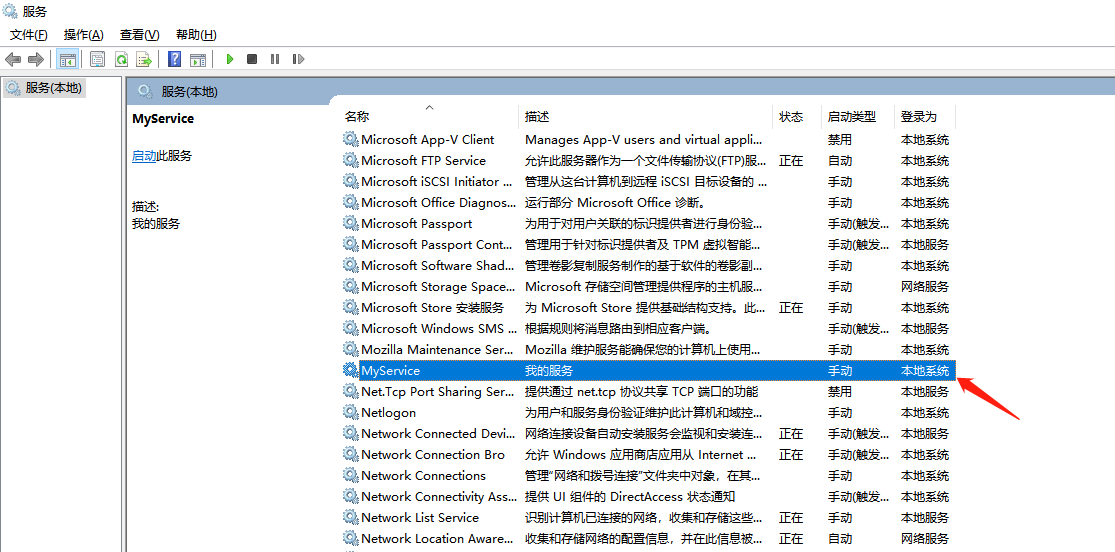
9.我们可以通过刚刚写的开启服务来打开服务,如果服务不用了可以通过按钮直接停止或者卸载。

ok,今天关于windows服务的demo就分享到这了,如果有疑问的可以留言,讲的不对的欢迎指出!!!
关于如何将Daemon实施设置为Windows服务的问题我们已经讲解完毕,感谢您的阅读,如果还想了解更多关于.net – 为Windows服务设置环境变量、.NET:如何将Windows窗体转换为Windows控件、Anaconda设置为Windows默认的python解释器pandas报错问题、C# 创建Windows服务demo等相关内容,可以在本站寻找。
本文标签:


![[转帖]Ubuntu 安装 Wine方法(ubuntu如何安装wine)](https://www.gvkun.com/zb_users/cache/thumbs/4c83df0e2303284d68480d1b1378581d-180-120-1.jpg)

