本文将分享Windows10可能会因ProjectReunion带来重大变化的详细内容,并且还将对可能是由于inf是为windows95进行详尽解释,此外,我们还将为大家带来关于AndroidStud
本文将分享Windows10可能会因Project Reunion带来重大变化的详细内容,并且还将对可能是由于inf是为windows95进行详尽解释,此外,我们还将为大家带来关于Android Studio Open Project 设置 This Window 与 New Window 为询问(Ask) 方式、Creating sub-projects in IIS with Web Application Projects、Delphi 2007 x Windows 10 - 打开项目时出错 (Delphi 2007 x Windows 10 - Error on opening project)、efcore - No project was found. Change the current working directory or use the --project option.的相关知识,希望对你有所帮助。
本文目录一览:- Windows10可能会因Project Reunion带来重大变化(可能是由于inf是为windows95)
- Android Studio Open Project 设置 This Window 与 New Window 为询问(Ask) 方式
- Creating sub-projects in IIS with Web Application Projects
- Delphi 2007 x Windows 10 - 打开项目时出错 (Delphi 2007 x Windows 10 - Error on opening project)
- efcore - No project was found. Change the current working directory or use the --project option.
")
Windows10可能会因Project Reunion带来重大变化(可能是由于inf是为windows95)
微软在其Build 2020开发者大会上首次宣布了Project Reunion,这可能是该公司通过弥合UWP和Win32这两个主要应用程序开发平台之间的鸿沟来改善Windows 10上本机应用程序体验的最佳尝试。
自Windows 8和Metro UI发布以来,Microsoft一直在尝试使Windows及其开发平台现代化。微软还试图说服开发人员转向现代平台并支持Windows应用商店。

预计Project Reunion将“统一”这两个应用程序平台,因此开发人员将能够轻松编写具有所有最新Windows 10功能和触摸/现代API支持的应用程序。
什么是团圆计划?
Project Reunion不是新的应用程序模型,并且不提供其他API集。相反,它应该改善当前的开发经验。
Win32和UWP的世界有很大的不同。例如,两个平台都提供了不同的工具,这使得选择一个平台而不是另一个平台决定了开发人员或多或少地陷入困境。
例如,如果开发人员开始使用UWP应用程序并且意识到它无法满足他们的需求,则他们不得不放弃该应用程序。同样,如果Win32一直在为开发人员工作,则几乎没有动力转向UWP。这是Project Reunion进来的地方。
微软希望缩小Win32和UWP之间的鸿沟
在Ignite 2021期间,Microsoft解释说,“团圆计划”旨在将两个世界(UWP和Win32)整合在一起,从而不存在鸿沟。
借助Project Reunion,Microsoft将Windows 10中的Win32和UWP API分离,并采用UWP中附带的API,并使它们可用于Win32,以“弥合”这两个平台之间的鸿沟。
“我们之所以选择“团圆”这个名称,是因为从根本上讲,这是将两个世界融合在一起,从而不存在这种鸿沟,” Windows UI团队的微软开发人员史蒂夫•科巴赫(Steve Kirbach)说。
该项目还应该启用Win32的UWP开发功能。例如,开发人员通过MSIX分发的应用程序与通过MSIX分发UWP应用程序没有什么不同。
“对于不希望通过MSIX进行分发的开发人员,他们仍使用需要所谓“程序包身份”的功能,这使Windows OS能够更简单地显示这些信息,例如Windows OS能够显示诸如Notifications或允许您的应用使用共享目标”,微软说。
如果该想法可行,则所有平台(Win32和UWP)都可以访问Windows 10所有受支持版本上的所有功能,现代应用程序和可触摸的UI。
 方式")
Android Studio Open Project 设置 This Window 与 New Window 为询问(Ask) 方式

AndroidStudio 4.2 版本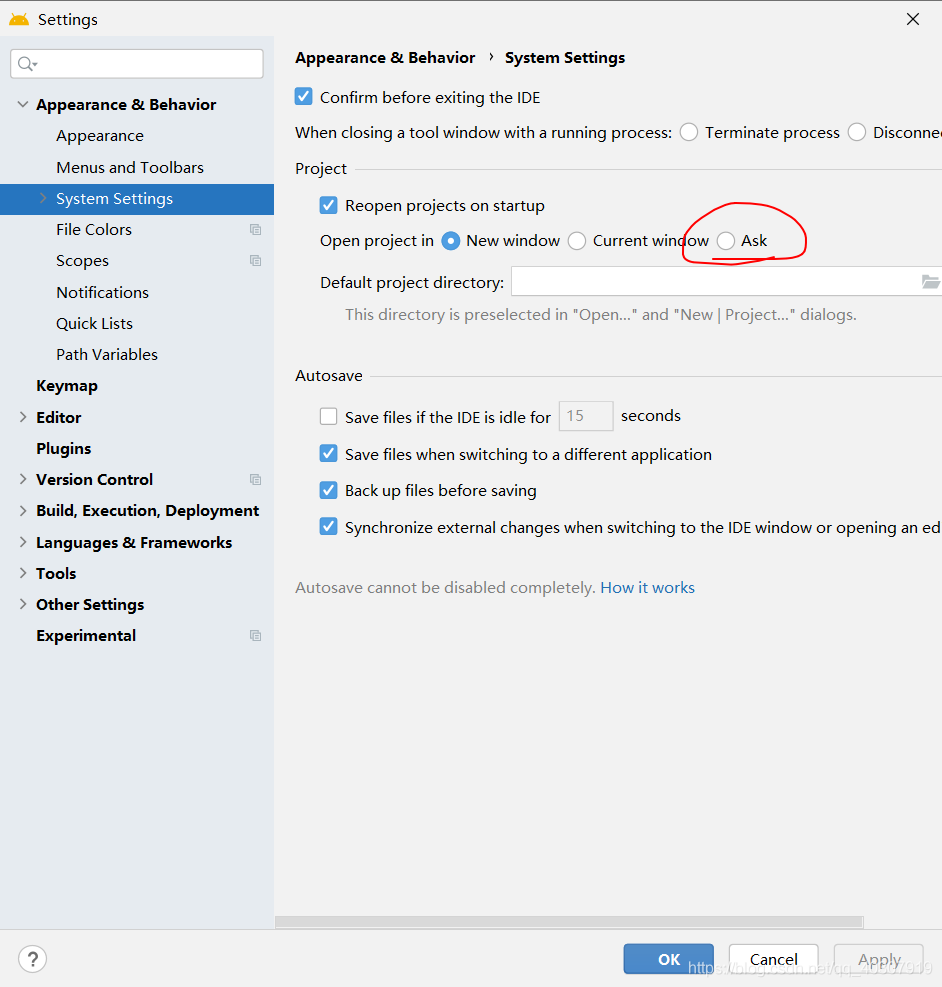

Creating sub-projects in IIS with Web Application Projects
Part 1 of 3: Creating sub-projects in IIS with Web Application Projects
From: http://blogs.msdn.com/webdevtools/archive/2006/07/01/652986.aspx
This post is one of a three part series that describes how to factor development of a single large ASP.NET application into multiple projects inside of Visual Studio 2005 using the Web Application Projects add-in.
Part 1 of 3: In this post, I’ll describe the basics on how to setup a sub-project structure using IIS.
Part 2 of 3: Creating shared user controls and master pages with sub-projects
Part 2 of 3: The next post will describe intricacies with master pages, user controls, and project references when using a sub-project structure.
- Creating a shared master page in the root project and using it in sub-projects
- Creating a shared user control in the root project and using it sub-projects
Part 3 of 3: The final part to the series will describe how to use the same technique but with the built-in development server in Visual Studio 2005.
Part 3 of 3: Creating sub-projects using the Visual Studio Development Server and Web Application Projects
Why use sub-projects?
With very large web applications, such as those that contain thousands of files, using a sub-project structure in Visual Studio provides several benefits.
At development time, it provides a clean isolation between different parts of the application. This enables different developers to own their own projects within a single web application, and allows them to make changes without affecting code that is in a different project.
As well, using sub-projects provides a clean way to compartmentalize functionality so different parts of the application can be developed in isolation from others. The compartmentalization also enables the ability to deploy the varIoUs sub-projects to production independently from each other thus providing more flexibility around incremental updates to one part of the application without affecting other parts.
Setting up the root project using IIS
The first thing I want to show is a step-by-step on how to setup a sub-project project structure based on developing on IIS.
Setting up a sub-project structure in Visual Studio 2005 is fairly straightforward. If one has done it in Visual Studio 2003, the process described below should be very familiar.
Here is a step-by-step walkthrough of how to setup sub-projects using Visual Studio 2005 and the Web Application Projects add-in.
1) Download and install “Web Application Projects” add-in(For VS2005). The add-in can be installed from the following location: http://msdn.microsoft.com/asp.net/reference/infrastructure/wap/default.aspx
2) Create the root project. The first thing we want to do is create a new Web Application project that will represent the root of the application in IIS. To do this select File > New Project. Choose the ASP.NET Web Application item, and type in a name and location for the root project. In this example we’ll call the root project MyLargeWebApp. Make sure the “Create directory for solution” checkBox is unchecked. One can create the “Root” project in a folder in the “inetpub/wwwroot” directory for IIS, or in any other location where you wish to create the virtual root for your app. In this example, we’ll use a location underneath “inetpub/wwwroot”.

3) The next step is to map the MyLargeWebApp project in IIS using the “Web” tab in project properties. To do this, right-click on the root node of the project and select “Properties”. Click the “Web” tab on the page that is launched, and select the “Use IIS Web Server” option.
4) Next you need to create a virtual directory mapping in IIS to point to the location where your root project exists. To do this click the “Create Virtual Directory” button on the same Properties page.

5) You can Now test your root project, by adding some content to default.aspx and selecting F5. This should run launch IE and the default.aspx page will get served from IIS.


Creating sub-projects under a root project
Once the root project is up and running fine, the next step is to create a sub-project and set it up so it builds and runs as part of the same ASP.NET application represented by the root project. The following steps describe how to do this:
1) The first thing you need to do is add a new Web Application project to the same solution. Make sure the MyLargeWebApp solution/project is already open in the solution explorer. To add a new project to the solution, select “File > Add > New Project”. Select “ASP.NET Web Application” as the template. Then type in a name for the sub-project (“SubProject1” in this example), and set it to the location of the folder where the root project is (c:\inetpub\wwwroot\MyLargeWebApp in this example).

2) You should Now have two projects in your solution which represent a single ASP.NET application. To verify this, go to the IIS management console by selecting Start > Run > inetmgr in Windows. In the management console, you should see a “SubProject1” folder under single IIS web application called “MyLargeWebApp”.

3) To get the sub project building and running a few more steps are required in Visual Studio. The first thing you should do is delete the web.config file in the sub-project.

4) Next you need to adjust a few of the properties for the sub-project. Right click on the sub-project’s node in solution explorer and select “Properties”. Under the “Compile” page change the “Build output path” to “..\bin\”.

5) Finally in the sub-project’s properties, under the “Web” page, select the “Use IIS Web Server” option and change the “Project URL” setting to “http://localhost/MyLargeWebApp/SubProject1”. Also check the "Overwrite application root URL" and provide the URL to the root project, which in this case is "http://localhost/MyLargeWebApp/". Do not click the “Create Virtual Directory” button in the sub-project’s setting as you don’t want to create another application root in IIS at the sub-projects folder.

6) Once you’ve updated these properties for the sub-project, the sub-project should be ready to go. Add some content to the default.aspx page in the sub-project and press F5. This should build the sub-project, deploy its DLL to the \bin of the root project, and then run the page from the sub-project. If you select the root-project and “Show All Files” in the solution explorer, you will see in its \bin folder that there are two deployed assemblies, one for the root project (MyLargeWebApp.dll) and one for the sub-project (SubProject1.dll).

Summary
This wraps up my first post on sub-projects. Hopefully it provides a quick introduction on how to setup a sub-project structure using the Web Application Project add-in for Visual Studio 2005.
As mentioned in the beginning of the post, sub-projects are a good way to partition a single large ASP.NET application into several Visual Studio projects so you get the benefits of isolated development and deployment.
Looking forward to hear from you about this post, and I'll update with Part 2 hopefully next week.
--Omar


如何为asp.net网站项目添加子项目
我采取了重新建立一个projects的方法,比如把后台管理剥离出来,新建一个admin的website,这个新的projects放在website的根目录下,然后修改文件编译生成dll后的目录为..\bin并且删除项目中的web.config.编译后访问,呵呵,真的可以访问了,并且达到了拆分项目的要求.倒是并不完美,还有手动修改很多设置,并且这2个项目中不能共享相同的master,和usercontrol,甚至是图片,js等,如果直接使用相对路径,那么视图模式下将不能正常显示,如果vs直接提供新建子项目的功能并能解决共享这些文件,该有多好啊.
于是通过Google,找到一篇文章http://blogs.msdn.com/webdevtools/archive/2006/07/01/652986.aspx,Creating sub-projects in IIS with Web Application Projects,不幸的是文中提到的“Web Application Projects” add-in,我Download了,but can't install!
虽然这样的应用程序我们无法制作,但是我们可以按照他的思路自己修改配置啊.
发现他的方法,跟一开始我的做法是很类似的,不过他可以共享master和user control,为什么我的不能呢?
仔细翻看了一下,发现原来他在子项目中创建了虚拟目录比如 http://localhost/group,所以之前使用~/Group.Master,只能访问本项目中的master,而现在则可以访问根目录中的master了,试试usercontrol,也可以了,呵呵,原理奥妙都在这个虚拟目录中呀.
本文来自:http://www.jb51.net/article/16300.htm
")
Delphi 2007 x Windows 10 - 打开项目时出错 (Delphi 2007 x Windows 10 - Error on opening project)
问题:
Just updated from Windows 8.1 to Windows 10 and now when I try to open any project on Delphi 2007, I get his error :
Unable to load project xxxxx The imported project "c:\Windows\Microsft.NET...\Borland.Delphi.Targets" was not found. Confirm that the path declaration is correct, and that file exists on disk
查找需拷贝的文件路径:
在 C:\Windows.old 目录下搜索 Borland.Common.Targets 就能找到该文件所在路径。
解决方案:
You need to copy some files in your old Windows folder to the new one. After that projects open again.
The needed files are these :
c:\windows\Microsoft.NET\Framework\v2.0.50727\Borland.Common.Targets
c:\windows\Microsoft.NET\Framework\v2.0.50727\Borland.Cpp.Targets
c:\windows\Microsoft.NET\Framework\v2.0.50727\Borland.Delphi.Targets
c:\windows\Microsoft.NET\Framework\v2.0.50727\Borland.Group.Targets

efcore - No project was found. Change the current working directory or use the --project option.
最近使用efcore通过实体类创建迁移类时经常遇到一个问题
使用的创建脚本如下:
dotnet ef migrations add test起初一直使用的是这个脚本创建的,但是再用这脚本就出现一个错误,如下:
No project was found. Change the current working directory or use the --project option.
找了很多方法,包括所谓的修改默认项目位置,统统不好用,又重新翻官网内容,发现了一个可能解决问题的方法,官网原命令如下:
dotnet ef migrations add NewMigration --project MyApp.Migrations将命令修改如下:
dotnet ef migrations add test --project Lantu.Wxchat.Test //此处为项目程序集名称测试OK了
今天的关于Windows10可能会因Project Reunion带来重大变化和可能是由于inf是为windows95的分享已经结束,谢谢您的关注,如果想了解更多关于Android Studio Open Project 设置 This Window 与 New Window 为询问(Ask) 方式、Creating sub-projects in IIS with Web Application Projects、Delphi 2007 x Windows 10 - 打开项目时出错 (Delphi 2007 x Windows 10 - Error on opening project)、efcore - No project was found. Change the current working directory or use the --project option.的相关知识,请在本站进行查询。
本文标签:


![[转帖]Ubuntu 安装 Wine方法(ubuntu如何安装wine)](https://www.gvkun.com/zb_users/cache/thumbs/4c83df0e2303284d68480d1b1378581d-180-120-1.jpg)

