最近很多小伙伴都在问4.BeanFactory和ApplicationContext的区别和beanfactory和applicationcontext有什么区别这两个问题,那么本篇文章就来给大家详细
最近很多小伙伴都在问4.BeanFactory和ApplicationContext的区别和beanfactory 和 applicationcontext 有什么区别这两个问题,那么本篇文章就来给大家详细解答一下,同时本文还将给你拓展19.spring beanfactory与applicationcontext、ApplicationContext 容器和 BeanFactory 容器的区别、ApplicationContext(四)BeanFactory 功能扩展、BeanFactory 与 ApplicationContext等相关知识,下面开始了哦!
本文目录一览:- 4.BeanFactory和ApplicationContext的区别(beanfactory 和 applicationcontext 有什么区别)
- 19.spring beanfactory与applicationcontext
- ApplicationContext 容器和 BeanFactory 容器的区别
- ApplicationContext(四)BeanFactory 功能扩展
- BeanFactory 与 ApplicationContext
")
4.BeanFactory和ApplicationContext的区别(beanfactory 和 applicationcontext 有什么区别)
ApplicationContext和BeanFactory都是用于加载Bean的, 但是二者之间存在区别, ApplicationContext能够提供更多的扩展功能.
1).BeanFactory可以理解为含有bean的集合工厂类, 其中包含了bean的定义, 以便在接收到客户端请求时将对应的bean实例化.
同时在实例化对象时生成写作类之间的关系, 将bean自身与bean客户端的配置中解放出来, BeanFactory还包含了bean生命周期的控制, 调用客户端的初始化方法和销毁方法.

2).ApplicationContext接口是一个BeanFactory基础上封装了更多功能的,Spring中最为常用的IoC容器,其包含两个子接口:ConfigurableApplicationContext、WebApplicationContext。
ApplicationContext同样具有bean的定义,bean的关联关系的设置,根据请求分发bean的功能,但是ApplicationContext提供了扩展功能, 主要包括:
提供了支持国际化的文本消息;
统一的资源文件读取方式;
已在监听器中注册的bean的事件,通过实现ApplicationContextAware接口;
ApplicationContext的三个实现类:a、ClassPathXmlApplication:把上下文文件当成类路径资源
b、FileSystemXmlApplication:从文件系统中的XML文件载入上下文定义信息
c、XmlWebApplicationContext:从Web系统中的XML文件载入上下文定义信息

19.spring beanfactory与applicationcontext
IOC容器架构概述
beanfactory和Applicacontext区别
beanfactory(Bean工厂)
1.idea调试 spring源码 不需要去 spring官网下载源码 idea 支持maven jar 依赖源码
Applicacontext beanfactory
2.org.springframework.beans.factory.support.DefaultSingletonBeanRegistry#getSingleton(java.lang.String, boolean) 根据名称获取单例bean对象
3.org.springframework.context.support.AbstractApplicationContext.refresh()
beanfactory概述
1.beanfactory,以Factory结尾,表示它是一个工厂类(接口), 它负责生产和管理bean的一个工厂。在Spring中,beanfactory是IOC容器的核心接口,它的职责包括:实例化、定位、配置应用程序中的对象及建立这些对象间的依赖。
2.beanfactory只是个接口,并不是IOC容器的具体实现,但是spring容器给出了很多种实现,如 DefaultListablebeanfactory、Xmlbeanfactory、ApplicationContext等,其中Xmlbeanfactory就是常用的一个,该实现将以XML方式描述组成应用的对象及对象间的依赖关系。Xmlbeanfactory类将持有此XML配置元数据,并用它来构建一个完全可配置的系统或应用。
3.它为其他具体的IOC容器提供了最基本的规范,例如DefaultListablebeanfactory,Xmlbeanfactory,ApplicationContext 等具体的容器都是实现了beanfactory,再在其基础之上附加了其他的功能。
4.原始的beanfactory无法支持spring的许多插件,如AOP功能、Web应用等。ApplicationContext接口,它由beanfactory接口派生而来。现在一般使用ApplicationnContext,其不但包含了beanfactory的作用,同时还进行更多的扩展。
5.beanfactory实际上是实例化,配置和管理众多bean的容器。 这些bean通常会彼此合作,因而它们之间会产生依赖。 beanfactory使用的配置数据可以反映这些依赖关系中,一个beanfactory可以用接口org.springframework.beans.factory.beanfactory表示, 这个接口有多个实现。 最常使用的的简单的beanfactory实现是org.springframework.beans.factory.xml.Xmlbeanfactory。
按住键盘ctrl+alt+u生成类图
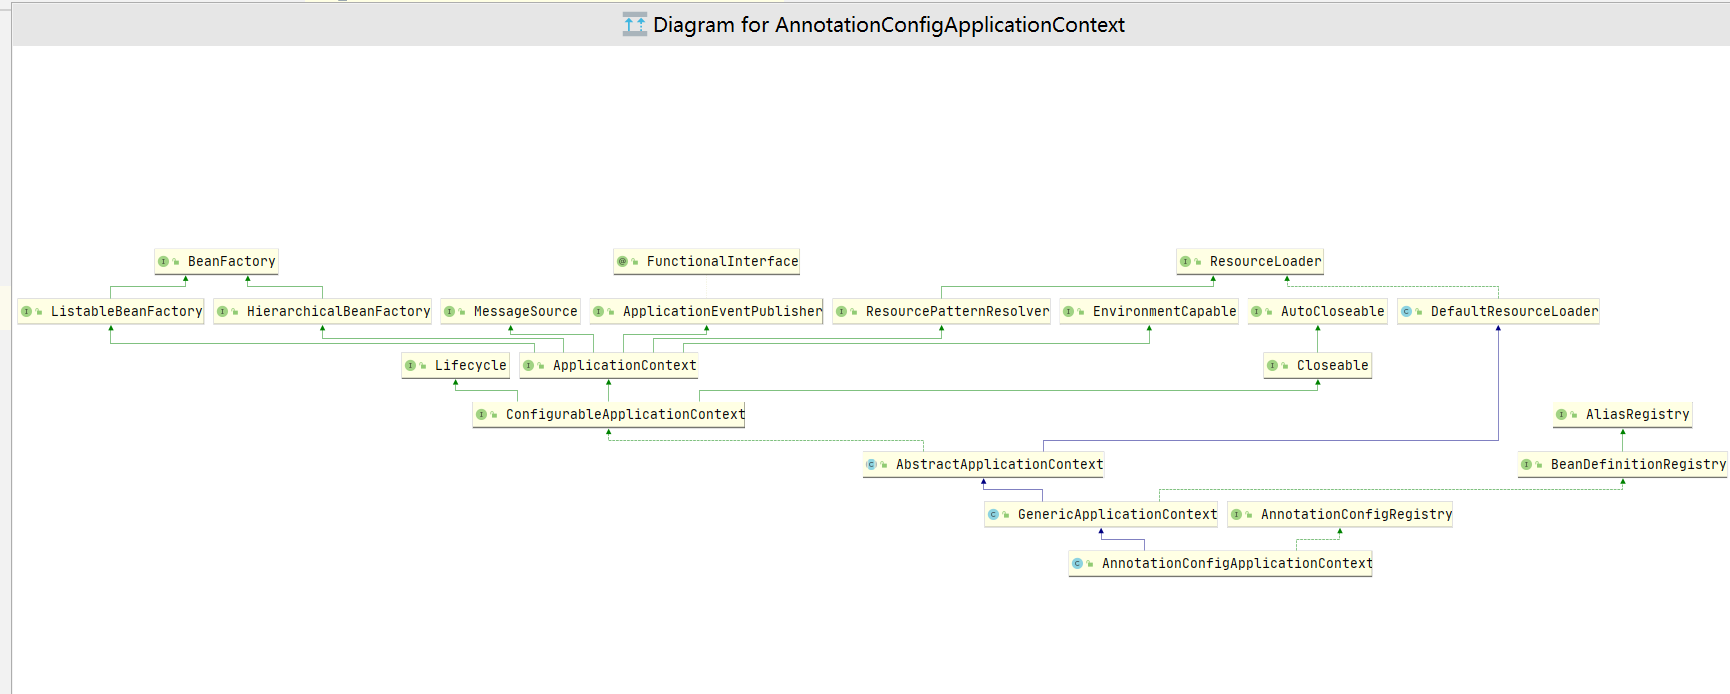
Applicacontext间接的形式继承beanfactory 实现额外功能扩展 保留了beanfactory 基础功能
例如getBean()
AnnotationConfigApplicationContext applicationContext
= new AnnotationConfigApplicationContext(SpringConfig.class);
        UserEntity userEntity = applicationContext.getBean("user", UserEntity.class);
#####查看底层源码 底层通过getbeanfactory().getBean方法
@Override
public <T> T getBean(String name, Class<T> requiredType) throws BeansException {
		assertbeanfactoryActive();
		return getbeanfactory().getBean(name, requiredType);
}
beanfactory核心功能
beanfactory只是个接口,并不是IOC容器的具体实现,但是spring容器给出了很多种实现,如 DefaultListablebeanfactory、Xmlbeanfactory、ApplicationContext等,其中Xmlbeanfactory就是常用的一个,该实现将以XML方式描述组成应用的对象及对象间的依赖关系。Xmlbeanfactory类将持有此XML配置元数据,并用它来构建一个完全可配置的系统或应用
通过类图可以分析出:DefaultSingletonBeanRegistry 负责管理单例对象 底层采用
public class DefaultSingletonBeanRegistry extends SimpleAliasRegistry implements SingletonBeanRegistry {

	/** Cache of singleton objects: bean name to bean instance. */
	private final Map<String, Object> singletonObjects = new ConcurrentHashMap<>(256);
Applicacontext功能
ApplicationContext的中文意思是“应用前后关系”,它继承自beanfactory接口,除了包含beanfactory的所有功能之外,在国际化支持、资源访问(如URL和文件)、事件传播等方面进行了良好的支持,被推荐为Java EE应用之首选,可应用在Java APP与Java Web中。

1.MessageSource(国际化的支持)
2.ResourcePatternResolver (匹配资源路径)
3.EnvironmentCapable (环境变量配置)
4.ApplicationEventPublisher(事件发布)
MessageSource(国际化的支持)
MessageSource基本用法
messageSource是spring中的转换消息接口,提供了国际化信息的能力。MessageSource用于解析消息,并支持消息的参数化和国际化。 Spring 包含两个内置的MessageSource实现:ResourceBundleMessageSource和ReloadableResourceBundleMessageSource。
package com.mayikt.config;
import com.mayikt.entity.UserEntity;
import com.mayikt.service.MayiktService;
import org.springframework.context.annotation.Bean;
import org.springframework.context.annotation.ComponentScan;
import org.springframework.context.annotation.Configuration;
import org.springframework.context.support.ResourceBundleMessageSource;
@Configuration
@ComponentScan(value = {"com.mayikt.service"})
public class SpringConfig {
@Bean
public ResourceBundleMessageSource messageSource() {
ResourceBundleMessageSource source = new ResourceBundleMessageSource();
//设置基础名
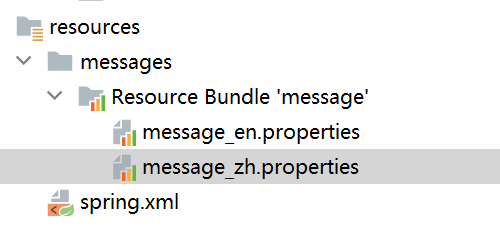
source.setBasenames("messages/message");
//设置编码
source.setdefaultencoding("GBK");
return source;
}
}
resources 目录创建文件夹messages
message_en.properties
test=test
message_zh.properties
test=测试
AnnotationConfigApplicationContext applicationContext
    = new AnnotationConfigApplicationContext(SpringConfig.class);
ResourceBundleMessageSource messageSource =
    applicationContext.getBean("messageSource", ResourceBundleMessageSource.class);
String test1 = messageSource.getMessage("test", null, Locale.CHInesE);
String test2 = messageSource.getMessage("test", null, Locale.ENGLISH);
System.out.println(test1 + "," + test2);
测试,test
MessageSource底层实现
spring的AbstractApplicationContext中MessageSource初始化
初始化
在AbstractApplicationContext中有一个refresh()方法,在刷新方法里面调用一个initMessageSource()。initMessageSource()方法就是初始化上下文中的MessageSource资源国际化组件。
protected void initMessageSource() {
		ConfigurableListablebeanfactory beanfactory = getbeanfactory();
		if (beanfactory.containsLocalBean(MESSAGE_SOURCE_BEAN_NAME)) {
			this.messageSource = beanfactory.getBean(MESSAGE_SOURCE_BEAN_NAME, MessageSource.class);
			// Make MessageSource aware of parent MessageSource.
			if (this.parent != null && this.messageSource instanceof HierarchicalMessageSource) {
				HierarchicalMessageSource hms = (HierarchicalMessageSource) this.messageSource;
				if (hms.getParentMessageSource() == null) {
					// Only set parent context as parent MessageSource if no parent MessageSource
					// registered already.
					hms.setParentMessageSource(getInternalParentMessageSource());
				}
			}
			if (logger.isTraceEnabled()) {
				logger.trace("Using MessageSource [" + this.messageSource + "]");
			}
		}
		else {
			// Use empty MessageSource to be able to accept getMessage calls.
			DelegatingMessageSource dms = new DelegatingMessageSource();
			dms.setParentMessageSource(getInternalParentMessageSource());
			this.messageSource = dms;
			beanfactory.registerSingleton(MESSAGE_SOURCE_BEAN_NAME, this.messageSource);
			if (logger.isTraceEnabled()) {
				logger.trace("No '" + MESSAGE_SOURCE_BEAN_NAME + "' bean, using [" + this.messageSource + "]");
			}
		}
	}
使用容器中的messageSource
AbstractApplicationContext提供了接口getMessage方法来使用容器中的messagesource
	@Override
	public String getMessage(String code, @Nullable Object[] args, @Nullable String defaultMessage, Locale locale) {
		return getMessageSource().getMessage(code, args, defaultMessage, locale);
	}
ResourcePatternResolver (匹配资源路径)
用于解析资源文件的策略接口,其特殊的地方在于,它应该提供带有*号这种通配符的资源路径。
此接口是ResourceLoader接口的拓展接口。
PathMatchingResourcePatternResolver是此接口的独立实现,其常常用于应用上下文之外如ResourceArraypropertyeditor中
理应支持所有类似”/WEB-INF/*-context.xml”这种模式的路径输入
在写一个资源路径时,提倡使用classpath*作为前缀以查找所有Jar的根目录。使用无占位符的
文件名如/beans.xml来确切的表名想要引入的文件名。
package org.springframework.core.io.support;

import java.io.IOException;

import org.springframework.core.io.Resource;
import org.springframework.core.io.ResourceLoader;

public interface ResourcePatternResolver extends ResourceLoader {

	 /**
     * 在所有根目录下搜索文件的伪URL的前缀
     * 与ResourceLoader中classpath不同的地方在于,此前缀会在所有的jar包的根目录下搜索指定文件。
     */
	String CLAsspATH_ALL_URL_PREFIX = "classpath*:";

   /**
     * 返回指定路径下所有的资源对象。
     * 返回的对象集合应该有Set的语义,也就是说,对于同一个资源,只应该返回一个资源对象
     */
	Resource[] getResources(String locationPattern) throws IOException;

}
读取resources 目录下
application.properties
name=mayikt
        Resource[] resources = applicationContext.getResources("classpath:application.properties");
        Arrays.stream(resources).forEach((r) -> {
            System.out.println(r);
        });
读取spring-beans-5.2.1.RELEASE.jar!/meta-inf/spring.factories
        Resource[] resources = applicationContext.getResources("classpath*:meta-inf/spring.factories");
        Arrays.stream(resources).forEach((r) -> {
            System.out.println(r);
        });
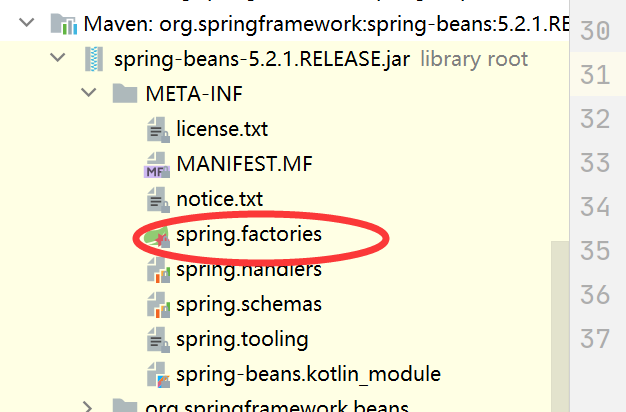
classpath: 只会到你的target下面的class路径中查找找文件
classpath*:(1)不仅包含target下面的class路径,还包括jar文件中(target下面的class路径)进行查找;(2)当项目中有多个classpath路径(不是xml文件,而是包含xml文件的路径),并同时加载多个classpath路径下的所有xml文件,就发挥了作用,如果不加*,也就是只使用classpath,则表示仅仅加载匹配到的第一个classpath路径
EnvironmentCapable (环境变量配置)
读取:
1.JAVA 系统变量 java -D命令后的配置
2.操作系统环境变量
3.application.yml,application.properties文件
ConfigurableEnvironment environment = applicationContext.getEnvironment();
String javaHome = environment.getProperty("java_home");
String comMayikt = environment.getProperty("com.mayikt");
System.out.println(javaHome +  "," + comMayikt);
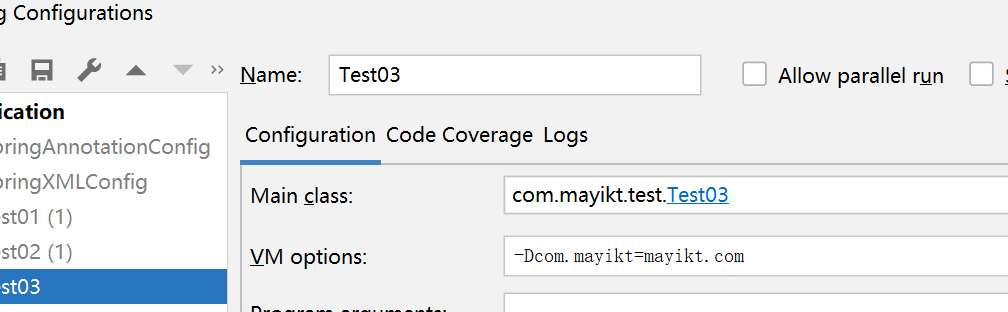
-Dcom.mayikt=mayikt.com
ApplicationEventPublisher(事件发布)
1.ApplicationEventPublisherAware
ApplicationEventPublisherAware 是由 Spring 提供的用于为 Service 注入 ApplicationEventPublisher 事件发布器的接口,使用这个接口,我们自己的 Service 就拥有了发布事件的能力。
用户注册后,不再是显示地调用其他的业务 Service,而是发布一个用户注册事件。
2.ApplicationListener
ApplicationListener接口是由 Spring 提供的事件订阅者必须实现的接口,我们一般把该 Service 关心的事件类型作为泛型传入。处理事件,通过 event.getSource() 即可拿到事件的具体内容
3.ApplicationEventPublisher
ApplicationEventPublisher是ApplicationContext的父接口之一。这接口的作用是:Interface that encapsulates event publication functionality.
功能就是发布事件,也就是把某个事件告诉的所有与这个事件相关的监听器。
public class UserInfoEvent extends ApplicationEvent {
    /**
     * source事件源
     *
     * @param source
     */
    public UserInfoEvent(Object source) {
        super(source);
    }
}

@Component
public class EmailListener {
    private static final Logger log = LoggerFactory.getLogger(EmailListener.class);

    @EventListener
    public void emailListener(UserInfoEvent userInfoEvent) {
        log.debug("userInfoEvent:{}", userInfoEvent);
    }
}
@Component
public class PhoneListener  {
    private static final Logger log = LoggerFactory.getLogger(PhoneListener.class);

    @EventListener
    public void emailListener(UserInfoEvent userInfoEvent) {
        log.debug("userInfoEvent:{}", userInfoEvent);
    }

}
AnnotationConfigApplicationContext applicationContext
                = new AnnotationConfigApplicationContext(SpringConfig.class);
applicationContext.publishEvent(new UserInfoEvent(applicationContext));
beanfactory功能
1.beanfactory,以Factory结尾,表示它是一个工厂类(接口), 它负责生产和管理bean的一个工厂。在Spring中,beanfactory是IOC容器的核心接口,它的职责包括:实例化、定位、配置应用程序中的对象及建立这些对象间的依赖。
2.beanfactory只是个接口,并不是IOC容器的具体实现,但是spring容器给出了很多种实现,如 DefaultListablebeanfactory、Xmlbeanfactory、ApplicationContext等,其中Xmlbeanfactory就是常用的一个,该实现将以XML方式描述组成应用的对象及对象间的依赖关系。Xmlbeanfactory类将持有此XML配置元数据,并用它来构建一个完全可配置的系统或应用。
3.它为其他具体的IOC容器提供了最基本的规范,例如DefaultListablebeanfactory,Xmlbeanfactory,ApplicationContext 等具体的容器都是实现了beanfactory,再在其基础之上附加了其他的功能。
\3. 原始的beanfactory无法支持spring的许多插件,如AOP功能、Web应用等。ApplicationContext接口,它由beanfactory接口派生而来。现在一般使用ApplicationnContext,其不但包含了beanfactory的作用,同时还进行更多的扩展。
4.beanfactory实际上是实例化,配置和管理众多bean的容器。 这些bean通常会彼此合作,因而它们之间会产生依赖。 beanfactory使用的配置数据可以反映这些依赖关系中,一个beanfactory可以用接口org.springframework.beans.factory.beanfactory表示, 这个接口有多个实现。 最常使用的的简单的beanfactory实现是org.springframework.beans.factory.xml.Xmlbeanfactory。
beanfactory后置处理器
ApplicationContext 属于实现方式 AnnotationConfigApplicationContext(注解启动方式)
AnnotationConfigApplicationContext----继承父类AbstractApplicationContext…
refresh()------先创建一个默认的DefaultListablebeanfactory
1.后置处理(加载bean 、依赖注入)
2.初始化国家化配置、事件监听
ConfigurationClasspostProcessor 解析Configuration配置 bean注解 并且加载到ioc容器中
DefaultListablebeanfactory是整个bean加载的核心,是spring注册及加载bean的默认实现。
org.springframework.context.annotation.internalConfigurationAnnotationProcessor ##
处理lConfiguration注解
org.springframework.context.annotation.internalAutowiredAnnotationProcessor ##处理Autowired
org.springframework.context.annotation.internalCommonAnnotationProcessor ##处理@Resource
//1.获取beanfactory
DefaultListablebeanfactory beanfactory
    = new DefaultListablebeanfactory();
//2.bean 定义 class(反射初始化)、是否是为单例 销毁
AbstractBeanDeFinition beanDeFinition
    = BeanDeFinitionBuilder.genericBeanDeFinition
    (SpringConfig.class).getBeanDeFinition();
//3.注册beanDeFinition
beanfactory.registerBeanDeFinition("springConfig", beanDeFinition);
//4.新增我们的后置处理器 解析配置
AnnotationConfigUtils.registerannotationConfigProcessors(beanfactory);
//5.通过后置处理器beanfactoryPostProcessor  处理加载bean 解析 SpringConfig 中的 配置bean
beanfactory.getBeansOfType(beanfactoryPostProcessor.class).values().stream().forEach(
    (beanfactoryPostProcessor) -> {
        beanfactoryPostProcessor.postProcessbeanfactory(beanfactory);
    }
);
//6.处理依赖注入@Autowired
beanfactory.getBeansOfType(BeanPostProcessor.class).values().stream().forEach(
    (beanPostProcessor) -> {
        beanfactory.addBeanPostProcessor(beanPostProcessor);
    }
);
// 7.提前初始化单例对象
beanfactory.preInstantiateSingletons();
System.out.println("------------");
// 默认的情况下延迟加载 可以采用
MayiktBean mayiktBean = beanfactory.getBean("mayiktBean", MayiktBean.class);
System.out.println(mayiktBean.getUserEntity());

//8.输出beanName
Arrays.stream(beanfactory.getBeanDeFinitionNames()).forEach((beanName) -> {
    System.out.println("beanName:" + beanName);
});
BeanPostProcessor:该接口我们也叫后置处理器,作用是在Bean对象在实例化和依赖注入完毕后,在显示调用初始化方法的前后添加我们自己的逻辑。注意是Bean实例化完毕后及依赖注入完成后触发的
@Autowired
defaultListablebeanfactory.getBeansOfType(BeanPostProcessor.class).values()
.stream().forEach((b) -> {
defaultListablebeanfactory.addBeanPostProcessor(b);
});
beanfactoryPostProcessor :
beanfactoryPostProcessor是实现spring容器功能扩展的重要接口,例如修改bean属性值,实现bean动态代理等,很多框架都是通过此接口实现对spring容器的扩展
//5.通过后置处理器beanfactoryPostProcessor  处理加载bean 解析 SpringConfig 中的 配置bean
beanfactory.getBeansOfType(beanfactoryPostProcessor.class).values().stream().forEach(
    (beanfactoryPostProcessor) -> {
        beanfactoryPostProcessor.postProcessbeanfactory(beanfactory);
    }
);
beanfactory 不会主动调用beanfactory后置处理器 和Bean后置处理器、提前初始化单例, 而我们Applicacontext封装beanfactory 实现好了 根据后置处理器 bean对象初始化。
Bean后置处理器 bean初始化 、依赖注入
下次课----后置处理器 bean生命周期中
Applicacontext实现
1.基于xml方式
2.基于磁盘目录xml方式
3.基于java配置类方式
4.web环境 java配置类方式 AnnotationConfigWebApplicationContext
基于xml方式
<?xml version="1.0" encoding="UTF-8"?>
<beans xmlns="http://www.springframework.org/schema/beans"
       xmlns:xsi="http://www.w3.org/2001/XMLSchema-instance"
       xsi:schemaLocation="http://www.springframework.org/schema/beans http://www.springframework.org/schema/beans/spring-beans.xsd">
    <bean id="userEntity" class="com.mayikt.entity.UserEntity">
    </bean>
</beans>
        //1.基于xml
        ClasspathXmlApplicationContext classpathXmlApplicationContext
                = new ClasspathXmlApplicationContext("spring-bean.xml");
        UserEntity userEntity = classpathXmlApplicationContext.getBean("userEntity", UserEntity.class);
        System.out.println(userEntity);
基于磁盘目录xml方式
FileSystemXmlApplicationContext fileSystemXmlApplicationContext = new FileSystemXmlApplicationContext("D:\\list\\spring-bean.xml");
UserEntity userEntity = fileSystemXmlApplicationContext.getBean("userEntity", UserEntity.class);
System.out.println(userEntity);
基于java配置类方式
1.配置类@Configuration
2.@ComponentScan 组件使用(@Controller/@Service/@Reponsitory/@Component)
3.使用@Bean注解配置类中的方法
4.@Import 快速给容器中导入组件
id默认为组件的全类名
三种方式:
4.1@Import({A.class,B.class}) 组件的id默认是全类名
4.2@Import (MyImportSelector.class)
其中MyImportSelector实现了ImportSelector接口
4.2@Import (MyImportSelector.class)
其中MyImportSelector实现了ImportBeanDeFinitionRegistrar接口
5.@Scope 设置组件作用域
singleton:单实例(默认) --ioc容器启动时会调用相关方法创建对象并放到ioc容器中
prototype:多实例 --每次获取Bean的时候才会调用相关方法创建对象
request:同一次请求创建一个实例
session:同一个session创建一个实例
6.@Lazy 懒加载:针对单实例Bean
容器启动的时候先不创建对象,在第一次获取Bean的时候创建对象并初始化
7.@Conditional 按照一定的条件来决定Bean是否加载到IOC容器中 可以注解类和方法,需要传入Class数组,对应的类要实现Condition接口。
@Import
1.@Import 直接导入配置类
package com.mayikt.config;

import org.springframework.context.annotation.Bean;


public class Spring03Config {
    @Bean
    public MayiktBean mayiktBean() {
        return new MayiktBean();
    }
}

package com.mayikt.config;

import com.mayikt.entity.UserEntity;
import org.springframework.context.annotation.Bean;
import org.springframework.context.annotation.ComponentScan;
import org.springframework.context.annotation.Configuration;
import org.springframework.context.annotation.Import;


@Configuration
@ComponentScan("com.mayikt.service")
@Import({Spring03Config.class, MyImportSelector.class, MyImportBeanDeFinitionRegistrar.class})
public class Spring02Config {
    @Bean
    public UserEntity user() {
        UserEntity userEntity = new UserEntity();
        return userEntity;
    }
}
2.@Import 直接导入配置类
其中MyImportSelector实现了ImportSelector接口
package com.mayikt.config;

import org.springframework.context.annotation.ImportSelector;
import org.springframework.core.type.AnnotationMetadata;


public class MyImportSelector implements ImportSelector {
    @Override
    public String[] selectImports(AnnotationMetadata importingClassMetadata) {
        return new String[]{"com.mayikt.config.Spring04Config"};
    }
}

package com.mayikt.config;

import org.springframework.context.annotation.Bean;


public class Spring04Config {
    @Bean
    public MayiktBean mayiktBean02() {
        return new MayiktBean();
    }
}


package com.mayikt.config;

import com.mayikt.entity.UserEntity;
import org.springframework.context.annotation.Bean;
import org.springframework.context.annotation.ComponentScan;
import org.springframework.context.annotation.Configuration;
import org.springframework.context.annotation.Import;


@Configuration
@ComponentScan("com.mayikt.service")
@Import({Spring03Config.class, MyImportSelector.class, MyImportBeanDeFinitionRegistrar.class})
public class Spring02Config {
    @Bean
    public UserEntity user() {
        UserEntity userEntity = new UserEntity();
        return userEntity;
    }
}
3实现ImportBeanDeFinitionRegistrar接口
package com.mayikt.config;

import org.springframework.beans.factory.support.BeanDeFinitionRegistry;
import org.springframework.beans.factory.support.RootBeanDeFinition;
import org.springframework.context.annotation.ImportBeanDeFinitionRegistrar;
import org.springframework.core.type.AnnotationMetadata;


public class MyImportBeanDeFinitionRegistrar implements ImportBeanDeFinitionRegistrar {
    @Override
    public void registerBeanDeFinitions(AnnotationMetadata importingClassMetadata, BeanDeFinitionRegistry registry) {
        RootBeanDeFinition rootBeanDeFinition = new RootBeanDeFinition(MayiktBean.class);
        registry.registerBeanDeFinition("mayiktBean03", rootBeanDeFinition);
    }
}
package com.mayikt.config;

import com.mayikt.entity.UserEntity;
import org.springframework.context.annotation.Bean;
import org.springframework.context.annotation.ComponentScan;
import org.springframework.context.annotation.Configuration;
import org.springframework.context.annotation.Import;


@Configuration
@ComponentScan("com.mayikt.service")
@Import({Spring03Config.class, MyImportSelector.class, MyImportBeanDeFinitionRegistrar.class})
public class Spring02Config {
    @Bean
    public UserEntity user() {
        UserEntity userEntity = new UserEntity();
        return userEntity;
    }
}
@Conditional
@Conditional 翻译过来就是:条件装配
就是指满足指定的条件,则进行组件注入,如果不满足,则不注入
以下为springboot的封装
@ConditionalOnBean:仅仅在当前上下文中存在某个对象时,才会实例化一个Bean。
@ConditionalOnClass:某个class位于类路径上,才会实例化一个Bean。
@ConditionalOnExpression:当表达式为true的时候,才会实例化一个Bean。
@ConditionalOnMissingBean:仅仅在当前上下文中不存在某个对象时,才会实例化一个Bean。
@ConditionalOnMissingClass:某个class类路径上不存在的时候,才会实例化一个Bean。
@ConditionalOnNotWebApplication:不是web应用,才会实例化一个Bean。
@ConditionalOnBean:当容器中有指定Bean的条件下进行实例化。
@ConditionalOnMissingBean:当容器里没有指定Bean的条件下进行实例化。
@ConditionalOnClass:当classpath类路径下有指定类的条件下进行实例化。
@ConditionalOnMissingClass:当类路径下没有指定类的条件下进行实例化。
@ConditionalOnWebApplication:当项目是一个Web项目时进行实例化。
@ConditionalOnNotWebApplication:当项目不是一个Web项目时进行实例化。
@ConditionalOnProperty:当指定的属性有指定的值时进行实例化。
@ConditionalOnExpression:基于SpEL表达式的条件判断。
@ConditionalOnJava:当JVM版本为指定的版本范围时触发实例化。
@ConditionalOnResource:当类路径下有指定的资源时触发实例化。
@ConditionalOnJndi:在JNDI存在的条件下触发实例化。
@ConditionalOnSingleCandidate:当指定的Bean在容器中只有一个,或者有多个但是指定了首选的Bean时触发实例化。
案例1 不同环境执行不同操作
package com.mayikt.condition;

import org.springframework.context.annotation.Condition;
import org.springframework.context.annotation.ConditionContext;
import org.springframework.core.type.AnnotatedTypeMetadata;

public class LinuxCondition implements Condition {
    @Override
    public boolean matches(ConditionContext conditionContext, AnnotatedTypeMetadata annotatedTypeMetadata) {
        return System.getProperty("os.name").toLowerCase().contains("linux");
    }
}
package com.mayikt.condition;

import org.springframework.context.annotation.Condition;
import org.springframework.context.annotation.ConditionContext;
import org.springframework.core.type.AnnotatedTypeMetadata;

public class WindowsCondition implements Condition {
    @Override
    public boolean matches(ConditionContext conditionContext, AnnotatedTypeMetadata annotatedTypeMetadata) {
        return System.getProperty("os.name").toLowerCase().contains("windows");
    }
}

package com.mayikt.condition;

public class SystemOperation {
    private String name;

    public SystemOperation(String name) {
        this.name = name;
    }

    @Override
    public String toString() {
        return "SystemOperation{" +
                "name='" + name + '\'' +
                '}';
    }
}
package com.mayikt.condition;

import org.springframework.context.annotation.Bean;
import org.springframework.context.annotation.Condition;
import org.springframework.context.annotation.Conditional;
import org.springframework.context.annotation.Configuration;

@Configuration
public class SpringConditionConfig {

    @Bean
    @Conditional(value = WindowsCondition.class)
    public SystemOperation windowsSystemOperation() {
        return new SystemOperation("执行windows命令");
    }

    @Bean
    @Conditional(value = LinuxCondition.class)
    public SystemOperation linuxSystemOperation() {
        return new SystemOperation("执行linux命令");
    }
}
AnnotationConfigApplicationContext annotationConfigApplicationContext
    = new AnnotationConfigApplicationContext(SpringConditionConfig.class);
Map<String, SystemOperation> beansOfType = annotationConfigApplicationContext.getBeansOfType(SystemOperation.class);
System.out.println(beansOfType);
{windowsSystemOperation=SystemOperation{name=‘执行windows命令’}}
案例2 判断如果有该类的话 则直接报错
package com.mayikt.config;

import org.springframework.boot.autoconfigure.condition.ConditionalOnClass;
import org.springframework.context.annotation.Bean;
import org.springframework.context.annotation.Configuration;


@Configuration
public class SpringConditionalOnClass {

    @Bean
    @ConditionalOnClass(name = "com.mayikt.config.MayiktConfig")
    public Object object1() throws Exception {
        throw new Exception("当前环境中中不允许MayiktConfig");
    }
}
Spring Cloud Gateway 启动报错(因为web依赖) 报错:
Spring Cloud Gateway启动一直报错 详细错误信息
Parameter 0 of method modifyRequestBodyGatewayFilterFactory in org.springframework.cloud.gateway.config.GatewayAutoConfiguration required a bean of type ‘org.springframework.http.codec.ServerCodecConfigurer’ that Could not be found.
Action:
Consider defining a bean of type ‘org.springframework.http.codec.ServerCodecConfigurer’ in your configuration.
   @Configuration(
        proxyBeanMethods = false
    )
    @ConditionalOnMissingClass({"org.springframework.web.reactive.dispatcherHandler"}) //重点注解
    protected static class WebfluxMissingFromClasspathConfiguration {
        public WebfluxMissingFromClasspathConfiguration() {
            GatewayClasspathWarningAutoConfiguration.log.warn("\n\n**********************************************************\n\nspring Webflux is missing from the classpath, which is required for Spring Cloud Gateway at this time. Please add spring-boot-starter-webflux dependency.\n\n**********************************************************\n\n");
        }
    }
相关代码

ApplicationContext 容器和 BeanFactory 容器的区别
Application Context 是 BeanFactory 的子接口
- ApplicationContext容器会在容器初始化时,会将其中的所有对象一次性装配好,以后用这些对象时只需要在内存中直接调用即可,优点是执行率高,缺点就是占用内存。
- BeanFactory 容器采用延时加载,在调用容器中的对象(getBean())才会装配该对象,虽然节省了资源占用但效率上大大降低。
ApplicationContext: 单例对象适用 ,采用此接口
它在构建核心容器时,创建对象采取的策略是采用立即加载(懒加载)的方式。也就是说,只要一读取完配置文件马上就创建配置文件中配置的对象。
BeanFactory: 多例对象使用
它在构建核心容器时,创建对象采取的策略是采用延迟加载的方式。也就是说,什么时候根据id获取对象了,什么时候才真正的创建对象。
BeanFactory 功能扩展")
ApplicationContext(四)BeanFactory 功能扩展
ApplicationContext(四)BeanFactory 功能扩展
上节我们提到容器刷新的第二步初始化 BeanFactory 工厂并解析配制文件,但此时 BeanFactory 的功能还很简单,需要对其进行扩展。这就涉及到下面第三步:BeanFactory 功能扩展。
那 Spring 究竟进行了那些功能扩展呢?
源代码【AbstractApplicationContext】
protected void prepareBeanFactory(ConfigurableListableBeanFactory beanFactory) {
    // 1. 设置 beanFactory 的 classLoader 为当前 context 的 classLoader
    beanFactory.setBeanClassLoader(getClassLoader());

    // 2. 设置 beanFactory 的表达式语言处理器,Spring3 增加了表达式语言的支持
    beanFactory.setBeanExpressionResolver(new StandardBeanExpressionResolver(beanFactory.getBeanClassLoader()));

    // 3. 为 beanFactory 增加一个默认的 propertyEditor,这个主要是对 bean 的属性等设置管理的一个工具
    beanFactory.addPropertyEditorRegistrar(new ResourceEditorRegistrar(this, getEnvironment()));

    // 4. 添加 BeanPostProcessor
    beanFactory.addBeanPostProcessor(new ApplicationContextAwareProcessor(this));

    // 5. 设置了几个忽略自动装配的接口
    beanFactory.ignoreDependencyInterface(ResourceLoaderAware.class);
    beanFactory.ignoreDependencyInterface(ApplicationEventPublisherAware.class);
    beanFactory.ignoreDependencyInterface(MessageSourceAware.class);
    beanFactory.ignoreDependencyInterface(ApplicationContextAware.class);
    beanFactory.ignoreDependencyInterface(EnvironmentAware.class);

    // 6. 设置了几个自动装配的特殊规则
    beanFactory.registerResolvableDependency(BeanFactory.class, beanFactory);
    beanFactory.registerResolvableDependency(ResourceLoader.class, this);
    beanFactory.registerResolvableDependency(ApplicationEventPublisher.class, this);
    beanFactory.registerResolvableDependency(ApplicationContext.class, this);

    // 7. 增加对 AspectJ 的支持
    if (beanFactory.containsBean(LOAD_TIME_WEAVER_BEAN_NAME)) {
        beanFactory.addBeanPostProcessor(new LoadTimeWeaverAwareProcessor(beanFactory));
        // Set a temporary ClassLoader for type matching.
        beanFactory.setTempClassLoader(new ContextTypeMatchClassLoader(beanFactory.getBeanClassLoader()));
    }

    // 8. 添加默认的系统环境 bean
    if (!beanFactory.containsLocalBean(ENVIRONMENT_BEAN_NAME)) {
        beanFactory.registerSingleton(ENVIRONMENT_BEAN_NAME, getEnvironment());
    }
    if (!beanFactory.containsLocalBean(SYSTEM_PROPERTIES_BEAN_NAME)) {
        beanFactory.registerSingleton(SYSTEM_PROPERTIES_BEAN_NAME, getEnvironment().getSystemProperties());
    }
    if (!beanFactory.containsLocalBean(SYSTEM_ENVIRONMENT_BEAN_NAME)) {
        beanFactory.registerSingleton(SYSTEM_ENVIRONMENT_BEAN_NAME, getEnvironment().getSystemEnvironment());
    }
}
上面函数中主要进行了几个方面的扩展。
(1) 增加对 SPEL 语言的支持
(2) 增加对属性编辑器的支持
(3) 增加对一些内置类,比如 Environmentaware、 Messagesourceaware 的信息注入。
(4) 设置了依赖功能可忽略的接口
(5) 注册一些固定依的属性
(6) 增加 Aspect的支持(会在第7章中进行详细的讲解)
(7) 将相关环境变量及属性注册以单例模式注册
可能读者不是很理解每个步骤的具体含义,接下来我们会对各个步骤进行详细地分析。
一、增加对 SPEL 语言的支持
SpEL使用 #{...} 作为定界符,所有在大框号中的字符都将被认为是 SpEL,使用格式如下:
@Value("#{19 - 1}")
private int age3;
在源码中通过代码 beanFactory.setBeanExpressionResolver(new StandardBeanExpressionResolver(beanFactory.getBeanClassLoader())) 注册语言解析器,就可以对 SPEL 进行解析了,那么在注册解析器后 Spring 又是在什么时候调用这个解析器进行解析呢?详见 《SPEL语言执行过程》
二、增加对属性编辑器的支持
2.1 属性编辑器的基本用法
在 Spring DI 注入的时候可以把普通属性注入进来,但是像 Date 类型就无法被识別。例如:
public class UserManager {
    private Date data;
    // 省略get/set
}
上面代码中,需要对日期型属性进行注入:
<bean id="userManager">
    <property name="data" value="2018-08-01 00:00:00"/>
</bean>
如果直接这样使用,程序则会报异常,类型转换不成功。因为在 Usermanager 中的 data Value 属性是 Date 类型型的,而在 XML中配置的却是 String 类型的,所以当然会报异常。
Spring 针对此问题提供了两种解决办法。
1. 使用用自定义属性编辑器
使用自定义属性编辑器,通过继承 PropertyEditorSupport,重写 setastext 方法,具体步骤如下。
(1) 编写自定义的属性编辑器。
public class DatePropertyEdit extends PropertyEditorSupport implements PropertyEditor {
    private String format = "yyyy-MM-dd HH:mm:ss";
    @Override
    public void setAsText(String text) throws IllegalArgumentException {
        SimpleDateFormat sdf = new SimpleDateFormat(format);
        try {
            Date date = sdf.parse(text);
            this.setValue(date);
        } catch (ParseException e) {
        }
    }
}
(2) 将自定义属性编辑器注册到 Spring 中。
<bean>
    <property name="customEditors">
        <map>
            <entry key="java.util.Date"
                   value="com.github.binarylei.spring01.day0728.propertyedit.DataPropertyEdit">
            </entry>
        </map>
    </property>
</bean>
在配置文件中引入类型为 CustomEditorConfigurer 的 bean,并在属性 customeditors 中加入自定义的属性编辑器,其中 key 为属性编辑器所对应的类型。通过这样的配置,当 Spring 在注入 bean 的属性时一旦遇到了 java.uti.Date 类型的属性会自动调用自定义的 DatepropertyEditor 解解析器进行解析,并用解析结果代替配置属性进行注入。
2. 注册 Spring 自带的属性编辑器 CustomDateEditor
通过注册 Spring 自带的属性编辑器 CustomDateEditor,具体步骤如下。
(1) 定义属性编辑器
public class DatePropertyEditorRegistar implements PropertyEditorRegistrar {
    @Override
    public void registerCustomEditors(PropertyEditorRegistry registry) {
        registry.registerCustomEditor(Date.class,
                new CustomDateEditor(new SimpleDateFormat("yyyy-MM-dd"),true));
    }
}
(2) 注册到 Spring
<bean>
    <property name="propertyEditorRegistrars">
        <list>
            <bean/>
        </list>
    </property>
</bean>
通过在配置文件中将自定义的 DatePropertyEditorRegistar 注册进人 org.springframework.beans.factory.config.CustomEditorConfigurer 的 propertyEditorRegistrars 属性中,可以具有与方法 1 同样的效果我们了解了自定义属性编辑器的使用。
但是,似乎这与本节中围绕的核心代码 beanFactory.addPropertyEditorRegistrar(new ResourceEditorRegistrar(this, getEnvironment())) 并无联系,因为在注册自定义属性编辑器的时候使用的是 PropertyEditorRegistrar 的 registerCustomEditors 方法,而这里使用的是 ConfigurableListableBeanFactory 的 addPropertyEditorRegistrar 方法。我们不妨深入探索下 ResourceEditorRegistrar 的内部实现,在 ResourceEditorRegistrar 中,我们最关心的方法是 registerCustomEditor 方法。
2.2 属性编辑器的内部原理
beanFactory.addPropertyEditorRegistrar(new ResourceEditorRegistrar(this, getEnvironment()))
源代码【AbstractBeanFactory】
public void addPropertyEditorRegistrar(PropertyEditorRegistrar registrar) {
    Assert.notNull(registrar, "PropertyEditorRegistrar must not be null");
    this.propertyEditorRegistrars.add(registrar);
}
源代码【ResourceEditorRegistrar】
// 1. PropertyEditorRegistrar 将常用的资源编辑器注册到 PropertyEditorRegistry 上,相当于一个工具类
// 2. PropertyEditorRegistry 实际持有编辑器
public void registerCustomEditors(PropertyEditorRegistry registry) {
    ResourceEditor baseEditor = new ResourceEditor(this.resourceLoader, this.propertyResolver);
    doRegisterEditor(registry, Resource.class, baseEditor);
    doRegisterEditor(registry, ContextResource.class, baseEditor);
    doRegisterEditor(registry, InputStream.class, new InputStreamEditor(baseEditor));
    doRegisterEditor(registry, InputSource.class, new InputSourceEditor(baseEditor));
    doRegisterEditor(registry, File.class, new FileEditor(baseEditor));
    doRegisterEditor(registry, Reader.class, new ReaderEditor(baseEditor));
    doRegisterEditor(registry, URL.class, new URLEditor(baseEditor));

    ClassLoader classLoader = this.resourceLoader.getClassLoader();
    doRegisterEditor(registry, URI.class, new URIEditor(classLoader));
    doRegisterEditor(registry, Class.class, new ClassEditor(classLoader));
    doRegisterEditor(registry, Class[].class, new ClassArrayEditor(classLoader));

    if (this.resourceLoader instanceof ResourcePatternResolver) {
        doRegisterEditor(registry, Resource[].class,
                new ResourceArrayPropertyEditor((ResourcePatternResolver) this.resourceLoader, this.propertyResolver));
    }
}

/**
 * 注册对应的属性编辑器
 */
private void doRegisterEditor(PropertyEditorRegistry registry, Class<?> requiredType, PropertyEditor editor) {
    if (registry instanceof PropertyEditorRegistrySupport) {
        ((PropertyEditorRegistrySupport) registry).overrideDefaultEditor(requiredType, editor);
    }
    else {
        registry.registerCustomEditor(requiredType, editor);
    }
}
在 doRegisterEditor 函数中,可以看到在之前提到的自定义属性中使用的关键代码 registry.registerCustomEditor(requiredType, editor),回过头来看 ResourceEditorRegistrar 类的 registerCustomEditors 方法的核心功能,其实无非是注册了一系列的常用类型的属性编辑器,例如,代码 doRegisterEditor(registry, Class.class, new ClassEditor(classLoader)) 实现的功能就是注册 Class 类对应的属性编辑器。那么,注册后,一且某个实体 bean 中存在一些 Class 类型的属性,那么 Spring 会调用 Classeditor 将配置中定义的 String 类型转换为 Class 类型并进行赋值。
分析到这里,我们不禁有个疑问,虽说 ResourceEditorRegistrar 类的 registerCustomEditors 方法实现了批量注册的功能,但是 beanFactory.addPropertyEditorRegistrar(new ResourceEditorRegistrar(this, getEnvironment())) 仅仅是注册了 ResourceEditorRegistrar 实例,却并没有调用 ResourceEditorRegistrar 的 registerCustomEditors 方法进行注册,那么到底是在什么时候进行注册的呢?
源代码【Abstractbeanfactory】
// 如此,BeanWrapper 就注册了各种属性编辑器,可以在 populate() 时解析各种 String 类型的字段进行注入
protected void initBeanWrapper(BeanWrapper bw) {
    bw.setConversionService(getConversionService());
    registerCustomEditors(bw);
}

// 调用 propertyEditorRegistrars 为 registry 注入属性编辑器
protected void registerCustomEditors(PropertyEditorRegistry registry) {
    PropertyEditorRegistrySupport registrySupport =
            (registry instanceof PropertyEditorRegistrySupport ? (PropertyEditorRegistrySupport) registry : null);
    if (registrySupport != null) {
        registrySupport.useConfigValueEditors();
    }
    if (!this.propertyEditorRegistrars.isEmpty()) {
        for (PropertyEditorRegistrar registrar : this.propertyEditorRegistrars) {
            registrar.registerCustomEditors(registry);
        }
    }
    if (!this.customEditors.isEmpty()) {
        for (Map.Entry<Class<?>, Class<? extends PropertyEditor>> entry : this.customEditors.entrySet()) {
            Class<?> requiredType = entry.getKey();
            Class<? extends PropertyEditor> editorClass = entry.getValue();
            registry.registerCustomEditor(requiredType, BeanUtils.instantiateClass(editorClass));
        }
    }
}
既然提到了 BeanWrapper,这里也有必要强调下, Spring 中用于封装 bean 的是 BeanWrapper 类型,而它又间接继承了 PropertyEditorRegistry 类型,也就是我们之前反复看到的方法参数 PropertyEditorRegistry registry,其实大部分情况下都是 BeanWrapper,对于 BeanWrapper 在 Spring 中的默认实现是 BeanWrapperlmpl,而 BeanWrapperlmpl 除了实现 BeanWrapper 接口外还继承了 PropertyEditorRegistrySupport,在 PropertyEditorRegistrySupport 中有这样一个方法
源代码【PropertyEditorRegistrySupport】
public class PropertyEditorRegistrySupport implements PropertyEditorRegistry {
    // 在 PropertyEditorRegistrySupport 中注册了一系列默认的属性编辑器
    private void createDefaultEditors() {
        this.defaultEditors = new HashMap<Class<?>, PropertyEditor>(64);

        // Simple editors, without parameterization capabilities.
        // The JDK does not contain a default editor for any of these target types.
        this.defaultEditors.put(Charset.class, new CharsetEditor());
        this.defaultEditors.put(Class.class, new ClassEditor());
        this.defaultEditors.put(Class[].class, new ClassArrayEditor());
        this.defaultEditors.put(Currency.class, new CurrencyEditor());
        this.defaultEditors.put(File.class, new FileEditor());
        this.defaultEditors.put(InputStream.class, new InputStreamEditor());
        this.defaultEditors.put(InputSource.class, new InputSourceEditor());
        this.defaultEditors.put(Locale.class, new LocaleEditor());
        this.defaultEditors.put(Pattern.class, new PatternEditor());
        this.defaultEditors.put(Properties.class, new PropertiesEditor());
        this.defaultEditors.put(Reader.class, new ReaderEditor());
        this.defaultEditors.put(Resource[].class, new ResourceArrayPropertyEditor());
        this.defaultEditors.put(TimeZone.class, new TimeZoneEditor());
        this.defaultEditors.put(URI.class, new URIEditor());
        this.defaultEditors.put(URL.class, new URLEditor());
        this.defaultEditors.put(UUID.class, new UUIDEditor());
        if (zoneIdClass != null) {
            this.defaultEditors.put(zoneIdClass, new ZoneIdEditor());
        }

        // Default instances of collection editors.
        // Can be overridden by registering custom instances of those as custom editors.
        this.defaultEditors.put(Collection.class, new CustomCollectionEditor(Collection.class));
        this.defaultEditors.put(Set.class, new CustomCollectionEditor(Set.class));
        this.defaultEditors.put(SortedSet.class, new CustomCollectionEditor(SortedSet.class));
        this.defaultEditors.put(List.class, new CustomCollectionEditor(List.class));
        this.defaultEditors.put(SortedMap.class, new CustomMapEditor(SortedMap.class));

        // Default editors for primitive arrays.
        this.defaultEditors.put(byte[].class, new ByteArrayPropertyEditor());
        this.defaultEditors.put(char[].class, new CharArrayPropertyEditor());

        // The JDK does not contain a default editor for char!
        this.defaultEditors.put(char.class, new CharacterEditor(false));
        this.defaultEditors.put(Character.class, new CharacterEditor(true));

        // Spring''s CustomBooleanEditor accepts more flag values than the JDK''s default editor.
        this.defaultEditors.put(boolean.class, new CustomBooleanEditor(false));
        this.defaultEditors.put(Boolean.class, new CustomBooleanEditor(true));

        // The JDK does not contain default editors for number wrapper types!
        // Override JDK primitive number editors with our own CustomNumberEditor.
        this.defaultEditors.put(byte.class, new CustomNumberEditor(Byte.class, false));
        this.defaultEditors.put(Byte.class, new CustomNumberEditor(Byte.class, true));
        this.defaultEditors.put(short.class, new CustomNumberEditor(Short.class, false));
        this.defaultEditors.put(Short.class, new CustomNumberEditor(Short.class, true));
        this.defaultEditors.put(int.class, new CustomNumberEditor(Integer.class, false));
        this.defaultEditors.put(Integer.class, new CustomNumberEditor(Integer.class, true));
        this.defaultEditors.put(long.class, new CustomNumberEditor(Long.class, false));
        this.defaultEditors.put(Long.class, new CustomNumberEditor(Long.class, true));
        this.defaultEditors.put(float.class, new CustomNumberEditor(Float.class, false));
        this.defaultEditors.put(Float.class, new CustomNumberEditor(Float.class, true));
        this.defaultEditors.put(double.class, new CustomNumberEditor(Double.class, false));
        this.defaultEditors.put(Double.class, new CustomNumberEditor(Double.class, true));
        this.defaultEditors.put(BigDecimal.class, new CustomNumberEditor(BigDecimal.class, true));
        this.defaultEditors.put(BigInteger.class, new CustomNumberEditor(BigInteger.class, true));

        // Only register config value editors if explicitly requested.
        if (this.configValueEditorsActive) {
            StringArrayPropertyEditor sae = new StringArrayPropertyEditor();
            this.defaultEditors.put(String[].class, sae);
            this.defaultEditors.put(short[].class, sae);
            this.defaultEditors.put(int[].class, sae);
            this.defaultEditors.put(long[].class, sae);
        }
    }
}
2.3 添加 ApplicationContextAwareProcessor 处理器
在 Spring 中可以注入一些底层的组件,怎么实现的呢?这就是 beanFactory.addBeanPostProcessor(new ApplicationContextAwareProcessor(this)) 的作用了。首先回顾一下 ApplicationContextAware 的使用方法:
// 可以使用 ApplicationContext 组件
@Service
public class Bean implements ApplicationContextAware {
    private ApplicationContext context;

    @Override
    public void setApplicationContext(ApplicationContext applicationContext) throws BeansException {
        this.context = applicationContext;
    }
}
很显然 context 是在 bean 实例化完成,属性注入后准备进行 init-method 方法前完成的。我们看一下代码:
源代码【PropertyEditorRegistrySupport】
// 抛开各种异常处理 Spring 作了如下的处理,这里我们重点关注 applyBeanPostProcessorsBeforeInitialization
protected Object initializeBean(final String beanName, final Object bean, RootBeanDefinition mbd) {

    // 1. 注入 Spring 组件
    invokeAwareMethods(beanName, bean);

    // 2. 执行 init-method 前的回调,ApplicationContextAware 就是在这一步注入属性
    wrappedBean = applyBeanPostProcessorsBeforeInitialization(wrappedBean, beanName);

    // 3. 执行 init-method 方法
    invokeInitMethods(beanName, wrappedBean, mbd);

    // 4. 执行 init-method 后的回调
    wrappedBean = applyBeanPostProcessorsAfterInitialization(wrappedBean, beanName);
    return wrappedBean;
}

// 注入 BeanNameAware、BeanClassLoaderAware、BeanFactoryAware
private void invokeAwareMethods(final String beanName, final Object bean) {
    if (bean instanceof Aware) {
        if (bean instanceof BeanNameAware) {
            ((BeanNameAware) bean).setBeanName(beanName);
        }
        if (bean instanceof BeanClassLoaderAware) {
            ((BeanClassLoaderAware) bean).setBeanClassLoader(getBeanClassLoader());
        }
        if (bean instanceof BeanFactoryAware) {
            ((BeanFactoryAware) bean).setBeanFactory(AbstractAutowireCapableBeanFactory.this);
        }
    }
}

// 执行后置处理器,ApplicationContextAware 在这里注入了部分其它的 Aware
public Object applyBeanPostProcessorsBeforeInitialization(Object existingBean, String beanName)
        throws BeansException {

    Object result = existingBean;
    for (BeanPostProcessor beanProcessor : getBeanPostProcessors()) {
        result = beanProcessor.postProcessBeforeInitialization(result, beanName);
        if (result == null) {
            return result;
        }
    }
    return result;
}
下面我们看一下 ApplicationContextAwareProcessor 都做了那些事情,postProcessBeforeInitialization 实际上事情委托给了 invokeAwareInterfaces()
class ApplicationContextAwareProcessor implements BeanPostProcessor {
    public Object postProcessBeforeInitialization(final Object bean, String beanName) throws BeansException {

        invokeAwareInterfaces(bean);

        return bean;
    }

    private void invokeAwareInterfaces(Object bean) {
        if (bean instanceof Aware) {
            if (bean instanceof EnvironmentAware) {
                ((EnvironmentAware) bean).setEnvironment(this.applicationContext.getEnvironment());
            }
            if (bean instanceof EmbeddedValueResolverAware) {
                ((EmbeddedValueResolverAware) bean).setEmbeddedValueResolver(
                        new EmbeddedValueResolver(this.applicationContext.getBeanFactory()));
            }
            if (bean instanceof ResourceLoaderAware) {
                ((ResourceLoaderAware) bean).setResourceLoader(this.applicationContext);
            }
            if (bean instanceof ApplicationEventPublisherAware) {
                ((ApplicationEventPublisherAware) bean).setApplicationEventPublisher(this.applicationContext);
            }
            if (bean instanceof MessageSourceAware) {
                ((MessageSourceAware) bean).setMessageSource(this.applicationContext);
            }
            if (bean instanceof ApplicationContextAware) {
                ((ApplicationContextAware) bean).setApplicationContext(this.applicationContext);
            }
        }
    }
}
2.4 设置忽略依赖
beanFactory.ignoreDependencyInterface(ResourceLoaderAware.class);
beanFactory.ignoreDependencyInterface(ApplicationEventPublisherAware.class);
beanFactory.ignoreDependencyInterface(MessageSourceAware.class);
beanFactory.ignoreDependencyInterface(ApplicationContextAware.class);
beanFactory.ignoreDependencyInterface(EnvironmentAware.class);
很明显 ApplicationContextAware 不能再注入到 bean 中:
public class Bean {
    @Autowired
    private ApplicationContextAware applicationContextAware;
}
2.5 注册依赖
beanFactory.registerResolvableDependency(BeanFactory.class, beanFactory);
beanFactory.registerResolvableDependency(ResourceLoader.class, this);
beanFactory.registerResolvableDependency(ApplicationEventPublisher.class, this);
beanFactory.registerResolvableDependency(ApplicationContext.class, this);
Spring 还简化了底层组件的注入问题:
public class Bean {
    @Autowired
    private ApplicationContext context;
}
每天用心记录一点点。内容也许不重要,但习惯很重要!

BeanFactory 与 ApplicationContext
我对 Spring 框架还很陌生,我一直在使用它并将一些示例应用程序放在一起,以评估 Spring MVC
以用于即将到来的公司项目。到目前为止,我真的很喜欢我在 Spring MVC 中看到的东西,看起来很容易使用,并鼓励你编写对单元测试非常友好的类。
作为一个练习,我正在为我的一个示例/测试项目编写一个主要方法。我不清楚的一件事是BeanFactory和之间的确切区别ApplicationContext-
适合在哪些条件下使用?
我理解ApplicationContextextends BeanFactory,但如果我只是写一个简单的 main
方法,我需要ApplicationContext提供的额外功能吗?究竟提供了什么样的额外功能ApplicationContext?
除了回答“我应该在 main() 方法中使用哪个”之外,关于在这种情况下我应该使用哪种实现,是否有任何标准或指南?是否应该将我的 main()
方法编写为依赖于 XML 格式的 bean/应用程序配置 - 这是一个安全的假设,还是我将用户锁定在特定的东西上?
这个答案在 Web 环境中是否会发生变化 - 如果我的任何课程需要了解 Spring,他们是否更有可能需要ApplicationContext?
谢谢你的帮助。我知道很多这些问题可能在参考手册中得到了解答,但是如果没有用细齿梳通读手册,我很难找到这两个接口的明确细分以及每个接口的优缺点。
关于4.BeanFactory和ApplicationContext的区别和beanfactory 和 applicationcontext 有什么区别的问题我们已经讲解完毕,感谢您的阅读,如果还想了解更多关于19.spring beanfactory与applicationcontext、ApplicationContext 容器和 BeanFactory 容器的区别、ApplicationContext(四)BeanFactory 功能扩展、BeanFactory 与 ApplicationContext等相关内容,可以在本站寻找。
本文标签:


