在这里,我们将给大家分享关于如何通过pyinstaller使用tkcalendar模块安装python应用程序?的知识,让您更了解python-tk安装的本质,同时也会涉及到如何更有效地condain
在这里,我们将给大家分享关于如何通过pyinstaller使用tkcalendar模块安装python应用程序?的知识,让您更了解python-tk安装的本质,同时也会涉及到如何更有效地conda install 和 pip install 安装python依赖库的选择、conda 使用 pyinstaller 打包 py 程序为 exe 文件、Jenkins之使用Pyinstaller构建Python应用程序、pyinstaller install 打包 python包,失败了,应该在哪个路径下执行python安装包的内容。
本文目录一览:- 如何通过pyinstaller使用tkcalendar模块安装python应用程序?(python-tk安装)
- conda install 和 pip install 安装python依赖库的选择
- conda 使用 pyinstaller 打包 py 程序为 exe 文件
- Jenkins之使用Pyinstaller构建Python应用程序
- pyinstaller install 打包 python包,失败了,应该在哪个路径下执行python安装包
")
如何通过pyinstaller使用tkcalendar模块安装python应用程序?(python-tk安装)
我正在尝试使用pyinstaller在Windows上使用tkcalendar在Windows上安装python应用程序。应用程序正在运行,但tkcalendar.Calendar无法运行。
当我在不安装的情况下运行应用程序时,一切正常,但是如果执行此操作,则日历小部件将不会出现。我认为pyinstaller可以看到此模块,但他对tkcalendar使用的模块有疑问。我试图用
–path = / … / python / Lib / site-
packages运行pyinstaller,但这没有用。将模块文件复制到应用程序目录也无济于事。
答案1
小编典典问题并非来自tkcalendarPyInstaller未检测到第二级导入的事实。解决这个问题的方法是在tkcalendar的文档中解释的HOWTOs部分:
当捆绑在一起PyInstaller的应用程序,有一个
问题与检测tkcalendar的通天依赖。可以使用以下--hidden-import选项解决此问题:$ pyinstaller --hidden-import babel.numbers myscript.py或通过编辑 .spec 文件:
hiddenimports=["babel.numbers"]

conda install 和 pip install 安装python依赖库的选择
首先网上已经有很多文章讲了它们的区别了,完整内容不再赘述:
- https://www.askpython.com/pyt...
- https://www.anaconda.com/blog...
- https://stackoverflow.com/que...
简要概括一下关键点,作为选择的依据:
- conda里的python库数量很少,只有1500+,不是知名库基本就不要想了;相比之下pip源有23万+的库资源,高了两个数量级
- 但是pip有个明显的缺点:它在安装一个库的时候,会同时装对应的依赖,然而如果这个依赖已经存在了,并且跟预期的版本不同,那么它就不管不顾地把当前库删了,重装需要的版本,这经常会造成新安装以后,一些就的库不能用了;而conda会相应地执行SAT测试,尽量保证所有版本的兼容性
结论:python的依赖库,可以先尝试conda,有的话直接装,没有再用pip安装。

conda 使用 pyinstaller 打包 py 程序为 exe 文件
原文链接: conda 使用 pyinstaller 打包 py 程序为 exe 文件
上一篇: fabric 在 vue 中的简单使用
下一篇: fast style transfer 快速风格转换 导出视频
创建环境
conda create -n ins python=3.6激活环境
activate ins
目标代码
import time

for i in range(10):
    print(i)
    time.sleep(1)
在需要打包的程序目录下执行
含有命令行窗口
pyinstaller.exe  -F t.py

不含命令行窗口
pyinstaller.exe  -Fw t.py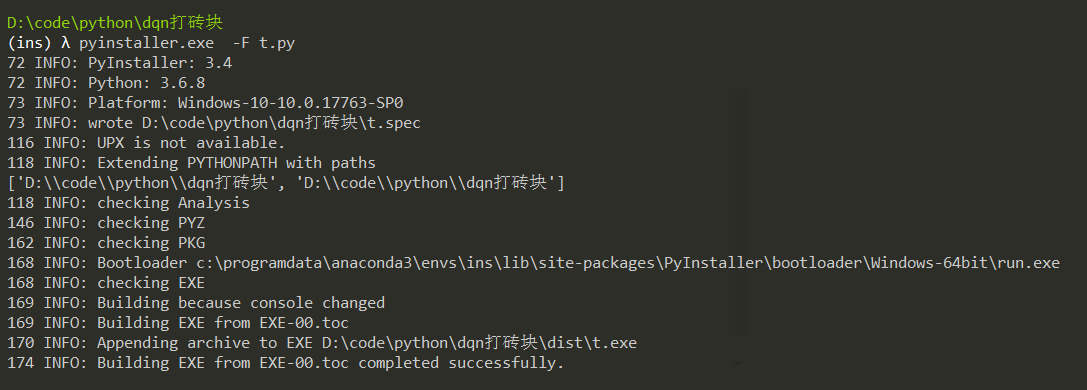
双击运行,每隔一秒输出一个数字

打包一个迷宫程序
大小只有 8M 多,可以看到带有命令行输出窗口,同时 gui 也能显示正常

import copy
from tkinter import Tk, Button, S, W, E, N, mainloop
import tkinter.messagebox


def getMat(rows=1, cols=1, val=0):
    res = []
    for i in range(rows):
        t = [copy.deepcopy(val)] * cols
        res.append(t)
    return res


# 用于获取最短路的辅助节点类
class Node:
    def __init__(self, x=0, y=0, step=0, pre=0):
        self.x = x
        self.y = y
        self.step = step
        self.pre = pre

    def __str__(self):
        return ''%d %d'' % (self.x, self.y)


# 迷宫类
class Maze():
    # g是二维数组,保存迷宫信息1可以走0不能走
    ''''''
        g: 迷宫地图
        rows,cols,迷宫形状
        sx,sy起始点
        ex,ey终点
    ''''''

    def __init__(self, g, rows, cols, sx, sy, ex, ey):
        self.g = copy.deepcopy(g)
        self.rows = rows
        self.cols = cols
        self.ex = ex
        self.ey = ey
        self.sx = sx
        self.sy = sy

    # 获得两个端点的路径列表,不存在时返回空列表
    # 使用队列只能找到一条最短路径
    def getPath(self):
        q = []  # 用来模拟队列
        vis = getMat(self.rows, self.cols, 0)
        # 加入初始点
        q.append(Node(self.sx, self.sy, 0, -1))
        front = 0
        tail = 1
        vis[self.sx][self.sy] = 1

        dir = [[0, 1], [0, -1], [1, 0], [-1, 0]]

        while front + 1 <= tail:
            t = q[front]
            front += 1

            if t.x == self.ex and t.y == self.ey:
                tt = copy.deepcopy(t)
                path = []
                while tt.pre != -1:
                    path.insert(0, tt)
                    tt = copy.deepcopy(q[tt.pre])
                path.insert(0, Node(self.sx, self.sy))
                return path

            for i in range(4):
                nx = t.x + dir[i][0]
                ny = t.y + dir[i][1]
                ns = t.step + 1
                if nx >= 0 and ny >= 0 \
                        and nx < self.rows \
                        and ny < self.cols \
                        and int(self.g[nx][ny]) != 0 \
                        and vis[nx][ny] == 0:
                    vis[nx][ny] = 1
                    q.append(Node(nx, ny, ns, front - 1))
                    tail += 1
                    if nx == self.ex and ny == self.ey:
                        vis[nx][ny] = 0
        return []

    # 显示迷宫保存的数字数组
    def showMaze(self):
        print(''Maze:'')
        for i in range(self.rows):
            for j in range(self.cols):
                print(self.g[i][j], end='' '')
            print()


# 用于显示图形界面的类
class View:
    def __init__(self, rows=16, cols=16):
        self.rows = rows
        self.cols = cols
        self.btns = getMat(rows, cols, 0)
        self.g = getMat(rows, cols, 1)
        self.ps = []  # 保存路径端点

    # 绘制图形界面
    def start(self):
        tk = Tk()

        for i in range(self.rows):
            for j in range(self.cols):
                self.btns[i][j] = Button(tk, text=''%d %d'' % (i, j),
                                         width=3, height=1,
                                         bg=''Silver'', fg=''Silver'')
                # 添加左键单击事件
                self.btns[i][j].bind(''<1>'', self.changeColor)
                # 添加右键单击事件
                self.btns[i][j].bind(''<3>'', self.setPos)
                self.btns[i][j].grid(row=i, column=j)
        # 两个操作按钮
        reset = Button(tk, text=''重置'', height=2, command=self.resetMaze)
        reset.grid(rows=self.rows, columnspan=self.cols, sticky=N + E + S + W)
        start = Button(tk, text=''显示路径'', height=2, command=self.showPath)
        start.grid(rows=self.rows, columnspan=self.cols, sticky=N + E + S + W)

        tk.resizable(height=False, width=False)
        tk.title(''简单最短路--阿豪'')  # 设置标题
        # tk.iconbitmap(''img.ico'')  # 设置图标
        mainloop()

    # 设置x,y点的颜色
    def setColor(self, x, y, color):
        self.btns[x][y][''bg''] = color
        self.btns[x][y][''fg''] = color

    # 鼠标左击事件
    def changeColor(self, event=None):
        if event != None:
            x = int(event.widget[''text''].split()[0])
            y = int(event.widget[''text''].split()[1])
            if self.g[x][y] == 0:
                self.setColor(x, y, ''Silver'')
                self.g[x][y] = 1
            elif self.g[x][y] == 1:
                self.setColor(x, y, ''black'')
                self.g[x][y] = 0
            print(x, y)

    # 鼠标右击事件
    def setPos(self, event=None):
        if event != None:
            x = int(event.widget[''text''].split()[0])
            y = int(event.widget[''text''].split()[1])
            if self.g[x][y] == -1:
                # 是端点,将端点变为可以走的点
                self.g[x][y] = 1
                self.setColor(x, y, ''silver'')
                if len(self.ps) == 1:
                    self.ps = []
                elif self.ps[0].x == x and self.ps[0].y == y:
                    self.ps = self.ps[1:]
                else:
                    self.ps = self.ps[:1]
            else:
                # 不是端点,要么是0,1代表墙和路
                self.g[x][y] = -1
                self.setColor(x, y, ''red'')
                self.ps.append(Node(x, y))
                if len(self.ps) == 3:
                    self.g[self.ps[0].x][self.ps[0].y] = 1
                    self.setColor(self.ps[0].x, self.ps[0].y, ''silver'')
                    self.ps = self.ps[1:]

    # 在UI中绘制路径
    def showPath(self):
        if len(self.ps) != 2:
            tkinter.messagebox.showinfo(title=''err'',
                                        message=''请选择两个端点'')
            return

        m = Maze(self.g, self.rows, self.cols,
                 self.ps[0].x, self.ps[0].y,
                 self.ps[1].x, self.ps[1].y)
        m.showMaze()
        print(''path'')
        path = m.getPath()
        if len(path) == 0:
            tkinter.messagebox.showinfo(title=''err'',
                                        message=''路径不存在'')
            return

        for i in range(self.rows):
            for j in range(self.cols):
                if self.g[i][j] != 0:
                    self.setColor(i, j, ''silver'')
                else:
                    self.setColor(i, j, ''black'')

        for i in path:
            self.setColor(i.x, i.y, ''blue'')
        self.setColor(self.ps[0].x, self.ps[0].y, ''red'')
        self.setColor(self.ps[1].x, self.ps[1].y, ''red'')

    # 重新初始化迷宫
    def resetMaze(self):
        self.g = getMat(self.rows, self.cols, 1)
        for i in range(self.rows):
            for j in range(self.cols):
                self.setColor(i, j, ''silver'')
        self.ps = []


if __name__ == ''__main__'':
    v = View()
    v.start()

Jenkins之使用Pyinstaller构建Python应用程序
[TOC]
<br><br>
1. 极简概述
Jenkins是一个独立的开源自动化服务器,可用于自动执行与构建,测试,交付或部署软件相关的各种任务,。
Jenkins可以通过本机系统软件包,Docker安装,甚至可以由安装了Java Runtime Environment(JRE)的任何机器独立运行。
<br><br>
<br><br>
2. Jenkins配置
安装Jenkins很简单,首先安装Java8,然后再安装Jenkins,这里使用Jenkins的2.173版本。包的话,直接去官网下载吧。
<br>
2.1 安装JDK
(1) 解压JDK
[root@jenkins ~]# tar zxvf jdk-8u171-linux-x64.tar.gz
[root@jenkins ~]# mv jdk1.8.0_171/ /usr/local/java
<br>
(2)添加环境变量
[root@jenkins ~]# vim /etc/profile # 写入如下内容
export JAVA_HOME=/usr/local/java
export PATH=$PATH:$MAVEN_HOME/bin:$JAVA_HOME/bin
export JRE_HOME=$JAVA_HOME/jre
export CLASSPATH=.:$JAVA_HOME/lib/dt.jar:$JAVA_HOME/lib/tools.jar:$JRE_HOME/lib
<br>
(3) 立即生效
[root@jenkins ~]# source /etc/profile
[root@jenkins ~]# java -version
java version "1.8.0_171"
Java(TM) SE Runtime Environment (build 1.8.0_171-b11)
Java HotSpot(TM) 64-Bit Server VM (build 25.171-b11, mixed mode)
<br><br>
2.2 安装Jenkins
<br>
(1) 直接用jre跑
[root@jenkins ~]# java -jar jenkins.war --httpPort=8080
<br>
(2) 访问Web
http://localhost:8080
<br>
(3) 跟着配置 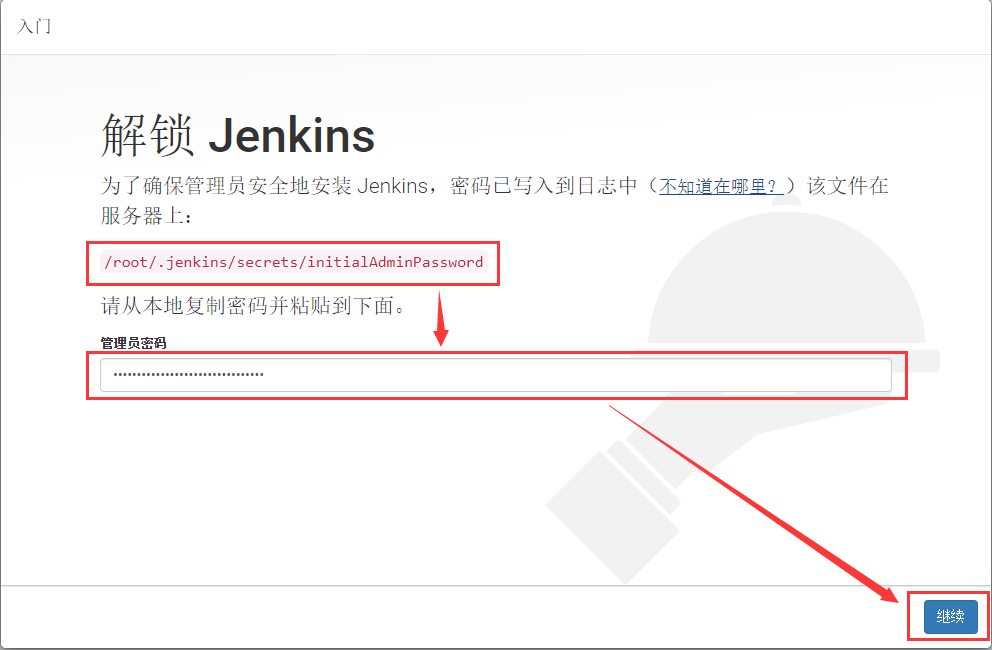
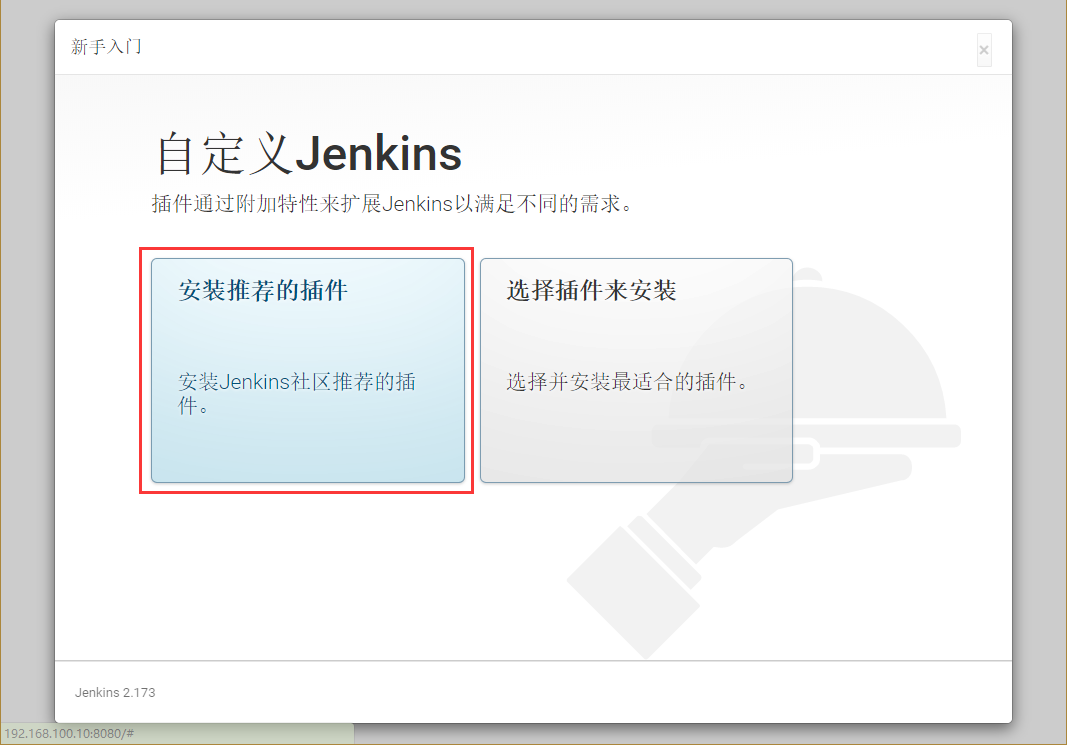
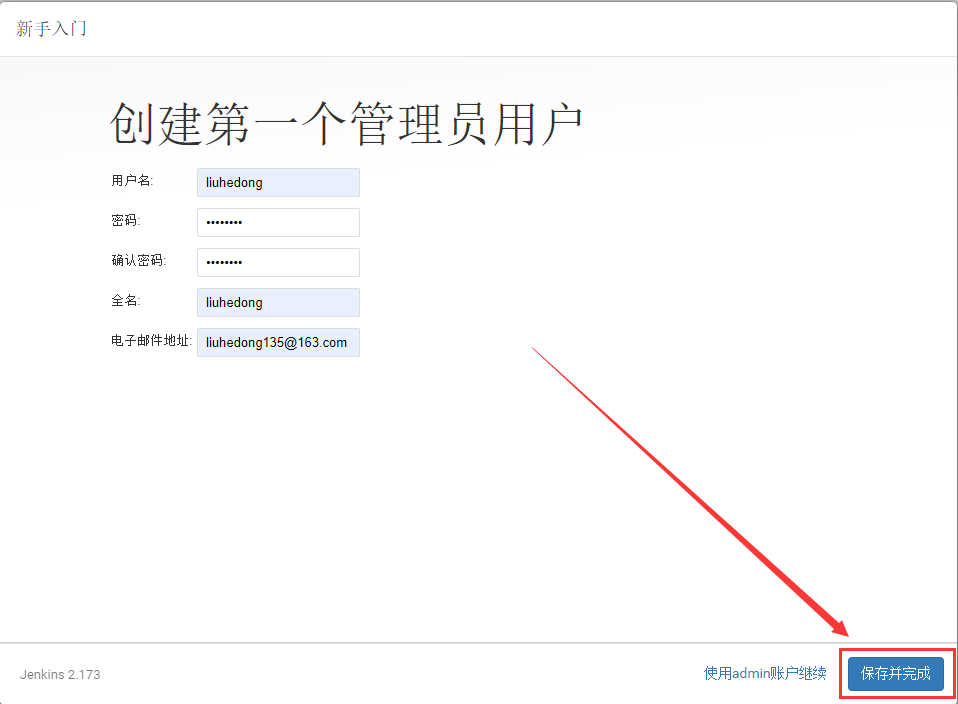
注意:如果这一步出现:Problem accessing /setupWizard/createAdminUser. Reason:,那么直接使用admin登陆。
<br>
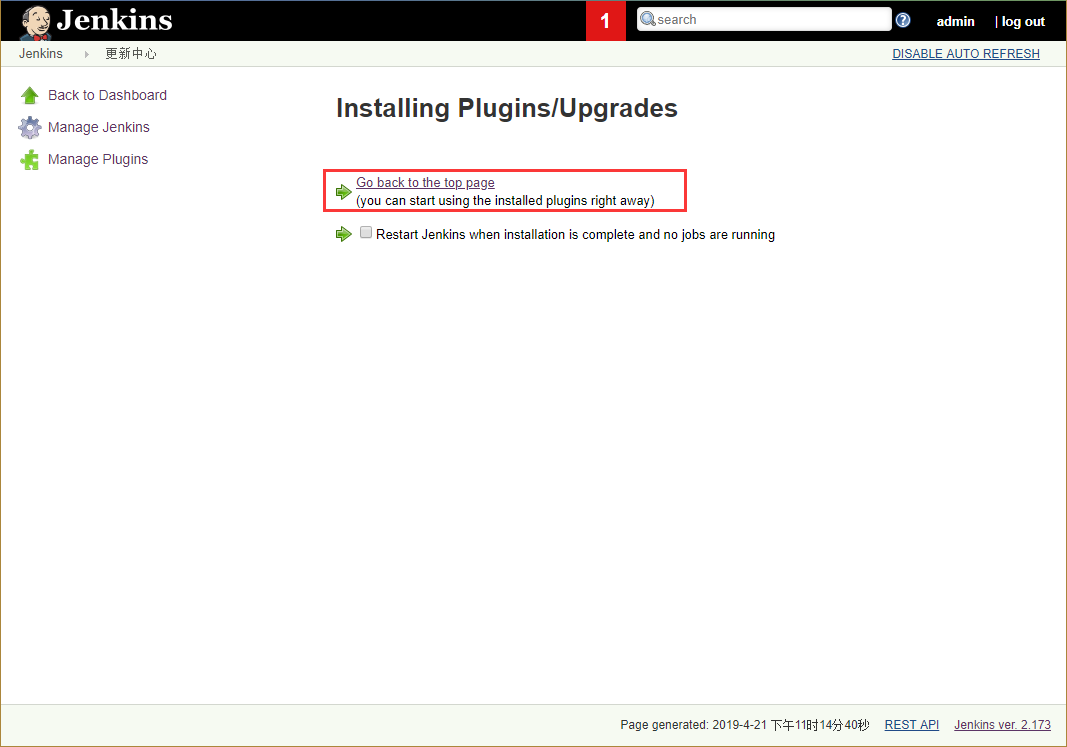
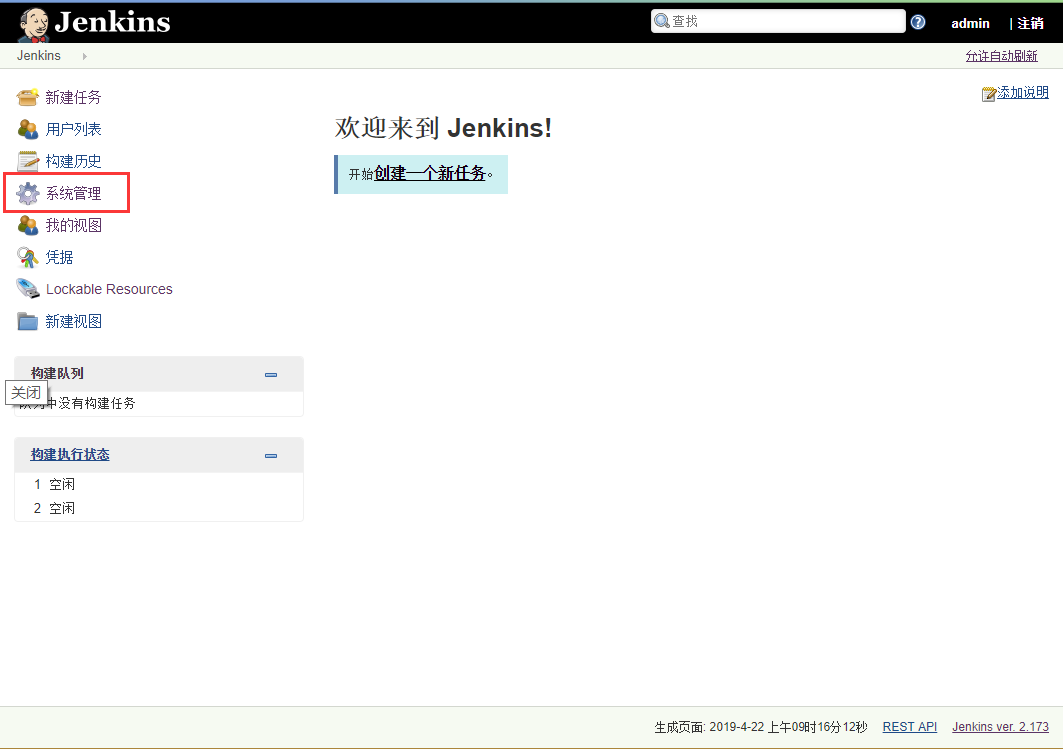
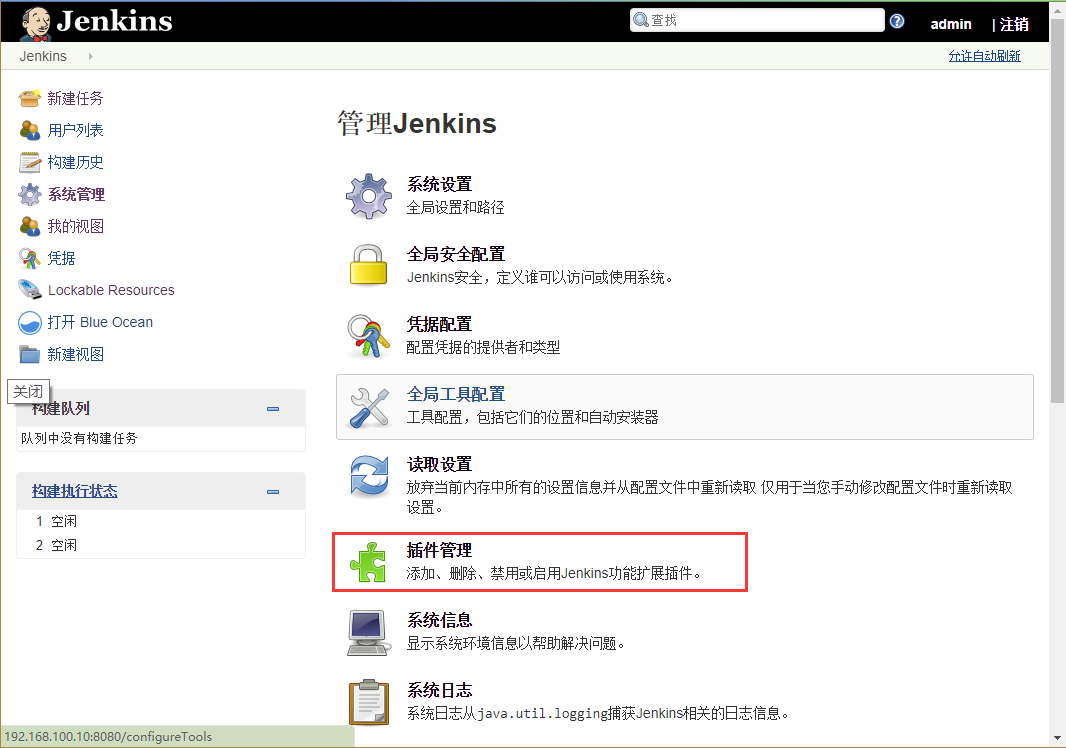
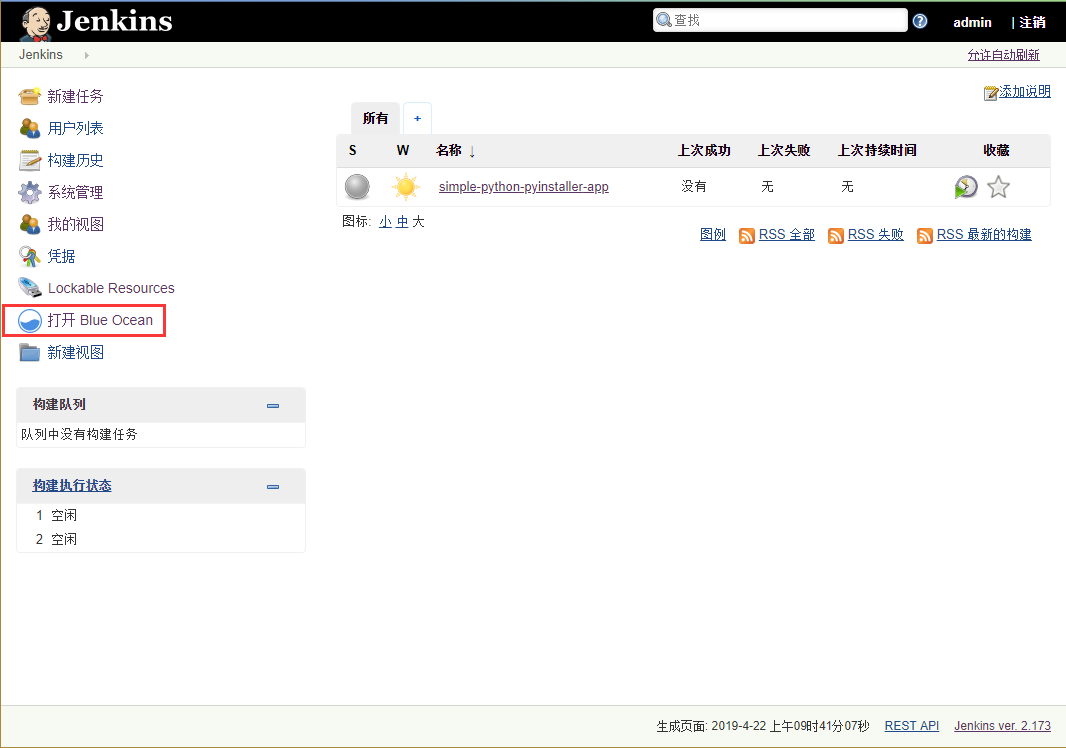
(4) 安装插件Open Blue Ocean Blue Ocean为开发人员提供了更具乐趣的Jenkins使用方式,它是从基础开始构建的,实现了一种全新的、现代风格的用户界面,有助于任何规模的团队实现持续交付。它以Jenkins插件的方式安装,并集成于Jenkins的流水线中。
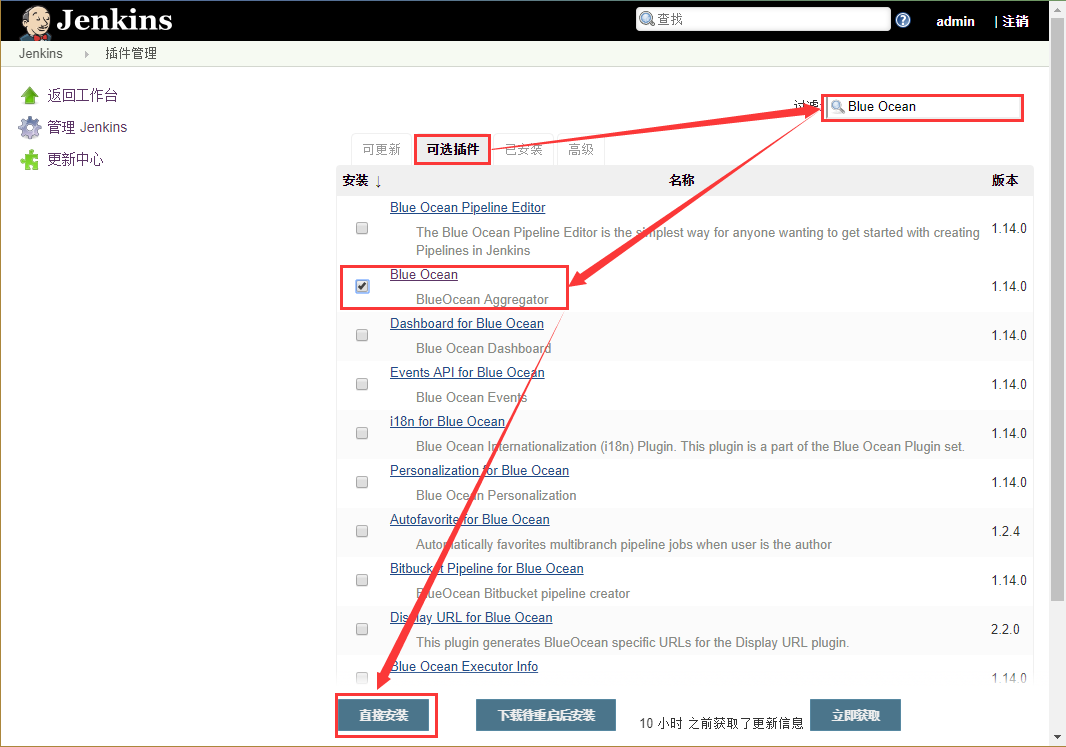
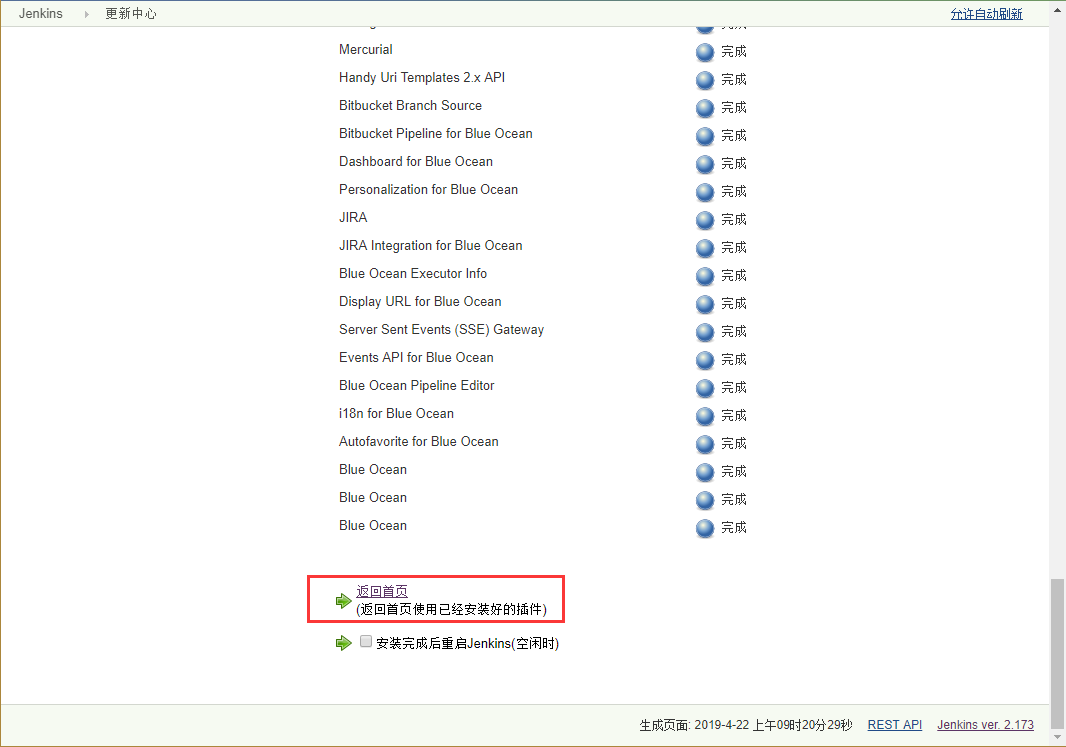
注意:版本2.165可能出现安装失败。解决方法未知。
<br><br>
<br><br>
3. 安装Docker
(1)安装依赖
[root@jenkins ~]# yum install -y yum-utils   device-mapper-persistent-data   lvm2
[root@jenkins ~]# yum-config-manager --add-repo https://download.docker.com/linux/centos/docker-ce.repo
[root@jenkins ~]# yum install docker-ce docker-ce-cli containerd.io
[root@jenkins ~]# sudo systemctl start docker

[root@jenkins ~]# docker run hello-world
Unable to find image ''hello-world:latest'' locally
latest: Pulling from library/hello-world
1b930d010525: Pull complete
Digest: sha256:92695bc579f31df7a63da6922075d0666e565ceccad16b59c3374d2cf4e8e50e
Status: Downloaded newer image for hello-world:latest

Hello from Docker!
This message shows that your installation appears to be working correctly.

To generate this message, Docker took the following steps:
 1. The Docker client contacted the Docker daemon.
 2. The Docker daemon pulled the "hello-world" image from the Docker Hub.
    (amd64)
 3. The Docker daemon created a new container from that image which runs the
    executable that produces the output you are currently reading.
 4. The Docker daemon streamed that output to the Docker client, which sent it
    to your terminal.

To try something more ambitious, you can run an Ubuntu container with:
 $ docker run -it ubuntu bash

Share images, automate workflows, and more with a free Docker ID:
 https://hub.docker.com/

For more examples and ideas, visit:
 https://docs.docker.com/get-started/
<br><br>
<br><br>
4. 使用PyInstaller构建Python应用程序
必须条件:
- GitHub账号
<br>
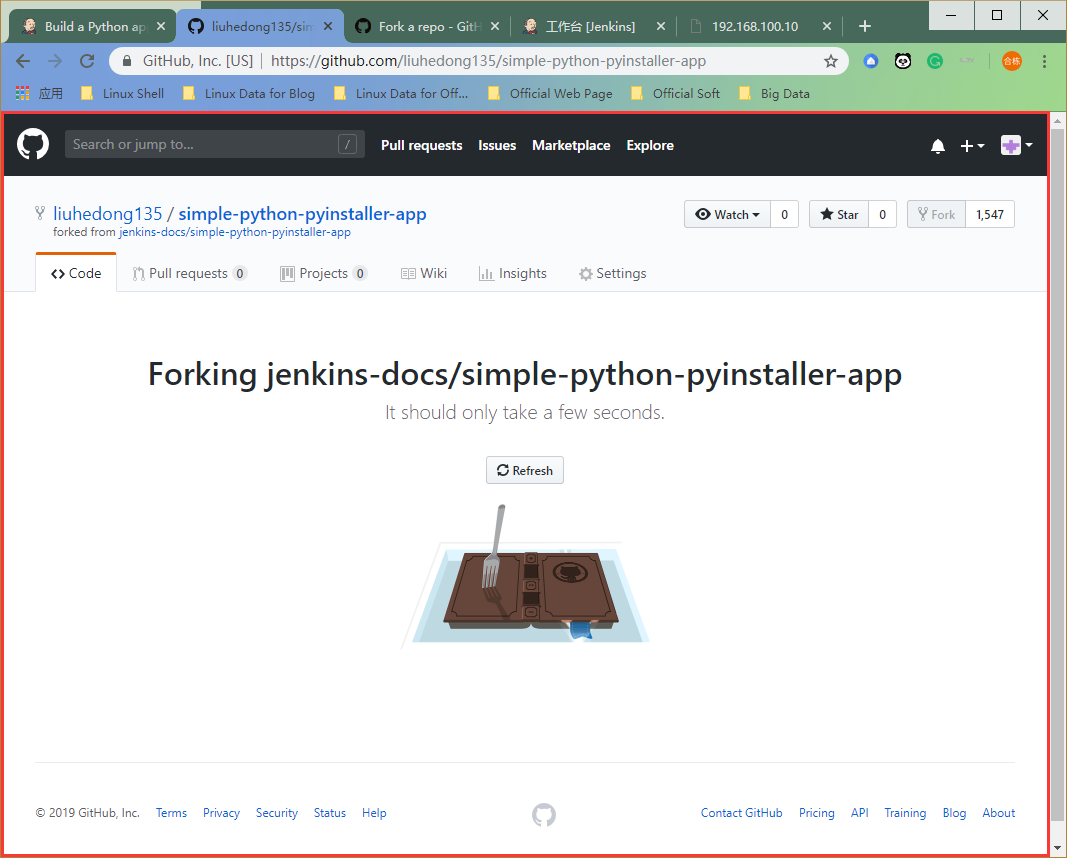
4.1 Fork 一个库
该存储库中包含一个简单的Python应用程序,它是一个命令行工具“add2vals”,它输出两个值的相加。如果至少有一个值是字符串,则“add2vals”将这两个值视为字符串,而是将值连接起来。 链接为:https://github.com/jenkins-docs/simple-python-pyinstaller-app 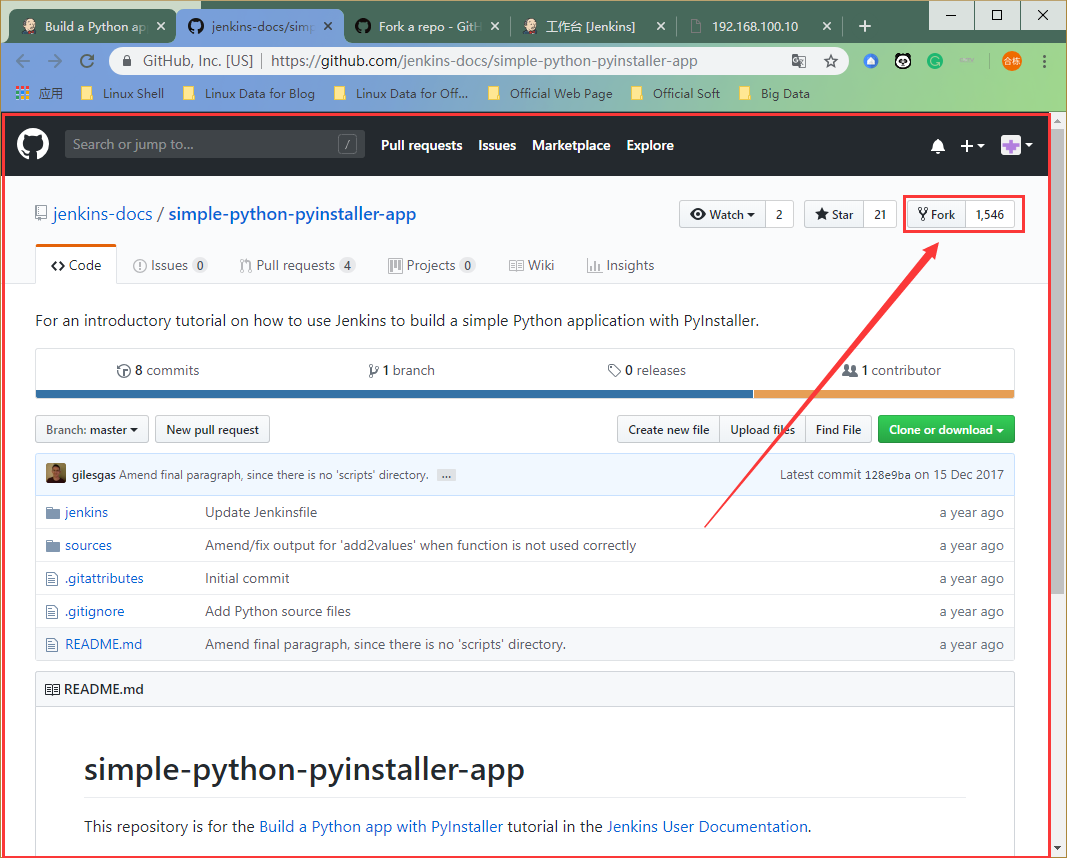

<br>
4.2 克隆项目
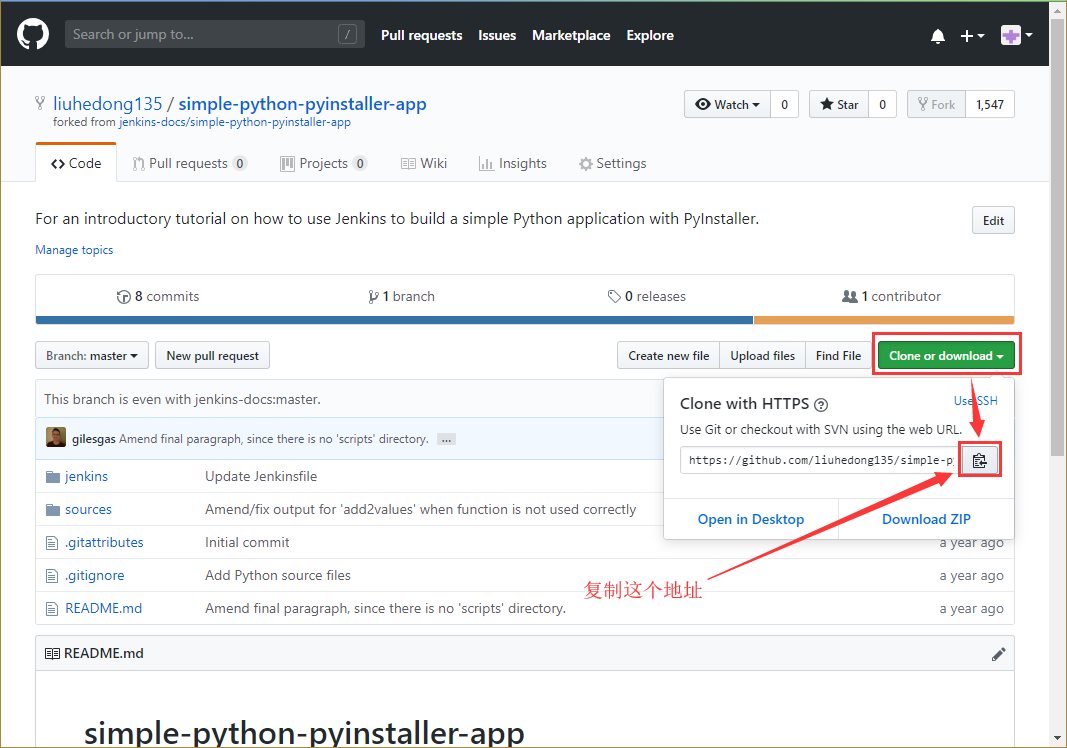
# 自己创建GitHub这个目录
[root@jenkins GitHub]# pwd
/root/GitHub
[root@jenkins GitHub]# git clone https://github.com/liuhedong135/simple-python-pyinstaller-app.git
Cloning into ''simple-python-pyinstaller-app''...
remote: Enumerating objects: 36, done.
remote: Total 36 (delta 0), reused 0 (delta 0), pack-reused 36
Unpacking objects: 100% (36/36), done.
[root@jenkins GitHub]# tree simple-python-pyinstaller-app/
simple-python-pyinstaller-app/
├── jenkins
│   └── Jenkinsfile
├── README.md
└── sources
    ├── add2vals.py
    ├── calc.py
    └── test_calc.py

2 directories, 5 files
<br>
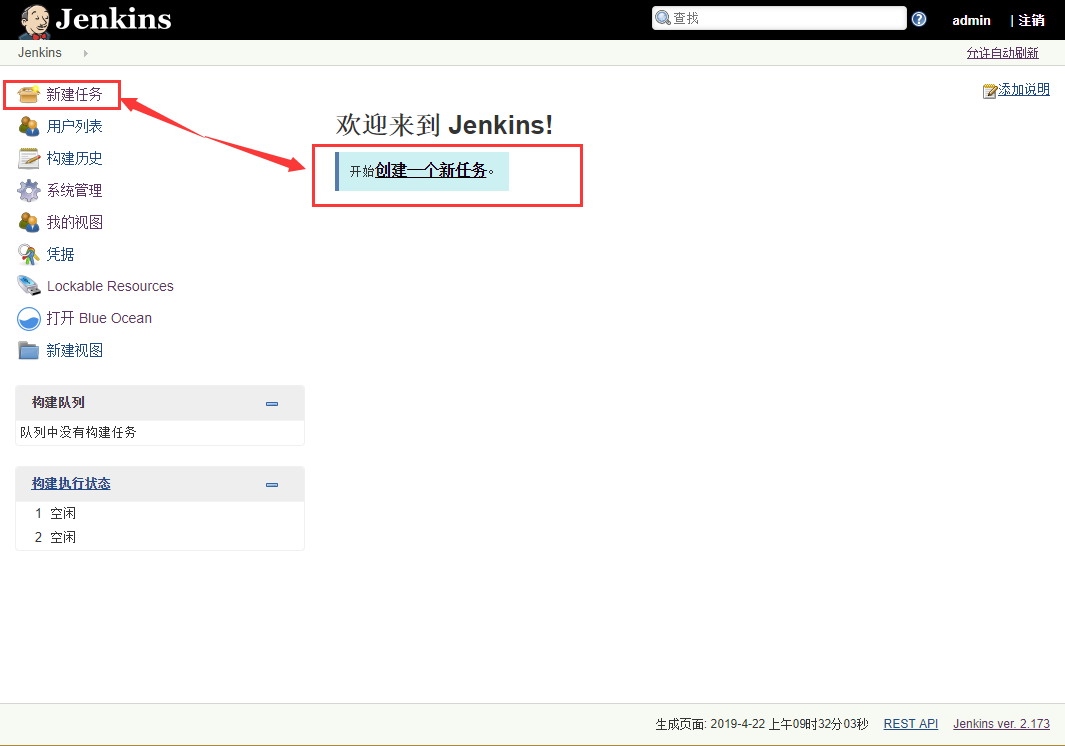
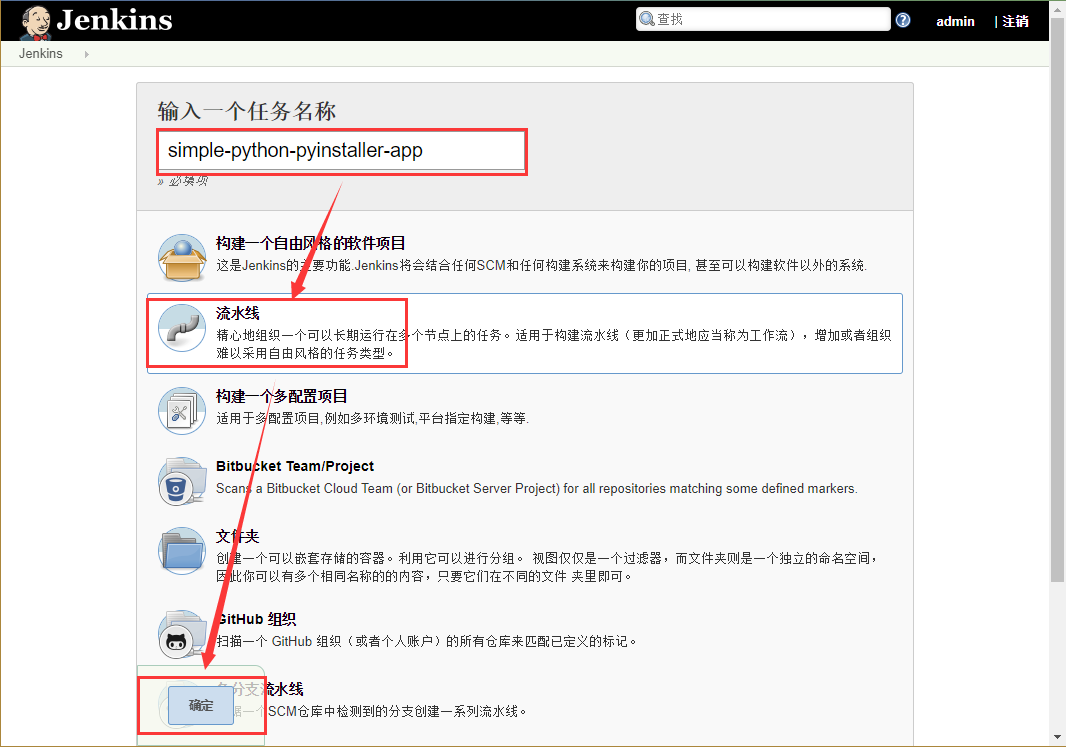
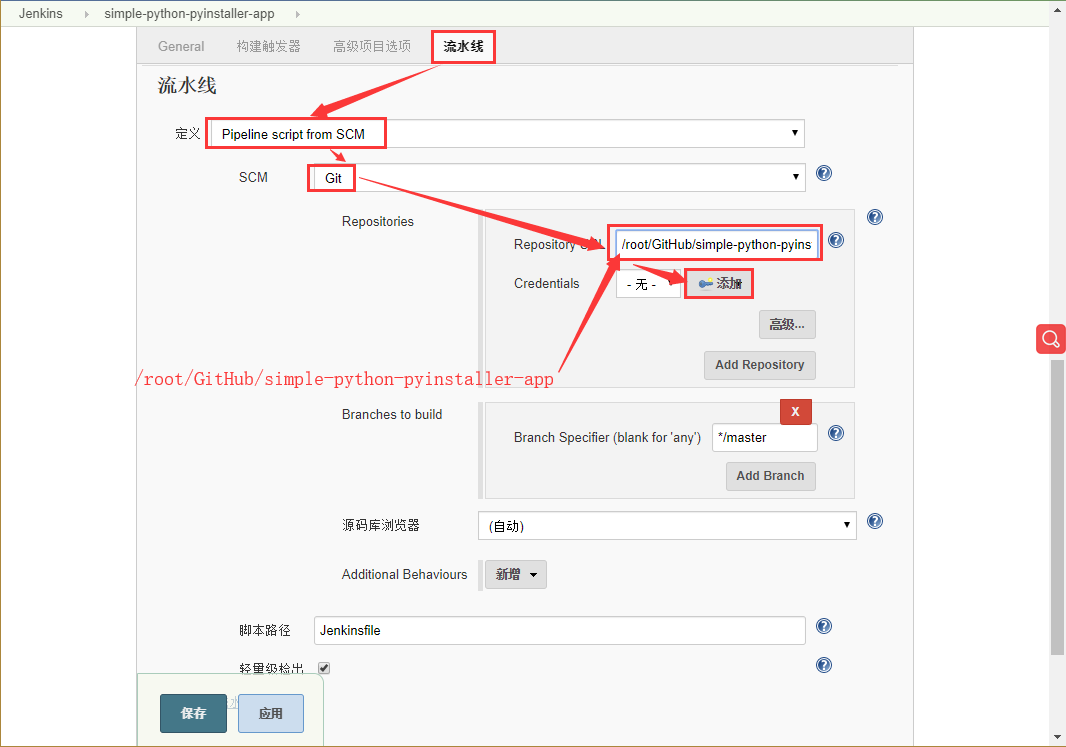
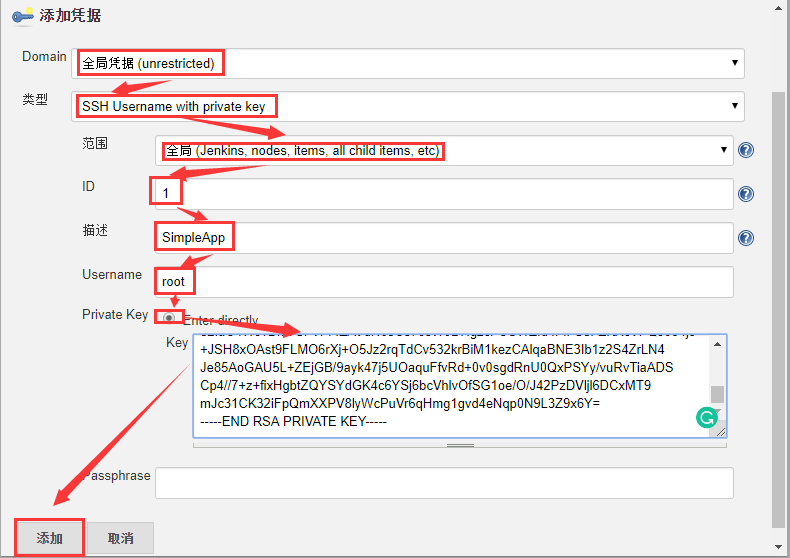
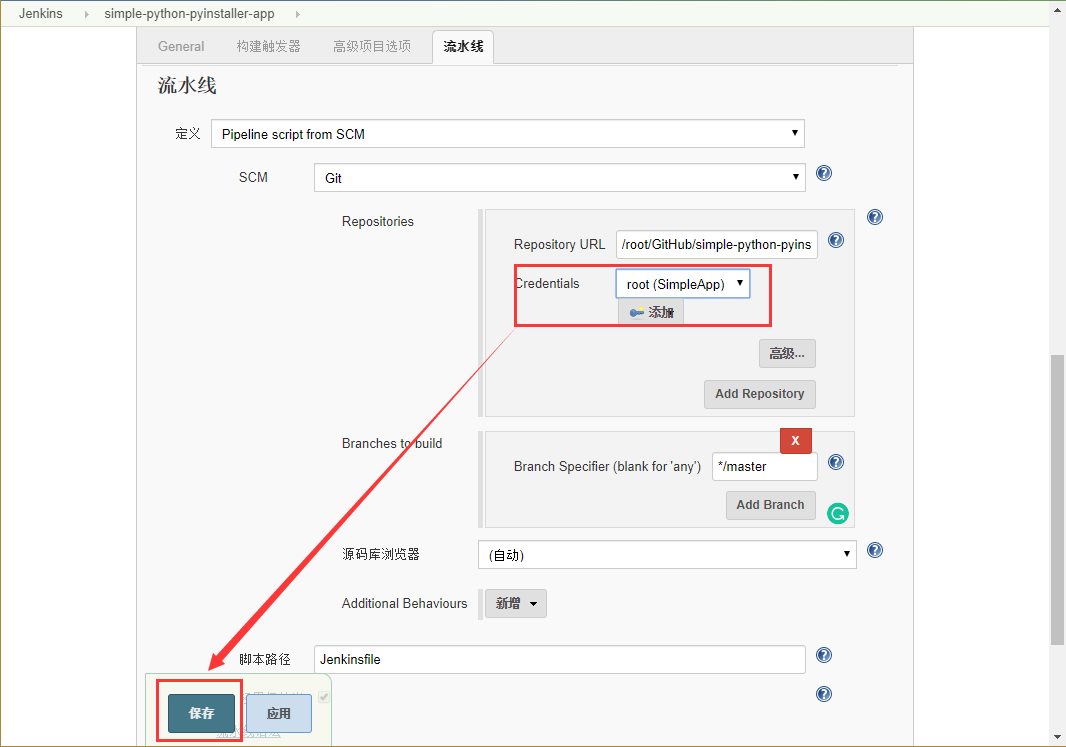
4.3 在Jenkins创建管道项目
[root@jenkins GitHub]# ssh-keygen -t rsa -P '''' -f ~/.ssh/id_rsa
Generating public/private rsa key pair.
Created directory ''/root/.ssh''.
Your identification has been saved in /root/.ssh/id_rsa.
Your public key has been saved in /root/.ssh/id_rsa.pub.
The key fingerprint is:
SHA256:Fgo8vZIPd5ITBmPVx0nB5m8Ihc0wxZUTOjeTJZv7qrA root@jenkins
The key''s randomart image is:
+---[RSA 2048]----+
|    +...o@+++o.  |
|   o +  o.@.o*   |
|    + + .=o B.   |
|     = =...o +   |
|    + B S. o.    |
|     = =  . o.   |
|      . .  .  .  |
|         o   .   |
|        E ...    |
+----[SHA256]-----+
[root@jenkins GitHub]# cat ~/.ssh/id_rsa
-----BEGIN RSA PRIVATE KEY-----
MIIEogIBAAKCAQEA4RrL+SbBJgMWmZJTvnZoMQ9L1pfQ1qPDDG+rcM/nCIng8ai+
WI6adg894jIP20pYvDLojTHx/zKMcOAOhUuileclui5coViYnFUwLpr+V6agWjqX
C7p09WtpVuz3i9+0+1n91BzK/0QiErdbALtm5UcSh2qcGq0aPQc7Bn/pzDmwC74F
ylrl5yykKqlUfDTUDtZZCtj48g7nkRUq0c/Kk5ETSPJDSBf4kMgOLwM4bAazCCWZ
allApAiGWP9Bc61WCz1Dyr29Jwgd9q3n6g7WxxcCmZOolxdJzwZKsyvKpweeiXOY
wc4mO7jrXprRbf3QIsLO0MvEZmHFvydYnOc6xQIDAQABAoIBAAcJsHDkvksy84Tv
p0CgMRe/k65s5rGfQxzjbOfFCEMjFG5ZyUG5i6i/Rz8IM6i2hVm0+cJYWmmRKgTp
bGrMd5PaOzq78ld1DqhsnWoHnIYfBoprpIdQWBHIPu3h0MeFwgHNyXrVP5+FgM82
/lhig5ANjc3ADoti+BwKWtUUMLoa0JxfMb7LDM1TxLVDp3iReMeQQFbM7OhAg27k
18RCLNDKYcenxFKhaU0N/fUNbpAwhowqj792H2AfLtsTX1wpncwJlYgzBVSKMsQc
bzbuRidLTnhN4JU24QggJDzM8eTLlVzAf3PwbkjPavKe7EmNAUYpmwjPUwMytgBq
8Lq42CECgYEA8cm9F951o6SpvAwodXCDbWX8EDo1pzF89aISEMus4rQLa97cnGv+
bqF5Rp8Rh7L0OEDXFFAXiDYlUtUpKqFopG+dxPxEyRq1XcGTFjHWguBCwUUM6YkU
ZZdyWSF53nuSObzZhnxIVk7RqlX8eqKWkNcqXvrr5PEdbonO9xfU6M0CgYEA7lYE
qbTSsYiH5l2tYfQ2Ku8wgSfv8YbrsMoe4Wn4StRAvcYYpy9XpF0XrhG1BJqzbxKh
nXZ6VpJMxwkeH+ADuwWGD8NIqSO+6OYeRt3j+7+qbhtixyoQmqChREk1JYyZ+y8S
PLI78gDuR+aGvK+BYaHxfmbCSNdg7T55GLj5edkCgYA8KXlungDhhhBh5RiQGD3r
k6vDkehVwL+aEwixuyw6gJgy8BIurcRyXKVjiCMBg+q2sJOTz1X7o5Vn5fhHTkBO
YiN8p1SqQYYNXSQvKpl4mTqjAn5zAZPcr3FZcjXzwQWibjYl+3i4WQZcfubC0P/r
7E3zsjXOEpzDK3EfFIP6pQKBgDVRLufcGMo4ddZ2HGRuYnPGYH50Nbw9Z5p8DN52
e2IaC4WovDkiYSPW44ZAVdN63Cs76sW0DHgzcFOSWZfd4FfFS5FZKXcVFQ8684j8
+JSH8xOAst9FLMO6rXj+O5Jz2rqTdCv532krBiM1kezCAlqaBNE3Ib1z2S4ZrLN4
Je85AoGAU5L+ZEjGB/9ayk47j5UOaquFfvRd+0v0sgdRnU0QxPSYy/vuRvTiaADS
Cp4//7+z+fixHgbtZQYSYdGK4c6YSj6bcVhlvOfSG1oe/O/J42PzDVljl6DCxMT9
mJc31CK32iFpQmXXPV8lyWcPuVr6qHmg1gvd4eNqp0N9L3Z9x6Y=
-----END RSA PRIVATE KEY-----
<br>
4.4 为初始管道创建Jenkinsfile
[root@jenkins simple-python-pyinstaller-app]# pwd
/root/GitHub/simple-python-pyinstaller-app
[root@jenkins simple-python-pyinstaller-app]# vim Jenkinsfile
# 写入如下内容
pipeline {
    agent none
    stages {
        stage(''Build'') {
            agent {
                docker {
                    image ''python:2-alpine''
                }
            }
            steps {
                sh ''python -m py_compile sources/add2vals.py sources/calc.py''
            }
        }
    }
}
[root@jenkins simple-python-pyinstaller-app]# git config --global user.email "liuhedong135@163/com"
[root@jenkins simple-python-pyinstaller-app]# git config --global user.name "liuhedong"
[root@jenkins simple-python-pyinstaller-app]# git add .
[root@jenkins simple-python-pyinstaller-app]# git commit -m "Add initial Jenkinsfile"
[master 6966a7d] Add initial Jenkinsfile
 1 file changed, 15 insertions(+)
 create mode 100644 Jenkinsfile
<br>
4.5 测试阶段

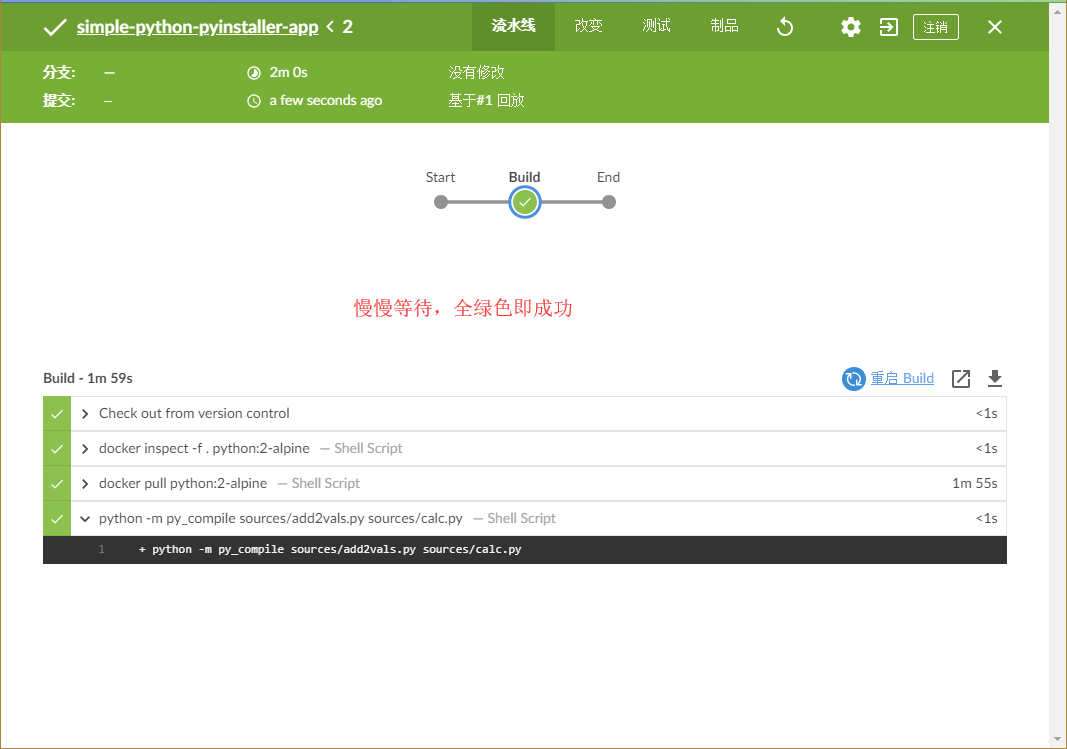
[root@jenkins simple-python-pyinstaller-app]# pwd
/root/GitHub/simple-python-pyinstaller-app
[root@jenkins simple-python-pyinstaller-app]# vim Jenkinsfile
# 添加如下内容
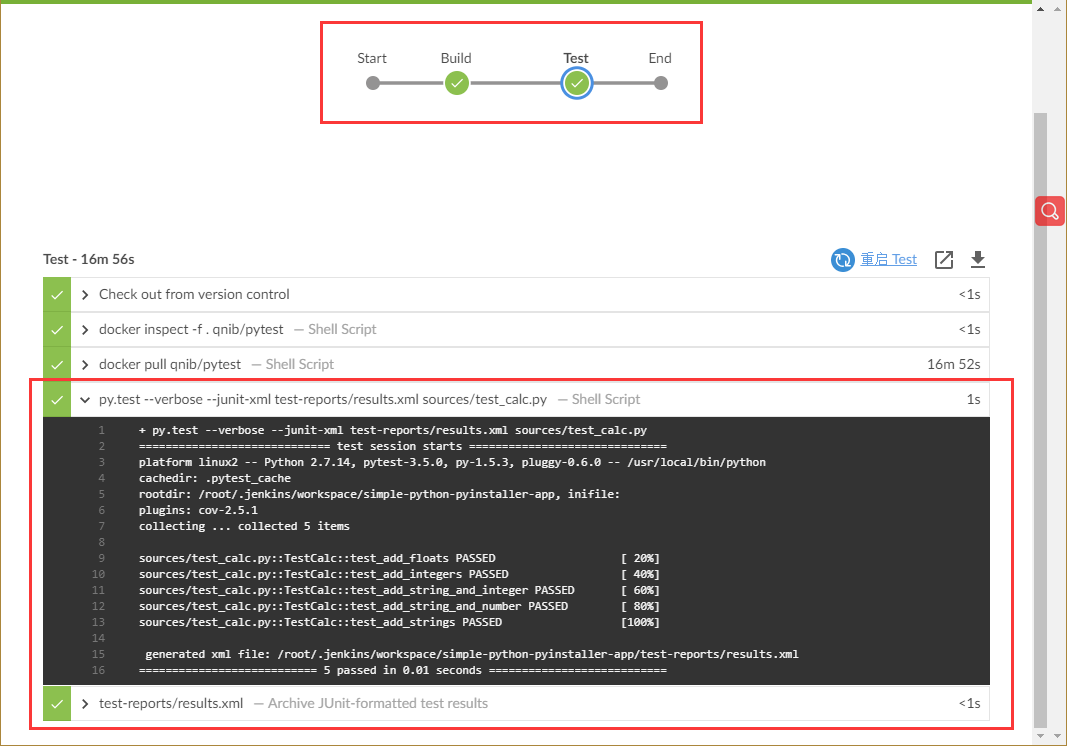
stage(''Test'') {
agent {
docker {
image ''qnib/pytest''
}
}
steps {
sh ''py.test --verbose --junit-xml test-reports/results.xml sources/test_calc.py''
}
post {
always {
junit ''test-reports/results.xml''
}
}
}
[root@jenkins simple-python-pyinstaller-app]# cat Jenkinsfile
pipeline {
agent none
stages {
stage(''Build'') {
agent {
docker {
image ''python:2-alpine''
}
}
steps {
sh ''python -m py_compile sources/add2vals.py sources/calc.py''
}
}
stage(''Test'') {
agent {
docker {
image ''qnib/pytest''
}
}
steps {
sh ''py.test --verbose --junit-xml test-reports/results.xml sources/test_calc.py''
}
post {
always {
junit ''test-reports/results.xml''
}
}
}
}
}
[root@jenkins simple-python-pyinstaller-app]# git stage .
[root@jenkins simple-python-pyinstaller-app]# git commit -m "Add Test stage"
[master 342b643] Add Test stage
1 file changed, 16 insertions(+)
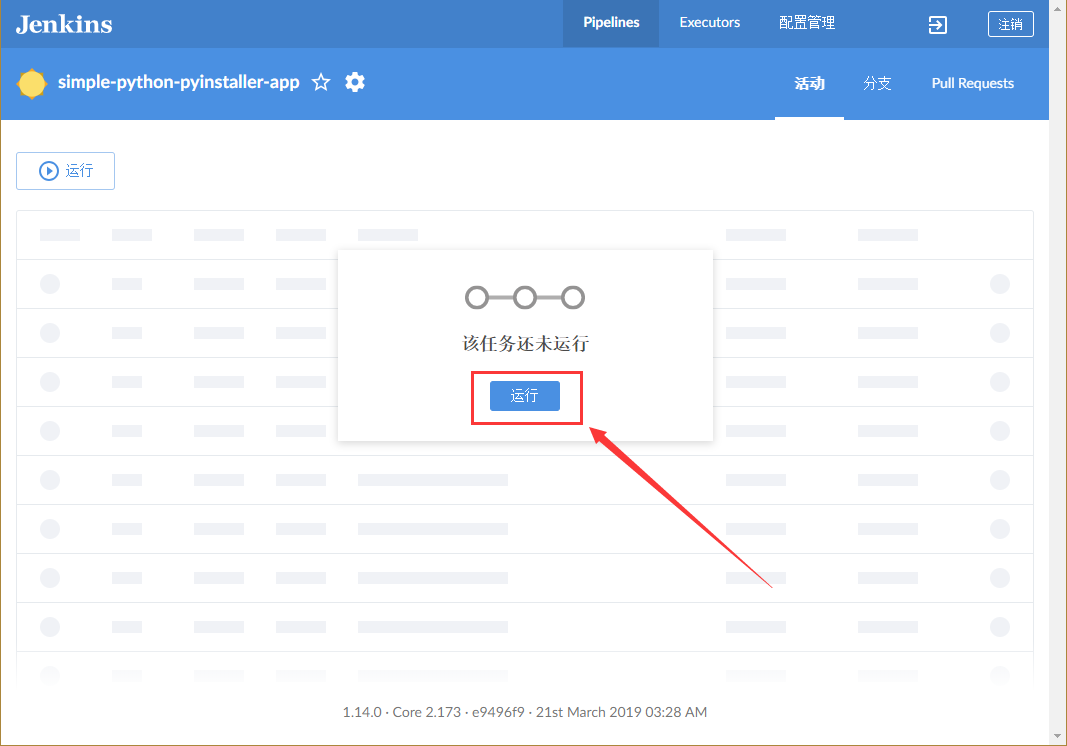
重新进入Blue Ocean 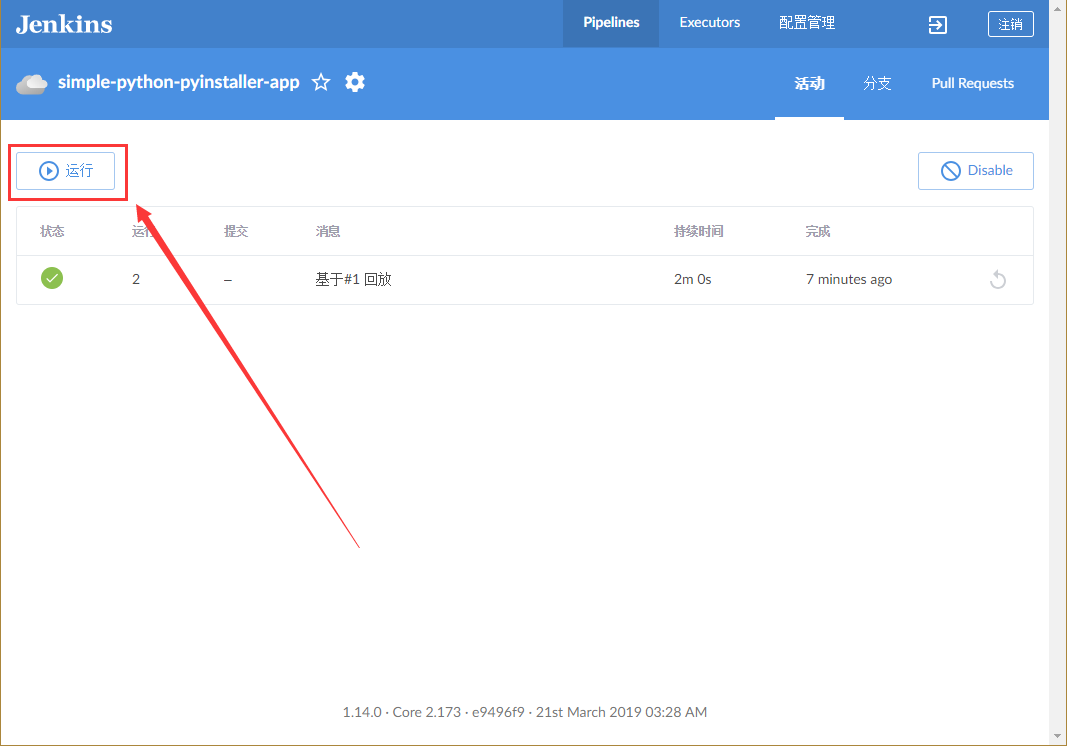
<br>
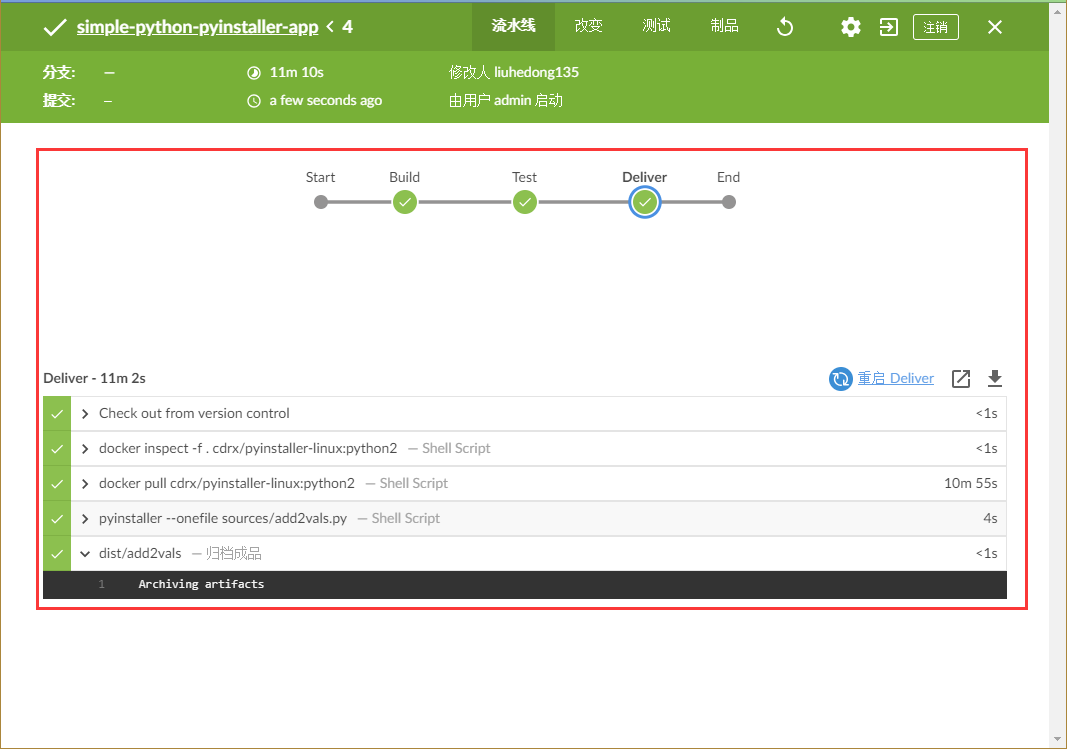
4.6 交付阶段
[root@jenkins simple-python-pyinstaller-app]# pwd
/root/GitHub/simple-python-pyinstaller-app
[root@jenkins simple-python-pyinstaller-app]# vim Jenkinsfile
# 写入如下内容
stage(''Deliver'') {
            agent {
                docker {
                    image ''cdrx/pyinstaller-linux:python2''
                }
            }
            steps {
                sh ''pyinstaller --onefile sources/add2vals.py''
            }
            post {
                success {
                    archiveArtifacts ''dist/add2vals''
                }
            }
        }
# 最终为如下内容
[root@jenkins simple-python-pyinstaller-app]# cat Jenkinsfile
pipeline {
    agent none
    stages {
        stage(''Build'') {
            agent {
                docker {
                    image ''python:2-alpine''
                }
            }
            steps {
                sh ''python -m py_compile sources/add2vals.py sources/calc.py''
            }
        }
		stage(''Test'') {
            agent {
                docker {
                    image ''qnib/pytest''
                }
            }
            steps {
                sh ''py.test --verbose --junit-xml test-reports/results.xml sources/test_calc.py''
            }
            post {
                always {
                    junit ''test-reports/results.xml''
                }
            }
        }
		stage(''Deliver'') {
            agent {
                docker {
                    image ''cdrx/pyinstaller-linux:python2''
                }
            }
            steps {
                sh ''pyinstaller --onefile sources/add2vals.py''
            }
            post {
                success {
                    archiveArtifacts ''dist/add2vals''
                }
            }
        }
    }
}
[root@jenkins simple-python-pyinstaller-app]# git stage .
[root@jenkins simple-python-pyinstaller-app]# git commit -m "Add Deliver stage"
[master 19c0c48] Add Deliver stage
 1 file changed, 15 insertions(+)
重新进入Blue Ocean 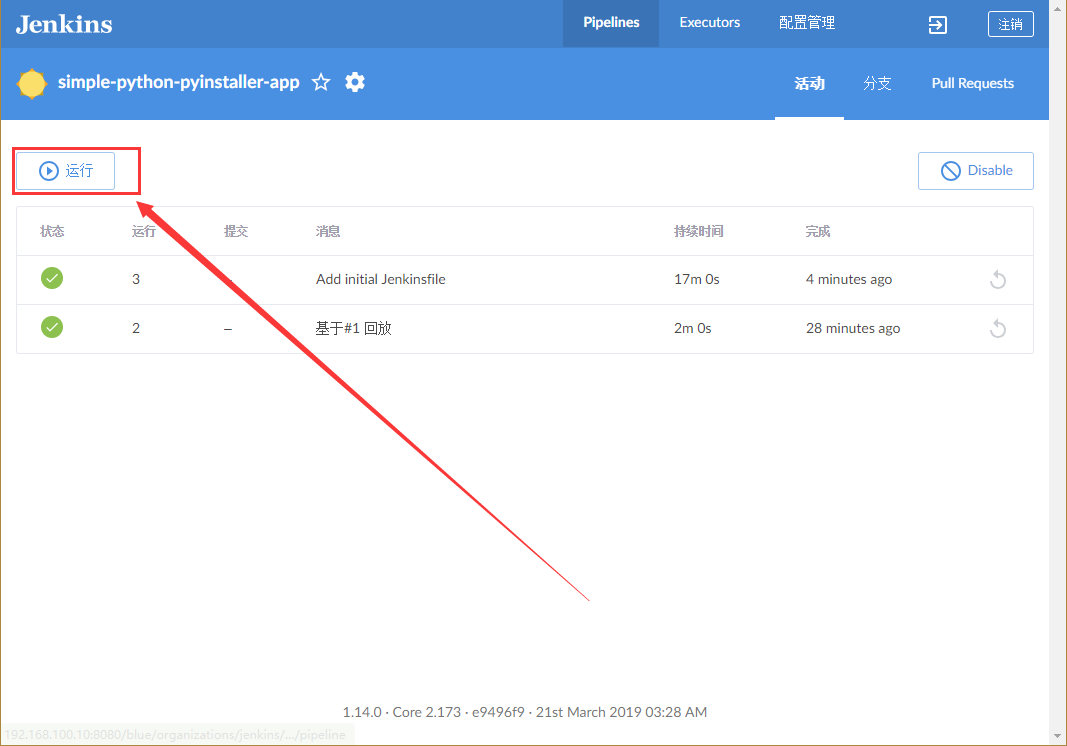

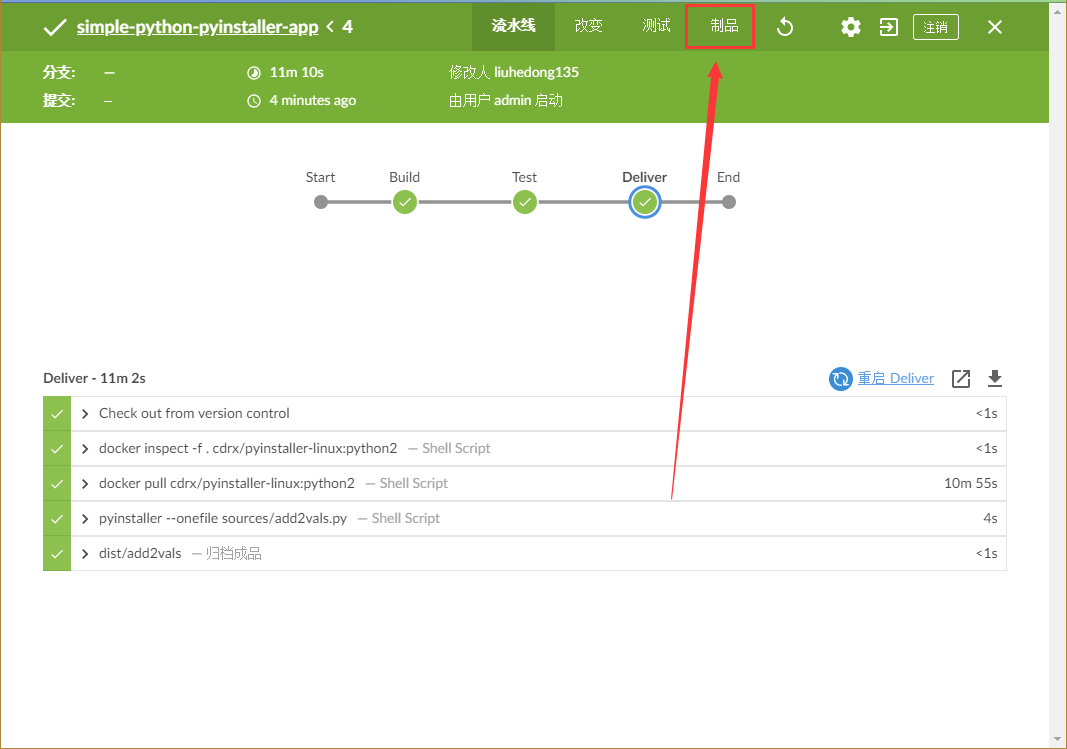
 最后点击下载,并传入到linux,
[root@jenkins ~]# ls -lh
total 3.4M
-rw-r--r-- 1 root root 3.4M Apr 21 10:54 add2vals
drwxr-xr-x 3 root root   43 Apr 22 09:32 GitHub
[root@jenkins ~]# chmod +x add2vals
[root@jenkins ~]# ./add2vals

You entered 0 value/s.

Usage: ''add2vals X Y'' where X and Y are individual values.
       If add2vals is not in your path, usage is ''./add2vals X Y''.
       If unbundled, usage is ''python add2vals.py X Y''.

[root@jenkins ~]# ./add2vals 1 1

The result is 2
最后我们就成功的将应用打包,并在linux上运行,这个应用是一个简单的计算。

pyinstaller install 打包 python包,失败了,应该在哪个路径下执行python安装包
C:\Users\Administrator\Desktop>pyinstaller install tenso.py
187 INFO: PyInstaller: 3.5
187 INFO: Python: 2.7.15
187 INFO: Platform: Windows-7-6.1.7601-SP1
192 INFO: wrote C:\Users\Administrator\Desktop\install.spec
194 INFO: UPX is not available.
Traceback (most recent call last):
File "e:\programdata\anaconda22\lib\runpy.py", line 174, in _run_module_as_mai
n
"__main__", fname, loader, pkg_name)
File "e:\programdata\anaconda22\lib\runpy.py", line 72, in _run_code
exec code in run_globals
File "E:\ProgramData\Anaconda22\Scripts\pyinstaller.exe\__main__.py", line 7,
in <module>
File "e:\programdata\anaconda22\lib\site-packages\PyInstaller\__main__.py", li
ne 111, in run
run_build(pyi_config, spec_file, **vars(args))
File "e:\programdata\anaconda22\lib\site-packages\PyInstaller\__main__.py", li
ne 63, in run_build
PyInstaller.building.build_main.main(pyi_config, spec_file, **kwargs)
File "e:\programdata\anaconda22\lib\site-packages\PyInstaller\building\build_m
ain.py", line 844, in main
build(specfile, kw.get(''distpath''), kw.get(''workpath''), kw.get(''clean_build''
))
File "e:\programdata\anaconda22\lib\site-packages\PyInstaller\building\build_m
ain.py", line 791, in build
exec(code, spec_namespace)
File "C:\Users\Administrator\Desktop\install.spec", line 17, in <module>
noarchive=False)
File "e:\programdata\anaconda22\lib\site-packages\PyInstaller\building\build_m
ain.py", line 190, in __init__
raise ValueError("script ''%s'' not found" % script)
ValueError: script ''C:\Users\Administrator\Desktop\install'' not found
关于如何通过pyinstaller使用tkcalendar模块安装python应用程序?和python-tk安装的问题我们已经讲解完毕,感谢您的阅读,如果还想了解更多关于conda install 和 pip install 安装python依赖库的选择、conda 使用 pyinstaller 打包 py 程序为 exe 文件、Jenkins之使用Pyinstaller构建Python应用程序、pyinstaller install 打包 python包,失败了,应该在哪个路径下执行python安装包等相关内容,可以在本站寻找。
本文标签:


