本文将介绍Delphi中给Windows服务程序添加描述信息的详细情况,特别是关于delphi服务程序的相关信息。我们将通过案例分析、数据研究等多种方式,帮助您更全面地了解这个主题,同时也将涉及一些关
本文将介绍Delphi中给Windows服务程序添加描述信息的详细情况,特别是关于delphi 服务程序的相关信息。我们将通过案例分析、数据研究等多种方式,帮助您更全面地了解这个主题,同时也将涉及一些关于.Net Windows服务程序 exe文件安装与卸载、BCB和Delphi添加Windows服务的描述性文字、C# 编写Windows Service(windows服务程序)、C#/.NET基于Topshelf创建Windows服务程序及服务的安装和卸载的知识。
本文目录一览:- Delphi中给Windows服务程序添加描述信息(delphi 服务程序)
- .Net Windows服务程序 exe文件安装与卸载
- BCB和Delphi添加Windows服务的描述性文字
- C# 编写Windows Service(windows服务程序)
- C#/.NET基于Topshelf创建Windows服务程序及服务的安装和卸载
")
Delphi中给Windows服务程序添加描述信息(delphi 服务程序)
总结
以上是小编为你收集整理的Delphi中给Windows服务程序添加描述信息全部内容。
如果觉得小编网站内容还不错,欢迎将小编网站推荐给好友。

.Net Windows服务程序 exe文件安装与卸载
注意:Framework版本信息 ,文件格式 .bat
---------------------------------------------------------------------------------安装服务
@echo off
@title 安装windows服务
path %SystemRoot%\Microsoft.NET\Framework\v4.0.30319
echo==============================================================
echo=
echo windows服务程序安装
echo=
echo==============================================================
@echo off
InstallUtil.exe C:\Show\Test.exe
pause
---------------------------------------------------------------------------------卸载服务
@echo off
@title 卸载Windows服务
path %SystemRoot%\Microsoft.NET\Framework\v4.0.30319
echo==============================================================
echo=
echo windows服务卸载
echo=
echo==============================================================
@echo off
InstallUtil.exe /u C:\Show\Test.exe
pause

BCB和Delphi添加Windows服务的描述性文字
总结
以上是小编为你收集整理的BCB和Delphi添加Windows服务的描述性文字全部内容。
如果觉得小编网站内容还不错,欢迎将小编网站推荐给好友。
")
C# 编写Windows Service(windows服务程序)
C# 编写Windows Service(windows服务程序)
- Windows Service简介:
一个Windows服务程序是在Windows操作系统下能完成特定功能的可执行的应用程序。Windows服务程序虽然是可执行的,但是它不像一般的可执行文件通过双击就能开始运行了,它必须有特定的启动方式。这些启动方式包括了自动启动和手动启动两种。对于自动启动的Windows服务程序,它们在Windows启动或是重启之后用户登录之前就开始执行了。只要你将相应的Windows服务程序注册到服务控制管理器(Service Control Manager)中,并将其启动类别设为自动启动就行了。而对于手动启动的Windows服务程序,你可以通过命令行工具的NET START 命令来启动它,或是通过控制面板中管理工具下的服务一项来启动相应的Windows服务程序。
同样,一个Windows服务程序也不能像一般的应用程序那样被终止。因为Windows服务程序一般是没有用户界面的,所以你也要通过命令行工具或是下面图中的工具来停止它,或是在系统关闭时使得Windows服务程序自动停止。因为Windows服务程序没有用户界面,所以基于用户界面的API函数对其是没有多大的意义。为了能使一个Windows服务程序能够正常并有效的在系统环境下工作,程序员必须实现一系列的方法来完成其服务功能。Windows服务程序的应用范围很广,典型的Windows服务程序包含了硬件控制、应用程序监视、系统级应用、诊断、报告、Web和文件系统服务等功能。
和Windows服务程序相关的命名空间涉及到以下两个:System.ServiceProcess 和System.Diagnostics。
- 用C#创建Windows服务的步骤:
1.创建Windows Service项目
从Visual C# 工程中选取 Windows 服务(Windows Service)选项,给工程一个新文件名,然后点击 确定。
2.向服务中函数功能实现
OnStart函数在启动服务时执行,OnStop函数在停止服务时执行。在这里,当启动和停止服务时,向一个文本文件中写入一些文字信息,代码如下:

using System;
using System.Collections.Generic;
using System.ComponentModel;
using System.Data;
using System.Diagnostics;
using System.IO;
using System.Linq;
using System.ServiceProcess;
using System.Text;
using System.Threading.Tasks;

namespace MyService
{
    public partial class Service1 : ServiceBase
    {
        public Service1()
        {
            InitializeComponent();
        }

        protected override void OnStart(string[] args)
        {
            FileStream fs = new FileStream(@"d:\xx.txt", FileMode.OpenOrCreate, FileAccess.Write);
            StreamWriter sw = new StreamWriter(fs);
            sw.BaseStream.Seek(0, SeekOrigin.End);
            sw.WriteLine("WindowsService: Service Started" + DateTime.Now.ToString() + "\n");

            sw.Flush();
            sw.Close();
            fs.Close();
        }

        //protected override void OnContinue()
        //{
        //    base.OnContinue();
        //}

        //protected override void OnPause()
        //{
        //    base.OnPause(); // father class method inherit
        //}

        //protected override void OnShutdown()
        //{
        //    base.OnShutdown();
        //}

        protected override void OnStop()
        {
            FileStream fs = new FileStream(@"d:\xx.txt", FileMode.OpenOrCreate, FileAccess.Write);
            StreamWriter sw = new StreamWriter(fs);
            sw.BaseStream.Seek(0, SeekOrigin.End);
            sw.WriteLine("WindowsService: Service Stopped" + DateTime.Now.ToString() + "\n");
            sw.Flush();
            sw.Close();
            fs.Close();

        }
    }
}
4.回到设计窗口点右键选择-添加安装程序 -生成serviceInstaller1和 serviceProcessInstaller1两个组件
把serviceInstaller1的属性ServiceName改写为你的服务程序名,并把启动模 式设置为AUTOMATIC
把serviceProcessInstaller1的属性account改写为 LocalSystem
5.编译链接生成服务程序
通过从生成菜单中选择生成来生成项目。
6.安装服务
用.net framework工具INSTALLUTIL安装服务程序即可。
用项目的输出作为参数,从命令行运行 InstallUtil.exe。在命令行中输入下列代码:
installutil yourproject.exe
Hint: a windows service must first be installed using installutil.exe and then started with the serviceExplorer, windows Services Administrative tool or the NET START command.
7.卸载服务
用项目的输出作为参数,从命令行运行 InstallUtil.exe。
installutil /u yourproject.exe
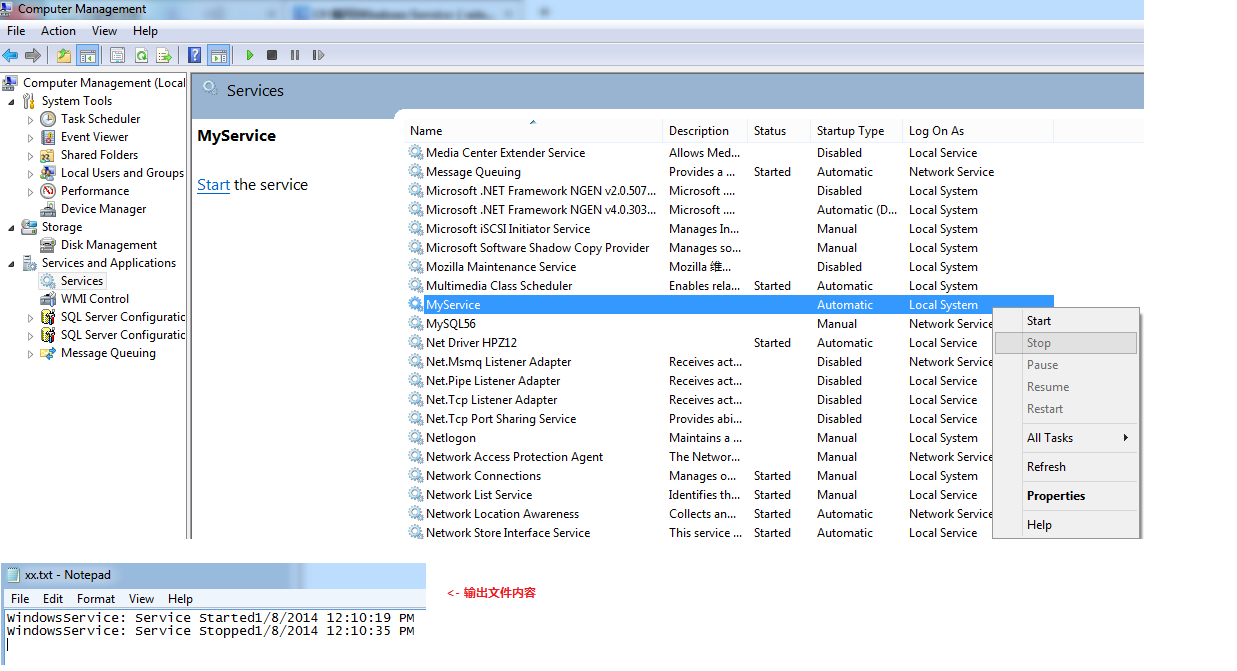
如上服务程序运行结果截图:
- 补充:
1.Service启动属性:
Manual 服务安装后,必须手动启动。
Automatic 每次计算机重新启动时,服务都会自动启动。
Disabled 服务无法启动。
2.新建的Service项目,其中各属性的含义(设计视图->右键属性):
Autolog 是否自动写入系统的日志文件
CanHandlePowerEvent 服务时候接受电源事件
CanPauseAndContinue 服务是否接受暂停或继续运行的请求
CanShutdown 服务是否在运行它的计算机关闭时收到通知,以便能够调用 OnShutDown 过程
CanStop 服务是否接受停止运行的请求
ServiceName 服务名
3. 也可以在系统服务管理器中,设置相应Service的属性或启动方式等
计算机管理 -> 服务和应用程序 -> 服务 -> ...

C#/.NET基于Topshelf创建Windows服务程序及服务的安装和卸载
本文首发于码友网--一个专注.NET/.NET Core开发的编程爱好者社区。
文章目录
C#/.NET基于Topshelf创建Windows服务的系列文章目录:
- C#/.NET基于Topshelf创建Windows服务程序及服务的安装和卸载 (1)
- 在C#/.NET应用程序开发中创建一个基于Topshelf的应用程序守护进程(服务) (2)
- C#/.NET基于Topshelf创建Windows服务的守护程序作为服务启动的客户端桌面程序不显示UI界面的问题分析和解决方案 (3)
前言
对于使用Windows操作系统的人来说,Windows Service(Windows服务)应该不会陌生。在Windows操作系统中,我们可以在"运行"窗口中运行service.msc:

即可打开一个查看Windows服务的窗口,如图:

Windows服务基本都是一些后台运行的服务进程,没有UI界面,每个服务处理着各自独立的任务并且有专门的启动或者停止策略。所以,Windows服务在很多情况下会被用来者处理一些定时任务或者调度。
那么,对于.NET的开发者来说,可不可以自己创建Windows服务呢,如何使用C#创建Windows服务呢?
本文就为大家分享一种基于Topshelf创建的Windows服务的方法。
创建Topshelf服务项目
首先打开Visual Studio(本文使用的是Visual Studio 2019),打开新建项目的对话框,选择.NET Framework的控制台应用程序(Console App(.NET Framework)),如图:

注:只可选择控制台应用程序
点击"下一步",在项目名称中输入TopshelfDemoService,.NET Framework 选择4.6.2,其中选项根据自己情况填写即可,最后点击"创建"按钮。
安装Topshelf组件
在TopshelfDemoService项目中,打开Nuget包管理工具,搜索Topshelf,在搜索结果中选中Topshelf,点击"安装",如图:

编写Topshelf服务的示例程序代码
Topshelf组件安装完成后,我们就可以开始编写服务的示例代码了。
首先,创建一个名为HealthMonitorService.cs的类(其作用假设为定时监控某个系统的运行健康状况),在其中分别创建方法:Start()和Stop()以及一个定时器,让定时器定时执行检查系统健康状况的任务(这里模拟的每秒向控制台输出一条文本信息),完整的代码如下:
using System;
using System.Timers;

namespace TopshelfDemoService
{
    internal class HealthMonitorService
    {
        private readonly Timer _timer;
        public HealthMonitorService()
        {
            _timer = new Timer(1000) { AutoReset = true };
            _timer.Elapsed += (sender, eventArgs) => Console.WriteLine("执行系统健康检查任务,所有指标均正常。执行时间:{0}", DateTime.Now);
        }

        public void Start()
        {
            _timer.Start();
        }
        public void Stop()
        {
            _timer.Stop();
        }
    }
}再创建一个名为MyServiceConfigure.cs的服务配置类,这个类主要用来配置Topshelf服务的各种运行参数,代码如下:
using System;
using Topshelf;

namespace TopshelfDemoService
{
    internal class MyServiceConfigure
    {
        internal static void Configure()
        {
            var rc = HostFactory.Run(host =>                                    // 1
            {
                host.Service<HealthMonitorService>(service =>                   // 2
                {
                    service.ConstructUsing(() => new HealthMonitorService());   // 3
                    service.WhenStarted(s => s.Start());                        // 4
                    service.WhenStopped(s => s.Stop());                         // 5
                });

                host.RunAsLocalSystem();                                        // 6

                host.EnableServiceRecovery(service =>                           // 7
                {
                    service.RestartService(3);                                  // 8
                });
                host.SetDescription("Windows service based on topshelf");       // 9
                host.SetDisplayName("Topshelf demo service");                   // 10
                host.SetServiceName("TopshelfDemoService");                     // 11
                host.StartAutomaticallyDelayed();                               // 12
            });

            var exitCode = (int)Convert.ChangeType(rc, rc.GetTypeCode());       // 13
            Environment.ExitCode = exitCode;
        }
    }
}
注:其中数字的含义请见本文末尾的解释。
最后,打开Program.cs文件,开启Topshelf服务,如下:
namespace TopshelfDemoService
{
    class Program
    {
        static void Main(string[] args)
        {
            MyServiceConfigure.Configure();
        }
    }
}
好了,完成到这里,整个示例程序就写好了,按F5运行示例程序,你将看到如下类似的控制台信息:

可以看到,我们创建的TopshelfDemoService服务每秒向控制台打印了一条文本信息,这和我们的预期是吻合的。
这样,我们就成功创建了一个基于Topshelf的Windows服务,当然,这也只是一个简单和示例服务程序,其中没有复杂的业务逻辑和配置等等。这些都等待你去发掘。
作为Windows服务安装和卸载
我们刚才运行的只是一个控制台应用程序,如果将这个控制台应用程序关掉,定时任务也会被停止了。如果我们希望定时任务可以一直运行,那需要将这个控制台应用程序作为服务安装到Windows服务进程中,如何操作呢?
非常简单的安装和卸载命令。
首先,以管理员身份打开一个命令行工具,进入到控制台应用程序所在目录。
安装
安装服务运行如下命令:
TopshelfDemoService.exe install
打开Windows服务查看窗口(刷新),可以看到Topshelf demo service已经在服务列表中了,如图:

这时,我们只需要按照Windows服务来操作这个服务即可。
卸载
如果需要卸载服务,则运行如下命令:
TopshelfDemoService.exe uninstallTopshelf配置参数说明
1.设置服务主机使用HostFactory.Run()来创建并运行一个Topshelft服务。
2.设置Topshelf使用类型HealthMonitorService作为服务类。
3.配置如何创建一个服务的实例,这里采用的是使用关键字new来实例化一个HealthMonitorService对象,你也可以使用IoCp容器来实例化服务对象。
4.设置当服务启动时执行的操作。
5.设置当服务停止时执行的操作。
6.设置将服务以本地系统身份运行。
7.启动恢复服务模式(当服务意外停止后自动恢复)。
8.设置第一次自动恢复服务的延迟时间为3分钟。
9.设置Topshelf服务在Windows服务中的描述信息。
10.设置Topshelf服务在Windows服务中的显示名称。
11.设置Topshelf服务在Windows服务中的服务名称。
12.设置Topshelf服务随Windows启动时自动运行(延迟)。
13.设置服务的退出代码。
示例代码托管和下载
本示例代码托管地址可以在原出处找到:示例代码下载地址
我们今天的关于Delphi中给Windows服务程序添加描述信息和delphi 服务程序的分享已经告一段落,感谢您的关注,如果您想了解更多关于.Net Windows服务程序 exe文件安装与卸载、BCB和Delphi添加Windows服务的描述性文字、C# 编写Windows Service(windows服务程序)、C#/.NET基于Topshelf创建Windows服务程序及服务的安装和卸载的相关信息,请在本站查询。
本文标签:


