此处将为大家介绍关于使用vitae软件包,multiple-bibliographies.lua错误编织Rmd时出现问题复制系统的详细内容,此外,我们还将为您介绍关于(OK)Graphviz-MANE
此处将为大家介绍关于使用vitae软件包,multiple-bibliographies.lua错误编织Rmd时出现问题 复制系统的详细内容,此外,我们还将为您介绍关于(OK) Graphviz - MANET - multiple interfaces multiple paths、Author name disambiguation using a graph model with node splitting and merging based on bibliogra...、CentOS 7更新时出现Multilib version problems、CentOS 7更新时出现:Multilib version problems问题的解决方法的有用信息。
本文目录一览:- 使用vitae软件包,multiple-bibliographies.lua错误编织Rmd时出现问题 复制系统
- (OK) Graphviz - MANET - multiple interfaces multiple paths
- Author name disambiguation using a graph model with node splitting and merging based on bibliogra...
- CentOS 7更新时出现Multilib version problems
- CentOS 7更新时出现:Multilib version problems问题的解决方法

使用vitae软件包,multiple-bibliographies.lua错误编织Rmd时出现问题 复制系统
如何解决使用vitae软件包,multiple-bibliographies.lua错误编织Rmd时出现问题 复制系统?
当尝试使用履历包从Rmd编织履历时,我看到以下错误:
    Error running filter /tmp/RtmpLl0xn9/multiple-bibliographies.lua:
    /tmp/RtmpLl0xn9/multiple-bibliographies.lua:34: attempt to compare string with table
    stack traceback:
         /tmp/RtmpLl0xn9/multiple-bibliographies.lua:34: in function </tmp/RtmpLl0xn9/multiple-bibliographies.lua:32>
         /tmp/RtmpLl0xn9/multiple-bibliographies.lua:32: in main chunk
    Error: pandoc document conversion Failed with error 83
在为任何提供的模板使用默认居里模板内容时,我看到相同的错误。我尝试了各种Rmd文件,更新了我的所有r软件包,并且对下一步的工作感到迷茫。
复制
- 在rstudio中,选择文件->新文件-> R Markdown
- 从模板中选择
- 选择“简历”(真棒CV格式)
- 加载Rmd文件后,单击“编织”
- 看到以下错误
系统
我正在使用:
- R版本4.0.3
- Linux(Ubuntu 20.04.1)
- Rstudio 1.2.5001
- 简历0.2.2.9000
解决方法
暂无找到可以解决该程序问题的有效方法,小编努力寻找整理中!
如果你已经找到好的解决方法,欢迎将解决方案带上本链接一起发送给小编。
小编邮箱:dio#foxmail.com (将#修改为@)
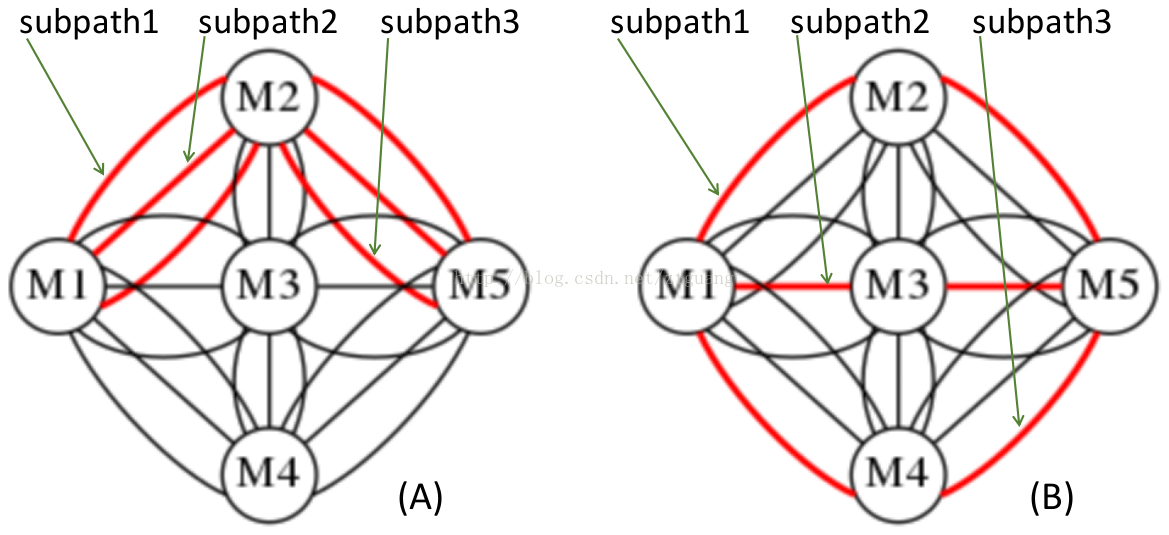
 Graphviz - MANET - multiple interfaces multiple paths")
(OK) Graphviz - MANET - multiple interfaces multiple paths
/*
dot example3.dot -Tpng -o example3.png
*/

digraph G {

	size="10,10";

	rankdir=LR					// set graph direction rankdir="TB", "LR", "BT", "RL"

	//ranksep="1.0 equally"
	//splines=line
	nodesep=0.4;
	//node [label=""];

	subgraph cluster_1 {
	 color=white;
	 node [style=solid, color=black, shape=circle, width=.4 height=.4, fixedsize=true];
	 M1;
	 //label = "layer 1";
	}

	subgraph cluster_2 {
	 color=white;
	 node [style=solid, color=black, shape=circle, width=.4 height=.4, fixedsize=true];
	 M2;
	 //label = "layer 2";
	}

	subgraph cluster_3 {
	 color=white;
	 node [style=solid, color=black, shape=circle, width=.4 height=.4, fixedsize=true];
	 M3;
	 //label = "layer 2";
	}

	subgraph cluster_4 {
	 color=white;
	 node [style=solid, color=black, shape=circle, width=.4 height=.4, fixedsize=true];
	 M4;
	 //label = "layer 2";
	}

	subgraph cluster_5 {
	 color=white;
	 node [style=solid, color=black, shape=circle, width=.4 height=.4, fixedsize=true];
	 M5;
	 //label = "layer 3";
	}

	//At present, the recognized style names are "dashed", "dotted", "solid", "invis" and "bold" for nodes and edges, "tapered" for edges only, and "filled", "striped", "wedged", "diagonals" and "rounded" for nodes only. The styles "filled", "striped" and "rounded" are recognized for clusters. The style "radial" is recognized for nodes, clusters and graphs, and indicates a radial-style gradient fill if applicable.


//-------------------------------------------------------------------------------------------------
// original MPTCP
/*
	M1 -> M2 [style=bold, dir="both", arrowhead=none, arrowtail=none, color=red]
	M1 -> M2 [style=bold, dir="both", arrowhead=none, arrowtail=none, color=red]
	M1 -> M2 [style=bold, dir="both", arrowhead=none, arrowtail=none, color=red]

	M1 -> M3 [style=solid, dir="both", arrowhead=none, arrowtail=none]
	M1 -> M3 [style=solid, dir="both", arrowhead=none, arrowtail=none]
	M1 -> M3 [style=solid, dir="both", arrowhead=none, arrowtail=none]

	M1 -> M4 [style=solid, dir="both", arrowhead=none, arrowtail=none]
	M1 -> M4 [style=solid, dir="both", arrowhead=none, arrowtail=none]
	M1 -> M4 [style=solid, dir="both", arrowhead=none, arrowtail=none]

	M2 -> M5 [style=bold, dir="both", arrowhead=none, arrowtail=none, color=red]
	M2 -> M5 [style=bold, dir="both", arrowhead=none, arrowtail=none, color=red]
	M2 -> M5 [style=bold, dir="both", arrowhead=none, arrowtail=none, color=red]

	M3 -> M5 [style=solid, dir="both", arrowhead=none, arrowtail=none]
	M3 -> M5 [style=solid, dir="both", arrowhead=none, arrowtail=none]
	M3 -> M5 [style=solid, dir="both", arrowhead=none, arrowtail=none]

	M4 -> M5 [style=solid, dir="both", arrowhead=none, arrowtail=none]
	M4 -> M5 [style=solid, dir="both", arrowhead=none, arrowtail=none]
	M4 -> M5 [style=solid, dir="both", arrowhead=none, arrowtail=none]

	M2 -> M3 [style=solid, dir="both", arrowhead=none, arrowtail=none, constraint=false]
	M2 -> M3 [style=solid, dir="both", arrowhead=none, arrowtail=none, constraint=false]
	M2 -> M3 [style=solid, dir="both", arrowhead=none, arrowtail=none, constraint=false]

	M4 -> M3 [style=solid, dir="both", arrowhead=none, arrowtail=none, constraint=false]
	M4 -> M3 [style=solid, dir="both", arrowhead=none, arrowtail=none, constraint=false]
	M4 -> M3 [style=solid, dir="both", arrowhead=none, arrowtail=none, constraint=false]
//*/
//-------------------------------------------------------------------------------------------------


//-------------------------------------------------------------------------------------------------
// original MPTCP
//*
	M1 -> M2 [style=solid, dir="both", arrowhead=none, arrowtail=none]
	M1 -> M2 [style=solid, dir="both", arrowhead=none, arrowtail=none]
	M1 -> M2 [style=bold, dir="both", arrowhead=none, arrowtail=none, color=red]

	M1 -> M3 [style=solid, dir="both", arrowhead=none, arrowtail=none]
	M1 -> M3 [style=bold, dir="both", arrowhead=none, arrowtail=none, color=red]
	M1 -> M3 [style=solid, dir="both", arrowhead=none, arrowtail=none]

	M1 -> M4 [style=bold, dir="both", arrowhead=none, arrowtail=none, color=red]
	M1 -> M4 [style=solid, dir="both", arrowhead=none, arrowtail=none]
	M1 -> M4 [style=solid, dir="both", arrowhead=none, arrowtail=none]

	M2 -> M5 [style=solid, dir="both", arrowhead=none, arrowtail=none]
	M2 -> M5 [style=solid, dir="both", arrowhead=none, arrowtail=none]
	M2 -> M5 [style=bold, dir="both", arrowhead=none, arrowtail=none, color=red]

	M3 -> M5 [style=solid, dir="both", arrowhead=none, arrowtail=none]
	M3 -> M5 [style=bold, dir="both", arrowhead=none, arrowtail=none, color=red]
	M3 -> M5 [style=solid, dir="both", arrowhead=none, arrowtail=none]

	M4 -> M5 [style=bold, dir="both", arrowhead=none, arrowtail=none, color=red]
	M4 -> M5 [style=solid, dir="both", arrowhead=none, arrowtail=none]
	M4 -> M5 [style=solid, dir="both", arrowhead=none, arrowtail=none]

	M2 -> M3 [style=solid, dir="both", arrowhead=none, arrowtail=none, constraint=false]
	M2 -> M3 [style=solid, dir="both", arrowhead=none, arrowtail=none, constraint=false]
	M2 -> M3 [style=solid, dir="both", arrowhead=none, arrowtail=none, constraint=false]

	M4 -> M3 [style=solid, dir="both", arrowhead=none, arrowtail=none, constraint=false]
	M4 -> M3 [style=solid, dir="both", arrowhead=none, arrowtail=none, constraint=false]
	M4 -> M3 [style=solid, dir="both", arrowhead=none, arrowtail=none, constraint=false]
//*/
//-------------------------------------------------------------------------------------------------
}
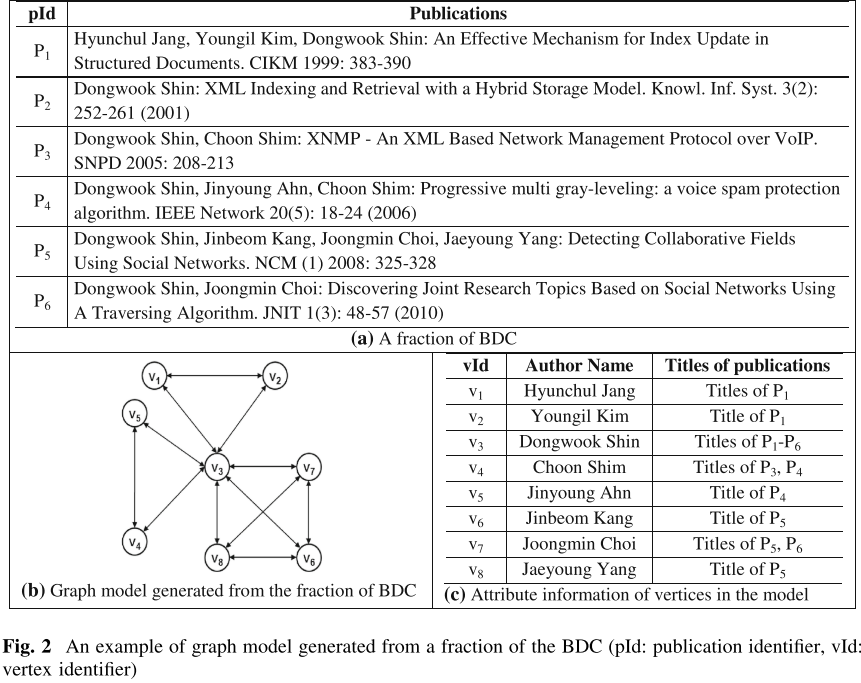
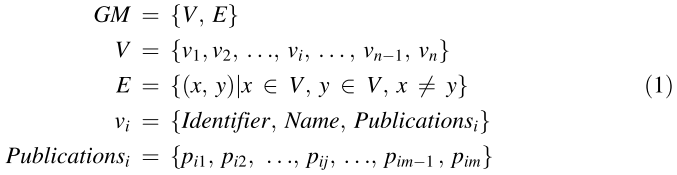
Author name disambiguation using a graph model with node splitting and merging based on bibliogra...
Author name disambiguation using a graph model with node splitting and merging based on bibliographic information
1. 概述
2. 创新点
3. 整体框架
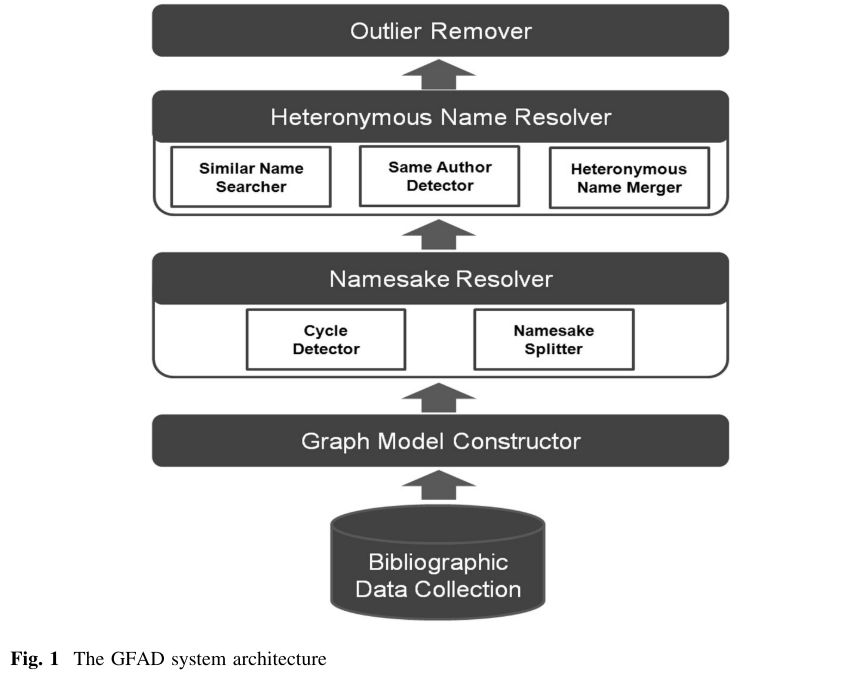
3.1. Graph Model Constructor
3.2. Namesake Resolver
3.2.1. Cycle Detector
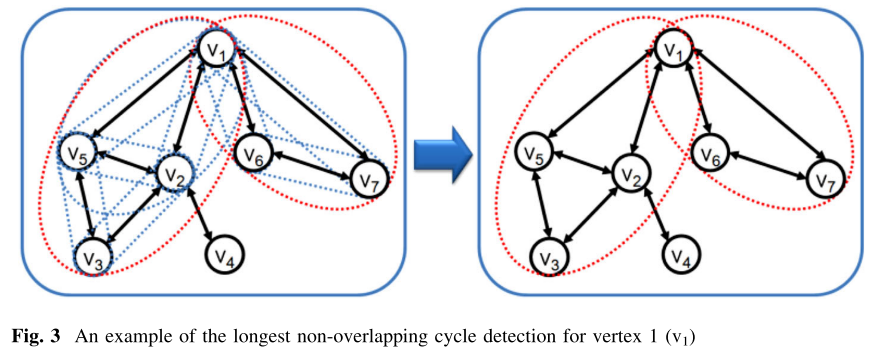
3.2.2. Namesake Splitter
3.3. Heteronymous Name Resolver
3.3.1. similar name searcher

3.3.2. same author detector
3.3.3. heteronymous name merger
3.4. Outlier Remover

4. Experiment
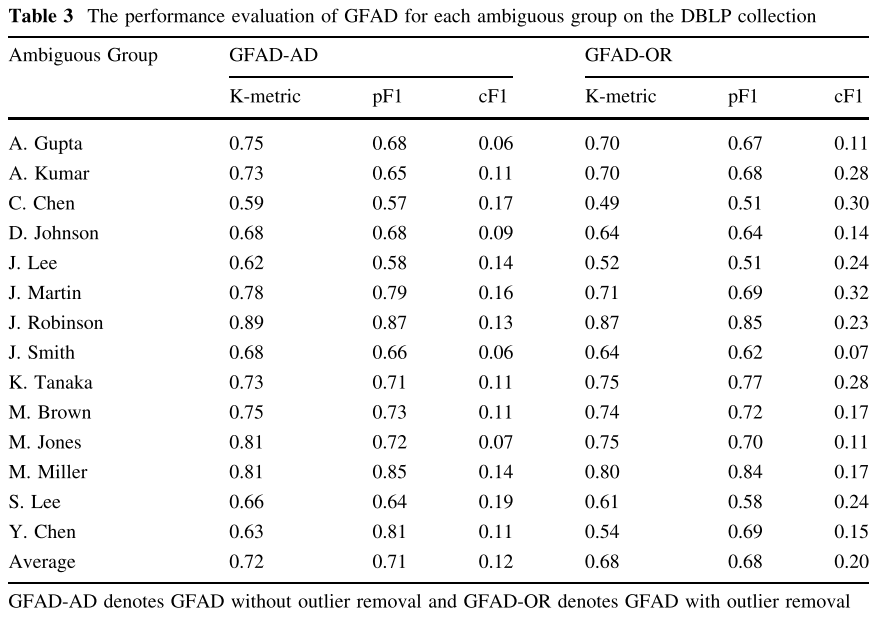
- 对比使用了哪些属性,信息缺失是否严重
- 如何定义相似性阈值
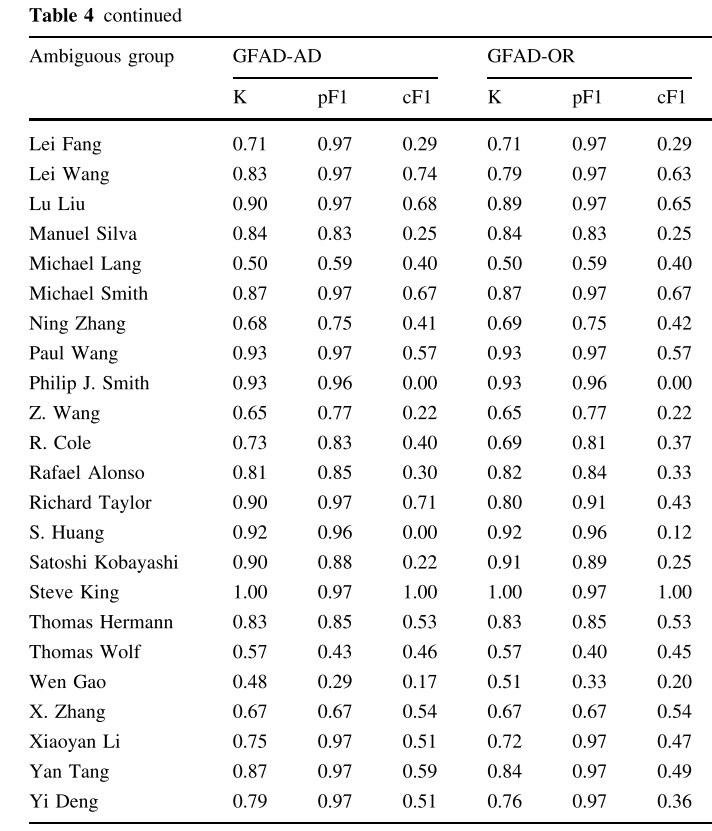
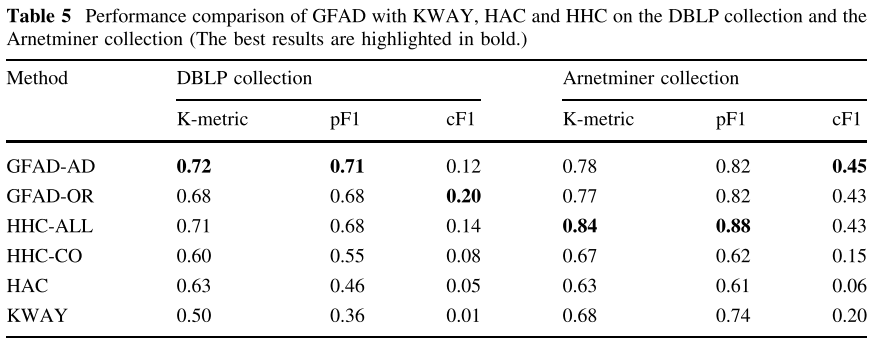
- 使用所有特征属性(合著者,title,地点)
- 在 arnet 上比 GFAD 性能好
- 需要预先定义标题和地址的相似度阈值
- 选择一个唯一的不变的阈值不太现实
- 仅使用共同作者
5. GFAD 局限性

CentOS 7更新时出现Multilib version problems
这两天在更新CentOS7系统时,出现了Multilib version problems错误,执行命令:
# yum update
出现了的错误信息:
....
---> Package libcap-ng.i686 0:0.7.5-4.el7 will be installed
---> Package libstdc++.i686 0:4.8.5-16.el7 will be installed
--> Finished Dependency Resolution
Error:  Multilib version problems found. This often means that the root
       cause is something else and multilib version checking is just
       pointing out that there is a problem. Eg.:

         1. You have an upgrade for glibc which is missing some
            dependency that another package requires. Yum is trying to
            solve this by installing an older version of glibc of the
            different architecture. If you exclude the bad architecture
            yum will tell you what the root cause is (which package
            requires what). You can try redoing the upgrade with
            --exclude glibc.otherarch ... this should give you an error
            message showing the root cause of the problem.

         2. You have multiple architectures of glibc installed,but
            yum can only see an upgrade for one of those architectures.
            If you don't want/need both architectures anymore then you
            can remove the one with the missing update and everything
            will work.

         3. You have duplicate versions of glibc installed already.
            You can use "yum check" to get yum show these errors.

       ...you can also use --setopt=protected_multilib=false to remove
       this checking,however this is almost never the correct thing to
       do as something else is very likely to go wrong (often causing
       much more problems).

       Protected multilib versions: glibc-2.17-196.el7.i686 != glibc-2.17-157.el7_3.1.x86_64
Error: Protected multilib versions: pcre-8.32-17.el7.i686 != pcre-8.32-15.el7_2.1.x86_64
Error: Protected multilib versions: elfutils-libs-0.168-8.el7.i686 != elfutils-libs-0.166-2.el7.x86_64
......
解决过程如下:
//查询重复的软件包
# rpm -q systemd-libs
systemd-libs-219-30.el7.x86_64
systemd-libs-219-42.el7_4.1.x86_64

//删除旧版
# rpm -e systemd-libs-219-30.el7.x86_64
error: Failed dependencies:
    systemd-libs = 219-30.el7 is needed by (installed) libgudev1-219-30.el7.x86_64

//仍然出现依赖问题,继续查询libgudev1的版本信息
# rpm -q libgudev1
libgudev1-219-30.el7.x86_64

//发现只有一个版本,升级试一下
# yum update libgudev1
......
Updated:
  libgudev1.x86_64 0:219-42.el7_4.1

Complete!
# rpm -q libgudev1
libgudev1-219-42.el7_4.1.x86_64

//升级完成后,删除旧版本的systemd-libs
# rpm -e systemd-libs-219-30.el7.x86_64
# rpm -q systemd-libs
systemd-libs-219-42.el7_4.1.x86_64
最后查询发现只剩下最新版本的systemd-libs,其他重复版本包的解决,也是同样的过程。
核心的命令主要是:
rpm -q package-names
rpm -e package-full-version

CentOS 7更新时出现:Multilib version problems问题的解决方法
前言
关于CentOS的出身就不多多说了,拥有RHEL所有功能和性能,甚至更加友好,最重要一点是免费,深受大家的喜爱,CentOS的受欢迎程度并不亚于Ubuntu,之前安装了CentOS7,关于安装的教程,有需要的朋友们可以参考这篇文章:https://www.jb51.net/article/95263.htm ,下面话不多说了,来一起看看详细的介绍吧。
发现问题
最近这两天在更新CentOS7系统时,出现了Multilib version problems错误,执行命令:
# yum update
出现了的错误信息:
....
---> Package libcap-ng.i686 0:0.7.5-4.el7 will be installed
---> Package libstdc++.i686 0:4.8.5-16.el7 will be installed
--> Finished Dependency Resolution
Error: Multilib version problems found. This often means that the root
 cause is something else and multilib version checking is just
 pointing out that there is a problem. Eg.:

  1. You have an upgrade for glibc which is missing some
  dependency that another package requires. Yum is trying to
  solve this by installing an older version of glibc of the
  different architecture. If you exclude the bad architecture
  yum will tell you what the root cause is (which package
  requires what). You can try redoing the upgrade with
  --exclude glibc.otherarch ... this should give you an error
  message showing the root cause of the problem.

  2. You have multiple architectures of glibc installed, but
  yum can only see an upgrade for one of those architectures.
  If you don''t want/need both architectures anymore then you
  can remove the one with the missing update and everything
  will work.

  3. You have duplicate versions of glibc installed already.
  You can use "yum check" to get yum show these errors.

 ...you can also use --setopt=protected_multilib=false to remove
 this checking, however this is almost never the correct thing to
 do as something else is very likely to go wrong (often causing
 much more problems).

 Protected multilib versions: glibc-2.17-196.el7.i686 != glibc-2.17-157.el7_3.1.x86_64
Error: Protected multilib versions: pcre-8.32-17.el7.i686 != pcre-8.32-15.el7_2.1.x86_64
Error: Protected multilib versions: elfutils-libs-0.168-8.el7.i686 != elfutils-libs-0.166-2.el7.x86_64
......
解决过程如下:
//查询重复的软件包
# rpm -q systemd-libs
systemd-libs-219-30.el7.x86_64
systemd-libs-219-42.el7_4.1.x86_64

//删除旧版
# rpm -e systemd-libs-219-30.el7.x86_64
error: Failed dependencies:
 systemd-libs = 219-30.el7 is needed by (installed) libgudev1-219-30.el7.x86_64

//仍然出现依赖问题,继续查询libgudev1的版本信息
# rpm -q libgudev1
libgudev1-219-30.el7.x86_64

//发现只有一个版本,升级试一下
# yum update libgudev1
......
Updated:
 libgudev1.x86_64 0:219-42.el7_4.1

Complete!
# rpm -q libgudev1
libgudev1-219-42.el7_4.1.x86_64

//升级完成后,删除旧版本的systemd-libs
# rpm -e systemd-libs-219-30.el7.x86_64
# rpm -q systemd-libs
systemd-libs-219-42.el7_4.1.x86_64
最后查询发现只剩下最新版本的systemd-libs,其他重复版本包的解决,也是同样的过程。
核心的命令主要是:
rpm -q package-names
rpm -e package-full-version
总结
以上就是这篇文章的全部内容了,希望本文的内容对大家的学习或者工作具有一定的参考学习价值,如果有疑问大家可以留言交流,谢谢大家对的支持。
- CentOS 8设置自动更新的完整步骤
今天关于使用vitae软件包,multiple-bibliographies.lua错误编织Rmd时出现问题 复制系统的介绍到此结束,谢谢您的阅读,有关(OK) Graphviz - MANET - multiple interfaces multiple paths、Author name disambiguation using a graph model with node splitting and merging based on bibliogra...、CentOS 7更新时出现Multilib version problems、CentOS 7更新时出现:Multilib version problems问题的解决方法等更多相关知识的信息可以在本站进行查询。
本文标签:


