针对如何使用Java访问githubgraphqlAPI这个问题,本篇文章进行了详细的解答,同时本文还将给你拓展AddaGraphQLAPItoyourHugositewithAWSAmplify、a
针对如何使用Java访问github graphql API这个问题,本篇文章进行了详细的解答,同时本文还将给你拓展Add a GraphQL API to your Hugo site with AWS Amplify、azure – 如何从SPA应用程序中的Web API访问Graph API、GitHub Actions GraphQL 获取存储库包 url 的 ID、Github API v4: GraphQL等相关知识,希望可以帮助到你。
本文目录一览:- 如何使用Java访问github graphql API
- Add a GraphQL API to your Hugo site with AWS Amplify
- azure – 如何从SPA应用程序中的Web API访问Graph API
- GitHub Actions GraphQL 获取存储库包 url 的 ID
- Github API v4: GraphQL

如何使用Java访问github graphql API
我需要访问github graphql API以获得有关某个存储库的一些数据。以下curl命令很好用
curl -i -H "Authorization: bearer myGithubToken" -X POST -d ''{"query": "query { repository(owner: \"wso2-extensions\", name: \"identity-inbound-auth-oauth\") { object(expression:\"83253ce50f189db30c54f13afa5d99021e2d7ece\") { ... on Commit { blame(path: \"components/org.wso2.carbon.identity.oauth.endpoint/src/main/java/org/wso2/carbon/identity/oauth/endpoint/authz/OAuth2AuthzEndpoint.java\") { ranges { startingLine endingLine age commit { message url history(first: 2) { edges { node { message url } } } author { name email } } } } } } } }"}'' https://api.github.com/graphql现在,我需要调用相同的名称Java来操纵输出。这是我尝试过的代码,
public void callGraphqlApi(){ CloseableHttpClient httpClientForGraphql = null; CloseableHttpResponse httpResponseFromGraphql= null; httpClientForGraphql=HttpClients.createDefault(); HttpPost httpPost= new HttpPost("https://api.github.com/graphql"); String query= "query\":\"query { repository(owner: \"wso2-extensions\", name:\"identity-inbound-auth-oauth\") { object(expression: \"83253ce50f189db30c54f13afa5d99021e2d7ece\") { ... on Commit { blame(path: \"components/org.wso2.carbon.identity.oauth.endpoint/src/main/java/org/wso2/carbon/identity/oauth/endpoint/authz/OAuth2AuthzEndpoint.java\") { ranges { startingLine endingLine age commit { message url history(first: 2) { edges { node { message url } } } author { name email } } } } } } } }"; httpPost.addHeader("Authorization","Bearer myGithubToken"); try { StringEntity params= new StringEntity(query); httpPost.addHeader("content-type","application/x-www-form-urlencoded"); httpPost.setEntity(params); httpResponseFromGraphql= httpClientForGraphql.execute(httpPost); } catch (UnsupportedEncodingException e) { // TODO Auto-generated catch block e.printStackTrace(); } catch (ClientProtocolException e) { // TODO Auto-generated catch block e.printStackTrace(); } catch (IOException e) { // TODO Auto-generated catch block e.printStackTrace(); }}当我调试代码时,它向我显示此错误,
HttpResponseProxy {HTTP / 1.1
400错误的请求[服务器:GitHub.com,日期:2017年2月3日,星期五,格林尼治标准时间12:14:58,内容类型:application /
json; charset = utf-8,内容长度:89,状态:400错误的请求,X-RateLimit-Limit:200,X-RateLimit-
Remaining:187,X-RateLimit-Reset:1486125149,X-OAuth-
Scopes:repo,用户,X-Accepted-OAuth-Scopes:回购,X-GitHub-Media-
Type:github.v3;format = json,Access-Control-Expose-Header:ETag,链接,X-GitHub-
OTP,X-RateLimit-Limit,X-RateLimit-Remaining,X-RateLimit-Reset,X-OAuth-
Scopes,X-Accepted- OAuth范围,X轮询间隔,访问控制允许来源:*,内容安全策略:default-
src’none’,严格传输安全性:max-age = 31536000; includeSubdomains; 预加载,X-Content-Type-
Options:nosniff,X-Frame-Options:deny,X-XSS-Protection:1;模式=块,X-GitHub-
Request-Id:CF0A:0EE1:B057F26:EBCB8DF:58947441] ResponseEntityProxy
{[Content-Type:application / json; charset = utf-8,内容长度:89,已压缩:false]}}
我做错了什么?您能帮我解决这个问题吗?提前致谢
答案1
小编典典通过更改以下代码使程序正常工作。与大多数情况下一样,使用JSON库来JSON像上面那样创建复合体是一个好习惯,而不是像大多数时候手动创建那样,手动创建复合体JSON可能会带来很多麻烦。
import org.json.JSONObject;public void callingGraph(){ CloseableHttpClient client= null; CloseableHttpResponse response= null; client= HttpClients.createDefault(); HttpPost httpPost= new HttpPost("https://api.github.com/graphql"); httpPost.addHeader("Authorization","Bearer myToken"); httpPost.addHeader("Accept","application/json"); JSONObject jsonObj = new JSONObject(); jsonobj.put("query", "{repository(owner: \"wso2-extensions\", name: \"identity-inbound-auth-oauth\") { object(expression: \"83253ce50f189db30c54f13afa5d99021e2d7ece\") { ... on Commit { blame(path: \"components/org.wso2.carbon.identity.oauth.endpoint/src/main/java/org/wso2/carbon/identity/oauth/endpoint/authz/OAuth2AuthzEndpoint.java\") { ranges { startingLine, endingLine, age, commit { message url history(first: 2) { edges { node { message, url } } } author { name, email } } } } } } } }"); try { StringEntity entity= new StringEntity(jsonObj.toString()); httpPost.setEntity(entity); response= client.execute(httpPost); } catch(UnsupportedEncodingException e){ e.printStackTrace(); } catch(ClientProtocolException e){ e.printStackTrace(); } catch(IOException e){ e.printStackTrace(); } try{ BufferedReader reader= new BufferedReader(new InputStreamReader(response.getEntity().getContent())); String line= null; StringBuilder builder= new StringBuilder(); while((line=reader.readLine())!= null){ builder.append(line); } System.out.println(builder.toString()); } catch(Exception e){ e.printStackTrace(); } }
Add a GraphQL API to your Hugo site with AWS Amplify
https://amazonaws-china.com/blogs/mobile/add-a-graphql-api-to-your-hugo-site-with-aws-amplify/
This post was written by Tom Moore, Solutions Architect at AWS
Hugo is a very popular web framework for developing static web sites. The AWS Amplify console provides an easy way for you to host your Hugo web site with an automated CI/CD Pipeline built for you. This Blog post will help users to extend their Hugo web sites hosted in the Amplify console with back end services like AppSync that are built using the Amplify tool chain.
By following the steps outlined in this blog post you will be able to host data stored in Amazon AppSync on your Hugo web site.
Prerequisites
Install NodeJS and Node Package Manager (NPM)
You can install NodeJS and NPM on MacOS or Linux by using either Homebrew, or Node Version Manager (NVM.) Windows users can download and install the package published at: https://nodejs.org/
Setting up the Amplify tools
Instructions for installing and configuring the Amplify Command Line tools can be found here: https://aws-amplify.github.io/docs/
Under Getting Started. These instructions will walk you through the process of setting up an AWS Account along with installing and configuring the AWS Amplify command line tools. Once you are done with the first two steps, return to this post. You do not need follow the instructions in section 3, “Build your app”.
Install Hugo
In order to build a Hugo website, you will need to install the Hugo tool chain. Instructions for installing Hugo can be found here: https://gohugo.io/getting-started/installing/
Install Git
This project will require interacting with git source control. You should install a git client, and make sure you have access to Git credentials via HTTPS or SSH. This lab blog post assumes a basic level of familiarity with how to use git.
Setting up source control
In order to use the Amplify Console later in this process, we will need to have access to a source control repository. This repository will serve as the repository for the Amplify CI/CD pipeline.
- In the AWS Console, select the Code Commit service.
- From code commit, select Repositories.

- Click on the Create Repository button on the right-hand side.

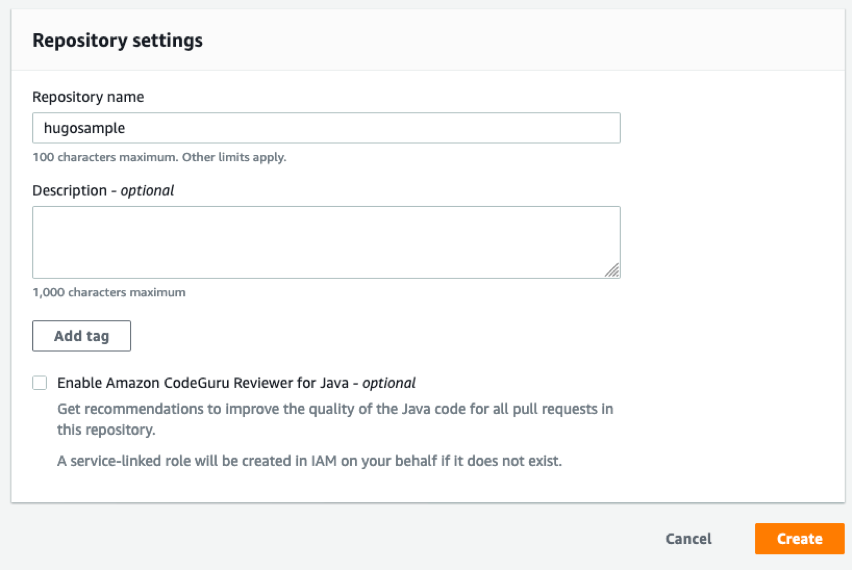
In the create repository dialog, provide a Repository name, and optionally a description. For this sample the repository is called “hugosample”. If you use a different name, you will need to use that wherever the instructions call for your repository name.
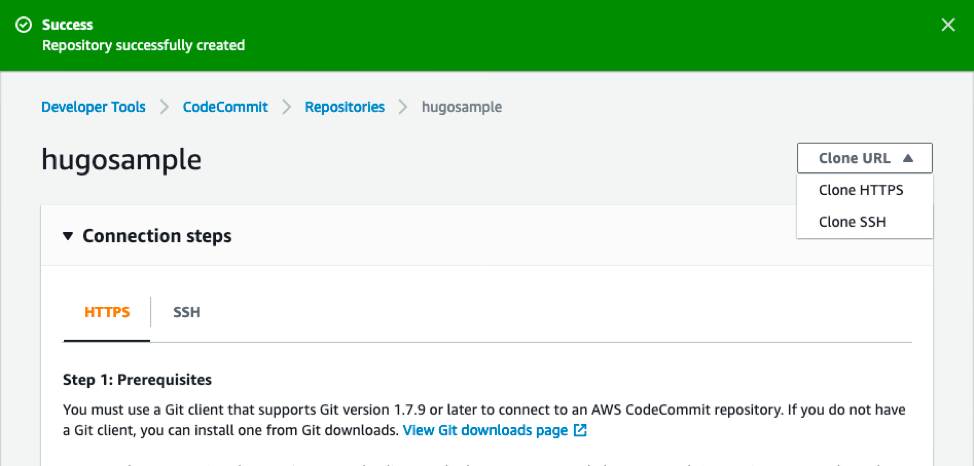
Once your repository has been created, the Code Commit console provides instructions for downloading and configuring your git client to access Code Commit. The console also provides a way of getting access to the clone URL for the repository.
Cloning your repository
On your local development machine use your git client to clone your repository to a local folder.
git clone {Repository URL copied from above.}You will receive the following warning, but you will have a new directory created that matches the name of the repository that you created in Code Commit.
![]()
Creating your Hugo site
The Hugo command line will create your new website via the command line. Unfortunately, the Hugo command line insists on creating the new site in a sub folder, which is not ideal for our purposes. Use the following commands from the command line in order to generate a new Hugo website, and move all the files to the base of your repository.
cd hugosample
hugo new site hugoSampleSite
mv hugoSampleSite/* ./
rmdir hugoSampleSite
Once you have the site constructed in the root directory of the repository, the only thing left to do is download and copy a Hugo theme into the theme directory of your site and configure it.
For this demo we will use the Hugo theme ‘Ananke’ which is available here: https://themes.gohugo.io/gohugo-theme-ananke/
For the purposes of this example I have downloaded a ZIP file of the theme, and added it to the theme directory in my hugo site.

Finally edit the config.toml file to configure Hugo to leverage the theme.
Make the hilighted change to the configuration file, telling Hugo to load the Ananke theme for your site.
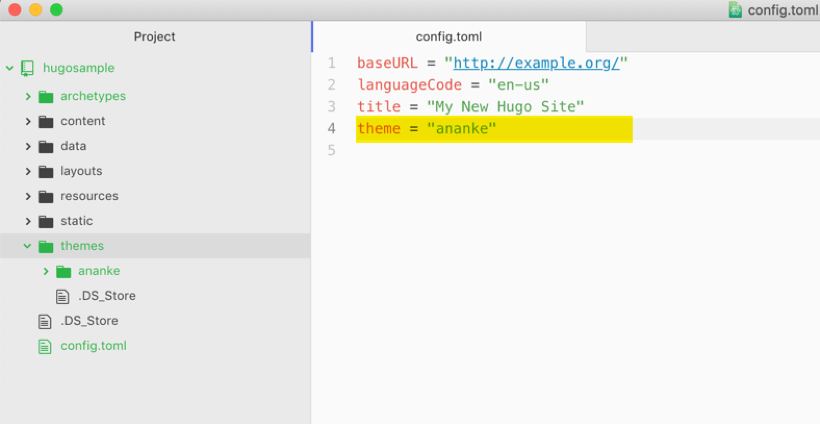
Once you have made all the changes, save the configuration file.
Finally, you need to create a first content page for Hugo to display. From the command line type the following command:
hugo new _index.mdThen run the following command line to start your Hugo development server:
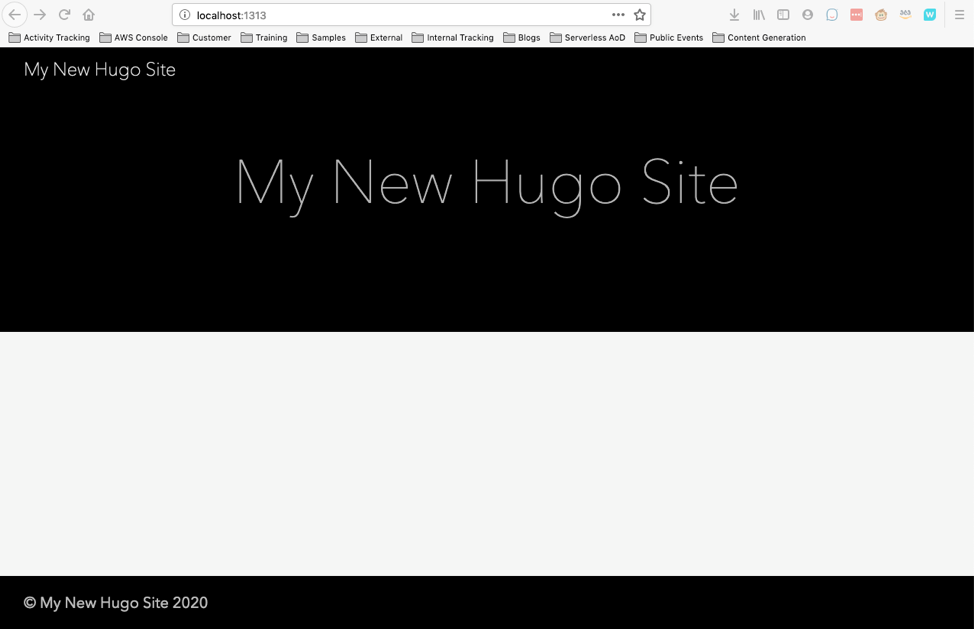
hugo Server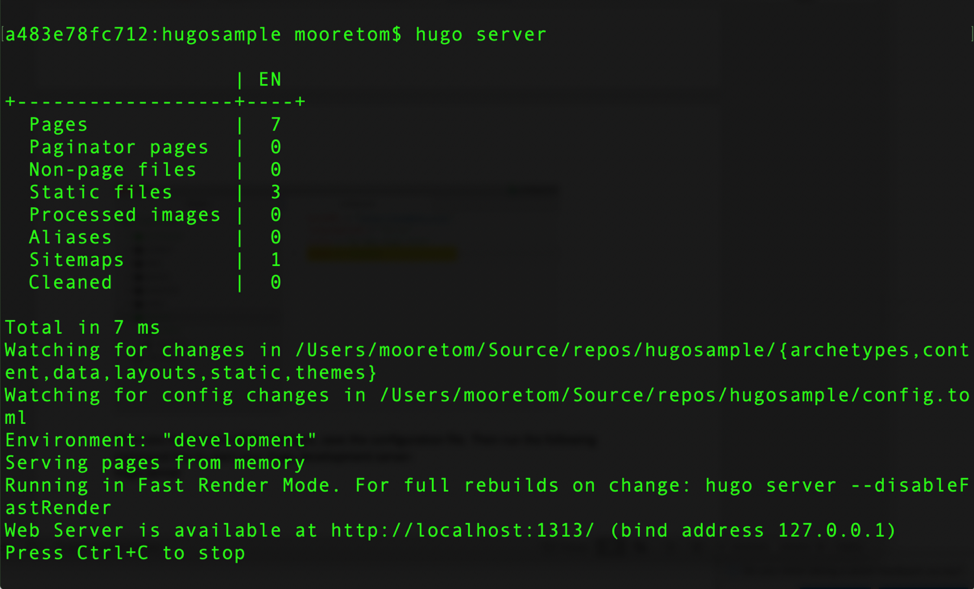
The Hugo server command will start a web server on the local machine, that allows you to browse the site for local testing. Using your browser browse to the address specified. (In this case it is http://localhost:1313/) You will see you skeleton Hugo site ready for customization.
Setting up Amplify Console
Now that we have a starting point for the website, we want to publish the site and set up the Amplify Console to host the website.
From the command line, use GIT to publish all of the changes to the project.
git add .
git commit -m “Initial checkin of site files.”
git push
Once your push is complete, you will receive a message similar to below:

Once your check in is completed, return to the AWS Console.
- From the AWS Console, select AWS Amplify
- Click on Connect App to create your new Amplify application and connect it to your source control.
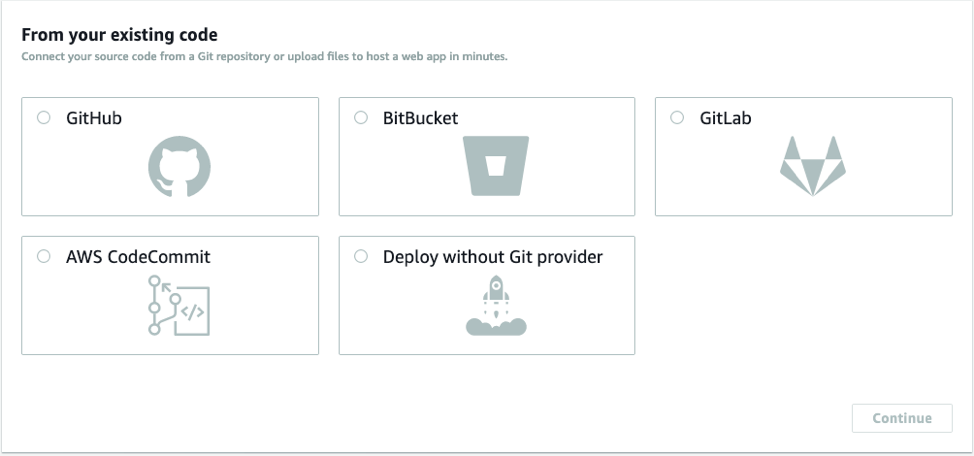
- From the source code selection option, choose AWS Code Commit as the location for your source control. Then click Continue.
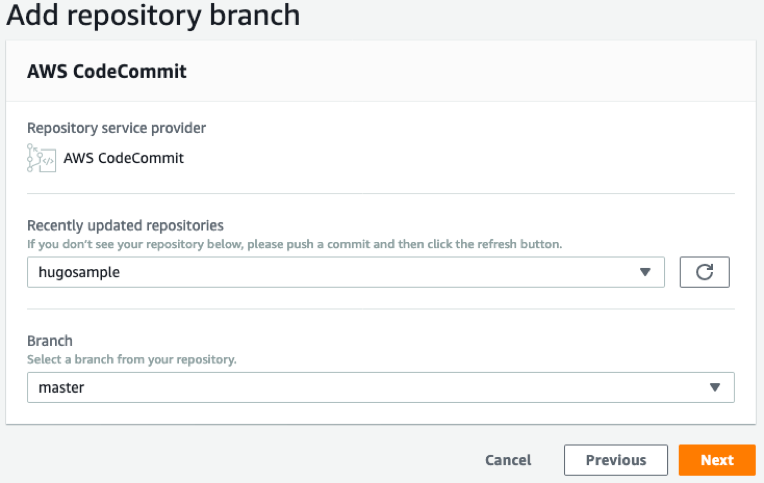
- From the Add repository branch dialog select the repository that you have used for the site. In this case ‘Hugosample’ and select the source control branch. In this case ‘master.’ Click Next.
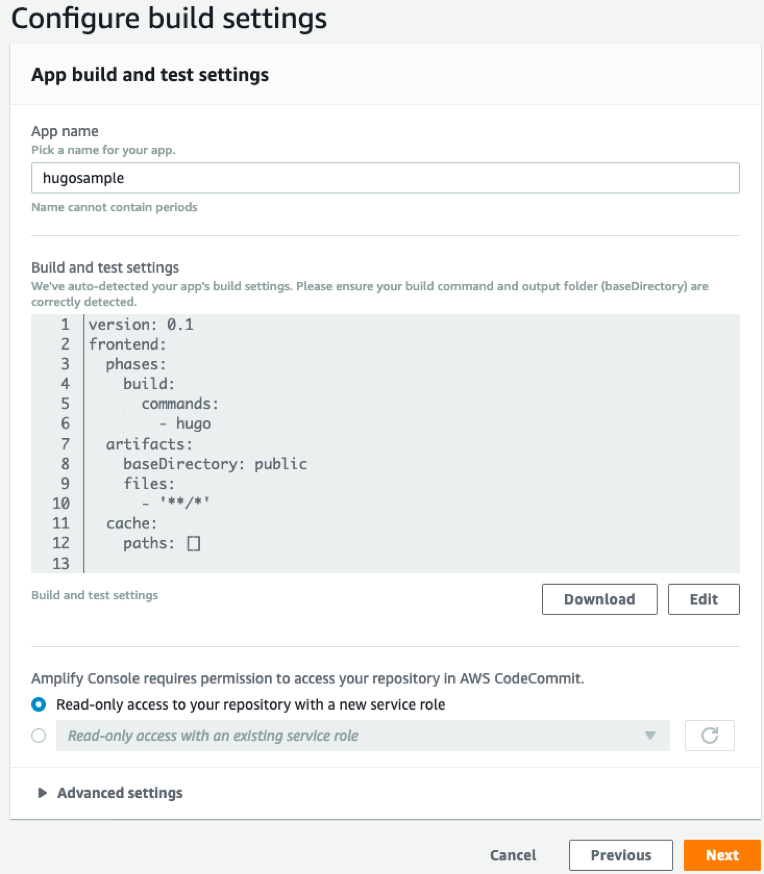
For App build and test settings you will need to configure options for how your application will be handled by the CI/CD pipeline. Keep all of the default options on this dialog and click Next.
From the review screen, click Save and Deploy to have Amplify save your configuration and automatically deploy the first copy of your webpage.

Because this is a basic Hugo web page, the deployment process will not take long before the web page is available for the first viewing.
Once the deployment has been completed, you can click on the link the Amplify console to launch your web page and view it.
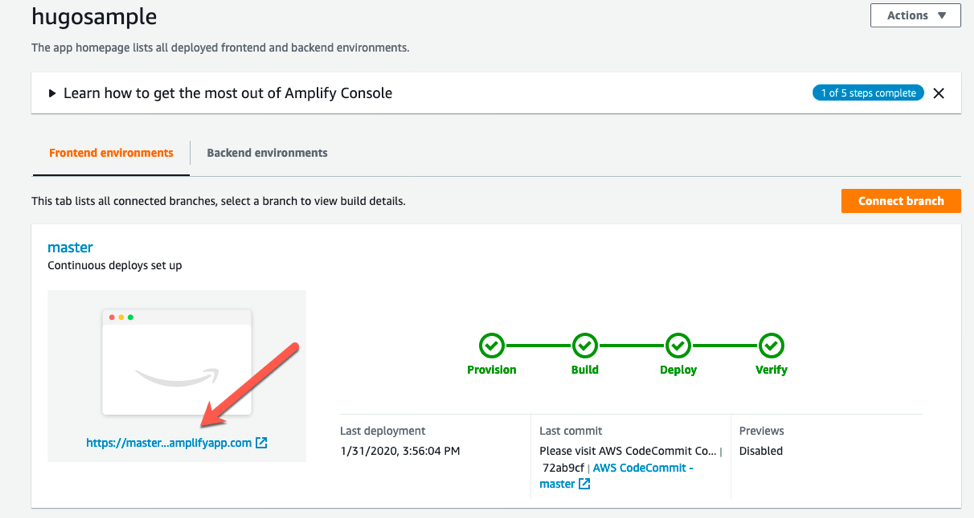
Depending on the theme you have used, and the way that the pages are configured your web site may or may not look the same as when it is being run locally. In order to fix any rendering issues, copy the URL that amplify uses for your web page, we will use that to update your Hugo template in the next stage.

Updating the Hugo configuration
After validating that the Amplify build and deployment has been successful. Copy the URL for the amplify site and use this up update the baseURL parameter in your Hugo config.toml file, and save your changes.

Adding NodeJS to the project
AWS Amplify leverages NodeJS for the automation features. In order to make use of Amplify in the website, we will need to add NodeJS to the deployment files.
From the command line, in the root of your site directory, use the following commands:
mkdir src
touch package.json webpack.config.js src/app.js
Using your text editor, add the following text to your package.json file:
{
  "name": "amplify-js-app",
  "version": "1.0.0",
  "description": "Amplify JavaScript Example",
  "dependencies": {
    "@aws-amplify/api": "latest",
    "@aws-amplify/pubsub": "latest",
    "hugo": "latest"
  },
  "devDependencies": {
    "webpack": "^4.17.1",
    "webpack-cli": "^3.1.0",
    "copy-webpack-plugin": "^4.5.2",
    "webpack-dev-server": "^3.1.5"
  },
  "scripts": {
    "start": "webpack && hugo server",
    "build": "webpack"
  }
}
From the command line run the following command:
npm installThis will download all of the node packages necessary for the application to work correctly.
Update your webpack.config.js file to the following:
const CopyWebpackPlugin = require(''copy-webpack-plugin'');
const webpack = require(''webpack'');
const path = require(''path'');

module.exports = {
    mode: ''development'',
    entry: ''./src/app.js'',
    output: {
        filename: ''[name].bundle.js'',
        path: path.resolve(__dirname, ''static/src'')
    },
    module: {
        rules: [
            {
                test: /\.js$/,
                exclude: /node_modules/
            }
        ]
    },
    plugins: [
        new webpack.HotModuleReplacementPlugin()
    ]
};
Update your _index.md file to contain the following:
---
title: ""
date: 2020-01-31T15:55:43-05:00
draft: false
---

<div>
    <button id="MutationEventButton">Add data</button>
    <div id="MutationResult"></div>
    <div id="QueryResult"></div>
    <div id="SubscriptionResult"></div>
</div>

<script src="src/main.bundle.js"></script>
You can now start your application locally by using the command
npm startYou should notice that the updated application has a new button called Add data
If you click this button, nothing will happen.
Updating your CI / CD Pipeline:
From the command line, use git to publish your local changes to the site:
git add .
git commit -m “Updating the UI changes.”
git push
Once the changes have been pushed, Amplify will automatically provision a new build environment, download your changes and publish an update to your web page.
Adding Amplify
From the command line in your website directory use the command to set up AWS Amplify in your project.:
amplify initAccept the default for all options except:
- Enter a name for the environment: dev
- Type of application: Javascript
- Javascript Framework: None
For the AWS Profile, choose Yes, and select either your default profile, or the profile you have created for AWS Amplify. Keep in mind that the profile you choose will need to have all necessary permissions to create and update your back end resources.
Adding AppSync
From the command line, use the command to add an AppSync API to the current project:
amplify add api- Choose GraphQL as the type of api.
- Use the default provider name
- Choose API key for the authorization type.
- For the Key Description type ‘test’
- For the number of days the key is valid, use the default of 7
- For advanced settings, choose “No, I am done.”
- For an Annotated GraphQL schema, choose No.
- For guided schema creation, choose Y
- Choose the default ‘Single Object’ option for the schema.
- For do you want to edit the schema now, choose no.
Once completed, use the command to build out your back end for the application:
amplify push- As part of the push process, you will be asked if you want amplify to generate code for your GraphQL API. Choose Y for this, and choose the option for the code to be generated in Javascript.
- Choose the default option for the pattern of GraphQL
- Choose Y to generate and update all possible GraphQL operations.
- Choose the default of 2 for the maximum statement depth.
The process of updating the back-end resources will take a few moments to complete.
Updating your website front end.
With the updates to the back end published, the front end of the application can now be updated to take advantage of the newly created services.
Update the app.js file to be the following:
import API, { graphqlOperation } from ''@aws-amplify/api''
import PubSub from ''@aws-amplify/pubsub'';
import { createTodo } from ''./mutations''
import { listTodos } from ''./queries''
import awsconfig from ''./aws-exports'';
API.configure(awsconfig);
PubSub.configure(awsconfig);
async function createNewTodo() {
const todo = { name: "Use AppSync" , description: "Realtime and Offline"}
return await API.graphql(graphqlOperation(createTodo, { input: todo }))
}
const MutationButton = document.getElementById(''MutationEventButton'');
const MutationResult = document.getElementById(''MutationResult'');
const QueryResult = document.getElementById(''QueryResult'');
MutationButton.addEventListener(''click'', (evt) => {
MutationResult.innerHTML = `MUTATION RESULTS:`;
createNewTodo().then( (evt) => {
MutationResult.innerHTML += `<p>${evt.data.createTodo.name} - ${evt.data.createTodo.description}</p>`
})
});
async function getData() {
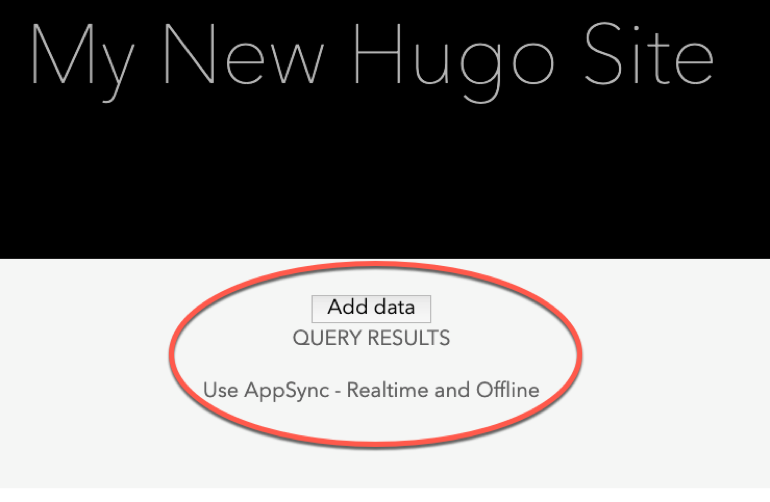
QueryResult.innerHTML = `QUERY RESULTS`;
API.graphql(graphqlOperation(listTodos)).then((evt) => {
evt.data.listTodos.items.map((todo, i) =>
QueryResult.innerHTML += `<p>${todo.name} - ${todo.description}</p>`
);
})
}
getData();Once the app.js file has been updated, save all your changes, and then restart your local web server by running:
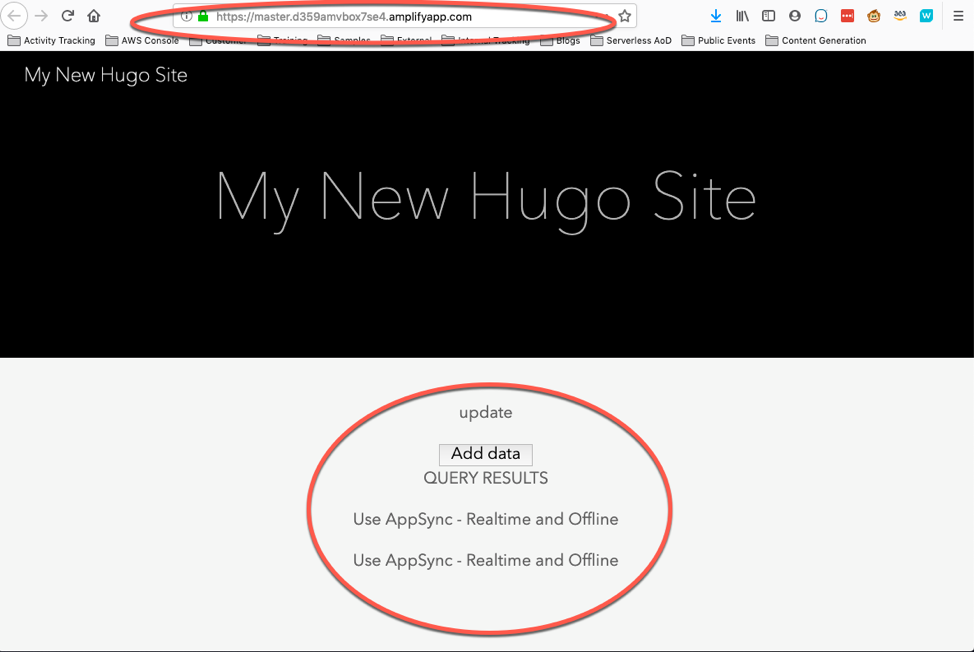
npm startWith the new website running, you will be able to press the Add data button, and web page will push data into the back end via AppSync. When the web page refreshes, AppSync will automatically query the data in the backend database, and update the web page with the data from the back-end data source.
Updating your .gitignore file
By default, Amplify adds a line into your .gitignore file which causes git to not commit your aws-exports.js file. For this process, we need to remove this line form the file, so that the file is committed to your git repository.
Deploying your update
Once you have made all the necessary changes, you can commit your changes to git and allow Amplify to build and deploy your web page complete with AppSync integration. Once the changes have been applied, you can view your application hosted in Amplify while connected to the back end.

azure – 如何从SPA应用程序中的Web API访问Graph API
我在这里跟踪了https://github.com/Azure-Samples/active-directory-angularjs-singlepageapp-dotnet-webapi的示例,并且能够针对AD对用户进行身份验证并将其传递给Web API.
但是,我想访问Web API中的Graph API并获取当前用户配置文件信息.我该如何设置?
更新以提供有关设置的更多上下文:
我有一个网站(site.domain1.com),它承载制作SPA应用程序的html和javascript文件.我在api.domain2.com上托管了Web API.使用OAAL隐式流与ADAL.js和angular-adal对Azure AD进行身份验证.我想在SPA中进行身份验证以获取API的accesstoken.我希望在API中作为查询Graph API的请求的一部分,以获取有关当前用户登录的更多信息.
我能够获得API的accesstoken,并且它当前生成了Claim Principal.问题是使用Web API中的当前标识查询Graph API.
更新:
我不想将管理员权限授予Web API,但我更愿意将用户同意仅从浏览器转发到网站和Web api的“读取用户配置文件”.
我使用类似的方法来代表https://github.com/Azure-Samples/active-directory-dotnet-webapi-onbehalfof的代表
它适用于我的测试AD并且不适用于生产AD的问题.说用户需要在使用Graph Api之前集中应用程序.(对于生产AD我只有用户可以添加用户权限但不能添加应用程序权限.我的猜测是该方案工作我需要AD的全局管理员首先集中).最终,我最终将Web站点和Web API的Azure AD应用程序合并在一起,并使用与Bootstrap Tokens相同的On Behalf Of方法.但我想知道如何使它与2个应用程序正常工作.
解决方法
至于确认,您作为管理员可以选择.用户接受与您的应用共享数据或管理员确认租户下的所有数据.
这是正确的方法.我的前端和后端就是这样工作的.

GitHub Actions GraphQL 获取存储库包 url 的 ID
如何解决GitHub Actions GraphQL 获取存储库包 url 的 ID?
是否可以使用 GitHubs GraphQL api 获取存储库包 URL 的 ID?
我在一个组织中有一个仓库,里面有一个 npm 包,这个包的 URL 如下所示:
https://github.com/ORG/repo-name/packages/321798/versions
我可以使用 GitHubs REST api 获取 ID 321798:
curl \
  -H "Authorization: token ${GITHUB_TOKEN}" \
  -H "Accept: application/vnd.github.v3+json" \
  https://api.github.com/orgs/ORG/packages/npm/PACKAGE_NAME
使用 GraphQL 我有这个查询。但是这个 ID 与来自 REST api 调用的 ID 不同:
query {
  organization(login: "ORG") {
    packages(packageType: NPM,names: ["PACKAGE_NAME"],first: 1) {
      nodes {
        latestVersion {
          id
        }
      }
    }
  }
}
REST api 响应是:"id": 321798
GraphQL api 响应是:"id":"P_kwAO7IP0aM4ADdYa"
是否可以在 GitHub Actions 中使用 GraphQL 获得相同的镜头数字 ID?
解决方法
暂无找到可以解决该程序问题的有效方法,小编努力寻找整理中!
如果你已经找到好的解决方法,欢迎将解决方案带上本链接一起发送给小编。
小编邮箱:dio#foxmail.com (将#修改为@)

Github API v4: GraphQL
GraphQL势不可挡,有着即将取代REST的API架构。主要好处就是“你要什么,api就给你什么。而不是你要不要都给你返回一大堆没用的。”
而且:GraphQL只需要一个网址URL!
https://api.github.com/graphql不像REST,你需要各种各有的URL去申请不同的内容。GraphQL一个URL全够了。
而且一般不是很复杂的情况下,你几乎只要request一次这个地址,就能拿到你全部需要的数据了(能按照你的需求返回给你各种嵌套的、格式化的数据)
网上看了很多文章解释之后发现还是什么都没懂。所以这篇分享不打算按照常规路线,先用一大堆结构图、语法给你弄懵。这里我想先让它运作起来,有个"Hello world",然后再去深究背后的逻辑和语法。
初试GraphQL
要说去了解一个API,最好的方式就是用Postman或Insomnia这种REST客户端去连接玩耍了,不需要任何编程,只是手动点一点就ok。
”有意思“的是,因为GraphQL太新潮,这两大客户端对它的支持各不相同,使用的参数、格式也大相径庭。
下面通过最简单的案例总结一下。
Insomnia 访问Github GraphQL 的案例
Insomnia对GraphQL的支持相当好,可以说已经领先别人一步。
以下为操作步骤:
- 新建request, 设置为POST方式访问
https://api.github.com/graphql - 申请授权认证:
Github的API v4不能陌生访问,必须使用自己的账号申请一个token密码串,然后在每次连接API时使用。
操作很简单,登录Github后,找到Settings -> Developer settings -> Personal access tokens -> Generate new token,生成一个新的token授权密码串,复制保存到本地备份。
- 添加授权认证:
在Insomnia软件里,有两种授权方式都可以达到同样认证效果:明文的Query参数里设置(即在url后面加上参数),或者Header表头里设置。
Query里设置的话,格式为:?access_token=xxxxxxxxxxx
Header里设置的话,格式是:名称为Authorization,值为token xxxxxxxxxx。
- 在栏目里面的Body位置选择
GraphQL格式:

- 输入Github指定格式的
查询语句(看似JSON格式实则不是):
query {
  viewer {
    login
  }
}- 点击Send发送请求,如果一切正常,则会得到查询的返回值:

Postman访问GraphQL失败
不像Insomnia,Postman暂时没有支持GraphQL的选项,但是可以通过类似的操作达到一样的效果。流程是一样的,只是每个地方设置格式都不同,这也是我不断尝试才找到的总结方案(可惜网上相关教程太少)。
这里只说不同的地方吧:
- 授权比Insomnia多一种方式,可以在
Authorization栏目里面直接选OAuth 2.0然后输入token密码串。 - 最重要的是Body部分,
查询语句完全不能使用Github指定的格式。只能选择Body格式为Raw -> JSON(application/json)。然后加上查询语句,格式如下(必须完全符合JSON语法):
{
  "query": "query {viewer { login } }"
}
GitHub GraphQL Explorer
这个是Github制作的网页练习机,免去了一切授权等处理,让你只专注于查询语句的调用练习。
每次点击运行,都会实时返回对应的数据。
如果记不住的、不懂的,还可以点击旁边的Docs,会显示出一个搜索框,显示你需要的内容的文档。
GraphQL API Explorer | GitHub Developer Guide

常用查询结构
下面展示一些我测试过的查询结构,希望能起到帮助作用。
为了增强阅读性,节省文字长度,返回值就先不粘上来了。而且返回值几乎就是查询语句的结构,没什么特别新鲜的。
查询指定的repo中的issues和comments
其中指定了某一个repo(通过owner和name指定),也指定了某一条issue(通过number指定),并要求返回最近的10条comments。

关于如何使用Java访问github graphql API的问题我们已经讲解完毕,感谢您的阅读,如果还想了解更多关于Add a GraphQL API to your Hugo site with AWS Amplify、azure – 如何从SPA应用程序中的Web API访问Graph API、GitHub Actions GraphQL 获取存储库包 url 的 ID、Github API v4: GraphQL等相关内容,可以在本站寻找。
本文标签:


