PHP+Ajax实现的博客文章添加类别功能示例(ajax php 模态 增删改查)
11
在本文中,我们将给您介绍关于PHP+Ajax实现的博客文章添加类别功能示例的详细内容,并且为您解答ajaxphp模态增删改查的相关问题,此外,我们还将为您提供关于Ajax+Jpgraph实现的动态折线
在本文中,我们将给您介绍关于PHP+Ajax实现的博客文章添加类别功能示例的详细内容,并且为您解答ajax php 模态 增删改查的相关问题,此外,我们还将为您提供关于Ajax+Jpgraph实现的动态折线图功能示例、Ajax+PHP实现的分类列表框功能示例、Ajax+PHP实现的删除数据功能示例、Ajax+PHP实现的模拟进度条功能示例的知识。
本文目录一览:")
PHP+Ajax实现的博客文章添加类别功能示例(ajax php 模态 增删改查)
本文实例讲述了PHP+Ajax实现的博客文章添加类别功能。分享给大家供大家参考,具体如下:
一. 代码
fun.js
rush:js;">
function saveType(typename,username){
if(typename==''){ //判断博客类别是否为空
alert('请输入类别名称!');
}else if(username==''){ //判断用户名是否为空
alert('请输入用户名!');
}else{
var xmlObj; //定义XMLHttpRequest对象
var urlData = "typename="+typename+"&username="+username; //指定要发送的数据
if(window.ActiveXObject){ //判断浏览器是否支持ActiveXObject组件,如支持则通过ActiveXObject方式创建XMLHttpRequest对象
xmlObj = new ActiveXObject("Microsoft.XMLHTTP");
}else if(window.XMLHttpRequest){ //如果浏览器不支持ActiveXObject组件,则使用XMLHttpRequest组件创建XMLHttpRequest对象
xmlObj = new XMLHttpRequest();
}
xmlObj.onreadystatechange = callBackFun; //指定回调函数
xmlObj.open("POST","saveType.PHP",true); //指定提交方法和页面
xmlObj.setRequestHeader("Content-Type","application/x-www-form-urlencoded;"); //指定发送数据库类型
xmlObj.send(urlData); //指定发送的数据
function callBackFun(){ //定义回调函数
if(xmlObj.readyState == 4 && xmlObj.status == 200){ //如果服务器端返回内容并无错误发生
if(xmlObj.responseText == 'y'){ //判断保存是否成功,并给出提示
alert('类别添加成功!');
}else{
alert('类别添加失败!');
}
}
}
}
}
conn.PHP
rush:PHP;">
index.PHP
rush:PHP;">
<a href="https://www.jb51.cc/tag/tianjia/" target="_blank">添加</a>类别
ottom.gif">二. 运行结果

更多关于PHP相关内容感兴趣的读者可查看本站专题:《》、《》、《》、《》、《》、《》及《PHP常见数据库操作技巧汇总》
希望本文所述对大家PHP程序设计有所帮助。
总结
以上是小编为你收集整理的PHP+Ajax实现的博客文章添加类别功能示例全部内容。
如果觉得小编网站内容还不错,欢迎将小编网站推荐给好友。
PHP博客文章添加类别
PHP相关文章
使用ThinkPHP+Uploadify实现图片上传功能
首先,将下载的Uploadify压缩包解压放到公共文件夹内。实现代码如下:
前台html部分:
JQuery打造PHP的AJAX表单提交实例
本实例只利用到JQuery类库本身的函数和功能,不需要第三方插件的支持。另外,所有表单信息都是利用PHPMailer类库邮件的形式发送给管理员。
PHP生成图片验证码、点击切换实例
这里来看下效果:
现在让我们来看下PHP代码:
<?php
session_start();
function random($len) {
PHP实现无限级分类(递归方法)
效果:
实现代码:
<?php
include(\"tree.class.php\");
//具有这个结构的数组,不是这样的话,可以改类的实现
php连接及读取和写入mysql数据库的常用代码
既然现在你看到了这篇文章,说明你肯定知道PHP和MySQL是怎么一回事,我就不啰嗦了。但为什么你还要继续阅读此文呢?可能是以前你习惯复制粘贴一些代码,并没有真正弄懂代码的含义;也可能你以前弄懂了,但像我一样,
PHP网站安装程序的原理及代码
原理:
其实PHP程序的安装原理无非就是将数据库结构和内容导入到相应的数据库中,从这个过程中重新配置连接数据库的参数和文件,为了保证不被别人恶意使用安装文件,当安装完成后需要修改安装文件。
PHP备份/还原MySQL数据库的代码
之前是采用PHP读取数据库结构和内容,然后写文件,这样可能会导致导出的文件不一定能百分百导入到MySQL中去,想想之后采用MySQL自带的导入导出命令最保险.
PHP上传压缩包并自解压方法
1、PHP上传压缩包并解压的大概流程:
普通上传功能->上传到服务器->加载系统组件->找到上传的文件并执行解压命令->成功解压到目录
- • 使用ThinkPHP+Uploadify实现图片上传功
- • JQuery打造PHP的AJAX表单提交实例
- • PHP生成图片验证码、点击切换实例
- • PHP实现无限级分类(递归方法)
- • php连接及读取和写入mysql数据库的常用
- • PHP网站安装程序的原理及代码
- • PHP备份/还原MySQL数据库的代码
- • PHP上传压缩包并自解压方法
- • php实现MySQL数据库备份与还原类实例
- • php mysql数据库操作类
pythonjavaC#AndroidrjQueryIOSdjangolinuxJSON路由器dockerClaravelPostgresqlexcelmongodbdartoraclexml.NetUbuntuASP.NETdatabasenumpyStringandroid-stvisual-stufunctioncentoswin10kubernetesaspShellSQLiterubyC++前端perl操作

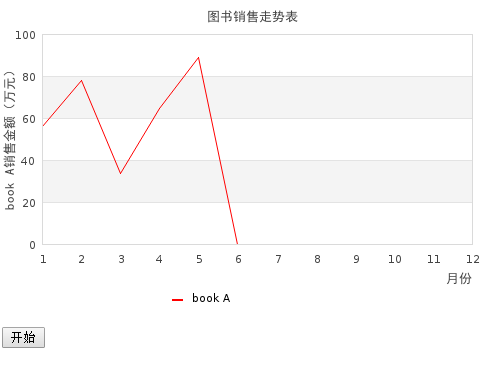
Ajax+Jpgraph实现的动态折线图功能示例
本文实例讲述了Ajax+Jpgraph实现的动态折线图功能。分享给大家供大家参考,具体如下:
一 代码
fun.js:
var i=1;
function progress(){
  setInterval("beginProgress()", 600);
}
function beginProgress(){
 $("#img").attr("src", "img.php?m="+i);
 i++;
 if(i>=12){
   i=1;
 }
}
index.php:
<!DOCTYPE html PUBLIC "-//W3C//DTD XHTML 1.0 Transitional//EN" "http://www.w3.org/TR/xhtml1/DTD/xhtml1-transitional.dtd">
<html xmlns="http://www.w3.org/1999/xhtml">
<head>
<meta http-equiv="Content-Type" content="text/html; charset=gb2312" />
<title>Ajax+Jpgraph制作动态折线图</title>
</head>
<script language="javascript" src="js/jquery-1.3.2.js"></script>
<script language="javascript" src="js/fun.js"></script>
<body>
  <img id="img" src="img.php?m=0" />
 <br>
 <input type="button" value="开始" onclick="progress()"/>
</body>
</html>
img.php:
<?php
require_once ''src/jpgraph.php'';   //导入Jpgraph类库
require_once ''src/jpgraph_line.php'';   //导入Jpgraph类库的柱状图功能
$dataTmp = array(56, 78, 34, 65, 89, 24 ,67 ,88, 45, 68, 70, 50);   //设置统计数据
$data1 = array(0, 0, 0, 0, 0, 0 ,0 ,0, 0, 0, 0, 0);   //设置统计数据
$m = $_GET[''m''];
for($i=0; $i<$m; $i++){
  $data1[$i] = $dataTmp[$i];
}
$graph = new Graph(500, 320);
$graph->SetScale("textlin");
$graph->SetShadow();
$graph->img->SetMargin(40, 30, 30, 70);
$graph->title->Set("图书销售走势表");
$lineplot1 = new LinePlot($data1);
$graph->Add($lineplot1);
$graph->xaxis->title->Set("月份");
$graph->yaxis->title->Set("book A销售金额(万元)");
$graph->title->SetFont(FF_SIMSUN, FS_BOLD);
$graph->yaxis->title->SetFont(FF_SIMSUN, FS_BOLD);
$graph->xaxis->title->SetFont(FF_SIMSUN, FS_BOLD);
$lineplot1->SetColor(''red'');
$lineplot1->SetLegend(''book A'');
$graph->legend->SetLayout(LEGEND_HOR);
$graph->legend->Pos(0.4, 0.95, ''center'', ''bottom'');
$graph->Stroke();
二 运行结果
更多关于PHP相关内容感兴趣的读者可查看本站专题:《PHP+ajax技巧与应用小结》、《PHP网络编程技巧总结》、《PHP基本语法入门教程》、《php面向对象程序设计入门教程》、《php字符串(string)用法总结》、《php+mysql数据库操作入门教程》及《php常见数据库操作技巧汇总》
希望本文所述对大家PHP程序设计有所帮助。
您可能感兴趣的文章:- PHP jpgraph库的配置及生成统计图表:折线图、柱状图、饼状图
- php使用Jpgraph创建折线图效果示例
- php使用Jpgraph绘制复杂X-Y坐标图的方法
- php使用Jpgraph绘制简单X-Y坐标图的方法
- php使用Jpgraph绘制3D饼状图的方法
- PHP图形操作之Jpgraph学习笔记
- php使用Jpgraph绘制柱形图的方法
- php使用Jpgraph绘制饼状图的方法
- php图形jpgraph操作实例分析
- php使用Jpgraph创建柱状图展示年度收支表效果示例
- php使用Jpgraph创建3D饼形图效果示例

Ajax+PHP实现的分类列表框功能示例
本文实例讲述了Ajax+PHP实现的分类列表框功能。分享给大家供大家参考,具体如下:
一 代码
conn.php:
<?php
  $conn = mysql_connect("localhost", "root", "root") or die("连接数据库服务器失败!".mysql_error()); //连接MySQL服务器
  mysql_select_db("db_database27",$conn); //选择数据库db_database27
  mysql_query("set names utf8"); //设置数据库编码格式utf8
?>
index.php:
<!DOCTYPE html PUBLIC "-//W3C//DTD XHTML 1.0 Transitional//EN" "http://www.w3.org/TR/xhtml1/DTD/xhtml1-transitional.dtd">
<html xmlns="http://www.w3.org/1999/xhtml">
<head>
<meta http-equiv="Content-Type" content="text/html; charset=utf-8" />
<title>添加商品信息</title>
</head>
<body>
<script language="javascript" src="index.js"></script>
<form name="form" method="post" action="">
<table width="419" border="0" align="center" cellspacing="1" bgcolor="#9999CC">
<tr>
<td height="36" colspan="3" bgcolor="#FFFFFF"><font color="#0066CC" size="+2">添加商品</font></td>
</tr>
<tr>
<td width="122" height="26" bgcolor="#FFFFFF" align="right">商品名称:</td>
<td height="26" colspan="2" bgcolor="#FFFFFF"><input type="text" name="name" /></td>
</tr>
<tr>
<td height="26" bgcolor="#FFFFFF" align="right">商品类别:</td>
<td width="64" height="26" bgcolor="#FFFFFF"><select name="ptype" id="ptype" onchange="changetype(this.value)">
<?php
include_once("conn/conn.php");//包含数据库连接文件
$sql=mysql_query("select * from tb_commotype group by ptype");//按大类分组查询
while($row=mysql_fetch_array($sql)){//循环输出下拉列表框选项
echo "<option value=''".$row[''ptype'']."''>".$row[''ptype'']."</option>";
}
?>
</select></td>
<td width="219" height="26" bgcolor="#FFFFFF" id="showtype" name="showtype"></td>
</tr>
<tr>
<td height="26" bgcolor="#FFFFFF" align="right">商品价格:</td>
<td height="26" colspan="2" bgcolor="#FFFFFF"><input type="text" name="price" /></td>
</tr>
<tr>
<td height="26" bgcolor="#FFFFFF"> </td>
<td height="26" colspan="2" bgcolor="#FFFFFF"><input type="submit" name="Submit" value="提交" /></td>
</tr>
</table>
</form>
<script language="javascript">
changetype(document.getElementById("ptype").value);//页面载入即执行函数,显示子类内容
</script>
</body>
</html>
type.php:
<?php
  include_once("conn/conn.php");//包含数据库连接文件
 //echo $_GET[''ptype''];
 //$ptype=iconv("gb2312","utf-8",$_GET[''ptype'']);//把参数值做编码转换
 $sql=mysql_query("select stype from tb_commotype where ptype=''".$_GET[''ptype'']."''");//查询子类内容
 echo "<select name=''stype'' id=''stype''>";//输出html
 while($row=mysql_fetch_array($sql)){//循环输出列表框选项中子类内容
  echo "<option value=''".$row[''stype'']."''>".$row[''stype'']."</option>";
 }
 echo "</select>";//输出html
?>
index.js:
function changetype(v){
 var xml;
 if(window.ActiveXObject){//如果是浏览器支持ActiveXObjext则创建ActiveXObject对象
  xml=new ActiveXObject(''Microsoft.XMLHTTP'');
 }else if(window.XMLHttpRequest){//如果浏览器支持XMLHttpRequest对象则创建XMLHttpRequest对象
  xml=new XMLHttpRequest();
 }
  xml.open("GET","type.php?ptype="+v,true);//使用GET方法调用type.php并传递参数的值
  xml.onreadystatechange=function(){//当服务器准备就绪执行回调函数
   if(xml.readyState==4 && xml.status==200){//如果服务器已经传回信息并未发生错误
    var msg=xml.responseText;//把服务器传回的值赋给变量msg
 //document.getElementById("showtype").innerHTML=msg;
 alert(msg);
   showtype.innerHTML=msg;//把传回的值显示在id=showtype的元素中
   }
  }
  xml.send(null);//不发送任何数据,因为数据已经使用请求URL通过GET方法发送
}
二 运行结果

更多关于PHP相关内容感兴趣的读者可查看本站专题:《PHP+ajax技巧与应用小结》、《PHP网络编程技巧总结》、《PHP基本语法入门教程》、《php面向对象程序设计入门教程》、《php字符串(string)用法总结》、《php+mysql数据库操作入门教程》及《php常见数据库操作技巧汇总》
希望本文所述对大家PHP程序设计有所帮助。
您可能感兴趣的文章:- PHP+Ajax检测用户名或邮件注册时是否已经存在实例教程
- PHP+AJAX实现无刷新注册(带用户名实时检测)
- php注册系统和使用Xajax即时验证用户名是否被占用
- PHP+Ajax异步通讯实现用户名邮箱验证是否已注册( 2种方法实现)
- jQuery ajax+PHP实现的级联下拉列表框功能示例
- Ajax+PHP实现的删除数据功能示例
- Ajax+PHP实现的模拟进度条功能示例
- PHP+Ajax实现的检测用户名功能简单示例

Ajax+PHP实现的删除数据功能示例
本文实例讲述了Ajax+PHP实现的删除数据功能。分享给大家供大家参考,具体如下:
一 代码
conn.php:
<?php
  $conn = mysql_connect("localhost", "root", " ") or die("连接数据库服务器失败!".mysql_error()); //连接MySQL服务器
  mysql_select_db("db_database27",$conn); //选择数据库db_database27
  mysql_query("set names utf8"); //设置数据库编码格式utf8
?>
del.php:
<?php
  include_once("conn/conn.php");//包含数据库连接文件
    $id=$_GET[''id''];//把传过来的参数值赋给变量$i
    $sql=mysql_query("delete from tb_demo02 where id=".$id);//根据参数值执行相应的删除操作
    if($sql){//如果操作的返回值为true
     $reback=1;//把变量$reback的值设为1
    }else{
     $reback=0;//否则变量$reback的值设为0
    }
    echo $reback;//输出变量$reback的值
?>
index.js:
function del(id){
    var xml;
    if(window.ActiveXObject){//如果是浏览器支持ActiveXObjext则创建ActiveXObject对象
     xml=new ActiveXObject(''Microsoft.XMLHTTP'');
    }else if(window.XMLHttpRequest){//如果浏览器支持XMLHttpRequest对象则创建XMLHttpRequest对象
     xml=new XMLHttpRequest();
    }
    xml.open("GET","del.php?id="+id,true);//使用GET方法调用del.php并传递参数的值
    xml.onreadystatechange=function(){//当服务器准备就绪执行回调函数
     if(xml.readystate==4 && xml.status==200){//如果服务器已经传回信息并未发生错误
        var msg=xml.responseText;//把服务器传回的值赋给变量msg
        if(msg==1){//如果服务器传回的值为1则提示删除成功
         alert("删除成功!");
      location.reload();
        }else{//否则提示删除失败
         alert("删除失败!");
         return false;
        }
   }
    }
    xml.send(null);//不发送任何数据,因为数据已经使用请求URL通过GET方法发送
}
index.php:
<!DOCTYPE HTML PUBLIC "-//W3C//DTD HTML 4.01 Transitional//EN" "http://www.w3.org/TR/html4/loose.dtd">
<html>
<head>
<meta http-equiv="Content-Type" content="text/html; charset=utf-8">
<title>分组统计</title>
<link rel="stylesheet" type="text/css" href="mystyle.css" rel="external nofollow" >
</head>
<body>
<script type="text/javascript" src="index.js"></script>
<center>
<!--banner-->
<table width="798" border="0" cellpadding="0" cellspacing="0">
<tr>
<td height="112" background="images/banner.jpg"></td>
</tr>
</table>
<?php
include_once("conn/conn.php");
?>
<table width="780" border="0" cellpadding="0" cellspacing="0">
<form name="form1" id="form1" method="post" action="deletes.php">
<tr>
<td height="20" width="5%"> </td>
<td width="5%">id</td>
<td width="30%">书名</td>
<td width="10%">价格</td>
<td width="20%">出版时间</td>
<td width="10%">类别</td>
<td width="10%">操作</td>
</tr>
<?php
$sqlstr1 = "select * from tb_demo02 order by id";//按id的升序查询表tb_demo02的数据
$result = mysql_query($sqlstr1,$conn);//执行查询语句
while ($rows = mysql_fetch_array($result)){//循环输出查询结果
?>
<tr>
<td height="25" align="center">
<input type=checkbox name="chk[]" id="chk" value=".$rows[''id''].">
</td>
<td height="25" align="center"><?php echo $rows[''id''];?></td>
<td height="25" align="center"><?php echo $rows[''bookname''];?></td>
<td height="25" align="center"><?php echo $rows[''price''];?></td>
<td height="25" align="center"><?php echo $rows[''f_time''];?></td>
<td height="25" align="center"><?php echo $rows[''type''];?></td>
<td><a href="#" rel="external nofollow" onClick="del(<?php echo $rows[''id''];?>)">删除</a></td>
</tr>
<?php
}
?>
<tr>
<td height="25" colspan="7"align="left"> </td>
</tr>
</form>
</table>
<!--show-->
<table width="798" border="0" cellpadding="0" cellspacing="0">
<tr>
<td height="48" background="images/bottom.jpg"> </td>
</tr>
</table>
</center>
</body>
</html>
二 运行结果

更多关于PHP相关内容感兴趣的读者可查看本站专题:《PHP+ajax技巧与应用小结》、《PHP网络编程技巧总结》、《PHP基本语法入门教程》、《php面向对象程序设计入门教程》、《php字符串(string)用法总结》、《php+mysql数据库操作入门教程》及《php常见数据库操作技巧汇总》
希望本文所述对大家PHP程序设计有所帮助。
您可能感兴趣的文章:- PHP+Ajax检测用户名或邮件注册时是否已经存在实例教程
- PHP+AJAX实现无刷新注册(带用户名实时检测)
- php注册系统和使用Xajax即时验证用户名是否被占用
- PHP+Ajax异步通讯实现用户名邮箱验证是否已注册( 2种方法实现)
- jQuery ajax+PHP实现的级联下拉列表框功能示例
- Ajax+PHP实现的分类列表框功能示例
- Ajax+PHP实现的模拟进度条功能示例
- PHP+Ajax实现的检测用户名功能简单示例

Ajax+PHP实现的模拟进度条功能示例
本文实例讲述了Ajax+PHP实现的模拟进度条功能。分享给大家供大家参考,具体如下:
一 代码
fun.js:
function progress(){
  setInterval("beginProgress()", 200);
}
function beginProgress(){
  $.get("progress.php", null, function(data){
     $("#pg").css("width", data+"%");
     $("#pgtext").html("The progress is "+data+"%");
  });
}
index.php:
<!DOCTYPE html PUBLIC "-//W3C//DTD XHTML 1.0 Transitional//EN" "http://www.w3.org/TR/xhtml1/DTD/xhtml1-transitional.dtd">
<html xmlns="http://www.w3.org/1999/xhtml">
<head>
<meta http-equiv="Content-Type" content="text/html; charset=gb2312" />
<title>jQuery制作进度条</title>
</head>
<script language="javascript" src="js/jquery-1.3.2.js"></script>
<script language="javascript" src="js/fun.js"></script>
<body>
<div>
  <div id="pg"></div>
</div>
<br>
<div id="pgtext"></div>
<br>
<input type="button" value="开始" onclick="progress()" />
</body>
</html>
progress.php:
<?php
$file = "./count.txt";
$fp = fopen($file, "r");
$txt = fread($fp, filesize($file));
echo $txt;
$fp1 = fopen($file, "w");
if($txt<100){
  $txt++;
  fwrite($fp1, $txt);
}else{
  fwrite($fp1, 1);
}
fclose($fp1);
fclose($fp);
?>
二 运行结果

更多关于PHP相关内容感兴趣的读者可查看本站专题:《PHP+ajax技巧与应用小结》、《PHP网络编程技巧总结》、《PHP基本语法入门教程》、《php面向对象程序设计入门教程》、《php字符串(string)用法总结》、《php+mysql数据库操作入门教程》及《php常见数据库操作技巧汇总》
希望本文所述对大家PHP程序设计有所帮助。
您可能感兴趣的文章:- PHP+Ajax检测用户名或邮件注册时是否已经存在实例教程
- PHP+AJAX实现无刷新注册(带用户名实时检测)
- php注册系统和使用Xajax即时验证用户名是否被占用
- PHP+Ajax异步通讯实现用户名邮箱验证是否已注册( 2种方法实现)
- jQuery ajax+PHP实现的级联下拉列表框功能示例
- Ajax+PHP实现的删除数据功能示例
- Ajax+PHP实现的分类列表框功能示例
- PHP+Ajax实现的检测用户名功能简单示例
今天关于PHP+Ajax实现的博客文章添加类别功能示例和ajax php 模态 增删改查的讲解已经结束,谢谢您的阅读,如果想了解更多关于Ajax+Jpgraph实现的动态折线图功能示例、Ajax+PHP实现的分类列表框功能示例、Ajax+PHP实现的删除数据功能示例、Ajax+PHP实现的模拟进度条功能示例的相关知识,请在本站搜索。


