本文将介绍python中交互变量的名称的详细情况,特别是关于python交互函数的相关信息。我们将通过案例分析、数据研究等多种方式,帮助您更全面地了解这个主题,同时也将涉及一些关于CentOS6.查看
本文将介绍python中交互变量的名称的详细情况,特别是关于python交互函数的相关信息。我们将通过案例分析、数据研究等多种方式,帮助您更全面地了解这个主题,同时也将涉及一些关于CentOS6.查看 Python中变量的信息(名称类型内容等)、Python 变量与变量的作用、常量、用户交互、注释、python中全局变量的修改、python中全局变量的问题的知识。
本文目录一览:- python中交互变量的名称(python交互函数)
- CentOS6.查看 Python中变量的信息(名称类型内容等)
- Python 变量与变量的作用、常量、用户交互、注释
- python中全局变量的修改
- python中全局变量的问题
")
python中交互变量的名称(python交互函数)
如何解决python中交互变量的名称?
我有一个问题,我认为这可能非常简单,但是我在这里找不到答案。
假设我有这样的代码:
for item in range(1:10)
     element_item = value
该变量元素如何在所有循环顺序中都可互操作?
我的意图是在每个回合中,可变元素根据即时循环更改其名称,例如:
element_1 =值,element_2 =值,...,element_10 =值。
谢谢。
解决方法
暂无找到可以解决该程序问题的有效方法,小编努力寻找整理中!
如果你已经找到好的解决方法,欢迎将解决方案带上本链接一起发送给小编。
小编邮箱:dio#foxmail.com (将#修改为@)
")
CentOS6.查看 Python中变量的信息(名称类型内容等)
ZC:环境:CentOS6、pycharm-community-2018.3.2.tar.gz
ZC:是在 使用 微信 的 “5.1 新建临时素材”,跑 media_upload__test.py 时用到的
ZC:用下面的 方式 变量postData,貌似 还是并不能很直观的 看到它的2进制数据,于是 还是 抓包 一起参照来看
ZC:注意,我把下面的 https的请求 改成了 http的请求,居然也成功了... 这样抓包 就能看到明文的通讯过程了。本来我只是 想着 看看 发送的请求数据包的格式,没指望 请求能真的成功,当然 能成功最好...
1、代码:(media_upload__test.py)
# -*- coding: utf-8 -*-
# filename: media.py
from basic import Basic
import urllib2
import poster.encode
from poster.streaminghttp import register_openers

class Media(object):
    def __init__(self):
        register_openers()

    def uplaod(self, accessToken, filePath, mediaType):
        openFile = open(filePath, "rb")
        param = {''media'': openFile}
        postData, postHeaders = poster.encode.multipart_encode(param)

        #postUrl = "https://api.weixin.qq.com/cgi-bin/media/upload?access_token=%s&type=%s" % (accessToken, mediaType)
    postUrl = "http://api.weixin.qq.com/cgi-bin/media/upload?access_token=%s&type=%s" % (accessToken, mediaType)
        request = urllib2.Request(postUrl, postData, postHeaders)
        #urlResp = urllib2.urlopen(request)
        #print urlResp.read()
        mystr = urllib2.urlopen(request).read()
        print (mystr)
        print (postData)
        print (postHeaders)
        print (postUrl)
        print (request.header_items())# ZC:这里可以打印出 HTTP发出请求的头信息
    print (request.data)
    print (param)

if __name__ == ''__main__'':
    myMedia = Media()
    accessToken = Basic().get_access_token()
    filePath = "/home/33/web.py-0.37/10.jpg"
    #filePath = "E:/ZC__Self/10.jpg"
    mediaType = "image"
    myMedia.uplaod(accessToken, filePath, mediaType)
1.1、利用poster模块发一个post文件请求,如何获取发出请求的头信息?(高分)-CSDN论坛.html(https://bbs.csdn.net/topics/380030808)
request.headers()方法也可以获取一个字典类型的头信息
1.2、Python中利用urllib2使用POST方式上传文件 - 天外飞仙丶 - 博客园.html(https://www.cnblogs.com/yu-zhang/p/3643528.html)

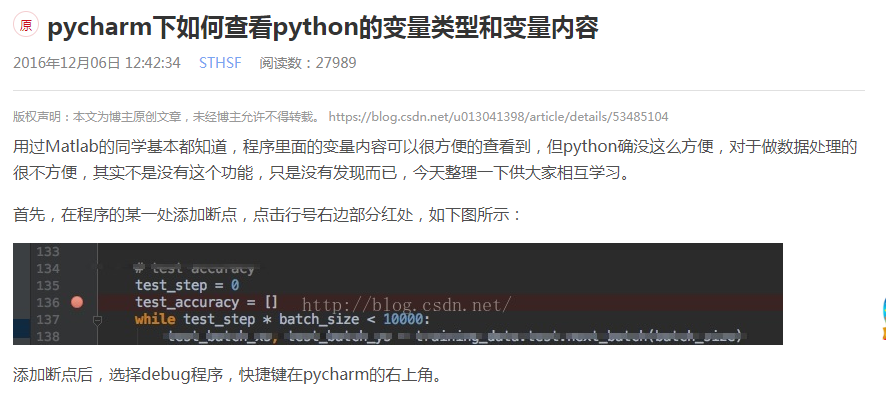
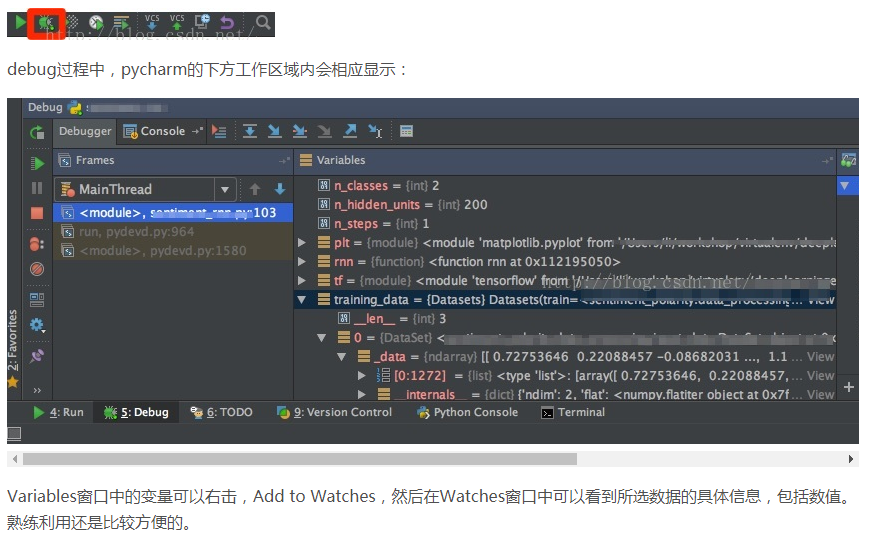
2、pycharm下如何查看python的变量类型和变量内容 - STHSF的地盘 - CSDN博客.html(https://blog.csdn.net/u013041398/article/details/53485104)
3、
4、
5、

Python 变量与变量的作用、常量、用户交互、注释
- C++
int main(void)
{
std::cout<<"Hello world";
}
- C
int main(void)
{
printf("\nhello world!"); \n 换行
return 0;
}
- JAVA
// 程序的入口
public static void main(String args[]){
// 向控制台输出信息
System.out.println("Hello World!");
}
}
- PHP
echo "hello world!";
?>
- Ruby
- GO
import "fmt"
func main(){
fmt.Printf("Hello World!\n God Bless You!");
}

变量
计算机的主要作用之一:进行计算,用 Python进行数据运算非常容易,跟我们平常用计算机一样简单。
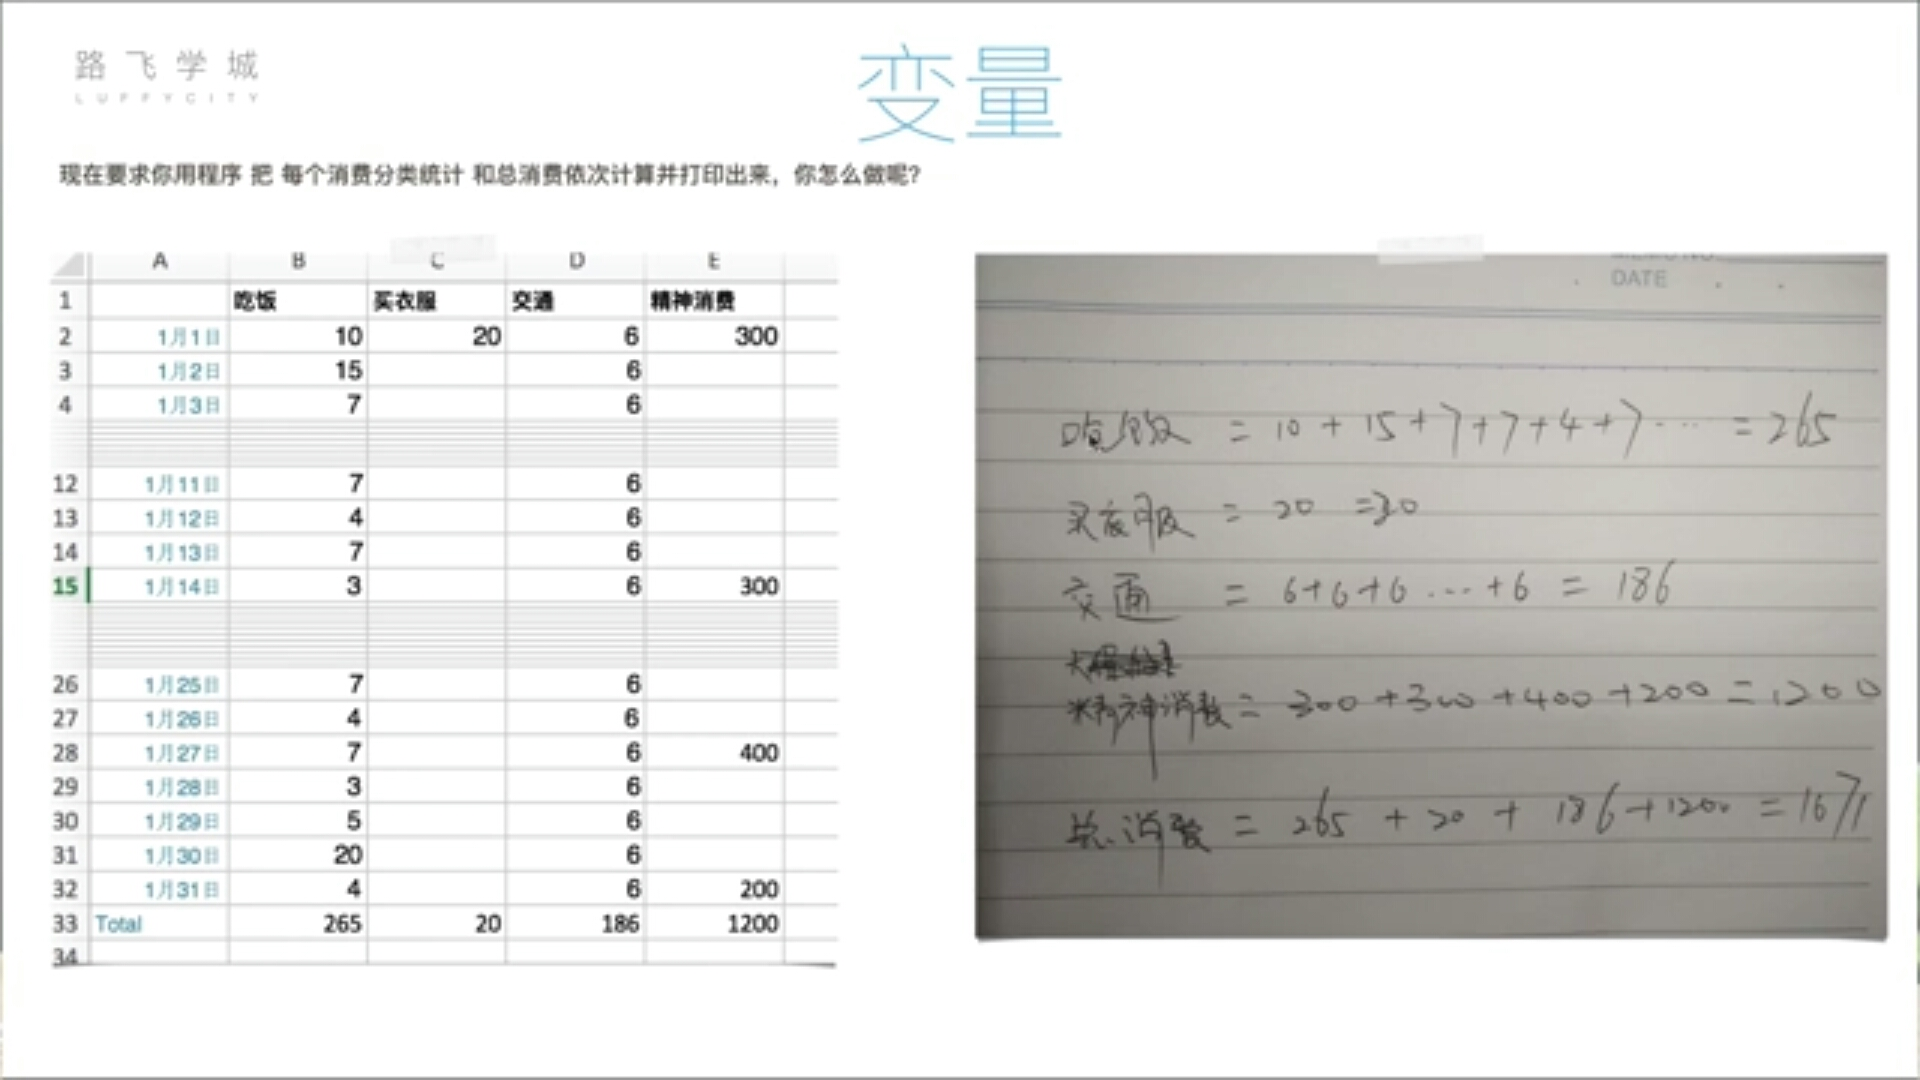
在算总消费的时候直接用的是之前已经算好的中间结果,这样是为了避免重新再算一遍所有的数据。
>>> print(''eat'',10+15+7+4+7+3)
eat 46
>>> print(''cloth'',20)
cloth 20
>>> print(''traffic'',6+6+6+6+6)
traffic 30
>>> print(''精神'',300+300+400+200)
精神 1200
>>>
>>>
>>> print(''总消费'', 46+20+30+1200)
总消费 1296
这么写之所以是不正确,是因为最后算总消费的时候 是人肉 把之前算出来的分类结果 填进去的, 但是我们把程序写在脚本里运行时, 计算机肯定不会预先知道吃饭、交通、买衣服3个分类的结果的,所以这个结果是我们自己动态算出来的,而不是计算机算出来的。
正确的写法是,直接把每个分类结果先起个名字存下来,然后计算总消费的时候,只需要把之前存下来的几个名字调用一下就可以了。
>>> eat = 10+15+7+4+7+3
>>> cloth = 20
>>> traffic = 6+6+6+6+6
>>> Spirit=300+300+200+400
>>>
>>> total = eat + cloth + traffic + Spirit
>>> print(''总消费'',total)
总消费 1296
- 变量:eat、cloth、traffic、Spirit、total 这几个的作用就是把程序运算的中间结果临时存到内存里,可以让后面的代码继续调用,这几个的学名就叫做“变量”。
- 变量的作用 :
- 声明变量:
变量名(标识符):name
变量值:Alex Li
- 定义变量的规则:
②变量名的第一个字符不能是数字。
③下面的关键字不能声明为变量名:
''and''、 ''as''、 ''assert''、 ''break''、''class'' 、 ''continue''、''def''、 ''del''、''elif''、''else''、''except''、 ''exec''、''finally''、 ''for''、 ''from''、 ''global''、 ''if''、 ''import''、 ''in''、 ''is''、
- 变量命名习惯:
AgeOfOldboy = 56
NumberOfStudents = 80
②下划线
age_of_oldboy = 56
number_of_students = 80
官方推荐使用第二种命名习惯,看起来更加的清晰。
- 定义变量的LOW 方式:
②变量名过长。
③变量名词不达意。
- 举例:
oldboy_gf_name = ''Lisa''
- 修改变量的值:
>>>oldboy_gf_age = 54 #老男孩女朋友的年龄为54
>>>age_of_oldboy + oldboy_gf_age # 老男孩的年龄与老男孩女朋友的年龄为110
110 结果
>>>oldboy_gf_age = 55 #修改老男孩女朋友的年龄为55
>>>age_of_oldboy + oldboy_gf_age #修改后老男孩的年龄与老男孩女朋友的年龄为111
111 修改后的结果
- 常量:
AGE_OF_OLDBOY = 56
在c语言中有专门的常量定义语法,const int count = 60; 一旦定义为常量,更改即会报错。
用户交互
name = input("What is your name:")
print("Hello " + name )
执行脚本后,发现程序会等输入姓名后才能往下继续走。
让用户输入多个信息:
name = input("What is your name:")age = input("How old are you:")
hometown = input("Where is your hometown:")
print("Hello ",name , "your are ", age , "years old, you came from",hometown)
执行输出:
What is your name:Wu qianqian
How old are you:21
Where is your hometown:ShiJiaZhuang
Hello Wu qianqian your are 21 years old, you came from ShiJiaZhuang
注释
代码注释分为单行和多行注释。 单行注释用#,多行注释可以用三对双引号""" """。
例:
def subclass_exception(name, parents, module, attached_to=None):
"""
Create exception subclass. Used by ModelBase below.
If ''attached_to'' is supplied, the exception will be created in a way that
allows it to be pickled, assuming the returned exception class will be added
as an attribute to the ''attached_to'' class.
"""
class_dict = {''__module__'': module}
if attached_to is not None:
def __reduce__(self):
# Exceptions are special - they''ve got state that isn''t
# in self.__dict__. We assume it is all in self.args.
return (unpickle_inner_exception, (attached_to, name), self.args)
def __setstate__(self, args):
self.args = args
class_dict[''__reduce__''] = __reduce__
class_dict[''__setstate__''] = __setstate__
return type(name, parents, class_dict)
- 代码注释的原则:
②注释可以用中文或英文,但绝对不要用拼音。

python中全局变量的修改
对于全局变量的修改,如果全局变量是int或者str,那么如果想要在函数中对函数变量进行修改,则需要先在函数内,声明其为global,再进行修改
如果是list或者dict则可以直接修改
a = 1
b = [2, 3]
c = 1

def func():
    a = 2
    print ("in func a:", a)
    b[0] = 1
    print ("in func b:", b)
    global c
    c = 3
    print ("in func c:", c)

if __name__ == ''__main__'':
    print ("before func a:", a)
    print ("before func b:", b)
    print ("before func c:", c)
    func()
    print ("after func a:", a)
    print ("after func b:", b)
print ("after func c:", c)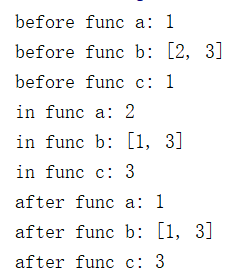

python中全局变量的问题
写了段python程序,
#!/usr/bin/python
print(''Function:'')
i=0
def Add():
print("Hello")
global i
i+=1
if i==10:
print("the function is 10 times")
s=0
while s<11:
Add()
global s
s+=1
在Add()函数中时,我没有加global时,报的错误为local variable ''i'' referenced before assignment,意思是在python的函数中和全局同名的变量,如果你有修改变量的值就会变成局部变量,在修改之前对该变量的引用自然就会出现没定义这样的错误了,如果确定要引用全局变量,并且要对它修改,必须加上global关键字。
我在while循环中使用s,也使用了global修饰,报的错误为:name s is assigned before global declaration
把global去掉就没问题了,这个难道s在while循环里面就已经是全局变量吗?
今天关于python中交互变量的名称和python交互函数的讲解已经结束,谢谢您的阅读,如果想了解更多关于CentOS6.查看 Python中变量的信息(名称类型内容等)、Python 变量与变量的作用、常量、用户交互、注释、python中全局变量的修改、python中全局变量的问题的相关知识,请在本站搜索。
此处将为大家介绍关于带有NetTopologySuite.IO.GeoJSON的JsonConvert.DeserializeObject异常找不到预期的令牌'}'的详细内容,此外,我们还将为您介绍关于.net写了一个服务端程序,使用newtonsoft.json.JsonConvert.Deserialize报出异常、asp.net – JObject.Parse与JsonConvert.DeserializeObject、C# GIS库 NetTopologySuite shp 转 geojson、C# JsonConvert.DeserializeObject 在解析json时出现异常。的有用信息。
本文目录一览:- 带有NetTopologySuite.IO.GeoJSON的JsonConvert.DeserializeObject异常找不到预期的令牌'}'
- .net写了一个服务端程序,使用newtonsoft.json.JsonConvert.Deserialize报出异常
- asp.net – JObject.Parse与JsonConvert.DeserializeObject
- C# GIS库 NetTopologySuite shp 转 geojson
- C# JsonConvert.DeserializeObject 在解析json时出现异常。

带有NetTopologySuite.IO.GeoJSON的JsonConvert.DeserializeObject异常找不到预期的令牌'}'
如何解决带有NetTopologySuite.IO.GeoJSON的JsonConvert.DeserializeObject异常找不到预期的令牌''}''?
我有以下数据传输对象
[DataContract]
    public class Entity : IEntity
    {
        /// <summary>
        ///
        /// </summary>
        public Entity() { }

        /// <summary>
        ///
        ///
        ///
        /// </summary>
        [DataMember]
        [JsonPropertyName("ENAME")]
        [display(Name = "ENAME")]
        public string ENAME { get; set; }

        /// <summary>
        ///
        /// </summary>
        [DataMember]
        [JsonPropertyName("ENTITY_DEF_I_EID")]
        [display(Name = "Entity Def EID")]
        public int ENTITY_DEF_I_EID { get; set; }

        /// <summary>
        ///
        /// </summary>
        [DataMember]
        [JsonPropertyName("I_SID")]
        [display(Name = "Server ID")]
        public int I_SID { get; set; }

        /// <summary>
        ///
        /// </summary>
        [DataMember]
        [JsonPropertyName("I_EID")]
        [display(Name = "Entity ID")]
        public int I_EID { get; set; }

        /// <summary>
        ///
        /// </summary>
        [DataMember]
        [JsonPropertyName("F_DELETED")]
        [display(Name = "Deleted")]
        public string F_DELETED { get; set; }

        /// <summary>
        ///
        /// </summary>
        [DataMember]
        [JsonPropertyName("S_LAST_MOD_INFO")]
        [display(Name = "Last Modified Into")]
        public string S_LAST_MOD_INFO { get; set; }

        /// <summary>
        ///
        /// </summary>
        [DataMember]
        [JsonPropertyName("CUSTOM1")]
        [display(Name = "Custom 1")]
        public string CUSTOM1 { get; set; }

        /// <summary>
        ///
        /// </summary>
        [DataMember]
        [JsonPropertyName("CUSTOM2")]
        [display(Name = "Custom 2")]
        public string CUSTOM2 { get; set; }

        /// <summary>
        ///
        /// </summary>
        [DataMember]
        [JsonPropertyName("CUSTOM3")]
        [display(Name = "Custom 3")]
        public string CUSTOM3 { get; set; }

        /// <summary>
        ///
        /// </summary>
        [DataMember]
        [JsonPropertyName("CUSTOM4")]
        [display(Name = "Custom 4")]
        public string CUSTOM4 { get; set; }

        /// <summary>
        ///
        /// </summary>
        [DataMember]
        [JsonPropertyName("CUSTOM5")]
        [display(Name = "Custom 5")]
        public string CUSTOM5 { get; set; }

        /// <summary>
        ///
        /// </summary>
        [DataMember]
        [JsonPropertyName("CUSTOM6")]
        [display(Name = "Custom 6")]
        public string CUSTOM6 { get; set; }

        /// <summary>
        ///
        /// </summary>
        [DataMember]
        [JsonPropertyName("CUSTOM7")]
        [display(Name = "Custom 7")]
        public string CUSTOM7 { get; set; }

        /// <summary>
        ///
        /// </summary>
        [DataMember]
        [JsonPropertyName("CUSTOM8")]
        [display(Name = "Custom 8")]
        public string CUSTOM8 { get; set; }

        /// <summary>
        ///
        /// </summary>
        [DataMember]
        [JsonPropertyName("CUSTOM9")]
        [display(Name = "Custom 9")]
        public string CUSTOM9 { get; set; }

        /// <summary>
        ///
        /// </summary>
        [DataMember]
        [JsonPropertyName("CUSTOM10")]
        [display(Name = "Custom 10")]
        public string CUSTOM10 { get; set; }

        /// <summary>
        ///
        /// </summary>
        [DataMember]
        [JsonPropertyName("RESV1")]
        [display(Name = "Reserved 1")]
        public string RESV1 { get; set; }

        /// <summary>
        ///
        /// </summary>
        [DataMember]
        [JsonPropertyName("RESV2")]
        [display(Name = "Reserved 2")]
        public string RESV2 { get; set; }

        /// <summary>
        ///
        /// </summary>
        [DataMember]
        [JsonPropertyName("RESV3")]
        [display(Name = "Reserved 3")]
        public string RESV3 { get; set; }

        /// <summary>
        ///
        /// </summary>
        [DataMember]
        [JsonPropertyName("RESV4")]
        [display(Name = "Reserved 4")]
        public string RESV4 { get; set; }

        /// <summary>
        ///
        /// </summary>
        [DataMember]
        [JsonPropertyName("RESV5")]
        [display(Name = "Reserved 5")]
        public string RESV5 { get; set; }

        /// <summary>
        ///
        /// </summary>
        [DataMember]
        [JsonPropertyName("FEATURE_DEF_NAME")]
        [display(Name = "Feature Def Name")]
        public string FEATURE_DEF_NAME { get; set; }

        /// <summary>
        ///
        /// </summary>
        [DataMember]
        [JsonPropertyName("PHOTO")]
        [display(Name = "Photo")]
        public string PHOTO { get; set; }

        /// <summary>
        ///
        /// </summary>
        [DataMember]
        [JsonPropertyName("DETAIL")]
        [display(Name = "Detail")]
        public string DETAIL { get; set; }

        /// <summary>
        ///
        /// </summary>
        [DataMember]
        [JsonPropertyName("DOCUMENT")]
        [display(Name = "Document")]
        public string DOCUMENT { get; set; }

        /// <summary>
        ///
        /// </summary>
        [DataMember]
        [JsonPropertyName("ACAD_COLOR")]
        [display(Name = "Acad Color")]
        public decimal ACAD_COLOR { get; set; }

        /// <summary>
        ///
        /// </summary>
        [DataMember]
        [JsonPropertyName("ACAD_LAYER")]
        [display(Name = "Layer")]
        public string ACAD_LAYER { get; set; }

        /// <summary>
        ///
        /// </summary>
        [DataMember]
        [JsonPropertyName("ATT_BLK")]
        [display(Name = "Attribute Block")]
        public string ATT_BLK { get; set; }

        /// <summary>
        ///
        /// </summary>
        [DataMember]
        [JsonPropertyName("ATT_LAY")]
        [display(Name = "Attribute Layer")]
        public string ATT_LAY { get; set; }

        /// <summary>
        ///
        /// </summary>
        [DataMember]
        [JsonPropertyName("TAG_ROT")]
        [display(Name = "Tag Rotation")]
        public decimal TAG_ROT { get; set; }

        /// <summary>
        ///
        /// </summary>
        [DataMember]
        [JsonPropertyName("X_COORD")]
        [display(Name = "X Coordinate")]
        public decimal X_COORD { get; set; }

        /// <summary>
        ///
        /// </summary>
        [DataMember]
        [JsonPropertyName("Y_COORD")]
        [display(Name = "Y Coordinate")]
        public decimal Y_COORD { get; set; }

        /// <summary>
        ///
        /// </summary>
        [DataMember]
        [JsonPropertyName("Z_COORD")]
        [display(Name = "Z Coordinate")]
        public decimal Z_COORD { get; set; }

        /// <summary>
        ///
        /// </summary>
        [DataMember]
        //[JsonPropertyName("GEOM")]
        //[JsonProperty(PropertyName = "GEOM",ItemConverterType = typeof(GeometryConverter))]
        [Newtonsoft.Json.JsonConverter(typeof(GeometryConverter))]
        [display(Name = "Geometry")]
        public Geometry GEOM { get; set; }
    }
我有一个REST Server,它具有以下方法,该方法负责查询Postgresql数据库,该数据库将数据传输对象返回给调用客户端。
/// <summary>
        /// Returns detailed information about the feature including the Latitude and Longitude data given an ename
        /// </summary>
        /// <param name="ServerDefName">Server DeFinition Name that will be used to build the connection string to the database</param>
        /// <param name="DataSetName">Dataset Name that will be used to build the connection string to the database</param>
        /// <param name="ENAME"></param>
        /// <returns>IQueryable(xxxxxxxxDTO)</returns>
        [HttpGet,Route("Entity")]
        [ProducesResponseType(StatusCodes.Status200OK)]
        [ProducesResponseType(StatusCodes.Status404NotFound)]
        [ProducesResponseType(StatusCodes.Status500InternalServerError)]
        public ActionResult Entity(string ServerDefName,string DataSetName,string ENAME)
        {
            try
            {
                sbLogger.Info("Web Service - " + MethodBase.GetCurrentMethod() + "(" + ServerDefName + "," + DataSetName + "," + ENAME + ")");

                SetConnectionString(ServerDefName,DataSetName);

                var query = new GetEntityDetailQuery(ConnectionString,DataUser,ENAME);
                var handler = SpatialBASEQueryHandlerFactory.Build(query);

                //Get the DataTable
                DataTable dt = handler.Get();

                var results = ConvertEntityDataTable(dt);

                //Serialize the Result
                SerializeResult(results);

                return Ok(results);
            }
            catch (Exception ex)
            {
                sbLogger.Warn("An Exception occured in " + MethodBase.GetCurrentMethod() + "!!",ex);
                var result = StatusCode(StatusCodes.Status500InternalServerError,ex);
                return result;
            }
        }
以下是在ActionResult内部返回的JSON结果
{
        "clli": null,"cT_CONAME": "AIRPORT DLC(SIC)","cT_EXCH": null,"relateD_PORTS": null,"switcH_ID": null,"maP_LATITUDE": -157.09853,"maP_LONGITUDE": 21.1574725,"acaD_BLOCK": "COFFICE","acaD_HAND": "5DF7","ename": "0:25:0:4919524","entitY_DEF_I_EID": 25,"i_SID": 0,"i_EID": 4919524,"f_DELETED": "N","s_LAST_MOD_INFO": "USER1:20100918110317","custoM1": null,"custoM2": null,"custoM3": null,"custoM4": null,"custoM5": null,"custoM6": null,"custoM7": null,"custoM8": null,"custoM9": null,"custoM10": null,"resV1": null,"resV2": null,"resV3": null,"resV4": null,"resV5": null,"featurE_DEF_NAME": "CO","photo": null,"detail": null,"document": null,"acaD_COLOR": 256.0,"acaD_LAYER": "B-LNDMRK","atT_BLK": null,"atT_LAY": null,"taG_ROT": 0.00256882745527,"x_COORD": -157.09854,"y_COORD": 21.1575195,"z_COORD": 0.0,"geom": {
            "type": "Point","coordinates": {
                "m": 0.0,"z": 0.0,"x": -157.09853,"y": 21.1574725
            }
        }
    },{
        "clli": null,"cT_CONAME": null,"maP_LATITUDE": -156.3413802,"maP_LONGITUDE": 20.725685900000003,"acaD_HAND": "11771","ename": "0:25:0:4919525","i_EID": 4919525,"s_LAST_MOD_INFO": "USER2:20100918110317","taG_ROT": -0.00187324353795,"x_COORD": -156.34147,"y_COORD": 20.7256984,"x": -156.3413802,"y": 20.725685900000003
            }
        }
    }
将ActionResult返回给客户端时,以下方法就是发生异常的地方。
Private Function GetReturnList(ByVal objects As String) As IEnumerable(Of Entity)
    Dim _listReturn As IEnumerable(Of Entity)
    Dim _listEntity As List(Of Entity) = New List(Of Entity)

    Dim settings As JsonSerializerSettings = New JsonSerializerSettings()
    settings.TypeNameHandling = TypeNameHandling.Auto
    settings.NullValueHandling = NullValueHandling.Ignore

    If Not Isnothing(objects) Then
        _listEntity = JsonConvert.DeserializeObject(Of List(Of Entity))(objects,settings).AsEnumerable()
        Dim obj As Entity = _listEntity(0)

        Select Case obj.FEATURE_DEF_NAME
            Case "CO","REMOTE_CO"
                _listReturn = JsonConvert.DeserializeObject(Of List(Of CT_CO))(objects,settings).Cast(Of Entity).AsEnumerable()

            Case "NETWORK_INTERFACE","STATION_PROTECTOR"
                _listReturn = JsonConvert.DeserializeObject(Of List(Of CT_SBFAC))(objects,settings).Cast(Of Entity).AsEnumerable()

            Case "WORKORDER"
                _listReturn = JsonConvert.DeserializeObject(Of List(Of CT_WORKS))(objects,settings).Cast(Of Entity).AsEnumerable()

            Case "CUSTOMER"
                _listReturn = JsonConvert.DeserializeObject(Of List(Of CUSTOMER))(objects,settings).Cast(Of Entity).AsEnumerable()

            Case "FIBERS"
                _listReturn = JsonConvert.DeserializeObject(Of List(Of FIBERS))(objects,settings).Cast(Of Entity).AsEnumerable()

            Case "FIBER_SPLITTER"
                _listReturn = JsonConvert.DeserializeObject(Of List(Of FO_SPLITTER))(objects,settings).Cast(Of Entity).AsEnumerable()
        End Select

    End If


    Return _listReturn
End Function
当我尝试在以下行上反序列化json字符串 objects 时发生异常:
_listEntity = JsonConvert.DeserializeObject(Of List(Of Entity))(对象,设置).AsEnumerable()
该异常消息是未找到预期令牌''}''。
以下是引发的异常的堆栈跟踪。
   at NetTopologySuite.IO.Converters.GeometryConverter.ParseGeometry(JsonReader reader,JsonSerializer serializer)
   at Newtonsoft.Json.Serialization.JsonSerializerInternalReader.DeserializeConvertable(JsonConverter converter,JsonReader reader,Type objectType,Object existingValue)
   at Newtonsoft.Json.Serialization.JsonSerializerInternalReader.SetPropertyValue(JsonProperty property,JsonConverter propertyConverter,JsonContainerContract containerContract,JsonProperty containerProperty,Object target)
   at Newtonsoft.Json.Serialization.JsonSerializerInternalReader.PopulateObject(Object newObject,JsonObjectContract contract,JsonProperty member,String id)
   at Newtonsoft.Json.Serialization.JsonSerializerInternalReader.CreateObject(JsonReader reader,JsonContract contract,JsonProperty containerMember,Object existingValue)
   at Newtonsoft.Json.Serialization.JsonSerializerInternalReader.CreateValueInternal(JsonReader reader,Object existingValue)
   at Newtonsoft.Json.Serialization.JsonSerializerInternalReader.PopulateList(IList list,JsonArrayContract contract,String id)
   at Newtonsoft.Json.Serialization.JsonSerializerInternalReader.CreateList(JsonReader reader,Object existingValue,String id)
   at Newtonsoft.Json.Serialization.JsonSerializerInternalReader.CreateValueInternal(JsonReader reader,Object existingValue)
   at Newtonsoft.Json.Serialization.JsonSerializerInternalReader.Deserialize(JsonReader reader,Boolean checkAdditionalContent)
   at Newtonsoft.Json.JsonSerializer.DeserializeInternal(JsonReader reader,Type objectType)
   at Newtonsoft.Json.JsonConvert.DeserializeObject(String value,Type type,JsonSerializerSettings settings)
   at Newtonsoft.Json.JsonConvert.DeserializeObject[T](String value,JsonSerializerSettings settings)
   at CtPortalServices.Queries.Handler.GetLocateFeaturesQueryHandler.GetReturnList(String objects) in C:\Development\Matador\Spatial E-Suite\11.0\Clients\Commander\CtPortalServices\Domain\Queries\Handler\Locate\GetLocateFeaturesQueryHandler.vb:line 108
   at CtPortalServices.Queries.Handler.GetLocateFeaturesQueryHandler.GetReturnObject(IRestResponse response) in C:\Development\Matador\Spatial E-Suite\11.0\Clients\Commander\CtPortalServices\Domain\Queries\Handler\Locate\GetLocateFeaturesQueryHandler.vb:line 90
   at CtPortalServices.Queries.QueryHandler.Get() in C:\Development\Matador\Spatial E-Suite\11.0\Clients\Commander\CtPortalServices\Domain\Queries\QueryHandler.vb:line 237
有人可以为我指出正确的解决方法吗?
提前谢谢!
解决方法
您的GeoJSON格式不正确,或者您试图使用GeoJSON转换器来转换非GeoJSON格式的数据。
根据RFC 7946第3.1节,coordinates属性的值不应是对象,而应是数组。例如,
            "coordinates": {
                "m": 0.0,"z": 0.0,"x": -156.3413802,"y": 20.725685900000003
            }
应该是
"coordinates": [-156.3413802,20.725685900000003,0.0]
(我不确定您将如何使用m值,但是在您的两个采样点中都为零,因此我希望可以忽略它。)
RFC包含GeoJSON的更多示例。
我不知道您是否具有更改返回到REST API的coordinates的功能,但是如果没有,您可能必须以其他方式解析JSON。
但是,不幸的是,NetTopologySuite GeoJson转换器似乎不太擅长处理这种情况。一旦开始处理您的coordinates属性中的第一个属性,它似乎就继续处理JSON令牌,直到它到达JSON数据末尾的数组结尾字符为止。
这是解决我的DeserializeObject问题的原因。
这与默认序列化程序处理各个几何类型的方式有关。
我在我的ConfigureServices方法中添加了以下代码。
services.AddControllers(options => {
                    options.ModelMetadataDetailsProviders.Add(new SuppressChildValidationMetadataProvider(typeof(Point)));
                    options.ModelMetadataDetailsProviders.Add(new SuppressChildValidationMetadataProvider(typeof(Coordinate)));
                    options.ModelMetadataDetailsProviders.Add(new SuppressChildValidationMetadataProvider(typeof(LineString)));
                    options.ModelMetadataDetailsProviders.Add(new SuppressChildValidationMetadataProvider(typeof(MultiLineString)));
                }).AddNewtonsoftJson(options => {
                    foreach (var converter in NetTopologySuite.IO.GeoJsonSerializer.Create(new GeometryFactory(new PrecisionModel(),4326)).Converters)
                    {
                        options.SerializerSettings.Converters.Add(converter);
                    }
                }).SetCompatibilityVersion(CompatibilityVersion.Version_3_0);
现在,客户端的JSON字符串格式正确,并且坐标格式正确。
"geom": {
            "type": "Point","coordinates": [
                -157.09853,21.1574725
            ]
        }

.net写了一个服务端程序,使用newtonsoft.json.JsonConvert.Deserialize报出异常
异常信息:
Newtonsoft.Json.JsonReaderException: Additional text encountered after finished
reading JSON content: {. Path '''', line 1, position 128548.
在 Newtonsoft.Json.JsonTextReader.ReadInternal()
在 Newtonsoft.Json.JsonTextReader.Read()
在 Newtonsoft.Json.Serialization.JsonSerializerInternalReader.Deserialize(Jso
nReader reader, Type objectType, Boolean checkAdditionalContent)
在 Newtonsoft.Json.JsonSerializer.DeserializeInternal(JsonReader reader, Type
objectType)
在 Newtonsoft.Json.JsonSerializer.Deserialize(JsonReader reader, Type objectT
ype)
在 Newtonsoft.Json.JsonConvert.DeserializeObject(String value, Type type, Jso
nSerializerSettings settings)
在 Newtonsoft.Json.JsonConvert.DeserializeObject[T](String value, JsonSeriali
zerSettings settings)
在 Newtonsoft.Json.JsonConvert.DeserializeObject[T](String value)
在 BLL.ServerConn.AcceptMessage(Object sender, ElapsedEventArgs e) 位置 x:\ne
wClient\ServerConn.cs:行号 116
关键代码:
try
{
msg = cotor.ReceiveMessage(client);
if (msg.Length == 0)
return;
string json1 = Encoding.ASCII.GetString (msg);
#116 MyData mydata = Newtonsoft.Json.JsonConvert.DeserializeObject<MyData>(json1);
this.Response(mydata);
}
catch (Exception ex)
{
Console.WriteLine(ex.ToString());
}
public byte[] ReceiveMessage(Socket sock)
{
try
{
int recv = 0;
int offset=0;
byte[] message = new byte[1000000];
recv = sock.Receive(message, offset, 1000000, SocketFlags.None);
MemoryStream ms = new MemoryStream();
ms.Write(message, offset, recv);
if (ms.Length == 0)
{
Console.WriteLine("接收消息为空!");
return message;
}
else
{
Console.WriteLine("接收消息长度为:{0}", ms.Length);
byte[] returnBytes = new byte[ms.Length];
returnBytes = ms.ToArray();
return returnBytes;
}
}
catch (Exception)
{
throw;
}
}
请大家帮忙看看这个异常为什么会出现,非常感谢。

asp.net – JObject.Parse与JsonConvert.DeserializeObject
作为参考,这里是一个使用两者完全相同的事情的例子 – 解析一个Json字符串并返回一个Json属性的列表。
public ActionResult ReadJson()
{
    string countiesJson = "{'Everything':[{'county_name':null,'description':null,'feat_class':'Civil','feature_id':'36865',"
                    +"'fips_class':'H1','fips_county_cd':'1','full_county_name':null,'link_title':null,'url':'http://www.alachuacounty.us/','name':'Alachua County'"+ ",'primary_latitude':'29.7','primary_longitude':'-82.33','state_abbreviation':'FL','state_name':'Florida'},"+
                    "{'county_name':null,"+ "'feat_class':'Civil','feature_id':'36866','fips_class':'H1','fips_county_cd':'3','url':'http://www.bakercountyfl.org/','name':'Baker County','primary_latitude':'30.33','primary_longitude':'-82.29','state_name':'Florida'}]}";

    //Can use either JSONParSEObject or JSONParseDynamic here
    List<string> counties = JSONParSEObject(countiesJson);
    JSONParseDynamic(countiesJson);
    return View(counties);
}

public List<string> JSONParSEObject(string jsonText)
{
    JObject jResults = JObject.Parse(jsonText);
    List<string> counties = new List<string>();
    foreach (var county in jResults["Everything"])
    {
        counties.Add((string)county["name"]);
    }
    return counties;
}

public List<string> JSONParseDynamic(string jsonText)
{
    dynamic jResults = JsonConvert.DeserializeObject(jsonText);
    List<string> counties = new List<string>();
    foreach(var county in jResults.Everything)
    {
        counties.Add((string)county.name);
    }
    return counties;
}
解决方法
另一方面,JsonConvert.DeserializeObject主要是为了在您提前了解JSON的结构并且要反序列化为强类型类时使用它们。例如,您将如何将JSON中的完整的县级数据从县域列表中列出。
class Program
{
    static void Main(string[] args)
    {
        string countiesJson = "{'Everything':[{'county_name':null,"
                +"'fips_class':'H1',"+
                "{'county_name':null,'state_name':'Florida'}]}";

        foreach (County c in JsonParseCounties(countiesJson))
        {
            Console.WriteLine(string.Format("{0},{1} ({2},{3})",c.name,c.state_abbreviation,c.primary_latitude,c.primary_longitude));
        }
    }

    public static List<County> JsonParseCounties(string jsonText)
    {
        return JsonConvert.DeserializeObject<RootObject>(jsonText).Counties;
    }
}

public class RootObject
{
    [JsonProperty("Everything")]
    public List<County> Counties { get; set; }
}

public class County
{
    public string county_name { get; set; }
    public string description { get; set; }
    public string feat_class { get; set; }
    public string feature_id { get; set; }
    public string fips_class { get; set; }
    public string fips_county_cd { get; set; }
    public string full_county_name { get; set; }
    public string link_title { get; set; }
    public string url { get; set; }
    public string name { get; set; }
    public string primary_latitude { get; set; }
    public string primary_longitude { get; set; }
    public string state_abbreviation { get; set; }
    public string state_name { get; set; }
}
请注意,Json.Net使用给JsonConvert.DeserializeObject方法的类型参数来确定要创建的对象类型。
当然,如果您在调用DeserializeObject时没有指定类型,或者使用对象或动态方法,那么Json.Net不得不反序列化为JObject。 (你可以看到你的动态变量实际上是通过检查jResults.GetType()来获取JObject。FullName。)所以在这种情况下,JsonConvert.DeserializeObject和JToken.Parse之间没有什么区别。或者会给你一样的结果。

C# GIS库 NetTopologySuite shp 转 geojson
将ShapeFile 读取为 FeatureCollection:
public bool ShpToFeatureCollection1(string filename, out FeatureCollection collection)
        {
            collection = null;
            try
            {
                var featureCollection = new Collection<DotSpatial.NetTopologySuite.Features.IFeature>();

                if (!File.Exists(filename + ".dbf"))
                {
                    return false;
                }
                var streamreader = new ShapefileStreamProviderRegistry(filename);
                var dataReader = new ShapefileDataReader(streamreader, new GeometryFactory(new PrecisionModel()));

                while (dataReader.Read())
                {
                    var feature = new DotSpatial.NetTopologySuite.Features.Feature { Geometry = dataReader.Geometry };
                    int length = dataReader.DbaseHeader.NumFields;
                    string[] keys = new string[length];
                    for (int i = 0; i < length; i++)
                        keys[i] = dataReader.DbaseHeader.Fields[i].Name;

                    feature.Attributes = new AttributesTable();
                    for (int i = 0; i < length; i++)
                    {
                        object val = dataReader.GetValue(i + 1);
                        feature.Attributes.AddAttribute(keys[i], val);
                    }

                    featureCollection.Add(feature);
                }
                dataReader.Close();
                dataReader.Dispose();

                if (featureCollection.Count == 0)
                {
                    return false;
                }

                collection = new FeatureCollection(featureCollection);
            }
            catch(Exception ex)
            {
                return false;
            }

            return true;
        }
FeatureCollection 转为 GeoJson:
private bool ConvertFeatureCollection(FeatureCollection value, out StringBuilder stringBuilder)
        {
            FeatureCollectionConverter target = new FeatureCollectionConverter();
            stringBuilder = new StringBuilder();
            JsonTextWriter writer = new JsonTextWriter(new StringWriter(stringBuilder));
            JsonSerializer serializer = DotSpatial.NetTopologySuite.IO.GeoJsonSerializer.Create(new JsonSerializerSettings { NullValueHandling = NullValueHandling.Ignore },
                GeometryFactory.Default);
            target.WriteJson(writer, value, serializer);
            writer.Flush();
            writer.Close();

            if (stringBuilder.Length == 0)
            {
                return false;
            }
            return true;
        }
Geojson 转为 FeatureCollection:
public bool ReadGeojson(string geojson, string fileName)
        {
            bool bResult = true;
            try
            {
                do
                {
                    DotSpatial.NetTopologySuite.IO.GeoJsonReader reader = new DotSpatial.NetTopologySuite.IO.GeoJsonReader();
                    FeatureCollection result = reader.Read<FeatureCollection>(geojson);

                    if (result == null)
                    {
                        bResult = false;
                        break;
                    }

                    ShapefileWriter.WriteFeatureCollection(fileName, result);
                }
                while (false);
            }
            catch(Exception ex)
            {
                bResult = false;
            }
            return bResult;
        }

C# JsonConvert.DeserializeObject 在解析json时出现异常。
class WordsResultDto
    {
        private string log_id;
        private long direction;
        private int words_result_num;
        private List<Words_result> words_result;
        private int language;

        public string Log_id { get => log_id; set => log_id = value; }
        public long Direction { get => direction; set => direction = value; }
        public int Words_result_num { get => words_result_num; set => words_result_num = value; }
        public int Language { get => language; set => language = value; }
        internal List<Words_result> Words_result { get => words_result; set => words_result = value; }
    }
class Words_result
{
private string words;
public string Words { get => words; set => words = value; }
}string json = "{\"log_id\": 2488745996327475492,\"direction\": 0,\"words_result_num\": 18,\"words_result\": [{ \"words\": \"xxxxxxxxxxx\"},{\"words\": \"yyyyyyyyyyyyyy\" }],\"language\": -1}";
WordsResultDto wordsResultDto = JsonConvert.DeserializeObject<WordsResultDto>(json);最后的结果是,其他字段值都正常,唯独words_result = null,这是什么鬼?还有有替代的方法没?
关于带有NetTopologySuite.IO.GeoJSON的JsonConvert.DeserializeObject异常找不到预期的令牌'}'的问题就给大家分享到这里,感谢你花时间阅读本站内容,更多关于.net写了一个服务端程序,使用newtonsoft.json.JsonConvert.Deserialize报出异常、asp.net – JObject.Parse与JsonConvert.DeserializeObject、C# GIS库 NetTopologySuite shp 转 geojson、C# JsonConvert.DeserializeObject 在解析json时出现异常。等相关知识的信息别忘了在本站进行查找喔。
如果您对TypeError:navigation.getParam不是一个函数-反应本机和typeerror: this.getoptions is not a function感兴趣,那么这篇文章一定是您不可错过的。我们将详细讲解TypeError:navigation.getParam不是一个函数-反应本机的各种细节,并对typeerror: this.getoptions is not a function进行深入的分析,此外还有关于android – 反应native native navigator.geolocation.getCurrentPosition不能正常工作、Angular 9-> 10迁移 TypeError:core_1.virtualFs.createSyncHost不是一个函数、angular – 带有AOT的延迟加载模块 – TypeError:”从NGINX提供时不是一个函数、AngularJS错误:TypeError:v2.login不是一个函数的实用技巧。
本文目录一览:- TypeError:navigation.getParam不是一个函数-反应本机(typeerror: this.getoptions is not a function)
- android – 反应native native navigator.geolocation.getCurrentPosition不能正常工作
- Angular 9-> 10迁移 TypeError:core_1.virtualFs.createSyncHost不是一个函数
- angular – 带有AOT的延迟加载模块 – TypeError:”从NGINX提供时不是一个函数
- AngularJS错误:TypeError:v2.login不是一个函数
")
TypeError:navigation.getParam不是一个函数-反应本机(typeerror: this.getoptions is not a function)
问题出在参数的get方法上。对于react-navigation版本5.X或更高版本,您需要使用route获取参数。
解决方案
像这样更改 componentDidMount()
componentDidMount() {
    // const { navigation } = this.props; remove this
    const { articlekey } = this.props.route.params; //add this
    const ref = firebase
      .firestore()
      .collection("articles")
      .doc(JSON.parse(articlekey));
    ref.get().then((doc) => {
      if (doc.exists) {
        this.setState({
          article: doc.data(),key: doc.id,isLoading: false,});
      } else {
        console.log("No such document!");
      }
    });
  }

android – 反应native native navigator.geolocation.getCurrentPosition不能正常工作
我使用的是真正的Android设备(版本5.1)
我可以使用react-native-maps确定我的位置(在我的应用程序内的地图上正确的蓝点位置)我可以使用谷歌地图应用程序并转到我的位置(GPS工作).
我正在使用一个大的超时,将enableHighAccuracy切换为true和false,删除选项等等.都没能得到navigator.geolocation来获取数据.
这是我的代码:
var options = {
  enableHighAccuracy: true,timeout: 5000,maximumAge: 0
};

function success(pos) {
  var crd = pos.coords;

  console.log('Your current position is:');
  console.log(`Latitude : ${crd.latitude}`);
  console.log(`Longitude: ${crd.longitude}`);
  console.log(`More or less ${crd.accuracy} meters.`);
};

function error(err) {
  console.warn(`ERROR(${err.code}): ${err.message}`);
};

navigator.geolocation.getCurrentPosition(success,error,options);
我收到:ERROR(3):位置请求超时
1)如果没有缓存坐标,那实际上不是高精度响应的高超时
2)某些设备的高精度设置存在问题.
尝试将30000毫秒作为超时并删除高精度,直到找到一个有效的设置.
编辑:我发现了我记得React Native:https://github.com/facebook/react-native/issues/7495的长虫
所以,试试这个:
1)删除maximumAge属性
2)如果不起作用,请删除第三个参数并使用本机模块中的默认值.意思是,不要发送选项对象.这应该工作.

Angular 9-> 10迁移 TypeError:core_1.virtualFs.createSyncHost不是一个函数
升级后,我有完全相同的错误。删除node_modules并重新安装依赖项可以解决此问题:
# with yarn
rm -rf node_modules && yarn

# with npm
rm -rf node_modules && npm install
尝试通过以下链接在升级过程中查找应用程序中的更改:
https://update.angular.io/#9.0:10.0l3
检查此功能的绞盘是否已在您的应用中使用,导致在迁移过程中导致此错误。

angular – 带有AOT的延迟加载模块 – TypeError:”从NGINX提供时不是一个函数
> dist with Lazy Modules,AOT
> dist with Lazy Modules,no AOT
> dist with AOT,no Lazy Modules
细分:
>我的dist构建,AOT和Lazy Loaded模块在使用npm包webpack-dev-server或live-server时工作正常
>只有当我将dist复制到Nginx html目录并且Nginx服务于我在Firefox和Chrome中看到Javascript错误的文件时
>我尝试了很多不同的webpack配置.
>我没有在任何Typescript文件中导入我的Lazy Loaded模块
>通过AOT编译关闭我的应用程序和Lazy Modules从Nginx可以正常运行
> TypeError:”不是函数错误来自与Nginx一起提供的延迟加载模块
我正在使用官方的Angular包@ ngtools / webpack将AOT编译添加到我的Angular 5应用程序中. This article解释了如何使用@ ngtools / webpack将AOT添加到Webpack构建项目中.很简单,虽然文章没有提到到add the Lazy Load module file paths到tsconfig-aot.json所需的步骤. AOT失败了.
所有作品都很棒localhost:
npm run serve
我的npm run serve命令是内存编译,资源使用npm包webpack-dev-server从内存中提供localhost.
当我部署到我的开发服务器时,编译文件存储在磁盘上,我的开发服务器使用Nginx提供资源.
我有延迟加载的模块,加载时会在Firefox中抛出这样的奇怪错误:
TypeError: i0.\u0275crt is not a function

这在Chrome中:
ERROR TypeError: i0.ɵcrt is not a function

通过Chrome中的错误了解更多细节,以下是抛出错误的源代码行代码:

我看到var i0的创建就是这一行:
var i0 = __webpack_require__(/*! @angular/core */ "./node_modules/@angular/core/esm5/core.js");
在我的开发服务器上,node_modules在父级别与我的dist文件夹:

我的dev服务器上的文件:

以下是从localhost提供的资源文件的比较:

这是从开发服务器提供的资源文件:

好的,所以这里有我的配置和npm包版本:
webpack.config
var merge = require('webpack-merge'),htmlPlugin = require('html-webpack-plugin'),revPlugin = require('webpack-rev-replace-plugin'),config = require('./build.config.json'),path = require('path'),extendedDefinePlugin = require('extended-define-webpack-plugin'),webpackDelPlugin = require('webpack-del-plugin'),openbrowserPlugin = require('open-browser-webpack-plugin'),uglifyJSPlugin = require('uglifyjs-webpack-plugin');
const AotPlugin = require('@ngtools/webpack').AngularCompilerPlugin;
//import {AngularCompilerPlugin} from '@ngtools/webpack';

//Note : in package.json the last variable (dev) is the param delivered to this function { env: 'dev' }.
module.exports = function (env) {
    console.log('env configuration',env.env);
    /**
     * configPerTarget is merged with build.config.json based on the env passed
     * currently no configuration properties,this configPerTarget not in use per se,keeping just in case - Ogden 4-12-2018
     */
    var configPerTarget = {
        localhost: {
        },development: {
        },test: {
        },staging: {
        },production: {
        },maintenance: {
        }
    };

    // Note : '__dirname' is the root file path.
    const ROOT_DIR = path.resolve(__dirname);
    const disT_DIR = path.join(ROOT_DIR,config.dist);

    // If no env make it dev
    if (!env) {
        env = {};
        env.env = config.envDevelopment;
    }

    //merge config with env specific configPerTarget
    config = merge(config,configPerTarget[env.env]);

    // this takes path variables from build.config.json and builds it with given env
    var appConfigPath = config.envs + config.appConfig.replace('{env}',env.env);


    var webPackConfig = {
        entry: ['babel-polyfill',config.src + config.entry],//main.ts
        output: {
            path: path.resolve(__dirname,config.dist),filename: config.buildjs,sourceMapFilename: config.buildjsmap,chunkFilename: '[id].[hash:6].chunk.js'
        },module: {
            rules: [
                { test: /\.html$/,use: 'raw-loader' },{ test: /\.css$/,{
                    test: /\.ts$/,loaders: [
                        'ts-loader','angular2-template-loader','angular-router-loader']
                },{
                    test: /\.scss$/,exclude: /node_modules/,loaders: ['style-loader','css-loader','sass-loader'],},//For images.
                { test: /\.(jpe?g|png|gif|svg)$/i,loader: 'file-loader?name=app/assets/images/[name].[ext]' },{
                    test: /\.(ttf|eot|woff|woff2)$/,loader: 'file-loader'
                },]
        },//https://webpack.js.org/configuration/devtool/
        //Webpack 4.4 has its own mode development and production,which are environment modes
        //do Webpack 4.4 is handling the devtool sourcemap config where in the past it was not
        //looks like we no longer have to worry about setting devtool
        //https://github.com/damianobarbati/yarsk/blob/50b6f352a13ec2e778fa8b252f915550b6132964/config/webpack.config.js#L110
        //devtool: config.devtool,resolve: {
            modules: [__dirname + path.sep + 'src',__dirname,'node_modules'],extensions: ['.js','.ts','.scss','.css']
        },plugins: [
            new htmlPlugin({
                template: config.src + config.index
            }),new revPlugin({
                cwd: config.src,files: '**/*.html',outputPageName: function (filename) {
                    return filename;
                },modifyReved: function (filename) {
                    return filename.replace(/(\/style\/|\/script\/)/,'')
                }
            }),//Makes AppConfig variable available in the application code.
            new extendedDefinePlugin({
                AppConfig: require(appConfigPath)
            }),//Usefull if you need remove some files or folders before compilation processes.
            //currently not used (no dist file).
            new webpackDelPlugin({ match: path.join(disT_DIR,'*.*') }),//opens browser after compilation.
            new openbrowserPlugin({ url: 'http://localhost:8080' })
        ]
    }

    //********************************AOT Compilation*************************************** */
    //-- AOT Compilation from this point on,currently AOT runs in all environments
    //this seems helpful because you get to see AOT build errors before pushing to build server
    //the downside might be more mangled code and harder to debug source code...

    if (env.env === config.envLocalhost) return webPackConfig;

    webPackConfig.module.rules.push(
        { test: /\.ts$/,loaders: ['@ngtools/webpack'] }
    );

    webPackConfig.plugins.push(new AotPlugin({
        tsConfigPath: './tsconfig-aot.json',//mainPath: path.resolve('./src/main.ts'),entryModule: path.join(config.src,'app/app.module#AppModule')
    }));

    webPackConfig.optimization = {
        minimizer: [
            new uglifyJSPlugin({
                uglifyOptions: {
                    output: {
                        comments: false,ascii_only: true
                    }
                }
            })
        ]
    }

    return webPackConfig;
}
的package.json
{
  "name": "tsl-frontend","version": "0.1.0","scripts": {
    "test": "karma start","build-localhost": "webpack --mode development --progress --colors --env.env localhost","build-development": "webpack --mode development --progress --colors --env.env development","build-staging": "webpack --mode production --progress --colors --env.env staging","build-production": "webpack --mode production -p --progress --colors --env.env production","build-maintenance": "webpack --mode production -p --progress --colors --env.env maintenance","serve": "webpack-dev-server --mode development --inline --progress --colors --env.env development","serve-production": "webpack-dev-server --mode production --inline --progress --colors --env.env development","serve-localhost": "webpack-dev-server --mode development --inline --progress --colors --env.env localhost","serve-host": "webpack-dev-server --host 0.0.0.0 --port 80 --disable-host-check --mode development --inline --progress --colors --env.env localhost","serve-maintenance": "webpack-dev-server --mode development --inline --progress --colors --env.env maintenance"
  },"dependencies": {
    "@angular/animations": "^5.2.11","@angular/cdk": "^2.0.0-beta.12","@angular/common": "^5.2.11","@angular/compiler": "^5.2.11","@angular/compiler-cli": "^5.2.11","@angular/core": "^5.2.11","@angular/forms": "^5.2.11","@angular/http": "^5.2.11","@angular/material": "^2.0.0-beta.12","@angular/platform-browser": "^5.2.11","@angular/platform-browser-dynamic": "^5.2.11","@angular/platform-server": "^5.2.11","@angular/router": "^5.2.11","@ng-bootstrap/ng-bootstrap": "^1.1.2","@types/file-saver": "^1.3.0","angular2-jwt": "^0.2.3","angular2-text-mask": "^8.0.5","bootstrap": "^4.1.2","chart.js": "^2.7.2","file-saver": "^1.3.8","font-awesome": "^4.7.0","moment": "2.18.1","moment-timezone": "0.5.13","ng2-bootstrap-modal": "1.0.1","ng2-charts": "^1.6.0","ng2-drag-drop": "^2.9.2","ng2-page-scroll": "^4.0.0-beta.12","ng2-toastr": "^4.1.2","popper.js": "^1.14.3","reflect-Metadata": "0.1.8","rxjs": "5.5.5","systemjs": "0.19.40","typescript": "^2.9.2","xlsx": "^0.11.19","zone.js": "^0.8.26"
  },"devDependencies": {
    "@ngtools/webpack": "^6.0.8","@servicestack/client": "^1.0.14","@types/jasmine": "^2.8.8","@types/node": "7.0.7","angular-router-loader": "^0.6.0","angular2-router-loader": "^0.3.5","angular2-template-loader": "^0.6.2","babel-polyfill": "^6.26.0","css-loader": "^0.28.11","extended-define-webpack-plugin": "^0.1.3","extract-text-webpack-plugin": "^3.0.2","file-loader": "^1.1.11","html-webpack-plugin": "^4.0.0-alpha","jasmine": "^2.99.0","karma": "^1.7.0","karma-sourcemap-loader": "^0.3.7","karma-webpack": "^2.0.13","ng-intercom": "^1.0.0-beta.5-2","ng2-tree": "^2.0.0-rc.11","node-sass": "^4.9.2","open-browser-webpack-plugin": "0.0.5","path": "^0.12.7","raw-loader": "^0.5.1","sass-loader": "^6.0.7","style-loader": "^0.13.2","text-mask-addons": "^3.7.2","toposort": "^1.0.7","ts-loader": "^4.4.2","webpack": "^4.16.1","webpack-cli": "^2.1.5","webpack-del-plugin": "0.0.1","webpack-dev-server": "^3.1.4","webpack-merge": "^4.1.3","webpack-rev-replace-plugin": "^0.1.1"
  }
}
tsconfig-aot.json(文件数组包含延迟加载的模块路径)
{
    "compilerOptions": {
        "target": "es5",//most browsers currently understand this version of Javascript
        "experimentalDecorators": true,//Angular2 uses Component,Injectable etc
        "emitDecoratorMetadata": true,//required for Angular2 to use the Metadata in our components
        //"sourceMap": true
        "types": [
            "node","jasmine"
        ],// "typeRoots": [
        //     "node_modules/@types"
        // ],"lib": [
            "es2015","es2015.iterable","dom"
        ]
    },"exclude": [
        "node_modules"
    ],"files": [
        "src/app/app.module.ts","src/main.ts","src/app.d.ts","src/app/sandBox/sandBox.module.ts","src/app/supplier-xchange/supplier-xchange.module.ts","src/app/company-profile/company-profile.module.ts","src/app/bom/bom.module.ts","src/app/custom-price-column/custom-price-column.module.ts","src/app/neca/neca.module.ts"
    ],"angularCompilerOptions": {
        "genDir": "aot",// Specify where Angular can create temporary AOT files
        "skipMetadataEmit": true // Don't generate not necessary Metadata files. They are useful only if you're publishing an Angular UI library
    }
}
这是我的Nginx配置:
daemon off;
user  Nginx;
worker_processes  2;

error_log  /var/log/Nginx/error.log warn;
pid        /var/run/Nginx.pid;


events {
    worker_connections  1024;
    use epoll;
    accept_mutex off;
}


http {
    include       /etc/Nginx/mime.types;
    proxy_set_header X-Real-IP $remote_addr;
    proxy_set_header X-Forwarded-For $proxy_add_x_forwarded_for;

    default_type  application/octet-stream;

    log_format  main  '$remote_addr - $remote_user [$time_local] "$request" '
                      '$status $body_bytes_sent "$http_referer" '
                      '"$http_user_agent" "$http_x_forwarded_for"';

    access_log  /var/log/Nginx/access.log  main;

    sendfile        on;
    #tcp_nopush     on;

    keepalive_timeout  65;

    client_max_body_size 300m;
    client_body_buffer_size 300k;
    large_client_header_buffers 8 64k;

    gzip  on;
    gzip_http_version 1.0;
    gzip_comp_level 6;
    gzip_min_length 0;
    gzip_buffers 16 8k;
    gzip_proxied any;
    gzip_types text/plain text/css text/xml text/javascript application/xml application/xml+RSS application/javascript application/json;
    gzip_disable "MSIE [1-6]\.";
    gzip_vary on;

    include /etc/Nginx/conf.d/*.conf;
}


server {
    listen 80 default_server;
    listen [::]:80 default_server;
    server_name _;

    # API Server
    # location /api/ {
    #     proxy_pass ${MY_API_URL}/;
    # }

    # Main
    location / {
        set $cors "true";
       if ($http_origin ~* (http:\/\/d\.mywebsite\.com\S*)$) {
            set $cors "true";
        }

        if ($request_method = 'OPTIONS') {
            set $cors "${cors}options";
        }

        if ($request_method = 'GET') {
            set $cors "${cors}get";
        }
        if ($request_method = 'POST') {
            set $cors "${cors}post";
        }

        if ($cors = "trueget") {
            add_header 'Access-Control-Allow-Origin' "$http_origin";
            add_header 'Access-Control-Allow-Credentials' 'true';
        }

        if ($cors = "truepost") {
            add_header 'Access-Control-Allow-Origin' "$http_origin";
            add_header 'Access-Control-Allow-Credentials' 'true';
        }

        if ($cors = "trueoptions") {
            add_header 'Access-Control-Allow-Origin' "$http_origin";
            add_header 'Access-Control-Allow-Credentials' 'true';
            add_header 'Access-Control-Allow-Methods' 'GET,POST,OPTIONS';
            add_header 'Access-Control-Allow-Headers' 'Authorization,Content-Type,Accept,Origin,User-Agent,DNT,Cache-Control,X-Mx-ReqToken,Keep-Alive,X-Requested-With,If-Modified-Since';
            add_header 'Content-Length' 0;
            add_header 'Content-Type' 'text/plain charset=UTF-8';
            return 204;
        }

        root   /usr/share/Nginx/html;
        index  index.html index.htm;
        try_files $uri$args $uri$args/ /index.html;
    }

    #error_page  404              /404.html;

    # redirect server error pages to the static page /50x.html
    #
    error_page   500 502 503 504  /50x.html;
    location = /50x.html {
        root   /usr/share/Nginx/html;
    }
}
认为这些文件对这个问题很重要,但以防万一:
main.ts
//CSS STYLES
import './styles';
import 'reflect-Metadata';
//Zone JS is required by Angular itself.
import 'zone.js/dist/zone';
import { platformbrowserDynamic } from '@angular/platform-browser-dynamic';
import { AppModule } from './app/app.module';
import { enableProdMode } from '@angular/core';


//remaining in ProdMode even in dev because of  ExpressionChangedAfterItHasBeenCheckedError: Expression has changed after it was checked errors
//http://www.allenhashkey.com/web-development/angular2/angular-2-expression-changed-after-it-has-been-checked-exception/
enableProdMode();
// if (!AppConfig.isDevelopment) {
//     enableProdMode();
// }


platformbrowserDynamic().bootstrapModule(AppModule)
    .then(success => console.log('Bootstrap success'))
    .catch(err => console.error("Bootstrap module failure: ",err));
app.module.ts
// vendor
import { NgModule } from '@angular/core';
import { browserModule } from '@angular/platform-browser';
import { LocationStrategy,HashLocationStrategy } from '@angular/common';
import { Injector } from '@angular/core';
import { browserAnimationsModule } from '@angular/platform-browser/animations';
import { Ng2DragDropModule } from 'ng2-drag-drop';
import { ToastModule } from 'ng2-toastr/ng2-toastr';
import { Ng2PageScrollModule } from 'ng2-page-scroll';
// Routing
import { AppRoutingModule,routableComponents } from './app-routing.module';
//Components
import { AppComponent } from './app.component';
//Shared Module
import { SharedModule } from './@shared/shared.module';
//Feature Modules
import { CoreModule } from './@core/core.module';
import { DashboardModule } from './dashboard/dashboard.module';
import { ProductModule } from './product/product.module';
import { SearchModule } from './search/search.module';
import { LoginModule } from './login/login.module';
import { ExampleModule } from './example/example.module';
import { ProfileModule } from './profile/profile.module';
import { ResetPasswordModule } from './reset-password/reset-password.module';
import { EdataFlexModule } from './e-data-flex/e-data-flex.module';
import { SubmittalManagerModule } from './submittal-manager/submittal-manager.module';
import { PimModule } from './pim/pim.module';
import { AnalyticsModule } from './analytics/analytics.module';
import { InviteUserModule } from './invite-user/invite-user.module';
import { DownloadsModule } from './downloads/downloads.module';
import { SettingsModule } from './settings/settings.module';
import { ChangeBulletinModule } from './change-bulletin/change-bulletin.module';
//Singletons - A Singleton Service shall only be kept in app.module.ts "providers" (array)
//and it shall not be placed in any other component or service provider (array).
import { TokenService } from './@core/auth/token.service';
// Intercom Module
import { IntercomModule } from 'ng-intercom';
import { BootstrapModalModule } from 'ng2-bootstrap-modal';

@NgModule({
  imports: [
    SharedModule,browserModule,DashboardModule,ProductModule,SearchModule,ProfileModule,ExampleModule,LoginModule,CoreModule,ResetPasswordModule,EdataFlexModule,SubmittalManagerModule,PimModule,AnalyticsModule,InviteUserModule,DownloadsModule,SettingsModule,ChangeBulletinModule,//Do not import feature modules below "AppRoutingModule"
    AppRoutingModule,browserAnimationsModule,BootstrapModalModule.forRoot({container:document.body}),Ng2PageScrollModule.forRoot(),Ng2DragDropModule.forRoot(),ToastModule.forRoot(),IntercomModule.forRoot({
      appId:AppConfig.intercom["appId"],// TSO App Id
      updateOnRouterChange : true // will automatically run 'update' on router event changes.
    })
  ],declarations: [
    AppComponent,routableComponents
  ],providers: [
    { provide: LocationStrategy,useClass: HashLocationStrategy },TokenService
  ],bootstrap: [AppComponent]

})
export class AppModule {
  /**
     * Allows for retrieving singletons using `AppModule.injector.get(MyService)`
     * This is good to prevent injecting the service as constructor parameter.
     */
  static injector: Injector;
  constructor(injector: Injector) {
    AppModule.injector = injector;
  }
}
解决方法
你需要告诉Nginx使用UTF-8字符集
server {
  listen 80 default_server;
  listen [::]:80 default_server;
  server_name _;

  charset UTF-8; #<==== Add this

AngularJS错误:TypeError:v2.login不是一个函数
login.js代码如下:
/*global Firebase,angular,console*/

'use strict';
// Create a new app with the AngularFire module
var app = angular.module("runsheetApp");

app.controller("AuthCtrl",function ($scope,$firebaseAuth) {
    var ref = new Firebase("https://xxxxx.firebaseio.com");
    function login() {
        ref.authWithPassword({
            email    : "xxxxx",password : "xxxx"
        },function (error,authData) {
            if (error) {
                console.log("Login Failed!",error);
            } else {
                console.log("Authenticated successfully with payload:",authData);
            }
        });
    }
});
<script src="https://ajax.googleapis.com/ajax/libs/angularjs/1.2.21/angular.min.js"></script>
而login.html的代码也在下面:
<div>
    <form>
      <h2https://www.jb51.cc/tag/heading/" target="_blank">heading">Please Sign In</h2>
      <input type="text"name="username" ng-model = "username" placeholder="Email Address" required="" autofocus="" />
        </br>
      <input type="password"name="password" ng-model = "password" placeholder="Password" required=""/>
        </br>
      <buttontype="submit" ng-click="login()">Login</button>
    </form>
  </div>
JS
// exposes login function in scope
$scope.login = login;
HTML
<divng-controller="AuthCtrl"> <!-- I notice here for include ng-controller to your main div -->
<form>
  <h2https://www.jb51.cc/tag/heading/" target="_blank">heading">Please Sign In</h2>
  <input type="text"name="username" ng-model = "username" placeholder="Email Address" required="" autofocus="" />
    </br>
  <input type="password"name="password" ng-model = "password" placeholder="Password" required=""/>
    </br>
  <buttontype="submit" ng-click="login()">Login</button>
</form>
今天的关于TypeError:navigation.getParam不是一个函数-反应本机和typeerror: this.getoptions is not a function的分享已经结束,谢谢您的关注,如果想了解更多关于android – 反应native native navigator.geolocation.getCurrentPosition不能正常工作、Angular 9-> 10迁移 TypeError:core_1.virtualFs.createSyncHost不是一个函数、angular – 带有AOT的延迟加载模块 – TypeError:”从NGINX提供时不是一个函数、AngularJS错误:TypeError:v2.login不是一个函数的相关知识,请在本站进行查询。
此处将为大家介绍关于如何在mysql中使用json_object创建值是动态的对象?的详细内容,此外,我们还将为您介绍关于Hive lateral view ,get_json_object,json_tuple 用法、Hive 的 Json 解析问题 get_json_object、Hive_解析 get_json_object ( )、hive函数 get_json_object的使用的有用信息。
本文目录一览:- 如何在mysql中使用json_object创建值是动态的对象?
- Hive lateral view ,get_json_object,json_tuple 用法
- Hive 的 Json 解析问题 get_json_object
- Hive_解析 get_json_object ( )
- hive函数 get_json_object的使用

如何在mysql中使用json_object创建值是动态的对象?
您不需要嵌套SELECT。只需调用该函数即可。
SELECT JSON_OBJECT("uuid",UUID());

Hive lateral view ,get_json_object,json_tuple 用法
要确保被解析的字段是string类型才可以使用json解析.解析map类型不能使用json解析,解析map类型可以使用col_name['key']获取对应key的value.
【Hive】解析json(get_json_object) https://blog.csdn.net/qq_34105362/article/details/80454697
lateral view:如果指定字段名则需要把lateral view查询出的列写到select中,才能在结果中出现;如果直接是select * 则自动会把lateral view查询出的列追加在后面。
select * from sales_info where dt = '2019-04-26'
----------------------------

")


