在这篇文章中,我们将带领您了解在Python3中generator.next()是可见的吗?的全貌,包括python里的next的相关情况。同时,我们还将为您介绍有关AttnGAN:Fine-Grai
在这篇文章中,我们将带领您了解在 Python 3 中 generator.next() 是可见的吗?的全貌,包括python里的next的相关情况。同时,我们还将为您介绍有关AttnGAN: Fine-Grained Text to Image Generation with Attentional Generative Adversarial Networks 笔记、go 模拟 python 的 generator、org.eclipse.xtext.generator.AbstractGenerator的实例源码、org.eclipse.xtext.generator.GeneratorContext的实例源码的知识,以帮助您更好地理解这个主题。
本文目录一览:- 在 Python 3 中 generator.next() 是可见的吗?(python里的next)
- AttnGAN: Fine-Grained Text to Image Generation with Attentional Generative Adversarial Networks 笔记
- go 模拟 python 的 generator
- org.eclipse.xtext.generator.AbstractGenerator的实例源码
- org.eclipse.xtext.generator.GeneratorContext的实例源码
 是可见的吗?(python里的next)")
在 Python 3 中 generator.next() 是可见的吗?(python里的next)
我有一个生成系列的生成器,例如:
def triangle_nums():
    '''Generates a series of triangle numbers'''
    tn = 0
    counter = 1
    while True:
        tn += counter
        yield tn
        counter += + 1
在 Python 2 中,我可以进行以下调用:
g = triangle_nums()  # get the generator
g.next()             # get the next value
但是在 Python 3 中,如果我执行相同的两行代码,则会收到以下错误:
AttributeError: 'generator' object has no attribute 'next'
但是,循环迭代器语法在 Python 3 中确实有效
for n in triangle_nums():
    if not exit_cond:
       do_something()...
我还没有找到任何东西来解释 Python 3 的这种行为差异。

AttnGAN: Fine-Grained Text to Image Generation with Attentional Generative Adversarial Networks 笔记
AttnGAN: Fine-Grained Text to Image Generation with Attentional Generative Adversarial Networks 笔记
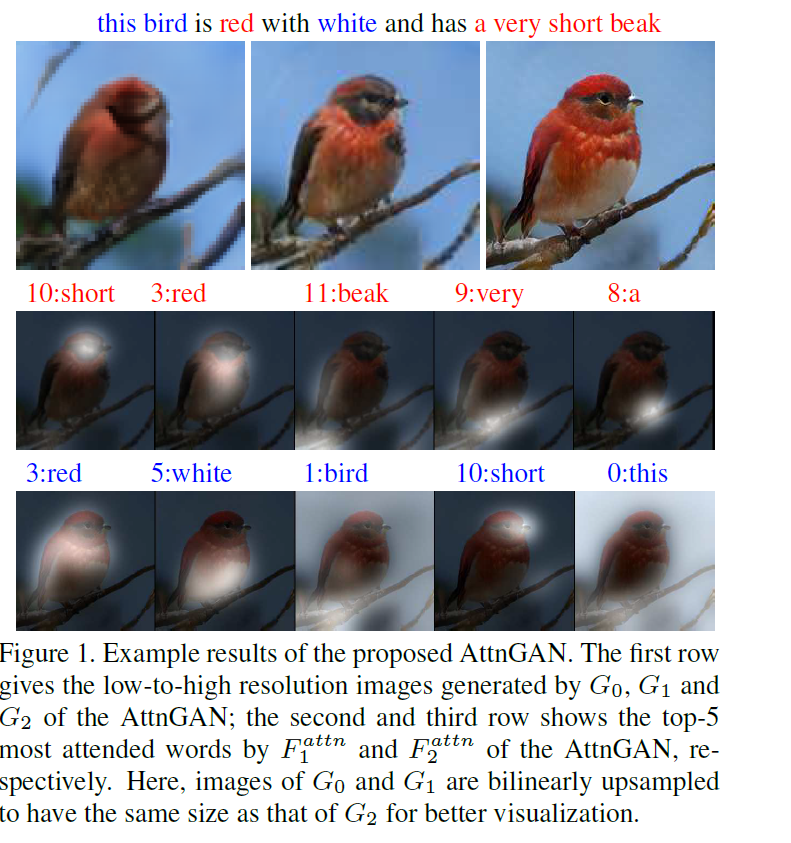
这篇文章的任务是 “根据文本描述” 生成图像。以往的常规做法是将整个句子编码为condition向量,与随机采样的高斯噪音$z$进行拼接,经过卷积神经网络(GAN,变分自编码等)来上采样生成图像。这篇文章发现的问题是:仅通过编码整个句子去生成图像会忽略掉一些细粒度的信息,而这些细粒度的信息是由单词层面来决定的(例如颜色、形状等)。
解决的方法是在生成过程中引入对单词的注意力机制,这种注意力机制需要把相关的单词与对应的图像区域匹配起来, 如果让我自己去设计这种匹配关系,我的第一反应是要先进行大量的人工标注(根据单词先人工框出来图像中对应的区域),这样搞的话光标注就需要巨大的人力与时间(特别是在COCO这么大的数据集上。。。)。
AttnGAN没有对数据集进行额外的标注, 利用生成过程中的 $C \times N \times N$ feature map ,有 $N^{2}$ 个位置。每一位置的向量维度是 $C$,为了表示某一位置与句子中某一单词的相关性,可以根据 某一位置向量与单词向量的内积 / 某一位置向量与句子中所有单词向量内积之和 来得到与某一单词的权重(相关)系数,那么在某一位置上的单词表征可以表示为所有单词向量的加权和。
方法

模型包含两个部分,
- 注意力生成网络
- 多模态注意力相似模型(DAMSM,是个匹配网络)
注意力生成网络包含多个阶段的生成(这里是三次生成,只要计算资源足,还可以加), coarse-to-fine的图像生成模式。 DAMSM需要在真实的数据对上预训练,相当于给生成网络加了一个监督信息,使生成的图像能像真实图像那样与相应的文本匹配。
Attentional Generative Network(注意力生成网络)
输入文本,经过Text Encoder(用的是双向LSTM)编码输出“整句特征”(global sentence vector)$\bar{e}$ 和拼接起来的“单词特征” $e \in \mathbb{R}^{D \times T}$。 $\bar{e}$ 经过 Conditioning Augmentation(具体可以看stackgan和vae的文章,目的是为了降维以及增加多样性) 进行降维转换来作为条件向量,用 $F^{ca}$ 来表示Conditioning Augmentation操作。
第一次的image features的生成过程为: $$ h_{0} = F_{0}(z, F^{ca}(\bar{e})) $$ 从图中可以看出$F_{0}$代表着一系列的上采样操作,但还没有生成最后的图像,输出了一个隐含特征$h_{0}$。这个隐含特征已经初具图像的位置和物体信息。后面的生成过程为: $$ h_{i} = F_{i}(h_{i-1}, F^{attn}{i}(e,h{i-1})) $$ 这里面最重要的就是$F_{i}^{attn}$的操作,也是作者所提出的创新点,即如何将单词信息融入到生成的过程中去,而且不同单词对于图像中不同区域的attention作用也是不同的。先来看看$F^{attn}{i}$的操作,输入是单词向量矩阵 $e$ 以及前一阶段所得到的image features $h{i-1}$($h \in \mathbb{R}^{\hat{D} \times N}$)。单词向量要经过一次乘积转换(可以加个全连接层)来改变维度到$\hat{D}$维,$e^{''}=Ue$ where $U\in\mathbb{R}^{\hat{D}\times D}$,与image features的维度保持一致, 有助于后面进行内积操作计算相似性。 $h$ 中的每一列其实都代表着图像的一个sub-region,其中$N=\sqrt{N}\times \sqrt{N}$。对于第 $j$ 个sub-region,用句子中所有的单词向量来进行表示,那么相关的单词向量应具有更大的权重,不相关的单词向量与其的相关权重应很小,每个sub-region进行单词向量加权和的结果称为“word-context”(相当于加入了具有侧重点的文本condition)。每一个sub-region与所有的单词向量权重计算以及最后的word-context计算过程为 $$ c_{j} = \sum\limits_{i=0}\limits^{T-1}\beta_{j,i}e^{''}{i}, where \beta{j,i}=\frac{exp(s^{''}{j,i})}{\sum{k=0}^{T-1}exp(s^{''}{j,k})} $$ $s^{''}{j,i}=h^{T}{j}e^{''}{i}$, $\beta_{j,i}$表示当生成图像第$j$个子区域时,第$i$个单词所获得的关注程度。$c_{j}$代表着第$j$个子区域的word-context向量,$F^{attn}$就是为了生成所有子区域的word-context向量:$F^{attn}(e,h)=(c_{0},c_{1},\ldots,c_{N-1})\in \mathbb{R}^{\hat{D}\times N}$。
图像的生成是根据Image features $h_{i}$ $$ \hat{x_{i}}=G_{i}(h_{i}) $$ 在注意力生成网络里的损失也就是常规的conditionGAN损失的变种(包含带有文本条件与不带有条件):


Deep Attentional Multimodal Similarity Model(匹配模型)
这一部分的提出相当于额外加了一个文本-图像匹配的监督信息,由于DAMSM是在真实数据集上预训练好的(即真实图像与相关的文本匹配损失会比较小),在输入生成的图像与相关的文本信息时,它会倒逼着注意力生成网络生成更加真实且与文本相关的图像。在这一模型中,从两个部分来计算匹配损失,分别是基于整个句子的和基于逐个单词的。
图像编码器(image encode)将图像下采样到feature matrix $f\in \mathbb{R}^{768\times 289}$(这是从$768\times 17\times 17$ reshape 过来的),为了度量图像与文本的相似性,文本与图像的特征维度应保持一致,在这里,是将图像的特征进行转换与单词向量的维度保持一致: $$ v=Wf, \bar{v}=\bar{W}\bar{f} $$ $v$是图像特征转换过之后的特征$v\in \mathbb{R}^{D\times 289}$,$\bar{v}\in \mathbb{R}^{D}$表示图像的全局向量,$\bar{f}$是从Inception-v3网络的最后一层(全连接分类层)提取出来的,作为全局特征。
经过维度统一之后,下面的单词层面的匹配操作类似于attention生成过程中的word-context计算过程,只不过这里是针对每个单词计算出相应的sub-region的加权和,也就是说每个单词都有个视觉信息的加权表征。计算过程如下: $$ s=e^{T}v $$ $s\in \mathbb{R}^{T\times 289}$,表示单词与sub-region的内积来度量相似性。这里搞了一个归一化,说是能提升效果 $$ \bar{s}{i,j} = \frac{exp(s{i,j})}{\sum_{k=0}^{T-1}exp(s_{k,j})} $$ 也就是针对同一个sub-region,所有单词相似性的归一化。
针对每一个单词所有的sub-region视觉信息加权和称为“region-context”向量,记作$c_{i}$,计算过程为 $$ c_{i}=\sum_\limits{j=0}^\limits{288}\alpha_{j}v_{j}, where \alpha_{j}=\frac{exp(\gamma_{1}\bar{s}{i,j})}{\sum{k=0}^{288}exp(\gamma_{1}\bar{s}{i,k})} $$ $\gamma{1}$表示对于相关的sub-regions扩大它的影响(相似性值越大的占的比重更大)。这样每一个单词都有一个对应的region-context视觉信息,可以进行单词-视觉信息相关的匹配度量,这里用余弦距离来衡量差异 $$ R(c_{i},e_{i})=(c_{i}^{T}e_{i})/(||c_{i}||||e_{i}||) $$ 基于单词层面来衡量整个图像与文本的相似性 $$ R(Q,D)=log\left(\sum_\limits{i=1}^\limits{T-1}exp(\gamma_{2}R(c_{i},e_{i}))\right)^{\frac{1}{\gamma_{2}}} $$ 之所以用这个形式,是为了突出最相关的word-to-region-context pair,用$\gamma_{2}$来调节突出程度,当$\gamma_{2} \rightarrow \infty$ 时,上式结果
趋近于$\max_{i=1}^{T-1}R(c_{i},e_{i})$。
DAMSM的监督标签是"图片与整个句子是否匹配"。用图片去匹配句子,目标函数的后验概率形式为

$Q$表示图像,$D$表示句子
基于单词水平的匹配损失函数为:

对应的,在以句子匹配图像的情况下,损失函数为

另外,基于整个句子的匹配损失设计与上面的类似,不同点是直接用全局向量计算相似距离。 $$ R(Q,D)=(\bar{v}^{T}\bar{e}/\left(||\bar{v}||||\bar{e}||\right)) $$ 

go 模拟 python 的 generator
def demo_input_and_output():
    input = yield ''what is the input?''
    yield ''input is: %s'' % input

gen = demo_input_and_output()
print(gen.next())
print(gen.send(42))
这段代码演示了 python generator 的功能。可以看到 yield 同时做了两个操作,一个是往外发数据 "waht is the input",同时做的操作是往里收数据 input。而且这个接收数据的操作是一个阻塞的操作,如果外部没有调用 next() (也就是往里传递None),或者调用send(42)(也就是往里传递42这个值),那么这个阻塞的操作就会一直等待下去。
也就是说 python 的 generator 自带了一个对外通信的 channel,用于收发消息。用 go 模拟 python 的 generator 的话写起来就是这样的
package main

import "fmt"

func demoInputAndOutput(channel chan string) {
    channel <- "what is my input?"
    input := <- channel
    channel <- fmt.Sprintf("input is: %s", input)
}

func main() {
    channel := make(chan string)
    go demoInputAndOutput(channel)
    fmt.Println(<- channel)
    channel <- "42"
    fmt.Println(<- channel)
}
这段代码和 python 版本基本上等价。隐含的 channel 在 go 版本里变成显式的了。yield 变成了 channel <- 操作,同时立马做了一个 <- channel 的阻塞读操作。这也就是 yield 的本质吧。
go 的 channel 也可以当成 iterator 被 for 循环使用:
package main

import "fmt"

func someGenerator() <-chan string {
    channel := make(chan string)
    go func() {
        channel <- "a"
        fmt.Println("after a")
        channel <- "c"
        fmt.Println("after c")
        channel <- "b"
        fmt.Println("after b")
        close(channel)
    }()
    return channel
}

func main() {
    channel := someGenerator()
    for val := range channel {
        fmt.Println(val)
    }
}
和 python 的 yield 不同,这里的 channel <- 不等价于 yield,它会往下执行直到阻塞。效果是
after a
a
c
after c
after b
b
这和预期的顺序不一样。这里没有把 after a after c after b 都打印出来是因为 channel 默认只有一个元素的buffer,所以写入了一个就阻塞了。如果增大 buffer,那么就有效果了
make(chan string, 10)
输出变成了:
after a
after c
after b
a
c
b
可见 goroutine 就好象一个独立的线程一样自己和自己玩去了,不用等待被执行。如果要模拟 yield 就要加上显示的同步操作(从 channel 里阻塞读取信号):
package main

import "fmt"

func someGenerator() chan string {
    channel := make(chan string)
    go func() {
        channel <- "a"
        <- channel
        fmt.Println("after a")
        channel <- "c"
        <- channel
        fmt.Println("after c")
        channel <- "b"
        <- channel
        fmt.Println("after b")
        close(channel)
    }()
    return channel
}

func main() {
    channel := someGenerator()
    for val := range channel {
        fmt.Println(val)
        channel <- ""
    }
}
输出的结果就是
a
after a
c
after c
b
after b
到这里我们可以看到,python 的 generator 就好象是 golang 的 goroutine 带了一个无buffer的channel。这样导致每次yield一个值,都会产生一次协程上下文切换。虽然协程上下文切换很廉价,但是也不是没有成本。像 goroutine 的 buffered channel 这样的设计,可以让一个 goroutine 一次性多产生一些输出再阻塞等待,而不是产生一个输出就阻塞等待一下,再产生另外一个输出。golang rocks!

org.eclipse.xtext.generator.AbstractGenerator的实例源码
protected void doGenerateXtendStubFile() {
  TypeReference _generatorStub = this.getGeneratorStub(this.getGrammar());
  StringConcatenationClient _client = new StringConcatenationClient() {
    @Override
    protected void appendTo(StringConcatenationClient.TargetStringConcatenation _builder) {
      _builder.append("/**");
      _builder.newLine();
      _builder.append(" ");
      _builder.append("* Generates code from your model files on save.");
      _builder.newLine();
      _builder.append(" ");
      _builder.append("* ");
      _builder.newLine();
      _builder.append(" ");
      _builder.append("* See https://www.eclipse.org/Xtext/documentation/303_runtime_concepts.html#code-generation");
      _builder.newLine();
      _builder.append(" ");
      _builder.append("*/");
      _builder.newLine();
      _builder.append("class ");
      String _simpleName = GeneratorFragment2.this.getGeneratorStub(GeneratorFragment2.this.getLanguage().getGrammar()).getSimpleName();
      _builder.append(_simpleName);
      _builder.append(" extends ");
      _builder.append(AbstractGenerator.class);
      _builder.append(" {");
      _builder.newLineIfNotEmpty();
      _builder.newLine();
      _builder.append("\t");
      _builder.append("override void doGenerate(");
      _builder.append(Resource.class,"\t");
      _builder.append(" resource,");
      _builder.append(IFileSystemAccess2.class,"\t");
      _builder.append(" fsa,");
      _builder.append(IGeneratorContext.class,"\t");
      _builder.append(" context) {");
      _builder.newLineIfNotEmpty();
      _builder.append("//\t\tfsa.generateFile(\'greetings.txt\',\'People to greet: \' + ");
      _builder.newLine();
      _builder.append("//\t\t\tresource.allContents");
      _builder.newLine();
      _builder.append("//\t\t\t\t.filter(Greeting)");
      _builder.newLine();
      _builder.append("//\t\t\t\t.map[name]");
      _builder.newLine();
      _builder.append("//\t\t\t\t.join(\',\'))");
      _builder.newLine();
      _builder.append("\t");
      _builder.append("}");
      _builder.newLine();
      _builder.append("}");
      _builder.newLine();
    }
  };
  this.fileAccessFactory.createXtendFile(_generatorStub,_client).writeto(this.getProjectConfig().getRuntime().getSrc());
}

org.eclipse.xtext.generator.GeneratorContext的实例源码
protected void doGenerate() {
    if (access == null) {
        dovalidation();
        access = fileSystemAccessprovider.get();

        access.setoutputConfigurations(outputConfigurations);
        for (Resource resource : sources) {
            if (resource instanceof XtextResource) {
                access.setProjectName(PROJECT_NAME);
                XtextResource xtextResource = (XtextResource) resource;
                IResourceServiceProvider resourceServiceProvider = xtextResource.getResourceServiceProvider();
                GeneratorDelegate generator = resourceServiceProvider.get(GeneratorDelegate.class);
                if (generator != null) {
                    GeneratorContext context = new GeneratorContext();
                    context.setCancelIndicator(CancelIndicator.NullImpl);
                    generator.generate(xtextResource,access,context);
                }
            }
        }
        generatedCode = newHashMap();
        for (final GeneratedFile e : access.getGeneratedFiles()) {
            if (e.getJavaClassName() != null) {
                generatedCode.put(e.getJavaClassName(),e.getContents().toString());
            }
        }
    }
}
protected void generate(final List<Resource> sourceResources) {
  final GeneratorContext context = new GeneratorContext();
  context.setCancelIndicator(CancelIndicator.NullImpl);
  for (final Resource it : sourceResources) {
    {
      String _lastSegment = it.getURI().lastSegment();
      String _plus = ("Starting generator for input: \'" + _lastSegment);
      String _plus_1 = (_plus + "\'");
      StandaloneBuilder.LOG.info(_plus_1);
      this.registerCurrentSource(it.getURI());
      final LanguageAccess access = this.languageAccess(it.getURI());
      final JavaIoFileSystemAccess fileSystemAccess = this.getFileSystemAccess(access);
      boolean _isWriteStorageResources = this.isWriteStorageResources();
      if (_isWriteStorageResources) {
        boolean _matched = false;
        if (it instanceof StorageAwareResource) {
          IResourceStorageFacade _resourceStorageFacade = ((StorageAwareResource)it).getResourceStorageFacade();
          boolean _tripleNotEquals = (_resourceStorageFacade != null);
          if (_tripleNotEquals) {
            _matched=true;
            ((StorageAwareResource)it).getResourceStorageFacade().saveResource(((StorageAwareResource)it),fileSystemAccess);
          }
        }
      }
      access.getGenerator().generate(it,fileSystemAccess,context);
    }
  }
}
protected void doGenerate() {
    if (access == null) {
        dovalidation();
        access = fileSystemAccessprovider.get();

        access.setoutputConfigurations(outputConfigurations);
        for (Resource resource : sources) {
            if (resource instanceof XtextResource) {
                access.setProjectName(PROJECT_NAME);
                XtextResource xtextResource = (XtextResource) resource;
                IResourceServiceProvider resourceServiceProvider = xtextResource.getResourceServiceProvider();
                GeneratorDelegate generator = resourceServiceProvider.get(GeneratorDelegate.class);
                if (generator != null) {
                    GeneratorContext context = new GeneratorContext();
                    context.setCancelIndicator(CancelIndicator.NullImpl);
                    generator.generate(xtextResource,e.getContents().toString());
            }
        }
    }
}
今天关于在 Python 3 中 generator.next() 是可见的吗?和python里的next的介绍到此结束,谢谢您的阅读,有关AttnGAN: Fine-Grained Text to Image Generation with Attentional Generative Adversarial Networks 笔记、go 模拟 python 的 generator、org.eclipse.xtext.generator.AbstractGenerator的实例源码、org.eclipse.xtext.generator.GeneratorContext的实例源码等更多相关知识的信息可以在本站进行查询。
本文标签:


