本文将为您提供关于很重要,paddingmargin百分比按照父元素width作为参照物的详细介绍,我们还将为您解释marginpadding百分比是参照的相关知识,同时,我们还将为您提供关于andr
本文将为您提供关于很重要,padding margin百分比按照父元素width作为参照物的详细介绍,我们还将为您解释marginpadding百分比是参照的相关知识,同时,我们还将为您提供关于android 中 padding 与 margin 的区别、Android:weight,margin,padding 详解实例、CAD中怎么旋转参照物和参照物缩放、css - 内联(行内)元素、块元素、margin、padding的实用信息。
本文目录一览:- 很重要,padding margin百分比按照父元素width作为参照物(marginpadding百分比是参照)
- android 中 padding 与 margin 的区别
- Android:weight,margin,padding 详解实例
- CAD中怎么旋转参照物和参照物缩放
- css - 内联(行内)元素、块元素、margin、padding
")
很重要,padding margin百分比按照父元素width作为参照物(marginpadding百分比是参照)
总结
以上是小编为你收集整理的很重要,padding margin百分比按照父元素width作为参照物全部内容。
如果觉得小编网站内容还不错,欢迎将小编网站推荐给好友。

android 中 padding 与 margin 的区别
android:padding 和 android:layout_margin 的区别,其实概念很简单,padding 是站在父 view 的角度描述问题,它规定它里面的内容必须与这个父 view 边界的距离。margin 则是站在自己的角度描述问题,规定自己和其他(上下左右)的 view 之间的距离,如果同一级只有一个 view,那么它的效果基本上就和 padding 一样了。例如我的 XML layout 代码如下:<?xml version="1.0" encoding="utf-8"?> <LinearLayout xmlns:android="http://schemas.android.com/apk/res/android" android:orientation="vertical" android:layout_width="fill_parent" android:layout_height="fill_parent" android:paddingLeft="10dip" android:paddingRight="10dip" android:paddingTop="10dip" android:paddingBottom="10dip" > <TextView android:layout_width="wrap_content" android:layout_height="wrap_content" android:background="#FF0000" android:text="@string/hello" android:paddingLeft="50dip" android:paddingRight="50dip" android:paddingTop="50dip" android:paddingBottom="50dip" android:layout_marginBottom="10dip" /> <TextView android:layout_width="wrap_content" android:layout_height="wrap_content" android:background="#FF0000" android:text="@string/hello" android:paddingLeft="50dip" android:paddingRight="50dip" android:paddingTop="50dip" android:paddingBottom="50dip" android:layout_marginBottom="10dip" /> <TextView android:layout_width="wrap_content" android:layout_height="wrap_content" android:background="#FF0000" android:text="@string/hello" android:paddingLeft="50dip" android:paddingRight="50dip" android:paddingTop="50dip" android:paddingBottom="50dip" android:layout_marginBottom="10dip" /> <TextView android:layout_width="wrap_content" android:layout_height="wrap_content" android:background="#FF0000" android:text="@string/hello" android:paddingLeft="50dip" android:paddingRight="50dip" android:paddingTop="50dip" android:paddingBottom="50dip" android:layout_marginBottom="10dip" /> </LinearLayout>
那么我会得到如下的效果,图上已经很明确的标出来区别咯。


Android:weight,margin,padding 详解实例

重量详解
weight是用来等比例划分区域的属性。
案例代码

<LinearLayout
xmlns:android="http://schemas.android.com/apk/res/android"
xmlns:tools="http://schemas.android.com/tools"
android:id="@+id/LinearLayout"
android:layout_width="match_parent"
android:layout_height="match_parent"
android:orientation="horizontal">

<LinearLayout
android:layout_width="0dp"
android:layout_height="match_parent"
android:background="#ADFF2F"
android:layout_weight="1"/>

<LinearLayout
android:layout_width="0dp"
android:layout_height="match_parent"
android:background="#DA70D6"
android:layout_weight="2"/>

</LinearLayout>
<LinearLayout
xmlns:android="http://schemas.android.com/apk/res/android"
xmlns:tools="http://schemas.android.com/tools"
android:id="@+id/LinearLayout"
android:layout_width="match_parent"
android:layout_height="match_parent"
android:orientation="horizontal">

<LinearLayout
android:layout_width="0dp"
android:layout_height="match_parent"
android:background="#ADFF2F"
android:layout_weight="1"/>

<LinearLayout
android:layout_width="0dp"
android:layout_height="match_parent"
android:background="#DA70D6"
android:layout_weight="1"/>

</LinearLayout>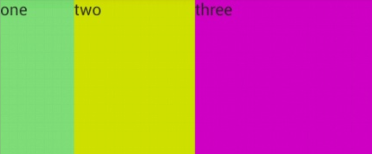
<LinearLayout
xmlns:android="http://schemas.android.com/apk/res/android"
  xmlns:tools="http://schemas.android.com/tools"
  android:id="@+id/LinearLayout"
  android:layout_width="match_parent"
  android:layout_height="match_parent"
  android:orientation="horizontal" >

  <TextView
  android:layout_weight="1"
  android:layout_width="wrap_content"
  android:layout_height="match_parent"
  android:text="one"
  android:background="#98FB98"
  />
  <TextView
  android:layout_weight="2"
  android:layout_width="wrap_content"
  android:layout_height="match_parent"
  android:text="two"
  android:background="#FFFF00"
 />
 <TextView
 android:layout_weight="3"
 android:layout_width="wrap_content"
 android:layout_height="match_parent"
 android:text="three"
 android:background="#FF00FF"
 />

</LinearLayout>
<LinearLayout
xmlns:android="http://schemas.android.com/apk/res/android"
  xmlns:tools="http://schemas.android.com/tools"
  android:id="@+id/LinearLayout"
  android:layout_width="match_parent"
  android:layout_height="match_parent"
  android:orientation="horizontal" >

  <TextView
  android:layout_weight="1"
  android:layout_width="match_parent"
  android:layout_height="match_parent"
  android:text="one"
  android:background="#98FB98"
  />
  <TextView
  android:layout_weight="2"
  android:layout_width="match_parent"
  android:layout_height="match_parent"
  android:text="two"
  android:background="#FFFF00"
 />
 <TextView
 android:layout_weight="3"
 android:layout_width="match_parent"
 android:layout_height="match_parent"
 android:text="three"
 android:background="#FF00FF"
 />

</LinearLayout>
为什么出现 2:1 的案例呢 3 怎么就不见了呢?
- 每个宽度为
match_parent,屏幕为 1,那么屏幕就是 1-3 = -2 个math_parent - 计算方法,
1 - 2 * (1/6) = 2/3,1 - 2 * (2/6) = 1/3, 1 - 2 * (3/6) = 0结果是一占了两份,两占了一份,三什么都没有
margin,padding详解
margin代表是偏移,表示组件离容器偏移量,margin针对的是容器中的组件元素;padding代表是填充,填充的对象针对的是组件中的元素。
<RelativeLayout
xmlns:android="http://schemas.android.com/apk/res/android"
  xmlns:tools="http://schemas.android.com/tools"
  android:layout_width="match_parent"
  android:layout_height="match_parent">

  <Button
  android:id="@+id/btn1"
  android:layout_height="wrap_content"
  android:layout_width="wrap_content"
  android:text="Button"/>
  <Button
  android:paddingLeft="100dp"
  android:layout_height="wrap_content"
  android:layout_width="wrap_content"
  android:text="Button"
  android:layout_toRightOf="@id/btn1"/>

  <Button
  android:id="@+id/btn2"
  android:layout_height="wrap_content"
  android:layout_width="wrap_content"
  android:text="Button"
  android:layout_alignParentBottom="true"/>
  <Button
  android:layout_marginLeft="100dp"
  android:layout_height="wrap_content"
  android:layout_width="wrap_content"
  android:text="Button"
  android:layout_toRightOf="@id/btn2"/>

</RelativeLayout>
结语
- 本文主要讲解 机器人:重量,余量,填充详解实例
- 下面我将继续对其他知识深入讲解,有兴趣可以继续关注
- 小礼物走一走或点赞

本文同步分享在 博客 “程序员哆啦 A 梦”(CSDN)。
如有侵权,请联系 support@oschina.cn 删除。
本文参与 “OSC 源创计划”,欢迎正在阅读的你也加入,一起分享。

CAD中怎么旋转参照物和参照物缩放
CAD绘图中会遇到下图类似的需求:对下面的图块进行旋转和比例缩放,使得图块中的红线与上面的红线平行并且长度相等。当两条红线中任意一条的转角和长度不为整数(存在若干位小数)时,无法在命令中通过输入给出足够精确的旋转角度和比例因子数值,此时可以通过参照选项进行实测并将结果直接传递给命令,从而保证符合精度要求的旋转和比例缩放。以下介绍参照旋转和参照缩放的具体操作过程。

一、对图块进行旋转:
1、命令行输入ro(命令全名rotate),选择图块对象,指定块中直线的左端点为基点(也可选择其他点,这里为方便选择此点),要求旋转角度时键入R(参照选项),点取块中直线的两个端点获取参照角度。

2、要求新角度时键入P(点选项),点取图块外直线的两个端点获得新角度。旋转命令通过以上传入的实测参照角和新角度,便可精确地计算出需要的旋转角度并对图块进行旋转。

3、旋转命令结束后,可以看到块内快外两条直线已经平行了。

二、对图块进行比例缩放:
1、命令行输入sc(命令全名scale),选择图块对象,指定块中直线的左端点为基点(也可选择其他点,这里为方便选择此点),要求比例因子时键入R(参照选项),点取块中直线的两个端点获取参照长度。

2、要求新长度时键入P(点选项),点取图块外直线的两个端点获得新长度。比例缩放命令通过以上传入的实测参照长度和新长度,便可精确地计算出需要的缩放因子并对图块进行缩放。

3、比例缩放命令结束后,可以看到块内快外两条直线的长度已经相等了。

元素、块元素、margin、padding")
css - 内联(行内)元素、块元素、margin、padding
css - 内联(行内)元素、块元素、margin、padding
block 元素的特点:
总是在新行上开始;
高度,行高以及顶和底边距都可控制;
宽度缺省是它的容器的 100%,除非设定一个宽度。<div>, <p>, <h1>, <form>, <ul> 和 <li > 是块元素的例子。
inline 元素的特点:
和其他元素都在一行上;
高,行高及顶和底边距不可改变;
宽度就是它的文字或图片的宽度,不可改变。<span>, <a>, <label>, <input>, <img>, <strong> 和 < em > 是 inline 元素的例子
我们来详细了解它们的情况。
块元素 (block element) 一般是其他元素的容器元素,块元素一般都从新行开始,它可以容纳内联元素和其他块元素,常见块元素是段落标签 ''P"。“form" 这个块元素比较特殊,它只能用来容纳其他块元素。
如果没有 css 的作用,块元素会顺序以每次另起一行的方式一直往下排。而有了 css 以后,我们可以改变这种 html 的默认布局模式,把块元素摆放到你想要的位置上去。而不是每次都愚蠢的另起一行。需要指出的是,table 标签也是块元素的一种,table based layout 和 css based layout 从一般使用者(不包括视力障碍者、盲人等)的角度来看这两种布局,除了页面载入速度的差别外,没有其他的差别。但是如果普通使用者不经意点了查看页面源代码按钮后,两者所表现出来的差异就非常大了。基于良好重构理念设计的 css 布局页面源码,至少也能让没有 web 开发经验的普通使用者把内容快速的读懂。从这个角度来说,css layout code 应该有更好的美学体验。
你能够把块容器元素 div 想象成一个个 box,或者如果你玩过剪贴文载的话,那就更加容易理解了。我们先把需要的文章从各种报纸、杂志总剪 下来。每块剪下来的内容就是一个 block。然后我们把这些纸块按照自己的排版意图,用胶水重新贴到一张空白的新纸上。这样就形成了你自己独特的文摘快报了。作为一种技术的延伸,网页布局设计也遵循了同样的模式。
内联元素 (inline element) 一般都是基于语义级 (semantic) 的基本元素。内联元素只能容纳文本或者其他内联元素,常见内联元素 “a”。
需要说明的是:inline element 的中文叫法,有多种内联元素、内嵌元素、行内元素、直进式元素。基本上没有统一的翻译,爱怎么叫怎么叫吧。另外提到内联元素,我们会想到有个 display 的属性是 display:inline; 这个属性能够修复著名的 IE 双倍浮动边界问题。
块元素 (block element) 和内联元素 (inline element) 都是 html 规范中的概念。块元素和内联元素的基本差异是块元素一般都从新行开始。而当加入了 css 控制以后,块元素和内联元素的这种属性差异就不成为差异了。比如,我们完全可以把内联元素 cite 加上 display:block 这样的属性,让他也有每次都从新行开始的属性。
A:行内就是在一行内的元素,只能放在行内;块级元素,就是一个四方块,可以放在页面上任何地方。
B:说白了,行内元素就好像一个单词;块级元素就好像一个段落,如果不另加定义的话,它将独立一行出现。
C:一般的 块级元素诸如段落 <p>、标 题 < h1><h2>…、列表,<ul><ol><li> 、表格 < table>、表单 < form>、DIV<div > 和 BODY<body > 等元素。而内联元素则如:表单元素 < input>、超级链接 < a>、图像 < img>、<span> ……..
D:块级无素的显著特点是:每个块级元素都是从一个新行开始显示,而且其后的无素也需另起一行进行显示。
E:<span> 在 CSS 定义中属于一个行内元素,而 < div > 是块级元素。
用容器这一词会更容易形象理解它们的存在与用途,行内元素相当一个小容器,而 <div> 相当于一个大容器,大容器当然可以放一个小容器 了。<span > 就是小容器。
块元素 (block element) 一般是其他元素的容器元素,块元素一般都从新行开始,它可以容纳内联元素和其他块元素,常见块元素是段落标签’P”。“form” 这个块元素比较特殊,它只能用来容纳其他块元素。
display:inline
它可以让行内显示为块的元素,变为行内显示,例如
DIV1
DIV2
这里 DIV1 和 DIV2 分别占一行,但是你给他们加上属性后变了
DIV1 DIV2
DIV1 和 DIV2 这时候显示在同一行了
和 display:inline 对应的是 display:block,block 会让应用了该 CSS 属性的 HTML 标记变成块级别元素,例如 SPAN 是行内显示的,但是你加了 display:block 属性就不一样了
[font] SPAN1 [/font]
block 一般一个块占一行,除非 float
inline 是自动排为一行,就象段内的文字一样,可成为多行。
display:inline 比较经典的用法是用在 <ul> 下的 <li> 中
display:inline 对应不显示为 display:none
display:block 对应不显示为 hidden
说通俗点 样式为 none 的元素不占位置,而样式为 hidden 的元素虽然不显示但还是占地方
inline-block 的元素特点:
display:inline-block 将对象呈递为内联对象,但是对象的内容作为块对象呈递。旁边的内联对象会被呈递在同一行内,允许空格。
将对象呈递为内联对象,但是对象的内容作为块对象呈递。旁边的内联对象会被呈递在同一行内,允许空格。(准确地说,应用此特性的元素呈现为内联对象,周围元素保持在同一行,但可以设置宽度和高度地块元素的属性)
并不是所有浏览器都支持此属性,目前支持的浏览器有:Opera、Safari 在 IE 中对内联元素使用 display:inline-block,IE 是不识别的,但使用 display:inline-block 在 IE 下会触发 layout,从而使内联元素拥有了 display:inline-block 属性的表症。从上面的这个分析,也不难理解为什么 IE 下,对块元素设置 display:inline-block 属性无法实现 inline-block 的效果。这时块元素仅仅是被 display:inline-block 触发了 layout,而它本就是行布局,所以触发后,块元素依然还是行布局,而不会如 Opera 中块元素呈递为内联对象。
IE 下块元素如何实现 display:inline-block 的效果?
有两种方法:
1、先使用 display:inline-block 属性触发块元素,然后再定义 display:inline,让块元素呈递为内联对象(两个 display 要先后放在两个 CSS 声明中才有效果,这是 IE 的一个经典 bug,如果先定义了 display:inline-block,然后再将 display 设回 inline 或 block,layout 不会消失)。代码如下(... 为省略的其他属性内容):
div {display:inline-block;...}
div {display:inline;}
2、直接让块元素设置为内联对象呈递(设置属性 display:inline),然后触发块元素的 layout(如:zoom:1 等)。代码如下:
div {display:inline; zoom:1;...}
块元素 (block element)
◎ address - 地址
◎ blockquote - 块引用
◎ center - 举中对齐块
◎ dir - 目录列表
◎ div - 常用块级容易,也是 css layout 的主要标签
◎ dl - 定义列表
◎ fieldset - form 控制组
◎ form - 交互表单
◎ h1 - 大标题
◎ h2 - 副标题
◎ h3 - 3 级标题
◎ h4 - 4 级标题
◎ h5 - 5 级标题
◎ h6 - 6 级标题
◎ hr - 水平分隔线
◎ isindex - input prompt
◎ menu - 菜单列表
◎ noframes - frames 可选内容,(对于不支持 frame 的浏览器显示此区块内容
◎ noscript - 可选脚本内容(对于不支持 script 的浏览器显示此内容)
◎ ol - 排序表单
◎ p - 段落
◎ pre - 格式化文本
◎ table - 表格
◎ ul - 非排序列表 内联元素 (inline element)
◎ a - 锚点◎ abbr - 缩写
◎ acronym - 首字
◎ b - 粗体 (不推荐)
◎ bdo - bidi override
◎ big - 大字体
◎ br - 换行
◎ cite - 引用
◎ code - 计算机代码 (在引用源码的时候需要)
◎ dfn - 定义字段
◎ em - 强调
◎ font - 字体设定 (不推荐)
◎ i - 斜体
◎ img - 图片
◎ input - 输入框
◎ kbd - 定义键盘文本
◎ label - 表格标签
◎ q - 短引用
◎ s - 中划线 (不推荐)
◎ samp - 定义范例计算机代码
◎ select - 项目选择
◎ small - 小字体文本
◎ span - 常用内联容器,定义文本内区块
◎ strike - 中划线
◎ strong - 粗体强调
◎ sub - 下标
◎ sup - 上标
◎ textarea - 多行文本输入框
◎ tt - 电传文本
◎ u - 下划线
◎ var - 定义变量
按 ie 的说法,margin,padding,border 这些是 layout 属性。似乎不该用在 inline 元素上。
但 css2.1 规范里有说明:
margin 适用于
all elements except elements with table display types other than table-caption, table and inline-table
padding 适用于
all elements except table-row-group, table-header-group, table-footer-group, table-row, table-column-group and table-column
不过,
margin-top/bottom 对 non-replaced inline 元素无效(have no effect on non-replaced inline elements)。
margin-left/right 对 non-replaced inline 元素会起作用,但当 non-replaced inline 是 a 元素时,ie 下使用 margin-left/right 会有一个 a:active 虚框错位的小问题。
http://bbs.blueidea.com/thread-2927667-1-1.html
所以我觉得对 non-replaced inline 元素使用 margin 不大好。
对 replaced inline 元素(img,textarea,button 这些)的使用 margin 同 block 上效果也不大相同。
http://www.cssass.com/blog/index.php/2009/121.html
padding 也差不多。
padding-top/bottom 用在 non-replaced inline 元素上,我们也看不出效果。
最后,感谢蓝色代码 经典论坛,感谢百度百科,感谢意祥的 未眠花与蝴蝶,感谢
lzy19881227,感谢 angelox……
关于很重要,padding margin百分比按照父元素width作为参照物和marginpadding百分比是参照的问题就给大家分享到这里,感谢你花时间阅读本站内容,更多关于android 中 padding 与 margin 的区别、Android:weight,margin,padding 详解实例、CAD中怎么旋转参照物和参照物缩放、css - 内联(行内)元素、块元素、margin、padding等相关知识的信息别忘了在本站进行查找喔。
本文标签:


