在本文中,您将会了解到关于Vue3双向绑定CompositionAPI与Firestore文档字段的新资讯,同时我们还将为您解释vue双向绑定使用的相关在本文中,我们将带你探索Vue3双向绑定Comp
在本文中,您将会了解到关于Vue 3 双向绑定 Composition API 与 Firestore 文档字段的新资讯,同时我们还将为您解释vue双向绑定使用的相关在本文中,我们将带你探索Vue 3 双向绑定 Composition API 与 Firestore 文档字段的奥秘,分析vue双向绑定使用的特点,并给出一些关于@vue/composition-api 解析、Firebase Firestore onSnapshot 在使用 Firestore FieldValue for Timestamp 时为空、Flutter FirebaseFirestore [cloud_firestore/failed-precondition] 问题、SpringMVC常用注解@Controller,@Service,@repository,@Component,@Autowired,@Resource,@RequestMapping的实用技巧。
本文目录一览:- Vue 3 双向绑定 Composition API 与 Firestore 文档字段(vue双向绑定使用)
- @vue/composition-api 解析
- Firebase Firestore onSnapshot 在使用 Firestore FieldValue for Timestamp 时为空
- Flutter FirebaseFirestore [cloud_firestore/failed-precondition] 问题
- SpringMVC常用注解@Controller,@Service,@repository,@Component,@Autowired,@Resource,@RequestMapping
")
Vue 3 双向绑定 Composition API 与 Firestore 文档字段(vue双向绑定使用)
如何解决Vue 3 双向绑定 Composition API 与 Firestore 文档字段?
编辑:我需要弄清楚如何从 setup() 函数内的文档对象获取数据。问题是文档对象是异步的。
我是 Vue 的新手,目前正在研究双向数据绑定。
182|Beautiful Creatures|Kami Garcia,Margaret Stohl
<input type="text" name="title" placeholder="Title" v-model="title"https://www.jb51.cc/tag/wenjian/" target="_blank">文件:
document
解决方法
暂无找到可以解决该程序问题的有效方法,小编努力寻找整理中!
如果你已经找到好的解决方法,欢迎将解决方案带上本链接一起发送给小编。
小编邮箱:dio#foxmail.com (将#修改为@)

@vue/composition-api 解析
前言
组合式 API 是 vue3 提出的一个新的开发方式,而在 vue2 中我们可以使用新的组合式 API 进行组件开发。本篇通过一个例子,来分析这个插件是如何提供功能。
关于该插件的安装、使用,可以直接阅读文档。
安装
我们从最开始安装分析,一探究竟。
vue.use
按照文档所提到的,我们必须通过 Vue.use () 进行安装:
// vue.use 安装
import Vue from ''vue''
import VueCompositionAPI from ''@vue/composition-api''
Vue.use(VueCompositionAPI)
复制代码
我们先看入口文件:
// index.js
import type Vue from ''vue''
import { Data, SetupFunction } from ''./component''
import { Plugin } from ''./install''
export default Plugin
// auto install when using CDN
if (typeof window !== ''undefined'' && window.Vue) {
window.Vue.use(Plugin)
}
复制代码
可以知道我们 Vue.use 时,传入的就是 install 文件中的 Plugin 对象。
// install.ts 折叠源码
export function install(Vue: VueConstructor) {
if (isVueRegistered(Vue)) {
if (__DEV__) {
warn(
''[vue-composition-api] already installed. Vue.use(VueCompositionAPI) should be called only once.''
)
}
return
}
if (__DEV__) {
if (Vue.version) {
if (Vue.version[0] !== ''2'' || Vue.version[1] !== ''.'') {
warn(
`[vue-composition-api] only works with Vue 2, v${Vue.version} found.`
)
}
} else {
warn(''[vue-composition-api] no Vue version found'')
}
}
Vue.config.optionMergeStrategies.setup = function (
parent: Function,
child: Function
) {
return function mergedSetupFn(props: any, context: any) {
return mergeData(
typeof parent === ''function'' ? parent(props, context) || {} : undefined,
typeof child === ''function'' ? child(props, context) || {} : undefined
)
}
}
setVueConstructor(Vue)
mixin(Vue)
}
export const Plugin = {
install: (Vue: VueConstructor) => install(Vue),
}
复制代码
install
通过上面的代码和 Vue.use 可知,我们安装时其实就是调用了 install 方法,先分析一波 install。根据代码块及功能可以分成三个部分:
- 前两个大 if 的开发 check 部分
- 关于 setup 合并策略
- 通过 mixin 混入插件关于 组合式 API 的处理逻辑
第一部分中的第一个 if 是为了确保该 install 方法只被调用一次,避免浪费性能;第二个 if 则是确保 vue 版本为 2.x。不过这里有个关于第一个 if 的小问题:多次注册插件时,Vue.use 自己本身会进行重复处理 —— 安装过的插件再次注册时,不会调用 install 方法(Vue.use 代码见下)。那么这个 if 的目的是啥?
// Vue.use 部分源码
Vue.use = function (plugin: Function | Object) {
const installedPlugins = (this._installedPlugins || (this._installedPlugins = []))
if (installedPlugins.indexOf(plugin) > -1) {
return this
}
// additional parameters
const args = toArray(arguments, 1)
args.unshift(this)
if (typeof plugin.install === ''function'') {
plugin.install.apply(plugin, args)
} else if (typeof plugin === ''function'') {
plugin.apply(null, args)
}
installedPlugins.push(plugin)
return this
}
复制代码
根据上面代码可知 Vue.use 实际上还是传入 vue 并调用插件的 install 方法,那么如果有大神(或者是奇葩?)绕过 Vue.use 直接调用,那么这个 if 的判断就生效了。如下方代码,此时第二个 install 会判断重复后,抛出错误
// 直接调用 install
import Vue from ''vue''
import VueCompositionAPI from ''@vue/composition-api''
import App from ''./App.vue''
Vue.config.productionTip = false
VueCompositionAPI.install(Vue)
VueCompositionAPI.install(Vue)
复制代码
报错:

第二部分的合并策略是 “Vue.config.optionMergeStrategies” 这个代码块。Vue 提供的这个能力很生僻,我们日常的开发中几乎不会主动接触到。先上文档:
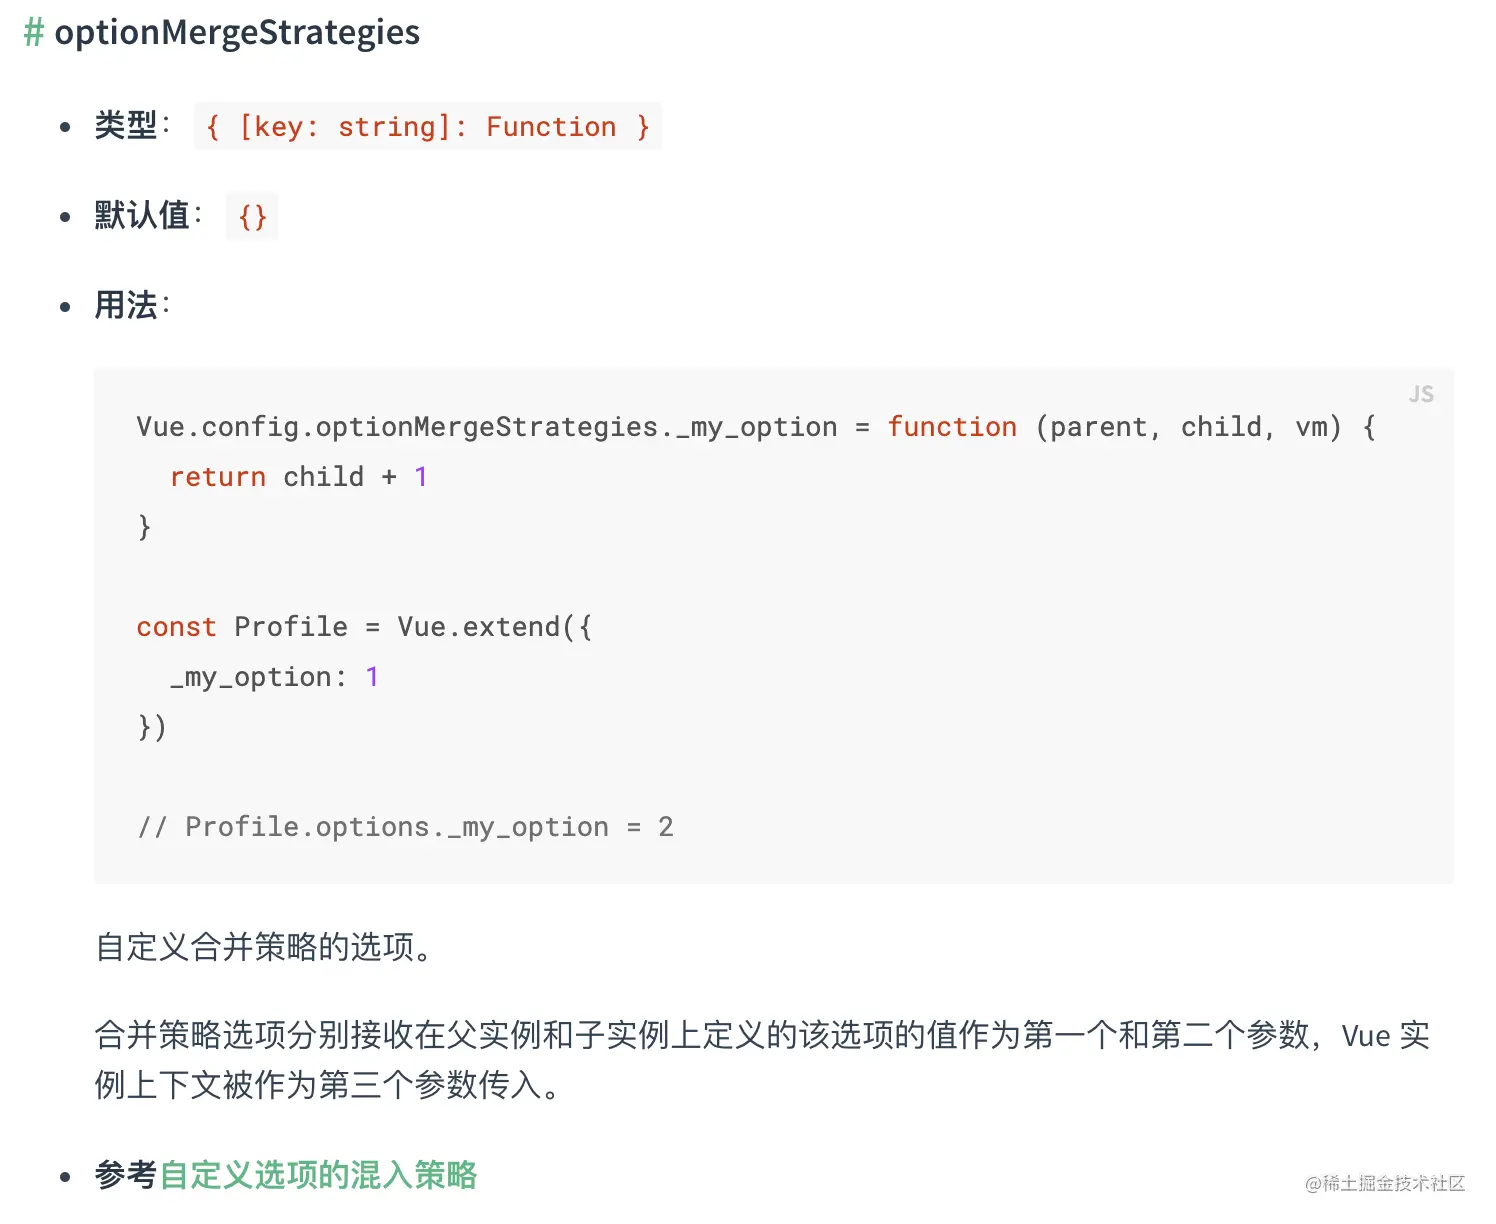
这是用来定义属性的合并行为。比如例子中的 extend 在调用时,会执行 mergeOptions。
// Vue.extend
Vue.extend = function (extendOptions) {
const Super = this
extendOptions = extendOptions || {}
Sub.options = mergeOptions(
Super.options,
extendOptions
)
}
复制代码
而 mergeOptions 里关于 _my_option 的相关如下:
const strats = config.optionMergeStrategies
function mergeOptions (parent, child, vm){
for (key in parent) {
mergeField(key)
}
for (key in child) {
if (!hasOwn(parent, key)) {
mergeField(key)
}
}
function mergeField (key) {
const strat = strats[key] || defaultStrat
options[key] = strat(parent[key], child[key], vm, key)
}
}
复制代码
这里的 parent 就是 Super.options 也就是 Vue.options,而 child 就是 extendOptions 也就是我们传入的 {_my_option: 1}。在这里使用了两个 for 循环,确保父子元素种所有的 key 都会执行到 mergeField,而第二个 for 循环中的 if 判断确保不会执行两次,保证了正确性及性能。而 mergeField 则是最终执行策略的地方。从 strats 中获取到我们定义的方法,把对应参数传入并执行,在这里就是:
// demo执行
strat(undefined, 1, vm, ''_my_option'') // return 2
复制代码
顺便一提,Vue.mixin 的实现就是 mergeOptions,也就是说当我们使用了 mixin 且里面具有 setup 属性时,会执行到上述合并策略。
Vue.mixin = function (mixin) {
this.options = mergeOptions(this.options, mixin)
return this
}
复制代码
而我们插件中相关的策略也很简单,获取好定义的父子 setup,然后合并成一个新的,在调用时会分别执行父子 setup,并通过 mergeData 方法合并返回:
// optionMergeStrategies.setup
Vue.config.optionMergeStrategies.setup = function (
parent: Function,
child: Function
) {
return function mergedSetupFn(props: any, context: any) {
return mergeData(
typeof parent === ''function'' ? parent(props, context) || {} : undefined,
typeof child === ''function'' ? child(props, context) || {} : undefined
)
}
}
复制代码
第三部分则是通过调用 mixin 方法向 vue 中混入一些事件,下面是 mixin 的定义:
function mixin(Vue) {
Vue.mixin({
beforeCreate: functionApiInit,
mounted(this: ComponentInstance) {
updateTemplateRef(this)
},
updated(this: ComponentInstance) {
updateTemplateRef(this)
}
})
function functionApiInit() {}
function initSetup() {}
// 省略...
}
复制代码
可以看到 mixin 内部调用了 Vue.mixin 来想 beforeCreate、mounted、updated 等生命周期混入事件。这样就完成 install 的执行, Vue.use (VueCompositionAPI) 也到此结束。
初始化 — functionApiInit
functionApiInit 执行
我们知道在 new Vue 时,会执行组件的 beforeCreate 生命周期。此时刚才通过 Vue.mixin 注入的函数 “functionApiInit” 开始执行。
function Vue (options) {
this._init(options)
}
Vue.prototype._init = function (options) {
initLifecycle(vm)
initEvents(vm)
initRender(vm)
callHook(vm, ''beforeCreate'') // 触发 beforeCreate 生命周期,执行 functionApiInit
initInjections(vm) // resolve injections before data/props
initState(vm)
initProvide(vm) // resolve provide after data/props
callHook(vm, ''created'')
}
复制代码
该方法也很清晰,分别暂存了组件最开始的 render 方法和 data 方法(我们平常写的 data 是一个函数),然后在这基础上又扩展了一下这两个方法,达到类似钩子的目的。
function functionApiInit(this: ComponentInstance) {
const vm = this
const $options = vm.$options
const { setup, render } = $options
if (render) {
// keep currentInstance accessible for createElement
$options.render = function (...args: any): any {
return activateCurrentInstance(vm, () => render.apply(this, args))
}
}
if (!setup) {
return
}
if (typeof setup !== ''function'') {
if (__DEV__) {
warn(
''The "setup" option should be a function that returns a object in component definitions.'',
vm
)
}
return
}
const { data } = $options
// wrapper the data option, so we can invoke setup before data get resolved
$options.data = function wrappedData() {
initSetup(vm, vm.$props)
return typeof data === ''function''
? (data as (
this: ComponentInstance,
x: ComponentInstance
) => object).call(vm, vm)
: data || {}
}
}
复制代码
虽然是先扩展的 render,但在 new Vue 的实际执行中会优先执行下方扩展的方法 “wrappedData”。因为 data 的执行是在 new Vue 时发生,而 render 的执行在 $mount 中。所以我们这里就按照执行顺序来看看如何扩展我们的 wrappedData。
wrappedData 这里只是简单执行了 initSetup 方法,对原先的 data 做了判断。这里是因为 Vue 执行时拿到的 data 已经是 wrappedData 这个函数而不是用户编写的 data,所以关于原 data 的处理移交在了 wrappedData 中。可以说 99% 的逻辑都在 initSetup 中。我们接下来看这个方法。
setup 调用及处理
这块是通过 initSetup 函数实现的,代码很长且仅有几行是这里不用关心的(可自行研究),整体上可以跟着注释走一遍。
function initSetup(vm: ComponentInstance, props: Record<any, any> = {}) {
// 获取定义好的 setup
const setup = vm.$options.setup!
// 创建 setup 方法接收的第二个参数 context,主流程中使用不上,先忽略
const ctx = createSetupContext(vm)
// fake reactive for `toRefs(props)`
// porps 相关,主流成可先忽略(毕竟可以不写 props...)
def(props, ''__ob__'', createObserver())
// resolve scopedSlots and slots to functions
// slots 相关,同 props 先忽略
// @ts-expect-error
resolveScopedSlots(vm, ctx.slots)
let binding: ReturnType<SetupFunction<Data, Data>> | undefined | null
// 执行 setup
activateCurrentInstance(vm, () => {
// make props to be fake reactive, this is for `toRefs(props)`
binding = setup(props, ctx)
})
// 以下都是根据 setup 返回值,进行的一些处理
if (!binding) return
if (isFunction(binding)) { // setup 可以返回一个渲染函数(render)
// keep typescript happy with the binding type.
const bindingFunc = binding
// keep currentInstance accessible for createElement
// 获取到渲染函数后,手动添加再 vue 实例上
vm.$options.render = () => {
// @ts-expect-error
resolveScopedSlots(vm, ctx.slots)
return activateCurrentInstance(vm, () => bindingFunc())
}
return
} else if (isPlainObject(binding)) { // setup 返回的是一个普通对象
if (isReactive(binding)) { // 如果返回的是通过 reactive 方法定义的对象,需要通过 toRefs 结构
binding = toRefs(binding) as Data
}
// 用于 slots 及 $refs ,先忽略
vmStateManager.set(vm, ''rawBindings'', binding)
const bindingObj = binding
// 遍历返回值,做一些处理
Object.keys(bindingObj).forEach((name) => {
let bindingValue: any = bindingObj[name]
if (!isRef(bindingValue)) {
if (!isReactive(bindingValue)) {
if (isFunction(bindingValue)) {
bindingValue = bindingValue.bind(vm)
} else if (!isObject(bindingValue)) {
bindingValue = ref(bindingValue)
} else if (hasReactiveArrayChild(bindingValue)) {
// creates a custom reactive properties without make the object explicitly reactive
// NOTE we should try to avoid this, better implementation needed
customReactive(bindingValue)
}
} else if (isArray(bindingValue)) {
bindingValue = ref(bindingValue)
}
}
asVmProperty(vm, name, bindingValue)
})
return
}
// 不是对象和方法时,在开发环境下抛错
if (__DEV__) {
assert(
false,
`"setup" must return a "Object" or a "Function", got "${Object.prototype.toString
.call(binding)
.slice(8, -1)}"`
)
}
}
复制代码
我们先聚焦到 setup 的执行。setup 包裹在 activateCurrentInstance 方法中,activateCurrentInstance 目的是为了设置当前的实例。类似我们平常写的交换 a、b 变量的值。setup 在调用前,会先获取 currentInstance 变量并赋值给 preVm,最开始时 currentInstance 为 null。接着再把 currentInstance 设置成当前的 vue 实例,于是我们变可以在 setup 通过 插件提供的 getCurrentInstance 方法获取到当前实例。在执行完毕后,又通过 setCurrentInstance (preVm) 把 currentInstance 重置为 null。所以印证了文档中所说的,只能在 setup 及生命周期(不在本篇重点)中使用 getCurrentInstance 方法。
// setup执行
activateCurrentInstance(vm, () => {
// make props to be fake reactive, this is for `toRefs(props)`
binding = setup(props, ctx)
})
function activateCurrentInstance(vm, fn, onError) {
let preVm = getCurrentVue2Instance()
setCurrentInstance(vm)
try {
return fn(vm)
} catch (err) {
if (onError) {
onError(err)
} else {
throw err
}
} finally {
setCurrentInstance(preVm)
}
}
let currentInstance = null
function setCurrentInstance(vm) {
// currentInstance?.$scopedSlots
currentInstance = vm
}
function getCurrentVue2Instance() {
return currentInstance
}
function getCurrentInstance() {
if (currentInstance) {
return toVue3ComponentInstance(currentInstance)
}
return null
}
复制代码
这里有个思考,为什么需要在最后把 currentInstance 设置为 null?我们写了一个点击事件,并在相关的事件代码里调用了 getCurrentInstance 。如果在 setup 调用重置为 null ,那么在该事件里就可能导致获取到错误的 currentInstance。于是就置为 null 用来避免这个问题。(个人想法,期待指正)。
setup 内部可能会执行的东西有很多,比如通过 ref 定义一个响应式变量,这块放在后续单独说。
当获取完 setup 的返回值 binding 后,会根据其类型来做处理。如果返回函数,则说明这个 setup 返回的是一个渲染函数,便把放回值赋值给 vm.$options.render 供挂载时调用。如果返回的是一个对象,则会做一些相应式处理,这块内容和响应式相关,我们后续和响应式一块看。
// setup 返回对象
if (isReactive(binding)) {
binding = toRefs(binding) as Data
}
vmStateManager.set(vm, ''rawBindings'', binding)
const bindingObj = binding
Object.keys(bindingObj).forEach((name) => {
let bindingValue: any = bindingObj[name]
if (!isRef(bindingValue)) {
if (!isReactive(bindingValue)) {
if (isFunction(bindingValue)) {
bindingValue = bindingValue.bind(vm)
} else if (!isObject(bindingValue)) {
bindingValue = ref(bindingValue)
} else if (hasReactiveArrayChild(bindingValue)) {
// creates a custom reactive properties without make the object explicitly reactive
// NOTE we should try to avoid this, better implementation needed
customReactive(bindingValue)
}
} else if (isArray(bindingValue)) {
bindingValue = ref(bindingValue)
}
}
asVmProperty(vm, name, bindingValue)
})
复制代码
我们这里只看重点函数 “asVmProperty”。我们知道 setup 返回的是一个对象 (赋值给了 binding /bindingObj),且里面的所有属性都能在 vue 的其他选项中使用。那么这块是如何实现的呢?
访问 setup 返回值 — asVmProperty 实现
这个函数执行后,我们就可以在 template 模版及 vue 选项中访问到 setup 的返回值,的下面是 “asVmProperty” 这个函数的实现:
function asVmProperty(vm, propName, propValue) {
const props = vm.$options.props
if (!(propName in vm) && !(props && hasOwn(props, propName))) {
if (isRef(propValue)) {
proxy(vm, propName, {
get: () => propValue.value,
set: (val: unknown) => {
propValue.value = val
},
})
} else {
proxy(vm, propName, {
get: () => {
if (isReactive(propValue)) {
;(propValue as any).__ob__.dep.depend()
}
return propValue
},
set: (val: any) => {
propValue = val
},
})
}
}
}
function proxy(target, key, { get, set }) {
Object.defineProperty(target, key, {
enumerable: true,
configurable: true,
get: get || noopFn,
set: set || noopFn,
})
}
复制代码
函数很短,这里有 3 个处理逻辑:
- 普通属性的 get 和 set 正常返回
- 如果是 ref 类型的属性(通过 ref 创建),通过 vm.xxx 访问 / 修改时,访问 / 修改 ref 的 value 属性
- 代理 reactive 类型的属性 (通过 reactive 创建),reactive 返回的是一个响应式对象。当访问这个对象时, 需要调用 响应式对象种的 depend 收集 watcher(观察者),以便数据更新时通知 watcher 进行更新。
总之 asVmProperty 是拿到 setup 返回值中的一个键值对后,再通过 Object.defineProperty 劫持了 this(是 vm,也就是组件实例)中访问改键值对的 get 和 set,这样我们便可以通过 this.xxx 访问到 setup 中 return 出去的属性。
而模版访问也同理,因为 template 编译成 render 后,上面的变量都实际会编译成 _vm.xxx,而 _vm 就是 this ,也就是组件实例。
结语
创作不易,如果对大家有所帮助,希望大家点赞支持,有什么问题也可以在评论区里讨论~
如果你觉得这篇文章对你有点用的话,麻烦请给我们的开源项目点点 star:
http://github.crmeb.net/u/defu
不胜感激 !
来自 “开源独尊” ,链接:
https://ym.baisou.ltd/post/847.html

Firebase Firestore onSnapshot 在使用 Firestore FieldValue for Timestamp 时为空
这是由于 Firebase 调用的 "latency compensation":
您应用中的本地写入将立即调用快照侦听器。
这是因为一个称为“延迟补偿”的重要功能。
当您执行写入时,您的听众将收到新的通知
数据发送到后端之前的数据。
你的快照是在离开你的应用之前触发的,时间戳字段为null,然后在到达后端并设置时间戳后再次触发。
要区分两者,请使用文档中所述的字段 metadata.hasPendingWrites。
![Flutter FirebaseFirestore [cloud_firestore/failed-precondition] 问题](http://www.gvkun.com/zb_users/upload/2025/03/7ea8e75c-7b5c-4049-9517-acb17b2d4df91742095359197.jpg "Flutter FirebaseFirestore [cloud_firestore/failed-precondition] 问题")
Flutter FirebaseFirestore [cloud_firestore/failed-precondition] 问题
如何解决Flutter FirebaseFirestore [cloud_firestore/failed-precondition] 问题?
我正在尝试执行在 where 语句中包含 orderBy 和 FirebaseFirestore.instance.collection(''collectionName'').where(''fieldName1'',isEqualTo: ''value1'').orderBy(''fieldName1'',descending:true).snapshots() 的查询。我还为上述语句中定义的两个字段创建了一个复合索引。
不过,我收到此错误:
[log] [cloud_firestore/Failed-precondition] Operation was rejected because the system is not in a state required for the operation''s execution. If performing a query,ensure it has been indexed via the Firebase console.
我正在使用
firebase_core: ^1.3.0
cloud_firestore: ^2.3.0
解决方法
我想索引可能有问题。我建议您按照以下步骤操作:
- 删除索引。
- 再次运行该函数。将抛出错误。
- 使用
adb logcat 检查日志。
- 将显示一些信息以创建适当的索引。

SpringMVC常用注解@Controller,@Service,@repository,@Component,@Autowired,@Resource,@RequestMapping
1、controller层使用@Controller注解-用于呈现层,(spring-mvc)
@Controller 用于标记在一个类上,使用它标记的类就是一个SpringMVC Controller 对象。分发处理器将会扫描使用了该注解的类的方法。通俗来说,被Controller标记的类就是一个控制器,这个类中的方法,就是相应的动作。
@RequestMapping是一个用来处理请求地址映射的注解,可用于类或方法上。用于类上,表示类中的所有响应请求的方法都是以该地址作为父路径。比如图一中,跳转到登录页面的路径就是localhost:8080/xxx-war/user/toLogin
2、service采用@Service注解-用于服务层,处理业务逻辑
例:@Service("userService")注解是告诉spring,当Spring要创建UserServiceImpl的的实例时,bean的名字必须叫做"userService",这样当Action需要使用UserServiceImpl的的实例时,就可以由Spring创建好的"userService",然后注入给Action。
3、dao层使用@Repository注解-用于持久层,数据库访问层
@Repository(value="userDao")注解是告诉Spring,让Spring创建一个名字叫“userDao”的UserDaoImpl实例。
当Service需要使用Spring创建的名字叫“userDao”的UserDaoImpl实例时,就可以使用@Resource(name = "userDao")注解告诉Spring,Spring把创建好的userDao注入给Service即可。
@Autowired可以对成员变量、方法和构造函数进行标注,来完成自动装配的工作,我们也要清楚,@Autowired是根据类型进行自动装配的。
4、mapper层使用@Component注解-spring基础的注解,被spring管理的组件或bean
@component (把普通pojo实例化到spring容器中,相当于配置文件中的<bean id=""/>)
注:
spring不但支持自己定义的@Autowired注解,还支持几个由JSR-250规范定义的注解,它们分别是@Resource、@PostConstruct以及@PreDestroy。
@Resource的作用相当于@Autowired,只不过@Autowired按byType自动注入,而@Resource默认按 byName自动注入罢了。@Resource有两个属性是比较重要的,分是name和type,Spring将@Resource注解的name属性解析为bean的名字,而type属性则解析为bean的类型。所以如果使用name属性,则使用byName的自动注入策略,而使用type属性时则使用byType自动注入策略。如果既不指定name也不指定type属性,这时将通过反射机制使用byName自动注入策略。
@Resource装配顺序
1. 如果同时指定了name和type,则从Spring上下文中找到唯一匹配的bean进行装配,找不到则抛出异常
2. 如果指定了name,则从上下文中查找名称(id)匹配的bean进行装配,找不到则抛出异常
3. 如果指定了type,则从上下文中找到类型匹配的唯一bean进行装配,找不到或者找到多个,都会抛出异常
4. 如果既没有指定name,又没有指定type,则自动按照byName方式进行装配;如果没有匹配,则回退为一个原始类型进行匹配,如果匹配则自动装配;
@Autowired 与@Resource的区别:
1、 @Autowired与@Resource都可以用来装配bean. 都可以写在字段上,或写在setter方法上。
2、 @Autowired默认按类型装配(这个注解是属业spring的),默认情况下必须要求依赖对象必须存在,如果要允许null值,可以设置它的required属性为false,如:@Autowired(required=false) ,如果我们想使用名称装配可以结合@Qualifier注解进行使用,如下:
3、@Resource(这个注解属于J2EE的),默认按照名称进行装配,名称可以通过name属性进行指定,如果没有指定name属性,当注解写在字段上时,默认取字段名进行安装名称查找,如果注解写在setter方法上默认取属性名进行装配。当找不到与名称匹配的bean时才按照类型进行装配。但是需要注意的是,如果name属性一旦指定,就只会按照名称进行装配。
推荐使用:@Resource注解在字段上,这样就不用写setter方法了,并且这个注解是属于J2EE的,减少了与spring的耦合。这样代码看起就比较优雅。
我们今天的关于Vue 3 双向绑定 Composition API 与 Firestore 文档字段和vue双向绑定使用的分享已经告一段落,感谢您的关注,如果您想了解更多关于@vue/composition-api 解析、Firebase Firestore onSnapshot 在使用 Firestore FieldValue for Timestamp 时为空、Flutter FirebaseFirestore [cloud_firestore/failed-precondition] 问题、SpringMVC常用注解@Controller,@Service,@repository,@Component,@Autowired,@Resource,@RequestMapping的相关信息,请在本站查询。
本文标签:


