在这篇文章中,我们将为您详细介绍ansible组件Ad-Hoc的内容,并且讨论关于ansibleadd_host模块的相关问题。此外,我们还会涉及一些关于03.Ansible常用Ad-Hoc模式、2.
在这篇文章中,我们将为您详细介绍ansible组件 Ad-Hoc的内容,并且讨论关于ansible add_host 模块的相关问题。此外,我们还会涉及一些关于03.Ansible常用Ad-Hoc模式、2.0 Ansible Ad-Hoc命令、2.ansible命令行ad-hoc、ansible --- 3. 远程控制 (ad-hoc)的知识,以帮助您更全面地了解这个主题。
本文目录一览:- ansible组件 Ad-Hoc(ansible add_host 模块)
- 03.Ansible常用Ad-Hoc模式
- 2.0 Ansible Ad-Hoc命令
- 2.ansible命令行ad-hoc
- ansible --- 3. 远程控制 (ad-hoc)
")
ansible组件 Ad-Hoc(ansible add_host 模块)
ad hoc ---临时的,在ansible里需要快速执行,并不用保存命令的执行方式
简单命令
playbook 复杂命令
EXAMPLES:

- name: install the latest version of Apache
  yum:
    name: httpd
    state: latest

- name: ensure a list of packages installed
  yum:
    name: "{{ packages }}"
  vars:
    packages:
    - httpd
    - httpd-tools

- name: remove the Apache package
  yum:
    name: httpd
    state: absent

- name: install the latest version of Apache from the testing repo
  yum:
    name: httpd
    enablerepo: testing
    state: present

- name: install one specific version of Apache
  yum:
    name: httpd-2.2.29-1.4.amzn1
    state: present

- name: upgrade all packages
  yum:
    name: ''*''
    state: latest

- name: upgrade all packages, excluding kernel & foo related packages
  yum:
    name: ''*''
    state: latest
    exclude: kernel*,foo*

- name: install the Nginx rpm from a remote repo
  yum:
    name: http://Nginx.org/packages/centos/6/noarch/RPMS/Nginx-release-centos-6-0.el6.ngx.noarch.rpm
    state: present

- name: install Nginx rpm from a local file
  yum:
    name: /usr/local/src/Nginx-release-centos-6-0.el6.ngx.noarch.rpm
    state: present

- name: install the ''Development tools'' package group
  yum:
    name: "@Development tools"
    state: present

- name: install the ''Gnome desktop'' environment group
  yum:
    name: "@^gnome-desktop-environment"
    state: present

- name: List ansible packages and register result to print with debug later.
  yum:
    list: ansible
  register: result

- name: Install package with multiple repos enabled
  yum:
    name: sos
    enablerepo: "epel,ol7_latest"

- name: Install package with multiple repos disabled
  yum:
    name: sos
    disablerepo: "epel,ol7_latest"

- name: Install a list of packages
  yum:
    name:
      - Nginx
      - postgresql
      - postgresql-server
    state: present

- name: Download the Nginx package but do not install it
  yum:
    name:
      - Nginx
    state: latest
    download_only: true
EXAMPLES:

- name: example copying file with owner and permissions
  copy:
    src: /srv/myfiles/foo.conf
    dest: /etc/foo.conf
    owner: foo
    group: foo
    mode: 0644

- name: The same example as above, but using a symbolic mode equivalent to 0644
  copy:
    src: /srv/myfiles/foo.conf
    dest: /etc/foo.conf
    owner: foo
    group: foo
    mode: u=rw,g=r,o=r

- name: Another symbolic mode example, adding some permissions and removing others
  copy:
    src: /srv/myfiles/foo.conf
    dest: /etc/foo.conf
    owner: foo
    group: foo
    mode: u+rw,g-wx,o-rwx

- name: copy a new "ntp.conf file into place, backing up the original if it differs from the copied version
  copy:
    src: /mine/ntp.conf
    dest: /etc/ntp.conf
    owner: root
    group: root
    mode: 0644
    backup: yes

- name: copy a new "sudoers" file into place, after passing validation with visudo
  copy:
    src: /mine/sudoers
    dest: /etc/sudoers
    validate: /usr/sbin/visudo -cf %s

- name: copy a "sudoers" file on the remote machine for editing
  copy:
    src: /etc/sudoers
    dest: /etc/sudoers.edit
    remote_src: yes
    validate: /usr/sbin/visudo -cf %s

- name: copy using the ''content'' for inline data
  copy:
    content: ''# This file was moved to /etc/other.conf''
    dest: /etc/mine.conf''


RETURN VALUES:

dest:
    description: destination file/path
    returned: success
    type: string
    sample: /path/to/file.txt
src:
    description: source file used for the copy on the target machine
    returned: changed
    type: string
    sample: /home/httpd/.ansible/tmp/ansible-tmp-1423796390.97-147729857856000/source
md5sum:
    description: md5 checksum of the file after running copy
    returned: when supported
    type: string
    sample: 2a5aeecc61dc98c4d780b14b330e3282
checksum:
    description: sha1 checksum of the file after running copy
    returned: success
    type: string
    sample: 6e642bb8dd5c2e027bf21dd923337cbb4214f827
backup_file:
    description: name of backup file created
    returned: changed and if backup=yes
    type: string
    sample: /path/to/file.txt.2015-02-12@22:09~
gid:
    description: group id of the file, after execution
    returned: success
    type: int
    sample: 100
group:
    description: group of the file, after execution
    returned: success
    type: string
    sample: httpd
owner:
    description: owner of the file, after execution
    returned: success
    type: string
    sample: httpd
uid:
    description: owner id of the file, after execution
    returned: success
    type: int
    sample: 100
mode:
    description: permissions of the target, after execution
    returned: success
    type: string
    sample: 0644
size:
    description: size of the target, after execution
    returned: success
    type: int
    sample: 1220
state:
    description: state of the target, after execution
    returned: success
    type: string
    sample: file
[root@ftp:/root]
> ansible webservers -m shell -a ''uptime'' -o
ansible03 | CHANGED | rc=0 | (stdout)  17:34:22 up  4:12,  2 users,  load average: 0.00, 0.01, 0.05
ansible04 | CHANGED | rc=0 | (stdout)  17:34:22 up  3:45,  2 users,  load average: 0.16, 0.05, 0.05
ansible02 | CHANGED | rc=0 | (stdout)  17:34:22 up  3:41,  1 user,  load average: 0.00, 0.01, 0.05
ansible01 | CHANGED | rc=0 | (stdout)  17:34:22 up  4:11,  2 users,  load average: 0.00, 0.01, 0.05

[root@ftp:/root]
> ansible webservers -m shell -a ''uptime'' -o -f 10
ansible03 | CHANGED | rc=0 | (stdout)  17:34:56 up  4:12,  2 users,  load average: 0.00, 0.01, 0.05
ansible01 | CHANGED | rc=0 | (stdout)  17:34:56 up  4:12,  2 users,  load average: 0.24, 0.06, 0.06
ansible04 | CHANGED | rc=0 | (stdout)  17:34:56 up  3:45,  2 users,  load average: 0.10, 0.04, 0.05
ansible02 | CHANGED | rc=0 | (stdout)  17:34:56 up  3:41,  1 user,  load average: 0.00, 0.01, 0.05

[root@ftp:/root]
>
[root@ftp:/root]
> ansible webservers -m copy -a ''src=/etc/hosts dest=/tmp/hosts owner=root group=root mode=777''
ansible04 | CHANGED => {
    "changed": true,
    "checksum": "19aad245261f1772bffdabf3a6f5347312b20b46",
    "dest": "/tmp/hosts",
    "gid": 0,
    "group": "root",
    "md5sum": "39c0b18a971b35e3888758a2494b6083",
    "mode": "0777",
    "owner": "root",
    "size": 346,
    "src": "/root/.ansible/tmp/ansible-tmp-1552815757.85-214840644098444/source",
    "state": "file",
    "uid": 0
}
ansible03 | CHANGED => {
    "changed": true,
    "checksum": "19aad245261f1772bffdabf3a6f5347312b20b46",
    "dest": "/tmp/hosts",
    "gid": 0,
    "group": "root",
    "md5sum": "39c0b18a971b35e3888758a2494b6083",
    "mode": "0777",
    "owner": "root",
    "size": 346,
    "src": "/root/.ansible/tmp/ansible-tmp-1552815757.82-188384435660718/source",
    "state": "file",
    "uid": 0
}
ansible01 | CHANGED => {
    "changed": true,
    "checksum": "19aad245261f1772bffdabf3a6f5347312b20b46",
    "dest": "/tmp/hosts",
    "gid": 0,
    "group": "root",
    "md5sum": "39c0b18a971b35e3888758a2494b6083",
    "mode": "0777",
    "owner": "root",
    "size": 346,
    "src": "/root/.ansible/tmp/ansible-tmp-1552815757.71-273021490189009/source",
    "state": "file",
    "uid": 0
}
ansible02 | CHANGED => {
    "changed": true,
    "checksum": "19aad245261f1772bffdabf3a6f5347312b20b46",
    "dest": "/tmp/hosts",
    "gid": 0,
    "group": "root",
    "md5sum": "39c0b18a971b35e3888758a2494b6083",
    "mode": "0777",
    "owner": "root",
    "size": 346,
    "src": "/root/.ansible/tmp/ansible-tmp-1552815757.77-7921352044895/source",
    "state": "file",
    "uid": 0
}

[root@ftp:/root]
>
总结
以上是小编为你收集整理的ansible组件 Ad-Hoc全部内容。
如果觉得小编网站内容还不错,欢迎将小编网站推荐给好友。
原文地址:https://www.cnblogs.com/liweiming/p/10547879.html

03.Ansible常用Ad-Hoc模式
Ansible常用Ad-Hoc模式
1、authorized_key
# 给主机添加密钥认证
ansible all -m authorized_key -a key="{{ lookup(''file'', ''~/.ssh/id_rsa.pub'') }} user=root" --ask-pass -u root
2、ping
 ansible cdh_uat -m ping
172.17.208.73 | SUCCESS => {
    "ansible_facts": {
        "discovered_interpreter_python": "/usr/bin/python"
    },
    "changed": false,
    "ping": "pong"
}
172.17.208.72 | SUCCESS => {
    "ansible_facts": {
        "discovered_interpreter_python": "/usr/bin/python"
    },
    "changed": false,
    "ping": "pong"
}
172.17.208.74 | SUCCESS => {
    "ansible_facts": {
        "discovered_interpreter_python": "/usr/bin/python"
    },
    "changed": false,
    "ping": "pong"
}
172.17.208.75 | SUCCESS => {
    "ansible_facts": {
        "discovered_interpreter_python": "/usr/bin/python"
    },
    "changed": false,
    "ping": "pong"
}
3、group
# 添加组
ansible all -m group -a "gid=41000 name=ansible_test state=present system=no"
# 删除组
ansible all -m group -a "gid=41000 name=ansible_test state=absent"
4、user
# 创建用户
ansible all -m user -a ''uid=41000 name=ansible_test state=present group=ansible_test shell=/bin/bash''
5、copy
# 从文件复制
ansible all -m copy -a "src=/Users/user/Downloads/hosts dest=/etc/hosts"
#从内容复制
ansible all -m copy -a "content=''hello world\n'' dest=/root/hi.txt"
6、fetch
ansible 10.9.251.30 -m fetch -a ''src=/etc/hosts dest=./hosts''

10.9.251.30 | CHANGED => {
    "changed": true,
    "checksum": "4b8e199a4422de7f7d5854f9e5cbc8656f557162",
    "dest": "/Users/user/Downloads/hosts/10.9.251.30/etc/hosts",
    "md5sum": "11196d628534ecf0a5eada5b6077fdc9",
    "remote_checksum": "4b8e199a4422de7f7d5854f9e5cbc8656f557162",
    "remote_md5sum": null
}
7、command
不支持变量
ansible all -m command -a ''ifconfig''

ansible all -m command -a ''chdir=/tmp mkdir ansible_tmp''
8、shell
ansible all -m shell -a ''echo hello | passwd --stdin ansible_test''
9、file
# 创建指定目录
ansible all -m file -a ''path=/tmp/hello.dir state=directory''
10、cron
# 每3min同步一次时间,任务名称叫ntp date
ansible all -m cron -a ''minute=*/3 job="/usr/sbin/ntpdate time.pool.aliyun.com >/dev/null 2>&1" state=present name="ntp date"''
11、yum
ansible all -m yum -a ''name=htop state=installed''
ansible all -m yum -a ''name=Nginx state=installed''
12、service(Centos6)
ansible all -m service -a ''name=Nginx state=started''
13、systemd(Centos7)
ansible all -m systemd -a ''name=Nginx state=started enabled=true''
总结
以上是小编为你收集整理的03.Ansible常用Ad-Hoc模式全部内容。
如果觉得小编网站内容还不错,欢迎将小编网站推荐给好友。
原文地址:https://blog.csdn.net/lynnyq/article/details/102726499

2.0 Ansible Ad-Hoc命令
概览
什么是 ad-hoc commands 呢 ? 下面这样就是
ansible all -a "free -h"
也就是在命令行直接执行Ansible命令,不是我装逼,这个没找到很好的翻译,官方文档和一些国外的书籍都这么称呼
在命令行直接运行Ansible命令,基本上只存在于测试环节,甚至有时候测试都不用,毕竟生产环境都是写playbook管理,否则有点什么操作大家都冲到机器上执行个Ansible远程命令,也没啥记录,时间久了其不乱成一坨,而写成playbook尤其是在配合git进行管理,则可以清楚的看到服务修改的来龙去脉
我们在查看官方文档,某个模块如何用的时候,官方文档给的示例基本也是playbook形式
为什么需要 ad-hoc commands 呢 ?
不过在一些特殊情况下,直接在命令行执行Ansible命令有一个优点,那就是快,比如新上线某个服务严重拖垮机器资源,此时根本来不及再去写什么完整的playbook,直接一行命令批量把这个服务先停掉再说
Ansible ad-hoc command适合新手学习、简单测试,能够帮助我们快速了解Ansible强大的功能,所有能够使用Ansible命令行直接实现的操作,都可以通过书写playbook实现
环境准备
和之前的环境一致
[root@192-168-31-106 ~]# cat /etc/ansible/hosts
[allservers]
192.168.31.106
192.168.31.100
192.168.31.101
192.168.31.102
[webservers]
192.168.31.100
192.168.31.101
192.168.31.102
基础
ansible group-or-host [-m MODULE_NAME] [-a MODULE_ARGS]
查看帮助 ansible -h OR man ansible
上面我们查看内存的命令,如果写完整是这样
ansible all -m shell -a "free -h"
即默认的执行模块是shell命令
参数的顺序无关紧要,上面的命令写成这样也正确
ansible -m shell -a "free -h" all
输出详细信息
-v    输出详细信息
-vvv  输出更详细信息
-vvvv 调试(debug)模式

并发执行
Ansible默认是采用并发执行的方式,管理多台机器,反复执行下面的命令观察结果的顺序
ansible all -a "hostname"

可以看到每次的输出顺序是不通的,可以通过参数控制并发的个数
ansible all -a "hostname" -f 1
ansible all -a "hostname" --forks 10 #参数的长写法,同-f功能一致
Ansible默认是5个并发执行
拿到目标机器的全部环境信息
ansible 192.168.31.100 -m setup
这个命令会输出大量目标机器的详细信息,如操作系统、IP地址、内存、磁盘等,返回的是一个JSON格式数据,输出之详细我们甚至可以用这种方法在生产环境上收集机器的信息,当然过滤这些信息最好拿python之类的程序进行JSON格式化解析

注意我们这里的IP 192.168.31.100 ,是已经写在主机清单里的,如果填写一个主机清单里没有的IP地址,则会报错:
[root@192-168-31-106 ~]# ansible 192.168.31.120 -m setup
[WARNING]: Could not match supplied host pattern, ignoring: 192.168.31.120
[WARNING]: No hosts matched, nothing to do
后面我们学习变量的时候,会讲到利用这些信息做些特定操作,如判断目标机器是CentOS6安装一个包,如果是CentOS7则安装另外一个包之类
使用原生命令
前面我们已经使用过这种方法,如查看远程机器的内存:
ansible all -a "free -h"  OR
ansible all -m shell -a "free -h"
使用-m shell功能更为强大,如普通执行远程命令的方式不支持管道,但普通的命令执行方式因为其功能少,相对来说安全性好

https://docs.ansible.com/ansible/2.9/modules/shell_module.html
https://docs.ansible.com/ansible/2.9/modules/command_module.html
幂等性
幂等性是指如果系统已经处于期望的状态,则对系统什么也不操作。
下面我们看下,使用Ansible的YUM模块给机器安装上Nginx,借这个例子再重点看下Ansible的幂等性
ansible webservers -m ping
ansible webservers -m yum -a "name=Nginx state=present"

命令执行第2次,就可以看到全是绿色的,说明机器状态无变化

可不可以不实用YUM模块,就使用Shell命令呢,可以,如下
ansible webservers -m shell -a "yum install Nginx -y"

我们可以看到,输出内容有蓝色警告内容,提醒我们建议使用YUM模块而不是Shell YUM命令,并且更关键的是后面3台机器的输出内容都是黄色的,表示机器状态已被修改,即便我们多次执行ansible webservers -m shell -a "yum install Nginx -y",输出内容依旧是黄色CHANGED的状态
可以看到要想让Ansible完美支持幂等性,需要尽可能不使用直接的Shell命令,而是多使用Ansible自带的模块,后面我们还会学习到Ansible其它模块
使用Ansible自带的模块而不是原生shell命令有2个好处:
- 方便维护,Ansible模块的语法统一,而shell脚本如果写的复杂,难以维护
- 支持幂等性(idempotency)
为什么非要强调幂等性的重要呢,比如说一个常见的场景,老板说让初始化一台新机器,安装Nginx提供七层的负载均衡服务,团队之前已经写好了对应的playbook,理想情况下是直接一条Ansible命令完成初始化,但是谁也不能保证永远不报错,一旦有什么错误,或者新增什么新的需求,就需要这套Ansible服务支持反复执行,状态始终是预期的状态,换句话说我们希望写的playbook文件是一种对状态的描述,类似于"保持Nginx出于安装并且启动的状态"而不是"安装Nginx"
理想虽好,但是实际工作中想要保证Ansible剧本里完全没有直接运行shell命令的方式,全部使用的是Ansible自带的模块,难,非常难,但是我么至少要保证别挖大坑,避免第一次执行脚本正常,而多次执行某个脚本系统处于什么状态,已经完全不可预期的情况
类似的,我们用copy模块测试幂等性的效果
ansible all  -m copy -a "src=/root/node_exporter-1.0.0.linux-amd64.tar.gz  dest=/tmp"
ansible all  -m copy -a "src=/root/node_exporter-1.0.0.linux-amd64.tar.gz  dest=/tmp"
上面的命令连续执行两次,可以发现第1次输出为黄色,表明系统已经做了修改,第2次输出为绿色表明无任何修改,具有一定的幂等性
限制针对某台机器执行
假设我们之前的主机清单是这样的
[root@192-168-31-106 ~]# cat /etc/ansible/hosts
[webservers]
192.168.31.100
192.168.31.101
即已经有了2台webserver服务器,但现在的场景是,量太大,机器抗不住,需要初始化一台新的webserver机器加入集群,因此我们修改主机清单,增加一行IP,如下
[root@192-168-31-106 ~]# cat /etc/ansible/hosts
[webservers]
192.168.31.100
192.168.31.101
192.168.31.102
此时我们进行相关部署操作的时候,希望限定在对102机器执行操作,其它不动,我们可以使用--limit ${ip}参数
ansible webservers -m yum -a "name=Nginx state=present" --limit "192.168.31.102"
管理系统users和groups
在shell命令中,我们使用useradd、usermod、userdel来管理用户,使用groupadd、groupdel、groupmod来管理组
在Ansible中分别使用user和group进行管理
管理组 group
ansible 192.168.31.100 -m group -a "name=test1 state=present" #增加test1组
ansible 192.168.31.100 -m group -a "name=test1 state=absent"  #删除test1组
ansible 192.168.31.100 -m group -a "name=test1 state=present gid=2000"  #指定组的gid

管理用户 user
ansible 192.168.31.100 -m user -a "name=test2 state=present"   #增加用户
ansible 192.168.31.100 -m user -a "name=test2 state=absent"    #删除用户
ansible 192.168.31.100 -m user -a "name=test3 password={{ ''123456'' | password_hash(''sha512'', ''mysecretsalt'') }} state=present" #创建用户并指定密码


更多参数,参考官方文档
https://docs.ansible.com/ansible/2.9/modules/user_module.html
https://docs.ansible.com/ansible/2.9/modules/group_module.html
管理包
上面我们已经看到,Ansible的yum模块来管理包,Ansible还有一个通用的包管理模块,可跨平台支持不同的操作系统
ansible 192.168.31.100 -m package -a "name=git state=present"

管理文件和目录
1 查看文件的状态信息
#该功能类似 stat
ansible all -m stat -a "path=/etc/profile"

2 把本地文件或目录(在管理机器上)拷贝到远程机器上
#该功能类似 scp 、 rsync
ansible 192.168.31.100 -m copy -a "src=/etc/hosts dest=/tmp/hosts"

其中src可以是文件,可以是目录,如果是目录的话注意末尾是否有斜线,行为不同
有斜线,拷贝目录里的内容,不包括目录本身
无斜线,连同目录本身和目录里的内容一块拷贝
ansible 192.168.31.100 -m copy -a “src=/etc/sysconfig/network-scripts dest=/tmp”
ansible 192.168.31.100 -m copy -a “src=/etc/sysconfig/network-scripts/ dest=/tmp”

rsync也有类似的逻辑,在实际使用的时候多加测试即可
与cp命令不同,类似 cp /etc/* 这种带星号的逻辑,不支持
3 把远程机器的文件拉到本地
#这种场景应用的比较少,我们演示一种情况,备份所有机器的/etc/hosts到管理机器上
ansible all -m fetch -a "src=/etc/hosts dest=/tmp/xtmp"
#可以看到,还贴心的自动生成了IP文件夹以区分

4 创建目录和文件
#类似 touch mkdir
ansible 192.168.31.100 -m file -a "path=/tmp/test10 mode=644 state=directory"   #创建目录
ansible 192.168.31.100 -m file -a "path=/tmp/test6.txt mode=0644 state=touch"   #创建文件

5 删除目录和文件
ansible 192.168.31.100 -m file -a "path=/tmp/test10 state=absent"

更多文件操作的细节功能,参考官方文档
https://docs.ansible.com/ansible/2.9/modules/file_module.html
https://docs.ansible.com/ansible/2.9/modules/copy_module.html
管理定时任务
话不多说,我们直接看个简单的效果
ansible  192.168.31.100 -m cron -a "name=''cron_test'' minute=''*/2'' job=''date >> /tmp/tmp.txt'' state=''present''"
ansible  192.168.31.100 -m cron -a "name=''cron_test'' minute=''*/2'' job=''date >> /tmp/tmp.txt'' state=''absent''"

参考链接
https://docs.ansible.com/ansible/2.9/modules/cron_module.html
提升权限
执行Ansible的用户默认就是当前使用的用户,如果管理机器上用root执行,到目标机器上也是root用户,可以通过参数更改使用的用户
ansible all -a "whoami" -u Nginx
SSH免密码配置是针对用户的,如果我们用其它的用户去执行Ansible命令,那么这个用户也需要配置免密
如果这个普通用户,配置了sudo免密切到root,则可以加上参数-b OR ----become,这样需要提权才能执行的操作才能正常执行
ansible all -a "whoami" -u Nginx -b
可能遇到的报错
1 No hosts matched
遇到此类报错,一般都是主机清单没有配置正确,如果确认已经配置正确,还可以通过设定环境变量的方式指定主机清单文件,如
ANSIBLE_INVENTORY=/etc/ansible/hosts ansible all -a "hostname"
上面的命令直接执行,明确告诉Ansible的路径,也可以把相关环境变量写到脚本里,或者/etc/profile
2 The authenticity of host ‘192.168.31.100’ can’t be established
类似这种报错是因为,默认SSH远程有一个输入yes确认的过程,我们可以随便用一个远程命令测试下,把yes输入上,或者使用如下的环境变量
ANSIBLE_HOST_KEY_CHECKING=False ansible all -a "hostname"
总结
本篇文章,我们主要是围绕着Ansible Ad-Hoc命令,以一些重点模块为例,展开讲一些Ansible的主要功能,主要的目的是让大家对Ansible能够干啥有个直观的认识,另外还简要探讨了幂等性这个重要的概念,有了这些基本的认识,为我们紧接着学习playbook打下良好的基础
总结
以上是小编为你收集整理的2.0 Ansible Ad-Hoc命令全部内容。
如果觉得小编网站内容还不错,欢迎将小编网站推荐给好友。
原文地址:https://blog.csdn.net/xys2015/article/details/113822144

2.ansible命令行ad-hoc
ad-hoc
-
命令格式
ansible <host-pattern> [-f forks] [-m module_name] [-a args] -
参数说明
# 组名,全部用all host-pattern # 执行模块名称,默认command模块 -m # 模块参数 -a # 用户 -u # 登录密码 --ask-sudo-pas -k -
示例
# ping,测试主机连通性 ansible all -m ping -uroot -k # 使用默认模块,command ansible all -a ''uname -a'' -uroot -k # 批量修改user01用户密码 ansible -i hosts all -m shell -a "echo ''password'' | passwd --stdin user01" -uroot -k -
私钥配置
#生成私钥
ssh-keygen
# 复制私钥到远程主机
ssh-copy-id root@x.x.x.1
总结
以上是小编为你收集整理的2.ansible命令行ad-hoc全部内容。
如果觉得小编网站内容还不错,欢迎将小编网站推荐给好友。
原文地址:https://www.cnblogs.com/qms19/p/14190055.html
")
ansible --- 3. 远程控制 (ad-hoc)
一. 下载安装
#下载wget
yum install -y wget


#将epel源下载到本地
wget -O /etc/yum.repos.d/epel.repo http://mirrors.aliyun.com/repo/epel-7.repo


#安装ansible
yum install -y ansible
二. ansible 命令格式
Usage: ansible <host-pattern> [options]

-a  MODULE_ARGS, #模块参数
-C, --check # 干跑,白跑
-f FORKS, --forks=FORKS #指定并发,默认5个
--list-hosts #列出主机
-m MODULE_NAME# 模块名称
--syntax-check #检查语法
-k #密码
rpm -ql ansible|more # 查看ansible生成的文件

所有文件如下:
/etc/ansible
/etc/ansible/ansible.cfg #配置文件
/etc/ansible/hosts # 写入被控机的ip地址 ****
/etc/ansible/roles #空文件夹
ping走什么协议  ICMP

ansible 底层是通过ssh实现的
三.配置 host
1.通过用户密码连接
① hosts 的简单配置

②连接的代码
2.通过秘钥连接
①秘钥
ssh-keygen     生成秘钥对   (一直回车就可以,)

ssh-copy-id  root@192.168.2.132    将公钥传到 被控机

ssh root@192.168.2.132     就可直接连接 被控机
② hosts 的配置
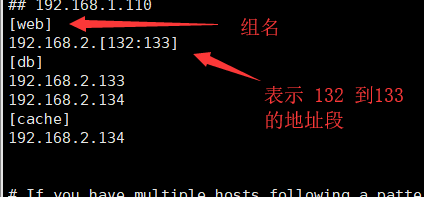
③连接的 常用命令
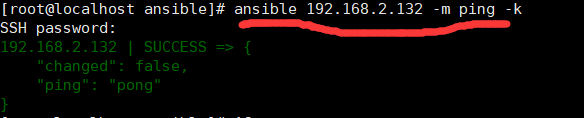
ansible 192.168.226.101 -m ping #单独机器的ping

ansible 192.168.226.101,192.168.226.102 -m ping #多个机器的ping

ansible all -m ping #全部机器

ansible web -m ping #单个的组

ansible web,db -m ping #多个组的并集

ansible ''web:&db'' -m ping #多个组的交集

ansible ''web:!db'' -m ping #多个组的差集,在前面但是不在后面
四.模块
0. ansible-doc (模块信息)
ansible-doc [-l|-F|-s] [options] [-t <plugin type> ] [plugin]
-j #以json的方式返回数据

 -l, --list #列出所有的模块

 -s, --snippet #以片段式显示模块信息
ansible-doc 模块名 #直接查看完整信息
ansible-doc -l |wc -l 所有模块的数量
片段式显示模块信息:

完整信息:
![]()
1.command (执行远程命令)
ansible web -m command -a "pwd"
ansible web -m command -a "ls"
ansible web -m command -a "chdir=/tmp pwd" #切换目录并执行命令
ansible web -m command -a "creates=/tmp pwd" #因为tmp目录存在,pwd不会执行
ansible web -m command -a "creates=/tmp2 pwd" #因为tmp2不存在,pwd执行
ansible web -m command -a "removes=/tmp2 pwd" #因为tmp2不存在pwd不执行
ansible web -m command -a "removes=/tmp pwd" #因为tmp目录存在,pwd会执行

ansible web -m command -a "useradd alex"   创建用户(查看home文件下有无此文件夹)
ansible web -m shell -a "echo ''1234'' |passwd --stdin alex"
#设置用户的密码 (要用shell 模块)
2.shell (支持特殊字符<>|$&)
ansible web -m shell -a "echo ''1234'' |passwd --stdin alex" 设置用户的密码
ansible web -m shell -a "chdir=/tmp pwd" #shabang 用来写解释器
ansible 192.168.226.101 -m shell -a "bash a.sh" #执行shell脚本
ansible 192.168.226.101 -m shell -a "/root/a.sh" # 执行shell脚本,文件要有执行的权限
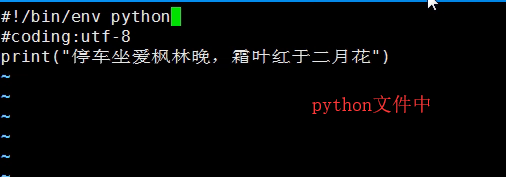
ansible 192.168.226.101 -m shell -a "/root/a.py" #执行Python文件
两种执行文件的方式
第一种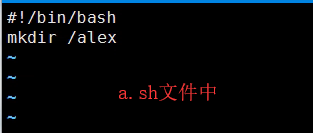
chmod  +X  a.sh    给文件添加权限

执行代码:
./a.sh   直接打开文件
第二种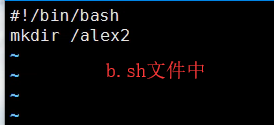
执行代码:
bash b.sh
3.script (执行管控机文件,作用在被控机)
ansible db -m script -a "/root/a.sh" #执行本地的文件,管控机的文件

ansible db -m script -a "creates=/root/a.sh /root/a.sh"
# 判断被控机上的文件是否存在,如果不存在,就执行,如果存在,就跳过

ansible db -m script -a "creates=/tmp /root/a.sh" #判断被控机上的文件
4. copy (将本地文件复制到远程)
backup #创建一个备份文件,以时间戳结尾
content #直接往文件里面写内容(覆盖)
dest #目标地址
group #属组
mode# 文件的权限 W 2 R 4 X 1
owner #属主
src #源地址

ansible web -m copy -a "src=/etc/fstab dest=/tmp/f"
#复制本地文件到远程主机,并修改文件名,多次执行不会改变,因为checksum值是一样的

ansible web -m copy -a "src=a.sh dest=/tmp/a.sh backup=yes"
#复制本地文件,并备份

ansible web -m copy -a "src=a.sh dest=/tmp/a.sh backup=yes group=alex mode=755"
# 复制本地文件到远程主机,并指定属组和权限

ansible web -m copy -a "src=/etc/init.d dest=/tmp backup=yes group=alex mode=755"
#复制本地的目录到远程主机,修改目录权限,则目录里面的文件也会跟着变更

ansible web -m copy -a "src=/etc/init.d/ dest=/tmp backup=yes group=alex mode=755"
#复制本地目录下的所有文件,

ansible web -m copy -a "content=''大弦嘈嘈如急雨,小弦切切如私语,嘈嘈切切错 杂弹,大珠小珠落玉盘'' dest=/tmp/b"
#直接往文件里面写内容, 若再次写就是覆盖写,慎用
5.file (文件或者文件夹的操作)
参数:

- path 路径

- state
    - absent  删除
    - directory  目录
    - link    软连接
    - hard    硬链接
    - touch  空文件
    - file   (没有就不创建,很少用)

- group   属组

- owner   属主

- mode    权限

- src    源文件(指向被控机的文件)
    - link
    - hard
举例说明:

ansible web -m file -a "path=/alex5 state=directory owner=alex"
#创建目录,并制定属主

ansible web -m file -a "path=/tmp/wusir.txt state=touch mode=777"
#创建文件,并指定权限

ansible web -m file -a "path=/tmp/cron src=/var/log/cron state=link"
#创建软链接,链接的是自己的文件

ansible web -m file -a "path=/tmp/cron state=absent"
# 删除软连接

ansible web -m file -a "path=/alex5 state=absent"
#删除文件夹
补充:

软连接:  快捷方式  ln -s   源文件修改软连接修改  源文件删除软连接失效  可以跨分区

硬链接:  硬盘的位置 ln     源文件修改硬链接修改  源文件删除硬链接不变 不可以跨分区

复制:    开辟新空间 cp     源文件修改cp的不变   源文件删除不变 可以跨分区
6.fetch (拉取远程主机的文件)
创建一个以ip地址或者主机名为名称的目录,并且保留原来的目录结构
参数:

- dest  目标地址 (管控机)

- src   源地址(被控机)


举例说明:

ansible web -m fetch -a "src=/var/log/cron dest=/tmp"
#拉取远程主机的文件,并以主机ip地址或者主机名为目录,并且保留了原来的目录结构
7.yum (安装linux的安装包)
参数:

- name  包名 或 包组名

- state
  -install  安装
  -remove   卸载
- disablerepo #禁用某个源
- enablerepo #启用某个源
举例说明:

首先要:
ansible web -m yum -a "name=python2-pip" #安装软件包
ansible web -m yum -a "name=python2-pip,redis" #安装多个包
ansible web -m yum -a "name=''@Development Tools''" #安装开发包组
rpm -q nginx (查看nginx是否安装)
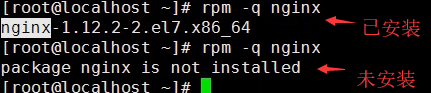
ansible web -m yum -a "name=nginx state=absent" #卸载
补充(本机的配置):

1.yum跟rpm有什么关系,有什么区别
rpm redhat package manager(全称)  手动解决依赖关系
yum 可以解决依赖关系

2.yum源怎么配置

[epel]    #名称
name=Extra Packages for Enterprise Linux 7 - $basearch  #全名或者描述信息
baseurl=http://mirrors.aliyun.com/epel/7/$basearch  # 源url地址
failovermethod=priority
enabled=1  #是否启用,1启用,0不启用
gpgcheck=0  #是否检验key文件,0不校验 1校验
gpgkey=file:///etc/pki/rpm-gpg/RPM-GPG-KEY-EPEL-7


3.yum怎么安装包组
 yum grouplist #查包组信息

 yum groupinstall -y "Development Tools"  安装开发包组
![]()
8.pip (安装python的包)
参数:

- name   包名

- chdir   切换目录 (编译安装时会用到)
- requirements 导出的文件
- virtualenv 虚拟环境
举例说明:
ansible web -m pip -a "name=django==1.11" 安装django
补充:

pip freeze > a.txt #将本地环境导出
pip install -r a.txt  #安装所有的包
pip list #查看所有的包
pip uninstall flask #卸载
9.service (启动服务)
参数:

- name   服务名称

- state
  - started   启动
  - stopped   停止
  - restarted  重启
  - reloaded   平滑重启

- enabled   开机启动

- user  启动的用户

举例说明:
ansible web -m service -a "name=redis state=started" #启动
ansible web -m service -a "name=redis state=stopped" #关闭
ansible web -m service -a "name=redis enabled=yes" #设置开机自启动
补充:

1.启动
systemctl start redis    #centos7
service redis start     #centos6

2.开机自启动
systemctl enable redis   #centos7

centos6 中
chkconfig redis on    开机自动启动 #centos6
chkconfig iptables off  #关闭

chkconfig --list 所有的自启项
0 关机  1单用户 3命令行 5图形界面 6重启
举例:代码如下
  init 6   重启

3.
ps -ef|grep redis #查进程
ss -tunlp   #查端口
  -t tcp
  -u udp
  -n 以端口形式显示
  -l 显示所有已经启动的端口
  -p 显示pid

4.常见端口号:
ssh 22
http 80
https 443
mysql  3306
redis 6379
mongodb 27017
oracle 1521
tomcat 8080
windows 远程桌面 3389
ftp 20 21
django 8000
flask  5000
10.cron (定时任务)
参数:(添加时名字必须不同,不加名称为None)

- name 名字 描述信息

- minute  分钟

- hour   小时

- day   天

- month   月

- weekday  周

- job    任务

- disabled   禁用(前面加#)

- user   用户

- state (默认是创建)
  -absent   删除


举例说明:
ansible web -m cron -a "minute=12 name=touchfile job=''touch /tmp/xiaoqiang.txt''"# 创建
ansible web -m cron -a "name=touchfile state=absent"#删除
ansible web -m cron -a "minute=12 name=touchfile2 job=''touch /tmp/xiaoqiang.txt'' disabled=yes" #注释
ansible web -m cron -a "name=None state=absent" #删除名称为空的计划任务
crontab
* * * * * job
分 时 日 月 周 任务
3/* * * * * job 每隔3分钟执行一次
4 10-12 * * * job 10点-12点第4分钟执行,包括12点
0-59 0-23 1-31 1-12 0-7

分钟最好不要用*
尽量写绝对路径

* * * * * tar zcf /tmp/etc.tar.gz /etc  每分钟进行压缩

备份
同步时间
删除文件

-e 编辑
-l 查看
-r 删除

举例:
crontab -l  查看当前有什么任务
11. user (用户)
参数:

- name  用户名

- group  属组

- groups  附加组

- home    设置家目录

- remove  删除用户并删除用户的家目录

- shell   用户登录后的shell

- system   系统用户

- uid     用户的id

- password   密码

- state  (默认是创建)
  -absent  删除


举例说明
ansible web -m user -a "name=alex10 shell=/sbin/nologin home=/opt/alex10 uid=3000 groups=root"
#创建用户,并指定用户的shell不能登录的状态,家目录,uid,以及附加组
ansible web -m user -a "name=alex11 shell=/sbin/nologin home=/opt/alex11"
ansible web -m user -a "name=alex12 system=yes" #创建系统用户
ansible web -m user -a "name=alex12 state=absent" #删除用户,但不会删除家目录
ansible web -m user -a "name=alex11 state=absent remove=yes" # 删除用户并删除用户的家目录
补充:

1.查看用户是否创建成功
tail /etc/passwd
tail /etc/shadow
id alex2

useradd
-d 设置用户家目录
useradd -d /opt/alex2 alex2
-g 设置用户的属组
useradd -g alex2 alex3
-G, --groups 附加组
useradd -G alex2,root alex4
-r, --system 系统账号
useradd -r alex5 # 系统账号没有家目录
-s, --shell #设置用户登录后的shell
useradd -s /sbin/nologin alex8
-u, --uid UID #设置用户的id
useradd -u 2000 alex9
设置了用户的id以后,在设置用户则从最大的id开始往后数
用户分类
超级管理员 root 0
普通用户
    系统用户  启动一些服务或者进程,不能登录  1-999 centos7 1-499 centos6 从大到小
    登录用户  可以登录的用户 1000-65535 centos7 500-65535 centos6
从小到大

userdel
userdel alex8 默认不删除家目录
-r 删除用户的家目录
userdel -r alex9 删除用户并删除用户的家目录
12. group (组)
参数:

- name  名称

- gid   组id

- system   系统组

- state  默认是创建
  -absent 删除


举例说明:
ansible web -m group -a "name=wusir10 system=yes gid=5000" 创建系统组
ansible web -m group -a "name=wusir11" 创建普通的组
ansible web -m group -a "name=wusir11 state=absent" #删除组
补充:

创建组
groupadd
  -g 设置id
  -r 系统组
groupadd -g 3000 wusir10
groupadd -r wusir11
超级管理员组 root 0
普通组
    系统组  1-999 centos7 1-499 centos6 从大到小
    登录用户组 1000-65535 centos7 500-65535 centos6
从小到大

查看
tail /etc/group
我们今天的关于ansible组件 Ad-Hoc和ansible add_host 模块的分享已经告一段落,感谢您的关注,如果您想了解更多关于03.Ansible常用Ad-Hoc模式、2.0 Ansible Ad-Hoc命令、2.ansible命令行ad-hoc、ansible --- 3. 远程控制 (ad-hoc)的相关信息,请在本站查询。
本文标签:


