关于pythonselectors模块应用和python的selector模块的问题就给大家分享到这里,感谢你花时间阅读本站内容,更多关于7、nginx的upstream及fastcgi模块应用、cs
关于python selectors 模块应用和python的selector模块的问题就给大家分享到这里,感谢你花时间阅读本站内容,更多关于7、nginx 的 upstream 及 fastcgi 模块应用、css – :has vs:matches – Selectors Level 4、CSS 派生选择器 contextual selectors、css-selectors – Google跟踪代码管理器中“点击类”和“点击元素”之间的差异等相关知识的信息别忘了在本站进行查找喔。
本文目录一览:- python selectors 模块应用(python的selector模块)
- 7、nginx 的 upstream 及 fastcgi 模块应用
- css – :has vs:matches – Selectors Level 4
- CSS 派生选择器 contextual selectors
- css-selectors – Google跟踪代码管理器中“点击类”和“点击元素”之间的差异
")
python selectors 模块应用(python的selector模块)

import selectors
import socket
sel = selectors.DefaultSelector()
def accept(sock, mask):
conn, addr = sock.accept () # Should be ready 建立连接
print(''accepted'', conn, ''from'', addr)
conn.setblocking(False)
sel.register (conn, selectors.EVENT_READ, read)# 注册到时间循环列表(不立刻收,客户端可能还没有发。)如果再有活动就调用 read 函数
def read(conn, mask):
data = conn.recv(1000) # Should be ready
if data:
print(''echoing'', repr(data), ''to'', conn)
conn.send(data) # Hope it won''t block
else:
print(''closing'', conn)
sel.unregister(conn)
conn.close()
sock = socket.socket()
sock.bind((''localhost'', 1234))
sock.listen(100)
sock.setblocking(False)
sel.register (sock, selectors.EVENT_READ, accept)# 先注册 server 对象。调用 accept
while True:
events = sel.select () #默认阻塞,有活动链接就返回活动列表
for key, mask in events:
callback = key.data
callback(key.fileobj, mask)

7、nginx 的 upstream 及 fastcgi 模块应用
ngx_http_proxy_module, ngx_http_upstream_module
ngx_http_proxy_module:实现反向代理及缓存功能
proxy_pass http://{SERVER_IP|UPSTREAM_NAME}/uri
proxy_cache_path path [levels=levels] keys_zone=name:size [inactive=time] [max_size=size];
proxy_cache zone_name; // 缓存名称
proxy_cache_valid [code] time; // 指明不同响应码内容的缓存时长
proxy_cache_method // 只对哪些方法获取的资源进行缓存,一般使用 get
proxy_cache_use_stale error timeout ... // 是否使用过期的缓存进行响应
proxy_cache_min_uses // 某资源至少响应请求多少次后才被缓存下来
proxy_cache_bypass string: 设置在何种情形下 nginx 将不从 cache 取数据的;比如邮件
例如:$cookie_nocache、$arg_nocache 、$http_authorization
proxy_set_header
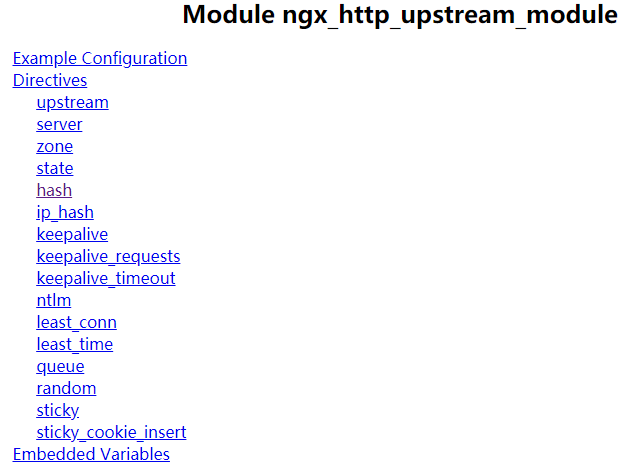
ngx_http_upstream_module: 定义服务器组 http://nginx.org/en/docs/http/ngx_http_upstream_module.html
可以调用服务器组反向代理有:proxy_pass, fastcgi_pass, uwsgi_pass,
upstream name {
server address [parameters];
ip_hash; // 基于源地址绑定,比 ip_hash 更精确的是 session 绑定机制是 cookie 记录,但 LVS 是没办法识别 cookie 的,因为 cookie 是应用层数据
}
nginx(2)
1、SNAT 模式的大量 Client
基于 sticky 实现 session 绑定:对应于工作在应用层的程序才拥有的功能
(1) cookie:基于 cookie 的绑定
upstream backend {
    server backend1.example.com;
    server backend2.example.com;

    sticky cookie srv_id expires=1h domain=.example.com path=/;
}
(2) route:基于路由的绑定
map $cookie_jsessionid $route_cookie {
    ~.+\.(?P<route>\w+)$ $route;
}

map $request_uri $route_uri {
    ~jsessionid=.+\.(?P<route>\w+)$ $route;
}

upstream backend {
    server backend1.example.com route=a;
    server backend2.example.com route=b;

    sticky route $route_cookie $route_uri;
}
(3) learn () :基于学习的绑定
upstream backend {
   server backend1.example.com:8080;
   server backend2.example.com:8081;

   sticky learn
          create=$upstream_cookie_examplecookie
          lookup=$cookie_examplecookie
          zone=client_sessions:1m;
}
2、least_conn: 调度方法,最少连接 (相当于 LVS 中的 wlc 算法);
3、keeplive: 激活代理服务器 nginx 和后端服务器之间的持久连接功能的,专用在 upstream,
| Syntax: | keepalive |
|---|---|
| Default: | — |
| Context: | upstream |
例子:keepalive 一般用在上游服务器是非 http 服务器时才使用,因为 keepalive 会损坏 http 的并发性能,如果后端是专用存储时 (比如基于键值存储的 memcache),基于 keepalive 指令可以使链接处于一段时间的长连接,提高查询性能。
upstream memcached_backend {
server 127.0.0.1:11211;
server 10.0.0.2:11211;
keepalive 32;
}
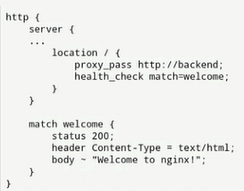
health_check:只能同在location
使用health_check时建议关闭访问日志,因为后端服务器不能检测health_check的检测是正常请求还是只是用来检测的
自定义响应首部:
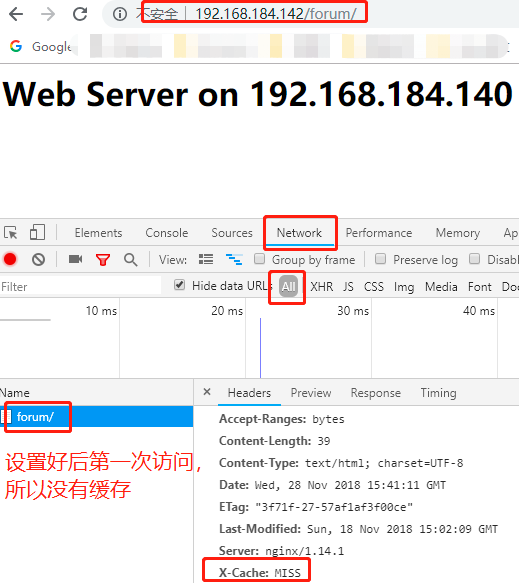
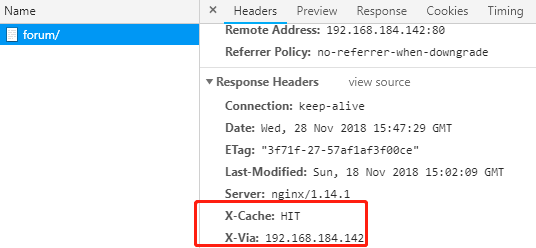
add_header X-Via $server_addr; 自定义响应首部通知客户端是由谁响应的
add_header X-Cache $upstream_cache_status; 告诉客户端响应是否命中
首先编辑代理服务器的 server 配置文件
# vim /etc/nginx/conf.d/default.conf
server {
    listen       80;
    server_name  localhost;
    add_header X-Via $server_addr;
    add_header X-Cache $upstream_cache_status;

    #charset koi8-r;
    #access_log  /var/log/nginx/host.access.log  main;

    location / {
        root   /usr/share/nginx/html;
        index  index.html index.htm;
    }

    location /forum/ {
        proxy_cache mycache;
        proxy_cache_valid 200 1d;
        proxy_cache_valid 301 302 10m;
        proxy_cache_valid any 1m;
        proxy_cache_use_stale error timeout http_500 http_502 http_503 http_504;
        proxy_pass http://upservers/;
        proxy_set_header Host $host;
        proxy_set_header X-Real-IP $remote_addr;
        add_header X-Via $server_addr;    //启用添加自定义头部
        add_header X-Cache $upstream_cache_status;
} 

Module ngx_http_fastcgi_module 模块介绍
http://nginx.org/en/docs/http/ngx_http_fastcgi_module.html
proxy_pass http://{SERVER_IP|UPSTREAM_NAME}/uri //proxy_pass 指令是把用户的请求反向代理至上有的 web 服务器,所以这里的协议是 http 协议,如果上有的协议不是 http 协议而是 fastcgi 协议,就必须使用 fastcgi 模块来实现。
fastcgi 模块的意义是:
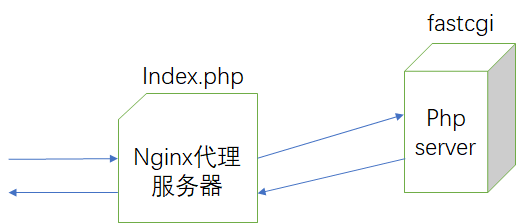
nginx 作为代理服务器,当客户端发起对 nginx 代理服务器的 php 类型资源的请求,比如是 index.php,此时 nginx 代理服务器只是一个静态内容服务器,所以 nginx 就会把 index.php 的文件内容拿过来包装成响应报文后直接返回给客户端,但此时响应报文是源代码,客户端是看不懂的。
所以应该让 nginx 自持 php 应用代码的运行,但是 nginx 自己不支持,所以需要做一个 php 的服务器。此后 nginx 在接收到报文时就可以根据请求资源的后缀名进行判断,一旦是 php,nginx 就会使用特定协议将请求报文反向代理至 php 的 server 上,php 服务器将会执行 index.php 上的代码并将执行后的结果返回值 nginx 代理服务器上,然后 nginx 就会把响应报文进行封装并返回给客户端。这又是一种反向代理,但是使用的协议是 fastcgi 协议而不是 http 协议。
如何让 nginx 支持 LNMP:
php 是无法作为 nginx 的模块的,所以 php 只能工作于 fpm 模式
# yum list all *fpm* // 查找是否有 fpm 模块
Loaded plugins: fastestmirror
Repodata is over 2 weeks old. Install yum-cron? Or run: yum makecache fast
Determining fastest mirrors
* base: mirrors.nwsuaf.edu.cn
* extras: mirrors.neusoft.edu.cn
* updates: mirrors.neusoft.edu.cn
Available Packages
php-fpm.x86_64 5.4.16-45.el7 base
# yum info php-fpm // 查看此模块的详细信息
# yum install php-fpm // 安装 php-fpm 模块
# rpm -ql php-fpm // 查看 php-fpm 安装信息
/etc/logrotate.d/php-fpm
/etc/php-fpm.conf // 主配置文件
/etc/php-fpm.d
/etc/php-fpm.d/www.conf // 这里可以查看 php 监听的地址,如果 php 和 nginx 不在同一主机的话,就需要修改 php 监听的地址了
/etc/sysconfig/php-fpm // 服务脚本
/run/php-fpm
/usr/lib/systemd/system/php-fpm.service
/usr/lib/tmpfiles.d/php-fpm.conf
/usr/sbin/php-fpm // 可执行程序
/usr/share/doc/php-fpm-5.4.16
/usr/share/doc/php-fpm-5.4.16/fpm_LICENSE
/usr/share/doc/php-fpm-5.4.16/php-fpm.conf.default
/usr/share/fpm
/usr/share/fpm/status.html
/usr/share/man/man8/php-fpm.8.gz
/var/log/php-fpm
# systemctl start php-fpm // 启动
# ss -tunl // 查看端口
下面让 nginx 将用户的请求基于 fastcgi 协议发送给 php
# vim /etc/nginx/conf.d/default.conf // 编辑此文件,启用 php 配置段
 location ~ \.php$ {
        root           html;    //这里的页面要和上面nginx的web页面保持一致,修改如下
         root   /usr/share/nginx/html;
        fastcgi_pass   127.0.0.1:9000;
        fastcgi_index  index.php;
        fastcgi_param  SCRIPT_FILENAME  /scripts$fastcgi_script_name;  //向后端传递的参数
                       //SCRIPT_FILENAME是变量名指令,用户请求的文件名(即变量名$fastcgi_script_name),
                         通过uri(~ \.php$)的方式传递给后端的服务器(127.0.0.1:9000)
include fastcgi_params; //包含另外一个文件
}
# cd /usr/share/nginx/html/ //对主页面进行修改
# vim index.php
<?php
phpinfo();
?>
# vim /etc/nginx/conf.d/default.conf location / {
root /usr/share/nginx/html;
index index.php index.html index.htm; // 并在根这里添加 index.php
要对 /etc/nginx/fastcgi_params 做修改
/etc/nginx // 在这个文件目录下有一个 fastcgi_params 配置文件
fastcgi_param  QUERY_STRING       $query_string;
fastcgi_param  REQUEST_METHOD     $request_method;
fastcgi_param  CONTENT_TYPE       $content_type;
fastcgi_param  CONTENT_LENGTH     $content_length;

fastcgi_param  SCRIPT_NAME        $fastcgi_script_name;
fastcgi_param  REQUEST_URI        $request_uri;
fastcgi_param  DOCUMENT_URI       $document_uri;
fastcgi_param  DOCUMENT_ROOT      $document_root;
fastcgi_param  SERVER_PROTOCOL    $server_protocol;
fastcgi_param  REQUEST_SCHEME     $scheme;
fastcgi_param  HTTPS              $https if_not_empty;

fastcgi_param  GATEWAY_INTERFACE  CGI/1.1;
fastcgi_param  SERVER_SOFTWARE    nginx/$nginx_version;

fastcgi_param  REMOTE_ADDR        $remote_addr;
fastcgi_param  REMOTE_PORT        $remote_port;
fastcgi_param  SERVER_ADDR        $server_addr;
fastcgi_param  SERVER_PORT        $server_port;
fastcgi_param  SERVER_NAME        $server_name;

# PHP only, required if PHP was built with --enable-force-cgi-redirect
fastcgi_param  REDIRECT_STATUS    200;
编辑 /etc/nginx/fastcgi_params,将其内容更改为如下内容:
fastcgi_param GATEWAY_INTERFACE CGI/1.1;
fastcgi_param SERVER_SOFTWARE nginx;
fastcgi_param QUERY_STRING $query_string;
fastcgi_param REQUEST_METHOD $request_method;
fastcgi_param CONTENT_TYPE $content_type;
fastcgi_param CONTENT_LENGTH $content_length;
fastcgi_param SCRIPT_FILENAME $document_root$fastcgi_script_name;
fastcgi_param SCRIPT_NAME $fastcgi_script_name;
fastcgi_param REQUEST_URI $request_uri;
fastcgi_param DOCUMENT_URI $document_uri;
fastcgi_param DOCUMENT_ROOT $document_root;
fastcgi_param SERVER_PROTOCOL $server_protocol;
fastcgi_param REMOTE_ADDR $remote_addr;
fastcgi_param REMOTE_PORT $remote_port;
fastcgi_param SERVER_ADDR $server_addr;
fastcgi_param SERVER_PORT $server_port;
fastcgi_param SERVER_NAME $server_name;
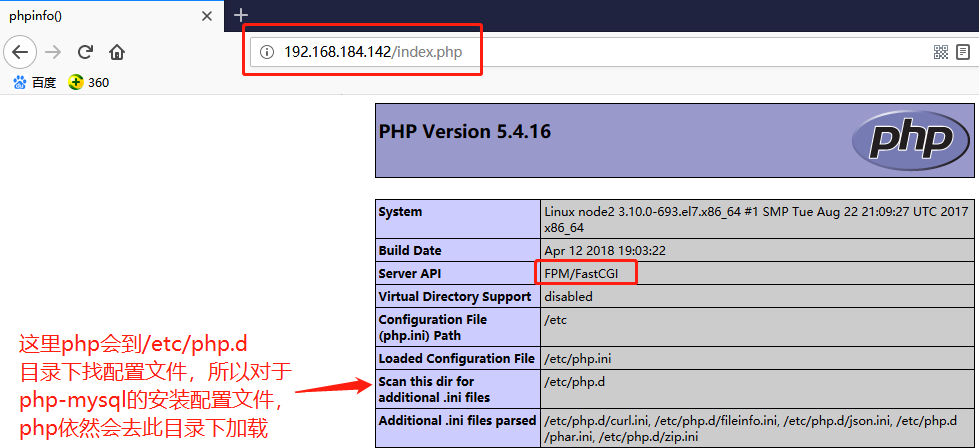
此时 nginx 已经可以和 php 结合工作了,下面就要解决 php 和 mysql/mariadb 结合
# yum install php-mysql
# rpm -ql php-mysql
/etc/php.d/mysql.ini
/etc/php.d/mysqli.ini
/etc/php.d/pdo_mysql.ini
/usr/lib64/php/modules/mysql.so
/usr/lib64/php/modules/mysqli.so
/usr/lib64/php/modules/pdo_mysql.so
# systemctl reload php-fpm
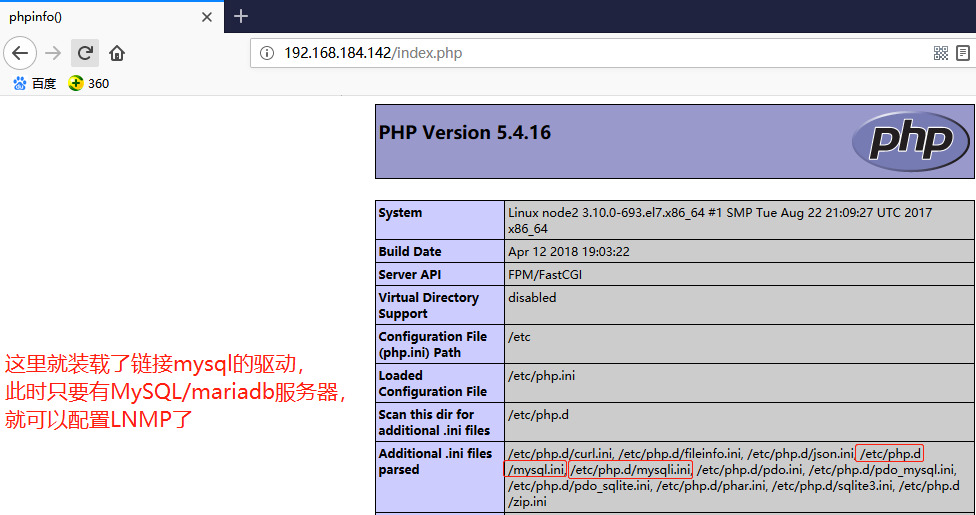
# yum install mariadb-server // 安装 mariadb
安装好 mariadb 后,验证 php 和 mariadb 是否可以结合工作
# vim /usr/share/nginx/html/index.php
<?php
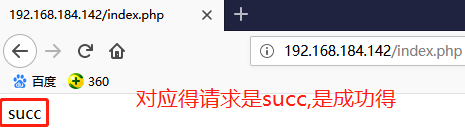
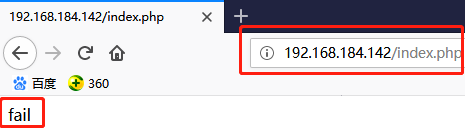
$conn = mysql_connect(''127.0.0.1'',''root'','''');
if ($conn)
echo succ;
else
echo fail;
mysql_close();
?>
# systemctl stop mariadb // 关闭 mariadb 后在测试
LNAMP :以 nginx 做代理服务器进行负载均衡,后端的服务器平台是多个 LAMP,在这种场景中 nginx 和后端的 LAMP 交互时是两个 web 服务器之间的交互 (http 协议),LAMP 中的 php 可以以 apache 的模块进行工作。
动态内容和静态内容分离:php 服务器和 MySQL 服务器与后端负载均衡的服务器不在同一个服务器上
LNMP, fastcgi_cache fastcgi 协议的缓存服务器
| Syntax: |
[ |
|---|---|
| Default: | — |
| Context: | http //需要定义在http上下文 |
fastcgi_cache_path /data/nginx/cache levels=1:2 keys_zone=one:10m;
以上是定义位置以及定义方法,定义完成后需要使用fastvgi_cache进行调用
| Syntax: | fastcgi_cache |
|---|---|
| Default: | |
| Context: | http, server, location 使用上下文 |
# vim /etc/nginx/nginx.conf// 首先编辑 nginx 的主配置文件 http 上下文
fastcgi_cache_path /cache/fastcgi/ levels=1:1 keys_zone=fcgicache:10m inactive=3m max_size=1g;
# vim /etc/nginx/conf.d/default.conf // 在对应的 location 中进行调用
location ~ \.php$ {    //对应的php的location中进行调用
        fastcgi_cache fcgicache;
        root           /usr/share/nginx/html;
        fastcgi_pass   127.0.0.1:9000;
        fastcgi_index  index.php;
        fastcgi_param  SCRIPT_FILENAME  /scripts$fastcgi_script_name;
        include        fastcgi_params;
    }
# systemctl reload nginx
# mkdir /cache/fastcgi -pv
# ll /cache
total 0
drwx------ 2 nginx root 6 Nov 29 05:02 fastcgi
drwxr-xr-x 4 nginx nginx 24 Nov 28 23:41 nginx
#vim /usr/share/nginx/html/test.php
<?php
phpinfo();
?>
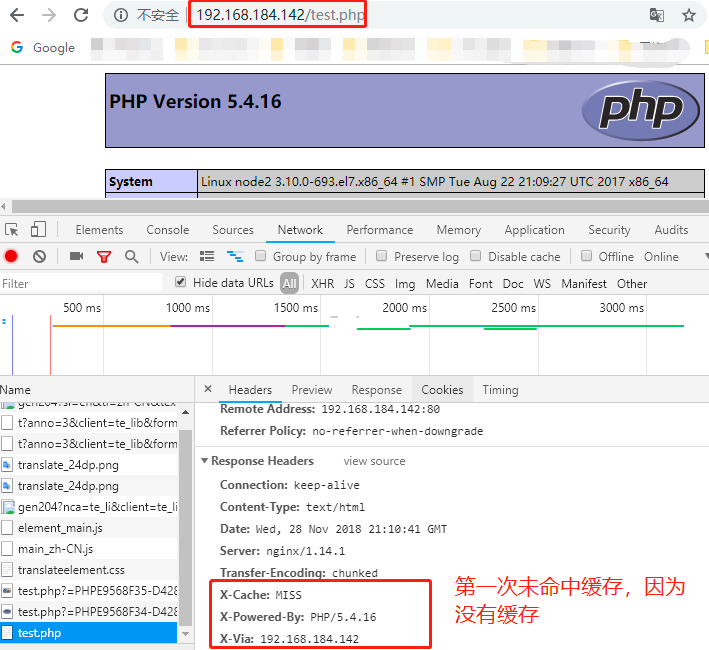
再次刷新时发现X-Cache仍然是MISS,即无法缓存
#vim /etc/nginx/conf.d/default.conf   //在php配置段中指明缓存响应码,如果不指明,就不缓存
fastcgi_cache_valid 200 10m;
fastcgi_cache_valid 302 3m;
fastcgi_cache_valid any 1m;
下面利用 ab 命令对开启缓存和不开启缓存进行性能对比
1、首先关闭 fastcgi_cache
# /etc/nginx/conf.d/default.conf
#fastcgi_cache fcgicache;
fastcgi_cache off; // 暂时关闭 fastcgi_cache
# systemctl reload nginx
# yum install httpd-tools
# ab -n 10000 -c 100 http://192.168.184.142/test.php -n 是请求数量,-c 是并发量
This is ApacheBench, Version 2.3 <$Revision: 1430300 $>
Copyright 1996 Adam Twiss, Zeus Technology Ltd, http://www.zeustech.net/
Licensed to The Apache Software Foundation, http://www.apache.org/

Benchmarking 192.168.184.142 (be patient)
Completed 1000 requests
Completed 2000 requests
Completed 3000 requests
Completed 4000 requests
Completed 5000 requests
Completed 6000 requests
Completed 7000 requests
Completed 8000 requests
Completed 9000 requests
Completed 10000 requests
Finished 10000 requests


Server Software:        nginx/1.14.1
Server Hostname:        192.168.184.142
Server Port:            80

Document Path:          /test.php
Document Length:        43330 bytes

Concurrency Level:      100
Time taken for tests:   4.891 seconds
Complete requests:      10000
Failed requests:        996
   (Connect: 0, Receive: 0, Length: 996, Exceptions: 0)
Write errors:           0
Total transferred:      435018878 bytes
HTML transferred:       433298878 bytes
Requests per second:    2044.69 [#/sec] (mean)
Time per request:       48.907 [ms] (mean)
Time per request:       0.489 [ms] (mean, across all concurrent requests)
Transfer rate:          86863.18 [Kbytes/sec] received

Connection Times (ms)
              min  mean[+/-sd] median   max
Connect:        0    1   0.5      1       4
Processing:     3   48  13.7     47     114
Waiting:        2   47  13.6     46     113
Total:          5   49  13.6     48     114

Percentage of the requests served within a certain time (ms)
  50%     48
  66%     53
  75%     57
  80%     59
  90%     67
  95%     73
  98%     81
  99%     84
 100%    114 (longest request)
2、开启 fastcgi_cache
# vim /etc/nginx/conf.d/default.conf
fastcgi_cache fcgicache;
#fastcgi_cache off;
#systemctl reload nginx
# ab -n 10000 -c 100 http://192.168.184.142/test.php
This is ApacheBench, Version 2.3 <$Revision: 1430300 $>
Copyright 1996 Adam Twiss, Zeus Technology Ltd, http://www.zeustech.net/
Licensed to The Apache Software Foundation, http://www.apache.org/

Benchmarking 192.168.184.142 (be patient)
Completed 1000 requests
Completed 2000 requests
Completed 3000 requests
Completed 4000 requests
Completed 5000 requests
Completed 6000 requests
Completed 7000 requests
Completed 8000 requests
Completed 9000 requests
Completed 10000 requests
Finished 10000 requests


Server Software:        nginx/1.14.1
Server Hostname:        192.168.184.142
Server Port:            80

Document Path:          /test.php
Document Length:        43330 bytes

Concurrency Level:      100
Time taken for tests:   0.527 seconds
Complete requests:      10000
Failed requests:        0
Write errors:           0
Total transferred:      435160000 bytes
HTML transferred:       433300000 bytes
Requests per second:    18986.36 [#/sec] (mean)   //与上面的对比差距是非常大的
Time per request:       5.267 [ms] (mean)
Time per request:       0.053 [ms] (mean, across all concurrent requests)
Transfer rate:          806845.98 [Kbytes/sec] received

Connection Times (ms)
              min  mean[+/-sd] median   max
Connect:        0    0   0.3      0       4
Processing:     1    5   0.9      5       8
Waiting:        0    5   0.9      5       8
Total:          4    5   0.9      5       8

Percentage of the requests served within a certain time (ms)
  50%      5
  66%      5
  75%      6
  80%      6
  90%      6
  95%      7
  98%      7
  99%      7
 100%      8 (longest request)
练习:
(1) root 为同一路径;
(2) root 为不同的路径;
location \.php$ {
root /web/app/wp;
}
location / {
root /web/htdocs;
}
如何解决 root 路径不同的问题?
(3) fpm server 为另一主机;
location \.php$ {
fastcgi_pass fastcgi://192.168.184.142:9000;
}
location / {
root /web/htdocs;
}
总结:
cache:
proxy_cache
fastcgi_cache

css – :has vs:matches – Selectors Level 4
规范http://dev.w3.org/csswg/selectors-4/#overview说:
E:matches(s1,s2)
an E element that matches compound selector s1 and/or compound selector s2
§4.2 The Matches-any Pseudo-class: :matches()E:has(rs1,rs2)
an E element,if either of the relative selectors rs1 or rs2,when evaluated with E as the :scope elements,match an element
§4.4 The Relational Pseudo-class: :has()
解决方法
> E:has(rs1,rs2)匹配E,当不同的元素F匹配任何与E相关的选择器参数时.如果你知道jQuery的:has() selector,这是完全相同的.
> E:匹配(s1,s2)匹配E,当E本身匹配任何选择器参数时.可以认为:matches()与:not()直接相反,如果E本身与任何参数都不匹配,则匹配E.您还可以将:matches()视为jQuery的.filter() method的伪类版本.
这种表示法相当于将每个选择器参数与E连接(假设你实际上可以连接它们),这样你就有了一个选择器列表(E)(s1),(E)(s2).例如,div:matches(.foo,.bar)相当于div.foo,div.bar.
使用选择器div最直接地证明了这个基本区别:匹配(p)和div:has(p):
> div:has(p)匹配任何具有p后代的div元素.
这与div p非常相似,除了前者以div为目标
而后者的目标是p.
>由于div永远不能是p,div:matches(p)永远不会匹配
任何东西. (同样,div:not(p)将匹配所有div元素.)
这是一个更复杂的例子,略微不那么荒谬的选择器:
div:has(.foo,.bar)
div:matches(.foo,.bar)
使用以下标记:
<div></div> <!-- [1] -->
<div></div> <!-- [1] -->

<div>   <!-- [2] -->
  <p></p>
</div>

<div>                   <!-- [3] -->
  <p></p>
</div>

<div>                   <!-- [3] -->
  <div>                 <!-- [3] -->
    <p></p>
  </div>
</div>

<div>                   <!-- [4] -->
  <div>     <!-- [5] -->
    <p></p>
  </div>
</div>
选择器匹配哪些元素?
>按div匹配:匹配(.foo,.bar)
第一个div元素具有“foo”类,第二个div元素具有“bar”类,因此每个元素在:matches()伪类中满足其各自的选择器参数.
>按div匹配:匹配(.foo,.bar)
第三个div元素有两个类,因此它匹配两个选择器参数.
关于特异性的说明:这两个参数具有相同的特异性,使得总特异性(0,1,1),但是当一个元素匹配具有不同特异性值的多个选择器参数时,规范称为the specificity is that of the most specific argument that is matched.
> div匹配:has(.foo,.bar)
这些div元素中的每一个都有一个后代元素(在本例中为p),其中一个类与:has()伪类中的相应选择器参数相匹配.
> div匹配:has(.foo,.bar)
这个div元素有一个div.foo后代和一个p.bar后代,因此它满足两个相对选择器参数.
关于特异性的说明:因为:has()尚未在fast profile中,因此暂时被排除在CSS之外,特异性的概念根本不适用.有计划在快速配置文件中包含一个限制版本用于CSS,但目前还没有具体的内容.任何新的发展都将在适当的时候增加.
> div匹配:匹配(.foo,.bar)和div:has(.foo,.bar)
这个div元素匹配两个伪类:
>它是.foo(因为它有“foo”类),和
>它有一个带有“bar”类的后代.
这个元素也匹配div:matches(.foo,.bar):has(.foo,.bar),它是一个有效的4级选择器,因为复合选择器可以有任何伪类的组合.
另外一个区别是:matches()和:has()是:has()接受所谓的relative selector.相对选择器有一个范围;选择器作用域本身就是一个完整的主题,但出于以下目的:has(),作用域元素始终是您附加的元素:has()伪类.但是,更重要的是,相对选择器可以具有隐式后代组合子,或者明确地使用组合器(例如>或〜)开始 – 这个组合器将相对选择器的其余部分链接到其作用域元素.
例如,while:has()默认为祖先 – 后代关系,您可以传递以…开头的相对选择器,然后它变成邻近兄弟关系:ul:has(p)匹配任何直接后跟的ul元素ap(并不一定包含ap后代).
至于:matches(),而概述表说它接受了一个复合选择器列表,AFAIK还没有确定它是否需要复合选择器列表或复杂选择器,以及哪个配置文件(快速)或完成).但是复合选择器只是Selectors 3当前称为sequence of simple selectors的新名称,复杂选择器是整个系列的复合选择器和组合器.在这方面,相对选择器更像是复杂的选择器.有关选择器中使用的各种术语的非详尽列表,请参阅this answer.
1是的,这是复数的“参数” – 在选择器4,:not() can now accept a list of selectors中而不是单个简单选择器.这是一个急需的增强功能,但它也是为了使其与其他新的功能伪类保持一致.

CSS 派生选择器 contextual selectors
总结
以上是小编为你收集整理的CSS 派生选择器 contextual selectors全部内容。
如果觉得小编网站内容还不错,欢迎将小编网站推荐给好友。

css-selectors – Google跟踪代码管理器中“点击类”和“点击元素”之间的差异
假设我有class =“按钮初级小”.
什么工作:
Click Element -> Matches CSS selector -> .buttons.small
Click Classes -> contains -> small
什么不起作用
Click Element -> contains -> .buttons.small
Click Classes -> Matches CSS selector -> small
如果Click Classes是“一个对象类的数组”,那么当进行这种操作时,GTM的“幕后”究竟会发生什么?
这不是我有一个真正的问题,只是试图正确理解.
解决方法
Click元素返回作为操作目标的HTML元素.
“contains”是GTM中用于对齐字符串的匹配类型.这就是为什么它适用于Click Classes(返回一个字符串)而不是Click Element.
“匹配CSS选择器”检查任何给定元素是否与给定的CSS选择器匹配.因此,必须对HTML元素执行“匹配CSS选择器”.这就是为什么它适用于Click Element而不是Click Classes.
在我看来,Click Classes是多余的,因为你最好不要对Click Element进行CSS选择器检查,而不是对Click Classes进行字符串匹配.这种方式更加健壮,您也不必担心类名属于类属性值中的某个顺序.
换句话说,更好:
单击元素匹配CSS选择器.buttons.primary.small
更差:
单击“类”包含主要小按钮
关于python selectors 模块应用和python的selector模块的介绍现已完结,谢谢您的耐心阅读,如果想了解更多关于7、nginx 的 upstream 及 fastcgi 模块应用、css – :has vs:matches – Selectors Level 4、CSS 派生选择器 contextual selectors、css-selectors – Google跟踪代码管理器中“点击类”和“点击元素”之间的差异的相关知识,请在本站寻找。
本文标签:


