关于python不关闭控制台的实现方法和python不关闭窗口的问题就给大家分享到这里,感谢你花时间阅读本站内容,更多关于CorePython|2-CorePython:GettingStarted|
关于python 不关闭控制台的实现方法和python不关闭窗口的问题就给大家分享到这里,感谢你花时间阅读本站内容,更多关于Core Python | 2 - Core Python: Getting Started | 2.5 - Modularity | 2.5.5 - The Python Execution Mod、Error: Can‘t find Python executable “python“, you can set the PYTHON env variable、ERROR: Command "python setup.py egg_info" python-nss、python + docker, 实现天气数据 从 FTP 获取以及持久化(二)-- python 操作 MySQL 数据库等相关知识的信息别忘了在本站进行查找喔。
本文目录一览:- python 不关闭控制台的实现方法(python不关闭窗口)
- Core Python | 2 - Core Python: Getting Started | 2.5 - Modularity | 2.5.5 - The Python Execution Mod
- Error: Can‘t find Python executable “python“, you can set the PYTHON env variable
- ERROR: Command "python setup.py egg_info" python-nss
- python + docker, 实现天气数据 从 FTP 获取以及持久化(二)-- python 操作 MySQL 数据库
")
python 不关闭控制台的实现方法(python不关闭窗口)
直接打开dos窗口,再执行python程序
在脚本的最后一行后面添加:raw_input()语句,这样直到按下回车键,窗口才关闭。
使用time模块的sleep函数,它有一个参数,传入数字,其单位是秒:
代码如下:
import time
print “aaaaaaaaaaa”
time.sleep(150);
如果控制台里面的行数过多过乱,我们可以使用下面语句进行清屏:
代码如下:
import os
#linux
os.system(‘cls’)
#windows
os.system(‘clear’)
但是交互运行(非脚本运行)敲上述代码可能会多打印返回值 0
代码如下:
import os
#linux
os.system(‘echo “Press any key to continue…” read’)
#windows
os.system(‘pause’)

Core Python | 2 - Core Python: Getting Started | 2.5 - Modularity | 2.5.5 - The Python Execution Mod
It's important to understand the Python execution model and precisely when function deFinitions and other important events occur when a module is imported or executed. Here, we show execution of our Python module as it's imported in a graphical debugging environment. We step through the top‑level statements in the module. What's important to realize here is that the def used for the fetch_words function isn't merely a declaration. It's actually a statement, which when executed in sequence with the other top‑level model scope code, causes the code within the function to be bound to the name of the function. When modules are imported or run, all of the top‑level statements are run, and this is the means by which the function within the module namespace are defined. We are sometimes asked about the difference between Python modules, Python scripts, and Python programs. Any .py file constitutes a Python module. But as we've seen, modules can be written for convenient import, convenient execution, or using the if dunder name = dunder main idiom, both. We strongly recommend making even simple scripts importable since it eases development and testing so much if you can access your code from within the REPL. Likewise, even modules, which are only ever meant to be imported in production settings, benefit from having executable test code. For this reason, nearly all modules we create have this form of defining one or more importable functions with a postscript to facilitate execution. Whether you consider a module to be a Python script or Python program is a matter of context and usage. It's certainly wrong to consider Python to be merely a scripting tool, in the vein of Windows batch files or UNIX Shell scripts, as many large and complex applications are built exclusively with python.
- def不仅仅是一个declaration声明,更是一条statement语句。它将其中的python代码于函数名绑定在一起
- 一个py文件就是一个模块,这个模块包含类或函数。你写python,要尽量将代码包装成函数和类,方便各种import
- 一个py文件也可看作是一个脚本,在系统命令行中运行
- python不仅仅是脚本语言,很多大型程序都是用python构建的

Error: Can‘t find Python executable “python“, you can set the PYTHON env variable
在启动vue项目的时候,安装node.js组件node-sass过程中报错了,错误提示如下
Error: Can’t find Python executable “python”, you can set the PYTHON env variable
由错误提示可知:Node.js 在安装模块组件node-sass的时候,node.js缺少Visual Studio2015 Build Tools相关的组件和python的环境,如果安装了vs2015组件的小伙伴们就不用安装Visual Studio2015 Build Tools相应的组件,只用安装python2.7即可解决缺少的python组件的问题。
欲安装python2.7,请至python官网:www.python.org 下载,然后配置好python的环境变量即可。
不过博主我并不推荐上述的解决方案,因为对于程序员来说,效率第一,上述的问题一个命令就可以轻松解决你所遇到的麻烦,前面说了那么多,无非就是想告诉在看本篇博客的同仁们放下浮躁的心,遇到问题首先不是急着去解决问题,而是分析为什么会这样,然后才能水到聚成的去找到解决问题的方法。
运行下面这个命令即可解决你们遇到的Error问题
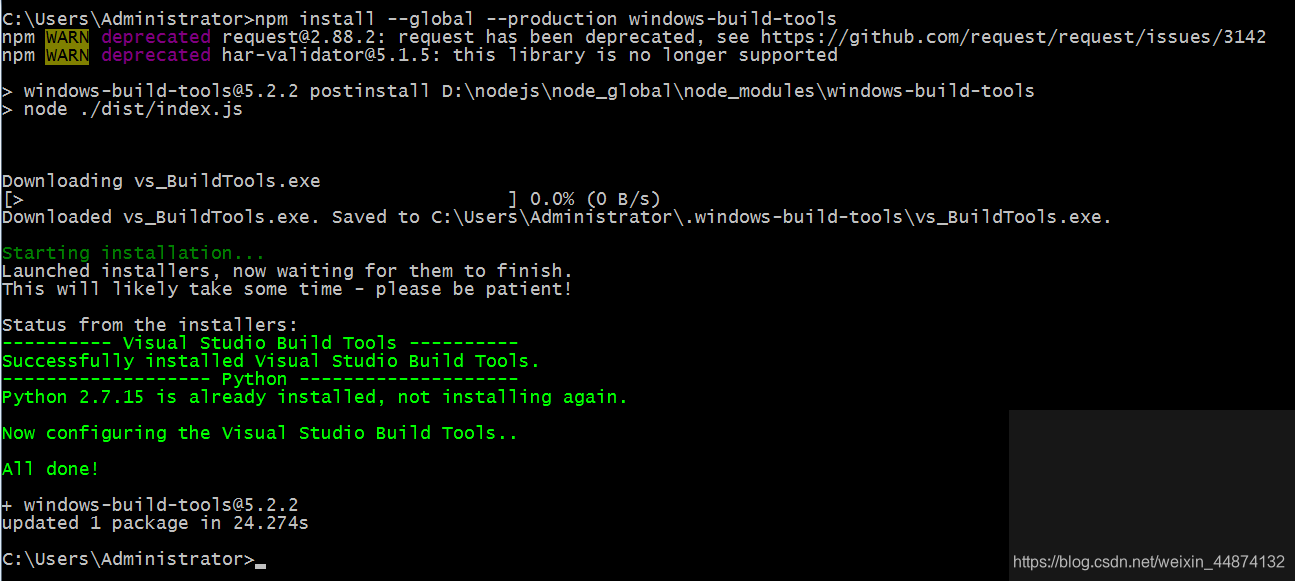
npm install --global --production windows-build-tools
注:上面讲述了一堆就是为了讲述此命令是干嘛的,上面已经描述很详细了,就不再赘述了,该操作与上述的一堆操作无异,效果却是一样的。
然后运气不好的小伙伴可能接着会遇到一个坑,那就是执行了:npm install --global --production windows-build-tools这个命令的人细心点会发现执行到一半就卡住了,这个卡住了没有红字重点提示,而且下方还有英文在等待中,粗心的小伙伴可能以为是命令执行完了,组件安装好了,其实不然,我这边已经解决了,就无法复现了,具体点就是中文的提示,提示我们由于有类似组件在运行或者下载导致无法继续下载安装组件了。稳妥点的解决办法是,将电脑重启,将底层正在运行的模块干掉,待电脑重启后再执行npm install --global --production windows-build-tools这条命令即可,博主我就是这样解决的,稳稳的幸福就会浮现在你面前如下图所示,你的可能和我不一样,因为我已经跑成功过一次了,没有你的那么多细节的log打印。
然后就是在你的项目下shift+鼠标右击你的项目运行npm run dev即可启动vue项目了。

ERROR: Command "python setup.py egg_info" python-nss
[root@localhost ~]# pip install python-nss

DEPRECATION: Python 2.7 will reach the end of its life on January 1st, 2020. Please upgrade your Python as Python 2.7 won''t be maintained after that date. A future version of pip will drop support for Python 2.7.
Looking in indexes: http://pypi.douban.com/simple
Collecting python-nss
  Downloading http://pypi.doubanio.com/packages/6b/29/629098e34951c358b1f04f13a70b3590eb0cf2df817d945bd05c4169d71b/python-nss-1.0.1.tar.bz2 (222kB)
     |████████████████████████████████| 225kB 31kB/s
    ERROR: Complete output from command python setup.py egg_info:
    ERROR: Traceback (most recent call last):
      File "<string>", line 1, in <module>
      File "/tmp/pip-install-JGnrT5/python-nss/setup.py", line 409, in <module>
        sys.exit(main(sys.argv))
      File "/tmp/pip-install-JGnrT5/python-nss/setup.py", line 333, in main
        nss_include_dir  = find_include_dir([''nss3'', ''nss''],   [''nss.h'',  ''pk11pub.h''], include_roots=include_roots)
      File "/tmp/pip-install-JGnrT5/python-nss/setup.py", line 94, in find_include_dir
        raise ValueError("unable to locate include directory containing header files %s" % include_files)

    ValueError: unable to locate include directory containing header files [''nss.h'', ''pk11pub.h'']

ERROR: Command "python setup.py egg_info" failed with error code 1 in /tmp/pip-install-JGnrT5/python-nss/
查看错误日志缺少头文件
进入python-nss官网,写着To build python-nss you the C language header files and libraries for both NSPR and NSS will need to be installed. This is system and distribution specific, as such we cannot give you explicit instructions. On Linux typically these packages are called:
- nss-devel
- nspr-devel
yum install nss-devel -y
yum install nspr-devel -y
-- python 操作 MySQL 数据库")
python + docker, 实现天气数据 从 FTP 获取以及持久化(二)-- python 操作 MySQL 数据库
前言
在这一节中,我们主要介绍如何使用 python 操作 MySQL 数据库。
准备
MySQL 数据库使用的是上一节中的 docker 容器 “test-mysql”.

Python 操作 MySQL
我们使用的 IDE 是 “神奇” 的 pycharm:
1. 首先新建一个 python 的项目,并且安装 “mysql-connector-python”。

“mysql-connector-python” 是 MySQL 官方对于 python 的数据驱动,感兴趣的童鞋可以移步这里: https://dev.mysql.com/doc/connector-python/en/
2. 创建 MySQLUtil.py
基于上一节的介绍,我们的任务是要读取 FTP 上的文本文件,从中解析出天气数据,并且插入到数据库表中(持久化)。因此,我们将基本的数据库操作都封装到这个 python 文件中。
3. 准备工作 -- 在第一次连接的时候需要 DDL 操作(创建相应的数据库和表); 之后的的操作是 DML(增 / 删 / 改 / 查)
# -*- coding: utf-8 -*-


from __future__ import print_function

import mysql.connector
from mysql.connector import errorcode

config_prepare = {
  ''user'': ''root'',
  ''password'': ''password'',
  ''host'': ''127.0.0.1'',
  #''database'': ''weather_db'',
  ''raise_on_warnings'': True,
}

config_op = {
  ''user'': ''root'',
  ''password'': ''password'',
  ''host'': ''127.0.0.1'',
  ''database'': ''weather_db'',
  #''raise_on_warnings'': True,
}

def preparation(db_name=''weather_db'', table_name=''weather''):
    try:
        cnx = mysql.connector.connect(**config)
    except mysql.connector.Error as err:
        print(err)
        return (-1)

    # try use db or create it
    try:
        cursor = cnx.cursor()
        cursor.execute("CREATE DATABASE IF NOT EXISTS {} DEFAULT CHARACTER SET ''UTF8MB4''".format(db_name))
        cnx.database = db_name
    except mysql.connector.Error as err:
        print(err)
        #return (-2)


    # Create table if not exist
    try:
        cnx.database = db_name
        cursor = cnx.cursor()
        createTableSql = """CREATE TABLE IF NOT EXISTS `weather`  ( \
        `weather_timestamp` varchar(32) NOT NULL, \
         `weather_data` varchar(256) NOT NULL, \
          PRIMARY KEY (`weather_timestamp`) \
        ) ENGINE=InnoDB;"""

        cursor.execute(createTableSql)
        cursor.close()
    except mysql.connector.errorcode as err:
        print(err.msg)
        return (-3)


    print ("Preparation OK")

    return (0)
4. 插入或更新数据
def insert_or_update_weather_data(datas):
    sql = "INSERT INTO weather(weather_timestamp, weather_data) " \
            "VALUES(%s,%s)" \
            "ON DUPLICATE KEY UPDATE weather_data = VALUES(weather_data);"

    try:
        cnx = mysql.connector.connect(**config_op)

        cursor = cnx.cursor()
        cursor.executemany(sql, datas)

        cnx.commit()

    except mysql.connector.errorcode as e:
        print(''Error:'', e)
        return (-1)

    finally:
        cursor.close()
        cnx.close()

    return (0)
PS: 由于天气数据是由供应商提供,提供的方式是 每日两次(早上 8 点;下午 5 点)放到 FTP 上面,每次提供 7 天的天气预报。 因此,当我们读取天气数据的时候,有一段时间的数据是重合的。因此采用插入或更新 (表中没有天气数据时:插入; 有数据时:更新)的方式来处理。
5. 根据时间条件,读取天气数据
def query_weather_data(begin_time_stamp, end_time_stamp):

    sql = "SELECT weather_timestamp, weather_data FROM weather " \
            "WHERE weather_timestamp BETWEEN %s AND %s;"

    try:
        cnx = mysql.connector.connect(**config_op)

        cursor = cnx.cursor()
# The second parameter must be a tuple that contains all the delimeters
cursor.execute(sql, (begin_time_stamp, end_time_stamp)) rows = cursor.fetchall()
return rows
except mysql.connector.errorcode as e:
print(''Error:'', e)
return []
finally:
cursor.close()
cnx.close()
6. 最后附上测试代码
if __name__ == ''__main__'':
    print("=== Unit test begin ===")

    # Test prepareation
    nRet = preparation()

    # Test insert or update datas in ''weather'' table
    datas1 = (
        (''201804280000'', ''0.0    0.0    0.0    16.461    95.163    6.038    97.493    1013.791''),
        (''201804280015'', ''0.0    0.0    0.0    16.347    95.532    6.046    97.606    1013.713''),
        (''201804280030'', ''0.0    0.0    0.0    16.233    95.901    6.055    97.719    1013.634''),
        (''201804280045'', ''0.0    0.0    0.0    16.139    96.269    6.063    97.832    1013.556''),
    )
    nRet1 = insert_or_update_weather_data(datas1)

    datas2 = (

        (''201804280030'', ''{data1:0.0, data2:0.0, data3:0.0, data4:16.233, data5:95.901, data6:6.055, data7:97.719, data8:1013.030}''),
        (''201804280045'', ''{data1:0.0, data2:0.0, data3:0.0, data4:11.111, data5:93.901, data6:6.099, data7:97.700, data8:1013.045}''),
    )
    nRet2 = insert_or_update_weather_data(datas2)

    # Test query data from ''weather'' table
    ret_list = query_weather_data(''201804270000'', ''201804280040'')
    if len(ret_list) == 0:
        print ("No data queried out.")
    else:
        for timestamp, data in ret_list:
            print (''timestamp:%s data:%s'' %(timestamp, data))


    print("=== Unit test done ===")
小结
至此,我们操作 MySQL 的工具代码就全部编写完成。 在下一节中,我们将着重 FTP 部分的说明。
感谢大家的收看,欢迎积极留言讨论~~
关于python 不关闭控制台的实现方法和python不关闭窗口的问题我们已经讲解完毕,感谢您的阅读,如果还想了解更多关于Core Python | 2 - Core Python: Getting Started | 2.5 - Modularity | 2.5.5 - The Python Execution Mod、Error: Can‘t find Python executable “python“, you can set the PYTHON env variable、ERROR: Command "python setup.py egg_info" python-nss、python + docker, 实现天气数据 从 FTP 获取以及持久化(二)-- python 操作 MySQL 数据库等相关内容,可以在本站寻找。
本文标签:


