本文将分享运维少年系列-pythonandcisco的详细内容,并且还将对2进行详尽解释,此外,我们还将为大家带来关于2019ACM/ICPC全国邀请赛(西安)JAndAndAnd(树DP+贡献计算)
本文将分享运维少年系列 - python and cisco的详细内容,并且还将对2进行详尽解释,此外,我们还将为大家带来关于2019 ACM/ICPC 全国邀请赛(西安)J And And And (树 DP + 贡献计算)、20190616——and 和 or 使用方法、python 运算符总结、python 数据类型、About bash_profile and bashrc on macOS and higher Serbia、Apache Hive and Apache Tez – Memory management and Tuning的相关知识,希望对你有所帮助。
本文目录一览:- 运维少年系列 - python and cisco(2)(运维教程)
- 2019 ACM/ICPC 全国邀请赛(西安)J And And And (树 DP + 贡献计算)
- 20190616——and 和 or 使用方法、python 运算符总结、python 数据类型
- About bash_profile and bashrc on macOS and higher Serbia
- Apache Hive and Apache Tez – Memory management and Tuning
(运维教程)")
运维少年系列 - python and cisco(2)(运维教程)
运维少年系列 - python and cisco(2)
骚年 运维少年
运维少年系列 - python and cisco(2)
一、任务概述
假设网络有多台可管理的二层交换机,现在需要在每台交换机上创建10个VLAN,在没有CDP的情况下,如何使用python完成?(别忘了python几乎适用于所有支持远程登录的设备)
二、实现步骤说明
1) 先决条件
首先准备的还是和上篇文章一样,交换机需要开启SSH和配置IP,请将所有设备登录的用户名和密码配置一致。
2) 拓扑图

3) 如何实现多IP
如果网络中有台设备,那么每台设备的IP地址都是不一样的(这是废话),我们如何去逐个登录多台设备然后执行命令呢?
在python中,如果是连续的地址,那么我们可以使用for循环实现逐个登录设备的功能,比如
[root@yunwei cisco]# cat for.py
for i in range(1,10):
    print '192.168.108.%s' %i

[root@yunwei cisco]#
[root@yunwei cisco]# python for.py
192.168.108.1
192.168.108.2
192.168.108.3
192.168.108.4
192.168.108.5
192.168.108.6
192.168.108.7
192.168.108.8
192.168.108.9
但是,如果IP不是连续的怎么办呢?那么在python中我们可以将所有的IP写入一个文件,然后使用for循环去逐行循环该文件,实现登录。如
[root@yunwei cisco]# cat IP.txt
192.168.108.252
192.168.108.253
[root@yunwei cisco]#
[root@yunwei cisco]# cat for.py
ip = file('IP.txt','rb')  # 以只读的形式打开文件
for i in ip.xreadlines(): # 逐行读取文件中的内容
    print i,
[root@yunwei cisco]#
[root@yunwei cisco]# python for.py
192.168.108.252
192.168.108.253
[root@yunwei cisco]#
4) 如何实现多命令
如何一次性执行多个文件?我们可以像上次那样使用多次send函数,但很显然,这样效率太低了。我们可以将命令写道一个文件中,使用for循环对文件进行逐行读取,然后执行。如
[root@yunwei cisco]# cat command.txt
conf t
vlan 10
name V10
vlan 20
name V20
vlan 30
name V30
vlan 40
name V40
vlan 50
name V50
vlan 60
name V60
vlan 70
name V70
vlan 80
name V80
vlan 90
name V90
vlan 100
name V100
exit
int e0/0
switchport trunk encapsulation dot1q
switchport mode trunk
end
show vlan

show int trunk

[root@yunwei cisco]#
[root@yunwei cisco]# cat for.py
cmd = file('command.txt','rb')
for i in cmd.xreadlines():
    print i,
[root@yunwei cisco]#
最终脚本
这里做个简单的注释,详细注释请参考第一篇文章。
import paramiko # 导入模块
import time
user = 'yunwsn' # 定义登录用户名
passwd = '123456' # 定义登录密码
s = paramiko.SSHClient() # 实例化
s.set_missing_host_key_policy(paramiko.AutoAddPolicy())
IP = file('IP.txt','rb') # 打开IP文件
for ip in IP.xreadlines(): # 循环IP文件
    s.connect(ip,username=user,password=passwd,look_for_keys=False,allow_agent=False)      # 登录读取到的IP文件行
    print '[ \033[0;32m success\033[0m ] login %s ' %ip  # 打印登录成功信息
    cmd = s.invoke_shell()     # 交互式sshell
    command = file('command.txt','rb') # 因为上面已经登录成功,这里打开命令文件
    for command in command.xreadlines(): # 逐行读取命令
        cmd.send(command)  # 执行命令
        time.sleep(0.1)
        output = cmd.recv(65535) # 每执行一个命令就打印一次
        print output

    cmd.close() # 一个IP命令执行完毕,关闭交互式shell,循环下一个ip
IP.close() # 全部Ip执行完成,则关闭IP文件
效果如下(动图)


J And And And (树 DP + 贡献计算)")
2019 ACM/ICPC 全国邀请赛(西安)J And And And (树 DP + 贡献计算)
Then n - 1n−1 lines follow. ii-th line contains two integers f_{a_i}(1 \le f_{a_i} < i)fai(1≤fai<i), w_i(0 \le w_i \le 10^{18})wi(0≤wi≤1018) —The parent of the ii-th node and the edge weight between the ii-th node and f_{a_i} (ifai(istart from 2)2).
Output
Print a single integer — the answer of this problem, modulo 10000000071000000007.
样例输入 1 复制
2
12
样例输出 1 复制
0样例输入 2 复制
5
1 0
2 0
3 0
4 0
样例输出 2 复制
35
题意:
给你一颗n个节点的有根树,让你求那个公式的值。
题解:
首先来看如何判定两个节点的路径权值异或起来为0,
我们借助异或的一个这样的性质 x^x=0
那么我们不妨维护出根节点到所有节点的异或值,
如果两个节点x,y,根节点到x的异或值和根节点到y的异或值相等,那么x异或到y的值就一定为0.
接下来我们考虑一对符合条件的节点x,y对答案的贡献。
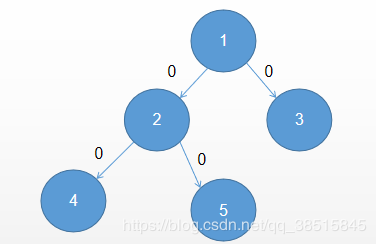
例如这个树中的2和4节点,
我们容易知道,2和4对答案的贡献数量就是4下面那一块(就4这一个节点,)和2右边那一块(2,1,3,5)这四个节点。
那么怎么计算具体的数量呢。
我们把总的贡献数量分为2类来分开求解。
1、计算两个节点在同一条链上。
例如上面说到的2,4就是在同一条链上(这里讲的同一条链上是其中一个节点在和根节点的路径上含有另一个节点。)
那么我们就可以在dfs过程中,在dfs一个节点的子节点之前,把当前节点的贡献加到map里,加的数量用一个变量tmp来维护。
它记录的是该整颗树的节点减去当前节点的子树节点数。那么数量也就是它的子树中的节点如果和它是有效的节点对,
该节点外面可以贡献的节点数量。
当dfs子节点结束后,就返回到之前的数值,对另外一个节点进行dfs,这样可以保证每一次的tmp是针对一个链的。
2、计算不在同一条链上的节点。
同样是dfs,不过这次我们是先dfs,然后更新信息,这样就是一种从下往上更新贡献信息的操作,
因为更新答案是进入dfs就更新的,进入当前节点更新ans的时候,他的子节点还没有加到贡献里,所以就不会重复计算
在同一条立链上的节点,只会计算在不同链上的节点。
本博客参考这个巨巨的博客:https://blog.csdn.net/qq_38515845/article/details/90582561
如果有描述不清楚的地方,可以上这个博客学习。
细节见代码:
#include <iostream>
#include <cstdio>
#include <cstring>
#include <algorithm>
#include <cmath>
#include <queue>
#include <stack>
#include <map>
#include <set>
#include <vector>
#include <iomanip>
#define ALL(x) (x).begin(), (x).end()
#define rt return
#define dll(x) scanf("%I64d",&x)
#define xll(x) printf("%I64d\n",x)
#define sz(a) int(a.size())
#define all(a) a.begin(), a.end()
#define rep(i,x,n) for(int i=x;i<n;i++)
#define repd(i,x,n) for(int i=x;i<=n;i++)
#define pii pair<int,int>
#define pll pair<long long ,long long>
#define gbtb ios::sync_with_stdio(false),cin.tie(0),cout.tie(0)
#define MS0(X) memset((X), 0, sizeof((X)))
#define MSC0(X) memset((X), ''\0'', sizeof((X)))
#define pb push_back
#define mp make_pair
#define fi first
#define se second
#define eps 1e-6
#define gg(x) getInt(&x)
#define db(x) cout<<"== [ "<<x<<" ] =="<<endl;
using namespace std;
typedef long long ll;
ll gcd(ll a, ll b) {return b ? gcd(b, a % b) : a;}
ll lcm(ll a, ll b) {return a / gcd(a, b) * b;}
ll powmod(ll a, ll b, ll MOD) {ll ans = 1; while (b) {if (b % 2)ans = ans * a % MOD; a = a * a % MOD; b /= 2;} return ans;}
inline void getInt(int* p);
const int maxn = 100010;
const int inf = 0x3f3f3f3f;
/*** TEMPLATE CODE * * STARTS HERE ***/
int n;
struct node
{
    int next;
    ll x;
};
ll ans = 0ll;
std::vector<node> son[maxn];
const ll mod = 1e9 + 7;
ll num[maxn];
void dfs_num(int x)
{
    // num[x] 代表x的子树的节点个数。
    //
    num[x]++;
    for (auto y : son[x])
    {
        dfs_num(y.next);
        num[x] += num[y.next];
    }
}
map<ll, int> m;
ll tmp = 0ll;
void dfs1(int id, ll s)
{
    // 同一条链
    ans = (ans + 1ll * num[id] * m[s]) % mod;
    for (auto y : son[id])
    {
        tmp = (tmp + 1ll * num[id] - num[y.next]) % mod;
        m[s] = (m[s] + tmp) % mod;
        dfs1(y.next, s ^ y.x);
        m[s] -= tmp;
        m[s] = (m[s] + mod) % mod;
        tmp -= 1ll * num[id] - num[y.next];
        tmp = (tmp + mod) % mod;
    }
}
void dfs2(int id, ll s)
{
    // 不同链
    ans = (ans + 1ll * num[id] * m[s]) % mod;
    for (auto y : son[id])
    {
        dfs2(y.next, s ^ y.x);
    }
    m[s] = (m[s] + num[id]) % mod;
}
int main()
{
    // freopen("D:\\common_text\\code_stream\\in.txt","r",stdin);
    //freopen("D:\\common_text\\code_stream\\out.txt","w",stdout);
    gbtb;
    cin >> n;
    int id; ll x; node temp;
    repd(i, 2, n)
    {
        cin >> id;
        cin >> x;
        temp.x = x;
        temp.next = i;
        son[id].push_back(temp);
    }
    dfs_num(1);
    // db(ans);
    dfs1(1, 0ll);
    m.clear();
    dfs2(1, 0ll);
    cout << (ans + mod) % mod;


    return 0;
}

inline void getInt(int* p) {
    char ch;
    do {
        ch = getchar();
    } while (ch == '' '' || ch == ''\n'');
    if (ch == ''-'') {
        *p = -(getchar() - ''0'');
        while ((ch = getchar()) >= ''0'' && ch <= ''9'') {
            *p = *p * 10 - ch + ''0'';
        }
    }
    else {
        *p = ch - ''0'';
        while ((ch = getchar()) >= ''0'' && ch <= ''9'') {
            *p = *p * 10 + ch - ''0'';
        }
    }
}

20190616——and 和 or 使用方法、python 运算符总结、python 数据类型
 1 """ 如果有括号:先计算括号内
 2     如果没有括号:
 3     执行顺序:从前到后
 4     结果:True or ==》True
 5         True and ==》继续走
 6         False or ==》继续走
 7         False and ==》Flase
 8 """
 9 user = ''ales''
10 pwd = ''123''
11 v1 = user == ''ales'' and pwd == ''1233'' or user == ''alex'' and pwd == ''1273'' and user == ''alets''
12 v2 = user == ''ales'' and (pwd == ''1233'' or user == ''alex'' and pwd == ''1273'')
13 print(v1)
14 print(v2)

》》》》》》
False
False
 1 结果是值:
 2     算数运算
 3         a=10*10
 4     赋值运算
 5         a=a+1    a+=1
 6
 7 结果是布尔值
 8     比较运算
 9         a=1>5
10     逻辑运算
11         a=1>6 or 1==1
12     成员运算
13         a=“稳” in “证件问”
python 数据类型详见转载文章:
https://www.cnblogs.com/wupeiqi/articles/5444685.html#top

About bash_profile and bashrc on macOS and higher Serbia
About bash_profile and bashrc on macOS
Note:bash_profileis completely different from configuration profiles. Learn more about Configuration Profiles in my book:‘Property Lists,Preferences and Profiles for Apple Administrators’
Note: please consider supporting the author of this siteby purchasing one of my books! Thank you!
In thisspontaneous series on the macOS TerminalI have often mentioned adding something as analiasorfunctionto yourbash_profileorbashrc. ObvIoUsly,you may wonder: how do I do that? And which file should I use?
Why?
When you work with the command line and thebashshell frequently,you will want to customize the environment. This can mean changing environment variables,such as where the shell looks for commands or how the prompt looks,or adding customized commands.
For example,macOS sets thePATHenvironment variable to/usr/local/bin:/usr/bin:/bin:/usr/sbin:/sbinby default. This is a list of directories (separated by a colon ‘:’) that the system searches through in order for commands. I like to add a folder in my home directory~/binto that list,so that I can execute certain tools without needing to type out the full path. (e.g.munkipkg,quickpkgandssh-installer).
Inbashyou append to existingPATHdo this with:
export PATH="$PATH:~/bin"
YouCouldtype this command every time you open a new Terminal window (i.e. shell),or you can configure your shell to do this automatically.
Depending on which shell you use and how you start the shell,then certain script files will be executed which allow you to set up these customizations.
This article will talk about customizingbashon macOS. Other shells and other operating systems may have other files or rules.
So,which file?
Thanks to the rich and long history ofbashthe answer to which file you should put your configuration in,is surprisingly confusing.
There are (mainly) two user level files whichbashmay run when abashshell starts.~/.bash_profileor~/.bashrc.
Both these files are on the first level of your home directory~/. Since the file names start with a.Finder and normallswill not show them. You need to usels -ato see if they are present.Read more about invisible and hidden files here.
The usual convention is that.bash_profilewill be executed at login shells,i.e. interactive shells where you login with your user name and password at the beginning. When yousshinto a remote host,it will ask you for user name and password (or some other authentication) to log in,so it is a login shell.
When you open a terminal application,it does not ask for login. You will just get a command prompt. In other versions of Unix or Linux,this will not run the.bash_profilebut a different file.bashrc. The underlying idea is that the.bash_profileshould be run only once when you login,and the.bashrcfor every new interactive shell.
However,Terminal.app on macOS,doesnotfollow this convention. When Terminal.app opens a new window,it will run.bash_profile. Not,as users familiar with other Unix systems would expect,.bashrc.
Note: The Xterm application installed as part ofXquartzruns.bashrcwhen a new window opens,not.bash_profile. Other third-party terminal applications on macOS may follow the precedent set by Terminal.app or not.
This is all very confusing.
There are two main approaches:
- When you are living mostly or exclusively on macOS and the Terminal.app,you can create a
.bash_profile,ignore all the special cases and be happy. - If you want to have an approach that is more resilient to other terminal applications and might work (at least partly) across Unix/Linux platforms,put your configuration code in
.bashrcand source.bashrcfrom.bash_profilewith the following code in.bash_profile:
if [ -r ~/.bashrc ]; then
   source ~/.bashrc
fi
Theif [ -r ... ]tests wether a file exists and is readable and thesourcecommand reads and evaluates a file in place. Sometimes you see
[ -r ~/.bashrc ] && . ~/.bashrc
(mind the spaces) Which is a shorter way to do the same thing.
Since either file can drastically change your environment,you want to restrict access to just you:
$ chmod 700 ~/.bash_profile
$ chmod 700 ~/.bashrc
That was confusing. Is that all?
No. There are more files which may be executed when a shell is created.
Whenbashcannot find.bash_profileit will look for.bash_loginand if that does not exist either.profile. If.bash_profileis present the succeeding files will be ignored. (though you cansourcethem in your.bash_profile)
There is also a file/etc/profilethat is run for interactive login shells (and Terminal.app). This provides a central location to configure the shells for all users on a system. On macOS/etc/profilesets the defaultPATHwith thepath_helpertool and thensources/etc/bashrcwhich (you guessed) would be the central file for all users that is executed for non-login interactive shells. For macOS Terminal.app/etc/bashrcsets the default prompt and then itself sources/etc/bashrc_Apple_Terminalwhich sets up the session persistence across logins.
So in macOS Terminal.app,before you even see a prompt,these scripts will be run:
-
/etc/profile-
/etc/bashrc-
/etc/bashrc_Apple_Terminal
-
-
- if it exists:
~/.bash_profile- when
~/.bash_profiledoes not exists,~/.bash_login - when neither
~/.bash_profilenor~/.bash_loginexist,~/.profile
- when
-
~/bash_profilecan optionally source~/.bashrc
There is also a file~/.inputrc,where you can setup certain command line input options. One common example for this isto enable case-insensitive tab-completion. You can finda list of more options here.
Finally,there is~/.bash_logoutwhich is run when a shell exits or closes.
Ok,so I have the file,Now what?
Whichever file you choose,(I went with option one and have everything in.bash_profile) Now you want to put stuff in it.
Technically this is a script,so you can do anything you can code inbash. However,usually the contents of a.bash_profileor.bashrcfall into one of three categories:
- setting environment variables,usually ones that affect shell behavior (
PATH) or look and feel (PS1) or set configuration for other commands or programs (CLICOLOR) - aliases
- functions
I will show some examples for each in thenext post!

Apache Hive and Apache Tez – Memory management and Tuning
Apache Tez is an extensible framework for building high performance batch and interactive data processing applications, coordinated by YARN in Apache Hadoop. Tez improves the MapReduce paradigm by dramatically improving its speed, while maintaining MapReduce’s ability to scale to petabytes of data.
Apache Tez是一个基于Apache Hadoop YARN用于构建高性能批计算和交互式数据处理应用的扩展框架。Tez显著提高MapReduce计算速度的同时也拥有其数据扩展的能力。
YARN considers all the available computing resources on each machine in the cluster. Based on the available resources, YARN negotiates resource requests from applications running in the cluster, such as MapReduce. YARN then provides processing capacity to each application by allocating containers. A container is the basic unit of processing capacity in YARN, and is an encapsulation of resource elements (for example, memory, cpu, and so on).
YARN包含了集群中每一台计算机的可用计算资源。基于可用的计算资源,YARN负责应用的资源请求,比如MapReduce。YARN然后通过分配containers来提供处理能力。container是YARN的基本处理单元,包含了像内存、cpu资源等资源。
In a Hadoop cluster, it is important to balance the memory (RAM) usage, processors (cpu cores), and disks so that processing is not constrained by any one of these cluster resources. Generally, allow for 2 containers per disk and per core for the best balance of cluster utilization.
在Hadoop集群中,均衡化内存使用、处理器以及磁盘是非常重要的,如此以至于任务处理不会被集中在集群中的某个节点。通常来说,对于集群应用来说,每个磁盘和cpu核心分配2个containers是较为合适的。
This article is meant to outline the best practices on memory management of application master and container, java heap size and memory allocation of distributed cache.
该文章指明了Application Master、container、java heap size以及分布式缓存内存分配内存管理的最佳实践。
Environment – Apache Hive 1.2.1 and Apache Tez 0.7.0
环境要求:Apache Hive 1.2.1 以及Apache Tez 0.7.0
Keywords – Hadoop, Apache Hive, Apache Tez, HDFS, YARN, Map Reduce, Application Master, Resource Manager, Node Manager, Cluster, Container, Java Heap, Apache HBase, YARN Scheduler, distributed Cache, Map Join, Stack Memory, RAM, disk, Output Sort Buffer
关键字:Hadoop, Apache Hive, Apache Tez, HDFS, YARN, Map Reduce, Application Master, Resource Manager, Node Manager, Cluster, Container, Java Heap, Apache HBase, YARN Scheduler, distributed Cache, Map Join, Stack Memory, RAM, disk, Output Sort Buffer
Few configuration parameters which are important in context of jobs running in the Container are described below -
container中运行的任务的重要的配置参数如下所示:

Calculating YARN and MapReduce Memory Configuration
When determining the appropriate YARN and MapReduce memory configurations for a cluster node, start with the available hardware resources. Specifically, note the following values on each node:
在计算合适的YARN和MR内存配置参数时,请从以下可用的硬件资源开始考虑:
-
RAM (Amount of memory)
-
CORES (Number of cpu cores)
-
disKS (Number of disks)
The total available RAM for YARN and MapReduce should consider the Reserved Memory. Reserved Memory is the RAM needed by system processes and other Hadoop processes (such as HBase).
YARN和MR的总的内存资源必须考虑预留内存,该预留内存用于系统进程以及其他的Hadoop进程(比如Hbase)。
Reserved Memory = Reserved for stack memory + Reserved for HBase Memory (If HBase is on the same node).
预留内存 = stack memory预留内存 + Hbase预留内存
Use the following table to determine the Reserved Memory per node.
使用如下表格来决定每个节点的雨里内存:


The total YARN memory on all nodes usually between 75% and 87.5% of RAM.
YARN内存大概占所有节点总内存的75% - 87.5%。
There are two methods used to determine YARN and MapReduce memory configuration settings
有两种方法来决定YARN和MR的内存配置:
-
Running the YARN Utility Script
-
运行YARN的实用脚本
-
Manually Calculating YARN and MapReduce Memory Configuration Settings
-
计算YARN和MR的内存配置设置
The HDP utility script is the recommended method for calculating HDP memory configuration settings, but information about manually calculating YARN and MapReduce memory configuration settings is also provided for reference.
HDP的实用脚本是用来计算HDP内存配置设置的推荐方式,同时计算YARN和MR内存配置设置的信息也是提供的。
Running YARN Utility script
HDP provides a utility script called hdp-configuration-utils.py script to calculate YARN, MapReduce, Hive, and Tez memory allocation settings based on the node hardware specifications.
HDP提供一个叫做hdp-configuration-utils.py的脚本,该脚本基于节点硬件资源用来计算YARN、MR、Hive以及Tez的内存分配。
To run the hdp-configuration-utils.py script, execute the following command from the folder containing the script hdp-configuration-utils.py options where options are as follows:
运行hdp-configuration-utils.py,请输入以下参数:

运行示例:
Running the following command:
python hdp-configuration-utils.py -c 16 -m 64 -d 4 -k True
The output would look like below -


In Ambari, configure the appropriate settings for YARN and MapReduce or in a non-Ambari managed cluster, manually add the first three settings in yarn-site.xml and the rest in mapred-site.xml on all nodes.
在Ambari中,或者在非Ambari集群中,为了合理配置YARN和Mapreduce,将前面三个配置加到yarn-site.xml中,其余部分加到mapred-site.xml中。
Manually Calculating YARN and MapReduce Memory Configuration
手动计算YARN和MapReduce内存配置
In yarn-site.xml, set yarn.nodemanager.resource.memory-mb to the memory that YARN uses:
在yarn-site.xml文件中,设置yarn.nodemanager.resource.memory-mb规则如下:
- For systems with 16GB of RAM or less, allocate one-quarter of the total memory for system use and the rest can be used by YARN.
比如说有16G或更少内存,那么分配1/4内存用于系统使用,其余给YARN使用。
- For systems with more than 16GB of RAM, allocate one-eighth of the total memory for system use and the rest can be used by YARN.
对于高于16G内存空间的,分配1/8内存用于系统使用,其余用于YARN使用。
yarn.scheduler.maximum-allocation-mb is the same as yarn.nodemanager.resource.memory-mb.
yarn.scheduler.maximum-allocation-mb 的配置和 yarn.nodemanager.resource.memory-mb一样。
yarn.nodemanager.resource.memory-mb is the total memory of RAM allocated for all the nodes of the cluster for YARN. Based on the number of containers, the minimum YARN memory allocation for a container is yarn.scheduler.minimum-allocation-mb. yarn.scheduler.minimum-allocation-mb will be a very important setting for Tez Application Master and Container sizes. The total YARN memory on all nodes usually between 75% and 87.5% of RAM as per the above calculation.
yarn.nodemanager.resource.memory-mb是节点分配给YARN的总内存。基于containers的数量,YARN给container分配的最小内存为:yarn.scheduler.minimum-allocation-mb。yarn.scheduler.minimum-allocation-mb对于Tez Application Master和Container sizes来说非常重要!
Calculation to determine the max number of containers per node
Configuration parameter i.e. tez.am.resource.memory.mb and hive.tez.container.size define Tez application master size and container size respectively.
配置参数,比如 tez.am.resource.memory.mb 和 hive.tez.container.size定义Tez应用master的大小和container的大小。
Set tez.am.resource.memory.mb to be the same as yarn.scheduler.minimum-allocation-mb (the YARN minimum container size)
设置tez.am.resource.memory.mb和yarn.scheduler.minimum-allocation-mb一样的大小。
Set hive.tez.container.size to be the same as or a small multiple (1 or 2 times that) of YARN container size yarn.scheduler.minimum-allocation-mb but NEVER more than yarn.scheduler.maximum-allocation-mb. You want to have headroom for multiple containers to be spun up.
hive.tez.container.size和yarn.scheduler.minimum-allocation-mb大小一样或者是其1-2倍,但是绝对不超过yarn.scheduler.maximum-allocation-mb。
The formula for determining the max number of container allowed per node is
通过如下方式计算单节点container的最大数量:
of containers = min (2CORES, 1.8disKS, (Total available RAM) / MIN_CONTAINER_SIZE)
Here disKS is the value for dfs.data.dirs (number of data disks) per machine and MIN_CONTAINER_SIZE is the minimum container size (in RAM). This value is dependent on the amount of RAM available. In smaller memory nodes, the minimum container size should also be smaller. The following table outlines the recommended values.
其中disKS表示dfs.data.dir,MIN_CONTAINER_SIZE表示最小的container大小。该大小由节点总内存决定,大概可以参考如下表格:

Calculation to determine the amount of RAM per container
The formula for calculating the amount of RAM per container is
通过如下方式计算每个container的大小:
RAM per container = max(MIN_CONTAINER_SIZE, (Total Available RAM) / containers))
With these calculations, the YARN and MapReduce configurations can be set.
基于上述计算方式,YARN和MapReduce配置如下:

Note: please refer output section of #running YARN utility script, to get the exact value of these configuration parameter for a cluster having cores=16, memory=64GB and disks=4.
Calculation to determine Java heap memory of Application Master and Container
Configuration parameter tez.am.launch.cmd-opts and hive.tez.java.ops define java heap memory of Application master and Container respectively.
tez.am.launch.cmd-opts和hive.tez.java.ops定义了Application Master和Container的java堆内存大小。该堆内存大小可设置为container大小的80%。
The heap memory size would be 80% of the container sizes, tez.am.resource.memory.mb and hive.tez.container.size respectfully.

Calculation to determine Hive Memory Map Join Settings parameters
A map-side join is a special type of join where a smaller table is loaded in memory (distributed cache) and join is performed in map phase of MapReduce job. Since there is no reducer involved in the map-side join, it is much faster when compared to regular join.
map端join是一种特殊类型的连接,其中较小的表被加载到内存中(分布式缓存),连接在MapReduce作业的map阶段执行。 因为在映射端连接中不涉及reducer,所以它比常规join快得多。
hive.auto.convert.join.noconditionaltask.size is the configuration parameter to size memory to perform Map Joins.
hive.auto.convert.join.noconditionaltask.size参数用于设置Map Join的内存大小
By default hive.auto.convert.join.noconditionaltask = true
通常我们设置:hive.auto.convert.join.noconditionaltask = true并且设置hive.auto.convert.join.noconditionaltask.size为hive.tez.container.size的1/3
Formula to set the size of the map join is 33% of container size.
i.e.
SET hive.auto.convert.join.noconditionaltask.size to 1/3 of hive.tez.container.size
Calculation to determine the size of the sort buffer
tez.runtime.io.sort.mb is the configuration parameter which defines the size of the soft buffer when output is sorted.
Formula to calculate the soft buffer size is 40% of the container size.
SET tez.runtime.io.sort.mb to be 40% of hive.tez.container.size.
tez.runtime.unordered.output.buffer.size-mb is the memory when the output does not need to be sorted. Its value is 10% of container size
SET tez.runtime.unordered.output.buffer.size-mb to 10% of hive.tez.container.size
A quick summary
小结

(fig to understand the properties with their calculated values)
Example
实例:
Considering a Cluster nodes having 16 cpu cores, 64 GB RAM, and 4 disks.
假如说我们有一个集群,拥有16个cpu核心,64G内存以及4个硬盘。
Reserved Memory = 8 GB reserved for system memory + 8 GB for HBase = 16 GB
我们保留8G用于系统运行,以及8G用于Hbase运行。
If there is no HBase:
如果没有安装Hbase的话,我们通过以下方式计算containers
of containers = min (216, 1.8* 16, (64-8)/2) = min (32, 28.8, 28) = 28
RAM per container = max (2, (64-8)/28) = max (2, 2) = 2

If HBase is included:
如果安装Hbase的话,我们通过以下方式计算containers:
of containers = min (216, 1.8 16, (64-8-8)/2) = min (32, 28.8, 24) = 24
RAM-per-container = max (2, (64-8-8)/24) = max (2, 2) = 2

Note – As container size is multiply of yarn.scheduler.minimum-allocation-mb, 2 multiple of yarn.scheduler.minimum-allocation-mb (i.e. 2048 * 2 = 4096 MB is the recommended configuration)
注意事项:container通常事yarn.scheduler.minimum-allocation-mb的好几倍,一般我们设置为2倍。

Conclusion
结论
The minimum allocation for every container request at the RM is 1024 MB. Memory requests lower than this won’t take effect, and the specified value will get allocated at minimum. The maximum allocation for every container request at the RM is 8192 MB. Memory requests higher than this won’t take effect, and will get capped to this value.
RM上每个容器请求的最小分配是1024 MB。低于这个值的内存请求将不会生效,指定的值将以最小值分配。 RM上每个容器请求的最大分配是8192 MB。高于这个值的内存请求将不会生效,并且会被限制到这个值。
The RM can only allocate memory to containers in increments of yarn.scheduler.minimum-allocation-mb and not exceed yarn.scheduler.maximum-allocation-mb
RM只会给containers分配介于yarn.scheduler.minimum-allocation-mb和yarn.scheduler.maximum-allocation-mb之间的内存。
If one job is asking for 1030 MB memory per map container (set mapreduce.map.memory.mb=1030), RM will give it one 2048 MB (2*yarn.scheduler.minimum-allocation-mb) container because each job will get the memory it asks for rounded up to the next slot size. If the minimum is 4GB and the application asks for 5 GB, it will get 8GB. If we want less rounding, we must make the minimum allocation size smaller.
加如一个任务请求1030MB内存用于map container(set mapreduce.map.memory.mb = 1030),RM会给每个container分配2048MB内存(2*yarn.scheduler.minimum-allocation-mb),这是因为每个人物请求的内存会是上述设置值的倍数。当然,假如你设置的最小值为4G,而你请求5G,那么机会分配8G。所以说,为了更合理配置内存,我们建议将最小分配的内存设置为一个较小的值。
The HEAP memory configuration is 80% of container size and its not 100% because the JVM has some off heap overhead that still counts into the memory consumption of the Linux process.
堆内存的配置通常设置为container的80%,而不是100%。这是因为JVM在使用过程中有一些非堆开销,这些开销仍然会计入Linux进程的消耗。
总结
以上是小编为你收集整理的Apache Hive and Apache Tez – Memory management and Tuning全部内容。
如果觉得小编网站内容还不错,欢迎将小编网站推荐给好友。
原文地址:https://blog.csdn.net/weixin_39636364/article/details/120424837
我们今天的关于运维少年系列 - python and cisco和2的分享就到这里,谢谢您的阅读,如果想了解更多关于2019 ACM/ICPC 全国邀请赛(西安)J And And And (树 DP + 贡献计算)、20190616——and 和 or 使用方法、python 运算符总结、python 数据类型、About bash_profile and bashrc on macOS and higher Serbia、Apache Hive and Apache Tez – Memory management and Tuning的相关信息,可以在本站进行搜索。
本文标签:


