在这里,我们将给大家分享关于PythonSelenium-如何点击非按钮元素的知识,让您更了解pythonselenium点击按钮无效的本质,同时也会涉及到如何更有效地(selenium+python
在这里,我们将给大家分享关于Python Selenium - 如何点击非按钮元素的知识,让您更了解pythonselenium点击按钮无效的本质,同时也会涉及到如何更有效地(selenium+python)_UI 自动化 01_Mac 下 selenium 环境搭建、from selenium import selenium、java+selenium/java+selenium RC 项目搭建连接整理、pycharm+selenium 搭建环境之 no module named''selenium'' 异常解决的内容。
本文目录一览:- Python Selenium - 如何点击非按钮元素(pythonselenium点击按钮无效)
- (selenium+python)_UI 自动化 01_Mac 下 selenium 环境搭建
- from selenium import selenium
- java+selenium/java+selenium RC 项目搭建连接整理
- pycharm+selenium 搭建环境之 no module named''selenium'' 异常解决
")
Python Selenium - 如何点击非按钮元素(pythonselenium点击按钮无效)
如何解决Python Selenium - 如何点击非按钮元素
我一直试图点击 https://blockchain.coinmarketcap.com/chain/bitcoin 上的按钮,但没有成功(如下图所示)。 我什至无法获得我想要点击的元素。 如果有人能帮我找到该元素以及如何点击它,那对我会非常有帮助。 提前致谢。 The Button Im trying to click is the page 2 button
解决方法
首先你需要等到元素出现在页面上,然后滚动到它然后点击它。
我尝试这样做:
from selenium.webdriver.common.by import Byfrom selenium.webdriver.support.ui import WebDriverWaitfrom selenium.webdriver.support import expected_conditions as ECfrom selenium.webdriver.common.action_chains import ActionChainspagination_2_el_xpath = ''//li[@]''pagination_2_el = wait.until(EC.presence_of_element_located((By.XPATH,pagination_2_el_xpath)))time.sleep(0.1)actions = ActionChains(driver)actions.move_to_element(pagination_2_el).perform()pagination_2_el.click()
此外,最好点击“下一页”按钮,以便您可以使用:
from selenium.webdriver.common.by import Byfrom selenium.webdriver.support.ui import WebDriverWaitfrom selenium.webdriver.support import expected_conditions as ECfrom selenium.webdriver.common.action_chains import ActionChainsnext_page_css = ''li.ant-pagination-next''next_page = wait.until(EC.presence_of_element_located((By.CSS_SELECTOR,next_page_css)))time.sleep(0.1)actions = ActionChains(driver)actions.move_to_element(next_page).perform()next_page.click()
_UI 自动化 01_Mac 下 selenium 环境搭建")
(selenium+python)_UI 自动化 01_Mac 下 selenium 环境搭建
前言
Selenium 是一个用于 Web 网页 UI 自动化测试的开源框架,可以驱动浏览器模拟用户操作。支持多种平台 (Windows、Mac OS、Linux) 和多种浏览器 (IE、Firefox、Chrome、Safari),可以用多种语言 (Java,Ruby,Python,Perl,PHP,C#) 编写测试用例。
selenium+python 环境搭建
python 环境安装
mac 上安装 python 环境可参考:Mac 版 - python 环境配置(一):Python 下载安装
安装 selenium
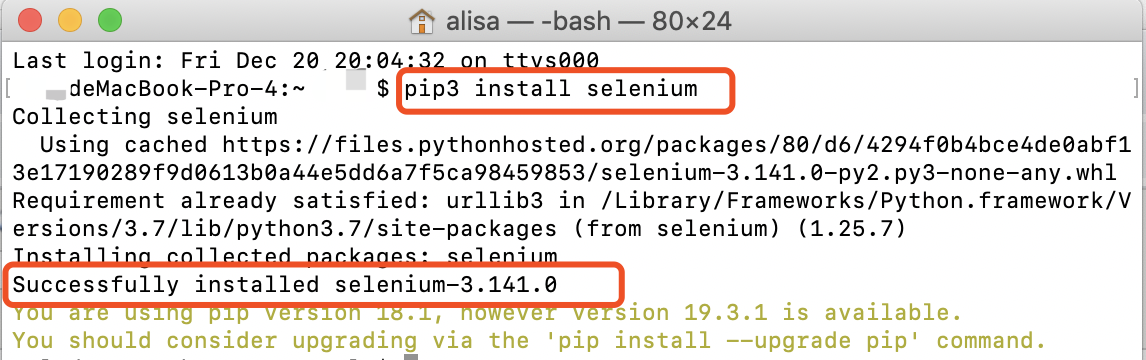
打开终端 ->pip 安装(安装命令:pip3 install selenium)
安装浏览器驱动
安装 Chrome 浏览器驱动 ChromeDriver
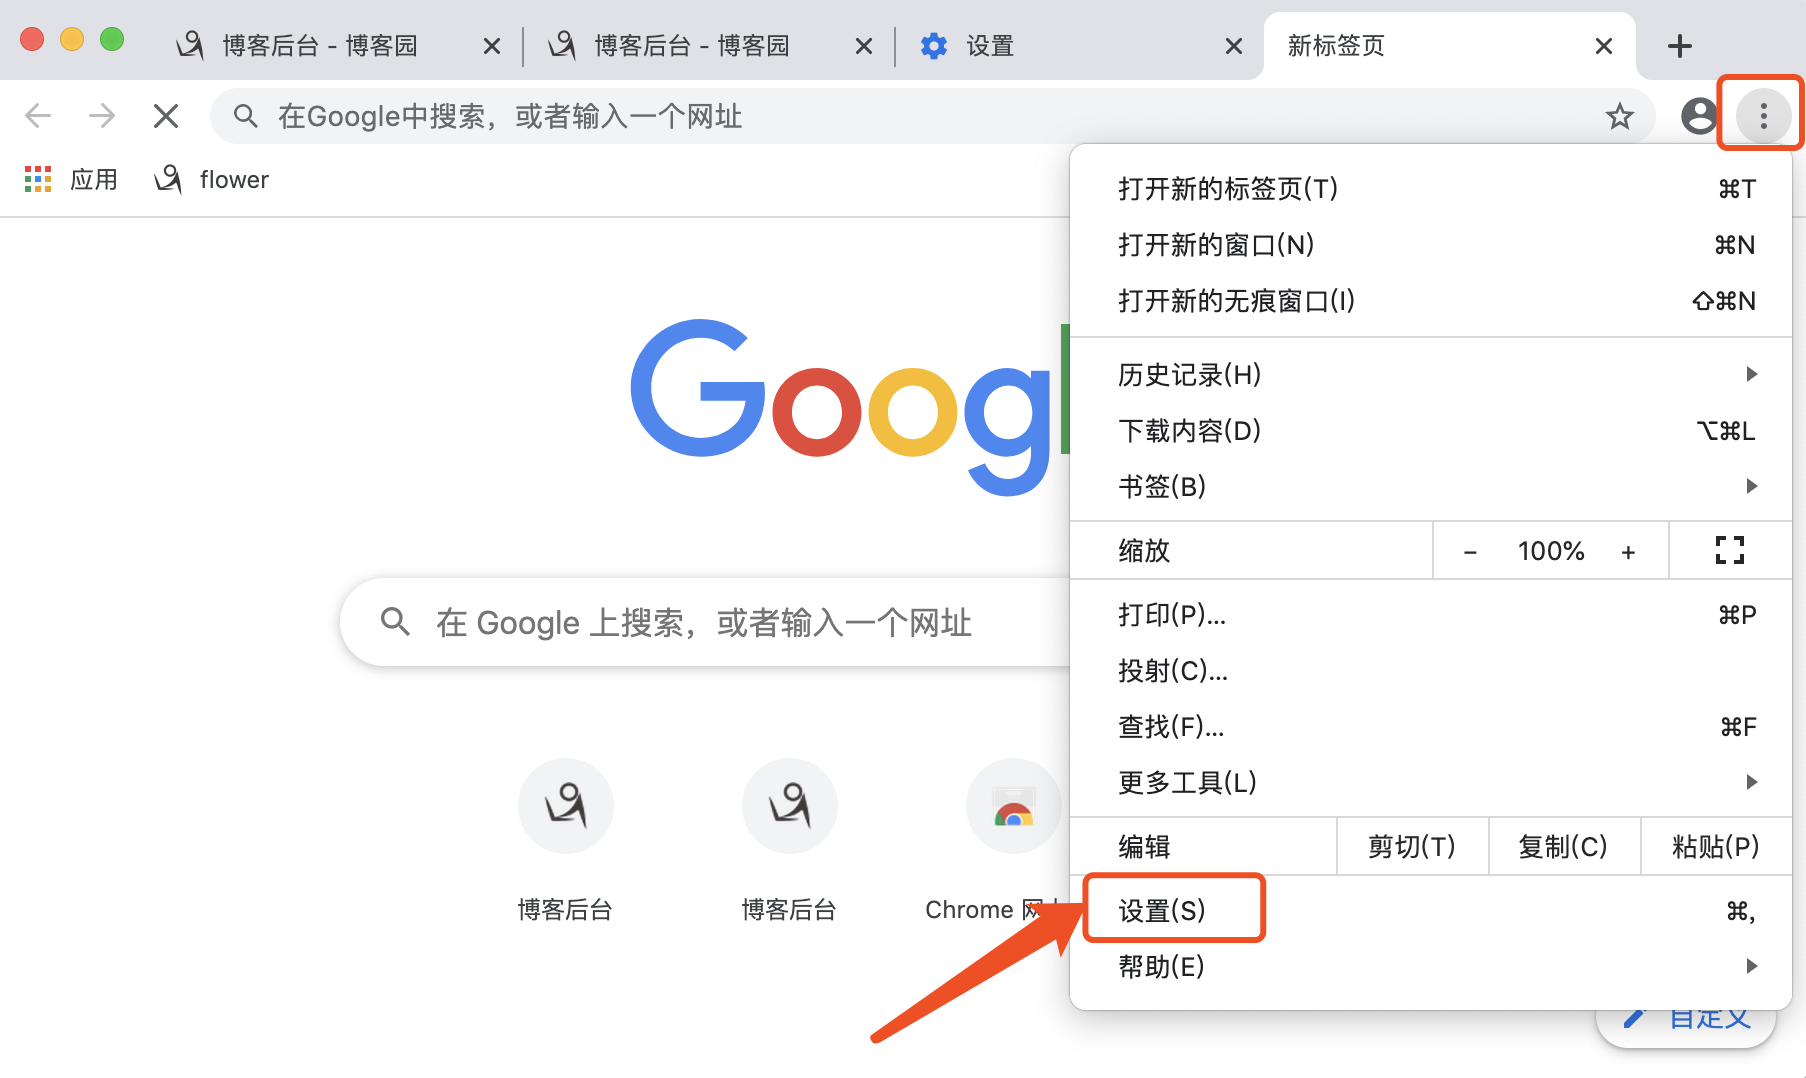
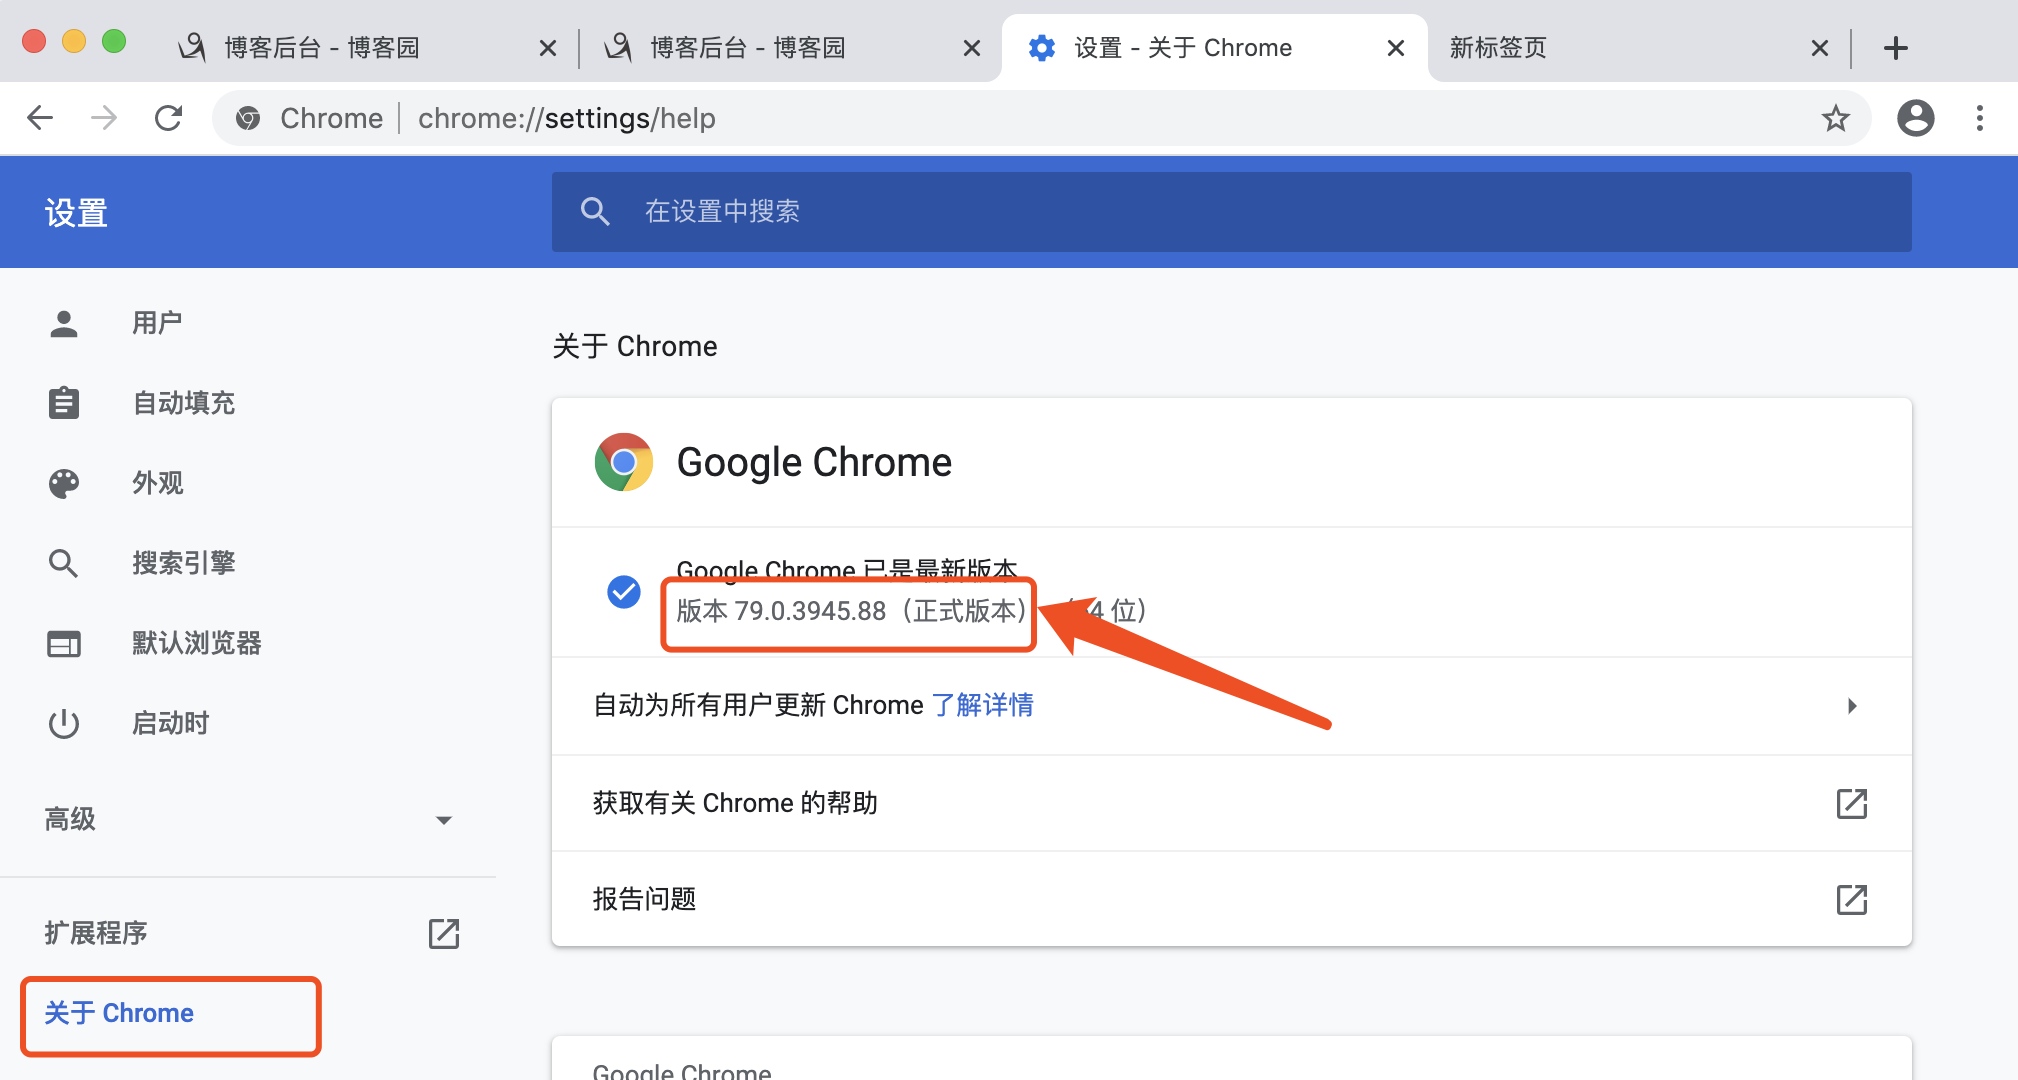
1. 查看 Chrome 版本
设置 -> 关于 Chrome
2. 查找 Chrome 和 ChromeDriver 的对应关系
Chrome 和 ChromeDriver 的对应关系可参考:https://www.cnblogs.com/mini-monkey/p/12088721.html
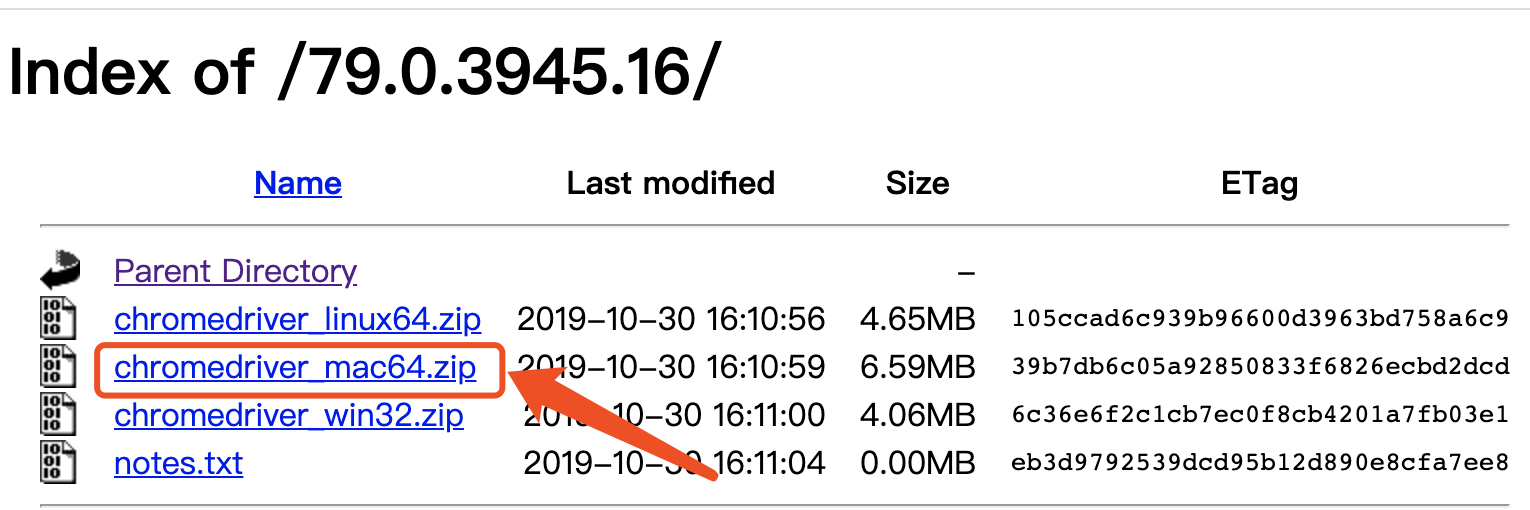
3. 下载对应 ChromeDriver
ChromeDriver 下载地址:http://chromedriver.storage.googleapis.com/index.html
小编 1 中查看到的 chrome 版本为 79,故下载 ChromeDriver 79 版本
4. ChromeDriver 环境配置
进入 /usr/local/bin 目录(由于 Mac 该目录是隐藏的,所以可通过快捷键 command+shift+g 打开)
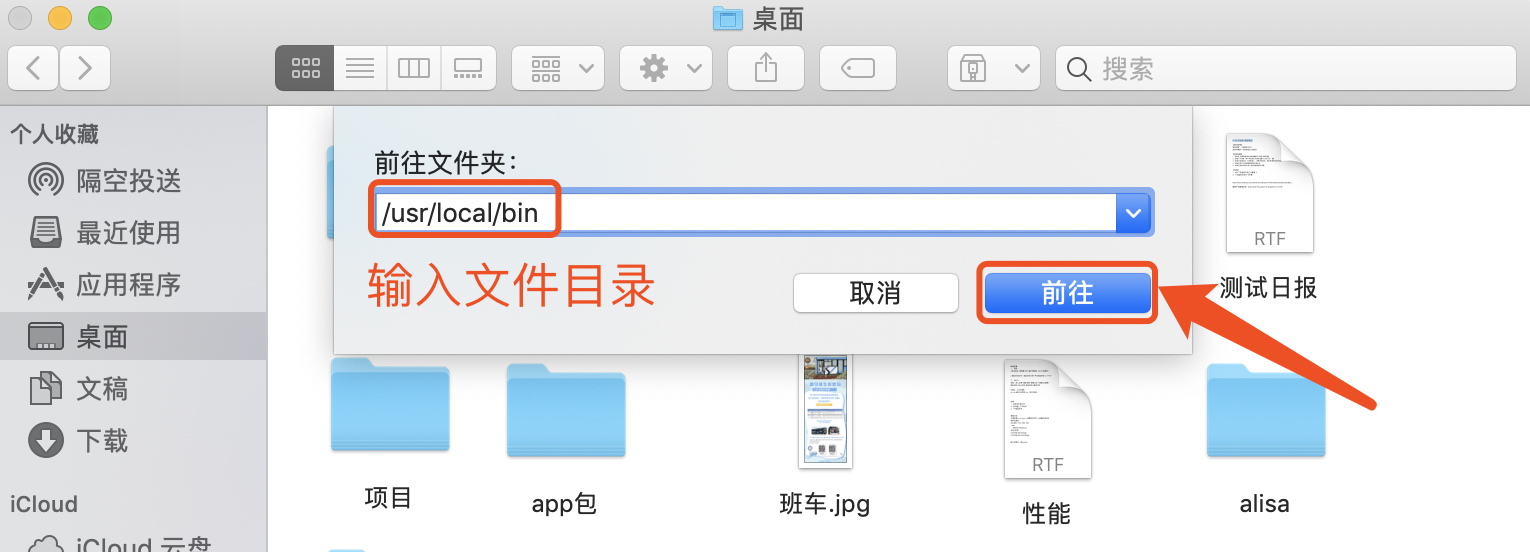
将解压的 ChromeDriver 拖拽到 bin 文件夹中
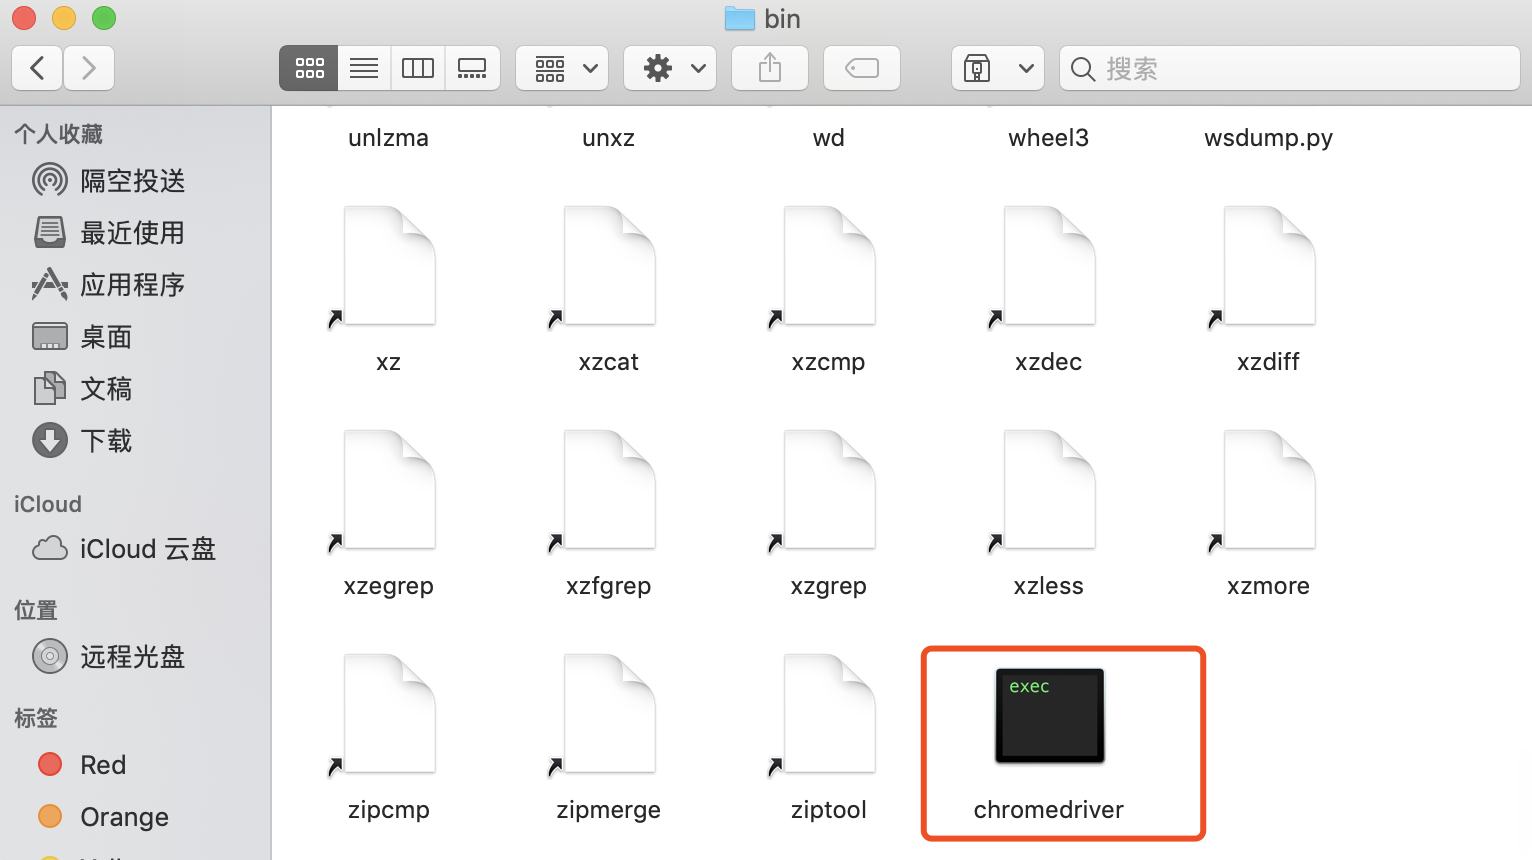
查看 ChromeDriver 版本:chromedriver --version

备注:输出 ChromeDriver 版本即安装成功
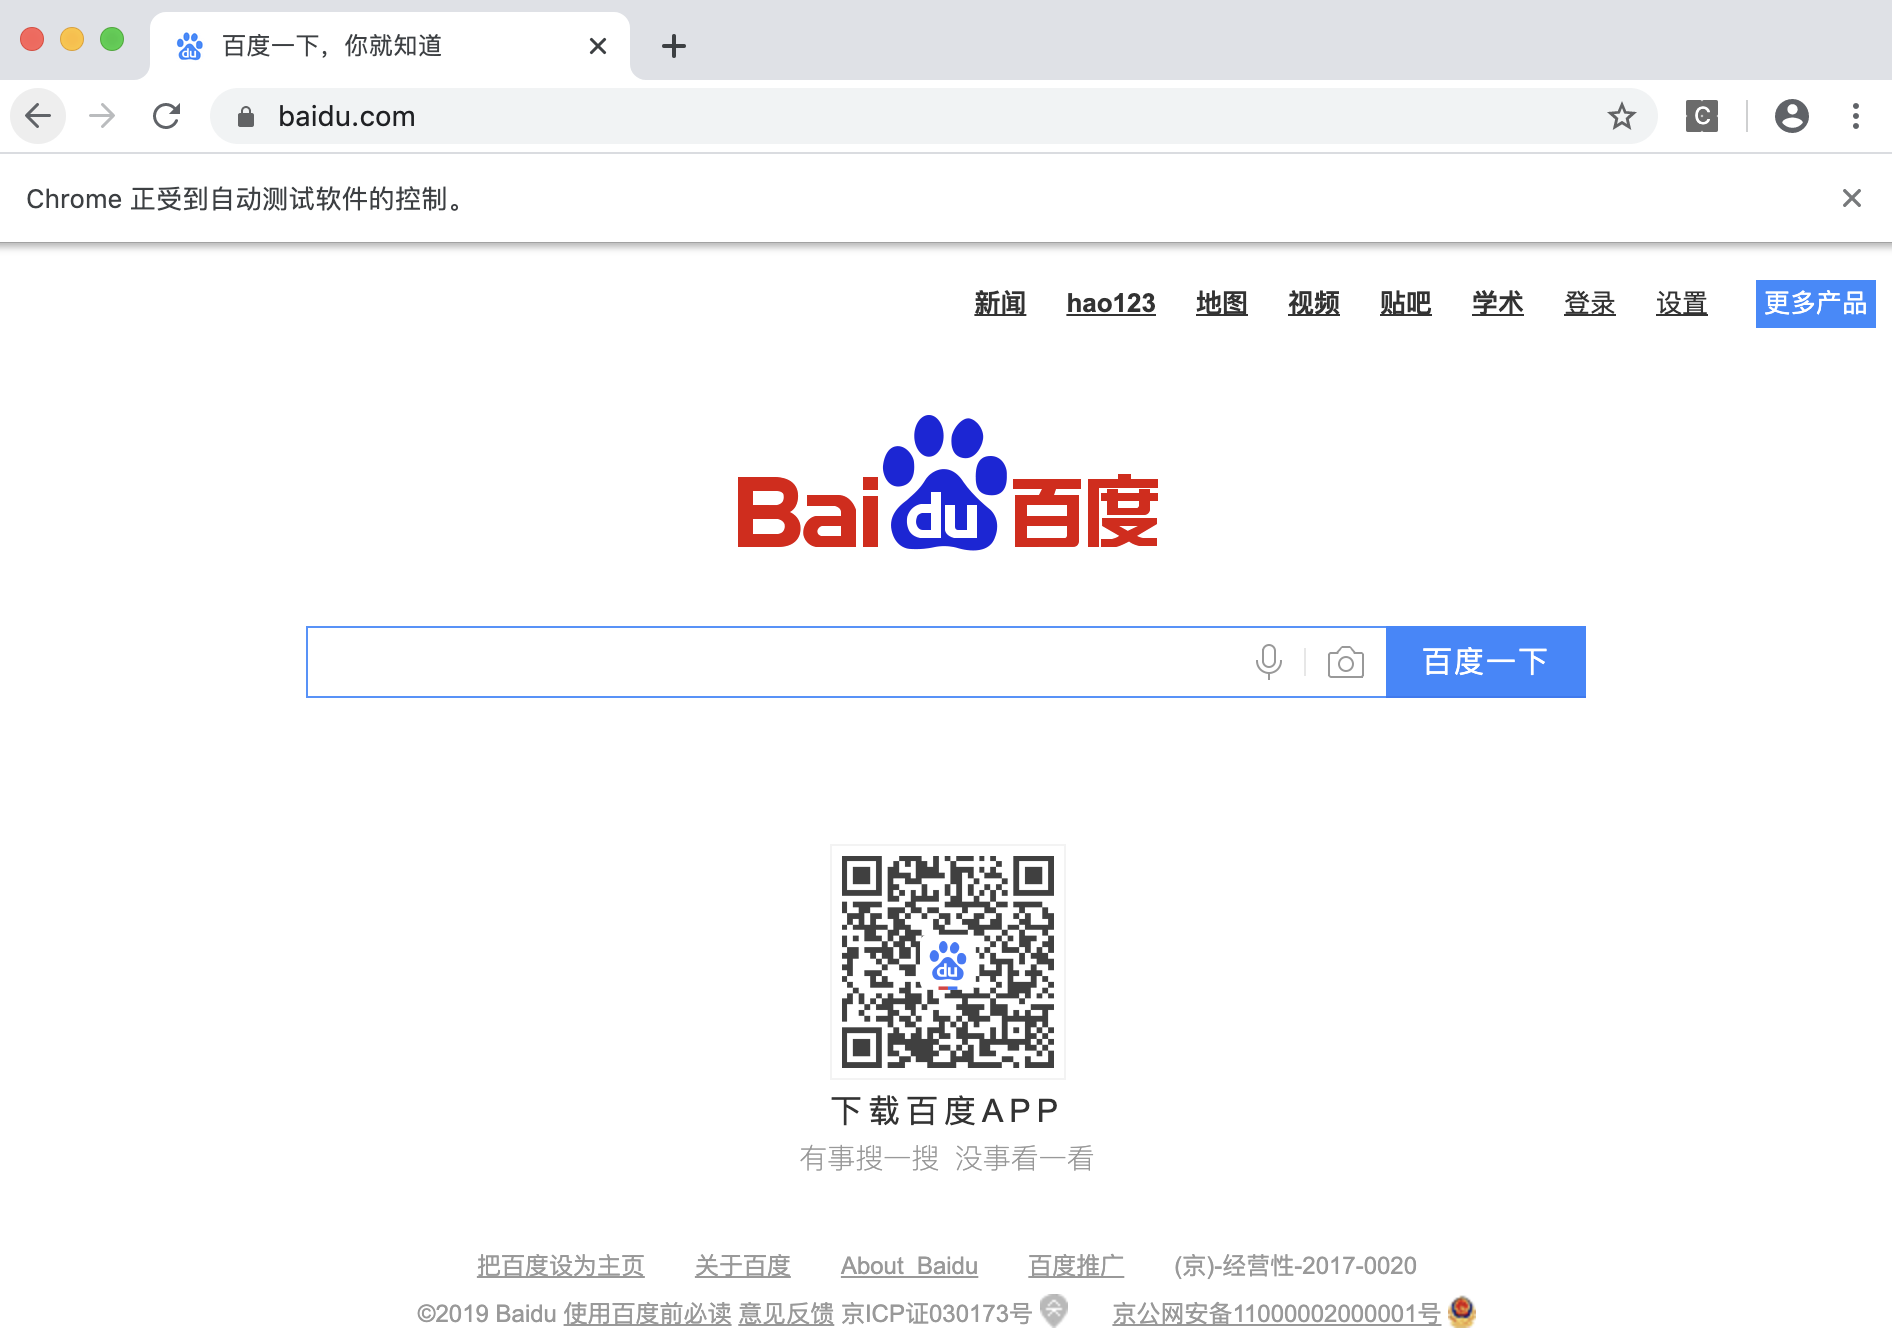
5. 编写脚本启动 Chrome 浏览器
1 # 启动Chrome
2 from selenium import webdriver
3
4 driver = webdriver.Chrome()
5 driver.get(''http://www.baidu.com/'')  # 打开百度
运行脚本,打开百度页

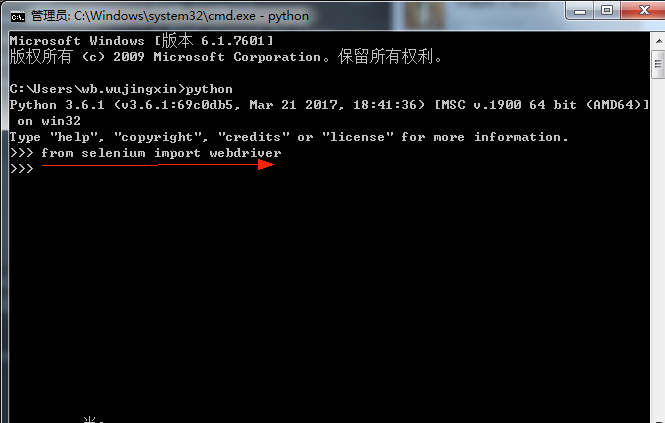
from selenium import selenium
[''__class__'', ''__delattr__'', ''__dict__'', ''__doc__'', ''__format__'', ''__getattribute__'', ''__hash__'',
''__init__'', ''__module__'', ''__new__'', ''__reduce__'', ''__reduce_ex__'', ''__repr__'', ''__setattr__'',
''__sizeof__'', ''__str__'', ''__subclasshook__'', ''__weakref__'', ''addCustomRequestHeader'',
''add_custom_request_header'', ''add_location_strategy'', ''add_script'', ''add_selection'',
''allow_native_xpath'', ''alt_key_down'', ''alt_key_up'', ''answer_on_next_prompt'', ''assign_id'',
''attach_file'', ''captureNetworkTraffic'', ''capture_entire_page_screenshot'',
''capture_entire_page_screenshot_to_string'', ''capture_network_traffic'', ''capture_screenshot'',
 ''capture_screenshot_to_string'', ''check'', ''choose_cancel_on_next_confirmation'',
''choose_ok_on_next_confirmation'', ''click'', ''click_at'', ''close'', ''context_menu'',
''context_menu_at'', ''control_key_down'', ''control_key_up'', ''create_cookie'',
''delete_all_visible_cookies'', ''delete_cookie'', ''deselect_pop_up'', ''do_command'', ''double_click'',
''double_click_at'', ''drag_and_drop'', ''drag_and_drop_to_object'', ''dragdrop'', ''fire_event'',
''focus'', ''get_alert'', ''get_all_buttons'', ''get_all_fields'', ''get_all_links'', ''get_all_window_ids'',
''get_all_window_names'', ''get_all_window_titles'', ''get_attribute'', ''get_attribute_from_all_windows'',
''get_body_text'', ''get_boolean'', ''get_boolean_array'', ''get_confirmation'', ''get_cookie'',
 ''get_cookie_by_name'', ''get_css_count'', ''get_cursor_position'', ''get_element_height'',
''get_element_index'', ''get_element_position_left'', ''get_element_position_top'',
''get_element_width'', ''get_eval'', ''get_expression'', ''get_html_source'', ''get_location'',
 ''get_log'', ''get_mouse_speed'', ''get_number'', ''get_number_array'', ''get_prompt'',
''get_select_options'', ''get_selected_id'', ''get_selected_ids'', ''get_selected_index'',
 ''get_selected_indexes'', ''get_selected_label'', ''get_selected_labels'', ''get_selected_value'',
''get_selected_values'', ''get_speed'', ''get_string'', ''get_string_array'', ''get_table'', ''get_text'',
''get_title'', ''get_value'', ''get_whether_this_frame_match_frame_expression'',
 ''get_whether_this_window_match_window_expression'', ''get_xpath_count'', ''go_back'',
''highlight'', ''ignore_attributes_without_value'', ''is_alert_present'', ''is_checked'',
''is_confirmation_present'', ''is_cookie_present'', ''is_editable'', ''is_element_present'',
''is_ordered'', ''is_prompt_present'', ''is_something_selected'', ''is_text_present'', ''is_visible'',
''key_down'', ''key_down_native'', ''key_press'', ''key_press_native'', ''key_up'', ''key_up_native'',
''meta_key_down'', ''meta_key_up'', ''mouse_down'', ''mouse_down_at'', ''mouse_down_right'',
''mouse_down_right_at'', ''mouse_move'', ''mouse_move_at'', ''mouse_out'', ''mouse_over'', ''mouse_up'',
''mouse_up_at'', ''mouse_up_right'', ''mouse_up_right_at'', ''open'', ''open_window'', ''refresh'',
''remove_all_selections'', ''remove_script'', ''remove_selection'', ''retrieve_last_remote_control_logs'',
 ''rollup'', ''run_script'', ''select'', ''select_frame'', ''select_pop_up'', ''select_window'',
 ''setExtensionJs'', ''set_browser_log_level'', ''set_context'', ''set_cursor_position'',
''set_mouse_speed'', ''set_speed'', ''set_timeout'', ''shift_key_down'', ''shift_key_up'',
''shut_down_selenium_server'', ''start'', ''stop'', ''submit'', ''type'', ''type_keys'', ''uncheck'',
 ''use_xpath_library'', ''wait_for_condition'', ''wait_for_frame_to_load'',
''wait_for_page_to_load'', ''wait_for_pop_up'', ''window_focus'', ''window_maximize'']
java+selenium/java+selenium RC 项目搭建连接整理
手把手__SELENIUM_JAVA 搭建_总结汇总篇:http://wenku.baidu.com/link?url=AbZX_o7JoH9Qaz0Q1aSWvTNLzeOwQCaqf_n0wnvbYAXgF9qoYIY6Chhb0hU6m3_sOI8dZ5iwOKThv9R2QQrmxO7yFNDBzpTBZlRFynIDC2q
selenium _RC _java 环境配置:http://wenku.baidu.com/view/6641fd0f844769eae009ed93.html?re=view

pycharm+selenium 搭建环境之 no module named''selenium'' 异常解决
在 pycharm 上搭建 python+selenium 自动化测试环境时,遇到一个很坑的问题:no moduel named ‘selenium’
如下图:
解决方法:
1. 查看你的 python 是否正确安装了 selenium 包,没有的话,在你的 python 安装目录 D:\Python36\Scripts 下执行 pip install selenium
安装完成后最好直接打开 python,在下面输入 from selenium import webdriver,回车后是否报错,没报错则说明成功安装 selenium 包
2.python 安装好后,查看你的 pycharm 输出控制台,第一行就写了你所使用的 python.exe 的路径,如下图箭头处所示:

检查 python 使用的是不是你刚刚安装的,如果不是,换成你刚刚安装的 python.exe 路径。步骤如下:
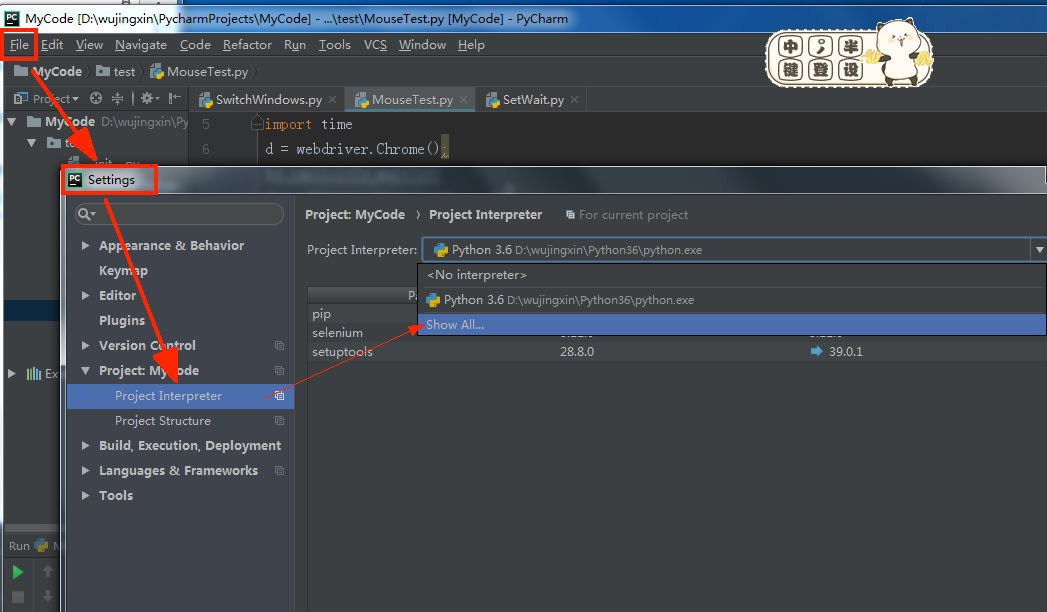
I. 打开 pycharm,点击 Settings,找到 Project Interpreter,点击右边的下拉菜单下的 show All... 选项,如图:
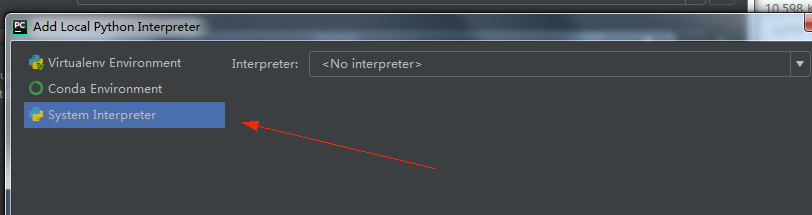
II. 点击 show All... 选项后,点击框框中的 + 号,在点击 System Interpeter 选项,从右边的 Interpreter 把你安装的 python 路径加进去即可
III. 在 I 步骤的 project Interpeter 那里选择你加入的 python 路径,如出现 pip、selenium、setuptools 模块则代表成功了,可以使用 selenium 了

今天关于Python Selenium - 如何点击非按钮元素和pythonselenium点击按钮无效的介绍到此结束,谢谢您的阅读,有关(selenium+python)_UI 自动化 01_Mac 下 selenium 环境搭建、from selenium import selenium、java+selenium/java+selenium RC 项目搭建连接整理、pycharm+selenium 搭建环境之 no module named''selenium'' 异常解决等更多相关知识的信息可以在本站进行查询。
本文标签:


