本篇文章给大家谈谈[转载]Centos7的安装、Docker1.12.3的安装,以及DockerSwarm集群的简单实例,同时本文还将给你拓展1.docker学习笔记之入门,docker在centos
本篇文章给大家谈谈[转载] Centos7 的安装、Docker1.12.3 的安装,以及 Docker Swarm 集群的简单实例,同时本文还将给你拓展1.docker 学习笔记之入门,docker 在 centos7 下的安装以及基础命令的使用、CentOS 下 Docker 与.netcore (五)之 三剑客之一 Docker-swarm 集群、centos7 64bit 安装 docker 最新版教程(Centos7 下安装 Docker Engine)、CentOS7 下 Docker 安装、启动等相关知识,希望对各位有所帮助,不要忘了收藏本站喔。
本文目录一览:- [转载] Centos7 的安装、Docker1.12.3 的安装,以及 Docker Swarm 集群的简单实例
- 1.docker 学习笔记之入门,docker 在 centos7 下的安装以及基础命令的使用
- CentOS 下 Docker 与.netcore (五)之 三剑客之一 Docker-swarm 集群
- centos7 64bit 安装 docker 最新版教程(Centos7 下安装 Docker Engine)
- CentOS7 下 Docker 安装、启动
![[转载] Centos7 的安装、Docker1.12.3 的安装,以及 Docker Swarm 集群的简单实例](http://www.gvkun.com/zb_users/upload/2025/02/057bad24-ae1f-484f-8b0b-86faf9b02ee91739532007892.jpg "[转载] Centos7 的安装、Docker1.12.3 的安装,以及 Docker Swarm 集群的简单实例")
[转载] Centos7 的安装、Docker1.12.3 的安装,以及 Docker Swarm 集群的简单实例
|
节点属性
|
匹配
|
示例
|
|
node.id
|
节点 ID
|
node.id
== 2ivku8v2gvtg4
|
|
node.hostname
|
节点 hostname
|
node.hostname != c2
|
|
node.role
|
节点 role: manager
|
node.role == manager
|
|
node.labels
|
用户自定义 node labels
|
node.labels.security == high
|
|
engine.labels
|
Docker Engine labels
|
engine.labels.operatingsystem == ubuntu 14.04
|
博客地址:Centos7 的安装、Docker1.12.3 的安装,以及 Docker Swarm 集群的简单实例
转载声明:可以转载,但必须以超链接形式标明文章原始出处和作者信息及版权声明,谢谢合作!

1.docker 学习笔记之入门,docker 在 centos7 下的安装以及基础命令的使用
1、更新update到最新的版本
    yum  update
2、卸载老版本docker
    yum  remove docker  docker-common docker-selinux  docker-engine
3、安装需要的软件包
    yum install -y yum-utils  device-mapper-persistent-data lvm2
4、设置yum源
    yum-config-manager --add-repo https://download.docker.com/linux/centos/docker-ce.repo
5、查看docker版本
    yum list docker-ce --showduplicates|sort -r

6、安装docker
    yum  install  docker-ce-18.03.1.ce -y  #yum  install docker-ce-3:20.10.9-3.el8
7、启动docker
    systemctl start docker
8、加入开机自启
    systemctl enable docker

9、配置国内镜像

    vi /etc/docker/daemon.json
    {
        "registry-mirrors": ["http://hub-mirror.c.163.com"]
    }
Docker 包括三个基本概念:
镜像(Image)
容器(Container)
仓库(Repository)如若以上操作 中出现错误

则强制安装此版本
yum install https://download.docker.com/linux/centos/8/x86_64/stable/Packages/containerd.io-1.4.3-3.1.el8.x86_64.rpm
1.启动
 docker start 容器名
2.删除
   docker rm 容器名
3.停止所容器
  docker stop  $(docker ps -a -q)
  docker rm  $(docker ps -a -q)

4.docker build -t 名称 .
  Usage:docker build [OPTIONS] PATH | URL | -

  OPTIONS:
  -t ,--tag list  #构建后的镜像名称
  -f, --file string #指定Dockerfiile文件位置
    示例:
     1,docker build .
     2,docker build -t redis:v1 .
     3,docker build -t redis:v2 -f /path/Dockerfile /path
Dockerfile 快速入门指令
  1.FROM 指定基础镜像

    所谓定制镜像,那一定是以一个镜像为基础,在其上进行定制。就像我们之前运行了一个redis镜像的容器,再进行修改一样,基础镜像是必须指定的。而 FROM 就是指定基础镜像,因此一个  Dockerfile  中  FROM  是必备的指令,并且必须是第一条指令。
    在 Docker Store 上有非常多的高质量的官方镜像,有可以直接拿来使用的服务类的镜像,如nginx  、 redis  、 mongo  、 mysql  、 httpd  、 php  、 tomcat  等;如果没有找到对应服务的镜像,官方镜像中还提供了一些更为基础的操作系统镜像,
    如ubuntu  、 debian  、 centos、 alpine 等这些操作系统的软件库

  2、RUN 执行命令

    RUN  指令是用来执行命令行命令的。
    格式:
      RUN \<command\> (类似/bin/sh -cshell格式)

      RUN ["executable", "param1", "param2"] (exec格式)

    类似shell脚本风格的:
        FROM alpine
        RUN sed -i ''s/dl-cdn.alpinelinux.org/mirrors.aliyun.com/g'' /etc/apk/repositories
        RUN apk add  gcc g++ libc-dev  wget vim  openssl-dev make  linux-headers
        RUN mkdir -p /usr/src/redis
        RUN cd /usr/src/redis
        RUN wget -O redis-4.0.11.tar.gz  "http://download.redis.io/releases/redis-4.0.11.tar.gz"
        RUN tar -xzf redis-4.0.11.tar.gz -C /usr/src/redis
        RUN cd /usr/src/redis/redis-4.0.11 &&  make && make PREFIX=/usr/local/redis install
    之前说过,Dockerfile 中每一个指令都会建立一层, RUN  也不例外。每一个  RUN  的行为,就和刚才我们手工建立镜像的过程一样:新建立一层,在其上执行这些命令,执行结束后, commit这一层的修改,构成新的镜像。使用 Dockerfile 定制镜像
    而上面的这种写法,创建了很多层镜像。这是完全没有意义的,而且很多运行时不需要的东西,都被装进了镜像里,比如编译环境、更新的软件包等等。结果就是产生非常臃肿、非常多层的镜像,不仅仅增加了构建部署的时间,也很容易出错。 这是很多初学
    Docker 的人常犯的一个错误。Union FS是有最大层数限制的,比如 AUFS,曾经是最大不得超过 42 层,现在是不得超过 127 层。
导出容器
导出容器可以导出一个已经创建的容器到一个文件,不管容器处于什么状态,可以使用docker export 命令。 命令格式为:docker export [-o|--output[=""]] CONTATINER 其中可以通过-o来指定导出的tar文件名,也可以直接通过重定向来实现。另一种格式为:docker export 容器 id/name > 文件名.tar
导入容器
  导入的文件可以使用docker import 命令导入变成镜像,该命令的格式为:

   docker import [-c|--change[=[]]] [-m|--message[=MESSAGE]] file|URL|-[REPOSITORY[:YAG]]

   其中-c 选项可以在导入的同时执行对容器进行修改的Dockerfile指令(网络等修改)
另外 docker save&load 命令也可以导入一个镜像存储文件,但是跟 docker import 命令是有区别的
用 export&import 还是 save & load ?
export&import 和 save & load 是 docker 中的两组命令,我们先主要看看他们的区别:
| 类型 | 导出的对象 | 导出文件大小 | 是否可回滚到历史层 |
|---|---|---|---|
| export & import | 将容器导出 | 小 | 否 |
| save & load | 用来将一个或者多个 image 打包 | 大 | 是 |
  相对于文件大小来说,save方式导出的文件比export方式导出的文件大
  正是因为save方式保存了镜像的历史和层(layer),使其可以层回滚,即回滚到之前的历史层,所以save方式导出的文件稍微大一些
  反观export方式,在导出过程中丢失所有的历史,导致其不可以层回滚,导出的文件会小一些
  可以通过 docker history 镜像名 看到层关系
3.2、容器网络
Docker 安装后,默认会创建下面三种网络类型
docker network ls 查看默认的网络

在启动容器时使用 --network bridge 指定网络类型
bridge:桥接网络
默认情况下启动的 Docker 容器,都是使用 bridge,Docker 安装时创建的桥接网络,每次 Docker 容器重启时,会按照顺序获取对应的 IP 地址,这个就导致重启下,Docker 的 IP 地址就变了
none:无指定网络 使用 --network=none ,docker 容器就不会分配局域网的 IP
host: 主机网络 使用 --network=host,此时,Docker 容器的网络会附属在主机上,两者是互通的。 例如,在容器中运行一个 Web 服务,监听 8080 端口,则主机的 8080 端口就会自动映射到容器中
3.3、 指定自定义网络
因为默认的网络不能制定固定的地址,所以我们将创建自定义网络,并指定网段(IP 可以理解为 4 组 8 个二进制组成的一段代码,然后右侧网段的 24 是指锁定前面 24 位,也就是说生成的 IP 会是 192.168.1.X,1-255):192.168.1.0/24 并命名为 mynetwork,指令如下:
docker network create --subnet=192.168.1.0/24 mynetwork
使用此 docker 镜像 创建容器
代码如下:
docker run -itd --name redis-master --net mynetwork -p 6380:6379 --ip 192.168.1.2 redis 参数说明: 具体可以参看一些文档
http://www.runoob.com/docker/docker-run-command.htmlhttp://www.dockerinfo.net/docker%E5%AE%B9%E5%99%A8-2
-d: 后台运行容器,并返回容器ID; -i: 以交互模式运行容器,通常与 -t 同时使用; -p: 端口映射,格式为:主机(宿主)端口:容器端口 -t: 为容器重新分配一个伪输入终端,通常与 -i 同时使用; -V: 为容器挂载目录,比如 /usr/docker/data:/data 前者为数宿主机目录后者为容器内目录 --ip: 为容器制定一个固定的ip --net: 指定网络模式 这样,我们创建了2个容器,来一起查看下结果 docker ps -a 查看容器ip地址 docker network inspect mynetwork
docker build -t redis-test . #在文件夹中用默认的 Dockerfile 创建镜像
docker images #查看当前 docker 镜像
docker history 625dcdca8ecb #查看某个镜像的历史
docker ps -a #查看当前运行的容器
docker run -itd -p 8001:80 -v xxx1:xxx2 --name redis-master redis-test #使用镜像(redis-test)运行容器(redis-master) 宿主机 8001 端口映射到容器 80 端口 宿主机 xxx1 地址与容器 xxx2 地址共享(容器写入 xxx2 的数据同样会出现在宿主机的 xxx1 里)
docker rm 538265c49277 #移除容器
docker exec -it redis-master bash #进入容器 (如果出现:OCI runtime exec failed: exec failed: container_linux.go:348: starting container process caused "exec: \"bash\": executable file not found in $PATH": unknown ,那么就把 bash 改为 sh :docker exec -it redis-master sh)
docker stop $(docker ps -a -q) #停止全部容器(-q 返回容器 id)
docker rm $(docker ps -a -q) #移除所有容器
docker rmi $(docker images -q) #删除所有镜像
docker export f4092a93c312 > nginx-jzy.tar #docker export 容器 id > 文件名.tar 导出容器(镜像快照)
docker import nginx-jzy.tar nginx-jzy:v2 #使用镜像快照创建镜像,创建的镜像没有 history
docker run -itd --name nginx-jzy-v2 e70d288bc4ef bash #使用上面创建的镜像创建容器,这里必须要有 bash 或者其他可以被挂载的进程
docker save a68a3617e7dd > nginx-jzy-save.tar #保存镜像
docker rmi a68a3617e7dd #删除镜像,因为上面导出容器使用的是这个镜像,所以生成了一个依赖这个镜像的镜像 删除失败了(Error response from daemon: conflict: unable to delete a68a3617e7dd (cannot be forced) - image has dependent child images)
docker image inspect --format=''{{.RepoTags}} {{.Id}} {{.Parent}}'' $(docker image ls -q --filter since=a68a3617e7dd) #找出 from 这个镜像的子镜像([nginx-jzy:v2] sha256:e70d288bc4ef3f20015ca839653c1c1555ee7b2524e4085845348c7d990eb998)
docker rmi -f e70d288bc4ef #删除子镜像失败(Error response from daemon: conflict: unable to delete e70d288bc4ef (cannot be forced) - image is being used by running container be7eea6f8a9b)
docker stop be7eea6f8a9b #停止容器
docker rm be7eea6f8a9b #删除容器
docker rmi -f e70d288bc4ef #删除子镜像成功
docker rmi a68a3617e7dd #删除镜像成功
docker load < nginx-jzy-save.tar #读取保存的镜像文件(生成的镜像文件是有 history 的)
docker inspect imageid #查看镜像详情
docker network ls #查看网络列表
docker network inspect id1 #查看网络 id 为 id1 的信息
docker network create --subnet=192.168.1.0/24 redis-network #新增网络连接方式(增加网段)
docker run -itd --name redis-test2 --network=redis-network --ip 192.168.1.3 -p 6381:6379 -v /usr/docker/redis/conf/:/usr/src/redis/conf/redis #根据之前的 redis 镜像生成 redis-test2 容器 使用自定义的 redis-network 网络,指定 ip(必须在网段内),指定端口映射,指定共享文件夹
iptables -t nat -L -n #查看桥接网络
1. 为什么系统镜像那么小呢? 因为 docker 镜像在运行的时候直接使用 docker 宿主机器的 kernel,Linux 操作系统由内核空间和用户空间组成。
内核空间是 kernel,用户空间是 rootfs, 不同 Linux 发行版的区别主要是 rootfs. 比如 Ubuntu 14.04 使用 upstart 管理服务,apt 管理软件包; 而 CentOS 7 使用 systemd 和 yum。这些都是用户空间上的区别,Linux kernel 差别不大。所以 Docker 可以同时支持多种 Linux 镜像, 模拟出多种操作系统环境。容器共同使用镜像的内容(如果发生更改先复制镜像层到容器层然后再修改)
2. 镜像的文件如何存储的?
镜像文件是分层存储的,我们可以通过 docker history 命令查看到镜像的历史,也就是层
启动镜像的时候,一个新的可写层会加载到镜像的顶部。这一层通常称为 “容器层”, 之下是 “镜像层”。
容器层可以读写,容器所有发生文件变更写都发生在这一层。镜像层 read-only, 只允许读取。
Container 最上面是一个可写的容器层,以及若干只读的镜像层组成,Container 的数据就存放在这些层中,这样的分层结构最大的特性是 Copy-On-Write (写时复制):
新数据会直接存放在最上面的 Container 层。
修改现有的数据会先从 Image 层将数据复制到容器层,修改后的数据直接保存在 Container 层,Image 层保持不变。
3. 启动的容器会占用大量空间吗?
创建镜像的时候,分层可以让 docker 只保存我们添加和修改的部分内容。其他内容基于 base 镜像,不需要存储,读取 base 镜像即可。如此,当我们创建多个镜像的时候,所有的镜像共享 base 部分。节省了磁盘空间
docker 通过一个叫做 copy-on-write (CoW) 的策略来保证 base 镜像的安全性,以及更高的性能和空间利用率
简单的说,启动容器的时候,最上层容器层是可写层,之下的都是镜像层,只读层。
当容器需要读取文件的时候:从最上层镜像开始查找,往下找,找到文件后读取并放入内存,若已经在内存中了,直接使用。(即,同一台机器上运行的 docker 容器共享运行时相同的文件)。
当容器需要添加文件的时候:直接在最上面的容器层可写层添加文件,不会影响镜像层。
当容器需要修改文件的时候:从上往下层寻找文件,找到后,复制到容器可写层,然后,对容器来说,可以看到的是容器层的这个文件,看不到镜像层里的文件。容器在容器层修改这个文件。
当容器需要删除文件的时候:从上往下层寻找文件,找到后在容器中记录删除。即,并不会真正的删除文件,而是软删除。
综上,Docker 镜像通过分层实现了资源共享,通过 copy-on-write 实现了文件隔离。
之 三剑客之一 Docker-swarm 集群")
CentOS 下 Docker 与.netcore (五)之 三剑客之一 Docker-swarm 集群
CentOS 下 Docker 与.netcore (一) 之 安装
CentOS 下 Docker 与.netcore (二) 之 Dockerfile
CentOS 下 Docker 与.netcore (三)之 三剑客之一 Docker-Compose
CentOS 下 Docker 与.netcore (四)之 三剑客之一 Docker-machine+jenkins 简单自动化部署
CentOS 下 Docker 与.netcore (五)之 三剑客之一 Docker-swarm 集群
1. 什么是 docker-swarm
在公司网站流量爆发式增长的时候,一台服务器往往不能满足需求,之前我的解决办法是通过 nginx 来实现负载均衡,有了 docker-machine 之后,解决方案会更加简单。当流量增加时,我们按照需要往 docker-swarm 集群中添加主机就可以了。
2. 原理
我们把一组 docker-swarm 集群中的所有 docker 容器统称作一个 service,其中的每一个 docker 容器称做一个 task,如下图
3. 开始搭建环境
上一章我们讲了 docker-machine,在这里我们需要用到。我在我本地 Hyper-v 创建 4 个虚拟机

其中:
CentOS 设置静态 IP: 192.168.8.200,并在这个虚机上搭建好 docker-machine
CentOS2 设置静态 IP:192.168.8.201
CentOS3 设置静态 IP:192.168.8.202
CentOS3 设置静态 IP:192.168.8.203
然后通过 200 节点,分别在 201,202,203 上搭建好 docker

4. 创建集群(swarm 命令)
1)docker-mashine ssh 到 host1 上创建 leader
[root@localhost ~]# docker-machine ssh host1[root@host1 ~]# docker swarm init --advertise-addr 192.168.8.2012)docker-mashine ssh 到 host2 加入集群
[root@localhost ~]# docker-machine ssh host23)docker-mashine ssh 到 host1 上查看集群列表

到此,集群构建完毕,是一个最简单的集群
5. 新建.netcore 项目
1)修改 ValueController.cs
// GET api/values
        [HttpGet]
        public ActionResult<IEnumerable<string>> Get()
        {
            var ip = HttpContext.Connection.LocalIpAddress;
            var port = HttpContext.Connection.LocalPort;
            return new string[] { ip.ToString(), port.ToString() }; }
2)修改 Program.cs
public static IWebHostBuilder CreateWebHostBuilder(string[] args) =>
            WebHost.CreateDefaultBuilder(args).UseUrls("http://*:5000")
                .UseStartup<Startup>();
3)新建 dockerfile,并经属性设置为:始终复制到输出目录
FROM microsoft/dotnet:2.1-aspnetcore-runtime
MAINTAINER yishi.chen
LABEL description="DockerSwarmTest"
LABEL version="1.0"
WORKDIR /app
COPY . .
EXPOSE 5000
ENTRYPOINT ["dotnet","DockerSwarmTest.dll"]
4)构建 image 并上传到 docker-hub
5)创建 service
我们先只创建一个容器

测试接口

6)添加一个容器
[root@host1 ~]# docker service update --replicas 2 cys_web查看运行状态

两个都已经启动
6. 模拟并发请求接口
新建一个控制台程序
using System;
using System.Net.Http;
using System.Net.Http.Headers;
using System.Threading.Tasks;

namespace Client { class Program { static HttpClient httpClient = new HttpClient(); static void Main(string[] args) { Parallel.For(1, 10000, i => { HttpResponseMessage response = httpClient.SendAsync(new HttpRequestMessage { Method = new HttpMethod("GET"), RequestUri = new Uri("http://192.168.8.202:5000/api/values") }).Result; var result = response.Content.ReadAsStringAsync().Result; Console.WriteLine(result); }); } } }
运行测试,结果如下:
我们发现,请求 http://192.168.8.202:5000/api/values 时,是对 service 中的两个容器实现轮询调用的,因此,docker swarm 很简单的实现了负载,我们可以再把 host3 加进集群里,再测试一下有三个容器的情况的结果。
[root@host1 ~]# docker node ls
ID                            HOSTNAME            STATUS              AVAILABILITY        MANAGER STATUS      ENGINE VERSION
b6qt1dnbj4hnf2jks0rnxjm8y *   host1               Ready               Active              Leader              18.09.0
p9vfq9qt6dtv929an5hzmirn9     host2               Ready               Active                                  18.09.0
uy37l58v2ooux2tju89ex1o7q     host3               Ready               Active                                  18.09.0
运行控制台测试
三台机器完成负载!!
至此三剑客分享完毕
")
centos7 64bit 安装 docker 最新版教程(Centos7 下安装 Docker Engine)
一。先决条件
首选需要一个 64 位操作系统和 3.10 或者更版本的内核。
查看当前内核版本:
?
| 1 2 |
$ uname -r 3.10.0-229.el7.x86_64 |
二.yum 安装 Docker Engine
安装 Docker Engine 有两种方式,我们先选择 yum 安装,并且 Docker 官方提供了 yum 源。
1. 使用普通用户 sudo 或者 root 登录到你的服务器,更新 yum,确保你的软件都是最新的
?
| 1 |
$ yum update |
2. 添加 Docker 的 yum 源
?
| 1 2 3 4 5 67 8 |
$ sudo tee /etc/yum.repos.d/docker.repo <<-''EOF'' [dockerrepo] name=Docker Repository baseurl=https://yum.dockerproject.org/repo/main/centos/7/ enabled=1 gpgcheck=1 gpgkey=https://yum.dockerproject.org/gpg EOF |
3. 安装 Docker 软件包
?
| 1 |
$ yum install docker-engine |
4. 设置 Docker 服务开机自启
?
| 1 |
$ systemctl enable docker.service |
5. 启动 Docker 服务
?
| 1 |
$ systemctl start docker |
6. 验证 Docker 是否安装成功
?
| 1 |
$ docker run --rm hello-world |
至此:docker 最新版已经安装完成,下面我们进行生产环境镜像的创建,使用 dockerfile
dockerfile (白话其实就是一个脚本,把一个纯镜像按照所需应用或者环境每个操作集成到一个文件执行安装的过程,类似于 linux 的 shell.)
走世界自由行环境需求(tomcat+jdk)
#以下是我们采用纯净 centos,之后安装所需环境依赖的应用(tomcat+jdk)
FROM centos
#以下是我们声明的维护人或者叫做作者
MAINTAINER locutus "zoushijie"
# OS 环境配置
RUN yum install -y wget
# 安装 JDK
RUN mkdir /opt/jdk
RUN wget -P /opt/jdk/ http://zsj-linux.oss-cn-hangzhou.aliyuncs.com/yunwei/jdk-8u162-linux-x64.tar.gz
RUN tar -zxvf /opt/jdk/jdk-8u162-linux-x64.tar.gz -C /opt/jdk && rm -rf /opt/jdk/jdk-8u162-linux-x64.tar.gz
# 安装 tomcat
RUN mkdir /opt/tomcat
RUN wget -P /opt/tomcat http://45.77.240.64/apache-tomcat-8.0.47.tar.gz
RUN tar -zxvf /opt/tomcat/apache-tomcat-8.0.47.tar.gz -C /opt/tomcat && rm -rf /opt/tomcat/apache-tomcat-8.0.47.tar.gz
#设置环境变量
ENV JAVA_HOME /opt/jdk/jdk1.8.0_162
ENV CATALINA_HOME /opt/tomcat/apache-tomcat-8.0.47
ENV PATH $PATH:$JAVA_HOME/bin
ENV CLASSPATH .:$JAVA_HOME/jre/lib/rt.jar:$JAVA_HOME/lib/dt.jar:$JAVA_HOME/lib/tools.jar
#打包项目并拷贝到 tomcat webapps 目录
RUN mkdir /opt/webapp
ADD ./ /opt/webapp
RUN cd /opt/webapp && cp /opt/webapp/war/eureka-server.war /opt/tomcat/apache-tomcat-8.0.47/webapps/
#开启内部服务端口
EXPOSE 8080
#启动 tomcat 服务器
CMD ["./opt/tomcat/apache-tomcat-8.0.47/bin/catalina.sh","run"] && tail -f /opt/tomcat/apache-tomcat-8.0.47/logs/catalina.out
此为没有修改默认目录容器,下面我们进行修改默认访问目录操作
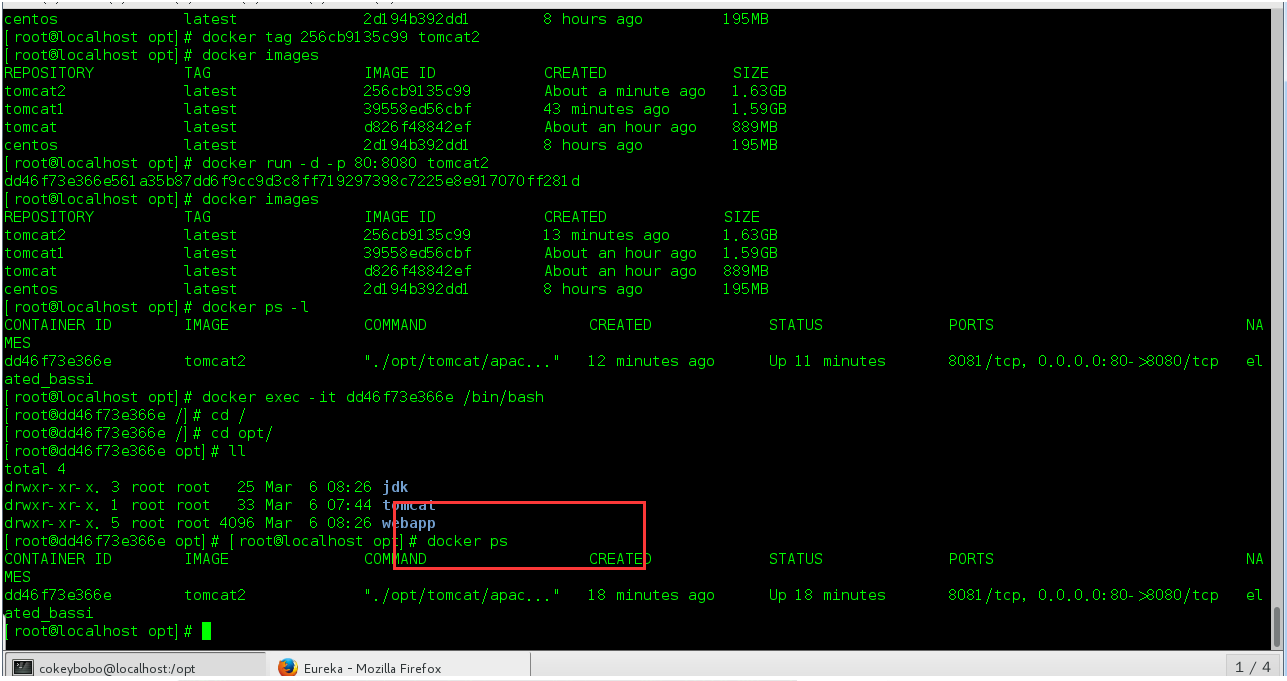
查看正在运行的容器:docker ps -l
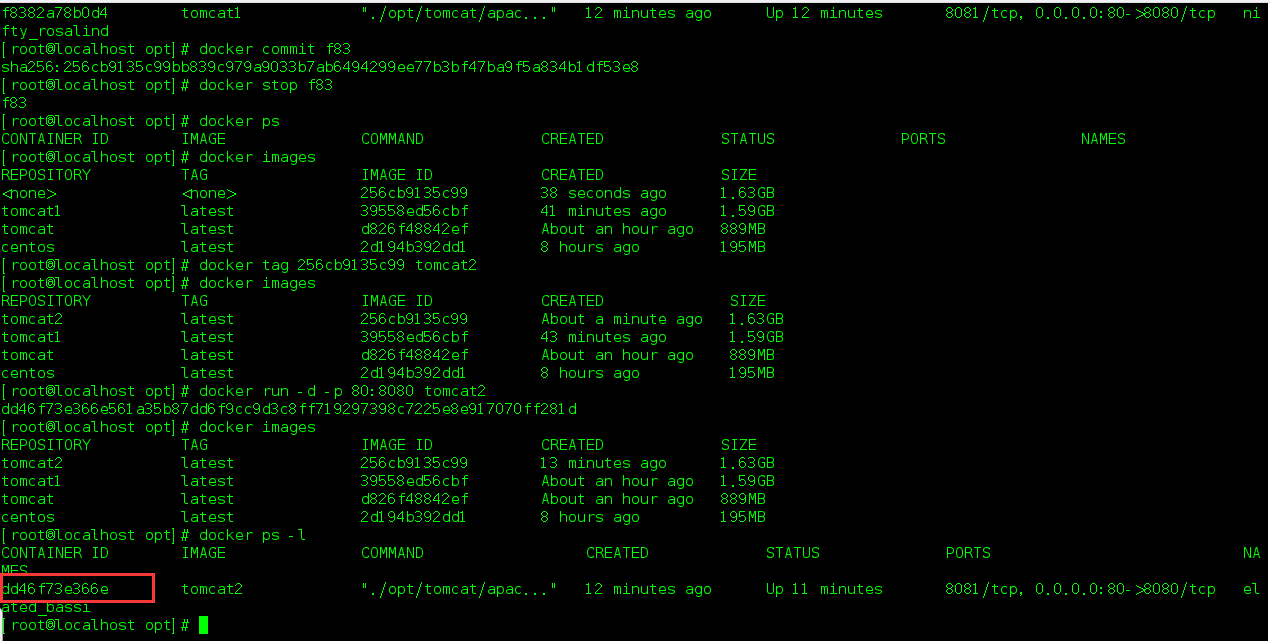
之后进入容器:docker exec -it dd46f73e366e /bin/bash
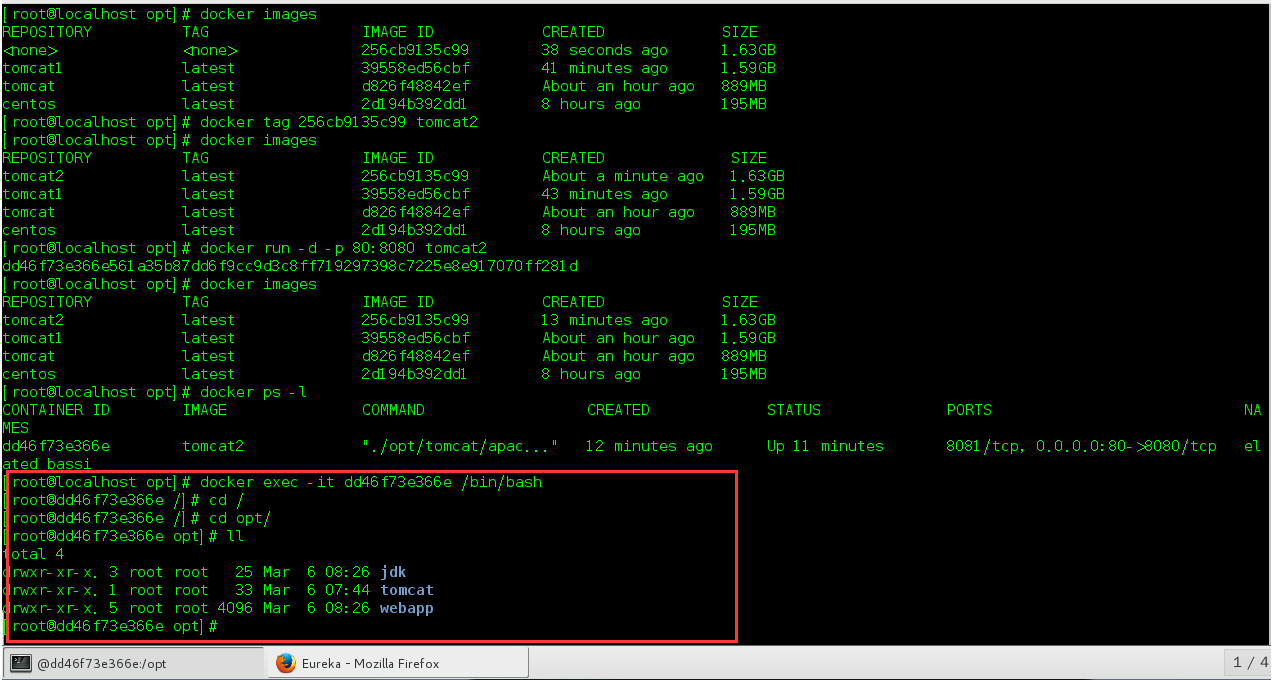
进入 tomcat 修改 server.xml 文件,添加对应微服务名称:<Context path=""docBase=" 微服务名称 "debug="0"reloadable="true" />
之后要保证容器运行的状态下退出交互界面:Ctrl+p+q,我们可以看到容器仍在运行,下面我们保存一下刚才修改的容器,并以微服务命名
docker commit dd4 eureka-server
查看新生成的镜像:出现了名为 eureka-server 的镜像
删除本地不用的镜像。docker rmi -f <镜像 id>,首先先停止运行中的容器,docker stop < 镜像 id>,停止运行中的容器,要从 docker ps 里查看 id. 不是在 docker images 里查看。

CentOS7 下 Docker 安装、启动
1、检查系统内核
Docker 要求 CentOS 系统的内核版本高于 3.10 ,查看本页面的前提条件来验证你的 CentOS 版本是否支持 Docker 。
通过 uname -r 命令查看你当前的内核版本。
[xcbeyond@docker ~]$ uname -r
3.10.0-327.10.1.el7.x86_64
2、安装 Docker
安装过程及其坎坷,出现了各种问题,并进行记录整个过程,与大家进行分享。2.1 节记录安装过程中出现的各种问题,2.2 节整理的是安装成功过程,作为正常安装步骤。
2.1 安装失败
(1)Docker 软件包和依赖包已经包含在默认的 CentOS-Extras 软件源里。执行命令 yum install docker
安装过程如下:
[xcbeyond@docker etc]$ sudo yum install docker
Loaded plugins: fastestmirror, langpacks
base | 3.6 kB 00:00:00
docker-ce-stable | 2.9 kB 00:00:00
extras | 3.4 kB 00:00:00
updates | 3.4 kB 00:00:00
docker-ce-stable/x86_64/primar FAILED
https://mirrors.aliyun.com/docker-ce/linux/centos/7/x86_64/stable/repodata/251ca0bf128072f68c0ccae90067d231841488501814e0b0b6f492c17c069daa-primary.sqlite.bz2: [Errno 14] curl#60 - "Peer''s Certificate issuer is not recognized."
Trying other mirror.
It was impossible to connect to the CentOS servers.
This could mean a connectivity issue in your environment, such as the requirement to configure a proxy,
or a transparent proxy that tampers with TLS security, or an incorrect system clock.
You can try to solve this issue by using the instructions on https://wiki.centos.org/yum-errors
If above article doesn''t help to resolve this issue please use https://bugs.centos.org/.
Loading mirror speeds from cached hostfile
* base: mirrors.nwsuaf.edu.cn
* extras: mirror.lzu.edu.cn
* updates: mirrors.163.com
docker-ce-stable/x86_64/primar FAILED
https://mirrors.aliyun.com/docker-ce/linux/centos/7/x86_64/stable/repodata/251ca0bf128072f68c0ccae90067d231841488501814e0b0b6f492c17c069daa-primary.sqlite.bz2: [Errno 14] curl#60 - "Peer''s Certificate issuer is not recognized."
Trying other mirror.
docker-ce-stable/x86_64/primary_db | 15 kB 00:00:00
Resolving Dependencies
……
Transaction Summary
========================================================================================
Install 1 Package (+12 Dependent packages)
Upgrade 1 Package (+15 Dependent packages)
Total download size: 38 M
Is this ok [y/d/N]: y
Downloading packages:
No Presto metadata available for base
updates/7/x86_64/prestodelta | 538 kB 00:00:00
(1/29): atomic-registries-1.22.1-22.git5a342e3.el7.x86_64.rpm | 35 kB 00:00:00
(2/29): container-selinux-2.68-1.el7.noarch.rpm | 36 kB 00:00:00
(3/29): docker-common-1.13.1-74.git6e3bb8e.el7.centos.x86_64.rpm | 92 kB 00:00:00
(4/29): container-storage-setup-0.11.0-2.git5eaf76c.el7.noarch.r | 35 kB 00:00:00
(5/29): libselinux-2.5-12.el7.x86_64.rpm | 162 kB 00:00:00
(6/29): libselinux-utils-2.5-12.el7.x86_64.rpm | 151 kB 00:00:00
(7/29): libselinux-python-2.5-12.el7.x86_64.rpm | 235 kB 00:00:00
(8/29): libsemanage-2.5-11.el7.x86_64.rpm | 150 kB 00:00:00
………………
(29/29): docker-1.13.1-74.git6e3bb8e.el7.centos.x86_64.rpm | 16 MB 00:00:09
----------------------------------------------------------------------------------------
Total 3.9 MB/s | 38 MB 00:09
Running transaction check
Running transaction test
Transaction test succeeded
Running transaction
Updating : libsepol-2.5-8.1.el7.x86_64 1/45
Updating : libselinux-2.5-12.el7.x86_64 2/45
Updating : libsemanage-2.5-11.el7.x86_64 3/45
Installing : lz4-1.7.5-2.el7.x86_64 4/45
Updating : systemd-libs-219-57.el7_5.1.x86_64 5/45
Updating : systemd-219-57.el7_5.1.x86_64 6/45
Updating : libselinux-utils-2.5-12.el7.x86_64 7/45
Updating : policycoreutils-2.5-22.el7.x86_64 8/45
Updating : selinux-policy-3.13.1-192.el7_5.6.noarch 9/45
Updating : selinux-policy-targeted-3.13.1-192.el7_5.6.noarch 10/45
warning: /etc/selinux/targeted/seusers created as /etc/selinux/targeted/seusers.rpmnew
‘/etc/selinux/targeted/modules/active/seusers’ -> ‘/etc/selinux/targeted/active/seusers.local’
Installing : 1:oci-register-machine-0-6.git2b44233.el7.x86_64 11/45
Updating : libsemanage-python-2.5-11.el7.x86_64 12/45
Updating : libselinux-python-2.5-12.el7.x86_64 13/45
Installing : 1:oci-systemd-hook-0.1.17-2.git83283a0.el7.x86_64 14/45
Installing : 2:oci-umount-2.3.3-3.gite3c9055.el7.x86_64 15/45
Updating : setools-libs-3.3.8-2.el7.x86_64 16/45
Updating : policycoreutils-python-2.5-22.el7.x86_64 17/45
Installing : 2:container-selinux-2.68-1.el7.noarch 18/45
Installing : container-storage-setup-0.11.0-2.git5eaf76c.el7.noarch 19/45
Installing : python-pytoml-0.1.14-1.git7dea353.el7.noarch 20/45
Installing : 1:atomic-registries-1.22.1-22.git5a342e3.el7.x86_64 21/45
Installing : 1:skopeo-containers-0.1.31-1.dev.gitae64ff7.el7.centos.x86_64 22/45
Installing : 2:docker-common-1.13.1-74.git6e3bb8e.el7.centos.x86_64 23/45
Installing : 2:docker-client-1.13.1-74.git6e3bb8e.el7.centos.x86_64 24/45
Installing : subscription-manager-rhsm-certificates-1.20.11-1.el7.centos.x86_ 25/45
Installing : 2:docker-1.13.1-74.git6e3bb8e.el7.centos.x86_64 26/45
Updating : systemd-python-219-57.el7_5.1.x86_64 27/45
Updating : systemd-sysv-219-57.el7_5.1.x86_64 28/45
Updating : libgudev1-219-57.el7_5.1.x86_64 29/45
Cleanup : policycoreutils-python-2.2.5-20.el7.x86_64 30/45
Cleanup : selinux-policy-targeted-3.13.1-60.el7_2.3.noarch 31/45
warning: /etc/selinux/targeted/modules/active/seusers.final saved as /etc/selinux/targeted/modules/active/seusers.final.rpmsave
Cleanup : systemd-python-219-19.el7_2.4.x86_64 32/45
Cleanup : selinux-policy-3.13.1-60.el7_2.3.noarch 33/45
Cleanup : systemd-sysv-219-19.el7_2.4.x86_64 34/45
Cleanup : policycoreutils-2.2.5-20.el7.x86_64 35/45
Cleanup : systemd-219-19.el7_2.4.x86_64 36/45
Cleanup : setools-libs-3.3.7-46.el7.x86_64 37/45
Cleanup : libselinux-utils-2.2.2-6.el7.x86_64 38/45
Cleanup : libselinux-python-2.2.2-6.el7.x86_64 39/45
Cleanup : libsemanage-python-2.1.10-18.el7.x86_64 40/45
Cleanup : libsemanage-2.1.10-18.el7.x86_64 41/45
Cleanup : libgudev1-219-19.el7_2.4.x86_64 42/45
Cleanup : systemd-libs-219-19.el7_2.4.x86_64 43/45
Cleanup : libselinux-2.2.2-6.el7.x86_64 44/45
Cleanup : libsepol-2.1.9-3.el7.x86_64 45/45
Verifying : libsemanage-python-2.5-11.el7.x86_64 1/45
Verifying : libsemanage-2.5-11.el7.x86_64 2/45
Verifying : libselinux-python-2.5-12.el7.x86_64 3/45
Verifying : subscription-manager-rhsm-certificates-1.20.11-1.el7.centos.x86_ 4/45
Verifying : 2:container-selinux-2.68-1.el7.noarch 5/45
Verifying : libselinux-utils-2.5-12.el7.x86_64 6/45
Verifying : policycoreutils-2.5-22.el7.x86_64 7/45
Verifying : libsepol-2.5-8.1.el7.x86_64 8/45
Verifying : 1:skopeo-containers-0.1.31-1.dev.gitae64ff7.el7.centos.x86_64 9/45
Verifying : policycoreutils-python-2.5-22.el7.x86_64 10/45
Verifying : 1:oci-systemd-hook-0.1.17-2.git83283a0.el7.x86_64 11/45
Verifying : selinux-policy-targeted-3.13.1-192.el7_5.6.noarch 12/45
Verifying : python-pytoml-0.1.14-1.git7dea353.el7.noarch 13/45
Verifying : systemd-python-219-57.el7_5.1.x86_64 14/45
Verifying : systemd-219-57.el7_5.1.x86_64 15/45
Verifying : libgudev1-219-57.el7_5.1.x86_64 16/45
Verifying : 2:docker-common-1.13.1-74.git6e3bb8e.el7.centos.x86_64 17/45
Verifying : systemd-libs-219-57.el7_5.1.x86_64 18/45
Verifying : lz4-1.7.5-2.el7.x86_64 19/45
Verifying : 1:oci-register-machine-0-6.git2b44233.el7.x86_64 20/45
Verifying : 2:oci-umount-2.3.3-3.gite3c9055.el7.x86_64 21/45
Verifying : 2:docker-client-1.13.1-74.git6e3bb8e.el7.centos.x86_64 22/45
Verifying : 2:docker-1.13.1-74.git6e3bb8e.el7.centos.x86_64 23/45
Verifying : systemd-sysv-219-57.el7_5.1.x86_64 24/45
Verifying : setools-libs-3.3.8-2.el7.x86_64 25/45
Verifying : libselinux-2.5-12.el7.x86_64 26/45
Verifying : 1:atomic-registries-1.22.1-22.git5a342e3.el7.x86_64 27/45
Verifying : container-storage-setup-0.11.0-2.git5eaf76c.el7.noarch 28/45
Verifying : selinux-policy-3.13.1-192.el7_5.6.noarch 29/45
Verifying : systemd-python-219-19.el7_2.4.x86_64 30/45
Verifying : selinux-policy-targeted-3.13.1-60.el7_2.3.noarch 31/45
Verifying : libsemanage-python-2.1.10-18.el7.x86_64 32/45
Verifying : setools-libs-3.3.7-46.el7.x86_64 33/45
Verifying : libsemanage-2.1.10-18.el7.x86_64 34/45
Verifying : systemd-219-19.el7_2.4.x86_64 35/45
Verifying : systemd-sysv-219-19.el7_2.4.x86_64 36/45
Verifying : libselinux-utils-2.2.2-6.el7.x86_64 37/45
Verifying : systemd-libs-219-19.el7_2.4.x86_64 38/45
Verifying : selinux-policy-3.13.1-60.el7_2.3.noarch 39/45
Verifying : libsepol-2.1.9-3.el7.x86_64 40/45
Verifying : libgudev1-219-19.el7_2.4.x86_64 41/45
Verifying : libselinux-python-2.2.2-6.el7.x86_64 42/45
Verifying : policycoreutils-2.2.5-20.el7.x86_64 43/45
Verifying : libselinux-2.2.2-6.el7.x86_64 44/45
Verifying : policycoreutils-python-2.2.5-20.el7.x86_64 45/45
Installed:
docker.x86_64 2:1.13.1-74.git6e3bb8e.el7.centos
Dependency Installed:
atomic-registries.x86_64 1:1.22.1-22.git5a342e3.el7
container-selinux.noarch 2:2.68-1.el7
container-storage-setup.noarch 0:0.11.0-2.git5eaf76c.el7
docker-client.x86_64 2:1.13.1-74.git6e3bb8e.el7.centos
docker-common.x86_64 2:1.13.1-74.git6e3bb8e.el7.centos
lz4.x86_64 0:1.7.5-2.el7
oci-register-machine.x86_64 1:0-6.git2b44233.el7
oci-systemd-hook.x86_64 1:0.1.17-2.git83283a0.el7
oci-umount.x86_64 2:2.3.3-3.gite3c9055.el7
python-pytoml.noarch 0:0.1.14-1.git7dea353.el7
skopeo-containers.x86_64 1:0.1.31-1.dev.gitae64ff7.el7.centos
subscription-manager-rhsm-certificates.x86_64 0:1.20.11-1.el7.centos
Updated:
systemd.x86_64 0:219-57.el7_5.1
Dependency Updated:
libgudev1.x86_64 0:219-57.el7_5.1
libselinux.x86_64 0:2.5-12.el7
libselinux-python.x86_64 0:2.5-12.el7
libselinux-utils.x86_64 0:2.5-12.el7
libsemanage.x86_64 0:2.5-11.el7
libsemanage-python.x86_64 0:2.5-11.el7
libsepol.x86_64 0:2.5-8.1.el7
policycoreutils.x86_64 0:2.5-22.el7
policycoreutils-python.x86_64 0:2.5-22.el7
selinux-policy.noarch 0:3.13.1-192.el7_5.6
selinux-policy-targeted.noarch 0:3.13.1-192.el7_5.6
setools-libs.x86_64 0:3.3.8-2.el7
systemd-libs.x86_64 0:219-57.el7_5.1
systemd-python.x86_64 0:219-57.el7_5.1
systemd-sysv.x86_64 0:219-57.el7_5.1
Complete!
(2)查看 Docker 版本。执行命令 docker version
[xcbeyond@docker etc]$ docker version
Client:
Version: 1.13.1
API version: 1.26
Package version:
Cannot connect to the Docker daemon at unix:///var/run/docker.sock. Is the docker daemon running?
(3) 启动 Docker。执行命令 service docker start.
[xcbeyond@docker ~]$ sudo service docker start
Redirecting to /bin/systemctl start docker.service
Job for docker.service failed because the control process exited with error code. See "systemctl status docker.service" and "journalctl -xe" for details.
哎,启动失败了。查看下 docker 状态,如下所示:
[xcbeyond@docker ~]$ systemctl status docker
● docker.service - Docker Application Container Engine
Loaded: loaded (/usr/lib/systemd/system/docker.service; disabled; vendor preset: disabled)
Active: failed (Result: exit-code) since Wed 2018-08-29 23:07:19 CST; 1min 13s ago
Docs: http://docs.docker.com
Process: 18527 ExecStart=/usr/bin/dockerd-current --add-runtime docker-runc=/usr/libexec/docker/docker-runc-current --default-runtime=docker-runc --exec-opt native.cgroupdriver=systemd --userland-proxy-path=/usr/libexec/docker/docker-proxy-current --init-path=/usr/libexec/docker/docker-init-current --seccomp-profile=/etc/docker/seccomp.json $OPTIONS $DOCKER_STORAGE_OPTIONS $DOCKER_NETWORK_OPTIONS $ADD_REGISTRY $BLOCK_REGISTRY $INSECURE_REGISTRY $REGISTRIES (code=exited, status=1/FAILURE)
Main PID: 18527 (code=exited, status=1/FAILURE)
Aug 29 23:07:17 docker systemd[1]: Starting Docker Application Container Engine...
Aug 29 23:07:18 docker dockerd-current[18527]: time="2018-08-29T23:07:18.066916004+...d"
Aug 29 23:07:18 docker dockerd-current[18527]: time="2018-08-29T23:07:18.071982389+...1"
Aug 29 23:07:19 docker dockerd-current[18527]: time="2018-08-29T23:07:19.085154395+08...
Aug 29 23:07:19 docker dockerd-current[18527]: Error starting daemon: SELinux is no...e)
Aug 29 23:07:19 docker systemd[1]: docker.service: main process exited, code=exite...URE
Aug 29 23:07:19 docker systemd[1]: Failed to start Docker Application Container Engine.
Aug 29 23:07:19 docker systemd[1]: Unit docker.service entered failed state.
Aug 29 23:07:19 docker systemd[1]: docker.service failed.
Hint: Some lines were ellipsized, use -l to show in full.
网上查阅了大量资料,进行配置的修改等,尝试都未能解决,最终决定还是卸载掉,重新换种方式来安装吧。
2.2 安装成功
(1)卸载 docker,并配置 docker.repo,如下所示:
[xcbeyond@docker run]$ sudo yum remove docker
……
[xcbeyond@docker run]$ sudo yum remove docker-selinux
……
[xcbeyond@docker run]$ sudo vi /etc/yum.repos.d/docker.repo
[dockerrepo]
name=Docker Repository
baseurl=https://yum.dockerproject.org/repo/main/centos/$releasever/
enabled=1
gpgcheck=1
gpgkey=https://yum.dockerproject.org/gpg
(2)安装 docker,执行命令 yum install docker-engine,如下所示:
(如失败,则可多执行几次便可。安装过程,因需下载安装包,请耐心等待)
[xcbeyond@docker run]$ sudo yum install docker-engine
Loaded plugins: fastestmirror, langpacks
base | 3.6 kB 00:00:00
dockerrepo | 2.9 kB 00:00:00
extras | 3.4 kB 00:00:00
updates | 3.4 kB 00:00:00
Loading mirror speeds from cached hostfile
* base: mirror.lzu.edu.cn
* extras: mirrors.aliyun.com
* updates: mirrors.aliyun.com
Resolving Dependencies
--> Running transaction check
---> Package docker-engine.x86_64 0:17.05.0.ce-1.el7.centos will be installed
--> Processing Dependency: docker-engine-selinux >= 17.05.0.ce-1.el7.centos for package: docker-engine-17.05.0.ce-1.el7.centos.x86_64
--> Running transaction check
---> Package docker-engine-selinux.noarch 0:17.05.0.ce-1.el7.centos will be installed
--> Finished Dependency Resolution
Dependencies Resolved
========================================================================================
Package Arch Version Repository Size
========================================================================================
Installing:
docker-engine x86_64 17.05.0.ce-1.el7.centos dockerrepo 19 M
Installing for dependencies:
docker-engine-selinux noarch 17.05.0.ce-1.el7.centos dockerrepo 28 k
Transaction Summary
========================================================================================
Install 1 Package (+1 Dependent package)
Total download size: 20 M
Installed size: 70 M
Is this ok [y/d/N]: y
Downloading packages:
warning: /var/cache/yum/x86_64/7/dockerrepo/packages/docker-engine-selinux-17.05.0.ce-1.el7.centos.noarch.rpm: Header V4 RSA/SHA512 Signature, key ID 2c52609d: NOKEY
Public key for docker-engine-selinux-17.05.0.ce-1.el7.centos.noarch.rpm is not installed
(1/2): docker-engine-selinux-17.05.0.ce-1.el7.centos.noarch.rpm | 28 kB 00:00:01
(2/2): docker-engine-17.05.0.ce-1.el7.centos.x86_64.rpm 22% [================= ] 6.3 kB/s | 4.5 MB 00:40:30 ETA % [================= ] 8.6 kB/docker-engine-17.05.0.ce-1.el7 FAILED 7:57 ETA
https://yum.dockerproject.org/repo/main/centos/7/Packages/docker-engine-17.05.0.ce-1.el7.centos.x86_64.rpm: [Errno 12] Timeout on https://yum.dockerproject.org/repo/main/centos/7/Packages/docker-engine-17.05.0.ce-1.el7.centos.x86_64.rpm: (28, ''Operation too slow. Less than 1000 bytes/sec transferred the last 30 seconds'')
Trying other mirror.
(2/2): docker-engine-17.05.0.ce-1.el7.centos.x86_64.rpm | 19 MB 00:08:32
----------------------------------------------------------------------------------------
Total 7.8 kB/s | 20 MB 42:45
Retrieving key from https://yum.dockerproject.org/gpg
Importing GPG key 0x2C52609D:
Userid : "Docker Release Tool (releasedocker) <docker@docker.com>"
Fingerprint: 5811 8e89 f3a9 1289 7c07 0adb f762 2157 2c52 609d
From : https://yum.dockerproject.org/gpg
Is this ok [y/N]: y
Running transaction check
Running transaction test
Transaction test succeeded
Running transaction
Installing : docker-engine-selinux-17.05.0.ce-1.el7.centos.noarch 1/2
Re-declaration of type docker_t
Failed to create node
Bad type declaration at /etc/selinux/targeted/tmp/modules/400/docker/cil:1
/usr/sbin/semodule: Failed!
Installing : docker-engine-17.05.0.ce-1.el7.centos.x86_64 2/2
Verifying : docker-engine-17.05.0.ce-1.el7.centos.x86_64 1/2
Verifying : docker-engine-selinux-17.05.0.ce-1.el7.centos.noarch 2/2
Installed:
docker-engine.x86_64 0:17.05.0.ce-1.el7.centos
Dependency Installed:
docker-engine-selinux.noarch 0:17.05.0.ce-1.el7.centos
Complete!
(3)启动 docker。执行命令 systemctl start docker,如下所示:
哈哈,大功告成,终于安装成功啦。睡觉喽!
如果在检索镜像时,出现如下类似错误:
[docker@docker xcbeyond]$ docker search redis
Error response from daemon: Get https://index.docker.io/v1/search?q=redis&n=25: x509: certificate signed by unknown authority
这是由于无法访问国外 docker 镜像仓库的原因,或者访问比较慢,可修改为国内 docker 仓库。docker 在中国已经有了仓库:https://www.docker-cn.com/registry-mirror,访问速度还不错。
修改方法:
(如果没有 daemon.json 文件,则创建)
[docker@docker xcbeyond]$ sudo vi /etc/docker/daemon.json
{
"registry-mirrors": ["https://registry.docker-cn.com"]
}
重启 docker,就可以了。
[root@docker docker]# systemctl restart docker
[docker@docker xcbeyond]$ docker search redis
NAME DESCRIPTION STARS OFFICIAL AUTOMATED
redis Redis is an open source key-value store th... 5665 [OK]
bitnami/redis Bitnami Redis Docker Image 88 [OK]
sameersbn/redis 71 [OK]
hypriot/rpi-redis Raspberry Pi compatible redis image 33
tenstartups/redis-commander 32 [OK]
kubeguide/redis-master redis-master with "Hello World!" 26
kubeguide/guestbook-redis-slave Guestbook redis slave 20
redislabs/redis Clustered in-memory database engine compat... 15
webhippie/redis Docker images for redis 9 [OK]
rediscommander/redis-commander Alpine image for redis-commander - Redis m... 8 [OK]
arm32v7/redis Redis is an open source key-value store th... 7
rtoma/logspout-redis-logstash Logspout including Redis adapter for sendi... 5
oliver006/redis_exporter Prometheus Exporter for Redis Metrics. Su... 5
centos/redis-32-centos7 Redis in-memory data structure store, used... 3
tomesar/redis-arm Redis for ARM! 2 [OK]
frodenas/redis A Docker Image for Redis 2 [OK]
dynomitedb/redis Redis backend for DynomiteDB. 2 [OK]
arm64v8/redis Redis is an open source key-value store th... 2
kilsoo75/redis-master This image is for the redis master of SK C... 1
tiredofit/redis Redis Server w/ Zabbix monitoring and S6 O... 1 [OK]
circleci/redis CircleCI images for Redis 1 [OK]
google/guestbook-python-redis A simple guestbook example written in Pyth... 1
anchorfree/redis redis cache server for logging 0
iadvize/redis 0
brendangibat/docker-logspout-redis Docker Logspout container with Logspout-Re... 0 [OK]
本文分享自微信公众号 - 程序猿技术大咖(cxyjsdk)。
如有侵权,请联系 support@oschina.cn 删除。
本文参与 “OSC 源创计划”,欢迎正在阅读的你也加入,一起分享。
今天的关于[转载] Centos7 的安装、Docker1.12.3 的安装,以及 Docker Swarm 集群的简单实例的分享已经结束,谢谢您的关注,如果想了解更多关于1.docker 学习笔记之入门,docker 在 centos7 下的安装以及基础命令的使用、CentOS 下 Docker 与.netcore (五)之 三剑客之一 Docker-swarm 集群、centos7 64bit 安装 docker 最新版教程(Centos7 下安装 Docker Engine)、CentOS7 下 Docker 安装、启动的相关知识,请在本站进行查询。
本文标签:


