本文将为您提供关于svelte路由器-如何根据路由更改标头?的详细介绍,我们还将为您解释路由器怎么改信号道的相关知识,同时,我们还将为您提供关于4K解码+路由器+HDMI收发ARM4核64bit、CC
本文将为您提供关于svelte 路由器 - 如何根据路由更改标头?的详细介绍,我们还将为您解释路由器怎么改信号道的相关知识,同时,我们还将为您提供关于4K 解码 + 路由器 + HDMI 收发 ARM 4核64bit、CCNP(BCMSN)实验:VRRP多组综合实验(路由器)、Cisco 交换机/路由器 ssh 配置、Cisco 路由器 访问控制列表的实用信息。
本文目录一览:- svelte 路由器 - 如何根据路由更改标头?(路由器怎么改信号道)
- 4K 解码 + 路由器 + HDMI 收发 ARM 4核64bit
- CCNP(BCMSN)实验:VRRP多组综合实验(路由器)
- Cisco 交换机/路由器 ssh 配置
- Cisco 路由器 访问控制列表
")
svelte 路由器 - 如何根据路由更改标头?(路由器怎么改信号道)
如何解决svelte 路由器 - 如何根据路由更改标头?
我使用纤细的路由 - 路由器。根据路线更改页眉和页脚而不将其单独放入每条路线的最佳方法是什么?我期待所有解决方案,即使我必须更换路由器。

4K 解码 + 路由器 + HDMI 收发 ARM 4核64bit
日前蓝莓电子技术有限公司宣布推出Blueberry Pi (A),它是基于Realtek 129x处理器设计,套件基于Linaro的96board规范.
Blueberry Pi的亮点包括:
系统和外围:
ARM Cortex-A53 Quad-Core processor with floating-point unit and NEON SIMD engine embedded, supporting the 64/32-bit ARMv8 architecture
ARM T820 GPU – Mali-450 8-core equivalent
Supports SATA III
Supports PCI Express1.1/2.0
Supports SDIO 3.0 interface
...
独立音视频DSP
Video DSP with HW acceleration
Decoding:
H.265 MP@L5.1 Main Tier
VP9 Profile 0
...
Encoding:
MPEG 4 SP@L5
H.264 BP, MP, HP@L4.2
H.264 MVC SHP 1080@30P
Audio DSP with HW acceleration
Decoding:
7.1 CH down-mix
MPEG I Layer 1, 2, 3 (2-CH) and MPEG II Layer 1, 2 (Multi-Channel)
LPCM, ADPCM, ALAC, FLAC, AAC, WAV, AIFF, VSELP, and OGG Vorbis
DTS HD, Dolby Digital Plus, TrueHD
WMA/WMA Pro, Dolby Digital AC3, and DTS
Recording:
LPCM/ADPCM/MP3/AAC audio recording
网络接口:
Supports RGMII/SGMII
Integrates 10/100/1000 Ethernet MAC and PHY
Integrates hardware NAT and IP6 engine for AP router application
存储接口:
Integrates USB3.0 Super Speed Dual-Role Device controller and PHY
with supports for Type C receptacle
HDMI 输出:
HDMI2.0a/MHL3.0,HDCP,and DVI 1.0 compliant transmitter
HDMI 输入:
One-chanel HDMI 2.0a compliant receiver
Supports video format up to 4K x 2k@59.94/60HZ
系统软件:
支持Android 6.x/Linux + OpenWrt
alex@blueberry-tek.com
13509624205
实验:VRRP多组综合实验(路由器)")
CCNP(BCMSN)实验:VRRP多组综合实验(路由器)

第一步:配置R2,R4和R5
R2上的配置:
interface Loopback0
ip address 2.2.2.2 255.255.255.0
!
interface FastEthernet0/0
ip address 12.0.0.2 255.255.255.0
!
interface FastEthernet1/0
ip address 23.0.0.2 255.255.255.0
!
router rip
version 2
network 2.0.0.0
network 12.0.0.0
network 23.0.0.0
no auto-summary
R4上的配置:
interface FastEthernet0/0
ip address 192.168.1.4 255.255.255.0
ip default-gateway 192.168.1.254
R5上的配置:
interface FastEthernet0/0
ip address 192.168.1.5 255.255.255.0
ip default-gateway 192.168.1.253
第二步:配置R1
track 100 interface FastEthernet0/0 line-protocol
//通过track 后面为组号,接着为要追踪的接口
interface FastEthernet0/0
ip address 12.0.0.1 255.255.255.0
!
interface FastEthernet0/1
ip address 192.168.1.1 255.255.255.0
no ip redirects
no ip proxy-arp
//上面两句为关闭重定向,和关闭代理arp
//我们在下面定义了两个组
vrrp 1 ip 192.168.1.254
vrrp 1 priority 105
vrrp 1 track 100
//这里和hsrp不同的是,vrrp要在全局下先定义,然后在这里调用,不然调用不起来
vrrp 2 ip 192.168.1.253
!
router rip
version 2
network 12.0.0.0
network 192.168.1.0
no auto-summary
第三步:配置R3
track 200 interface FastEthernet0/0 line-protocol
!
!
!
!
!
interface FastEthernet0/0
ip address 23.0.0.3 255.255.255.0
shutdown
duplex auto
speed auto
!
interface FastEthernet0/1
ip address 192.168.1.3 255.255.255.0
no ip redirects
no ip proxy-arp
duplex auto
speed auto
vrrp 1 ip 192.168.1.254
vrrp 2 ip 192.168.1.253
vrrp 2 priority 105
vrrp 2 track 200
!
router rip
version 2
network 23.0.0.0
network 192.168.1.0
no auto-summary
第四步:调试
当网络正常时:在R1和R3上的case
R1#sh vrrp
FastEthernet0/1 - Group 1
State is Master
Virtual IP address is 192.168.1.254
Virtual MAC address is 0000.5e00.0101
Advertisement interval is 1.000 sec
Preemption enabled
Priority is 105
Track object 100 state Up decrement 10
Master Router is 192.168.1.1 (local), priority is 105
Master Advertisement interval is 1.000 sec
Master Down interval is 3.589 sec
FastEthernet0/1 - Group 2
State is Backup
Virtual IP address is 192.168.1.253
Virtual MAC address is 0000.5e00.0102
Advertisement interval is 1.000 sec
Preemption enabled
Priority is 100
Master Router is 192.168.1.3, priority is 105
Master Advertisement interval is 1.000 sec
Master Down interval is 3.609 sec (expires in 3.009 sec)
R3#sh vrrp
FastEthernet0/1 - Group 1
State is Backup
Virtual IP address is 192.168.1.254
Virtual MAC address is 0000.5e00.0101
Advertisement interval is 1.000 sec
Preemption enabled
Priority is 100
Master Router is 192.168.1.1, priority is 105
Master Advertisement interval is 1.000 sec
Master Down interval is 3.609 sec (expires in 2.689 sec)
FastEthernet0/1 - Group 2
State is Master
Virtual IP address is 192.168.1.253
Virtual MAC address is 0000.5e00.0102
Advertisement interval is 1.000 sec
Preemption enabled
Priority is 105
Track object 200 state Up decrement 10
Master Router is 192.168.1.3 (local), priority is 105
Master Advertisement interval is 1.000 sec
Master Down interval is 3.589 sec
第五步:一个一个测试
先从R4来:
R1的外网接口Down 和up
在R1、R3和R4上出现的logging
R1上出现下列logging
R1(config)#int f0/0
R1(config-if)#sh
Apr 24 00:06:49.927: %VRRP-6-STATECHANGE: Fa0/1 Grp 1 state Master -> Backup
R1(config-if)#no sh
Apr 24 00:06:57.083: %VRRP-6-STATECHANGE: Fa0/1 Grp 1 state Backup -> Master
R1#sh vrrp
FastEthernet0/1 - Group 1
State is Backup
Virtual IP address is 192.168.1.254
Virtual MAC address is 0000.5e00.0101
Advertisement interval is 1.000 sec
Preemption enabled
Priority is 95 (cfgd 105) //优先级降到了95
Track object 100 state Down decrement 10
Master Router is 192.168.1.3, priority is 100
Master Advertisement interval is 1.000 sec
Master Down interval is 3.589 sec (expires in 2.669 sec)
FastEthernet0/1 - Group 2
State is Backup
Virtual IP address is 192.168.1.253
Virtual MAC address is 0000.5e00.0102
Advertisement interval is 1.000 sec
Preemption enabled
Priority is 100
Master Router is 192.168.1.3, priority is 105
Master Advertisement interval is 1.000 sec
Master Down interval is 3.609 sec (expires in 3.125 sec)
R3上出现:
#
Apr 24 00:06:29.779: %VRRP-6-STATECHANGE: Fa0/1 Grp 1 state Master -> Backup
Apr 24 00:06:49.635: %VRRP-6-STATECHANGE: Fa0/1 Grp 1 state Backup -> Master
*Apr 24 00:06:56.935: %VRRP-6-STATECHANGE: Fa0/1 Grp 1 state Master -> Backup
R4上出现:
R4-pc4#ping 2.2.2.2 re 33333
Type escape sequence to abort.
Sending 33333, 100-byte ICMP Echos to 2.2.2.2, timeout is 2 seconds:
.!!!!!!!!!!!!!!!!!!!!!!!!!!!!!!!!!!!!!!!!!!!!!!!!!!!!!!!!!!!!!!!!!U.U.
!!!!!!!!!!!!!!!!!!!!!!!!!!!!!!!!!!!!!!!!!!!!!!!!!!!!!!!!!!!!!!!!!!!!!!
!!!!!!!!!!!!.!!!!!!!!!!!!!!!!!!!!!!!!!!!!!!!!!!!!!!!!!.
Success rate is 96 percent (188/195), round-trip min/avg/max = 44/85/296 ms
//这里的切换更快,因为hello包为1s一个
在R5上测试,把R3的接口down后up,R5会出现下列所示
R5-pc5# ping 2.2.2.2 re 222222
Type escape sequence to abort.
Sending 222222, 100-byte ICMP Echos to 2.2.2.2, timeout is 2 seconds:
!!!!!!!!!!!!!!!!!!!!!!!!!!!!U.U.....!!!!!!!!!!!!!!!!!!!!!!!!!!!!!!!!!!
!!!!!!!!!!!!!!!!!!!!!!!!!!!!!!!!!!!!!!!!!!!!!!!!!!!!!!!!!!!!!!!!!.!!!!
!!!!!!!!!!!!!!!!!!!!!!!!!!!!!!!!!!!!!!!!!!!!!!!!!!!!!!!!!!!!!!!!!!!!!!
!!!!!!!!!!!!!!!!.
Success rate is 95 percent (217/227), round-trip min/avg/max = 44/85/1128 ms
R5-pc5#
R3上show vrrp
R3#sh vrrp
FastEthernet0/1 - Group 1
State is Backup
Virtual IP address is 192.168.1.254
Virtual MAC address is 0000.5e00.0101
Advertisement interval is 1.000 sec
Preemption enabled
Priority is 100
Master Router is 192.168.1.1, priority is 105
Master Advertisement interval is 1.000 sec
Master Down interval is 3.609 sec (expires in 3.353 sec)
FastEthernet0/1 - Group 2
State is Backup
Virtual IP address is 192.168.1.253
Virtual MAC address is 0000.5e00.0102
Advertisement interval is 1.000 sec
Preemption enabled
Priority is 95 (cfgd 105)
Track object 200 state Down decrement 10
Master Router is 192.168.1.1, priority is 100
Master Advertisement interval is 1.000 sec
Master Down interval is 3.589 sec (expires in 2.941 sec)

Cisco 交换机/路由器 ssh 配置
一准备工作:
1.开启交换机/路由器
2.连击Console控制线,到控制电脑
3.打开com口控制软件(支持ssh协议)
二配置工作:
1.进入特权模式
Cisco> enable2.输入密码
Password:3.进入全局配置模式
Cisco# conf t4.进入接口
(1)路由器输入
Cisco(config)#int GigabitEthernet 0/1 (2)交换机输入
Cisco(config)#int Vlan 15.根据需要配置IP
Cisco (config-if)#ip add x.x.x.x x.x.x.x6.打开接口
Cisco (config-if)#no shutdown7.可查看以上配置(可跳过,需要时查看)
Cisco (config-if)#do sh ip int br查看当前接口配置
8.退出接口
Cisco (config-if)#exi9.设置域名
Cisco (config)#ip domain-name cisco.com 为交换机/路由器配置一个域名,也可以认为该交换机/路由器属于这个域
10.配置SSH加密方式
Cisco (config)#crypto key generate rsa 生成一个为rsa算法的密钥
The name for the keys will be: R1.cisco.com
Choose the size of the key modulus in the range of 360 to 2048 for your
General Purpose Keys. Choosing a key modulus greater than 512 may take
a few minutes.
How many bits in the modulus [512]: 1024 ----------设置密钥为1024位
% Generating 1024 bit RSA keys, keys will be non-exportable...[OK]
*Mar 1 00:59:17.179: %SSH-5-ENABLED: SSH 1.99 has been enabled
PS:在Cisoc中rsa支持360-2048位密钥,该算法的原理是:主机将自己的公用密钥分发给相关的客户机,客户机在访问主机时则使用该主机的公开密钥来加密数据,主机则使用自己的私有的密钥来解密数据,从而实现主机密钥认证,确定客户机的可靠身份。
11.配置虚拟终端
Cisco (config)#line vty 0 512.使用本地数据库
Cisco (config-line)#login local 13.配置远程登录方式
Cisco (config-line)#transport input ssh 可先用Cisco (config-line)#transport input none ----------关闭VTY其他的远程登录协议
14.允许远程登录(非常重要)
Cisco (config-line)# access-class 1 in15.退出虚拟终端
Cisco (config-line)#exi16.创建用户名和密码
Cisco (config)#username admin password admin17.设置特权密码(可不设)
Cisco (config)#enable secret cisco 18.加入AAA认证
Cisco (config)# aaa new-model19.配置ssh超时时间
Cisco (config)#ip ssh time-out 12020.设置ssh版本
Cisco (config)#ip ssh version 2 配置完成

Cisco 路由器 访问控制列表
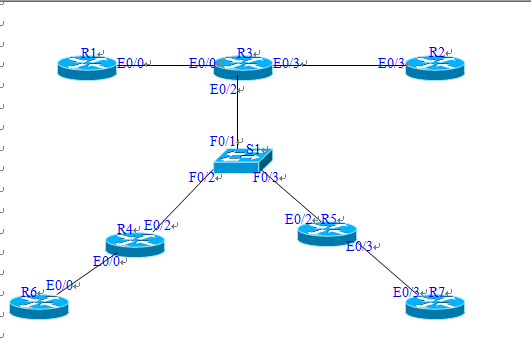
实验:访问控制列表
实验目的:学习使用标准访问控制列表和扩展访问控制列表做基本的安全控制
实验拓扑:如下图
实验要求:
l 标准访问控制列表
n 不允许10.10.2.0访问172.16.1.0
n 不允许10.10.1.0访问172.16.5.0
n 允许其他所有流量
(方法不唯一,我的只供参考)
l 扩展访问控制列表
n 不允许10.10.2.0 telnet 172.16.1.0
n 不允许10.10.1.0 telnet 172.16.5.0
n 允许其他所有流量
(方法不唯一,我的只供参考)
R1的配置
R1> en
R1# config t
R1(config)# no ip routing
R1(config)# ip default-gateway 10.10.1.1
R1(config)# int e0/0
R1(config-if)# ip add 10.10.1.10 255.255.255.0
R1(config-if)# no shut
R1(config-if)# end
R1#
R2的配置
R2> en
R2# config t
R2(config)# no ip routing
R2(config)# ip default-gateway 10.10.2.1
R2(config)# int e0/3
R2(config-if)# ip add 10.10.2.10 255.255.255.0
R2(config-if)# no shut
R2(config-if)# end
R2#
R3的配置
R3> en
R3# config t
R3(config)# int e0/0
R3(config-if)# ip add 10.10.1.1 255.255.255.0
R3(config-if)# no shut
R3(config-if)# int e0/3
R3(config-if)# ip add 10.10.2.1 255.255.255.0
R3(config-if)# no shut
R3(config-if)# int e0/2
R3(config-if)# ip add 192.168.1.10 255.255.255.0
R3(config-if)# duplex full
R3(config-if)# no shut
R3(config-if)# exit
R3(config)# router ospf 10
R3(config-router)# net 0.0.0.0 255.255.255.255 area 0
R3(config-router)# end
R3#
S1的配置
S1> en
S1# config t
S1(config)# int range f0/0 - 15
S1(config-if-range)# speed 10
S1(config-if-range)# duplex full
S1(config-if-range)# no shut
S1(config-if-range)# end
S1#
R4的配置
R4> en
R4# config t
R4(config)# int e0/2
R4(config-if)# ip add 192.168.1.1 255.255.255.0
R4(config-if)# duplex full
R4(config-if)# no shut
R4(config-if)# int e0/0
R4(config-if)# ip add 172.16.1.1 255.255.255.0
R4(config-if)# no shut
R4(config-if)# exit
R4(config)# router ospf 1
R4(config-router)# net 0.0.0.0 255.255.255.255 area 0
R4(config-router)# end
R4#
R5的配置
R5> en
R5# config t
R5(config)# int e0/2
R5(config-if)# ip add 192.168.1.5 255.255.255.0
R5(config-if)# duplex full
R5(config-if)# no shut
R5(config-if)# int e0/3
R5(config-if)# ip add 172.16.5.1 255.255.255.0
R5(config-if)# no shut
R5(config-if)# exit
R5(config)# router ospf 1
R5(config-router)# net 0.0.0.0 255.255.255.255 area 0
R5(config-router)# end
R5#
R6的配置
R6> en
R6# config t
R6(config)# no ip routing
R6(config)# ip default-gateway 172.16.1.1
R6(config)# int e0/0
R6(config-if)# ip add 172.16.1.10 255.255.255.0
R6(config-if)# no shut
R6(config-if)# end
R6#
R7的配置
R7> en
R7# config t
R7(config)# no ip routing
R7(config)# ip default-gateway 172.16.5.1
R7(config)# int e0/3
R7(config-if)# ip add 172.16.5.10 255.255.255.0
R7(config-if)# no shut
R7(config-if)# end
R7#
验证:在R1上ping任意一台路由器的IP,匀能ping通,就成功了!!!
===============================================================
标准访问控制列表的配置
配置路由器R4
R4> en
R4# config t
R4(config)# access-list 1 permit 10.10.1.0 0.0.0.255
R4(config)# access-list 1 permit 192.168.1.0 0.0.0.255
R4(config)# access-list 1 permit 172.16.5.0 0.0.0.255
R4(config)# int e0/2
R4(config-if)# ip access-group 1 in
R4(config-if)# end
R4#
配置路由器R5
R5> en
R5# config t
R5(config)# access-list 1 permit 10.10.1.0 0.0.0.255
R5(config)# access-list 1 permit 192.168.1.0 0.0.0.255
R5(config)# access-list 1 permit 172.16.1.0 0.0.0.255
R5(config)# int e0/2
R5(config-if)# ip access-group 1 in
R5(config-if)# end
R5#
验证:在R1上ping 172.16.1.10 和ping 172.16.5.10 能ping通
在R2上ping 172.16.1.10 和ping 172.16.5.10 不能ping通
===================================================================
扩展访问控制列表的配置
配置路由器R4
R4> en
R4# config t
R4(config)# no access-list 1
R4(config)# int e0/2
R4(config-if)# no ip access-g roup 1 in
R4(config-if)# exit
R4(config)#
R4(config)#
R4(config)# access-list 101 deny tcp 10.10.2.0 0.0.0.255 172.16.1.0 0.0.0.255 eq 23
R4(config)# access-list 101 permit ip any any
R4(config)# int e0/2
R4(config-if)# ip access-group 101 in
R4(config-if)# end
R4#
配置路由器R5
R5> en
R5# config t
R5(config)# no access-list 1
R5(config)# int e0/2
R5(config-if)# no ip access-g roup 1 in
R5(config-if)# exit
R5(config)#
R5(config)#
R5(config)# access-list 101 deny tcp 10.10.1.0 0.0.0.255 172.16.5.0 0.0.0.255 eq 23
R5(config)# access-list 101 permit ip any any
R5(config)# int e0/2
R5(config-if)# ip access-group 101 in
R5(config-if)# end
R5#
配置路由器R6
R6> en
R6# config t
R6(config)# enable password 123
R6(config)# line vty 0 4
R6(config-line)# password 123
R6(config-line)# login
R6(config-line)# end
R6#
配置路由器R7
R7> en
R7# config t
R7(config)# enable password 123
R7(config)# line vty 0 4
R7(config-line)# password 123
R7(config-line)# login
R7(config-line)# end
R7#
验证:
(1) 在R1上能ping通172.16.1.10和172.16.5.10
(2) 在R1上能telnet到172.16.1.10,不能telnet到172.16.5.10
(3) 在R2上能ping通172.16.1.10和172.16.5.10
(4) 在R2不能telnet到172.16.1.10,能telnet到172.16.5.10
关于svelte 路由器 - 如何根据路由更改标头?和路由器怎么改信号道的问题我们已经讲解完毕,感谢您的阅读,如果还想了解更多关于4K 解码 + 路由器 + HDMI 收发 ARM 4核64bit、CCNP(BCMSN)实验:VRRP多组综合实验(路由器)、Cisco 交换机/路由器 ssh 配置、Cisco 路由器 访问控制列表等相关内容,可以在本站寻找。
本文标签:


