本文将介绍在React路由器6的详细情况,特别是关于react路由配置菜鸟教程的相关信息。我们将通过案例分析、数据研究等多种方式,帮助您更全面地了解这个主题,同时也将涉及一些关于4K解码+路由器+HD
本文将介绍在 React 路由器 6的详细情况,特别是关于react路由配置菜鸟教程的相关信息。我们将通过案例分析、数据研究等多种方式,帮助您更全面地了解这个主题,同时也将涉及一些关于4K 解码 + 路由器 + HDMI 收发 ARM 4核64bit、Cisco 交换机/路由器 ssh 配置、Cisco 路由器 访问控制列表、Django urls.py + React 路由器的知识。
本文目录一览:- 在 React 路由器 6(react路由配置菜鸟教程)
- 4K 解码 + 路由器 + HDMI 收发 ARM 4核64bit
- Cisco 交换机/路由器 ssh 配置
- Cisco 路由器 访问控制列表
- Django urls.py + React 路由器
")
在 React 路由器 6(react路由配置菜鸟教程)
如何解决在 React 路由器 6
让我提出我的问题,
我在同一个 React SPA 代码库中有两个子域,比如 abc.domain.com 和 xyz.domain.com
我已经在逻辑上为两个子域分隔了 Routes 中的 Route 块。
这是我在根级别的代码
<browserRouter><div>{isabcSubdomain() && <AbcSubDomainApp />}{isxyzSubdomain() && <XyzSubDomainApp />}</div></browserRouter>
内部AbcSubDomainApp
<Routes><Route path="a" element={<A/>}/><Route path="b" element={<B/>}/></Routes>
同样,在 XyzSubDomainApp 内
<Routes><Route path="x" element={<X/>}/><Route path="y" element={<Y/>}/></Routes>
现在,我在 abc.domain.com/a 并希望导航到 xyz.domain.com/x 而无需任何页面重新加载,只需使用按钮触发器(例如),有什么方法可以实现这个?
解决方法
这不可能,不仅是因为 React 不支持它。
每次浏览器检测到新域(子域)的变化时,都会触发对 DNS 服务器的请求(它可能被缓存,但请求总是发出),然后浏览器会将内容视为即将到来来自不同的来源。
发生这种情况的原因非常充分。
- 如果您在不重新加载的情况下突然切换域,浏览器如何知道要使用哪个站点数据?
- 如果您在不知情的情况下切换了域,您可能会不小心将私人信息输入到错误的网站中!
我建议您不要在您的网站中使用此功能。在不同网站上拥有两份完全相同的代码并不是一个好的解决方案。

4K 解码 + 路由器 + HDMI 收发 ARM 4核64bit
日前蓝莓电子技术有限公司宣布推出Blueberry Pi (A),它是基于Realtek 129x处理器设计,套件基于Linaro的96board规范.
Blueberry Pi的亮点包括:
系统和外围:
ARM Cortex-A53 Quad-Core processor with floating-point unit and NEON SIMD engine embedded, supporting the 64/32-bit ARMv8 architecture
ARM T820 GPU – Mali-450 8-core equivalent
Supports SATA III
Supports PCI Express1.1/2.0
Supports SDIO 3.0 interface
...
独立音视频DSP
Video DSP with HW acceleration
Decoding:
H.265 MP@L5.1 Main Tier
VP9 Profile 0
...
Encoding:
MPEG 4 SP@L5
H.264 BP, MP, HP@L4.2
H.264 MVC SHP 1080@30P
Audio DSP with HW acceleration
Decoding:
7.1 CH down-mix
MPEG I Layer 1, 2, 3 (2-CH) and MPEG II Layer 1, 2 (Multi-Channel)
LPCM, ADPCM, ALAC, FLAC, AAC, WAV, AIFF, VSELP, and OGG Vorbis
DTS HD, Dolby Digital Plus, TrueHD
WMA/WMA Pro, Dolby Digital AC3, and DTS
Recording:
LPCM/ADPCM/MP3/AAC audio recording
网络接口:
Supports RGMII/SGMII
Integrates 10/100/1000 Ethernet MAC and PHY
Integrates hardware NAT and IP6 engine for AP router application
存储接口:
Integrates USB3.0 Super Speed Dual-Role Device controller and PHY
with supports for Type C receptacle
HDMI 输出:
HDMI2.0a/MHL3.0,HDCP,and DVI 1.0 compliant transmitter
HDMI 输入:
One-chanel HDMI 2.0a compliant receiver
Supports video format up to 4K x 2k@59.94/60HZ
系统软件:
支持Android 6.x/Linux + OpenWrt
alex@blueberry-tek.com
13509624205

Cisco 交换机/路由器 ssh 配置
一准备工作:
1.开启交换机/路由器
2.连击Console控制线,到控制电脑
3.打开com口控制软件(支持ssh协议)
二配置工作:
1.进入特权模式
Cisco> enable2.输入密码
Password:3.进入全局配置模式
Cisco# conf t4.进入接口
(1)路由器输入
Cisco(config)#int GigabitEthernet 0/1 (2)交换机输入
Cisco(config)#int Vlan 15.根据需要配置IP
Cisco (config-if)#ip add x.x.x.x x.x.x.x6.打开接口
Cisco (config-if)#no shutdown7.可查看以上配置(可跳过,需要时查看)
Cisco (config-if)#do sh ip int br查看当前接口配置
8.退出接口
Cisco (config-if)#exi9.设置域名
Cisco (config)#ip domain-name cisco.com 为交换机/路由器配置一个域名,也可以认为该交换机/路由器属于这个域
10.配置SSH加密方式
Cisco (config)#crypto key generate rsa 生成一个为rsa算法的密钥
The name for the keys will be: R1.cisco.com
Choose the size of the key modulus in the range of 360 to 2048 for your
General Purpose Keys. Choosing a key modulus greater than 512 may take
a few minutes.
How many bits in the modulus [512]: 1024 ----------设置密钥为1024位
% Generating 1024 bit RSA keys, keys will be non-exportable...[OK]
*Mar 1 00:59:17.179: %SSH-5-ENABLED: SSH 1.99 has been enabled
PS:在Cisoc中rsa支持360-2048位密钥,该算法的原理是:主机将自己的公用密钥分发给相关的客户机,客户机在访问主机时则使用该主机的公开密钥来加密数据,主机则使用自己的私有的密钥来解密数据,从而实现主机密钥认证,确定客户机的可靠身份。
11.配置虚拟终端
Cisco (config)#line vty 0 512.使用本地数据库
Cisco (config-line)#login local 13.配置远程登录方式
Cisco (config-line)#transport input ssh 可先用Cisco (config-line)#transport input none ----------关闭VTY其他的远程登录协议
14.允许远程登录(非常重要)
Cisco (config-line)# access-class 1 in15.退出虚拟终端
Cisco (config-line)#exi16.创建用户名和密码
Cisco (config)#username admin password admin17.设置特权密码(可不设)
Cisco (config)#enable secret cisco 18.加入AAA认证
Cisco (config)# aaa new-model19.配置ssh超时时间
Cisco (config)#ip ssh time-out 12020.设置ssh版本
Cisco (config)#ip ssh version 2 配置完成

Cisco 路由器 访问控制列表
实验:访问控制列表
实验目的:学习使用标准访问控制列表和扩展访问控制列表做基本的安全控制
实验拓扑:如下图
实验要求:
l 标准访问控制列表
n 不允许10.10.2.0访问172.16.1.0
n 不允许10.10.1.0访问172.16.5.0
n 允许其他所有流量
(方法不唯一,我的只供参考)
l 扩展访问控制列表
n 不允许10.10.2.0 telnet 172.16.1.0
n 不允许10.10.1.0 telnet 172.16.5.0
n 允许其他所有流量
(方法不唯一,我的只供参考)
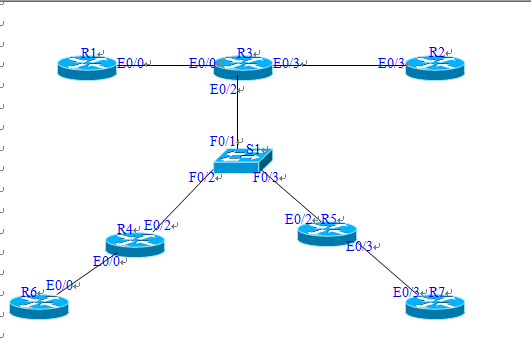
R1的配置
R1> en
R1# config t
R1(config)# no ip routing
R1(config)# ip default-gateway 10.10.1.1
R1(config)# int e0/0
R1(config-if)# ip add 10.10.1.10 255.255.255.0
R1(config-if)# no shut
R1(config-if)# end
R1#
R2的配置
R2> en
R2# config t
R2(config)# no ip routing
R2(config)# ip default-gateway 10.10.2.1
R2(config)# int e0/3
R2(config-if)# ip add 10.10.2.10 255.255.255.0
R2(config-if)# no shut
R2(config-if)# end
R2#
R3的配置
R3> en
R3# config t
R3(config)# int e0/0
R3(config-if)# ip add 10.10.1.1 255.255.255.0
R3(config-if)# no shut
R3(config-if)# int e0/3
R3(config-if)# ip add 10.10.2.1 255.255.255.0
R3(config-if)# no shut
R3(config-if)# int e0/2
R3(config-if)# ip add 192.168.1.10 255.255.255.0
R3(config-if)# duplex full
R3(config-if)# no shut
R3(config-if)# exit
R3(config)# router ospf 10
R3(config-router)# net 0.0.0.0 255.255.255.255 area 0
R3(config-router)# end
R3#
S1的配置
S1> en
S1# config t
S1(config)# int range f0/0 - 15
S1(config-if-range)# speed 10
S1(config-if-range)# duplex full
S1(config-if-range)# no shut
S1(config-if-range)# end
S1#
R4的配置
R4> en
R4# config t
R4(config)# int e0/2
R4(config-if)# ip add 192.168.1.1 255.255.255.0
R4(config-if)# duplex full
R4(config-if)# no shut
R4(config-if)# int e0/0
R4(config-if)# ip add 172.16.1.1 255.255.255.0
R4(config-if)# no shut
R4(config-if)# exit
R4(config)# router ospf 1
R4(config-router)# net 0.0.0.0 255.255.255.255 area 0
R4(config-router)# end
R4#
R5的配置
R5> en
R5# config t
R5(config)# int e0/2
R5(config-if)# ip add 192.168.1.5 255.255.255.0
R5(config-if)# duplex full
R5(config-if)# no shut
R5(config-if)# int e0/3
R5(config-if)# ip add 172.16.5.1 255.255.255.0
R5(config-if)# no shut
R5(config-if)# exit
R5(config)# router ospf 1
R5(config-router)# net 0.0.0.0 255.255.255.255 area 0
R5(config-router)# end
R5#
R6的配置
R6> en
R6# config t
R6(config)# no ip routing
R6(config)# ip default-gateway 172.16.1.1
R6(config)# int e0/0
R6(config-if)# ip add 172.16.1.10 255.255.255.0
R6(config-if)# no shut
R6(config-if)# end
R6#
R7的配置
R7> en
R7# config t
R7(config)# no ip routing
R7(config)# ip default-gateway 172.16.5.1
R7(config)# int e0/3
R7(config-if)# ip add 172.16.5.10 255.255.255.0
R7(config-if)# no shut
R7(config-if)# end
R7#
验证:在R1上ping任意一台路由器的IP,匀能ping通,就成功了!!!
===============================================================
标准访问控制列表的配置
配置路由器R4
R4> en
R4# config t
R4(config)# access-list 1 permit 10.10.1.0 0.0.0.255
R4(config)# access-list 1 permit 192.168.1.0 0.0.0.255
R4(config)# access-list 1 permit 172.16.5.0 0.0.0.255
R4(config)# int e0/2
R4(config-if)# ip access-group 1 in
R4(config-if)# end
R4#
配置路由器R5
R5> en
R5# config t
R5(config)# access-list 1 permit 10.10.1.0 0.0.0.255
R5(config)# access-list 1 permit 192.168.1.0 0.0.0.255
R5(config)# access-list 1 permit 172.16.1.0 0.0.0.255
R5(config)# int e0/2
R5(config-if)# ip access-group 1 in
R5(config-if)# end
R5#
验证:在R1上ping 172.16.1.10 和ping 172.16.5.10 能ping通
在R2上ping 172.16.1.10 和ping 172.16.5.10 不能ping通
===================================================================
扩展访问控制列表的配置
配置路由器R4
R4> en
R4# config t
R4(config)# no access-list 1
R4(config)# int e0/2
R4(config-if)# no ip access-g roup 1 in
R4(config-if)# exit
R4(config)#
R4(config)#
R4(config)# access-list 101 deny tcp 10.10.2.0 0.0.0.255 172.16.1.0 0.0.0.255 eq 23
R4(config)# access-list 101 permit ip any any
R4(config)# int e0/2
R4(config-if)# ip access-group 101 in
R4(config-if)# end
R4#
配置路由器R5
R5> en
R5# config t
R5(config)# no access-list 1
R5(config)# int e0/2
R5(config-if)# no ip access-g roup 1 in
R5(config-if)# exit
R5(config)#
R5(config)#
R5(config)# access-list 101 deny tcp 10.10.1.0 0.0.0.255 172.16.5.0 0.0.0.255 eq 23
R5(config)# access-list 101 permit ip any any
R5(config)# int e0/2
R5(config-if)# ip access-group 101 in
R5(config-if)# end
R5#
配置路由器R6
R6> en
R6# config t
R6(config)# enable password 123
R6(config)# line vty 0 4
R6(config-line)# password 123
R6(config-line)# login
R6(config-line)# end
R6#
配置路由器R7
R7> en
R7# config t
R7(config)# enable password 123
R7(config)# line vty 0 4
R7(config-line)# password 123
R7(config-line)# login
R7(config-line)# end
R7#
验证:
(1) 在R1上能ping通172.16.1.10和172.16.5.10
(2) 在R1上能telnet到172.16.1.10,不能telnet到172.16.5.10
(3) 在R2上能ping通172.16.1.10和172.16.5.10
(4) 在R2不能telnet到172.16.1.10,能telnet到172.16.5.10

Django urls.py + React 路由器
如何解决Django urls.py + React 路由器
我构建了一个 Django API 和一个 React 前端来使用 API。我正在使用 react-router 并且可以很好地导航,直到我刷新页面。然后我从 Django 中得到一个 Not Found 错误。
我不确定如何使用 Django 设置这些路径,以便它知道要提供什么服务。
api/urls.py
urlpatterns = [path('''',views.apiOverview,name=''api-overview''),path(''product-list'',views.product_list,name=''product-list''),path(''product/<str:slug>'',views.product_detail,name=''product-detail''),path(''images/<str:fk>'',views.product_images,name=''product_images''),]
urls.py
urlpatterns = [path('''',TemplateView.as_view(template_name="index.html"),name=''app''),path(''admin/'',admin.site.urls),path(''api/'',include(''api.urls'')),] + static(settings.MEDIA_URL,document_root=settings.MEDIA_ROOT)
app.js
function App() {return (<Router><Nav /><div className="App"><Switch><Route path="/products/:slug" exact component={ ProductDetail } /><Route path="/products"><Projects /></Route><Route path="/"><div className=''container''><Header /><hr /><h2 className="section-title">Featured Products</h2><ProductsListHome /></div></Route></Switch></div><Footer /></Router>);}
解决方法
如果您的应用部署到 Netlify,请将名为 _redirects 的文件添加到您的公共文件夹。然后,添加以下行:
/* /index.html 200
今天关于在 React 路由器 6和react路由配置菜鸟教程的讲解已经结束,谢谢您的阅读,如果想了解更多关于4K 解码 + 路由器 + HDMI 收发 ARM 4核64bit、Cisco 交换机/路由器 ssh 配置、Cisco 路由器 访问控制列表、Django urls.py + React 路由器的相关知识,请在本站搜索。
本文标签:


