在本文中,我们将给您介绍关于第十五天的详细内容,并且为您解答UsingAJAXwithSenchaTouch的相关问题,此外,我们还将为您提供关于javaScript--touch事件详解(touch
在本文中,我们将给您介绍关于第十五天的详细内容,并且为您解答Using AJAX with Sencha Touch的相关问题,此外,我们还将为您提供关于javaScript -- touch事件详解(touchstart、touchmove和touchend)、javascript – sencha touch Ext.Router、javascript – Sencha Touch Tab Handlers、Java第三十五天(Ajax & Jquery)的知识。
本文目录一览:- 第十五天(Using AJAX with Sencha Touch)(第十五天白板是不是没戏了)
- javaScript -- touch事件详解(touchstart、touchmove和touchend)
- javascript – sencha touch Ext.Router
- javascript – Sencha Touch Tab Handlers
- Java第三十五天(Ajax & Jquery)
(第十五天白板是不是没戏了)")
第十五天(Using AJAX with Sencha Touch)(第十五天白板是不是没戏了)
原文地址:http://docs-origin.sencha.com/touch/2.2.0/#!/guide/ajax
Using AJAX with Sencha Touch
在st中使用AJAX
Contents
- Simple Requests with Ext.Ajax
- Cross-Domain Requests
- Form Uploads
Sencha Touch provides a variety of convenient ways to get data into and out of your application. All of the data-bound Components such as Lists,nested Lists,and DataViews use Stores,which are easily configured to fetch and save data to a large variety of sources. We will look at managing data with stores later on,but first let us start with how to generate simple AJAX requests.
st提供了很多种向应用导入导出数据的方式。所有的数据绑定组件,例如Lists、nested List及DataViews都使用了很容易配置的数据存储来从大量的数据源存取数据。我们稍后会看如何管理数据存储的数据,首先我们看下如何生成一个简单的ajax请求。
Simple Requests with Ext.Ajax
用Ext.Ajax发送简单的请求
Because of browser security restrictions,AJAX requests are usually made to urls on the same domain as your application. For example,if your application is found at http://myapp.com,you can send AJAX requests to urls such as http://myapp.com/login.PHP and http://myapp.com/products/1.json,but not to other domains such as http://google.com. However,Sencha Touch provides some alternatives to get around this limitation,as shown in the final part of this guide (Cross-Domain Requests and JSON-P).
由于浏览器安全策略的限制,ajax请求通常与你的应用使用相同的域。例如,如果你的应用建立在http://myapp.com, 你可以向这些url发送请求,http://myapp.com/login.PHP 、http://myapp.com/products/1.json,但是不能向其它域如http://google.com发送请求。然而,st提供了几种绕开该限制的方法,如该向导的最后一部分所述(Cross-Domain Request 和JSON-P).
The following code shows an AJAX request to load data from an url on the same domain:
下面的代码展示了向同一个域上的url请求数据:
Ext.Ajax.request({ url: 'myUrl', callback function(options success response) { consolelogresponseresponseText);}});
Assuming that your app is on http://myapp.com,the prevIoUs code sends a GET request to http://myapp.com/myUrl. Since AJAX calls are asynchronous,once the response comes back,the callback function is called with the response. In this example the callback function logs the contents of the response to the console when the request has finished.
假设你的app在http://myapp.com上,上面的代码向http://myapp.com/myUrl发送了一个get请求。尽管AJAX调用是异步的,一旦响应返回,callback函数就会被调用。在这个例子中,当请求结束时,callback函数会将响应的内容打印出来。
AJAX Options
AJAX配置项
Ext.Ajaxtakes a wide variety of options,including setting the method (GET,POST,PUT,or DELETE),sending headers,and setting params to be sent in the url. The following code sets the method such that a POST request is sent instead of a GET:
Ext.Ajax有大量的配置项,包括设置请求方法(GET、POST、PUT 或者DELETE),请求头,url中要发送的参数。下面的代码设置了请求的方法为POST而不是GET:
method'POST' Sending parameters done as shown in the following example:发送参数如下面的代码所示:
params username'Ed' password'not a good place to put a password'},sans-serif; font-size:12.800000190734863px; line-height:19.5px"> When setting parameters like in this example,the request is automatically sent as a POST with the params object sent as form data. The prevIoUs request above is like submitting a form with username and password fields.当像上面的例子所示设置参数时,请求会自动将参数作为表单数据发送一个post请求。上面的请求提交了一个有username和password字段的表单。
If we wanted to send this as a GET request instead,we would have to specify the method again,in which case our params are automatically escaped and appended to the url:
如果我们想将上述请求改为get请求,我们需要再次指定method方法,这时我们的参数会自动过滤并追加到url后:
'GET''bad place for a password' The prevIoUs code sample generates the following request:上面的代码生成了如下的请求:
http://mywebsite.com/myUrl?_dc=1329443875411&username=Ed&password=bad%20place%20for%20a%20passwordYou may have noticed that our request created an url that contained "_dc=1329443875411". When you make a GET request like this,many web servers cache the response and send you back the same response every time you make the request. Although this speeds the web up,it is not always what you want. In fact in applications this is rarely what you want,so we "bust" the cache by adding a timestamp to every request. This tells the web server to treat it like a fresh,uncached request.
你可能会发现我们的请求创建了一个包含“_dc=1329443875411”参数的url。当你像上面这样创建一个get请求时,很多web服务器会缓存该响应并在每次接到该请求时都返回你相同的响应。尽管这提供了web访问速度,但是它并不总是你想要的。事实上,在应用程序中,这几乎不是你想要的,因此我们通过为每一个请求添加时间戳来禁用缓存。这告诉web服务器它是一个新的、不缓存的请求。
If you want to turn this behavior off,we cCould set disableCaching to false,as shown in the following code sample:
如果你想关闭该功能,可以设置disableCaching 为false,如下面的代码所示:
disableCachingfalse Since the request no longer contains the cache busting string,it looks like the following string:因为请求不再包含缓存字符串,请求url如下所示:
//mywebsite.com/myUrl?username=Ed&password=bad%20place%20for%20a%20passwordSending Headers
发送头信息
Another option related to customizing the request is the headers option. This enables you to send any custom headers to your server,which is often useful when the web server returns different content based on these headers. For example,if your web server returns JSON,XML,or CSV based on the header it is passed,we can request JSON like in the following example:
请求的另一个可配置项时头信息。这让你能够将任何客户头信息发送给服务器,这在服务器依据不同的头信息返回不同的内容时很有用。例如,如果你的web服务器依据头信息返回json、xml或者csv时,我们可以像下面这样请求json:
headers"Content-Type""application/json" If you create a request like this and inspect it in Firebug/web inspector,you will see that the Content-Type header has been set to application/json. Your web server can pick up on this and send you the right response. You can pass any number of headers you like into the headers option.如果你像上面那样创建了一个请求,并在firebug、web监视器中查看,你可以看到Content-Type头被设置成了application/json。你的web服务器能够获得该信息并给你正确的响应。你可以在headers配置中传递任意数量的头信息。
Callback Options
回调功能
Not every AJAX request succeeds: sometimes the server is down,or your internet connection drops,or something else bad happens.Ext.Ajaxallows you to specify separate callbacks for each of these cases:
不是每一个的ajax请求都会成功:有时,服务器挂了或者网络连接断了亦或者发生了其它一些事。Ext.Ajax允许你为不同的情况指定回调函数:
("Spiffing,everything worked" failure"Curses,something terrible happened" These do exactly what you would expect them to do,and hopefully most of the time it is your success callback that gets called. It is pretty common to provide a success callback that updates the UI or does whatever else is needed by the application flow,and a failure handler that either resends the request or alerts the user that something went wrong.这会根据你的意愿去做正确的处理,并且通常情况下会调用success回调函数。提供一个success回调函数来更新ui或者做一些其它必要的事情、一个failure回调函数处理重新请求或者给用户弹出一个错误提示窗口是相当不错的做法。
You can providesuccess/failureandcallbackat the same time,so for this request thesuccessfunction is called first (if everything was ok),followed by the maincallbackfunction. In the case of failure,thefailurefunction is called first,followed bycallback:
你也可以同时提供success/failure和callback,这种情况下,如果一切正常,该请求会首先调用success方法然后调用callback,在失败的情况下,会先调用failure方法再调用callback方法:
"It is what it is"});Timeouts and Aborting Requests
超时和废弃请求
Another way requests can fail is when the server took too long to respond and the request timed out. In this case yourfailurefunction is called,and the request object it is passed has the timedout variable set to true:
请求失败的另一种情况是服务器需要很长时间响应导致请求超时。在这种情况下,failure方法被调用,传递的请求对象的timedout参数被设为true:
timedout // logs true By default the timeout threshold is 30 seconds,but you can specify it for every request by setting the timeout value in millisecond. In the following case the request will give up after 5 seconds:默认情况系下,超时阈值为30s,但是你可以设置timeout参数为多少毫秒来指定每一个请求的超时阈值。在下面的例子中,请求会在5s后放弃:
timeout 5000 It is also possible to abort requests that are currently outstanding. In order to do this,you need to save a reference to the request object thatExt.Ajax.requestreturns,sans-serif; font-size:12.800000190734863px; line-height:19.5px"> 废弃当前尚未完成的请求也是可能的。为了达到这个目的,你需要保存对请求对象的引用,即Ext.Ajax.request返回的对象,如下所示:var myRequest = aborted}); abortmyRequest);This time the failure callback is called and its response.aborted property is set. You can use all of the error handling above in your apps:
这一次,failure方法会被调用,并且response.aborted参数会被设置。你可以在你的app中使用下面所有的错误处理:
if Msgalert'Timeout'"The server timed out :("else'Aborted'"Looks like you aborted the request"'Bad'"Something went wrong with your request"});Cross-Domain Requests
跨域请求
A relatively new capability of modern browsers is calledCORS,which stands for Cross-Origin Resource Sharing. This allows you to send requests to other domains,without the usual security restrictions enforced by the browser. Sencha Touch provides support for CORS,although you will probably need to configure your web server in order to enable it. If you are not familiar with the required actions for setting up your web server for CORS,a quick web search should give you plenty of answers.
现代浏览器的一个相对比较新的功能叫CORS,代表Cross-Origin Resource Sharing(跨域资源共享)。这允许你撇开浏览器的安全策略要求向其他的域发起请求。st对cors提供了支持,但是你需要配置你的服务器以允许它。如果你对配置web服务器允许cors不熟,一个快速的检索将给你很多答案。
Assuming your server is set up,sending a CORS request is easy:
假设你的服务器已经配置好了,发送一个cors请求是很简单的:
'http://www.somedomain.com/some/awesome/url.PHP' withCredentialstrue useDefaultXhrHeaderfalse});Form Uploads
表单上传
The final topic covered in this guide is uploading forms,a functionality that is illustrated in the following sample code:
本向导包含的最后一个话题 是表单上传,如下代码所示的功能:
form'myFormId'success'Success''We got your form submission''Fail''Hmm,that did not work' This finds a <form> tag on the page with id="myFormId",retrieves its data and puts it into the request params object,as shown at the start of this guide. Then it submits it to the specified url and calls your callbacks like normal.这会寻找页面上id = “myFormId”的<form>标签,检索表单里的数据并将其放入请求的params参数,如本篇开始里所提到的样。然后会跟正常情况下样提交到指定的url并执行callback回调函数。
昨晚的今天来补上!
")
javaScript -- touch事件详解(touchstart、touchmove和touchend)
HTML5中新添加了很多事件,但是由于他们的兼容问题不是很理想,应用实战性不是太强,所以在这里基本省略,咱们只分享应用广泛兼容不错的事件,日后随着兼容情况提升以后再陆续添加分享。今天为大家介绍的事件主要是触摸事件:touchstart、touchmove和touchend。
一开始触摸事件touchstart、touchmove和touchend是iOS版Safari浏览器为了向开发人员传达一些信息新添加的事件。因为ios设备既没有鼠标也没有键盘,所以在为移动Safari浏览器开发交互性网页的时候,PC端的鼠标和键盘事件是不够用的。
在iPhone 3Gs发布的时候,其自带的移动Safari浏览器就提供了一些与触摸(touch)操作相关的新事件。随后,Android上的浏览器也实现了相同的事件。触摸事件(touch)会在用户手指放在屏幕上面的时候、在屏幕上滑动的时候或者是从屏幕上移开的时候出发。下面具体说明:
touchstart事件:当手指触摸屏幕时候触发,即使已经有一个手指放在屏幕上也会触发。
touchmove事件:当手指在屏幕上滑动的时候连续地触发。在这个事件发生期间,调用preventDefault()事件可以阻止滚动。
touchend事件:当手指从屏幕上离开的时候触发。
touchcancel事件:当系统停止跟踪触摸的时候触发。关于这个事件的确切出发时间,文档中并没有具体说明,咱们只能去猜测了。
上面的这些事件都会冒泡,也都可以取消。虽然这些触摸事件没有在DOM规范中定义,但是它们却是以兼容DOM的方式实现的。所以,每个触摸事件的event对象都提供了在鼠标实践中常见的属性:bubbles(起泡事件的类型)、cancelable(是否用 preventDefault() 方法可以取消与事件关联的默认动作)、clientX(返回当事件被触发时,鼠标指针的水平坐标)、clientY(返回当事件触发时,鼠标指针的垂直坐标)、screenX(当某个事件被触发时,鼠标指针的水平坐标)和screenY(返回当某个事件被触发时,鼠标指针的垂直坐标)。除了常见的DOM属性,触摸事件还包含下面三个用于跟踪触摸的属性。
touches:表示当前跟踪的触摸操作的touch对象的数组。
targetTouches:特定于事件目标的Touch对象的数组。
changeTouches:表示自上次触摸以来发生了什么改变的Touch对象的数组。
每个Touch对象包含的属性如下。
clientX:触摸目标在视口中的x坐标。
clientY:触摸目标在视口中的y坐标。
identifier:标识触摸的唯一ID。
pageX:触摸目标在页面中的x坐标。
pageY:触摸目标在页面中的y坐标。
screenX:触摸目标在屏幕中的x坐标。
screenY:触摸目标在屏幕中的y坐标。
target:触目的DOM节点目标。
上面的属性光这么看,果然非常繁琐,每个属性说的都是那么的细致,只有真刀实枪的来点小例子才能更加明白其中的奥妙。所以小例子如下。
function load (){

    document.addEventListener(''touchstart'',touch, false);
    document.addEventListener(''touchmove'',touch, false);
    document.addEventListener(''touchend'',touch, false);

    function touch (event){
        var event = event || window.event;

        var oInp = document.getElementById("inp");

        switch(event.type){
            case "touchstart":
                oInp.innerHTML = "Touch started (" + event.touches[0].clientX + "," + event.touches[0].clientY + ")";
                break;
            case "touchend":
                oInp.innerHTML = "<br>Touch end (" + event.changedTouches[0].clientX + "," + event.changedTouches[0].clientY + ")";
                break;
            case "touchmove":
                event.preventDefault();
                oInp.innerHTML = "<br>Touch moved (" + event.touches[0].clientX + "," + event.touches[0].clientY + ")";
                break;
        }

    }
}
window.addEventListener(''load'',load, false); 
javascript – sencha touch Ext.Router
Ext.setup({
    tabletStartupScreen: 'tablet_startup.png',phonestartupScreen: 'startup.png',icon: 'icon.png',onReady: function() {
       KOI.views.viewport = new KOI.views.Viewport();
    }
});
我有一个路由文件,(在app之前加载)
Ext.Router.draw(function(map) {
      map.connect("main",{ controller: 'menu',action: 'index' });
});
这是控制器
KOI.controllers.menus = new Ext.Controller({
    index: function(options) {
        KOI.views.viewport.setActiveItem(KOI.views.mainMenu);
    }
});
Ext.regController('menu',KOI.controllers.menus);
但是将URL更改为http://myapp.com/#main无效,尽管控制器可以正常工作.我缺少什么想法?任何帮助将不胜感激. Ext.router没有太多的文档,我无法看到调试最新情况的好方法.
解决方法
然而,Ext.regApplication创建了一个新的Ext.Application,将配置对象传递给它.
Ext.Application的一部分是Ext.Application.onBeforelaunch和Ext.Application.launch.如果启用了onBeforelaunch,则设置历史记录支持,然后调用launch.
如果启动没有返回false,那么onBeforelaunch将继续使用你的上一个历史项/令牌,你的defaultUrl或者所有其他都失败来调用Ext.redirect {controller:’application’,action:’index’}

javascript – Sencha Touch Tab Handlers
我正在尝试在Sencha Touch中做一个Tabpanel并为其中一个按钮添加处理程序,但是当我单击它时该事件不会触发.有任何想法吗?
这是代码:
处理程序:
var handler = function(button, event) {
        var txt = "YES!";
        alert(txt);
    };
和项目:
items: [{
        xtype: ''button'',
        title: ''Test'',
        html: ''Test'',
        iconCls: ''info'',
        cls: ''card1'',
        handler: handler
    }]
解决方法:
添加以下项目:
listeners: {
        cardswitch : function() {
          console.log(''cardswitch!'');
        }
}
见文档http://dev.sencha.com/deploy/touch/docs/?class=Ext.TabBar
总结
以上是小编为你收集整理的javascript – Sencha Touch Tab Handlers全部内容。
如果觉得小编网站内容还不错,欢迎将小编网站推荐给好友。
原文地址:https://codeday.me/bug/20190721/1497367.html
")
Java第三十五天(Ajax & Jquery)
Ajax & Jquery
Ajax
* 是什么?
> “Asynchronous Javascript And XML”(异步JavaScript和XML),
> 并不是新的技术,只是把原有的技术,整合到一起而已。
1. 使用CSS和XHTML来表示。
2. 使用DOM模型来交互和动态显示。
3. 使用XMLHttpRequest来和服务器进行异步通信。
4. 使用javascript来绑定和调用。
* 有什么用?
> 咱们的网页如果想要刷新局部内容。 那么需要重新载入整个网页。用户体验不是很好。 就是为了解决局部刷新的问题。 保持其他部分不动,只刷新某些地方。
数据请求 Get
1.创建对象
            function  ajaxFunction(){
               var xmlHttp;
               try{ // Firefox, Opera 8.0+, Safari
                    xmlHttp=new XMLHttpRequest();
                }
                catch (e){
                   try{// Internet Explorer
                         xmlHttp=new ActiveXObject("Msxml2.XMLHTTP");
                      }
                    catch (e){
                      try{
			//老版本的 Internet Explorer (IE5 和 IE6)使用 ActiveX 对象:
                         xmlHttp=new ActiveXObject("Microsoft.XMLHTTP");
                      }
                      catch (e){}
                      }
                }
                return xmlHttp;
             }
2. 发送请求
XMLHttpRequest 对象用于和服务器交换数据。
方法 描述 open(method,url,async) 规定请求的类型、URL 以及是否异步处理请求。
method:请求的类型;GET 或 POST url:文件在服务器上的位置 async:true(异步)或 false(同步) 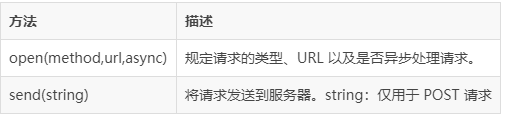
        //执行get请求
    function get() {
        //1\. 创建xmlhttprequest 对象
        var request = ajaxFunction();
        //2\. 发送请求。
        // http://localhost:8080/day16/demo01.jsp
        //http://localhost:8080/day16/DemoServlet01
        /*
            参数一method: 请求类型  GET or  POST
            参数二url: 请求的路径,文件在服务器上的位置
            参数三async: 是否异步,true(异步)或 false(同步)
        */
        request.open("GET" ,"/day16/DemoServlet01" ,true );
        request.send();
    }
如果发送请求的同时,还想获取数据,那么代码如下
    //执行get请求
    function get() {
        //1\. 创建xmlhttprequest 对象
        var request = ajaxFunction();
        //2\. 发送请求
        request.open("GET" ,"/day16/DemoServlet01?name=aa&age=18" ,true );
        //3\. 获取响应数据 注册监听的意思。  一旦准备的状态发生了改变,那么就执行 = 号右边的方法
        request.onreadystatechange = function(){
            //前半段表示 已经能够正常处理。  再判断状态码是否是200
            if(request.readyState == 4 && request.status == 200){
                //弹出响应的信息
                alert(request.responseText);
            }
        }
        request.send();
    }
数据请求 Post
<script type="text/javascript">

    //1\. 创建对象
    function  ajaxFunction(){
       var xmlHttp;
       try{ // Firefox, Opera 8.0+, Safari
            xmlHttp=new XMLHttpRequest();
        }
        catch (e){
           try{// Internet Explorer
                 xmlHttp=new ActiveXObject("Msxml2.XMLHTTP");
              }
            catch (e){
              try{
                 xmlHttp=new ActiveXObject("Microsoft.XMLHTTP");
              }
              catch (e){}
              }
        }
        return xmlHttp;
     }
    function post() {
        //1\. 创建对象
        var request = ajaxFunction();
        //2\. 发送请求
        request.open( "POST", "/day16/DemoServlet01", true );
        //如果不带数据,写这行就可以了
        //request.send();
        //如果想带数据,就写下面的两行
        //如果使用的是post方式带数据,那么 这里要添加头, 说明提交的数据类型是一个经过url编码的form表单数据
        request.setRequestHeader("Content-type","application/x-www-form-urlencoded");
        //带数据过去  , 在send方法里面写表单数据。
        request.send("name=aobama&age=19");
    }
</script>
需要获取数据
        function post() {
            //1\. 创建对象
            var request = ajaxFunction();
            //2\. 发送请求
            request.open( "POST", "/day16/DemoServlet01", true );
            //想获取服务器传送过来的数据, 加一个状态的监听。
            request.onreadystatechange=function(){
                if(request.readyState==4 && request.status == 200){
                    alert("post:"+request.responseText);
                }
            }
            //如果使用的是post方式带数据,那么 这里要添加头, 说明提交的数据类型是一个经过url编码的form表单数据
            request.setRequestHeader("Content-type","application/x-www-form-urlencoded");
            //带数据过去  , 在send方法里面写表单数据。
            request.send("name=aobama&age=19");
        }
校验用户名是否可用
1. 搭建环境
1. 页面准备
       <body>
       <table border="1" width="500">
           <tr>
               <td>用户名:</td>
               <td><input type="text" name="name" id="name"  onblur="checkUserName()"><span id="span01"></span></td>
           </tr>
           <tr>
               <td>密码</td>
               <td><input type="text" name=""></td>
           </tr>
           <tr>
               <td>邮箱</td>
               <td><input type="text" name=""></td>
           </tr>
           <tr>
               <td>简介</td>
               <td><input type="text" name=""></td>
           </tr>
           <tr>
               <td colspan="2"><input type="submit" value="注册"></td>
           </tr>
       </table>
   </body>
2. 数据库准备
2. Servlet代码
        protected void doGet(HttpServletRequest request, HttpServletResponse response) throws ServletException, IOException {
        try {
            request.setCharacterEncoding("UTF-8");
            //1\. 检测是否存在
            String name = request.getParameter("name");
            System.out.println("name="+name);
            UserDao dao = new UserDaomImpl();
            boolean isExist = dao.checkUserName(name);
            //2\.  通知页面,到底有还是没有。
            if(isExist){
                response.getWriter().println(1);  //存在用户名
            }else{
                response.getWriter().println(2); //不存在该用户名
            }
        } catch (SQLException e) {
            e.printStackTrace();
        }
    }
3. Dao代码
        public class UserDaomImpl implements UserDao{

            @Override
            public boolean checkUserName(String username) throws SQLException {
                QueryRunner runner = new QueryRunner(JDBCUtil02.getDataSource());
                String sql = "select count(*) from t_user where username =?";
         		runner.query(sql, new  ScalarHandler(), username);

                Long result = (Long) runner.query(sql, new  ScalarHandler(), username);
                return result > 0 ;
            }
        }
jsp页面显示
    function checkUserName() {

        //获取输入框的值 document 整个网页
        var name = document.getElementById("name").value; // value  value() val val()
        //1\. 创建对象
        var request = ajaxFunction();
        //2\. 发送请求
        request.open("POST"  ,"/day16/CheckUserNameServlet" , true );
        //注册状态改变监听,获取服务器传送过来的数据
        request.onreadystatechange = function(){
            if(request.readyState == 4 && request.status == 200){
                //alert(request.responseText);
                var data = request.responseText;
                if(data == 1){
                    //alert("用户名已存在");
                    document.getElementById("span01").innerHTML = "<font color=''red''>用户名已存在!</font>";
                }else{
                    document.getElementById("span01").innerHTML = "<font color=''green''>用户名可用!</font>";
                    //alert("用户名未存在");
                }
            }
        }
        request.setRequestHeader("Content-type","application/x-www-form-urlencoded");
        request.send("name="+name);
    }
JQuery
* 是什么?
> javascript 的代码框架。
* 有什么用?
> 简化代码,提高效率。
* 核心
> write less do more , 写得更少,做的更多。
load
<a href="" onclick="load()">使用JQuery执行load方法</a>
有两次刷新, 先走 onClick的方法,取到数据回来之后,赋值显示。 接着 走 href=""的路径,但是这个属性没有给值,所以会把当前的页面重新再刷新一次。所以导致看不见值。
    //找到这个元素, 去执行加载的动作, 加载/day16/DemoServlet02 , 得到的数据,赋值显示
    $("#aaa").load("/day16/DemoServlet02" , function(responseText , statusTXT  , xhr) {
            //找到id为text01的元素, 设置它的value属性值为 responseText 对应的值
            $("#aaa").val(responseText);
        });
Get
    $.get("/day16/DemoServlet02"  , function(data ,status) {
            $("#div01").text(data);
        });
赋值显示
\* val("aa");

\> 只能放那些标签带有value属性
\* html("aa"); ---写html代码
\* text("aa");
> 其实没有什么区别,如果想针对这分数据做html样式处理,那么只能用html()
load & get
* load
      $("#元素id").load(url地址);

      $("#div1").load(serlvet); ---> 使用的get请求,回来赋值的时候, 使用text();去赋值
* get
语法格式 : $.get(URL,callback);
使用案例:
$.get("/day16/DemoServlet02"  , function(data ,status) {
            $("#div01").text(data);
        });
* post
语法格式:$.post(URL,data,callback);
        function post() {
            $.post("/day16/DemoServlet02", {name:"zhangsan",age:18},function(data,status) {
                //想要放数据到div里面去。 --- 找到div
                $("#div01").html(data);
            });
        }
使用JQuery去实现校验用户名
        function checkUserName() {
            //1\. 获取输入框的内容
            var name = $("#name").val();

            //2\. 发送请求
            $.post("/day16/CheckUserNameServlet" , {name:name} , function(data , status){
                //alert(data);
                if(data == 1){//用户名存在
                    //alert("用户名存在");
                    $("#span01").html("<font color=''red''>用户名已被注册</font>");
                }else{
                    //alert("用户名可用");
                    $("#span01").html("<font color=''green''>用户名可以使用</font>");
                }
            } );
            //3\. 输出响应的数据到页面上。
        }
注意Juery代码种使用html()方法,js中使用了innerHtml()方法,IE里有些元素的innerHTML是只读的,在IE6,IE7,IE8,IE9里面 col, colGroup, frameSet, html, head, style,table, tBody, tFoot, tHead, title, tr 这几个的innerHTML属性是只读的,不可以赋值,赋值的话就脚本报错。IE10这些标签的innerHTML改成可写的了。
实现百度搜索提示
搭建环境
1. 定义首页
       <body>
       <center>
       <h2>黑马</h2>
           <input type="text" name="word" id="word">
           <input type="button" value="黑马一下"  >

           <div id="div01"></div>
       </center>
       </body>
2. 定义数据库
捕获键盘弹起
$(function(){
	$("#word").keyup(function() {
		alert("键盘弹起了..");
	})
});
JS请求
    $(function(){
        $("#word").keyup(function() {
            //2。 获取输入框的值
            //var word = $("#word").val();
            //this  对应就是执行这个方法的那个对象, $("#word")
            var word = $(this).val();

            if(word == ""){
                $("#div01").hide();
            }else{
                //3\. 请求数据。
                $.post("find",{word:word} ,function(data , status){
                    //alert(data);
                    $("#div01").show();
                    $("#div01").html(data);
                });
            }

        })
    });
Servlet代码
            protected void doGet(HttpServletRequest request, HttpServletResponse response) throws ServletException, IOException {

            request.setCharacterEncoding("utf-8");
            try {
                //1\. 先获取参数
                String word = request.getParameter("word");
                System.out.println("word="+word);
                //2\. 让dao执行查询
                WordsDao dao = new WordsDaoImpl();
                List<WordBean> list = dao.findWords(word);
                for (WordBean wordBean : list) {
                    System.out.println("==="+wordBean.toString());
                }
                request.setAttribute("list", list);
                //3\. 返回数据
                response.setContentType("text/html;charset=utf-8");
                //response.getWriter().write("数据是:");
                request.getRequestDispatcher("list.jsp").forward(request, response);
            } catch (SQLException e) {
                e.printStackTrace();
            }
        }
list.jsp
        <%@ page language="java" contentType="text/html; charset=UTF-8"
            pageEncoding="UTF-8"%>
         <%@ taglib uri="http://java.sun.com/jsp/jstl/core"  prefix="c"%>
        <table>
            <c:forEach items="${list }" var="wordBean">
                <tr>
                    <td>${wordBean.words}</td>
                </tr>
            </c:forEach>
        </table>
使用JQuery实现 省市联动
环境准备
-
准备数据库
-
准备页面
        <script type="text/javascript" src="js/jquery-1.11.3.min.js"></script>
            <script type="text/javascript" src="js/city.js"></script>
            </head>
            <body>
            省份: <select name="province" id ="province">
                    <option value="" >-请选择 -
                    <option value="1" >广东
                    <option value="2" >湖南
                    <option value="3" >湖北
                    <option value="4" >四川
                </select>
            城市:
                <select name="city" id="city">
                    <option value="" >-请选择 -
                </select>
            </body>
XStream的使用
        //3\. 返回数据。手动拼  ---> XStream  转化 bean对象成 xml
            XStream xStream = new XStream();
            //想把id做成属性
            xStream.useAttributeFor(CityBean.class, "id");
            //设置别名
            xStream.alias("city", CityBean.class);
            //转化一个对象成xml字符串
            String xml = xStream.toXML(list);
JS代码
        $(function() {
        //1。找到省份的元素
        $("#province").change(function() {
            //2\. 一旦里面的值发生了改变,那么就去请求该省份的城市数据
            //$("#province").varl();
            var pid = $(this).val();
            /*<list>
                <city>
                    <id>1<id>
                    <pid>1</pid>
                    <cname>深圳</cname>
                </city>
                <city >
                    <id>2<id>
                    <pid>1</pid>
                    <cname>东莞</cname>
                </city>
            </list>*/
            $.post( "CityServlet",{pid:pid} ,function(data,status){
                //alert("回来数据了:"+data);
                //先清空以前的值:
                $("#city").html("<option value='''' >-请选择-")
                //遍历:
                //从data数据里面找出所有的city  , 然后遍历所有的city。
                //遍历一个city,就执行一次function方法
                $(data).find("city").each(function() {
                    //遍历出来的每一个city,取它的孩子。 id , cname
                    var id = $(this).children("id").text();
                    var cname = $(this).children("cname").text();
                    $("#city").append("<option value=''"+id+"'' >"+cname)
                });
            } );
        });
    });
服务器和客户端数据传输的方式
* xml
     <list>
              <city>
                  <id>1<id>
                  <pid>1</pid>
                  <cname>深圳</cname>
              </city>
              <city >
                  <id>2<id>
                  <pid>1</pid>
                  <cname>东莞</cname>
              </city>
      </list>
* json
阅读性更好 、 容量更小。
{"name":"aaa" , "age":19}
        把javaBean  转化成 json数据

        //3\. 把list ---> json数据
            //JSONArray ---> 变成数组 , 集合  \[\]
            //JSONObject ---> 变成简单的数据  { name : zhangsan , age:18}
            JSONArray jsonArray = JSONArray.fromObject(list);
            String json = jsonArray.toString();
使用json格式数据显示省市联动效果
serlvet代码:
        protected void doGet(HttpServletRequest request, HttpServletResponse response) throws ServletException, IOException {

        try {
            //1\. 获取参数
            int pid = Integer.parseInt(request.getParameter("pid"));
            //2 找出所有的城市
            CityDao dao = new CityDaoImpl();
            List<CityBean> list = dao.findCity(pid);
            //3\. 把list ---> json数据
            //JSONArray ---> 变成数组 , 集合  \[\]
            //JSONObject ---> 变成简单的数据  { name : zhangsan , age:18}
            JSONArray jsonArray = JSONArray.fromObject(list);
            String json = jsonArray.toString();
            response.setContentType("text/html;charset=utf-8");
            response.getWriter().write(json);
        } catch (SQLException e) {
            // TODO Auto-generated catch block
            e.printStackTrace();
        };
    }
js代码
        $(function() {
            //1。找到省份的元素
            $("#province").change(function() {
                //2\. 一旦里面的值发生了改变,那么就去请求该省份的城市数据
                //$("#province").varl();
                var pid = $(this).val();
                /*\[
                    {
                        "cname": "深圳",
                        "id": 1,
                        "pid": 1
                    },
                    {
                        "cname": "东莞",
                        "id": 2,
                        "pid": 1
                    }
                    ...
                \]*/
                $.post( "CityServlet02",{pid:pid} ,function(data,status){
                    //先清空
                    $("#city").html("<option value='''' >-请选择-");
                    //再遍历,追加
                    $(data).each(function(index , c) {
                        $("#city").append("<option value=''"+c.id+"'' >"+c.cname)
                    });
                },"json" );
            });
        });
总结
Ajax
发送get请求
发送post请求
都要求带数据 + 获取数据+ 放置到元素上。
JQuery
发送get请求
发送post请求
都要求带数据 + 获取数据+ 放置到元素上。
---------------------------------------
1. 服务器返回xml数据
2. 服务器返回json数据
今天关于第十五天和Using AJAX with Sencha Touch的分享就到这里,希望大家有所收获,若想了解更多关于javaScript -- touch事件详解(touchstart、touchmove和touchend)、javascript – sencha touch Ext.Router、javascript – Sencha Touch Tab Handlers、Java第三十五天(Ajax & Jquery)等相关知识,可以在本站进行查询。
本文标签: