本文将带您了解关于node.js中的window.performance.now的新内容,同时我们还将为您解释等效吗?的相关知识,另外,我们还将为您提供关于C的相当于windows的QueryPerf
本文将带您了解关于node.js中的window.performance.now的新内容,同时我们还将为您解释等效吗?的相关知识,另外,我们还将为您提供关于C的相当于windows的QueryPerformanceCounter、Getting started in window.performance、Inside NGINX: How We Designed for Performance & Scale、iOS-监听原生H5性能数据window.performance的实用信息。
本文目录一览:- node.js中的window.performance.now()等效吗?(node.js windows)
- C的相当于windows的QueryPerformanceCounter
- Getting started in window.performance
- Inside NGINX: How We Designed for Performance & Scale
- iOS-监听原生H5性能数据window.performance
等效吗?(node.js windows)")
node.js中的window.performance.now()等效吗?(node.js windows)
我认为问题很直接。
我正在寻找与nodejs V8引擎中的window.performance.now()类似的东西。
现在我正在使用:-
var now = Date.now();//do some processing..console.log("time elapsed:", Date.now() - now);但是,我读到window.performance.now()比使用日期要准确得多,因为这里定义了什么。
答案1
小编典典我只想提一下,作者在浏览器中选择使用计时API的三个原因似乎并不直接适用于节点情况,第四个是Javscript时间的不准确性,引用了2008年的一篇文章,并且我强烈警告不要依赖旧版本的有关Javascript性能细节的资料,特别是考虑到最近一轮性能改进,所有引擎都支持“
HTML5”应用程序。
但是,在回答您的问题时,您应该看一下process.hrtime()
更新:present软件包(可通过访问npm installpresent)可以根据需要提供一些糖hrtime。
注意: 从 Node的8.5.0版本开始 ,您可以使用
performance.now()

C的相当于windows的QueryPerformanceCounter
在linux中有没有一个等价的C函数来读取cpu计数器及其频率?
我正在寻找类似于QueryPerformanceCounter函数的东西来读取现代cpu中的64位计数器
Linux的USB连接/断开事件
与电篱笆库海湾合作委员会不生效
标题栏不可点击Form.TransparencyKey =白色
查找符号时,程序不会从正确的库中search
如何获得Windows服务的logon用户的安全令牌?
clock_gettime(2) ,参数为CLOCK_REALTIME_HR 。
HAVEGE库使用cpu计数器。 在这里查看它的源代码。 相关的文件是src / hardtick.h。
clock_gettime()与CLOCK_MONOTONIC_RAW

Getting started in window.performance
如何理解 window.performance
window.performance 是由 W3C 性能小组提出的用于精确计算网页性能数据的特性,它返一个 Performance 对象,支持 IE9 以上的所有浏览器,这里给出对象的原型:

Performance.timing
返回 PerformanceTiming 对象,包含延迟相关的性能信息。
Performance.navigation
返回 PerformanceNavigation 对象,该对象表示在当前给定浏览上下文中网页导航的类型(TYPE_BACK_FORWARD,TYPE_NAVIGATE,TYPE_RELOAD,TYPE_RESERVED)以及次数。
performance.memory
在 Chrome 中添加的一个非标准扩展,返回内存占用的基本信息。(尽量避免使用非标准化API)
Performance.timeOrigin
返回关于性能评估的开始时间(高分辨率时间戳)

Performance.onresourcetimingbufferfull
当 resourcetimingbufferfull 事件触发时,作为事件处理回调
function buffer_full_handler(event) {
    console.log(''[Warning]: Resource Timing Buffer is full'');
    performance.setResourceTimingBufferSize(200); // size >= 150
}

function initPerformanceMeasurement() {
    if (performance === undefined) {
        console.log("[Warning]: Performance interface is not supported");
        return
    }
    // Set a callback if the resource buffer becomes filled
    performance.onresourcetimingbufferfull = buffer_full_handler;
}

document.body.onload = initPerformanceMeasurement;
通常建议 performance entry 应该满足至少 150 个以上
为何使用 Performance
通常熟悉 Chrome 开发者工具的朋友都会在开发环境下用到网络面板的相关操作,当我们开启记录功能时,就会实时传回关于网页响应阶段的性能数据,但当我们需要统计分析用户打开网页时的性能,因此我们将 performance 原始信息或通过简单计算后的信息上传到服务器,配合其他网络属性(例如 HTTP 请求头信息),就可以很好地进行性能上报。
项目中的应用
1.判断是否刷新页面
const performance = window.performance

if(performance.navigation.type === 1) {
    console.log(''Page was not reloaded.'')
} else {
    console.log(''Page was reloaded.'')
}
这里的 performance.navigation.type 返回一个整数值,表示网页的加载来源,有以下几种情况:
返回值:0
类型常量:performance.navigation.TYPE_NAVIGATENEXT
描述:网页通过点击链接、地址栏输入、表单提交、脚本操作等方式加载
返回值:1
类型常量:performance.navigation.TYPE_RELOAD
描述:网页通过 刷新 按钮或者 location.reload() 方法加载
返回值:2
类型常量:performance.navigation.TYPE_BACK_FORWARD
描述;网页通过 前进 或 后退 按钮加载
返回值:255
类型常量:performance.navigation.TYPE_UNDEFINED
描述:网页通过其它 任何可执行的来源 加载
此外,通过 performance.navigation.redirectCount 可以获取当前网页重定向跳转的次数
2.测试函数执行时间
function fac() {
    return n === 1 ? 1 : n * arguments.callee(n - 1)
}

let t1 = window.performance.now()
fac(100)
let t2 = window.performance.now()
console.log(''diff: '', t2 - t1, '' ms'')

// output: diff: 0.14500000001862645 ms
未完待续...

Inside NGINX: How We Designed for Performance & Scale
NGINX leads the pack in web performance, and it’s all due to the way the software is designed. Whereas many web servers and application servers use a simple threaded or process-based architecture, NGINX stands out with a sophisticated event-driven architecture that enables it to scale to hundreds of thousands of concurrent connections on modern hardware.
The Inside NGINX infographic drills down from the high-level process architecture to illustrate how NGINX handles multiple connections within a single process. This blog explains how it all works in further detail.
Setting the Scene – The NGINX Process Model

To better understand this design, you need to understand how NGINX runs. NGINX has a master process (which performs the privileged operations such as reading configuration and binding to ports) and a number of worker and helper processes.
# service nginx restart
* Restarting nginx
# ps -ef --forest | grep nginx
root     32475     1  0 13:36 ?        00:00:00 nginx: master process /usr/sbin/nginx \
                                                -c /etc/nginx/nginx.conf
nginx    32476 32475  0 13:36 ?        00:00:00  \_ nginx: worker process
nginx    32477 32475  0 13:36 ?        00:00:00  \_ nginx: worker process
nginx    32479 32475  0 13:36 ?        00:00:00  \_ nginx: worker process
nginx    32480 32475  0 13:36 ?        00:00:00  \_ nginx: worker process
nginx    32481 32475  0 13:36 ?        00:00:00  \_ nginx: cache manager process
nginx    32482 32475  0 13:36 ?        00:00:00  \_ nginx: cache loader process
On this 4-core server, the NGINX master process creates 4 worker processes and a couple of cache helper processes which manage the on-disk content cache.
Why Is Architecture Important?
The fundamental basis of any Unix application is the thread or process. (From the Linux OS perspective, threads and processes are mostly identical; the major difference is the degree to which they share memory.) A thread or process is a self-contained set of instructions that the operating system can schedule to run on a CPU core. Most complex applications run multiple threads or processes in parallel for two reasons:
- They can use more compute cores at the same time.
- Threads and processes make it very easy to do operations in parallel (for example, to handle multiple connections at the same time).
Processes and threads consume resources. They each use memory and other OS resources, and they need to be swapped on and off the cores (an operation called a context switch). Most modern servers can handle hundreds of small, active threads or processes simultaneously, but performance degrades seriously once memory is exhausted or when high I/O load causes a large volume of context switches.
The common way to design network applications is to assign a thread or process to each connection. This architecture is simple and easy to implement, but it does not scale when the application needs to handle thousands of simultaneous connections.
How Does NGINX Work?
NGINX uses a predictable process model that is tuned to the available hardware resources:
- The master process performs the privileged operations such as reading configuration and binding to ports, and then creates a small number of child processes (the next three types).
- The cache loader process runs at startup to load the disk-based cache into memory, and then exits. It is scheduled conservatively, so its resource demands are low.
- The cache manager process runs periodically and prunes entries from the disk caches to keep them within the configured sizes.
- The worker processes do all of the work! They handle network connections, read and write content to disk, and communicate with upstream servers.
The NGINX configuration recommended in most cases – running one worker process per CPU core – makes the most efficient use of hardware resources. You configure it by setting the auto parameter on the worker_processes directive:
worker_processes auto;When an NGINX server is active, only the worker processes are busy. Each worker process handles multiple connections in a non-blocking fashion, reducing the number of context switches.
Each worker process is single-threaded and runs independently, grabbing new connections and processing them. The processes can communicate using shared memory for shared cache data, session persistence data, and other shared resources.
Inside the NGINX Worker Process

Each NGINX worker process is initialized with the NGINX configuration and is provided with a set of listen sockets by the master process.
The NGINX worker processes begin by waiting for events on the listen sockets (accept_mutex andkernel socket sharding). Events are initiated by new incoming connections. These connections are assigned to a state machine – the HTTP state machine is the most commonly used, but NGINX also implements state machines for stream (raw TCP) traffic and for a number of mail protocols (SMTP, IMAP, and POP3).

The state machine is essentially the set of instructions that tell NGINX how to process a request. Most web servers that perform the same functions as NGINX use a similar state machine – the difference lies in the implementation.
Scheduling the State Machine
Think of the state machine like the rules for chess. Each HTTP transaction is a chess game. On one side of the chessboard is the web server – a grandmaster who can make decisions very quickly. On the other side is the remote client – the web browser that is accessing the site or application over a relatively slow network.
However, the rules of the game can be very complicated. For example, the web server might need to communicate with other parties (proxying to an upstream application) or talk to an authentication server. Third-party modules in the web server can even extend the rules of the game.
A Blocking State Machine
Recall our description of a process or thread as a self-contained set of instructions that the operating system can schedule to run on a CPU core. Most web servers and web applications use a process-per-connection or thread-per-connection model to play the chess game. Each process or thread contains the instructions to play one game through to the end. During the time the process is run by the server, it spends most of its time ‘blocked’ – waiting for the client to complete its next move.
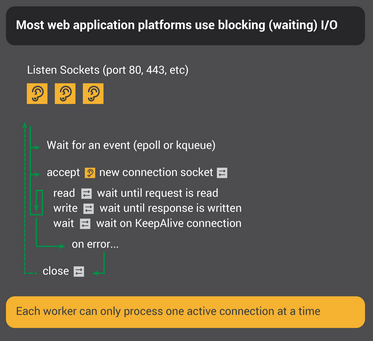
- The web server process listens for new connections (new games initiated by clients) on the listen sockets.
- When it gets a new game, it plays that game, blocking after each move to wait for the client’s response.
- Once the game completes, the web server process might wait to see if the client wants to start a new game (this corresponds to a keepalive connection). If the connection is closed (the client goes away or a timeout occurs), the web server process returns to listening for new games.
The important point to remember is that every active HTTP connection (every chess game) requires a dedicated process or thread (a grandmaster). This architecture is simple and easy to extend with third-party modules (‘new rules’). However, there’s a huge imbalance: the rather lightweight HTTP connection, represented by a file descriptor and a small amount of memory, maps to a separate thread or process, a very heavyweight operating system object. It’s a programming convenience, but it’s massively wasteful.
NGINX is a True Grandmaster
Perhaps you’ve heard of simultaneous exhibition games, where one chess grandmaster plays dozens of opponents at the same time?

Kiril Georgiev played 360 people simultaneously in Sofia, Bulgaria. His final score was 284 wins, 70 draws and 6 losses.
That’s how an NGINX worker process plays “chess.” Each worker (remember – there’s usually one worker for each CPU core) is a grandmaster that can play hundreds (in fact, hundreds of thousands) of games simultaneously.

- The worker waits for events on the listen and connection sockets.
- Events occur on the sockets and the worker handles them:
- An event on the listen socket means that a client has started a new chess game. The worker creates a new connection socket.
- An event on a connection socket means that the client has made a new move. The worker responds promptly.
A worker never blocks on network traffic, waiting for its “opponent” (the client) to respond. When it has made its move, the worker immediately proceeds to other games where moves are waiting to be processed, or welcomes new players in the door.
Why Is This Faster than a Blocking, Multi-Process Architecture?
NGINX scales very well to support hundreds of thousands of connections per worker process. Each new connection creates another file descriptor and consumes a small amount of additional memory in the worker process. There is very little additional overhead per connection. NGINX processes can remain pinned to CPUs. Context switches are relatively infrequent and occur when there is no work to be done.
In the blocking, connection-per-process approach, each connection requires a large amount of additional resources and overhead, and context switches (swapping from one process to another) are very frequent.
For a more detailed explanation, check out this article about NGINX architecture, by Andrew Alexeev, VP of Corporate Development and Co-Founder at NGINX, Inc.
With appropriate system tuning, NGINX can scale to handle hundreds of thousands of concurrent HTTP connections per worker process, and can absorb traffic spikes (an influx of new games) without missing a beat.
Updating Configuration and Upgrading NGINX
NGINX’s process architecture, with a small number of worker processes, makes for very efficient updating of the configuration and even the NGINX binary itself.

Updating NGINX configuration is a very simple, lightweight, and reliable operation. It typically just means running the nginx –s reload command, which checks the configuration on disk and sends the master process a SIGHUP signal.
When the master process receives a SIGHUP, it does two things:
- Reloads the configuration and forks a new set of worker processes. These new worker processes immediately begin accepting connections and processing traffic (using the new configuration settings).
- Signals the old worker processes to gracefully exit. The worker processes stop accepting new connections. As soon as each current HTTP request completes, the worker process cleanly shuts down the connection (that is, there are no lingering keepalives). Once all connections are closed, the worker processes exit.
This reload process can cause a small spike in CPU and memory usage, but it’s generally imperceptible compared to the resource load from active connections. You can reload the configuration multiple times per second (and many NGINX users do exactly that). Very rarely, issues arise when there are many generations of NGINX worker processes waiting for connections to close, but even those are quickly resolved.
NGINX’s binary upgrade process achieves the holy grail of high-availability – you can upgrade the software on the fly, without any dropped connections, downtime, or interruption in service.

The binary upgrade process is similar in approach to the graceful reload of configuration. A new NGINX master process runs in parallel with the original master process, and they share the listening sockets. Both processes are active, and their respective worker processes handle traffic. You can then signal the old master and its workers to gracefully exit.
The entire process is described in more detail in Controlling NGINX.
Conclusion
The Inside NGINX infographic provides a high-level overview of how NGINX functions, but behind this simple explanation is over ten years of innovation and optimization that enable NGINX to deliver the best possible performance on a wide range of hardware while maintaining the security and reliability that modern web applications require.
If you’d like to read more about the optimizations in NGINX, check out these great resources:
- Installing and Tuning NGINX for Performance (webinar; slides at Speaker Deck)
- Tuning NGINX for Performance
- The Architecture of Open Source Applications – NGINX
- Socket Sharding in NGINX Release 1.9.1 (using the SO_REUSEPORT socket option)

iOS-监听原生H5性能数据window.performance
WebKit-WKWebView
iOS8开始苹果推荐使用WKWebview作为H5开发的核心组件,以替代原有的UIWebView,以下是webkit基本介绍介绍: 介绍博客 Webkit 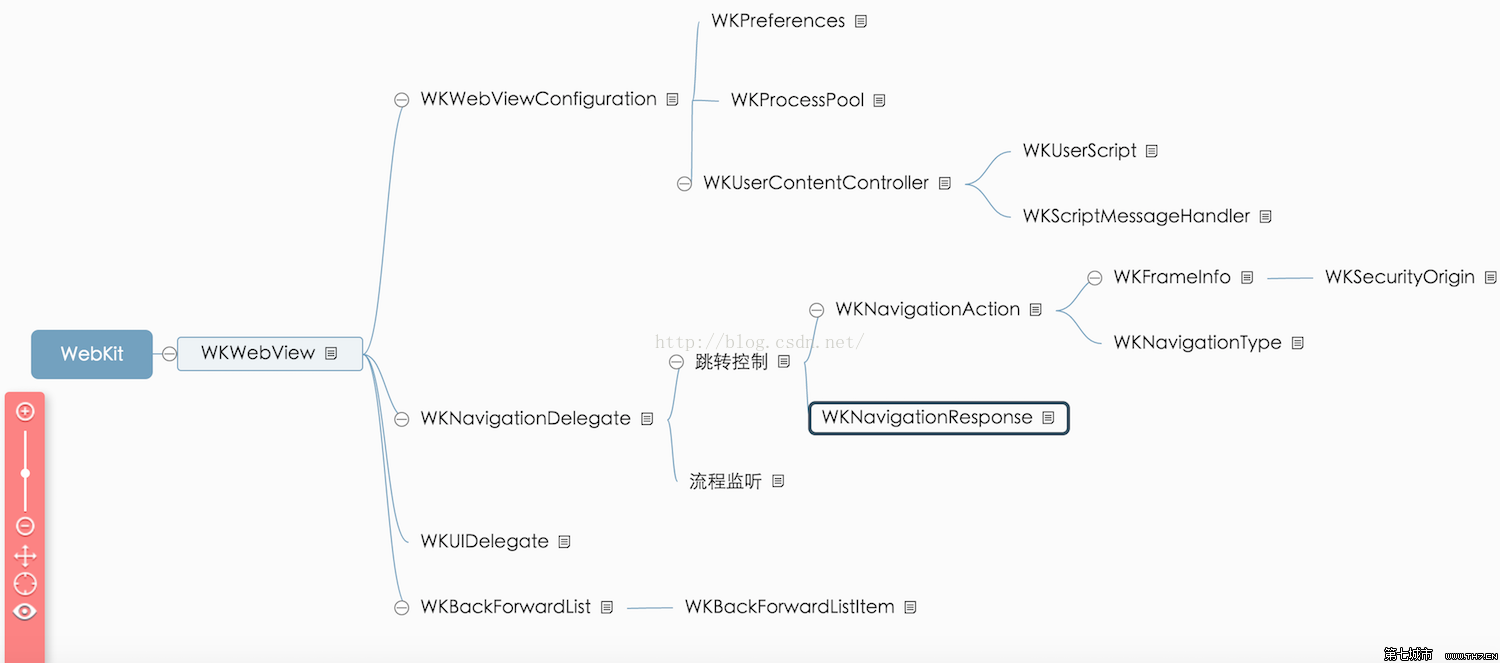
H5 - window.performance
window.performance 是W3C性能小组引入的新的API,主流浏览器都支持 iOS可以获取的字段可以通过xcode官方文档查看:(WebKit JS只有做Safari编程才能使用,所以只能查看) 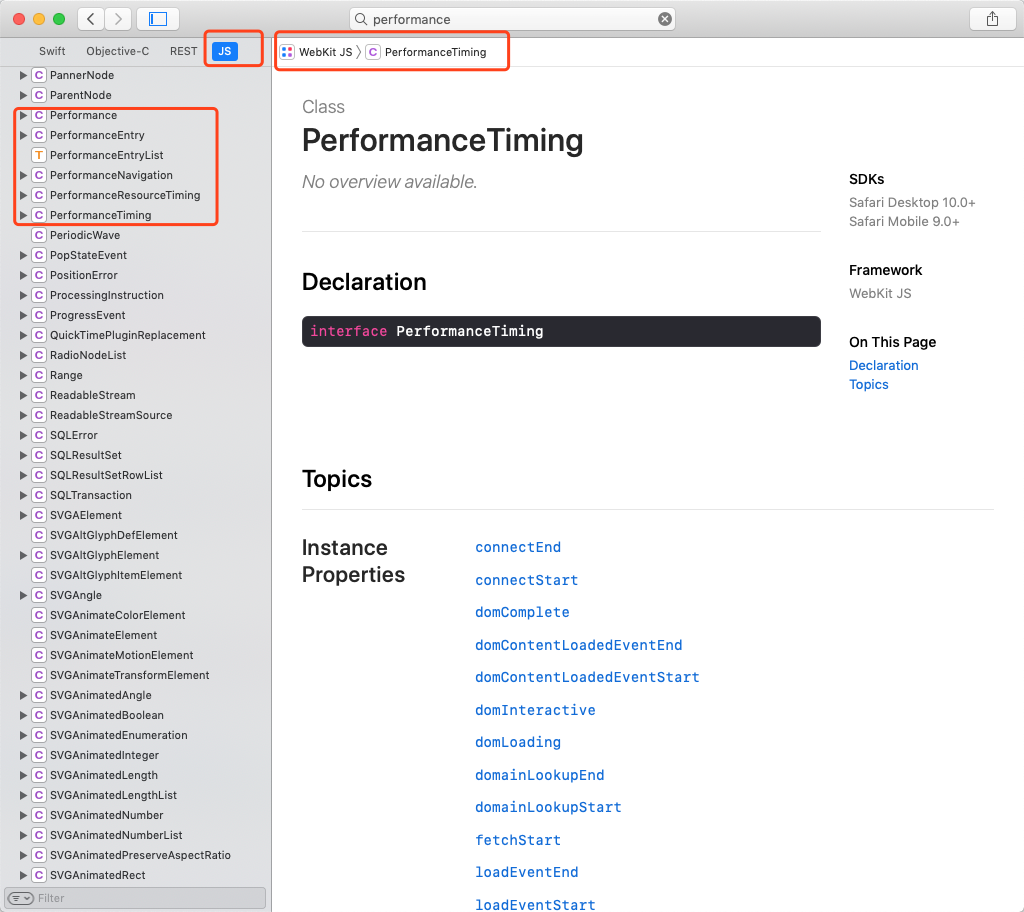
W3C的Performance的时间前后顺序如下: 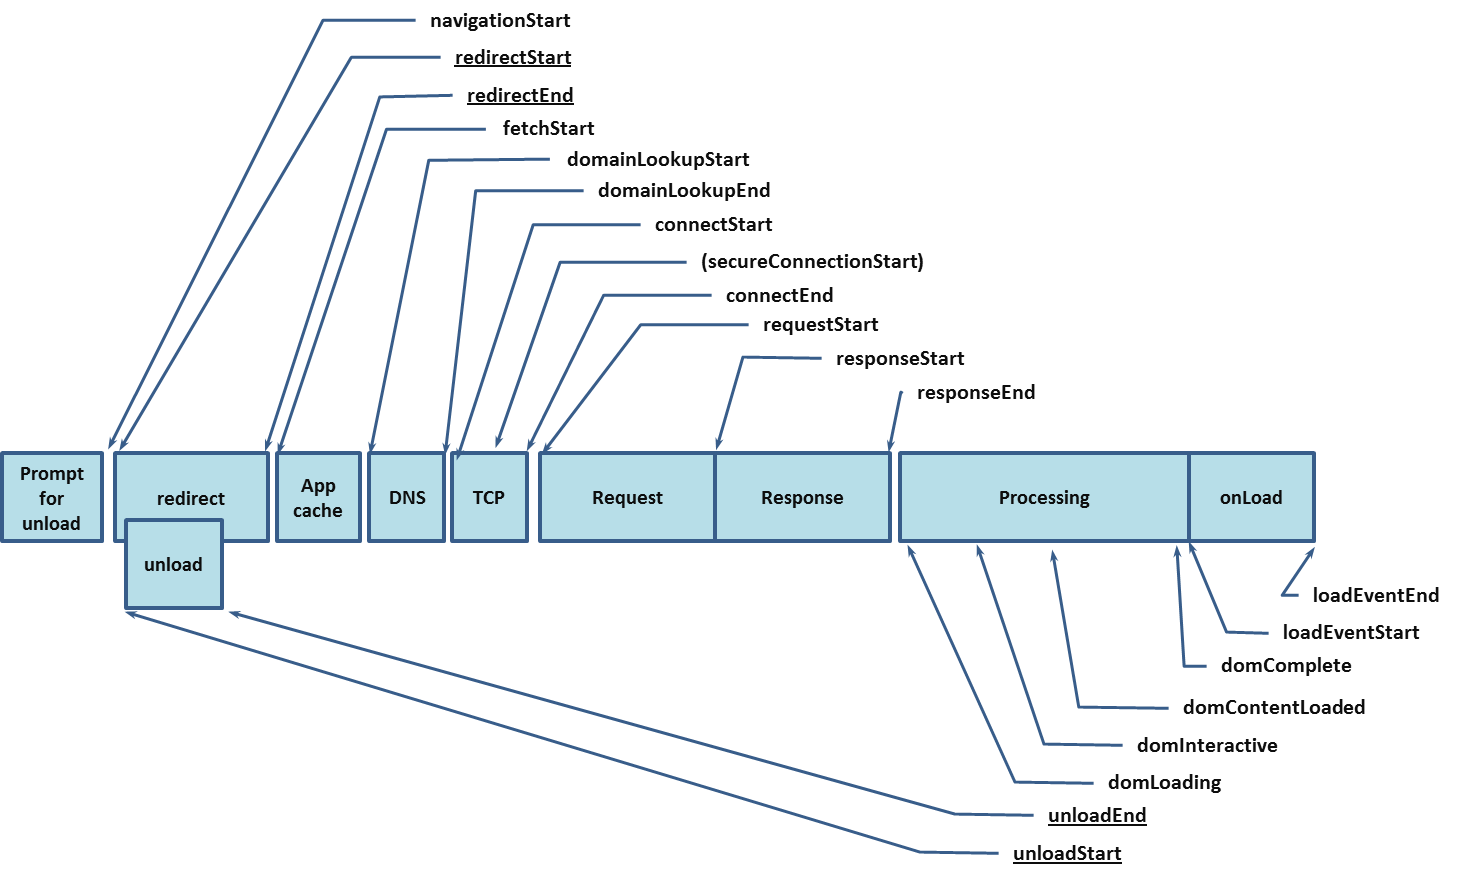
属性说明:
navigationStart:浏览器处理当前网页的启动时间 fetchStart:浏览器发起http请求读取文档的毫秒时间戳。 domainLookupStart:域名查询开始时的时间戳。 domainLookupEnd:域名查询结束时的时间戳。 connectStart:http请求开始向服务器发送的时间戳。 connectEnd:浏览器与服务器连接建立(握手和认证过程结束)的毫秒时间戳。 requestStart:浏览器向服务器发出http请求时的时间戳。或者开始读取本地缓存时。 responseStart:浏览器从服务器(或读取本地缓存)收到第一个字节时的时间戳。 responseEnd:浏览器从服务器收到最后一个字节时的毫秒时间戳。 domLoading:浏览器开始解析网页DOM结构的时间。 domInteractive:网页dom树创建完成,开始加载内嵌资源的时间。 domContentLoadedEventStart:网页DOMContentLoaded事件发生时的时间戳。 domContentLoadedEventEnd:网页所有需要执行的脚本执行完成时的时间,domReady的时间。 domComplete:网页dom结构生成时的时间戳。 loadEventStart:当前网页load事件的回调函数开始执行的时间戳。 loadEventEnd:当前网页load事件的回调函数结束运行时的时间戳。
通过代码获取数据
直接上代码: 通过在wkwebview的didFinish方法中使用自定义的jsTiming方法:
    func webView(_ webView: WKWebView, didFinish navigation: WKNavigation!) {
        webView.jsTiming()
    }
jsTiming()的源码
import WebKit

protocol MyWebViewTimingProtocal {
    func jsTiming()
}

extension WKWebView : MyWebViewTimingProtocal{

    /// 获取WebView的JS的性能数据
    func jsTiming() {
        let webView : WKWebView? = self
        if #available(iOS 10.0, *) {
            webView?.evaluateJavaScript("JSON.stringify(window.performance.timing.toJSON())") { (timingStr, error) in
                if error == nil && timingStr != nil {
                    JSTimingTool.parseJSTimingString(timingStr as! String)
                } else {
                    print("WKWebView Load Performance JS Faild!")
                }
            }
        } else {
            let jsFuncStr = "function flatten(obj) {"
                + "var ret = {}; "
                + "for (var i in obj) { "
                + "ret[i] = obj[i];"
                + "}"
                + "return ret;}"
            webView?.evaluateJavaScript(jsFuncStr) { (resultStr, error) in
                if error == nil && resultStr != nil {
                    webView?.evaluateJavaScript("JSON.stringify(flatten(window.performance.timing))", completionHandler: { (timingStr, error) in
                        if error == nil && timingStr != nil {
                            JSTimingTool.parseJSTimingString(timingStr as! String)
                        } else {
                            print("WKWebView Load Performance JS Faild!")
                        }
                    })
                } else {
                    print("WKWebView evaluateJavaScript Faild!")
                }
            }
        }
    }
}


/// 解析window.performance的工具类
private class JSTimingTool {


    /// 解析入口方法
    ///
    /// - Parameter timingStr:window.performance.timing字符串
    static func parseJSTimingString(_ timingStr: String) {
        if let dict = JSTimingTool.dictionaryFromString(timingStr) {
            JSTimingTool.parseJSTimingDictionary(dict)
        } else {
            print("Performance JS trans to Dictionary Faild!")
        }
    }


    /// 字符串转字典
    ///
    /// - Parameter str: 需要转换的字符串
    /// - Returns: 转换完成的字典
    static func dictionaryFromString(_ str: String) -> [String : Any]?{
        let data = str.data(using: String.Encoding.utf8)
        if let dict = try? JSONSerialization.jsonObject(with: data!, options: JSONSerialization.ReadingOptions.mutableContainers) as? [String : Any] {
            return dict
        }
        return nil
    }


    /// 分析性能数据字典
    ///
    /// - Parameter dict: window.performance.timing字典
    static func parseJSTimingDictionary(_ dict: Dictionary<String, Any>) {


        print("\(String(describing: dict))")


        let domainLookupStart = dict["domainLookupStart"] as! CLongLong
        let domainLookupEnd = dict["domainLookupEnd"] as! CLongLong
        let connectStart = dict["connectStart"] as! CLongLong
        let connectEnd = dict["connectEnd"] as! CLongLong
        let responseStart = dict["responseStart"] as! CLongLong
        let responseEnd = dict["responseEnd"] as! CLongLong
        let domInteractive = dict["domInteractive"] as! CLongLong
        let domComplete = dict["domComplete"] as! CLongLong
        let fetchStart = dict["fetchStart"] as! CLongLong
        let domLoading = dict["domLoading"] as! CLongLong
        let domContentLoadedEventEnd = dict["domContentLoadedEventEnd"] as! CLongLong
        let loadEventStart = dict["loadEventStart"] as! CLongLong
        let loadEventEnd = dict["loadEventEnd"] as! CLongLong

        let dnstiming = domainLookupEnd - domainLookupStart //DNS查询耗时
        let tcptiming = connectEnd - connectStart //TCP链接耗时
        let requesttiming = responseEnd - responseStart //request请求耗时
        let domtiming = domComplete - domInteractive //解析dom树耗时
        let wheetScreentiming = domLoading - fetchStart //白屏时间
        let domreadytiming = domContentLoadedEventEnd - fetchStart //dom ready时间
        let domloadtiming = loadEventEnd - loadEventStart //dom load时间
        let onloadtiming = loadEventEnd - fetchStart //onload总时间

        print("dnstiming:\(dnstiming)\ntcptiming:\(tcptiming)\nrequesttiming:\(requesttiming)\ndomtiming:\(domtiming)\nwheetScreentiming:\(wheetScreentiming)\ndomreadytiming:\(domreadytiming)\ndomloadtiming:\(domloadtiming)\nonloadtiming:\(onloadtiming)\n")
    }
}
示例
以http://www.baidu.com为例获取到的数据
["navigationStart": 1563415353543, "connectStart": 1563415353858, "redirectStart": 0,
"unloadEventEnd": 0, "loadEventStart": 1563415358406,
 "responseEnd": 1563415354271, "domainLookupEnd": 1563415353857, "redirectEnd": 0,
"connectEnd": 1563415353921, "secureConnectionStart": 1563415353888,
"unloadEventStart": 0, "domContentLoadedEventStart": 1563415354271,
"responseStart": 1563415354218, "loadEventEnd": 1563415358406,
 "domInteractive": 1563415354271, "requestStart": 1563415353921,
 "domComplete": 1563415358406, "domLoading": 1563415354231, "fetchStart": 1563415353852,
"domContentLoadedEventEnd": 1563415354271, "domainLookupStart": 1563415353855]
dnstiming:2
tcptiming:63
requesttiming:53
domtiming:4135
wheetScreentiming:379
domreadytiming:419
domloadtiming:0
onloadtiming:4554
全局监听
如果需要针对所有页面都监控,可以使用runtime机制,监听webview的didFinish方法,通过AOP方式hook到对应的自定义didFinish方法,然后在自定义的didFinish方法中调用jsTiming方法
局限性
window.performance只能在webview的didFinish方法中监听一次,如果H5页面内部做跳转,是无法监听到的,所以更适合做首次加载的性能分析,如果有二级H5页面的的性能监听需求,还是需要前端开发同学进行协助。
我们今天的关于node.js中的window.performance.now和等效吗?的分享已经告一段落,感谢您的关注,如果您想了解更多关于C的相当于windows的QueryPerformanceCounter、Getting started in window.performance、Inside NGINX: How We Designed for Performance & Scale、iOS-监听原生H5性能数据window.performance的相关信息,请在本站查询。
本文标签:


