对于想了解从CoredataSwift删除数据的读者,本文将提供新的信息,我们将详细介绍coredataswiftui,并且为您提供关于coredataswift简单入门、CoreDataSwift:
对于想了解从Coredata Swift删除数据的读者,本文将提供新的信息,我们将详细介绍coredata swiftui,并且为您提供关于coredata swift 简单入门、CoreData Swift:如何保存和加载数据?、CoreData 入门使用 增删改查 swift、CoreData 数据库迁移升级笔记--swift的有价值信息。
本文目录一览:- 从Coredata Swift删除数据(coredata swiftui)
- coredata swift 简单入门
- CoreData Swift:如何保存和加载数据?
- CoreData 入门使用 增删改查 swift
- CoreData 数据库迁移升级笔记--swift
")
从Coredata Swift删除数据(coredata swiftui)
在我的tableViewController中,我有以下内容。我正在尝试删除一个项目。
var myData: Array<AnyObject> = []override func tableView(tableView: UITableView, cellForRowAtIndexPath indexPath: NSIndexPath) -> UITableViewCell { let cellID: NSString = "Cell" var Cell: UITableViewCell = tableView.dequeueReusableCellWithIdentifier(cellID) as UITableViewCell var data: NSManagedObject = myData[indexPath.row] as NSManagedObject Cell.textLabel?.text = data.valueForKeyPath("Name") as? String return Cell}然后尝试删除我有。
override func tableView(tableView: (UITableView!), commitEditingStyle editingStyle: UITableViewCellEditingStyle, forRowAtIndexPath indexPath: NSIndexPath) { if editingStyle == .Delete { let cellID: NSString = "Cell" var Cell: UITableViewCell = tableView.dequeueReusableCellWithIdentifier(cellID) as UITableViewCell var data: NSManagedObject = myData[indexPath.row] as NSManagedObject data.delete(0) // Delete the row from the data source //tableView!.deleteRowsAtIndexPaths([indexPath], withRowAnimation: .Fade) } else if editingStyle == .Insert { // Create a new instance of the appropriate class, insert it into the array, and add a new row to the table view }}答案1
小编典典通过在swift和coredata中执行数据删除来更新我的编码问题。这最终使我的代码起作用了。
override func tableView(tableView: UITableView, commitEditingStyle editingStyle: UITableViewCellEditingStyle, forRowAtIndexPath indexPath: NSIndexPath) { switch editingStyle { case .Delete: // remove the deleted item from the model let appDel:AppDelegate = UIApplication.sharedApplication().delegate as AppDelegate let context:NSManagedObjectContext = appDel.managedObjectContext! context.deleteObject(myData[indexPath.row] as NSManagedObject) myData.removeAtIndex(indexPath.row) context.save(nil) //tableView.reloadData() // remove the deleted item from the `UITableView` self.tableView.deleteRowsAtIndexPaths([indexPath], withRowAnimation: .Fade) default: return }}上面针对Swift 2.2和Xcode 7.3.1的编辑
override func tableView(tableView: UITableView, commitEditingStyle editingStyle: UITableViewCellEditingStyle, forRowAtIndexPath indexPath: NSIndexPath) { switch editingStyle { case .Delete: // remove the deleted item from the model let appDel:AppDelegate = UIApplication.sharedApplication().delegate as! AppDelegate let context:NSManagedObjectContext = appDel.managedObjectContext context.deleteObject(myData[indexPath.row] ) myData.removeAtIndex(indexPath.row) do { try context.save() } catch _ { } // remove the deleted item from the `UITableView` self.tableView.deleteRowsAtIndexPaths([indexPath], withRowAnimation: .Fade) default: return }}还需要对这两行代码进行更正。
var myData: Array<AnyObject> = []let managedObjectContext = (UIApplication.sharedApplication().delegate as AppDelegate).managedObjectContext
coredata swift 简单入门
http://www.zoejblog.com/ioscoredata-swift-jian-dan-ru-men/
CoreData Swift:如何保存和加载数据?
我正在用Swift编写iOS游戏,但我想在结尾加上高分标签。我认为保存功能是正确的,但负载之一就是给我带来麻烦的功能。我已经创建了一个实体(“
BestScores”)和属性(“ classicBestScoreTF”):
要保存最高分:
var bestscore25 = 1000
var score: int

func savescore() {
    var appDel: AppDelegate = (UIApplication.sharedApplication().delegate as AppDelegate)
    var context:NSManagedObjectContext = appDel.managedObjectContext!
    var score25: AnyObject! = NSEntityDescription.insertNewObjectForEntityForName("BestScores",inManagedObjectContext: context) as NSManagedObject
    score25.setValue(score,forKey: "classicBestScoreTF")
    context.save(nil)
}

func loadscore() {
    var appDel: AppDelegate = (UIApplication.sharedApplication().delegate as AppDelegate)
    var context:NSManagedObjectContext = appDel.managedObjectContext!
    bestScore25 = valueForKey("classicBestScoreTF") as Int
}

func endgame() {

    if score > bestScore25 {
        savescore()
        loadscore()
        bestScoreLabel.text = "Best Score: \(bestScore25)"
    }

    if score < bestscore {
        loadscore()
        bestScoreLabel.text = "Best Score: \(bestScore25)"
    }
}
它不起作用:(请帮忙!

CoreData 入门使用 增删改查 swift
首先新建一个
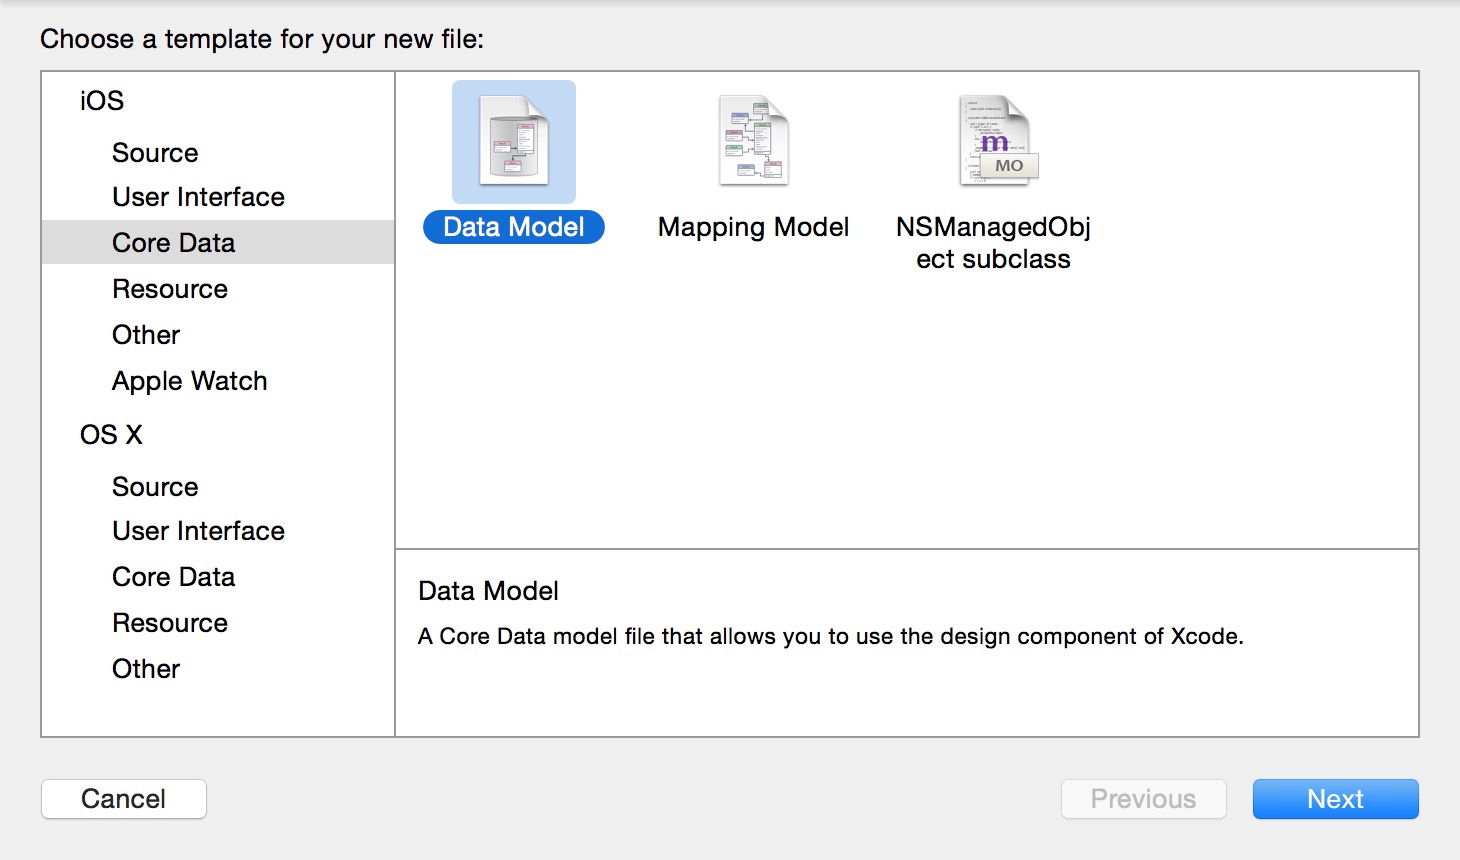
点击新建的testInfo.xcdatamodeld 会出现这么个界面

创建完testInfo.xcdatamodeld之后 AppDelegate 会自动帮你添加支持coredata的代码 有兴趣的自己研究
首先 使用coredata 存储数据 1.创建表 2.创建字段 3.创建对应字段的模型类 就足够了
创建表 点击
 然后出现
然后出现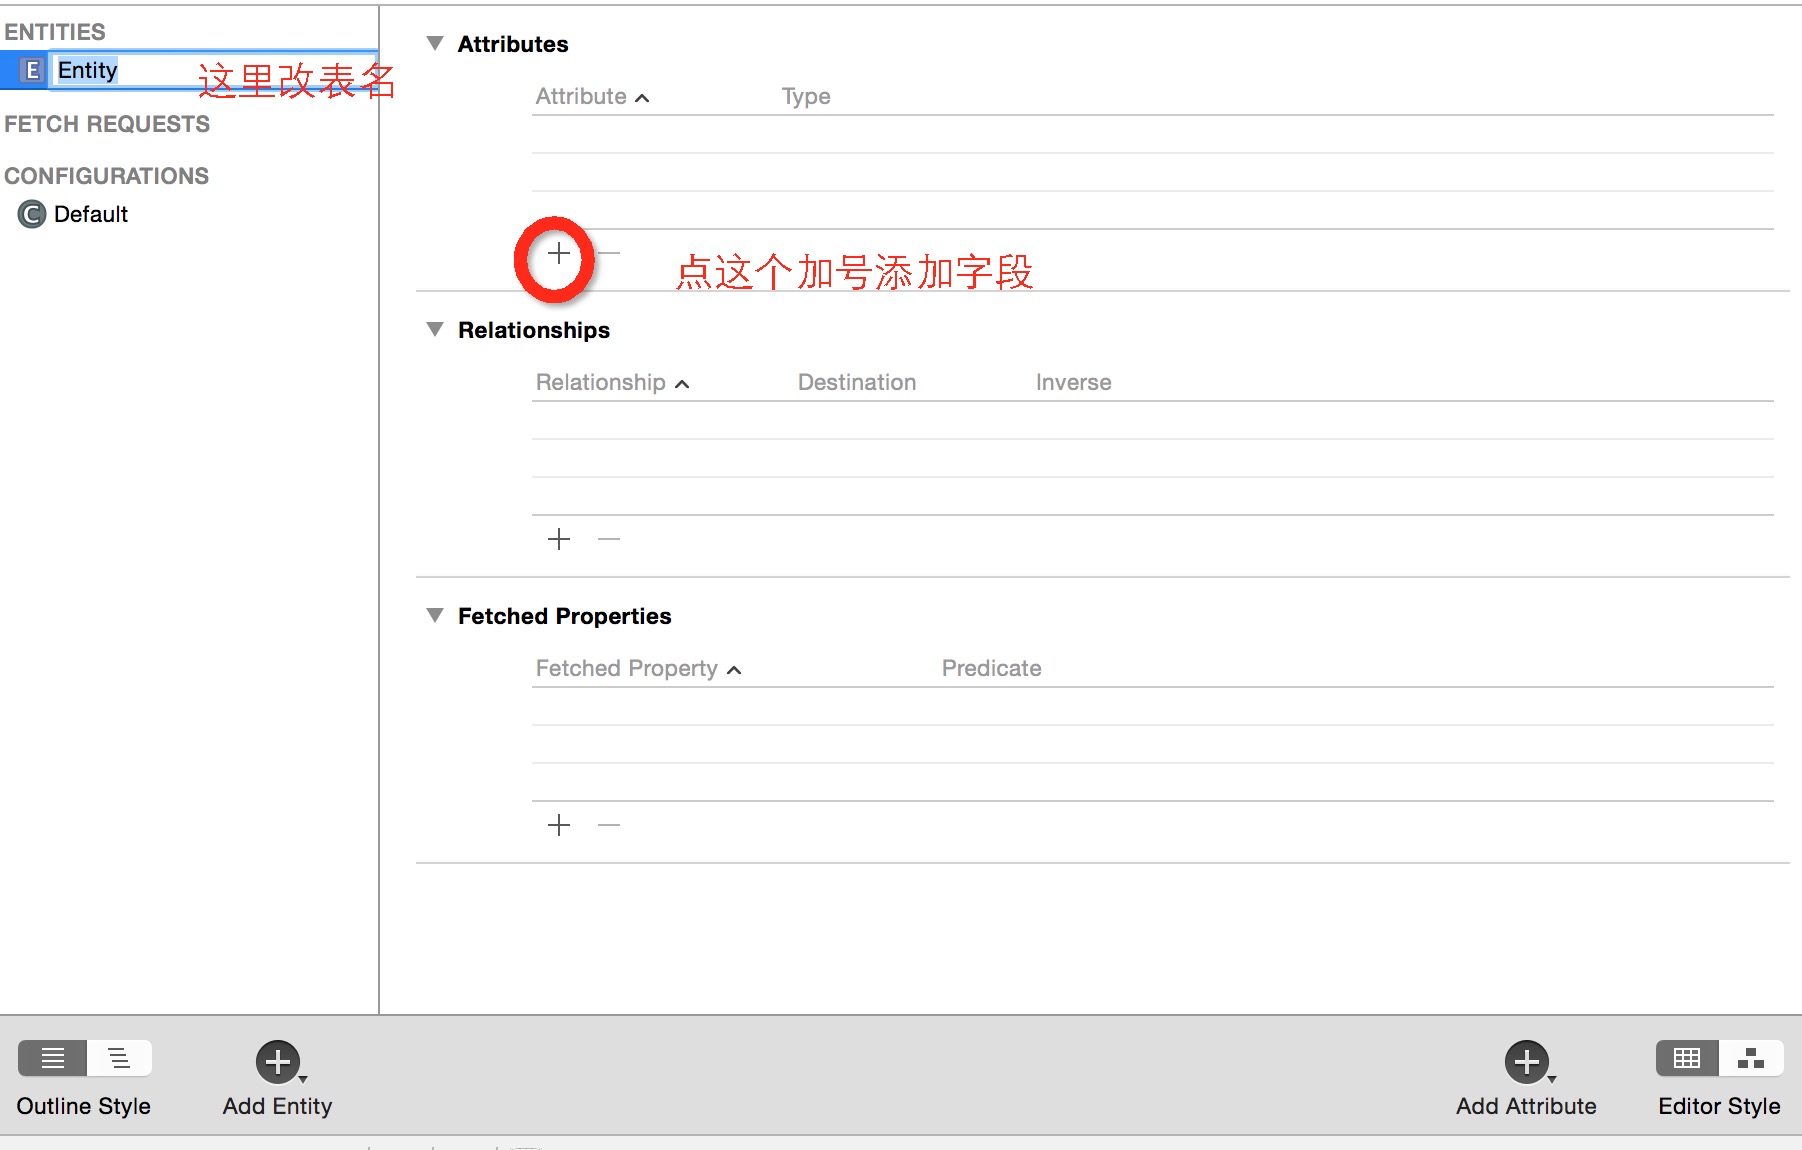
添加字段 ....................
创建对应字段的模型 command+n


都勾上之后会自动帮你创建一个类

好 一切准备完毕. 找个地方测试一下 增删改查 就直接在 AppDelegate里写测试代码
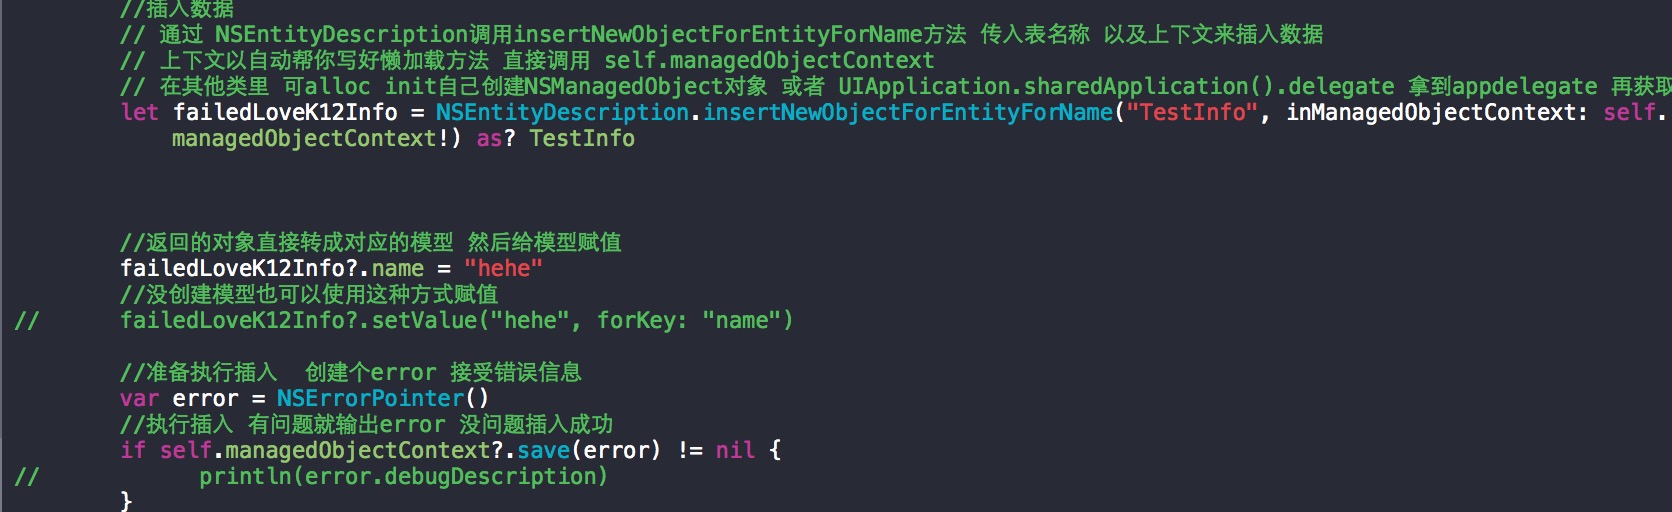
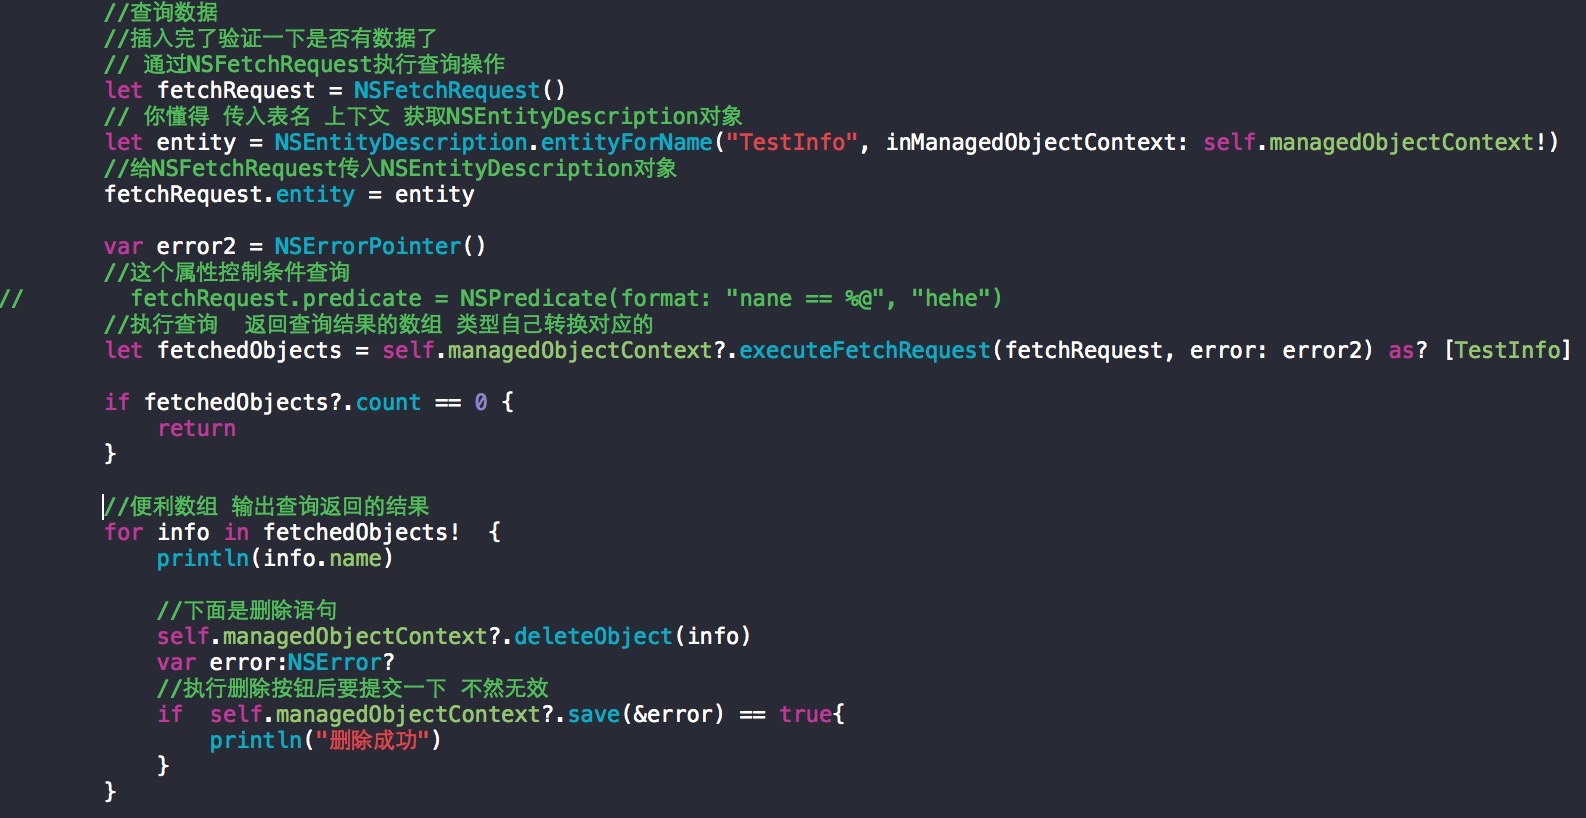
好 以上就是简单的coredata使用 献给第一次用的新手. 本实例只试用于入门上手使用

CoreData 数据库迁移升级笔记--swift
第一步:添加新的Mode Vision
操作步骤:选择xxxx.xcdatamodeld文件,点击Editor--> add model vision,创建新的xxxx.xcdatamodeld,在新的xxxx.xcdatamodeld文件中添加你要添加字段。
第二步:选择当前xxxx.xcdatamodeld
操作步骤:在属性栏找到model vision 选择新的xxxx.xcdatamodeld
第三步:appDelegate.swift中修改配置如下
  原来配置:


        if coordinator!.addPersistentStoreWithType(NSSQLiteStoreType, configuration: nil, URL: url, options: nil, error: &error) == nil {


      coordinator = nil

            var dict = [String: AnyObject]()
            dict[NSLocalizedDescriptionKey] = "Failed to initialize the application''s saved data"
            dict[NSLocalizedFailureReasonErrorKey] = failureReason
            dict[NSUnderlyingErrorKey] = error
            error = NSError(domain: "YOUR_ERROR_DOMAIN", code: 9999, userInfo: dict)
            // Replace this with code to handle the error appropriately.
            // abort() causes the application to generate a crash log and terminate. You should not use this function in a shipping application, although it may be useful during development.
            NSLog("Unresolved error \(error), \(error!.userInfo)")
            abort()
        }


   修改配置:


      if coordinator!.addPersistentStoreWithType(NSSQLiteStoreType, configuration: nil, URL: url, options: nil, error: &error) == nil {

            // Report any error we got.


            //

            var sqlPathRoot:NSString = url.absoluteString!

            var shmurl:NSURL = NSURL(string: sqlPathRoot.stringByAppendingString("-shm"))!
             var walurl:NSURL = NSURL(string: sqlPathRoot.stringByAppendingString("-wal"))!

               NSFileManager.defaultManager().removeItemAtURL(url, error: nil)
                NSFileManager.defaultManager().removeItemAtURL(shmurl, error: nil)
              NSFileManager.defaultManager().removeItemAtURL(walurl, error: nil)


            //在创建一次

            var persistentStore = coordinator!.addPersistentStoreWithType(NSSQLiteStoreType, configuration: nil, URL: url, options: nil, error: &error)


            if persistentStore == nil
            {
                print("版本更替失败了")

            }
            else
            {
             print("版本更替成功")

            }

}今天关于从Coredata Swift删除数据和coredata swiftui的讲解已经结束,谢谢您的阅读,如果想了解更多关于coredata swift 简单入门、CoreData Swift:如何保存和加载数据?、CoreData 入门使用 增删改查 swift、CoreData 数据库迁移升级笔记--swift的相关知识,请在本站搜索。
本文标签:


