在本文中,您将会了解到关于使用ServiceController类与WindowsService进行通信的新资讯,同时我们还将为您解释service使用方式的相关在本文中,我们将带你探索使用Servi
在本文中,您将会了解到关于使用ServiceController类与Windows Service进行通信的新资讯,同时我们还将为您解释service使用方式的相关在本文中,我们将带你探索使用ServiceController类与Windows Service进行通信的奥秘,分析service使用方式的特点,并给出一些关于2019 年 10 月 3 日 - KB4524157 (月度汇总)适用于: Windows 7 Service Pack 1Windows Server 2008 R2 Service Pack 1、@ControllerAdvice 捕获不到 Service 层的验证异常、Android service (一) startService vs bindService、Android Service 学习篇三:Service 启动方式之 bindService的实用技巧。
本文目录一览:- 使用ServiceController类与Windows Service进行通信(service使用方式)
- 2019 年 10 月 3 日 - KB4524157 (月度汇总)适用于: Windows 7 Service Pack 1Windows Server 2008 R2 Service Pack 1
- @ControllerAdvice 捕获不到 Service 层的验证异常
- Android service (一) startService vs bindService
- Android Service 学习篇三:Service 启动方式之 bindService
")
使用ServiceController类与Windows Service进行通信(service使用方式)
我有一个Windows服务项目由两个服务,service1和service2组成。 我们怎样才能在两个服务之间进行沟通? 例如,我们怎么能有service1启动service2? 我可以使用ServiceController类来做到这一点? 你会build议做什么?
System.Serializable属性在Windows 10 UWP应用程序?
如何在SaveFileDialog的默认FileName中设置长string(> 260)?
将函数包装到Windows桌面应用程序的最佳做法是什么?
如何访问Windows中的特殊目录?
没有find反序列化types为T的对象的构造函数
ServiceController类包含一个接受int的ExecuteCommand方法。 因此,如果您可以使用非常有限的参数,那么您的两个服务可以通过发送ExecuteCommand消息来相互通信。
然而,正如其他海报评论,WCF可能是一个更好的答案。 您可以创建命名管道或在两个服务之间使用HTTP。 两个很好的教程页面可以在下面找到。
基本WCF教程与例子
更复杂的WCF,如果你想'假'代表例如
希望有所帮助。
如果“通信”的意思只是启动和停止Service2,那么应该使用ServiceController 。
如果你需要其他类型的通信,比如将一些数据从一个发送到另一个,比ServiceController不会有帮助,你应该使用WCF
希望这可以帮助
适用于: Windows 7 Service Pack 1Windows Server 2008 R2 Service Pack 1")
2019 年 10 月 3 日 - KB4524157 (月度汇总)适用于: Windows 7 Service Pack 1Windows Server 2008 R2 Service Pack 1
2019 年 10 月 3 日 - KB4524157 (月度汇总)
适用于: Windows 7 Service Pack 1Windows Server 2008 R2 Service Pack 1
发布日期:
2019年10月3日
版本:
Monthly Rollup
重要信息:这是将自动提供给所有客户的必要的安全更新。 为了帮助保护你的设备,我们建议你尽快安装此更新,然后重新启动 PC 以完全应用缓解措施。 与所有汇总更新一样,此更新将取代之前的任何更新。
注意:此更新并不会取代即将于 2019 年 10 月 8 日发布的 2019 年 10 月的月度更新。
重要信息:在安装此更新之前,请确认 你已安装“如何获取此更新”部分中列出的建议更新。 关于从 2019 年 8 月 13 日开始的所有更新,我们强烈建议安装这些更新以防出现任何问题。
重要信息 购买了某些操作系统的本地版本的扩展安全更新 (ESU) 的客户必须遵循特定过程,才能在 2020 年 1 月 14 日扩展支持终止后继续接收安全更新。 有关更多信息,请参阅 KB4522133。
改进和修补程序
此安全更新包含属于更新 KB4516046(2019 年 9 月 10 日)和 KB4516048 (2019 年 9 月 24 日)的一部分的改进和修补程序,并解决了以下问题:
- 解决可能导致打印作业失败的打印假脱机程序服务的间歇性问题。 某些应用程序可能关闭或生成错误,例如远程过程调用 (RPC) 错误。
有关已修复的安全漏洞的更多信息,请参阅安全更新指南。
此更新中的已知问题
| 症状 | 解决方法 |
| 安装 KB4507437(月度汇总预览)或 KB4511872(Internet Explorer 累计更新)及更高版本后,默认情况下应禁用 Internet Explorer 11 中的 VBScript。 但是,在某些情况下,无法按预期禁用 VBScript。 | 此问题已在 KB4519976 中解决。 |
| 利用 Windows Javascript 引擎 (jscript.dll) 处理打印作业的应用程序和打印机驱动程序可能会遇到以下一种或多种情况:
|
此问题已在 KB4519976 中解决。 |
如何获取此更新
安装此更新前
在安装最新的汇总之前,必须安装下面列出的更新并重新启动设备。 安装这些更新可提高更新过程的可靠性,并且减少安装汇总时的潜在问题。
- 2019 年 3 月 12 日服务堆栈更新 (SSU) (KB4490628)。 若要获取此 SSU 的独立程序包,请在 Microsoft 更新目录中进行搜索。
- 最新 SHA-2 更新 (KB4474419) 已于 2019 年 9 月 10 日发布。 如果你使用的是 Windows 更新,则会自动为你提供最新 SHA-2 更新。 有关 SHA-2 更新的更多信息,请参阅针对 Windows 和 WSUS 的 2019 SHA-2 代码签名支持要求。
在安装了上述更新之后,Microsoft 强烈建议你安装最新的 SSU (KB4516655)。如果你使用的是 Windows 更新,则会自动为你提供最新的 SSU。若要获取最新 SSU 的独立程序包,请在 Microsoft 更新目录中进行搜索。
安装此更新
| 发布频道 | 可用 | 下一步 |
| Windows Update 和 Microsoft Update | 是 | 无。 此更新会通过 Windows 更新自动下载并安装。 |
| Microsoft 更新目录 | 是 | 若要获取此更新的独立程序包,请转到 Microsoft 更新目录网站。 |
| Windows Server Update Services (WSUS) | 是 | 如果按照以下方式配置“产品和分类”,此更新将自动与 WSUS 同步: 产品:Windows 7 Service Pack 1、Windows Server 2008 R2 Service Pack 1 分类: 安全更新 |
文件信息
有关此更新中提供的文件列表,请下载更新 4524157 的文件信息。
上次更新时间:2019年11月11日

@ControllerAdvice 捕获不到 Service 层的验证异常
public interface UserService extends IService<User> {
    boolean add(@Valid User u);
}
@Service
@Validated
public class UserServiceImpl extends ServiceImpl<UserMapper, User> implements UserService {
@Override
public boolean add(User u) {
int num = count(new QueryWrapper<User>().apply("username={0}", u.getUsername()));
if (num > 0) throw new ServiceException(106, u.getUsername() + "账号已存在!");
return save(u);
}
}There was an unexpected error (type=Internal Server Error, status=500).
add.u.phone: 手机号码错误
javax.validation.ConstraintViolationException: add.u.phone: 手机号码错误
at org.springframework.validation.beanvalidation.MethodValidationInterceptor.invoke(MethodValidationInterceptor.java:120)
at org.springframework.aop.framework.ReflectiveMethodInvocation.proceed(ReflectiveMethodInvocation.java:186)
at org.springframework.aop.framework.CglibAopProxy$CglibMethodInvocation.proceed(CglibAopProxy.java:750)
at org.springframework.aop.framework.CglibAopProxy$DynamicAdvisedInterceptor.intercept(CglibAopProxy.java:692)
at com.lshfong.mpsystem.service.impl.UserServiceImpl$$EnhancerBySpringCGLIB$$892a5c30.add(<generated>)
at com.lshfong.mpsystem.controller.UserController.Add(UserController.java:46)
at com.lshfong.mpsystem.controller.UserController$$FastClassBySpringCGLIB$$1e519f5.invoke(<generated>)@ControllerAdvice 捕获不到 Service 层的验证异常,但是能捕捉到 Service 层的其它异常
 startService vs bindService")
Android service (一) startService vs bindService
service 简介
- service 是Android的4大组件之一, 用于在后台<em>(这里指的是service不提供UI, 用户不可见)</em>执行任务.
- service 是在UI线程上被创建, 并且在UI线程上运行的, 如果service需要执行耗时操作,那么需要自己开启线程或线程池,然后在子线程中执行.
- service 有2种启动方式: startService & bindService <em>(也可以同时使用这2种方式)</em>
使用service VS 在其他组件中开启子线程
首先要说明的是service和thread是2个并不对等的概念, 这里之所以将它们放在一起比较, 是因为不少人在实际开发中会遇到这样的抉择: 是创建一个service去执行一个操作呢, 还是直接开启一个子线程?
service 和 thread 的区别
- service
- service是Android提供的一个基础组件, 当进程中有存活的service时, 那么这个进程至少拥有
Service process级别的优先级<em>(Android定义了5个级别的进程优先级)</em>. 因此这个进程退到后台后, 也不容易被回收. - 当系统负载过高杀死该进程之后, 该service依然会在系统资源变得充足之后再次运行<em>(如果
onStartCommand方法返回START_STICKY或者START_REDELIVER_INTENT的话)</em>. 这就意味着即使包含service的进程可能会被系统杀死, 但相应的任务依然是有机会恢复执行的, - service具有高可复用性, 可以为不同的进程, 不同的应用提供服务
- service是Android提供的一个基础组件, 当进程中有存活的service时, 那么这个进程至少拥有
- thread
- thread并不是Android提供的概念, 只是一个单独的执行单元, 可以用于实现负载均衡. 在Android中使用thread的一个常见情形是避免ANR.
何时使用service, 何时使用thread
- 如果该任务的结果只在用户与其交互时有效<em>(例如界面显示时有效, 界面隐藏或销毁之后就无效了)</em>, 那么适合用thread去执行.<em>(例如在界面上显示一张远程图片, 就可以在子线程中去下载图片)</em>
- 如果该任务在用户退到后台后仍然希望执行, 或者改任务并不直接影响到用户的交互, 那么适合使用service(通常在service中也要创建thread去执行).<em>(例如下载服务)</em>
startService VS bindService
startService 和 bindService 的简介
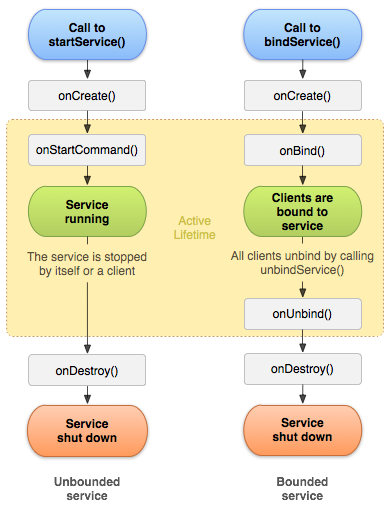
- startService
- 通过startService启动的service将在后台持续运行,直到某个组件调用stopService,或者该service自己调用stopSelf,或者因为内存不足而被系统销毁. <em>这意味着调用方通常需要管理service的生命周期</em>
- 通过这种方式启动的Service和启动它的组件之间没有绑定关系(可以理解为游离的),因此启动它的组件被销毁了,并不会影响到service的运行
onStartCommand的返回值对service的生命周期的影响.(仅当service没有正常终止而是被系统销毁,此方法的返回值才会有效)START_STICKY: 系统会重新创建该service,并调用onStartCommand方法,传入的intent为null.<em>(适用于需要长期存在的一些任务)</em>START_NOT_STICKY: 系统不会再创建该service, 除非其他组件start它. <em>(通常建议使用它)</em>START_REDELIVER_INTENT: 系统会重新创建该service,并调用onStartCommand方法,传入的intent为service销毁之前的最后一个intent. <em>(下载服务适用于此方式)</em>
<font color=red>注意: </font> 在Android 2.0以后, onStartCommand()方法默认返回START_STICKY, 通常情况下, 我们需要考虑我们的服务是否应该使用START_STICKY, 如果不是,则需要重写此方法.
-
bindService
- bind 这种方式使得
发起绑定的组件和被绑定的service形成了一个client-server模式.当发起绑定的组件被销毁后,被绑定的service也会随之销毁.<em>(前提是没有其他的组件和它绑定, 并且该service没有被start, 或者虽然被start过, 但已经执行了stopService/stopSelf 方法)</em> - 当绑定service的组件C被销毁后,service也会被销毁(service的onDestroy会被调用),不管组件C在销毁前是否调用了unbindService.<em>(如果没有调用unbindService,那么Logcat中会打印出
android.app.ServiceConnectionLeaked异常, 不过通过MAT分析内存dump文件,可以看出 绑定service的组件以及service自身都是可以被回收的)</em> - 通过bindService的方式, client可以得到一个IBinder的接口, 进而可以将其转换为IInterface接口, 用于和远程service进行通信.<em>(如果client和server在同一个进程内, 那么service返回的IBinder直接提供一个返回Service引用的方法, 使用起来可能会更方便一些)</em>
- 当被绑定的service被销毁之后,
ServiceConnection.onServiceDisconnected会被调用,当系统重新创建该service之后,ServiceConnection.onServiceConnected会再次被触发 - <font color=red>注意:</font>要支持bind, service的onBind方法必需返回一个IBinder对象, 如果返回null, 那么要绑定该service的组件提供的
ServiceConnection.onServiceConnected将不会被调用,也就是说绑定会失败.<em>(注意:该service仍然会被创建,也会一直运行,直到要绑定它的那个组件销毁的时候一起销毁)</em>. 如果希望某个service不允许被任何其他组件绑定, 那么在其onBind方法中返回null就好了. - <font color=red>重要:</font>通过相同的Intent调用bindService方法, service的onBind方法只会被调用一次(即第一次会被调用), 对于后续的bindService调用, 系统将会直接返回上一此的IBinder.
// 这里比较 Intent 是否相同, 使用的是: android.content.Intent.FilterComparison.equals() 方法 // 每次 onBind 方法成功执行之后, 对应的 IntentBindRecord 会保存到 ServiceRecord 之中 // com.android.server.am.ServiceRecord final ArrayMap<Intent.FilterComparison, IntentBindRecord> bindings = new ArrayMap<Intent.FilterComparison, IntentBindRecord>(); // 对于bindService(Intent service, ServiceConnection conn, int flags) // 如果参数 Intent 之前使用过, 那么对应的service的onBind方法不会再调用, 而是直接返回之前的IBinder- 只有当所有绑定到该service的组件都与其解绑了,
onUnbind方法才会被调用.(如果onUnbind返回true,那么下次绑定service,系统创建后将不会调用onBind,而是调用onRebind,并返回之前的IBinder)
- bind 这种方式使得
何时使用startService, 何时使用bindService
- 如果只是要启动service去执行一个任务, 则使用startService比较合适.
- 如果启动service之后要与它进行交互<em>(例如调用服务的方法, 甚至是client与server的双向通行)</em>, 则使用bindService比较合适.
既start又bind
通常这样做的目的是:
- 需要service能长时间的运行, 而不要关心启动它的组件是否被销毁. <em>start</em>
- 需要和service进行交互 以调用service的一些方法. <em>bind</em>
例如:实现一个DownloadService
1. startService目的: 使得 DownloadService 可以长久的在后台运行
2. bindService目的: 使用 DownloadService 提供的下载进度等Api

// 顺便说一句, 像DownloadService这样的服务, onStartCommand()方法建议返回START_REDELIVER_INTENT
此时要终止该service,需要同时具备下面2个条件:
- service调用了
stopSelf或者某个组件调用了stopService - 所有绑定到该service的组件都已解绑或者被销毁
隐式Intent的风险
之所以说通过隐式Intent启动service存在安全风险,是因为:
- 通常调用者无法确定通过隐式Intent启动的service是哪一个(这个service甚至可能来自其他应用)
- service在后台运行,没有用户界面.因此很难感知到这个service的存在以及它在干什么
通常建议startService和bindService使用显示Intent.并且在Manifest文件中定义service时,不应该提供<intent-filter>, export设置为false(如果没有提供<intent-filter>,那么export默认就是false)
**注意:**如果targetSdkVersion>=21的话,startService,bindService不能使用隐式Intent,否则会抛出IllegalArgumentException
ContextImpl.java
private void validateServiceIntent(Intent service) {
	if (service.getComponent() == null && service.getPackage() == null) {
		if (getApplicationInfo().targetSdkVersion >= Build.VERSION_CODES.LOLLIPOP) {
			IllegalArgumentException ex = new IllegalArgumentException("Service Intent must be explicit: " + service);
			throw ex;
		} else {
			Log.w(TAG, "Implicit intents with startService are not safe: " + service
                        + " " + Debug.getCallers(2, 3));
		}
	}
}
tips
- 使用隐式Intent, 但是限定被启动的组件在指定app中的方法:
//在使用隐式Intent的时候, 可以通过 Intent.setPackage(packagename);
//来将组件的匹配限制在某个应用内.

//限制该隐式intent只匹配自己应用内的某个组件
intent.setPackage("my package name");
BroadcastReceiver.onReceive(Context context, Intent intent)方法中的context是不能用来绑定service的, 因为该context是:android.app.ReceiverRestrictedContext重写了bindService方法, 并抛出异常.
@Override
public boolean bindService(Intent service, ServiceConnection conn, int flags) {
	throw new ReceiverCallNotAllowedException("BroadcastReceiver components are not allowed to bind to services");
}

Android Service 学习篇三:Service 启动方式之 bindService
客户端通过调用 bindService 方法能够绑定服务,然后 Android 系统会调用服务的 onBind 回调方法,这个方法会返回一个跟服务端交互的 IBinder 对象。这个绑定是异步的,bindService 方法立即返回,并且不给客户端返回 IBinder 对象。要接受 IBinder 对象,客户端必须创建一个 ServiceConnection 类的实例,并且把这个实例传递给 bindService 方法。
注意:只有 Activity、Service 和内容提供器 (content provider) 能够绑定服务,广播接收器是不能绑定服务的。
通过绑定服务来实现功能有以下几个步骤:
实现一个 ServiceConnection 接口,并重写里面的 onServiceConnected 和 onServiceDisconnected 两个方法,其中,前者是在服务已经绑定成功后回调的方法,后者是在服务发生异常终止时调用的方法。
在客户端,通过 bindService 方法来异步地绑定一个服务对象,如果绑定成功,则会回调 ServiceConnection 接口方法中的 onServiceConnected 方法,并得到一个 IBinder 对象。
服务端通过创建一个 *.aidl 文件来定义一个可以被客户端调用的业务接口,同时,服务端还需要提供一个业务接口的实现类,并实现 *.aidl 中定义的所有方法,通常让这个实现类去继承 Stub 类。
注意:创建 aidl 文件时有几个注意点:
(1)定义的方法前面不能有修饰符,类似于接口的写法。
(2)支持的类型有:8 大基本数据类型,CharSequence,String,List<String>,Map,以及自定义类型。
自定义类型需要做到以下几点:
实现 Parcelable 接口。
定义一个 aidl 文件来声明该类型。
如果要在其他的 aidl 文件中使用,则必须要使用 import 来引用。
通过 Service 组件来暴露业务接口。
通过 Service 的 onBind 方法来返回被绑定的业务对象。
客户端如果绑定成功,就可以像调用自己的方法一样去调用远程的业务对象方法。
为了便于理解,可以看一看下面的这个项目,项目名为 ServiceINS。
先来看看项目的构成:
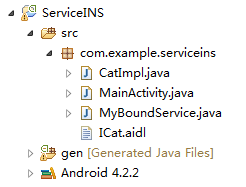
MainActivity:
package com.example.serviceins;

import android.app.Activity;
import android.content.ComponentName;
import android.content.Context;
import android.content.Intent;
import android.content.ServiceConnection;
import android.os.Bundle;
import android.os.IBinder;
import android.os.RemoteException;
import android.view.View;
import android.widget.Toast;

public class MainActivity extends Activity {
	private ICat cat;
	private boolean isBound = false;// 用于判断是否绑定

	@Override
	protected void onCreate(Bundle savedInstanceState) {
		super.onCreate(savedInstanceState);
		setContentView(R.layout.activity_main);
	}

	// 绑定服务的连接回调接口
	private ServiceConnection conn = new ServiceConnection() {

		// 已经绑定完成时调用
		@Override
		public void onServiceConnected(ComponentName name, IBinder service) {
			// 绑定成功后回调的方法
			cat = ICat.Stub.asInterface(service);
			isBound = true;
			Toast.makeText(MainActivity.this, "绑定成功", Toast.LENGTH_SHORT)
					.show();
		}

		// 服务发生异常终止时调用的方法
		@Override
		public void onServiceDisconnected(ComponentName name) {
			isBound = false;
		}
	};

	// 绑定服务
	public void boundClick(View view) {
		Intent intent = new Intent(this, MyBoundService.class);
		// 这个绑定的步骤是异步的,绑定成功后会回调onServiceConnected方法
		bindService(intent, conn, Context.BIND_AUTO_CREATE);
	}

	// 解除绑定
	public void unBoundClick(View view) {
		if (isBound) {
			unbindService(conn);
			Toast.makeText(MainActivity.this, "解除绑定成功", Toast.LENGTH_SHORT)
					.show();
		}
	}

	// 通过IPC调用业务方法
	public void callClick(View view) {
		if (cat == null) {
			return;
		}
		try {
			cat.setName("黑猫警长");
			Toast.makeText(this,
					cat.desc() + "\n" + cat.getPerson().toString(),
					Toast.LENGTH_LONG).show();
		} catch (RemoteException e) {
			e.printStackTrace();
		}
	}
}
activity_main.xml
<LinearLayout xmlns:android="http://schemas.android.com/apk/res/android"
    xmlns:tools="http://schemas.android.com/tools"
    android:layout_width="match_parent"
    android:layout_height="match_parent"
    android:orientation="vertical"
    android:paddingBottom="@dimen/activity_vertical_margin"
    android:paddingLeft="@dimen/activity_horizontal_margin"
    android:paddingRight="@dimen/activity_horizontal_margin"
    android:paddingTop="@dimen/activity_vertical_margin"
    tools:context=".MainActivity" >

    <Button
        android:layout_width="match_parent"
        android:layout_height="wrap_content"
        android:onClick="boundClick"
        android:text="绑定一个服务" />

    <Button
        android:layout_width="match_parent"
        android:layout_height="wrap_content"
        android:onClick="unBoundClick"
        android:text="解除绑定服务" />

    <Button
        android:layout_width="match_parent"
        android:layout_height="wrap_content"
        android:onClick="callClick"
        android:text="通过IPC调用业务方法" />

</LinearLayout>
ICat.aidl:
package com.example.serviceins;

import com.example.serviceins.Person;

interface ICat {

    void setName(String name);

    String desc();
}
ICatImpl:
package com.example.serviceins;

import android.os.RemoteException;

import com.example.serviceins.ICat.Stub;

/*
 * 业务接口的具体实现类
 */
public class CatImpl extends Stub {
	private String name;

	@Override
	public void setName(String name) throws RemoteException {
		this.name = name;
	}

	@Override
	public String desc() throws RemoteException {
		return "hello! my name is " + name + "," + "I am a police.";
	}
}
MyBoundService:
package com.example.serviceins;

import android.app.Service;
import android.content.Intent;
import android.os.IBinder;

public class MyBoundService extends Service {
	public MyBoundService() {
	}

	@Override
	public void onCreate() {
            super.onCreate();
	}

	@Override
	public IBinder onBind(Intent intent) {
	    return new CatImpl();
	}

	@Override
	public boolean onUnbind(Intent intent) {
	    return super.onUnbind(intent);
	}

	@Override
	public void onDestroy() {
	    super.onDestroy();
	}
}我们今天的关于使用ServiceController类与Windows Service进行通信和service使用方式的分享就到这里,谢谢您的阅读,如果想了解更多关于2019 年 10 月 3 日 - KB4524157 (月度汇总)适用于: Windows 7 Service Pack 1Windows Server 2008 R2 Service Pack 1、@ControllerAdvice 捕获不到 Service 层的验证异常、Android service (一) startService vs bindService、Android Service 学习篇三:Service 启动方式之 bindService的相关信息,可以在本站进行搜索。
本文标签:


