如果您对使用Python和OpenCV在Mac上,DestroyWindow不会关闭窗口感兴趣,那么本文将是一篇不错的选择,我们将为您详在本文中,您将会了解到关于使用Python和OpenCV在Mac
如果您对使用Python和OpenCV在Mac上,DestroyWindow不会关闭窗口感兴趣,那么本文将是一篇不错的选择,我们将为您详在本文中,您将会了解到关于使用Python和OpenCV在Mac上,DestroyWindow不会关闭窗口的详细内容,我们还将为您解答opencv图像窗口不能弹出的相关问题,并且为您提供关于Introduction to Image Processing in Python with OpenCV、MFC DestroyWindow、OnDestroy、OnClose 程序关闭相关、OpenCV - Windows(win10)编译 opencv + opencv_contrib、OpenCV中的destroyallWindows的作用的有价值信息。
本文目录一览:- 使用Python和OpenCV在Mac上,DestroyWindow不会关闭窗口(opencv图像窗口不能弹出)
- Introduction to Image Processing in Python with OpenCV
- MFC DestroyWindow、OnDestroy、OnClose 程序关闭相关
- OpenCV - Windows(win10)编译 opencv + opencv_contrib
- OpenCV中的destroyallWindows的作用
")
使用Python和OpenCV在Mac上,DestroyWindow不会关闭窗口(opencv图像窗口不能弹出)
我的程序使用以下代码生成一系列窗口:
def display(img, name, fun): global clicked cv.NamedWindow(name, 1) cv.ShowImage(name, img) cv.SetMouseCallback(name, fun, img) while cv.WaitKey(33) == -1: if clicked == 1: clicked = 0 cv.ShowImage(name, img) cv.DestroyWindow(name)我在gui窗口中按“ q”将其关闭。但是,该代码将继续显示函数的下一个调用,并显示第二个gui窗口,而不会关闭第一个。我使用的是带有OpenCV
2.1的Mac,并在Terminal中运行该程序。如何关闭GUI窗口?谢谢。
答案1
小编典典OpenCV中的GUI有一些特殊之处。该destroyImage调用无法关闭窗口(至少在Linux下,默认后端是Gtk
+直到2.1.0),除非waitKey调用该事件来泵送事件。之后添加一个waitKey(1)电话destroyWindow可能会起作用。
即使这样,也不能保证关闭。该waitKey函数仅在窗口具有焦点的情况下才会被拦截,因此,如果窗口在您调用时没有焦点destroyWindow,则它可能在下一次destroyWindow调用之前保持可见。
我假设这是源自Gtk +的行为;在Windows下使用该功能时,没有遇到任何麻烦。

Introduction to Image Processing in Python with OpenCV
http://stackabuse.com/introduction-to-image-processing-in-python-with-opencv/
Introduction
In this tutorial, we are going to learn how we can perform image processing using the Python language. We are not going to restrict ourselves to a single library or framework; however, there is one that we will be using the most frequently, the Open CV library. We will start off by talking a little about image processing and then we will move on to see different applications/scenarios where image processing can come in handy. So, let''s begin!
What is Image Processing?
It is important to know what exactly image processing is and what is its role in the bigger picture before diving into its how''s. Image Processing is most commonly termed as ''Digital Image Processing'' and the domain in which it is frequently used is ''Computer Vision''. Don''t be confused - we are going to talk about both of these terms and how they connect. Both Image Processing algorithms and Computer Vision (CV) algorithms take an image as input; however, in image processing, the output is also an image, whereas in computer vision the output can be some features/information about the image.
Why do we need it?
The data that we collect or generate is mostly raw data, i.e. it is not fit to be used in applications directly due to a number of possible reasons. Therefore, we need to analyze it first, perform the necessary pre-processing, and then use it.
For instance, let''s assume that we were trying to build a cat classifier. Our program would take an image as input and then tell us whether the image contains a cat or not. The first step for building this classifier would be to collect hundreds of cat pictures. One common issue is that all the pictures we have scraped would not be of the same size/dimensions, so before feeding them to the model for training, we would need to resize/pre-process them all to a standard size.
This is just one of many reasons why image processing is essential to any computer vision application.
Prerequisites
Before going any further, let''s discuss what you need to know in order to follow this tutorial with ease. Firstly, you should have some basic programming knowledge in any language. Secondly, you should know what machine learning is and the basics of how it works, as we will be using some machine learning algorithms for image processing in this article. As a bonus, it would help if you have had any exposure to, or basic knowledge of, Open CV before going on with this tutorial. But this is not required.
One thing you should definitely know in order to follow this tutorial is how exactly an image is represented in memory. Each image is represented by a set of pixels i.e. a matrix of pixel values. For a grayscale image, the pixel values range from 0 to 255 and they represent the intensity of that pixel. For instance, if you have an image of 20 x 20 dimensions, it would be represented by a matrix of 20x20 (a total of 400-pixel values).
If you are dealing with a colored image, you should know that it would have three channels - Red, Green, and Blue (RGB). Therefore, there would be three such matrices for a single image.
Installation
Note: Since we are going to use OpenCV via Python, it is an implicit requirement that you already have Python (version 3) already installed on your workstation.
Windows
$ pip install opencv-python
MacOS
$ brew install opencv3 --with-contrib --with-python3
Linux
$ sudo apt-get install libopencv-dev python-opencv
To check if your installation was successful or not, run the following command in either a Python shell or your command prompt:
import cv2
Some Basics You Should Know
Before we move on to using Image Processing in an application, it is important to get an idea of what kind of operations fall into this category, and how to do those operations. These operations, along with others, would be used later on in our applications. So, let''s get to it.
For this article we''ll be using the following image:

Note: The image has been scaled for the sake of displaying it in this article, but the original size we are using is about 1180x786.
You probably noticed that the image is currently colored, which means it is represented by three color channels i.e. Red, Green, and Blue. We will be converting the image to grayscale, as well as splitting the image into its individual channels using the code below.
Finding Image Details
After loading the image with the imread() function, we can then retrieve some simple properties about it, like the number of pixels and dimensions:
import cv2

img = cv2.imread(''rose.jpg'')

print("Image Properties")
print("- Number of Pixels: " + str(img.size))
print("- Shape/Dimensions: " + str(img.shape))
Output:
Image Properties
- Number of Pixels: 2782440
- Shape/Dimensions: (1180, 786, 3)
Splitting an Image into Individual Channels
Now we''ll split the image in to its red, green, and blue components using OpenCV and display them:
from google.colab.patches import cv2_imshow

blue, green, red = cv2.split(img) # Split the image into its channels
img_gs = cv2.imread(''rose.jpg'', cv2.IMREAD_GRAYSCALE) # Convert image to grayscale

cv2_imshow(red) # Display the red channel in the image
cv2_imshow(blue) # Display the red channel in the image
cv2_imshow(green) # Display the red channel in the image
cv2_imshow(img_gs) # Display the grayscale version of image
For brevity, we''ll just show the grayscale image.
Grayscale Image:

Image Thresholding
The concept of thresholding is quite simple. As discussed above in the image representation, pixel values can be any value between 0 to 255. Let''s say we wish to convert an image into a binary image i.e. assign a pixel either a value of 0 or 1. To do this, we can perform thresholding. For instance, if the Threshold (T) value is 125, then all pixels with values greater than 125 would be assigned a value of 1, and all pixels with values lesser than or equal to that would be assigned a value of 0. Let''s do that through code to get a better understanding.
Image used for Thresholding:

import cv2

# Read image
img = cv2.imread(''image.png'', 0)

# Perform binary thresholding on the image with T = 125
r, threshold = cv2.threshold(img, 125, 255, cv2.THRESH_BINARY)
cv2_imshow(threshold)
Output:
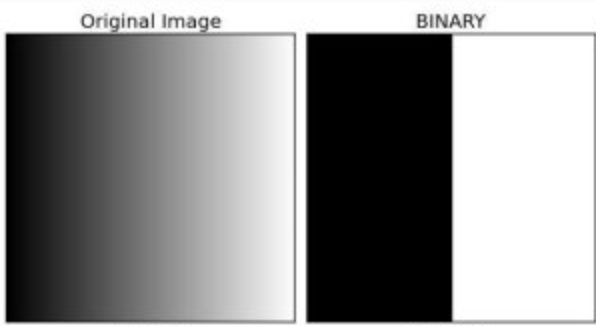
As you can see, in the resultant image, two regions have been established, i.e. the black region (pixel value 0) and white region (pixel value 1). Turns out, the threshold we set was right in the middle of the image, which is why the black and white values are divided there.
Applications
#1: Removing Noise from an Image
Now that you have got a basic idea of what image processing is and what it is used for, let''s go ahead and learn about some of its specific applications.
In most cases, the raw data that we gather has noise in it i.e. unwanted features that makes the image hard to perceive. Although these images can be used directly for feature extraction, the accuracy of the algorithm would suffer greatly. This is why image processing is applied to the image before passing it to the algorithm to get better accuracy.
There are many different types of noise, like Gaussian noise, salt and pepper noise, etc. We can remove that noise from an image by applying a filter which removes that noise, or at the very least, minimizes its effect. There are a lot of options when it comes to filters as well, each of them has different strengths, and hence is the best for a specific kind of noise.
To understand this properly, we are going to add ''salt and pepper'' noise to the grayscale version of the rose image that we considered above, and then try to remove that noise from our noisy image using different filters and see which one is best-fit for that type.
import numpy as np

# Adding salt & pepper noise to an image
def salt_pepper(prob):
      # Extract image dimensions
      row, col = img_gs.shape

      # Declare salt & pepper noise ratio
      s_vs_p = 0.5
      output = np.copy(img_gs)

      # Apply salt noise on each pixel individually
      num_salt = np.ceil(prob * img_gs.size * s_vs_p)
      coords = [np.random.randint(0, i - 1, int(num_salt))
            for i in img_gs.shape]
      output[coords] = 1

      # Apply pepper noise on each pixel individually
      num_pepper = np.ceil(prob * img_gs.size * (1. - s_vs_p))
      coords = [np.random.randint(0, i - 1, int(num_pepper))
            for i in img_gs.shape]
      output[coords] = 0
      cv2_imshow(output)

      return output

# Call salt & pepper function with probability = 0.5
# on the grayscale image of rose
sp_05 = salt_pepper(0.5)

# Store the resultant image as ''sp_05.jpg''
cv2.imwrite(''sp_05.jpg'', sp_05)
Alright, we have added noise to our rose image, and this is what it looks like now:
Noisy Image:

Lets now apply different filters on it and note down our observations i.e. how well each filter reduces the noise.
Arithmetic Filter with Sharpening Kernel
# Create our sharpening kernel, the sum of all values must equal to one for uniformity
kernel_sharpening = np.array([[-1,-1,-1],
                              [-1, 9,-1],
                              [-1,-1,-1]])

# Applying the sharpening kernel to the grayscale image & displaying it.
print("\n\n--- Effects on S&P Noise Image with Probability 0.5 ---\n\n")

# Applying filter on image with salt & pepper noise
sharpened_img = cv2.filter2D(sp_05, -1, kernel_sharpening)
cv2_imshow(sharpened_img)
The resulting image, from applying arithmetic filter on the image with salt and pepper noise, is shown below. Upon comparison with the original grayscale image, we can see that it brightens the image too much and is unable to highlight the bright spots on the rose as well. Hence, it can be concluded that arithmetic filter fails to remove salt and pepper noise.
Arithmetic Filter Output:

Midpoint Filter
from scipy.ndimage import maximum_filter, minimum_filter

def midpoint(img):
    maxf = maximum_filter(img, (3, 3))
    minf = minimum_filter(img, (3, 3))
    midpoint = (maxf + minf) / 2
    cv2_imshow(midpoint)

print("\n\n---Effects on S&P Noise Image with Probability 0.5---\n\n")
midpoint(sp_05)
The resulting image, from applying th Midpoint Filter on the image with salt and pepper noise, is shown below. Upon comparison with the original grayscale image, we can see that, like the kernel method above, brightens the image too much; however, it is able to highlight the bright spots on the rose. Therefore, we can say that it is a better choice than the arithmetic filter, but still it does not recover the original image completely.
Midpoint Filter Output:

Contraharmonic Mean Filter
Note: The implementations of these filters can be found online easily and how exactly they work is out of scope for this tutorial. We will be looking at the applications from an abstract/higher level.
def contraharmonic_mean(img, size, Q):
    num = np.power(img, Q + 1)
    denom = np.power(img, Q)
    kernel = np.full(size, 1.0)
    result = cv2.filter2D(num, -1, kernel) / cv2.filter2D(denom, -1, kernel)
    return result

print("\n\n--- Effects on S&P Noise Image with Probability 0.5 ---\n\n")
cv2_imshow(contraharmonic_mean(sp_05, (3,3), 0.5))
The resulting image, from applying Contraharmonic Mean Filter on the image with salt and pepper noise, is shown below. Upon comparison with the original grayscale image, we can see that it has reproduced pretty much the exact same image as the original one. Its intensity/brightness level is the same and it highlights the bright spots on the rose as well. Hence, we can conclude that contraharmonic mean filter is very effective in dealing with salt and pepper noise.
Contraharmonic Mean Filter Output:

Now that we have found the best filter to recover the original image from a noisy one, we can move on to our next application.
#2: Edge Detection using Canny Edge Detector
The rose image that we have been using so far has a constant background i.e. black, therefore, we will be using a different image for this application to better show the algorithm''s capabilities. The reason is that if the background is constant, it makes the edge detection task rather simple, and we don''t want that.
We talked about a cat classifier earlier in this tutorial, let''s take that example forward and see how image processing plays an integral role in that.
In a classification algorithm, the image is first scanned for ''objects'' i.e. when you input an image, the algorithm would find all the objects in that image and then compare them against the features of the object that you are trying to find. In case of a cat classifier, it would compare all objects found in an image against the features of a cat image, and if a match is found, it tells us that the input image contains a cat.
Since we are using the cat classifier as an example, it is only fair that we use a cat image going forward. Below is the image we will be using:
Image used for Edge Detection:

import cv2
import numpy as np
from matplotlib import pyplot as plt

# Declaring the output graph''s size
plt.figure(figsize=(16, 16))

# Convert image to grayscale
img_gs = cv2.imread(''cat.jpg'', cv2.IMREAD_GRAYSCALE)
cv2.imwrite(''gs.jpg'', img_gs)

# Apply canny edge detector algorithm on the image to find edges
edges = cv2.Canny(img_gs, 100,200)

# Plot the original image against the edges
plt.subplot(121), plt.imshow(img_gs)
plt.title(''Original Gray Scale Image'')
plt.subplot(122), plt.imshow(edges)
plt.title(''Edge Image'')

# Display the two images
plt.show()
Edge Detection Output:
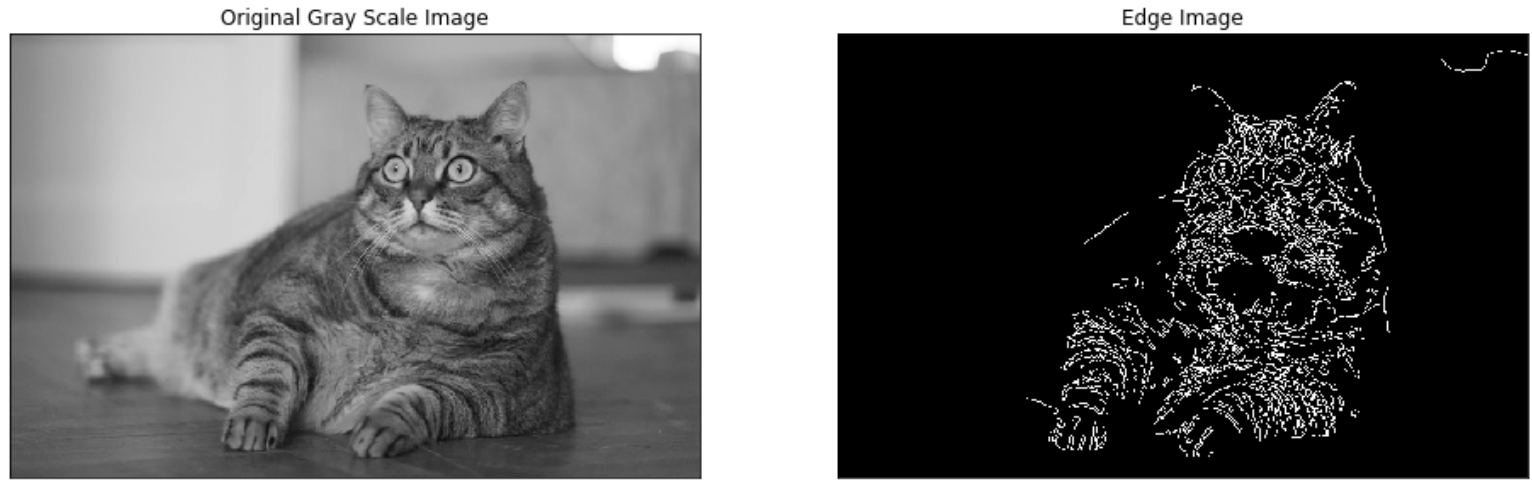
As you can see, the part of the image which contains an object, which in this case is a cat, has been dotted/separated through edge detection. Now you must be wondering, what is the Canny Edge Detector and how did it make this happen; so let''s discuss that now.
To understand the above, there are three key steps that need to be discussed. First, it performs noise reduction on the image in a similar manner that we discussed previously. Second, it uses the first derivative at each pixel to find edges. The logic behind this is that the point where an edge exists, there is an abrupt intensity change, which causes a spike in the first derivative''s value, hence making that pixel an ''edge pixel''.
At the end, it performs hysteresis thresholding; we said above that there''s a spike in the value of first derivative at an edge, but we did not state ''how high'' the spike needs to be for it to be classified as an edge - this is called a threshold! Earlier in this tutorial we discussed what simple thresholding is. Hysteresis thresholding is an improvement on that, it makes use of two threshold values instead of one. The reason behind that is, if the threshold value is too high, we might miss some actual edges (true negatives) and if the value is too low, we would get a lot of points classified as edges that actually are not edges (false positives). One threshold value is set high, and one is set low. All points which are above the ''high threshold value'' are identified as edges, then all points which are above the low threshold value but below the high threshold value are evaluated; the points which are close to, or are neighbors of, points which have been identified as edges, are also identified as edges and the rest are discarded.
These are the underlying concepts/methods that Canny Edge Detector algorithm uses to identify edges in an image.
Conclusion
In this article, we learned how to install OpenCV, the most popular library for image processing in Python, on different platforms like Windows, MacOS, and Linux, as well as how to verify that the installation was successful.
We went on to discuss what Image Processing is and its uses in the computer vision domain of Machine Learning. We talked about some common types of noise and how we can remove it from our images using different filters, before using the images in our applications.
Furthermore, we learned how image processing plays an integral part in high-end applications like Object Detection or classification. Do note that this article was just the tip of the iceberg, and Digital Image Processing has a lot more in the store that cannot possibly be covered in a single tutorial. Reading this should enable you to dive deeper and learn about other advanced concepts related to image processing. Good Luck!

MFC DestroyWindow、OnDestroy、OnClose 程序关闭相关
一、DestroyWindow:
The MFC framework manages window destruction as well as creation for those windows associated with framework documents and views. If you create additional windows, you are responsible for destroying them.
In the framework, when the user closes the frame window, the window''s default OnClose handler calls DestroyWindow. The last member function called when the Windows window is destroyed is OnNcDestroy, which does some cleanup, calls the Default member function
to perform Windows cleanup, and lastly calls the virtual member function PostNcDestroy. The CFrameWnd implementation ofPostNcDestroy deletes the C++ window object. You should never use the C++delete operator on a frame window.
Use DestroyWindow instead.
When the main window closes, the application closes. If there are modified unsaved documents, the framework displays a message box to ask if the documents should be saved and ensures that the appropriate documents are saved if necessary.
+ + 窗口对象。你不应该使用 C + + delete 操作符在框架窗口。使 DestroyWindow 代替。
总之:函数的功能就是销毁指定的窗口。通过发送 WM_DESTROY 消息和 WM_NCDESTROY 消息使窗口无效并移除其键盘焦点。这个函数还销毁窗口的菜单,清空线程的消息队列,销毁与窗口过程相关的定时器,解除窗口对剪贴板的拥有权,打断剪贴板器的查看链。
原型:
BOOL DestroyWindow(HWND hWnd);返回值:
如果函数成功,返回值为非零:如果函数失败,返回值为零。若想获得更多错误信息,请调用 GetLastError 函数。
备注说明:
一个线程不能使用本函数销毁别的线程创建的窗口
如果这个窗口是一个不具有 WS_EX_NOPARENTNOTIFY 样式的子窗口,则销毁窗口时将发 WM_PARENTNOTIFY 消息给其父窗口。
===========================================================================================
二、CWnd::DestroyWindow
MSDN:
Destroys the Windows window attached to the CWnd object.
销毁 Windows 窗口附加到 CWnd 对象。
原型:
virtual BOOL DestroyWindow( );
返回值:
非零,则销毁窗口;否则为 0
备注说明:
1、DestroyWindow 成员函数将相应信息到窗口停用并移除输入焦点。 如果 CWnd 是在浏览器链的顶部,它销毁 windows 的菜单中,对于应用程序队列,销毁处理计时器,还移除剪贴板所有权,以及中断剪贴板浏览器链。 其发送 WM_DESTROY 和 WM_NCDESTROY 信息到窗口。 但不销毁 CWnd 对象。
2、DestroyWindow 是进行清理一个位置容纳器。 由于 DestroyWindow 是虚函数,在所有 CWnd- 在选件类视图的派生类公开。 但,即使您重写在您的 CWnd 的此功能的派生类,DestroyWindow 不一定调用。 如果 DestroyWindow 在 MFC 代码未调用,则必须显式调用它在代码中,如果您希望此调用。
3、假定,例如,重写了 CView 的 DestroyWindow 派生类。 因为 MFC 源代码不对 DestroyWindow 其任何 CFrameWnd 派生类,重写的 DestroyWindow 不会调用,除非您显式调用它。
4、如果窗口是任何窗口的父级,自动销毁。这些子窗口,当销毁时父窗口。 DestroyWindow 成员函数首先然后销毁子窗口。
5、DestroyWindow 成员函数来销毁 CDialog::Create 创建的无模式对话框。
6、如果销毁的 CWnd 是子窗口,并没有 WS_EX_NOPARENTNOTIFY 样式设置,则 WM_PARENTNOTIFY 发送到父级。
三、CWnd::OnClose
WM_CLOSE 的响应函数
afx_msg void OnClose( );说明:
The default implementation calls DestroyWindow.
默认实现调用 DestroyWindow
四、CWnd::OnDestroy 框架调用该成员函数通知 CWnd 对象销毁它。
WM_DESTROY 的响应函数
afx_msg void OnDestroy( );说明:
OnDestroy is called after the CWnd object is removed from the screen.
OnDestroy is called first for the CWnd being destroyed, then for the child windows ofCWnd as they are destroyed. It can be assumed that all child windows still exist whileOnDestroy runs.
If the CWnd object being destroyed is part of the Clipboard-viewer chain (set by calling the SetClipboardViewer member function), theCWnd must remove itself from the Clipboard-viewer chain by calling the ChangeClipboardChain
member function before returning from theOnDestroy function.
OnDestroy 在窗口对象离开屏幕后调用
当销毁时,OnDestroy 首先调用为销毁的 CWnd,然后为子窗口 CWnd 它们。 可以假定,所有子窗口仍存在,则 OnDestroy 运行时。
如果销毁的 CWnd 对象是剪贴板浏览器链的一部分 (设置通过调用 SetClipboardViewer 成员函数),CWnd 必须从剪贴板浏览器链中移除其自身通过调用 ChangeClipboardChain 成员函数中返回从 OnDestroy 功能之前。
=============================================================================================
下面介绍下三个关闭消息:
WM_CLOSE:
在系统菜单里选择了 “关闭” 或者点击了窗口右上角的 “X” 按钮,你的窗口过程就会收到 WM_CLOSE。DefWindowProc 对 WM_CLOSE 的处理是调用 DestroyWindow。当然,你可以不让 DefWindowProc 处理,而是自己处理,例如询问用户是否保存更改等。如果用户选择 “取消”,
你忽略此消息,那么程序照常运行;如果用户确认要退出,你就调用 DestroyWindow。
WM_DESTROY:
接下来,DestroyWindow 完成窗口的清理工作,最后像窗口过程发送 WM_DESTROY。对于 WM_DESTROY,DefWindowProc 不会处理。也就是说,你如果不处理这个消息,虽然你的窗口已经销毁,但进程并不会结束。一般处理 WM_DESTROY 时都是释放资源(例如申请的内存等),
然后调用 PostQuitMessage。
WM_QUIT:
PostQuitMessage 会发送 WM_QUIT 给消息队列。注意,WM_QUIT 永远不会到达窗口过程,因为 GetMessage 得到 WM_QUIT 后就会返回 FALSE,从而结束消息循环,最后进程结束,程序退出。
假设使用者执行 HELLOWIN,并且使用者最终单击了 Close 按钮,或者假设用键盘或鼠标从系统菜单中选择了 Close,DefWindowProc 处理这一键盘或者鼠标输入,在检测到使用者选择了 Close 选项之后,它给窗口消息处理程序发送一条 WM_SYSCOMMAND 消息。WndProc 将这个消息
传给 DefWindowProc。 DefWindowProc 给窗口消息处理程序发送一条 WM_CLOSE 消息来响应之。WndProc 再次将它传给 DefWindowProc。 DestroyWindow 呼叫 DestroyWindow 来响应这条 WM_CLOSE 消息。DestroyWindow 导致 Windows 给窗口消息处理程序发送一条 WM_DESTROY 消息。WndProc 再呼叫 PostQuitMessage,将一条 WM_QUIT 消息放入消息队列中,以此来响应此消息。这个消息导致 WinMain 中的消息循环终止,然后程序结束。
言而简之:
(1) 用户点击退出按钮,发送了 WM_CLOSE 消息
(2) 在 WM_CLOSE 消息的处理函数中,调用 DestroyWindow ()
(3) 在 DestroyWindow () 中发送了 WM_DESTROY 消息
(4) 在 WM_DESTROY 消息中调用 PostQuitMessage (), 发送 WM_QUIT 消息,结束消息循环
综上,程序先调用 OnClose ()(也可能不调用),然后调用 OnDestroy ()(必调用),
所以,如果要进行程序结束时的清理工作,应该在 OnDestroy()中,而不是在 OnClose (),否则就有可能会出现内存泄漏的危险了!
=============================================================================================
五、WM_QUIT
The WM_QUIT message indicates a request to terminate an application and is generated when the application calls thePostQuitMessage function. It causes theGetMessage
function to return zero.
wParam
Specifies the exit code given in the PostQuitMessage function.
lParam
This parameter is not used.
Return Value
This message does not have a return value because it causes the message loop to terminate before the message is sent to the application''s window procedure.
这个消息没有返回值,因为它使消息循环终止在消息被发送到应用程序的窗口程序
注意事项:
The WM_QUIT message is not associated with a window and therefore will never be received through a window''s window procedure. It is retrieved only by theGetMessage orPeekMessage
functions.
Do not post the WM_QUIT message using the PostMessage function; usePostQuitMessage.
六、总结,比较异同
1、对话框中 点 “确定”、“取消” 时的关闭路由为
OnOK () 或 OnCancel () ---> EndDialog () ---> DestroyWindow () ---> OnDestroy () ---> PostNcDestroy ()
点 “关闭” 标题栏按钮的关闭路由为
OnClose()---> DestroyWindow() ---> OnDestroy() ---> PostNcDestroy()
所以 OnClose () 并不是关闭路由的必经路径,OnDestroy () 才是程序关闭的必经路径,因此重写 OnDestroy () , 把我需要在程序结束的操作全部放到了这个函数里面。
2、在 OnDestroy 中调用 PostQuitMessage () 发送 WM_QUIT 消息,结束消息循环,结束程序。
3、DestroyWindow 在运用过程分析
1、【单窗口】通过 new 创建了一个窗口对象 pWnd,然后 pWnd->Create。则销毁窗口的调用次序
1.1、手动调用 pWnd->DestroyWindow (),DestroyWindow 会发送 WM_DESTROY
1.2、WM_DESTROY 对应的消息处理函数是 OnDestroy ()
1.3、DestroyWindow 会发送 WM_NCDESTROY,WM_NCDESTROY 对应的消息处理函数是 OnNcDestroy
1.4、OnNcDestroy 最后会调用 PostNcDestroy------------------------------- 可以在 \src\WINCORE.CPP 中 查看源码
通过这种方式,窗口对象对应的窗口和窗口对象本身都被释放了
2、【含子窗口】则调用父窗口的 DestroyWindow 时,它会向子窗口发送 WM_DESTROY 和 WM_NCDESTROY 消息。
PostNcDestroy:源码
-
void CWnd::PostNcDestroy()
-
{
-
// default to nothing
-
}
-
void CView::PostNcDestroy()
-
{
-
// default for views is to allocate them on the heap
-
// the default post-cleanup is to ''delete this''.
-
// never explicitly call ''delete'' on a view
-
delete this;
-
}
-
void CFrameWnd::PostNcDestroy()
-
{
-
// default for frame windows is to allocate them on the heap
-
// the default post-cleanup is to ''delete this''.
-
// never explicitly call ''delete'' on a CFrameWnd, use DestroyWindow instead
-
delete this;
-
}
很明显:delete 会对 DestroyWindow 产生影响
delete 会引起析构函数,CWnd 的析构函数中有对 DestroyWindow 的调用
-
CWnd::~CWnd()
-
{
-
if (m_hWnd != NULL &&
-
this != (CWnd*)&wndTop && this != (CWnd*)&wndBottom &&
-
this != (CWnd*)&wndTopMost && this != (CWnd*)&wndNoTopMost)
-
{
-
TRACE(_T( "Warning: calling DestroyWindow in CWnd::~CWnd; ")
-
_T( "OnDestroy or PostNcDestroy in derived class will not be called.\n"));
-
DestroyWindow();
-
}
-
-
#ifndef _AFX_NO_OCC_SUPPORT
-
// cleanup control container,
-
// including destroying controls
-
-
delete m_pCtrlCont;
-
-
// cleanup control site
-
if (m_pCtrlSite != NULL && m_pCtrlSite->m_pWndCtrl == this)
-
m_pCtrlSite->m_pWndCtrl = NULL;
-
#endif
-
}
CDialog 的析构函数 有对 DestroyWindow 的调用,但条件比较松,只需要 m_hWnd != NULL。DoModal 也会调用 DestroyWindow。
-
CDialog::~CDialog()
-
{
-
if (m_hWnd != NULL)
-
{
-
TRACE0( "Warning: calling DestroyWindow in CDialog::~CDialog --\n");
-
TRACE0( "\tOnDestroy or PostNcDestroy in derived class will not be called.\n");
-
DestroyWindow();
-
}
-
}
-
int CDialog::DoModal()
-
{
-
...
-
// destroy modal window
-
DestroyWindow();
-
PostModal();
-
...
-
}
CFrameWnd------------OnClose 中会调用 DestroyWindow,但其析构中不会调用 DestroyWindow
-
void CFrameWnd::OnClose()
-
{
-
....
-
// then destroy the window
-
DestroyWindow();
-
}
-
CFrameWnd::~CFrameWnd()
-
{
-
RemoveFrameWnd();
-
-
if( AfxGetThreadState()->m_pRoutingFrame == this )
-
AfxGetThreadState()->m_pRoutingFrame = NULL;
-
-
if (m_phWndDisable != NULL)
-
delete[] (void*)m_phWndDisable;
-
}
CView 的析构没有调用 DestroyWindow。
-
CView::~CView()
-
{
-
if (AfxGetThreadState()->m_pRoutingView == this)
-
AfxGetThreadState()->m_pRoutingView = NULL;
-
-
if (m_pDocument != NULL)
-
m_pDocument->RemoveView( this);
-
}
以 SDI 程序的销毁过程为例:
点击退出按钮,CMainFrame 会收到 WM_CLOSE 消息。
CFrameWnd(CMainFrame 的父类)间接会调用 CWnd::DestroyWindow;
它首先向 CMyView 发送 WM_DESTORY 和 WM_NCDESTROY 消息,并引发相应的处理函数;
然后向 CXXXDlg 发送 WM_DESTORY 和 WM_NCDESTROY 消息,并引发相应的处理函数;
然后向 CMyWnd 发送 WM_DESTORY 和 WM_NCDESTROY 消息,并引发相应的处理函数。
DestroyWindow 执行过程:
1、调用 CMainFrame::DestroyWindow 调用 CWnd::DestroyWindow (虚函数)
2、调用基类的 CFrameWnd::OnDestroy
3、 CMyView::OnDestroy
4、 CMyWnd::OnDestroy
5、 CXXXDlg::OnDestroy
6、CMyWnd::PostNcDestroy
7、CMyWnd 的析构
8、CXXXDlg::OnDestroy // 执行基类 CWnd::PostNcDestroy 虚函数 也可以重写
9、CXXXDlg 的析构
10、CMyView::PostNcDestroy
11、CMyView 的析构
12、CMainFrame 的析构
13、CMainFrame::DestroyWindow 退出
上面情况是假设我们在 CMyWnd 和 CXXXDlg 的 PostNcDestroy 中添加了 delete this。如果没有添加,则 7,9 不会执行。
因为 CView::PostNcDestroy 中调用了 delete this,所以然后会执行 CMyView 的析构操作。
因为 CFrameWnd::PostNcDestroy 中调用了 delete this,所以最后执行 CMainFrame 的析构操作。
如果自己的 CMyDlg 和 CMyWnd 在 PostNcDestroy 中有 delete this;则二者会被析构。否则内存泄漏。当然 delete 也可以放在 CMyView 的析构中做,只是不够好。
总结:
可以有两种方法销毁窗口对象对应的窗口和释放窗口对象指针。一种是通过 DestroyWindow。这是比较好的方法,因为最后 MFC 会自动相应 WM_CLOSE 导致 CFrameWnd::DestroyWindow 被调用,然后会一次释放所有子窗口的句柄。用户需要做的是在 PostNcDestroy 中释放堆窗口对象指针。但因为某些对象是在栈中申请的,所以 delete this 可能出错。这就要保证写程序时自己创建的窗口尽量使用堆申请。
另一种是 delete。Delete 一个窗口对象指针,有的窗口类(如 CWnd,CDialog)会间接调用 DestroyWindow,有的窗口类(如 CView,CFrameWnd)不会调用 DestroyWindow。所以要小心应对。
===========================================================================================================================
附其他资料:作者:闻怡洋
一个 MFC 窗口对象包括两方面的内容:
一是窗口对象封装的窗口,即存放在 m_hWnd 成员中的 HWND(窗口句柄),
二是窗口对象本身是一个 C++ 对象。要删除一个 MFC 窗口对象,应该先删除窗口对象封装的窗口,然后删除窗口对象本身。
删除窗口最直接方法是调用 CWnd::DestroyWindow 或::DestroyWindow,前者封装了后者的功能。前者不仅会调用后者,而且会使成员 m_hWnd 保存的 HWND 无效 (NULL)。如果 DestroyWindow 删除的是一个父窗口或拥有者窗口,则该函数会先自动删除所有的子窗口或被拥有者,然后再删除父窗口或拥有者。
在一般情况下,在程序中不必直接调用 DestroyWindow 来删除窗口,因为 MFC 会自动调用 DestroyWindow 来删除窗口。
例如,当用户退出应用程序时,会产生 WM_CLOSE 消息,该消息会导致 MFC 自动调用 CWnd::DestroyWindow 来删除主框架窗口,当用户在对话框内按了 OK 或 Cancel 按钮时,MFC 会自动调用 CWnd::DestroyWindow 来删除对话框及其控件。
窗口对象本身的删除则根据对象创建方式的不同,分为两种情况。在 MFC 编程中,会使用大量的窗口对象,有些窗口对象以变量的形式嵌入在别的对象内或以局部变量的形式创建在堆栈上,有些则用 new 操作符创建在堆中。
1>> 对于一个以变量形式创建的窗口对象,程序员不必关心它的删除问题,因为该对象的生命期总是有限的,若该对象是某个对象的成员变量,它会随着父对象的消失而消失,若该对象是一个局部变量,那么它会在函数返回时被清除。
2>> 对于一个在堆中动态创建的窗口对象,其生命期却是任意长的。初学者在学习 C++ 编程时,对 new 操作符的使用往往不太踏实,因为用 new 在堆中创建对象,就不能忘记用 delete 删除对象。读者在学习 MFC 的例程时,可能会产生这样的疑问,为什么有些程序用 new 创建了一个窗口对象,却未显式的用 delete 来删除它呢?问题的答案就是有些 MFC 窗口对象具有自动清除的功能。
自动清除,当调用 CWnd::DestroyWindow 或::DestroyWindow 删除一个窗口时,被删除窗口的 PostNcDestroy 成员函数会被调用。缺省的 PostNcDestroy 什么也不干,但有些 MFC 窗口类会覆盖该函数并在新版本的 PostNcDestroy 中调用 delete this 来删除对象,从而具有了自动清除的功能。此类窗口对象通常是用 new 操作符创建在堆中的,但程序员不必操心用 delete 操作符去删除它们,因为一旦调用 DestroyWindow 删除窗口,对应的窗口对象也会紧接着被删除。
不具有自动清除功能的窗口类如下所示。这些窗口对象通常是以变量的形式创建的,无需自动清除功能。
所有标准的 Windows 控件类。
1. 从 CWnd 类直接派生出来的子窗口对象(如用户定制的控件)。
2. 切分窗口类 CSplitterWnd。
3. 缺省的控制条类(包括工具条、状态条和对话条)。
4. 模态对话框类。
具有自动清除功能的窗口类如下所示,这些窗口对象通常是在堆中创建的。
1. 主框架窗口类(直接或间接从 CFrameWnd 类派生)。
2. 视图类(直接或间接从 CView 类派生)。
读者在设计自己的派生窗口类时,可根据窗口对象的创建方法来决定是否将窗口类设计成可以自动清除的。
例如,对于一个非模态对话框来说,其对象是创建在堆中的,因此应该具有自动清除功能。
综上所述,对于 MFC 窗口类及其派生类来说,在程序中一般不必显式删除窗口对象。也就是说,既不必调用 DestroyWindow 来删除窗口对象封装的窗口,也不必显式地用 delete 操作符来删除窗口对象本身。只要保证非自动清除的窗口对象是以变量的形式创建的,自动清除的窗口对象是在堆中创建的,MFC 的运行机制就可以保证窗口对象的彻底删除。
如果需要手工删除窗口对象,则应该先调用相应的函数(如 CWnd::DestroyWindow)删除窗口,然后再删除窗口对象.
对于以变量形式创建的窗口对象,窗口对象的删除是框架自动完成的.
对于在堆中动态创建了的非自动清除的窗口对象,必须在窗口被删除后,显式地调用 delete 来删除对象(一般在拥有者或父窗口的析构函数中进行).
对于具有自动清除功能的窗口对象,只需调用 CWnd::DestroyWindow 即可删除窗口和窗口对象。
注意,对于在堆中创建的窗口对象,不要在窗口还未关闭的情况下就用 delete 操作符来删除窗口对象.
=======================================================================================
编译 opencv + opencv_contrib")
OpenCV - Windows(win10)编译 opencv + opencv_contrib
在之前的几篇文章中,我提到了在 Android、Linux 中编译 opencv + opencv_contrib,这篇文章主要讲在 Windows 中编译 opencv + opencv_contrib。
首先需要准备的环境有:
- Window 10 64 位:这个大家都知道,就不多说了啊;
- Cmake:编译工具,可以 https://cmake.org/download/ 下载安装,当前的最新版本为 3.10.1;
- Visual Studio:开发工具,编译的时候也需要用到,我安装的是 Visual Studio 2015。
- OpenCV Windows 包,下载地址:https://opencv.org/releases.html;
- OpenCV_Contrib 包,下载地址:https://github.com/opencv/opencv_contrib(注意版本对应)。
将下载得到的 OpenCV Windows 包解压,目录为 opencv,然后将下载的 OpenCV_Contrib 包解压放入 opencv 目录下,新建 new_build 文件夹(用来放编译之后结果):

使用 cmake 生成 OpenCV.sln:
打开安装之后的 cmake,在 where is the source code 中选择 openCV 的源代码目录:F:\opencv\sources;在 where to build the binaries 中选择编译为 Visual Studio 项目的目录:F:\opencv\new_build(这里我选择刚刚特地建立的 new_build 目录),如下图所示:

点击 Configure 按钮后,弹出对话框,选择编译器,根据本地计算机的 CPU 架构,这里特别要注意的是,自己机器上是否装有相应的 VS 版本,如果没有装,还是要编译就会出错,可能是找不到对应的工具原因,以及选择 X86 和 X64),这里用的是 VS 2015。

设置完成之后点击 “Generate” 开始生成工程,. 第一次编译完成之后,我们需要将额外的 opencv_contrib 加到工程中进行第二次编译,在配置表中找到 “OPENCV_EXTRA_MODULES_PATH”, 设置其参数值为 open_contrib 源码包中的 modles 目录,我的目录是 “F:\opencv\opencv_contrib\modules”:

再次点击 “Generate” 进行第二次编译:

这时候我们已经可以看见用 cmake 工具编译得到的 OpenCV.sln:

用 VS 打开 OpenCV.sln 工程,编译生成 Debug 和 Release 库:
用 VS 2015 打开 OpenCV.sln 工程,在解决方案中可以查看工程目录:

编译生成 debug 版本的库,记得在此之前要选择编译的平台信息,这就是编译生成 debug 版本和 release 版本的区别,也可以选择 release,因为自己的工程可能要用到相应的动态链接库:

在解决方案中选中工程,右键选择重新生成解决方案:

编译成功:

. 找到 CMakeTargets 中的 INSTALL,然后右键选择 “仅限于项目”-->“仅生成 INSTALL”:

完成编译后,Release 模式下同理。此时,有了 install 目录。该目录包含了我们需要的头文件、库文件。

把新的库文件配置到到项目中:
VC++ 目录 --> 包含目录,添加:
E:\OpenCV320\opencv\new_build\install\include
VC++ 目录 --> 库目录,添加:
E:\OpenCV320\opencv\new_build\install\x64\vc14\lib
链接器 --> 输入 --> 附加依赖项,添加: (注意添加的库与编译选项要一致,需要注意 debug 比 release 的文件名多了个 d)
opencv_aruco320.lib
opencv_aruco320d.lib
opencv_bgsegm320.lib
opencv_bgsegm320d.lib
opencv_bioinspired320.lib
opencv_bioinspired320d.lib
opencv_calib3d320.lib
opencv_calib3d320d.lib
opencv_ccalib320.lib
opencv_ccalib320d.lib
opencv_core320.lib
opencv_core320d.lib
opencv_datasets320.lib
opencv_datasets320d.lib
opencv_dnn320.lib
opencv_dnn320d.lib
opencv_dpm320.lib
opencv_dpm320d.lib
opencv_face320.lib
opencv_face320d.lib
opencv_features2d320.lib
opencv_features2d320d.lib
opencv_flann320.lib
opencv_flann320d.lib
opencv_fuzzy320.lib
opencv_fuzzy320d.lib
opencv_highgui320.lib
opencv_highgui320d.lib
opencv_imgcodecs320.lib
opencv_imgcodecs320d.lib
opencv_line_descriptor320.lib
opencv_line_descriptor320d.lib
opencv_ml320.lib
opencv_ml320d.lib
opencv_objdetect320.lib
opencv_objdetect320d.lib
opencv_optflow320.lib
opencv_optflow320d.lib
opencv_phase_unwrapping320.lib
opencv_phase_unwrapping320d.lib
opencv_photo320.lib
opencv_photo320d.lib
opencv_plot320.lib
opencv_plot320d.lib
opencv_reg320.lib
opencv_reg320d.lib
opencv_rgbd320.lib
opencv_rgbd320d.lib
opencv_saliency320.lib
opencv_saliency320d.lib
opencv_shape320.lib
opencv_shape320d.lib
opencv_stereo320.lib
opencv_stereo320d.lib
opencv_stitching320.lib
opencv_stitching320d.lib
opencv_structured_light320.lib
opencv_structured_light320d.lib
opencv_superres320.lib
opencv_superres320d.lib
opencv_surface_matching320.lib
opencv_surface_matching320d.lib
opencv_text320.lib
opencv_text320d.lib
opencv_tracking320.lib
opencv_tracking320d.lib
opencv_video320.lib
opencv_video320d.lib
opencv_videoio320.lib
opencv_videoio320d.lib
opencv_videostab320.lib
opencv_videostab320d.lib
opencv_xfeatures2d320.lib
opencv_xfeatures2d320d.lib
opencv_ximgproc320.lib
opencv_ximgproc320d.lib
opencv_xobjdetect320.lib
opencv_xobjdetect320d.lib
opencv_xphoto320.lib
opencv_xphoto320d.lib
kernel32.lib
user32.lib
gdi32.lib
winspool.lib
comdlg32.lib
advapi32.lib
shell32.lib
ole32.lib
oleaut32.lib
uuid.lib
odbc32.lib
odbccp32.lib
这样,我们就可以在 VS 中使用 OpenCV 了。
需要提到的一个点,所需要使用 Sift 等算法,需要引入 xfeatures2d 命名空间:
using namespace xfeatures2d;

OpenCV中的destroyallWindows的作用
对OpenCV的destroyallWindows一些认知
- 前言
- 一、先看代码
- 二、网上的资料
-
- 1.Stack Overflow的回答
- 2.官方回答
- 总结
前言
因为之前在学习OpenCV,当然了网络上有许多的资料,基本上都是在学习前人的造好的轮子。但是我这个人比较喜欢刨根问底,一直在写代码的过程中有的时候忘记写destroyallWindos这个函数,代码也可以正常运行,但是我看一些参考代码里面都最后带有destoryallWindos这个语句,有有些想法,于是找了一些资料。所以特地写一片文章,来记录一下,希望以后忘记了可以看看
一、先看代码
import cv2
# 这里0.jpg是同目录下的一张图片
img = cv2.imread("0.jpg")
cv2.imshow("CHJ", img)
cv2.waitKey(0)
这样的代码是可以运行的,并且会一直等待键盘输入,但是就是没有destroyallWindows
二、网上的资料
1.Stack Overflow的回答
stackoverflow上的回答
大家可以看一看
2.官方回答
这个是官方链接:官方文档
英文:
You can call destroyWindow() or destroyAllWindows() to close the window and de-allocate any associated memory usage. For a simple program, you do not really have to call these functions because all the resources and windows of the application are closed automatically by the operating system upon exit.
百度翻译一下:
您可以调用destroyWindow()或destroyAllWindows()来关闭窗口并取消分配任何相关的内存使用。对于一个简单的程序,实际上不必调用这些函数,因为退出时操作系统会自动关闭应用程序的所有资源和窗口
总结
如果之前没有释放掉内存的操作的话destroyallWIndows会释放掉被那个变量占用的内存
关于使用Python和OpenCV在Mac上,DestroyWindow不会关闭窗口和opencv图像窗口不能弹出的介绍已经告一段落,感谢您的耐心阅读,如果想了解更多关于Introduction to Image Processing in Python with OpenCV、MFC DestroyWindow、OnDestroy、OnClose 程序关闭相关、OpenCV - Windows(win10)编译 opencv + opencv_contrib、OpenCV中的destroyallWindows的作用的相关信息,请在本站寻找。
本文标签:


