对于无法在Windows10上为GPU导入Tensorflow感兴趣的读者,本文将提供您所需要的所有信息,我们将详细讲解无法使用gpu转换,并且为您提供关于2019最新win10安装tensorflo
对于无法在Windows 10上为GPU导入Tensorflow感兴趣的读者,本文将提供您所需要的所有信息,我们将详细讲解无法使用gpu转换,并且为您提供关于2019最新win10 安装tensorflow1.4(GPU/CPU)+cuda8.0+cudnn8.0-v6 + keras 安装CUDA失败 导入tensorflow失败报错问题解决、Anaconda+Opencv+Tensorflow安装 (Ubuntu/Windows) (cpu/gpu)、python:无法导入tensorflow-gpu、Tensorflow ImportError:Windows 10上没有名为'_pywrap_tensorflow_internal'的模块的宝贵知识。
本文目录一览:- 无法在Windows 10上为GPU导入Tensorflow(无法使用gpu转换)
- 2019最新win10 安装tensorflow1.4(GPU/CPU)+cuda8.0+cudnn8.0-v6 + keras 安装CUDA失败 导入tensorflow失败报错问题解决
- Anaconda+Opencv+Tensorflow安装 (Ubuntu/Windows) (cpu/gpu)
- python:无法导入tensorflow-gpu
- Tensorflow ImportError:Windows 10上没有名为'_pywrap_tensorflow_internal'的模块
")
无法在Windows 10上为GPU导入Tensorflow(无法使用gpu转换)
尝试在我的机器上安装Tensorflow的gpu版本,但尝试``导入tensorflow’‘时遇到此错误
ImportError追溯(最近一次通话最近)C:\ Users \ snh5_000 \ Anaconda3 \ lib \ site-
packages \ tensorflow \ python \ pywrap_tensorflo w_internal.py in
swig_import_helper()17尝试:—> 18返回importlib.import_module(mname)
19,除了ImportError:C:\ Users \ snh5_000 \ Anaconda3 \ lib \ importlib__init
__。py在import_module(名称,pac kage)中125级别+ = 1->
126返回_bootstrap._gcd_import(name [level:],包,级别)127_gcd_import中的C:\ Users \ snh5_000 \ Anaconda3 \ lib \
importlib_bootstrap.py(名称,pac kage,级别)在_find_and_load(name,import_)中的C:\ Users \ snh5_000 \ Anaconda3 \ lib \
importlib_bootstrap.pyC:\ Users \ snh5_000 \ Anaconda3 \ lib \ importlib_bootstrap.py in
find_and_load_unlock ed(name,import)_load_unlocked中的C:\ Users \ snh5_000 \ Anaconda3 \ lib \
importlib_bootstrap.py(spec)C:\ Users \ snh5_000 \ Anaconda3 \ lib \
importlib_bootstrap.py在module_from_spec(spec)中C:\ Users \ snh5_000 \ Anaconda3 \ lib \
importlib_bootstrap_external.py在create_modul e中(self,spec)C:\ Users \ snh5_000 \ Anaconda3 \ lib \ importlib_bootstrap.py in
_call_with_frames_rem oved(f, args,* kwds)ImportError:DLL加载失败:找不到指定的模块。
在处理上述异常期间,发生了另一个异常:
ImportError Traceback(最近一次通话最近一次)C:\ Users \ snh5_000 \ Anaconda3 \ lib \
site-packages \ tensorflow \ python \ pywrap_tensorflo w.py in()40
sys.setdlopenflags(_default_dlopen_flags | ctypes.RTLD_GLOBAL)—>
41来自tensorflow.python.pywrap_tensorflow_internal导入
42来自tensorflow.python.pywrap_tensorflow_internal导入 版本*C:\ Users \ snh5_000 \ Anaconda3 \ lib \ site-packages \ tensorflow \ python
\ pywrap_tensorflo w_internal.py in()20 return importlib.import_module(’_
pywrap_tensorflow_internal’)—> 21 _pywrap_tensorflow_internal =
swig_import_erC:\ Users \ snh5_000 \ Anaconda3 \ lib \ site-packages \ tensorflow \ python
\ pywrap_tensorflo w_internal.py in swig_import_helper()19除了ImportError:—>
20 return importlib.import_module(’_ pywrap_tensorflow_internal’)21
_pywrap_tensor = s )C:\ Users \ snh5_000 \ Anaconda3 \ lib \ importlib__init
__。py在import_module(名称,pac kage)中125级别+ = 1->
126返回_bootstrap._gcd_import(name [level:],包,级别)127ImportError:没有名为“ _pywrap_tensorflow_internal”的模块
在处理上述异常期间,发生了另一个异常:
()中的ImportError Traceback(最近一次呼叫最近)----> 1 import tensorflow
C:\ Users \ snh5_000 \ Anaconda3 \ lib \ site-packages \ tensorflow__init
__。py in()22 23#pylint:disable = wildcard-import —> 24 from
tensorflow.python import * 25#pylint:enable = wildcard-进口26C:\ Users \ snh5_000 \ Anaconda3 \ lib \ site-packages \ tensorflow \
python__init __。py in()49从tensorflow.python import numpy as np 50
—> 51 import pywrap_tensorflow 52 53#协议缓冲区C:\Users\snh5_000\Anaconda3\lib\site-
packages\tensorflow\python\pywrap_tensorflo w.py in () 50 for some common
reasons and solutions. Include the entire stack trace 51 above this error
message when asking for help.”“” % traceback.format_exc () -–> 52 raise
ImportError(msg) 53 54 # pylint: enable=wildcard-import,g-import-not-at-
top,unused-import,line- too-longImportError:追溯(最近一次通话最近):文件“ C:\ Users \ snh5_000 \ Anaconda3 \ lib \ site-
packages \ tensorflow \ python \ pywrap_t
ensorflow_internal.py”,swig_import_helper中的第18行,返回importlib.import_module(mname)文件“
C:\ Users \ snh5_000 \ Anaconda3 \ lib \ importlib__init
__。py”,在impt_module中的第126行,返回_bootstrap._gcd_import(name
[level:],package,level),文件“”,在986行,在_gcd_import
File“”中在_find_and_load文件“”中的第969行,在第958行,在_find_and_load_unlocked文件“”中的第958行,在_load_unlocked文件“”中的第666行,在module_from_spec
文件“”中的第577行,在create_module
文件“”中的906行_call_with_frames_removed ImportError:DLL加载失败:指定的模块无法找到。在处理上述异常期间,发生了另一个异常:
回溯(最近一次通话):文件“ C:\ Users \ snh5_000 \ Anaconda3 \ lib \ site-packages \
tensorflow \ python \ pywrap_t
ensorflow.py”,行41,来自tensorflow.python.pywrap_tensorflow_internal import *文件“
C :Users \ snh5_000 \ Anaconda3 \ lib \ site-packages \ tensorflow \ python
\ pywrap_t ensorflow_internal.py“,第21行,在_pywrap_tensorflow_internal =
swig_import_helper()文件“ C:\ Users \ snh5_000 \ Anaconda3 \ lib \ site-
tensorflow \ python \ pywrap_t
ensorflow_internal.py“,第20行,在swig_import_helper中,返回importlib.import_module(’
pywrap_tensorflow_internal’)文件” C:\ Users \ snh5_000 \ Anaconda3 \ lib \
importlib__init __。py“,行126,在错误启动时返回._gcd_import(name
[level:],程序包,级别)ImportError:没有名为“_pywrap_tensorflow_internal’无法加载本地TensorFlow运行时。
参见
https://www.tensorflow.org/install/install_sources#common_installation_probl
ems出于某些常见原因和解决方案。寻求帮助时,在此错误消息上方包括整个堆栈跟踪。
运行Windows 10,Python 3.5.2,Anaconda 4.2.0 64位。使用’pip install tensorflow-
gpu’安装了tensorflow-gpu。
我尝试过https://github.com/tensorflow/tensorflow/issues/5949中的修复程序,即运行Microsoft
Visual C ++ 2015 Redistributable Update 3,并确认我在System32 / SysWOW64 / my
Python文件夹中具有以下DLL:
内核32.dll
WSOCK32.dll
WS2_32.dll
SHLWAPI.dll
python35.dll
MSVCP140.dll
VCRUNTIME140.dll
api-ms-win-crt-runtime-l1-1-0.dll
api-ms-win-crt-heap-l1-1-0.dll
api-ms-win-crt-utility-l1-1-0.dll
api-ms-win-crt-stdio-l1-1-0.dll
api-ms-win-crt-string-l1-1-0.dll
api-ms-win-crt-math-l1-1-0.dll
api-ms-win-crt-convert-l1-1-0.dll
api-ms-win-crt-environment-l1-1-0.dll
api-ms-win-crt-filesystem-l1-1-0.dll
api-ms-win-crt-time-l1-1-0.dll
值得注意的是,Tensorflow的cpu版本可以导入并正常运行,但是当我尝试使用gpu版本时,会出现上述错误。我认为这是由于配置CUDA工具包/
cudNN时出现的错误,但是我认为我正确执行了说明中列出的所有内容。我确保在CUDA工具包的PATH环境变量中有一个条目(导致\ bin和\
libnvvp),并为cudNN添加了一个条目(导致\ cuda)。
您有什么需要帮助的想法或其他信息吗?
答案1
小编典典尝试重命名cudnn64_6.dll为cudnn64_5.dllin C:\Program Files\NVIDIA GPU ComputingToolkit\CUDA\v8.0\bin。
+cuda8.0+cudnn8.0-v6 + keras 安装CUDA失败 导入tensorflow失败报错问题解决")
2019最新win10 安装tensorflow1.4(GPU/CPU)+cuda8.0+cudnn8.0-v6 + keras 安装CUDA失败 导入tensorflow失败报错问题解决
原文作者:aircraft
原文链接:https://www.cnblogs.com/DOMLX/p/9747019.html
基本开发环境搭建
1. Microsoft Windows 版本
关于Windows的版本选择,本人强烈建议对于部分高性能的新机器采用Windows 10作为基础环境,部分老旧笔记本或低性能机器采用Windows 7即可,本文环境将以Windows 10作为开发环境进行描述。对于Windows 10的发行版本选择,笔者建议采用Windows_10_enterprise_2016_ltsb_x64作为基础环境。
这里推荐到MSDN我告诉你下载,也感谢作者国内优秀作者雪龙狼前辈所做出的贡献与牺牲。
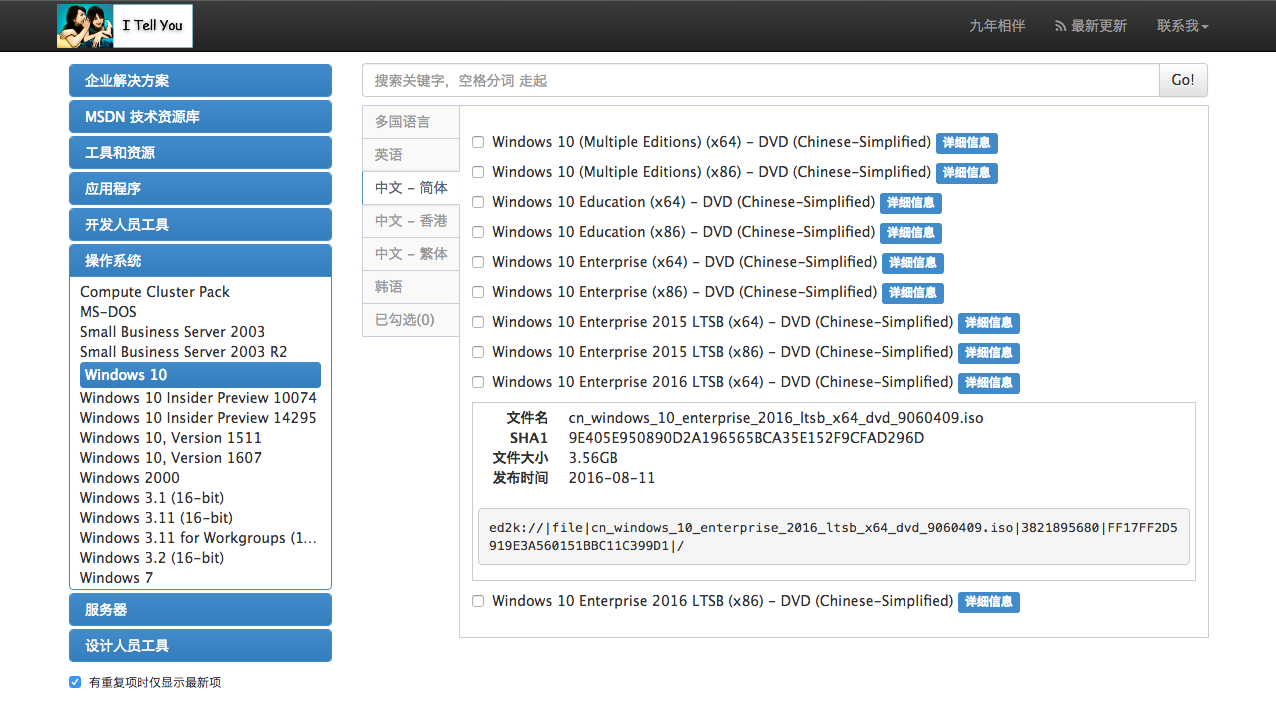
直接贴出热链,复制粘贴迅雷下载:
ed2k://|file|cn_windows_10_enterprise_2016_ltsb_x64_dvd_9060409.iso|3821895680|FF17FF2D5919E3A560151BBC11C399D1|/
2. 编译环境Microsoft Visual Studio 2015 Update 3
(安装CPU版本非必须安装)
CUDA编译器为Microsoft Visual Studio,版本从2010-2015,cuda8.0仅支持2015版本,暂不支持VS2017,本文采用Visual Studio 2015 Update 3。 同样直接贴出迅雷热链:
ed2k://|file|cn_visual_studio_professional_2015_with_update_3_x86_x64_dvd_8923256.iso|7745202176|DD35D3D169D553224BE5FB44E074ED5E|/
vs2015下载百度云磁力:链接:https://pan.baidu.com/s/1nZk92C-I8oRvxbyjELBNEw 密码:1hnb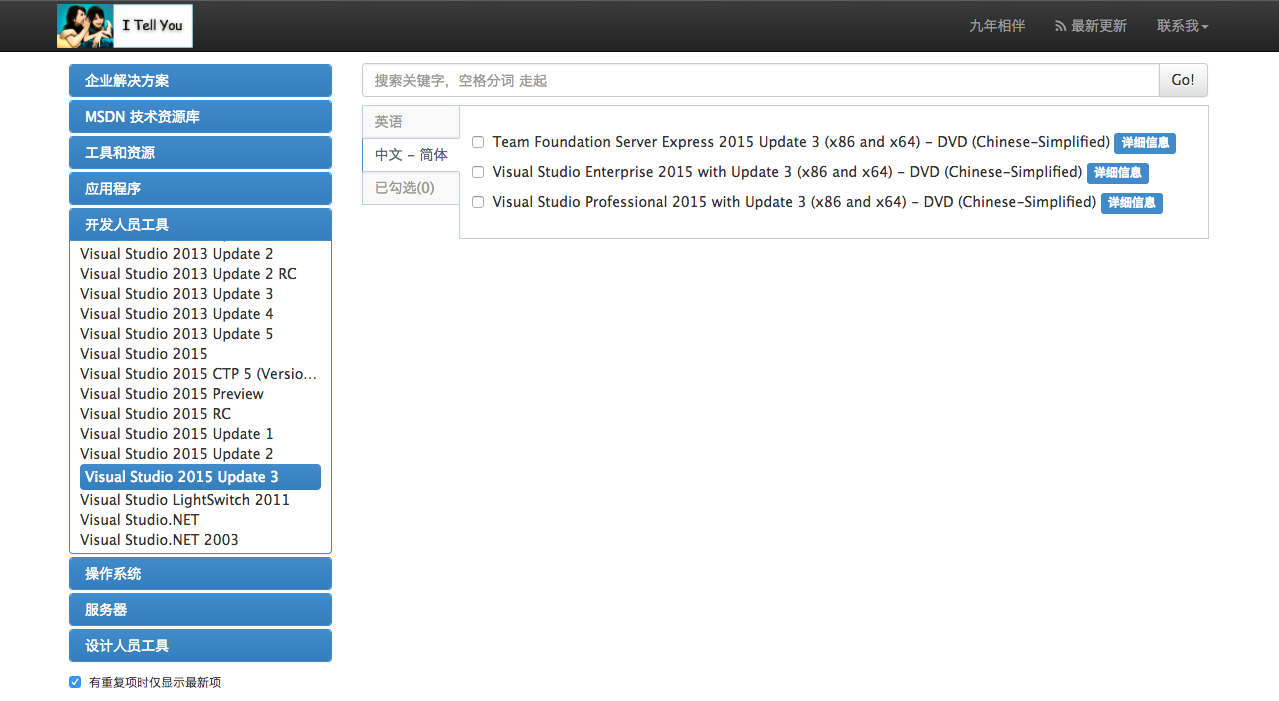
3. Python环境
python环境建设推荐使用科学计算集成python发行版Anaconda,Anaconda是Python众多发行版中非常适用于科学计算的版本,里面已经集成了很多优秀的科学计算Python库。 建议安装Anconda3 4.2.0版本,目前新出的python3.6存在部分不兼容问题,所以建议安装历史版本4.2.0 注意:windows10版本下的tensorflow暂时不支持python2.7
下载地址: Anaconda
创建python虚拟环境。
在CMD执行以下命令创建python版本为3.6、名字为tensorflow的虚拟环境。tensorflow文件可以在Anaconda安装目录envs文件下找到
conda create -n tensorflow python=3.6
这里的tensorflow只是个名字变量而已,可以随意改 比如我的是conda create -n py3 python=3.6
完毕后记得用activate 你的名字变量 进入虚拟环境
比如我的:activate
退出虚拟环境:deactivate
4. CUDA
(安装CPU版本非必须安装) CUDA Toolkit是NVIDIA公司面向GPU编程提供的基础工具包,也是驱动显卡计算的核心技术工具。 直接安装CUDA8.0即可 下载地址:https://developer.nvidia.com/cuda-downloads 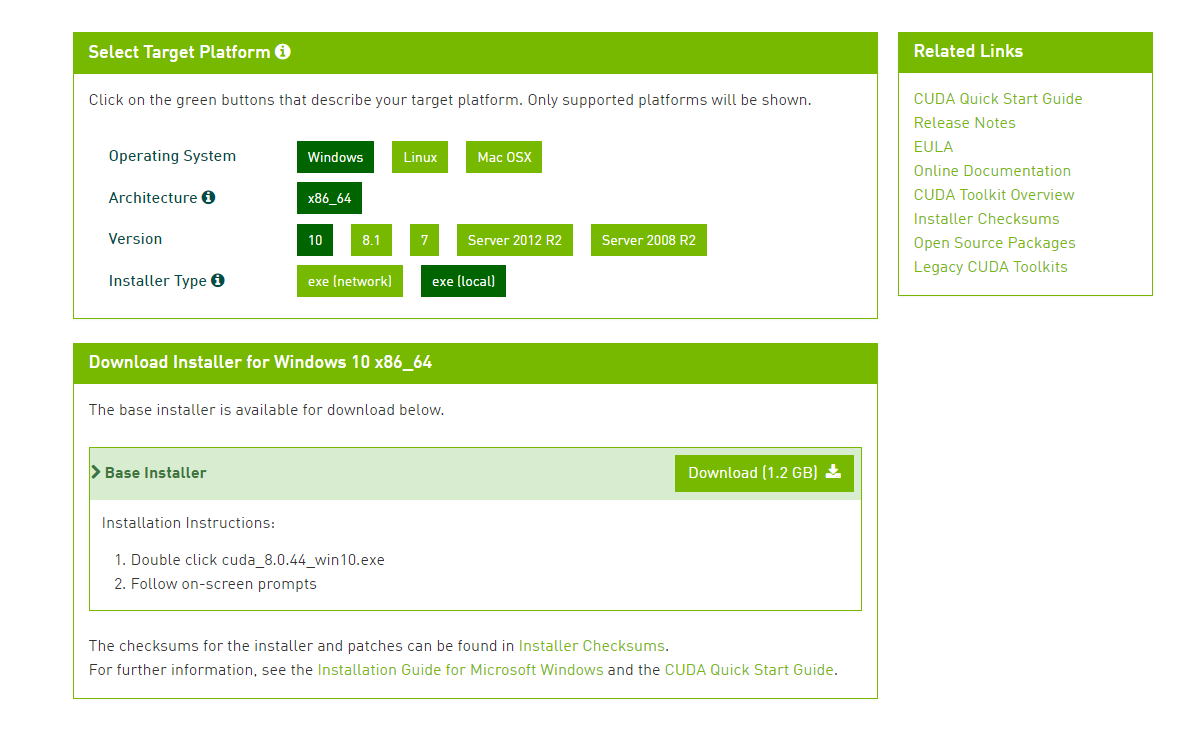 在下载之后,按照步骤安装,不建议新手修改安装目录,同上,环境不需要配置,安装程序会自动配置好。
这里可能会出现安装CUDA失败,原因可能是
1.VS2015(或者之前装的VS系列没有卸载干净,建议重装系统hhhhh)没有装
2.没有安装在C盘默认目录(因为这里我装其他盘都会失败,就C盘成功了)
3.从安全模式启动(参见http://www.tudoupe.com/win10/win10jiqiao/2016/1222/6230.html)。在c盘的Program Files和Program Files(x86)两个文件夹中分别删除NVIDIA Corporation和NVIDIA GPU Computing Toolkit(这个没有的话就随意)文件夹。正常模式重启,重新安装即可。 这里可能会出现文件NVIDIA Corporation被占用的情况,进入安全模式删除即可。
6. 加速库CuDNN
从官网下载需要注册 Nvidia 开发者账号,网盘搜索一般也能找到。
CuDNN5.1百度云下载
CuDNN6.1百度云下载
CuDNN9.0百度云三个版本下载都在下面百度云链接里
链接:https://pan.baidu.com/s/1mprpx7iO2CW3Y1xjFQBLzQ 密码:6m6g
本文用的是里面的cudnn8.0-v6版本+tensorflow--1.4+cuda8.0
7. 安装tensorflow
如果原来有安装,卸载原来的tensorflow:pip uninstall tensorflow-gpu
安装新版本的tensorflow:pip install tensorflow-gpu==1.4
这里如果是1.6以上的话CUDNN要9.0的才行1.3以下的话CUDA 和CUDNN都要换版本 具体情况具体百度查对应版本。1.1以下的话好像基本不能GPU运行了
(CPU版本:
pip install --upgrade tensorflow)CPU版本最简单也适合新手 直接python创建完虚拟环境3.6之后直接安装即可。
如果安装过程报错:Could not find a version that satisfies the requirement tensorflow (from versions: )
No matching distribution found for tensorflow
You are using pip version 9.0.1, however version 18.1 is available.
You should consider upgrading via the ''python -m pip install --upgrade pip'' command.
就直接:python -m pip install --upgrade pip
升级PIP即可
安装完毕开始测试:
首先确保自己进入安装tensorflow的虚拟环境,然后直接 python进入py环境
然后import tensorflow as tf
没有报错的话在输入 tf.__version__
出现版本号即代表成功了
如果import tensorflow as tf 出现错误:
Traceback (most recent call last):
File "C:\Users\****\Anaconda3\lib\site-packages\tensorflow\python\pywrap_tensorflow_internal.py", line 18, in swig_import_helper
return importlib.import_module(mname)
File "C:\Users\****\Anaconda3\lib\importlib\__init__.py", line 126, in import_module
return _bootstrap._gcd_import(name[level:], package, level)
File "<frozen importlib._bootstrap>", line 986, in _gcd_import
File "<frozen importlib._bootstrap>", line 969, in _find_and_load
File "<frozen importlib._bootstrap>", line 958, in _find_and_load_unlocked
File "<frozen importlib._bootstrap>", line 666, in _load_unlocked
File "<frozen importlib._bootstrap>", line 577, in module_from_spec
File "<frozen importlib._bootstrap_external>", line 906, in create_module
File "<frozen importlib._bootstrap>", line 222, in _call_with_frames_removed
ImportError: DLL load failed: 找不到指定的模块。
或者导入tensorflow报错:
ImportError: DLL load failed: 找不到指定的模块。
亦或者导入tensorflow报错:
See https://www.tensorflow.org/install/install_sources#common_installation_problems
for some common reasons and solutions. Include the entire stack trace
above this error message when asking for help.
亦或者导入tensorflow报错:
1、libcudnn.so.x 找不到的情况:没有装 cuDNN
2、libcublas.so.x 找不到的情况:版本不匹配, CUDA与 cuDNN 或者tensorflow 版本不匹配,等等
以上的所有报错我都经历过,并且别人的教程都说是CUDA和CUDNN版本不匹配,或者VS2015/2017没有安装 ,的确是这样的,结果我都试了好多个版本都没有解决。最后发现我的tensorflow是1.1版本的太老了 换成1.4就成功了(2017可能太新不匹配DUDA8.0)
所以解决办法:temsorflow版本+VS2015/2017安装+CUDA版本+CUDNN版本要匹配 中间哪一个版本没匹配都会出现上面的报错。具体情况具体查自己电脑配置的匹配版本 本电脑是1050TI,CPU是志强I5
7. 安装keras
pip install keras -U --pre

然后进入python
import keras
没有报错就代表成功。


如果报错:
Traceback (most recent call last):
  File "E:\ANDROD\envs\py3\lib\site-packages\pip-18.0-py3.6.egg\pip\_vendor\urllib3\response.py", line 331, in _error_catcher
    yield
  File "E:\ANDROD\envs\py3\lib\site-packages\pip-18.0-py3.6.egg\pip\_vendor\urllib3\response.py", line 413, in read
    data = self._fp.read(amt)
  File "E:\ANDROD\envs\py3\lib\site-packages\pip-18.0-py3.6.egg\pip\_vendor\cachecontrol\filewrapper.py", line 62, in read
    data = self.__fp.read(amt)
  File "E:\ANDROD\envs\py3\lib\http\client.py", line 449, in read
    n = self.readinto(b)
  File "E:\ANDROD\envs\py3\lib\http\client.py", line 493, in readinto
    n = self.fp.readinto(b)
  File "E:\ANDROD\envs\py3\lib\socket.py", line 586, in readinto
    return self._sock.recv_into(b)
  File "E:\ANDROD\envs\py3\lib\ssl.py", line 1002, in recv_into
    return self.read(nbytes, buffer)
  File "E:\ANDROD\envs\py3\lib\ssl.py", line 865, in read
    return self._sslobj.read(len, buffer)
  File "E:\ANDROD\envs\py3\lib\ssl.py", line 625, in read
    v = self._sslobj.read(len, buffer)
socket.timeout: The read operation timed out

During handling of the above exception, another exception occurred:

Traceback (most recent call last):
  File "E:\ANDROD\envs\py3\lib\site-packages\pip-18.0-py3.6.egg\pip\_internal\basecommand.py", line 141, in main
    status = self.run(options, args)
  File "E:\ANDROD\envs\py3\lib\site-packages\pip-18.0-py3.6.egg\pip\_internal\commands\install.py", line 299, in run
    resolver.resolve(requirement_set)
  File "E:\ANDROD\envs\py3\lib\site-packages\pip-18.0-py3.6.egg\pip\_internal\resolve.py", line 102, in resolve
    self._resolve_one(requirement_set, req)
  File "E:\ANDROD\envs\py3\lib\site-packages\pip-18.0-py3.6.egg\pip\_internal\resolve.py", line 256, in _resolve_one
    abstract_dist = self._get_abstract_dist_for(req_to_install)
  File "E:\ANDROD\envs\py3\lib\site-packages\pip-18.0-py3.6.egg\pip\_internal\resolve.py", line 209, in _get_abstract_dist_for
    self.require_hashes
  File "E:\ANDROD\envs\py3\lib\site-packages\pip-18.0-py3.6.egg\pip\_internal\operations\prepare.py", line 283, in prepare_linked_requirement
    progress_bar=self.progress_bar
  File "E:\ANDROD\envs\py3\lib\site-packages\pip-18.0-py3.6.egg\pip\_internal\download.py", line 836, in unpack_url
    progress_bar=progress_bar
  File "E:\ANDROD\envs\py3\lib\site-packages\pip-18.0-py3.6.egg\pip\_internal\download.py", line 673, in unpack_http_url
    progress_bar)
  File "E:\ANDROD\envs\py3\lib\site-packages\pip-18.0-py3.6.egg\pip\_internal\download.py", line 897, in _download_http_url
    _download_url(resp, link, content_file, hashes, progress_bar)
  File "E:\ANDROD\envs\py3\lib\site-packages\pip-18.0-py3.6.egg\pip\_internal\download.py", line 617, in _download_url
    hashes.check_against_chunks(downloaded_chunks)
  File "E:\ANDROD\envs\py3\lib\site-packages\pip-18.0-py3.6.egg\pip\_internal\utils\hashes.py", line 48, in check_against_chunks
    for chunk in chunks:
  File "E:\ANDROD\envs\py3\lib\site-packages\pip-18.0-py3.6.egg\pip\_internal\download.py", line 585, in written_chunks
    for chunk in chunks:
  File "E:\ANDROD\envs\py3\lib\site-packages\pip-18.0-py3.6.egg\pip\_internal\utils\ui.py", line 159, in iter
    for x in it:
  File "E:\ANDROD\envs\py3\lib\site-packages\pip-18.0-py3.6.egg\pip\_internal\download.py", line 574, in resp_read
    decode_content=False):
  File "E:\ANDROD\envs\py3\lib\site-packages\pip-18.0-py3.6.egg\pip\_vendor\urllib3\response.py", line 465, in stream
    data = self.read(amt=amt, decode_content=decode_content)
  File "E:\ANDROD\envs\py3\lib\site-packages\pip-18.0-py3.6.egg\pip\_vendor\urllib3\response.py", line 430, in read
    raise IncompleteRead(self._fp_bytes_read, self.length_remaining)
  File "E:\ANDROD\envs\py3\lib\contextlib.py", line 99, in __exit__
    self.gen.throw(type, value, traceback)
  File "E:\ANDROD\envs\py3\lib\site-packages\pip-18.0-py3.6.egg\pip\_vendor\urllib3\response.py", line 336, in _error_catcher
    raise ReadTimeoutError(self._pool, None, ''Read timed out.'')
pip._vendor.urllib3.exceptions.ReadTimeoutError: HTTPSConnectionPool(host=''files.pythonhosted.org'', port=443): Read timed out.


这是因为超时报错,直接:pip --default-timeout=100 install -U Pillow
设置超时时间即可。
若有兴趣交流分享技术,可关注本人公众号,里面会不定期的分享各种编程教程,和共享源码,诸如研究分享关于c/c++,python,前端,后端,opencv,halcon,opengl,机器学习深度学习之类有关于基础编程,图像处理和机器视觉开发的知识

 (cpu/gpu)")
Anaconda+Opencv+Tensorflow安装 (Ubuntu/Windows) (cpu/gpu)
安装Anaconda 4.2 + OpenCV3.1
1.下载并安装Anaconda4.2.0
所有的Anaconda版本,Linux选Anaconda3-4.2.0-Linux-x86_64.sh
Windows选Anaconda3-4.2.0-Windows-x86_64.exe
注意系统是64位,Tensorflow只支持windows64位。
(https://mirrors.tuna.tsinghua.edu.cn/anaconda/archive/)
2.打开cmd,然后执行(这个网站可能地址不稳定,多试几次)
conda install -c https://conda.anaconda.org/menpo opencv3
3.打开Spyder测试一下代码.
import cv2
print(cv2.__version__)
安装cpu/GPU版TensorFlow
1.安装Anaconda4.2版()
2.新建conda环境:使用管理员权限打开cmd,执行命令conda create -n tensorflow
3.激活conda环境:执行命令activate tensorflow(ubuntu为Source activate tensorflow)
4.在tensorflow环境下,使用pip安装cpu版TensorFlow,执行命令
pip install --ignore-installed --upgrade https://storage.googleapis.com/tensorflow/windows/cpu/tensorflow-1.1.0-cp35-cp35m-win_amd64.whl
pip install --ignore-installed --upgrade https://storage.googleapis.com/tensorflow/linux/gpu/tensorflow_gpu-1.1.0-cp35-cp35m-linux_x86_64.whl
测试TensorFlow
1.使用管理员权限打开cmd
2.激活conda环境,执行activate tensorflow
3.打开python,执行python
4.执行以下代码
import tensorflow as tf
hello = tf.constant('Hello,TensorFlow!')
sess = tf.Session()
print(sess.run(hello))
再次使用的时候再激活 :-)
$ source activate tensorflow
(tensorflow)$ # Your prompt should change.
# Run Python programs that use TensorFlow.
...
# When you are done using TensorFlow,deactivate the environment.
(tensorflow)$ source deactivate

python:无法导入tensorflow-gpu
我已使用此链接上介绍的步骤在计算机上使用Anaconda3成功创建了tensorflow环境。但是当我尝试去做的时候:
>>> import tensorflow as tf我收到以下错误消息:OSError和ImportError。
Traceback (most recent call last): File "C:\Users\Froilan\Anaconda3\envs\tensorflow\lib\site-packages\tensorflow\python\platform\self_check.py", line 75, in preload_checkctypes.WinDLL(build_info.cudart_dll_name) File "C:\Users\Froilan\Anaconda3\envs\tensorflow\lib\ctypes\__init__.py", line 351, in __init__self._handle = _dlopen(self._name, mode)OSError: [WinError 126] This specified module could not be foundDuring handling of the above exception, another exception occurred:Traceback (most recent call last): File "<stdin>", line 1, in <module> File "C:\Users\Froilan\Anaconda3\envs\tensorflow\lib\site-packages\tensorflow\__init__.py", line 24, in <module>from tensorflow.python import * File "C:\Users\Froilan\Anaconda3\envs\tensorflow\lib\site-packages\tensorflow\python\__init__.py", line 49, in <module>from tensorflow.python import pywrap_tensorflow File "C:\Users\Froilan\Anaconda3\envs\tensorflow\lib\site-packages\tensorflow\python\pywrap_tensorflow.py", line 30, in <module>self_check.preload_check() File "C:\Users\Froilan\Anaconda3\envs\tensorflow\lib\site-packages\tensorflow\python\platform\self_check.py", line 82, in preload_check% (build_info.cudart_dll_name, build_info.cuda_version_number))ImportError: Could not find ''cudart64_80.dll''. TensorFlow requires that this DLL be installed in a directory that is named in your %PATH% environment variable. Download and install CUDA 8.0 from this URL: https://developer.nvidia.com/cuda-toolkit可能与我的CPU有关吗?我使用Ryzen1700。+ GPU:GTX 1050 Ti-比1080 ti差一点。.但是我听说GPU的性能仍然比CPU更好。
答案1
小编典典您需要先安装CUDA库,我建议您点击以下链接:
https://gist.github.com/mjdietzx/0ff77af5ae60622ce6ed8c4d9b419f45
更新:对于Windows操作系统,请遵循以下方法:
http://blog.nitishmutha.com/tensorflow/2017/01/22/TensorFlow-with-gpu-for-
windows.html

Tensorflow ImportError:Windows 10上没有名为'_pywrap_tensorflow_internal'的模块
我正在与Udacity合作进行自动驾驶课程。我在Windows 10中启动了一个通用环境,我能够很好地运行tensorflow,但我想使用GPU。
我的GPU被列为兼容(GTX 950M)。
我按照Windows 10上的tensorflow指令添加了GPU:
https://www.tensorflow.org/install/install_windows
并下载并安装了cuda_8.0.61_win10
接下来,我重新启动了环境。我检查了一下它是否在使用简单的python程序:
import tensorflow as tf# Create TensorFlow object called tensorhello_constant = tf.constant(''Hello World!'')with tf.Session() as sess: # Run the tf.constant operation in the session output = sess.run(hello_constant) print(output)它执行如下:
(carnd-term1) D:\SelfDrivingCar\tensor-exp>python hello.pyb''Hello World!''接下来我安装了gpu版本的tensorflow:
(carnd-term1) D:\SelfDrivingCar\CarND-Traffic-Sign-Classifier-Project>pip install tensorflow-gpuCollecting tensorflow-gpu Downloading tensorflow_gpu-1.1.0-cp35-cp35m-win_amd64.whl (48.5MB) 100% |################################| 48.6MB 16kB/sRequirement already satisfied: six>=1.10.0 in d:\programdata\anaconda3\envs\carnd-term1\lib\site-packages (from tensorflow-gpu)Requirement already satisfied: protobuf>=3.2.0 in d:\programdata\anaconda3\envs\carnd-term1\lib\site-packages (from tensorflow-gpu)Requirement already satisfied: wheel>=0.26 in d:\programdata\anaconda3\envs\carnd-term1\lib\site-packages (from tensorflow-gpu)Requirement already satisfied: werkzeug>=0.11.10 in d:\programdata\anaconda3\envs\carnd-term1\lib\site-packages (from tensorflow-gpu)Requirement already satisfied: numpy>=1.11.0 in d:\programdata\anaconda3\envs\carnd-term1\lib\site-packages (from tensorflow-gpu)Requirement already satisfied: setuptools in d:\programdata\anaconda3\envs\carnd-term1\lib\site-packages (from protobuf>=3.2.0->tensorflow-gpu)Installing collected packages: tensorflow-gpuSuccessfully installed tensorflow-gpu-1.1.0我重新运行hello.py并得到以下内容
(carnd-term1) D:\SelfDrivingCar\tensor-exp>python hello.pyTraceback (most recent call last): File "d:\ProgramData\Anaconda3\envs\carnd-term1\lib\site-packages\tensorflow\python\pywrap_tensorflow_internal.py", line 18, in swig_import_helper return importlib.import_module(mname) File "d:\ProgramData\Anaconda3\envs\carnd-term1\lib\importlib\__init__.py", line 126, in import_module return _bootstrap._gcd_import(name[level:], package, level) File "<frozen importlib._bootstrap>", line 986, in _gcd_import File "<frozen importlib._bootstrap>", line 969, in _find_and_load File "<frozen importlib._bootstrap>", line 958, in _find_and_load_unlocked File "<frozen importlib._bootstrap>", line 666, in _load_unlocked File "<frozen importlib._bootstrap>", line 577, in module_from_spec File "<frozen importlib._bootstrap_external>", line 906, in create_module File "<frozen importlib._bootstrap>", line 222, in _call_with_frames_removedImportError: DLL load failed: The specified module could not be found.During handling of the above exception, another exception occurred:Traceback (most recent call last): File "d:\ProgramData\Anaconda3\envs\carnd-term1\lib\site-packages\tensorflow\python\pywrap_tensorflow.py", line 41, in <module> from tensorflow.python.pywrap_tensorflow_internal import * File "d:\ProgramData\Anaconda3\envs\carnd-term1\lib\site-packages\tensorflow\python\pywrap_tensorflow_internal.py", line 21, in <module> _pywrap_tensorflow_internal = swig_import_helper() File "d:\ProgramData\Anaconda3\envs\carnd-term1\lib\site-packages\tensorflow\python\pywrap_tensorflow_internal.py", line 20, in swig_import_helper return importlib.import_module(''_pywrap_tensorflow_internal'') File "d:\ProgramData\Anaconda3\envs\carnd-term1\lib\importlib\__init__.py", line 126, in import_module return _bootstrap._gcd_import(name[level:], package, level)ImportError: No module named ''_pywrap_tensorflow_internal''During handling of the above exception, another exception occurred:Traceback (most recent call last): File "hello.py", line 1, in <module> import tensorflow as tf File "d:\ProgramData\Anaconda3\envs\carnd-term1\lib\site-packages\tensorflow\__init__.py", line 24, in <module> from tensorflow.python import * File "d:\ProgramData\Anaconda3\envs\carnd-term1\lib\site-packages\tensorflow\python\__init__.py", line 51, in <module> from tensorflow.python import pywrap_tensorflow File "d:\ProgramData\Anaconda3\envs\carnd-term1\lib\site-packages\tensorflow\python\pywrap_tensorflow.py", line 52, in <module> raise ImportError(msg)ImportError: Traceback (most recent call last): File "d:\ProgramData\Anaconda3\envs\carnd-term1\lib\site-packages\tensorflow\python\pywrap_tensorflow_internal.py", line 18, in swig_import_helper return importlib.import_module(mname) File "d:\ProgramData\Anaconda3\envs\carnd-term1\lib\importlib\__init__.py", line 126, in import_module return _bootstrap._gcd_import(name[level:], package, level) File "<frozen importlib._bootstrap>", line 986, in _gcd_import File "<frozen importlib._bootstrap>", line 969, in _find_and_load File "<frozen importlib._bootstrap>", line 958, in _find_and_load_unlocked File "<frozen importlib._bootstrap>", line 666, in _load_unlocked File "<frozen importlib._bootstrap>", line 577, in module_from_spec File "<frozen importlib._bootstrap_external>", line 906, in create_module File "<frozen importlib._bootstrap>", line 222, in _call_with_frames_removedImportError: DLL load failed: The specified module could not be found.During handling of the above exception, another exception occurred:Traceback (most recent call last): File "d:\ProgramData\Anaconda3\envs\carnd-term1\lib\site-packages\tensorflow\python\pywrap_tensorflow.py", line 41, in <module> from tensorflow.python.pywrap_tensorflow_internal import * File "d:\ProgramData\Anaconda3\envs\carnd-term1\lib\site-packages\tensorflow\python\pywrap_tensorflow_internal.py", line 21, in <module> _pywrap_tensorflow_internal = swig_import_helper() File "d:\ProgramData\Anaconda3\envs\carnd-term1\lib\site-packages\tensorflow\python\pywrap_tensorflow_internal.py", line 20, in swig_import_helper return importlib.import_module(''_pywrap_tensorflow_internal'') File "d:\ProgramData\Anaconda3\envs\carnd-term1\lib\importlib\__init__.py", line 126, in import_module return _bootstrap._gcd_import(name[level:], package, level)ImportError: No module named ''_pywrap_tensorflow_internal''Failed to load the native TensorFlow runtime.See https://www.tensorflow.org/install/install_sources#common_installation_problemsfor some common reasons and solutions. Include the entire stack traceabove this error message when asking for help.我删除了环境,并使用以下命令重复了整个过程:
pip install --ignore-installed --upgrade https://storage.googleapis.com/tensorflow/windows/gpu/tensorflow_gpu-1.1.0-cp35-cp35m-win_amd64.whl并得到相同的结果。
由于列出的目录中没有名为cudnn64_6.dll的文件,因此以下命令不起作用(在Windows 10上无法导入Tensorflow forGPU)。
有什么想法为什么会发生导入错误?
答案1
小编典典您需要安装cudnn。目前仅正式支持5.1版。不知道6.0的重命名技巧是否在以下位置提及:
无法在Windows
10上为GPU导入Tensorflow
我们今天的关于无法在Windows 10上为GPU导入Tensorflow和无法使用gpu转换的分享就到这里,谢谢您的阅读,如果想了解更多关于2019最新win10 安装tensorflow1.4(GPU/CPU)+cuda8.0+cudnn8.0-v6 + keras 安装CUDA失败 导入tensorflow失败报错问题解决、Anaconda+Opencv+Tensorflow安装 (Ubuntu/Windows) (cpu/gpu)、python:无法导入tensorflow-gpu、Tensorflow ImportError:Windows 10上没有名为'_pywrap_tensorflow_internal'的模块的相关信息,可以在本站进行搜索。
本文标签:


