本文的目的是介绍asp.net-mvc–在MVCSignalR服务器和Windows服务SIgnalR客户端之间的SignalR的详细情况,特别关注mvc服务层的相关信息。我们将通过专业的研究、有关数
本文的目的是介绍asp.net-mvc – 在MVC SignalR服务器和Windows服务SIgnalR客户端之间的SignalR的详细情况,特别关注mvc服务层的相关信息。我们将通过专业的研究、有关数据的分析等多种方式,为您呈现一个全面的了解asp.net-mvc – 在MVC SignalR服务器和Windows服务SIgnalR客户端之间的SignalR的机会,同时也不会遗漏关于.net core 3.0 Signalr - 05 使用jwt将用户跟signalr关联、.net mvc 中 SignalR 的使用配置、.NET控制台实现signalr客户端连接signalr服务端(web api)、ASP.Net MVC SignalR的应用的知识。
本文目录一览:- asp.net-mvc – 在MVC SignalR服务器和Windows服务SIgnalR客户端之间的SignalR(mvc服务层)
- .net core 3.0 Signalr - 05 使用jwt将用户跟signalr关联
- .net mvc 中 SignalR 的使用配置
- .NET控制台实现signalr客户端连接signalr服务端(web api)
- ASP.Net MVC SignalR的应用
")
asp.net-mvc – 在MVC SignalR服务器和Windows服务SIgnalR客户端之间的SignalR(mvc服务层)
指定URL的服务器代码
app.MapSignalR("/signalr",new HubConfiguration());
如果我这样做,邮件将在哪里?当您做新的HubConfiguration时,集线器是什么?
它说我可以连接
NET client code that specifies the URL
 var hubConnection = new HubConnection("http://contoso.com/signalr",useDefaultUrl: false);
我会在我的Windows Server中,但是如果我在服务器上发送文本到http://myserver.com/signalr,我该如何得到它?什么中心?
还有哪里最好把它放在Windows服务中?一个很棒的例子
解决方法
在客户端(Windows服务)上:
protected override async void OnStart(string[] args)
        {
            eventLog1.WriteEntry("In OnStart");
            try
            {
                var hubConnection = new HubConnection("http://www.savitassa.com/signalr",useDefaultUrl: false);
                IHubProxy alphaProxy = hubConnection.CreateHubProxy("AlphaHub");

                await hubConnection.Start();

                await alphaProxy.Invoke("Hello","Message from Service");
            }
            catch (Exception ex)
            {
                eventLog1.WriteEntry(ex.Message);
            }
        }
在服务器上:
public class AlphaHub : Hub
    {
        public void Hello(string message)
        {
            // We got the string from the Windows Service
            // using SignalR. Now need to send to the clients
            Clients.All.addNewMessagetoPage(message);

            // Send message to Windows Service

        }

.net core 3.0 Signalr - 05 使用jwt将用户跟signalr关联
Signalr是以Group、Connect为核心来进行推送,比如,给某个组、某个连接来推送,但实际场景中,核心应该是某个组、某个人;然而一个人可以对应多个连接(浏览器多个tab页);本节就来介绍下自行管理人、组、连接这些关系
由于signalr连接的时候不那么方便附带header和cookie(因为推送独立成一个子系统了),实际实现中采用以url query的形式附带上token,然后服务器端自定义解析token得到用户信息;
服务器端实现
- ConfigureServices中添加服务相关方法,代码如下,完整代码
public void ConfigureServices(IServiceCollection services)
{
    var appSection = Configuration.GetSection("App");
    services.Configure<AppSetting>(option => appSection.Bind(option));
    var appSetting = appSection.Get<AppSetting>();

    services.AddSingleton<SignalrRedisHelper>();

    // services.AddHostedService<ClearBackGroundService>();

    services.AddAuthentication(options =>
    {
        options.DefaultAuthenticateScheme = JwtBearerDefaults.AuthenticationScheme;
        options.DefaultChallengeScheme = JwtBearerDefaults.AuthenticationScheme;
        options.DefaultForbidScheme = JwtBearerDefaults.AuthenticationScheme;
    })
    .AddJwtBearer(option =>
    {
        option.SecurityTokenValidators.Clear();
        option.SecurityTokenValidators.Add(new UserTokenValidation()); ;

        option.Events = new JwtBearerEvents()
        {
            OnMessageReceived = context =>
            {
                var userId = context.Request.Query["userId"].FirstOrDefault();
                if (!string.IsNullOrWhiteSpace(userId))
                {
                    context.Token = userId;
                }
                return Task.CompletedTask;
            }
        };
    });

    services.AddCors(options => options.AddPolicy(corsPolicy, builder =>
    {
        builder
              .SetIsOriginAllowedToAllowWildcardSubdomains()
              .WithOrigins(appSetting.CORS.Split(","))
              .AllowAnyMethod()
              .AllowCredentials()
              .AllowAnyHeader()
              .Build();
    }));

    services.AddControllers()
        .AddNewtonsoftJson(options => options.SerializerSettings.ContractResolver = new CamelCasePropertyNamesContractResolver())
        .ConfigureApiBehaviorOptions(options =>
        {
            options.InvalidModelStateResponseFactory = context =>
            {
                var result = new BadRequestObjectResult(context.ModelState);
                result.ContentTypes.Add(MediaTypeNames.Application.Json);
                // result.ContentTypes.Add(MediaTypeNames.Application.Xml);

                return result;
            };
        })
        .SetCompatibilityVersion(CompatibilityVersion.Version_3_0);

    // 添加Signalr
    services.AddSignalR(config =>
    {
        if (_webEnv.IsDevelopment())
        {
            config.EnableDetailedErrors = true;
        }
    })
    // 支持MessagePack
    .AddMessagePackProtocol()
    // 使用redis做底板 支持横向扩展 Scale-out
    .AddStackExchangeRedis(o =>
      {
          o.ConnectionFactory = async writer =>
          {
              var config = new ConfigurationOptions
              {
                  AbortOnConnectFail = false,
                  // Password = "changeme",
                  ChannelPrefix = "__signalr_",
              };
              //config.EndPoints.Add(IPAddress.Loopback, 0);
              //config.SetDefaultPorts();
              config.DefaultDatabase = appSetting.SignalrRedisCache.DatabaseId;
              var connection = await ConnectionMultiplexer.ConnectAsync(appSetting.SignalrRedisCache.ConnectionString, writer);
              connection.ConnectionFailed += (_, e) =>
              {
                  Console.WriteLine("Connection to Redis failed.");
              };

              if (connection.IsConnected)
              {
                  Console.WriteLine("connected to Redis.");
              }
              else
              {
                  Console.WriteLine("Did not connect to Redis");
              }

              return connection;
          };
      });
}
其中,SignalrRedisHelper 为redis辅助方法,详情请参见
UserTokenValidation 为自定义token解析方法,详情请参见,由于历史遗留问题,此处直接使用了userId,建议的做法是传递jwttoken,然后服务器端解析jwt token得到用户信息
Hub中跟用户关联
在Hub中通过Context.User.Identity.Name可以获取到解析的值,通过这种关系来跟用户关联上,当然,也可以自定义修改使用其他信息,比如Email或其他自定义的名称,具体请google
更多内容请通过快速导航查看下一篇
快速导航
| 标题 | 内容 |
|---|---|
| 索引 | .net core 3.0 Signalr - 实现一个业务推送系统 |
| 上一篇 | .net core 3.0 Signalr - 04 使用Redis做底板来支持横向扩展 |
| 下一篇 | .net core 3.0 Signalr - 06 业务实现-业务分析 |
| 源码地址 | 源码 |
| 官方文档 | 官方文档 |

原文出处:https://www.cnblogs.com/xiexingen/p/11626394.html

.net mvc 中 SignalR 的使用配置
安装 Microsoft.AspNet.SignalR(使用的版本 2.4.1)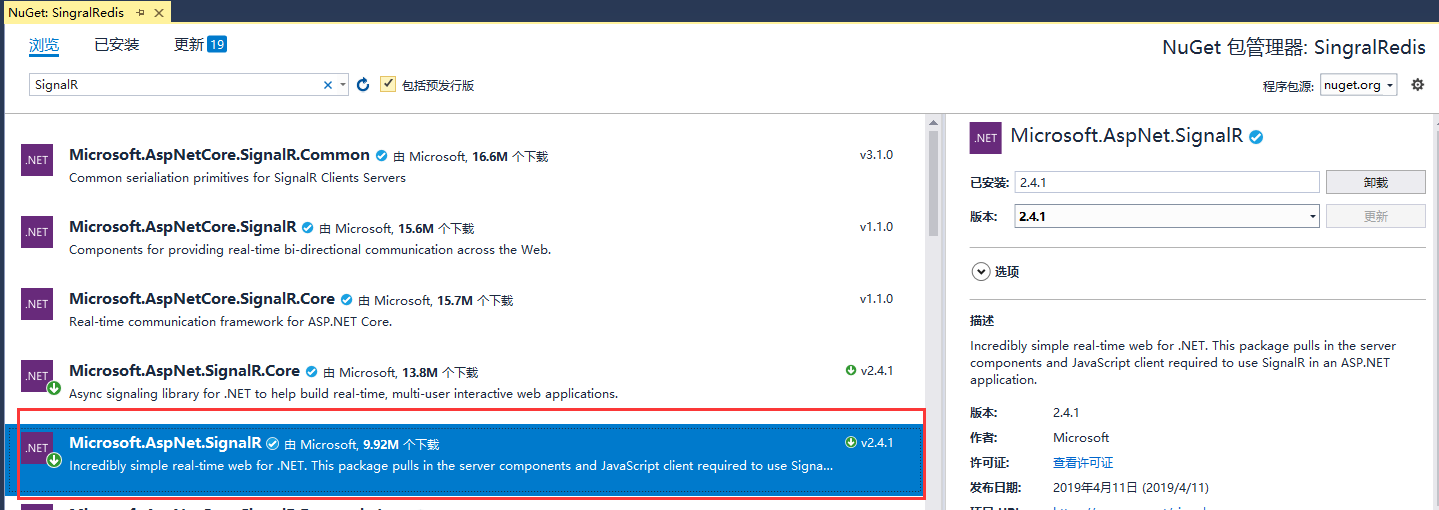
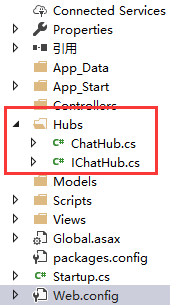
新建 Hubs 文件夹:Hub 的接口和实现


namespace SingralRedis.Hubs
{
    interface IChatHub
    {
        //服务器下发消息到各个客户端
        void SendChat(string id, string name, string message);

        //用户上线通知
        void SendLogin(string id, string name);

        //用户下线通知
        void SendLogoff(string id, string name);

        //接收客户端发送的心跳包并处理
        void TriggerHeartbeat(string id, string name);
    }
}
提供五个事件:OnConnected, OnReconnected, OnReceived, OnError 和 OnDisconnect.
这里只 override OnConnected, 看需要重载
using Microsoft.AspNet.SignalR;
using System;
using System.Collections.Generic;
using System.Linq;
using System.Timers;


namespace SingralRedis.Hubs
{
    public class ChatHub : Hub,IChatHub
    {

        public override System.Threading.Tasks.Task OnConnected()
        {

            string userName = Context.QueryString["userName"]; //获取客户端发送过来的用户名
            string userId = Context.QueryString["userId"]; //获取客户端发送过来的用户名
            string connectionId = Context.ConnectionId;
            if (!string.IsNullOrEmpty(userId))
            {
                SendLogin(userId, userName, connectionId);
            }
            //HttpContext.Current.Application.Add(userName, connectionId); //存储关系
            return base.OnConnected();
        }
        public class UserChat
        {
            public UserChat()
            {
                Count = 0;
                if (Timer == null) Timer = new Timer();
                Timer.Interval = 1000;  //1s触发一次
                Timer.Start();
                Timer.Elapsed += (sender, args) =>
                {
                    Count++;
                    if (Count >= 20)
                    {
                        action();  //该用户掉线了,抛出事件通知
                        Timer.Stop();
                    }
                };
            }

            private readonly Timer Timer;
            public event Action action;
            //public event Action action1;

            public string UserId { get; set; }
            public string ID { get; set; }
            public string Name { get; set; }

            //内部计数器(每次递增1),如果服务端每5s能收到客户端的心跳包,那么count被重置为0;
            //如果服务端20s后仍未收到客户端心跳包,那么视为掉线
            public int Count { get; set; }
        }

        public static class ChatUserCache
        {
            public static IList<UserChat> userList = new List<UserChat>();
        }

        private IList<UserChat> userList = ChatUserCache.userList;

        /// <summary>
        /// 推送个单个用户
        /// </summary>
        /// <param name="name">用户名</param>
        public void SendToUser(string name)
        {
            //根据username获取对应的ConnectionId
            var user = userList.FirstOrDefault(v => v.Name == name);
            if (user != null)
            {
                Clients.Client(user.UserId).addNewMessageToPage("新的信息");
            }
        }

        /// <summary>
        /// 自发自收
        /// </summary>
        public void ReturnId()
        {
            Clients.Caller.CheckId(Context.ConnectionId);
        }

        /// <summary>
        /// 获取全部用户
        /// </summary>
        public void GetAllUserList()
        {
            Clients.All.loginUser(userList);
        }


        public void SendChat(string id, string name, string message)
        {
            Clients.Client(id).GetChatMsg("<====用户 " + name +" 发送消息 "+ message+" ======>");

        }

        public void SendLogin(string id, string name, string connectionId)
        {
            connectionId = string.IsNullOrEmpty(connectionId) ? connectionId = Context.ConnectionId : connectionId;

            if (!userList.Any(v => v.ID == id))
            {
                var userInfo = new UserChat() { UserId = connectionId, ID = id, Name = name };
                userInfo.action += () =>
                {
                    //用户20s无心跳包应答,则视为掉线,会抛出事件,这里会接住,然后处理用户掉线动作。
                    SendLogoff(id, name);
                };
                userList.Add(userInfo);
            }
            else
            {
                var user = userList.FirstOrDefault(v => v.ID == id);
                user.UserId = connectionId;
                user.Count = 0;
            }
            Clients.All.loginUser(userList);

        }

        public void SendLogoff(string id, string name)
        {
            var userInfo = userList.Where(x => x.ID.Equals(id) && x.Name.Equals(name)).FirstOrDefault();
            if (userInfo != null)
            {
                var name1 = userInfo.Name;

                if (userList.Remove(userInfo))
                {
                    Clients.All.logoffUser(userList);


                    SendChat(id, name, "<====用户 " + name + " 退出了讨论组====>");
                }
            }
        }

        public void TriggerHeartbeat(string id, string name)
        {
            var userInfo = userList.Where(x => x.ID.Equals(id) && x.Name.Equals(name)).FirstOrDefault();
            if (userInfo != null)
            {
                userInfo.Count = 0;  //收到心跳,重置计数器
            }
        }
    }
}
新建 Startup.cs 文件
using Owin;

namespace SingralRedis
{
    public class Startup
    {
        public void Configuration(IAppBuilder app)
        {
            // Any connection or hub wire up and configuration should go here
            //会默认指定一个路径  "/signalr"


            app.MapSignalR();
        }
    }
}")
.NET控制台实现signalr客户端连接signalr服务端(web api)
最近有一个需求是通过定时任务去完成,完成后发送消息到web端,web端通过MVC,使用signalr实现即时通信。
具体服务端实现就不描述了,网上也有很多资料。
new Action(async () =>
            {
                try
                {
                    HubConnection hub = new HubConnection("http://domain/signalr");
                    IHubProxy _proxy = hub.CreateHubProxy("ChatsHub");
                    hub.StateChanged += new Action<StateChange>(async tgt =>
                    {
                        if (((StateChange)tgt).NewState == Microsoft.AspNet.SignalR.Client.ConnectionState.Connected)
                        {
                            //客户端调用服务端的 Send() 方法,传入参数"Hello"
                            await _proxy.Invoke("SendMsg2", "sendUserId", "toUserId", "您有新的通知", 1);
                        }
                    });
                    await hub.Start().ContinueWith((t) => {
                        if (t.IsFaulted)
                        {
                            Console.WriteLine("连接失败!");
                        }

                    });
                }
                catch(Exception e)
                {
                    Console.WriteLine(e.Message);
                }
            })();
参考:https://blog.csdn.net/m0_37044279/article/details/76789868

ASP.Net MVC SignalR的应用
ASP.Net MVC SignalR的应用
最近做的一个MVC项目有个模块是要使用即时通信实现弹幕效果。既要考虑通信的实时性也要考虑服务器性能和资源消耗,所幸项目对浏览器的版本没有要求。所以我最先想到用WebSocket来实现,在查询资料时, 看到 SignalR 这个技术,也就是本专题所讨论的对象。在拜读了 史上最全面的SignalR系列教程-认识SignalR ,算是对 SignalR有一个简单的认识,SignalR 是 .NET平台为我们提供的一种简洁高效智能的实时信息交互技术,SignalR 比 WebSocket 还要简单,这简直是我的福音。所以我直接一个Demo开始尝试。
SignalR
关于SignalR的介绍这边就不多赘述,可以去看我上面说的这篇博文史上最全面的SignalR系列教程-认识SignalR 或者直接看Microsoft文档 Introduction to SignalR,SignalR可用于任何即时性的功能;
Demo :使用SignalR和MVC 5实现实时聊天
通过第一部分的介绍,相信大家对SignalR有初步的认识,接下来直接上手一个Demo来看看(我的开发环境:VS2019 + .net 4.6.2 + MVC 5)。步骤参考微软教程 Tutorial: Real-time chat with SignalR 2 and MVC 5。
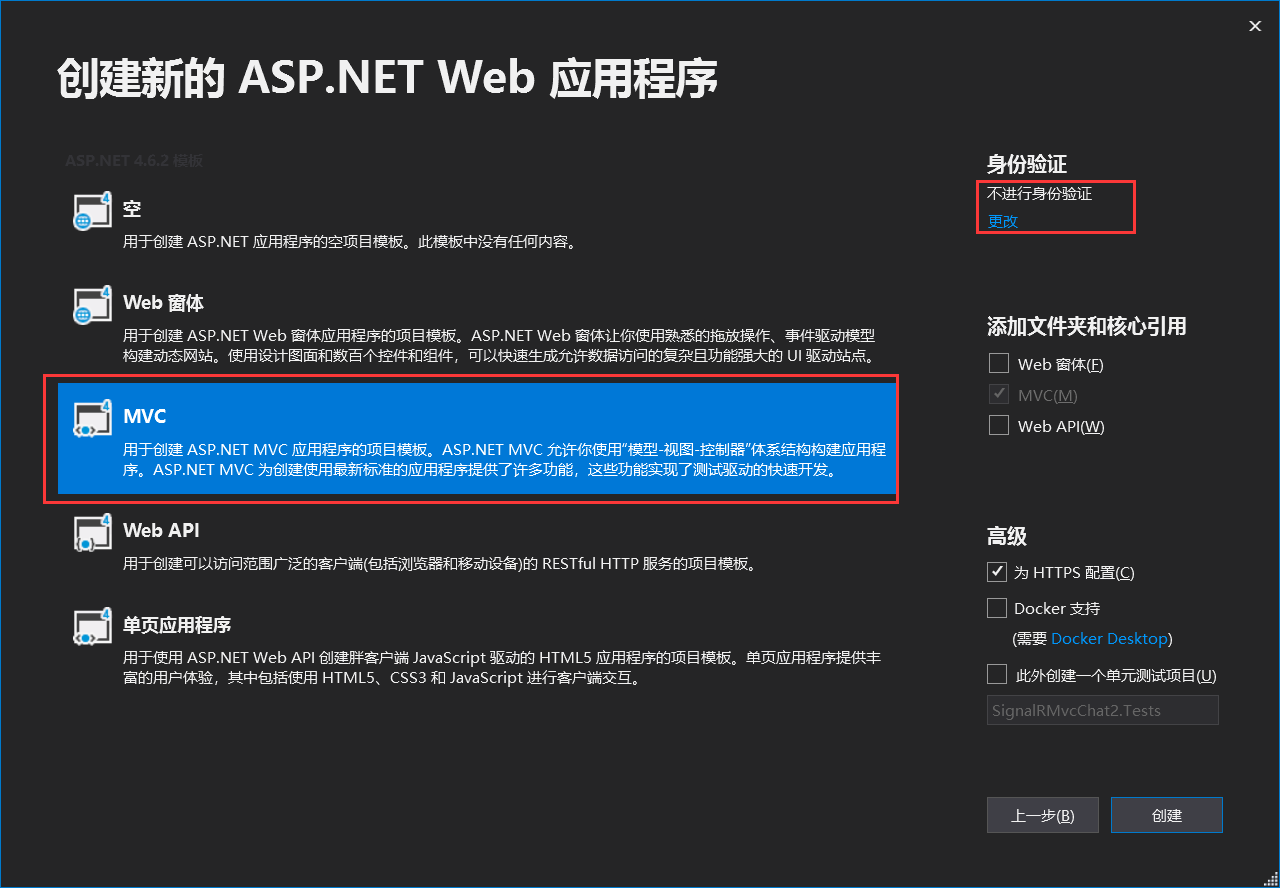
- 使用Visual Studio 2019 创建一个MVC工程-SignalRMvcChat


- 选择MVC,然后身份验证上,选择“无身份验证”,然后单击“创建”。
- 在项目上右击-添加新建项,选择 Installed > Visual C# > Web > SignalR and then 选择 SignalR Hub Class (v2).
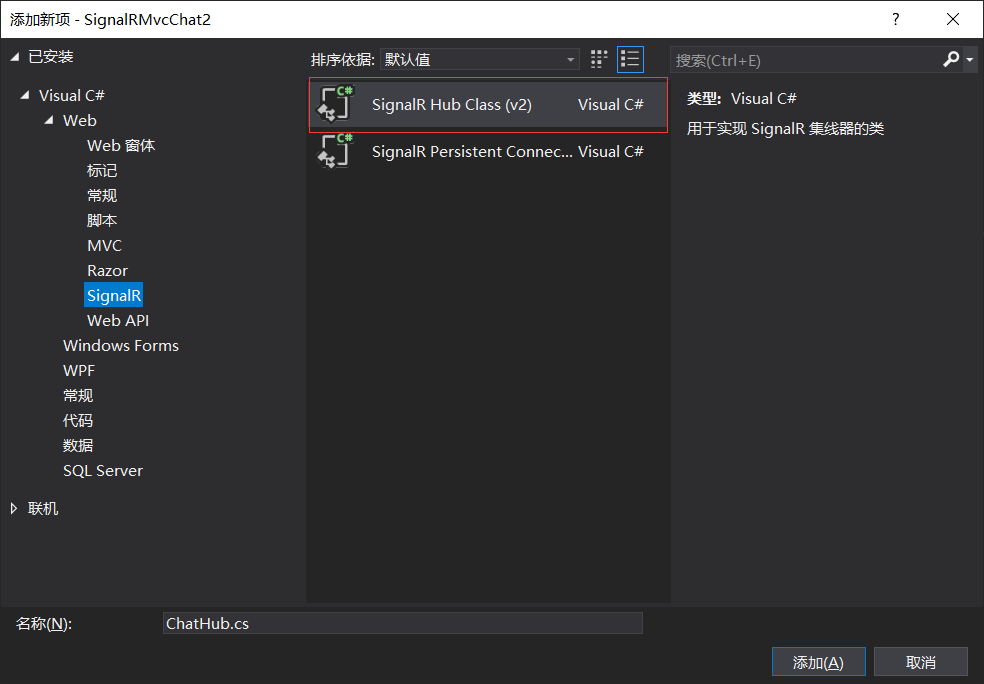
- 将类命名为ChatHub并将其添加到项目中。 此步骤将创建ChatHub.cs集线器类文件,并将一组支持SignalR的脚本文件和程序集引用添加到项目:
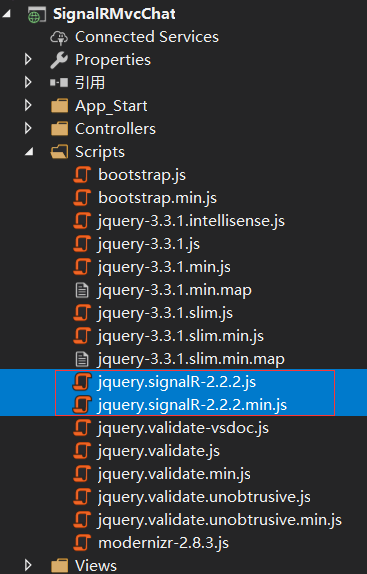
- 用以下代码替换新建的ChatHub.cs类文件中的代码:
using System;
using System.Collections.Generic;
using System.Linq;
using System.Web;
using Microsoft.AspNet.SignalR;

namespace SignalRMvcChat
{
    public class ChatHub : Hub
    {
        public void Send(string name, string message)
        {
            Clients.All.addNewMessageToPage(name, message);
        }
    }
}
- 在项目上,右键选择 添加>类,命名为Startup.cs,并用以下代码替换新建的Startup.cs类文件中的代码:
using Owin;
using Microsoft.Owin;
[assembly: OwinStartup(typeof(SignalRMvcChat.Startup))]
namespace SignalRMvcChat
{
    public class Startup
    {
        public void Configuration(IAppBuilder app)
        {
            // Any connection or hub wire up and configuration should go here
            app.MapSignalR();
        }
    }
}
注意: SignalR 框架使用Owin组件,每一个使用的OWin组件的Web框架都需要一个Startup入口类,用来声明OWin组件:
1.项目会自动扫描程序集根下的名为Startup的类,来作为入口类;
2.通过添加 [assembly: OwinStartup(typeof(SignalRChat.Startup))] 标签标记入口类;
3.如果你的启动类不在当前命名空间下,需要在Web.config中添加节点: ,来指定启动类;
- 在Home控制器中添加一个方法,来返回下面聊天步骤所使用的页面:在 HomeController.cs 中添加以下方法:
public ActionResult Chat()
{
    return View();
}
- 在Views/Home中添加Chat视图,并用以下代码替换到新建的视图文件中:(注意:视图中所引用的signalR脚本可能跟你实际安装的版本不一样,这里需要你根据实际安装的版本进行修改)
@{
    ViewBag.Title = "Chat";
}
<h2>Chat</h2>
<div>
    <input type="text" id="message" />
    <input type="button" id="sendmessage" value="Send" />
    <input type="hidden" id="displayname" />
    <ul id="discussion"></ul>
</div>
@section scripts {
    <!--jQuery库是必需的,默认情况下在_Layout.cshtml引用. -->
    <!--引用SignalR库. -->
    <script src="~/Scripts/jquery.signalR-2.2.2.min.js"></script>
    <!--引用自动生成的SignalR 集线器(Hub)脚本.在运行的时候在浏览器的Source下可看到. -->
    <script src="~/signalr/hubs"></script>
    <script>
        $(function () {
            // 引用自动生成的集线器代理 必须用小写字母开头.
            var chat = $.connection.chatHub;

            // 定义服务器端调用的客户端addNewMessageToPage来处理接收到的消息.
            chat.client.addNewMessageToPage = function (name, message) {
                // 将消息添加到ul上.
                $(''#discussion'').append(''<li><strong>'' + htmlEncode(name)
                    + ''</strong>: '' + htmlEncode(message) + ''</li>'');
            };

            // 获取用户名.
            $(''#displayname'').val(prompt(''Enter your name:'', ''''));

            // 设置焦点到输入框.
            $(''#message'').focus();

            // 开始连接服务器 done函数表明建立连接成功后为发送按钮注册了一个click事件.
            $.connection.hub.start().done(function () {
                $(''#sendmessage'').click(function () {
                    // 调用服务器端集线器的Send方法 也要小写开头.
                    chat.server.send($(''#displayname'').val(), $(''#message'').val());
                    // 清空输入框信息并获取焦点.
                    $(''#message'').val('''').focus();
                });
            });
        });

        // 这个可选功能将html-encodes消息显示在页面上.
        function htmlEncode(value) {
            var encodedValue = $(''<div />'').text(value).html();
            return encodedValue;
        }
    </script>
}
运行一下看看效果:
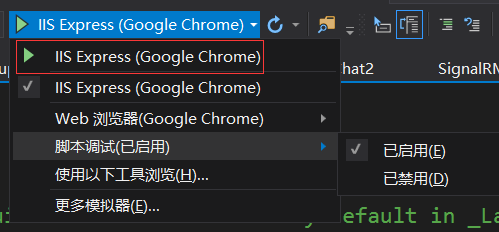
- 在工具栏中,启用“脚本调试”,然后点击“运行”按钮以在浏览器上调试(注意启动项目要设成当前的这个MVC项目)。
-进入聊天页面 ~/Home/Chat

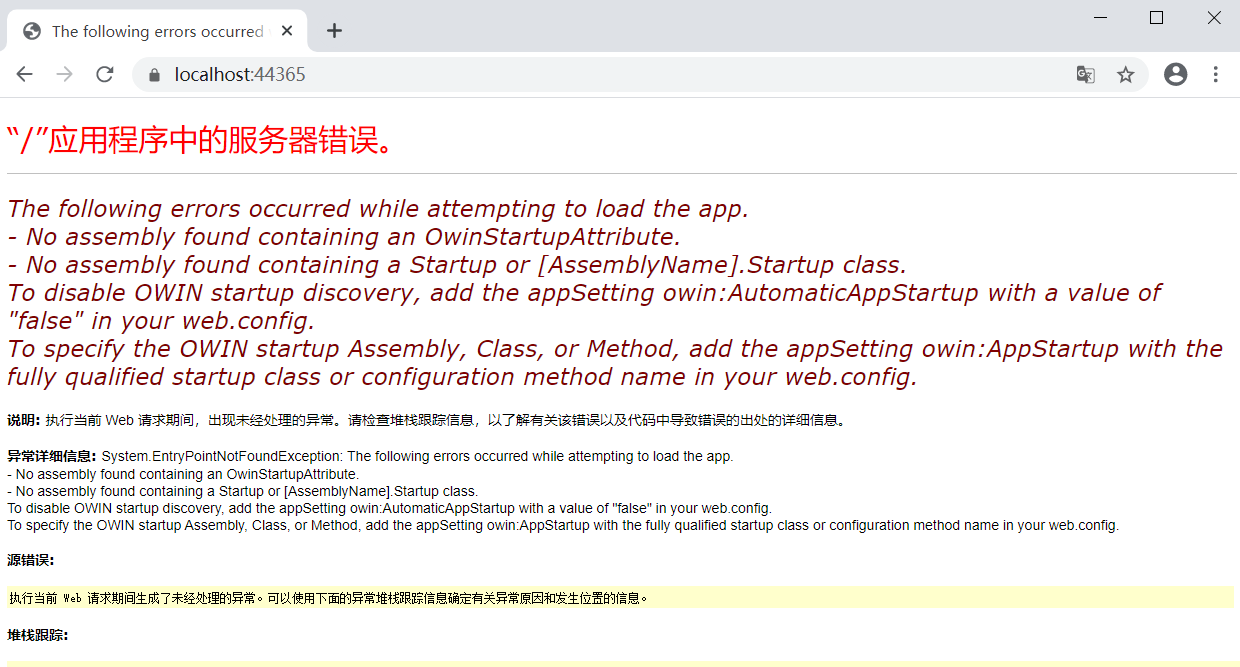
可能出现的问题:
The following errors occurred while attempting to load the app.
The following errors occurred while attempting to load the app.
- No assembly found containing an OwinStartupAttribute.
- No assembly found containing a Startup or [AssemblyName].Startup class.
To disable OWIN startup discovery, add the appSetting owin:AutomaticAppStartup with a value of "false" in your web.config.
To specify the OWIN startup Assembly, Class, or Method, add the appSetting owin:AppStartup with the fully qualified startup class or configuration method name in your web.config.
以上的问题出现在我第一次运行的时候,看着错误提示是没有找到 OwinStartupAttribute ,然后跟着提示在web.config的appSetting中添加如下的节点:
<appSettings>
    <add key="owin:AutomaticAppStartup" value="false" />
    ...
</appSettings>
运行居然真的就不报错,但是问题更大条了。在聊天页面并没有生成SignalR代理的hubs的脚本文件,出现了Uncaught TypeError: Cannot read property ''client'' of undefined错误。
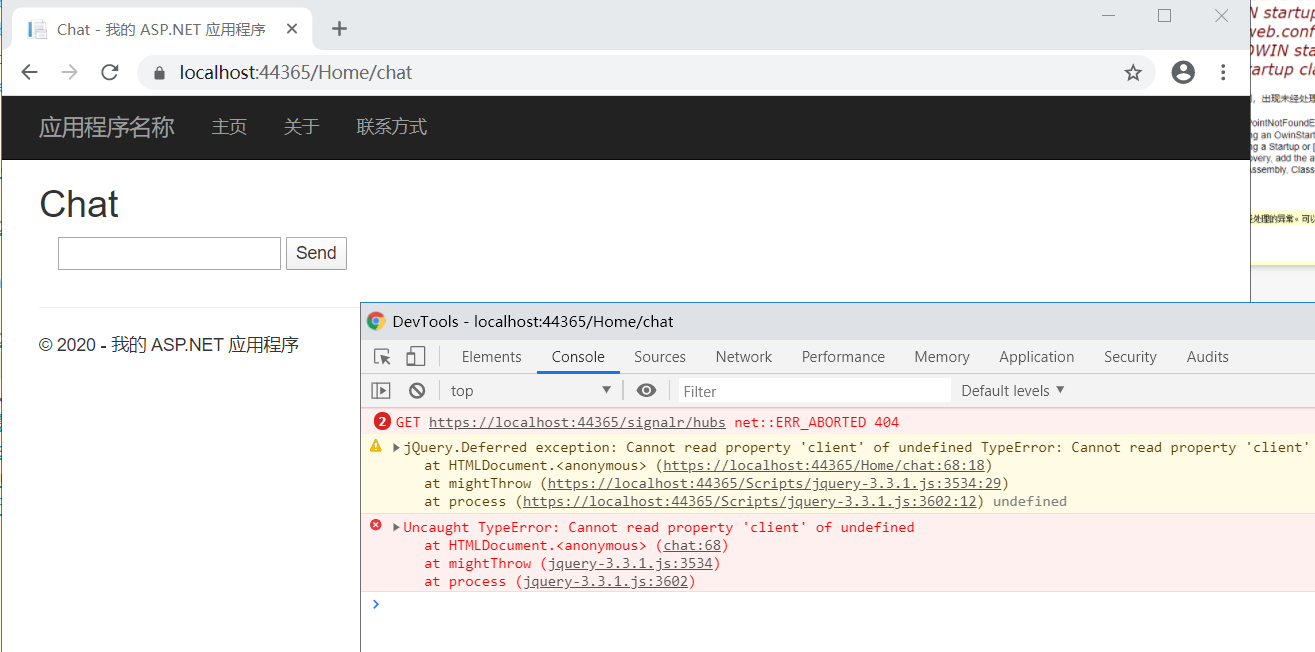
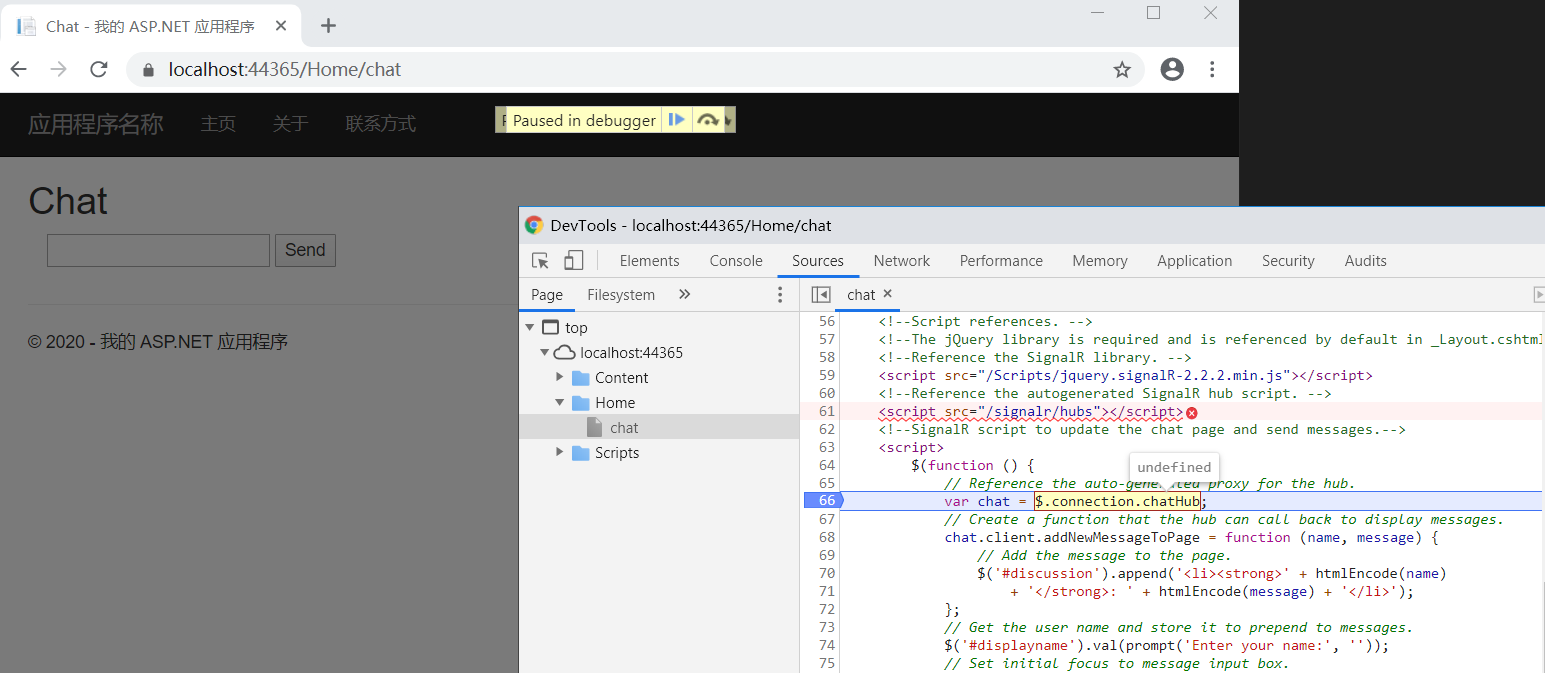
对比了微软官方使用 SignalR 步骤,才认识到 SignalR 框架使用Owin组件,一定要指定一个Startup入口类,我是少了以上步骤6,在添加了Startup.cs类之后,问题解决了(添加的Startup.cs类的命名空间为应用程序根目录的名称,去掉之前web.config中加入的错误代码)。对于SignalR代理对象异常,大家还可以看下这篇文章, SignalR代理对象异常:Uncaught TypeError: Cannot read property ''client'' of undefined 推出的结论,只要注意自动生成的集线器脚本中的代理名称和服务端方法都是小写字母开头,调用的时候使用小写就可以避免这个问题。
查看源码
以上就是今天给大家的分享全部内容了,祝大家元旦快乐!
参考文章
- 史上最全面的SignalR系列教程-认识SignalR
- Tutorial: Real-time chat with SignalR 2 and MVC 5
- SignalR代理对象异常:Uncaught TypeError: Cannot read property ''client'' of undefined 推出的结论
原文出处:https://www.cnblogs.com/anayigeren/p/12129597.html
今天关于asp.net-mvc – 在MVC SignalR服务器和Windows服务SIgnalR客户端之间的SignalR和mvc服务层的讲解已经结束,谢谢您的阅读,如果想了解更多关于.net core 3.0 Signalr - 05 使用jwt将用户跟signalr关联、.net mvc 中 SignalR 的使用配置、.NET控制台实现signalr客户端连接signalr服务端(web api)、ASP.Net MVC SignalR的应用的相关知识,请在本站搜索。
本文标签:


